Cute crafts from buttons are capable of acting by a real decoration of any interior. And in making these elements of the decor there is nothing complicated.
It is only necessary to show fantasy, collect the required amount of buttons and allocate some free time to implement ideas.
This real picture of buttons, in fact, requires only the flight of your imagination, and a minimum of material costs.
Original ideas for the creation of Pannaravnaya, which is worth considering when creating a panel - there are no restrictions. Not necessarily to create a complex story. It can be a simple, but spectacular pattern. 
After all, sometimes simple and simple simple panels look at the real magician, giving the interior of expressive and original notes. 
Even a beginner master from a piece of cardboard and remnants of the most ordinary buttons from unnecessary clothing will be able to create such an ionic tree. The compositions in the form of branches of trees framed by foliage made of white and transparent buttons are particularly spectacular. 
Simple performed, but charming, "blooming" tree from buttons. 
Want to create a more refined decor element? Create a panel with clear outlines. 
Freaky flower with petals overflowing in the sun make from buttons of different colors. Compositions made from buttons of different sizes painted into contrasting shades, look very impressive. 
With the help of buttons, you can even upload letters and geometric patterns. 
As it is impossible, by the way, these accessories will be and when creating original postcards. 
The background and pattern for the composition can be invented or reproduced by someone embodied ideas. 
If the buttons are made of buttons in the frame, they will become an even more elegant and noticeable detail of the interior, for example, like this amazing butterfly with sparkling openwork wings of buttons. 
Or a beautiful silhouette of a girl, whose dresses are laid out with a motley buttons ... 
The choice is limited to your fantasy.
Crafts from buttons with their own hands. Creating decorations are best to use flat buttons having two or four holes in the center.
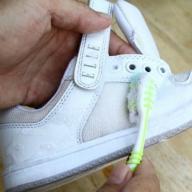
We bring to your attention the option of manufacturing a panel, which in addition to aesthetic task also performs a practical function. In our case, this panel acts as the basis for hanging chains, beads and other accessories. 
In addition to a set of buttons for making decoration, materials will be required:
wooden or cardboard basis; Cutting of burlap or canvas; 4 empty wooden coils; 4 tree screws; Thermocles or "universal"; A simple pencil and sheet of paper. If you plan to give clear contours of the composition, for its framing, prepare the corresponding size frame in advance.
Such a stand is convenient because it will allow convenient to place the decorations, without giving them the opportunity to confuse. You will not spend precious time before going out of the house, which often goes to unwinding the bracelets of bracelets and shoelaces with suspensions. 
Manufacturing panels are performed in such a sequence:
A square blank of 20x20 cm is cut out of a wooden or cardboard basis. On a sheet of paper make the pattern of the future heart. Its sizes should be approximately 12x12 cm. The pavement pattern is applied to the cardboard, they are cutting along the contour with a pencil, after which the workpiece is cut out. The workpiece is turned off with cuts of the canvas or burlap and on the back side are fixed with glue. On a square-based basis along one of the edges at an equidistant distance, they are screwed into the screws of the coil. The workpiece is connected to each other and carefully sample. Male secret: To get a symmetrical image, the sheet is folded in half and along the fold line draw half of the heart, which is consequeled and cut out the pattern. . 
When creating a butt ornament, you should not hurry. Elements first simply lay out the basis by forming a drawing. Only making sure that the composition was harmonious, each element is alternately lifted and covered with the back of the glue.
Crafts from buttons with children. The button of buttons you can use to fill the pattern of beads and beads. In addition, if the buttons come to each other with their edges, they give the composition an additional volume. 
In order for your crafts from buttons to be neat, make two duplicate of your drawing. On one copy, laid out a pattern from buttons, slowly picking down buttons in color and texture.
When the original drawing is ready, start to fill with buttons the second drawing, lubricating glue small sections of the drawing and carrying this fragment from the first pattern. 
Such crafts from buttons can be made not only on paper, but also on fabric, skin, etc. A good decorator reception is a combination of various techniques and textures in this wall panel, including the use of simple buttons. 
Simple crafts from buttons, despite the fact that they can even be made by a child will become a real highlight of your interior. 
This kitty can be a real decoration of your home that is made of cardboard and gray buttons.
Crafts from buttons are a simple and original way to make an unusual decor for your home along with children.
What is buttons are known to everyone. But not everyone guess that they can be applied not only for their intended purpose, but also to create a different kind of decor. How to make from buttons to craft? Read below.
Features of manufacturing patterns from buttons
Many at home has accumulated a lot of such fittings. It is quite forces to turn into wonderful panels and paintings with their own hands. Ideas There are plenty. Some of them are designed for children. For example, there are many ideas of crafts for kindergarten from buttons. But about this later.

Before you start work, you must decide on the plot of the picture. It is also important to choose a style. Someone souls abstraction, someone more about the classics. What about the topics, then you can spit anything on the Internet or come up with something your own.


The next step is to transfer the sketch of the fabric. After that, you can already start picking down buttons and try to make various combinations of them by type of mosaic. The stripe is better to carry out a mustle, so the drawing will be more voluminous.

The most important thing is to choose the right color and clearly follow the selected scheme. It is also desirable to try to make the most neat nodules.

As soon as the last element is sewn, the canvas must be pulled in the frame. Crafts from buttons with their own hands in the form of a panel is ready.

Nuances selection material
The choice of material depends on what exactly you decide to make it easily. In the case of a picture or panel for mounting buttons, you can use threads or glue.

If you stopped in the first version, you should competently pick their color. The shade of thread should approach the fittings and do not distort the image as a whole.

Are you a supporter of gluing? Remember that, depending on the situation, you can use the following types of glue: PVA, polymer or superchalter.

It is necessary to put it on the buttons at all, so that there is no divorce. It is allowed to use and hot glue. It allows you to adjust and cross the individual details.

Interior items
Master lovers love to use buttons to create original interior jewelry. So, they can completely transform the usual, boring mirror, adding it the style and a certain charm.


Lyudmila Dudoladova
For the manufacture we will need a dense cardboard, a stationery knife, a glue gun, paper napkins (a lot, stapler, adhesive pencil, scissors, paper cups.
So you can proceed. Draw a template on cardboard letters

i cut two at the same time letters Of the two pieces of cardboard, if you have a good stationery knife - it will be easy
Then I fastened two halves letters with tight paper cups

Paper cups are tight than plastic and our letter will be stable

Then begin to shit our Boca letters

For this we turn a lot volumeful circles from the napkin


How to make blanks I think already know many, but I repeat. We take a napkin, fold in half, then again in half, we bind the stapler cutting the circle (I used the template so that all the circles were flat)
How you decorate letters - It will tell you your fantasy. It turns out that way!

These volumetric letters - Gift by September 1 for my daughter. We will have an inscription - grade 3. I think the daughter and her disciples will be glad to decorate the class. Thanks to all. Time until September 1, there is still someone who will use my idea.
Publications on the topic:
 Dear Colleagues! I would like to share a pencil option made by your own hands. That seems to be a simple thing - a pencil, and such.
 I bring to your attention the master class "Flowers with your own hands." For the manufacture of colors we need: colored napkins or corrugated.
 Dear colleagues, I want to submit a master class on making a photo frame with your own hands in not traditional plasticography technique. Engaged.
 Such an element of the interior as a framework is used very often. The stores are greatly selected for the framework, and even the most arrogant buyer is always.
 Authors: Golovkin G. A., Yakunkova A. V. MBDOU "Kindergarten №6", Sarov Modern children are surrounded by abundance of bright toys that.
Master class "Lapbuk do it yourself" Municipal budgetary preschool educational institution Kindergarten "Rainbow" of the workers' village Sosnovoborsk master class.
 For the New Year holidays, there is always a desire to decorate the receiving and group room somehow differently, not as last year and.

To make interesting crafts from buttons, you do not need to possess special skills, you only need to stock up with certain tools and learn about some tricks.
Here is just a small part of one of the most interesting (simple and not very) crafts from buttons that can be made with your own hands.
Crafts from buttons: adjustable buttons
You will need:
Buttons
Thread, cord, fishing line or lace (strong and thin enough to pass through the holes in the button)
Scissors
Measuring tape.

1. Memore about 150 cm thread and cut a piece. To ingue the thread in the needle and start taking the button in turn.
Start on the reverse side of the button, in the hole, to the right and another hole.
The first button must be approximately 40 cm from the end of the thread.

Two buttons in the opposite, i.e. So that he attached to the first face to face.
Repeat alternateness as much as you want so much. In this example, the length of the button of buttons is 50 cm.


2. Make an adjustable clasp:
Prepare a button with two big holes - it will have to make a thread 2 times
To inhale this button about 10 cm from the end of the thread

Together, the other end of the thread into the needle and stretch the end through the same button (this time it turns out from the reverse side).
3. Tie the node at each end of the thread.
* Tightening the ends of the thread, you can adjust the length of the necklace.

Button Bracelet (Photo)

Tree from buttonhop

You will need:
Panno (you can use chipboard, canvas or wall from photo frame)
Many buttons
Scrapbooking paper
Simple pencil
Templates of wood and birds (optional).

1. Making the basis. If you have canvas, you can paint it; If the wall from the photo frame is to cover it with a cloth or can also paint; If the chipboard is to process the edges of sandpaper and apply varnish.
2. Prepare a tree pattern. You can print it and then transfer it to the wooden foundation.

3. Prepare the pattern of birds and transfer it to scrap paper or tight paper, then color.

4. Apply glue to buttons and glue them by wood pattern. The crown of wood can be made of green buttons of a different shade, and the trunk of brown.

5. Stick birds to the tree.
The picture is ready and it can be decorated with interior.

Button Tree (Photo)


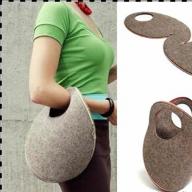
Master class from buttons: bowl

You will need:
Buttons of different shapes and sizes (small buttons are glued better)
PVA glue (you can dilute it with a small amount of water)
Brush
Scissors
Jar (which you will put a ball)
1. Inflate the desired size ball.
2. Put the ball on the jar tail down.
3. Cover half the ball with glue, using a brush or just a finger.


* During the applying of glue, you can keep the ball behind the tail and turn the glue evenly to lay down. After that, you can put a ball on the jar.
4. Let this layer of adhesive hardens. It will serve as a layer of protection between the ball and buttons.
5. Apply the second layer of glue and start gluing buttons - they must fit tightly to each other. Cover the ball with buttons.
* So that the buttons do not "move" down, after gluing them, turn the ball tail up and put on the jar.
6. Leave the workpiece to dry. It may take several hours.


7. When everything dried, cover the glued buttons by another layer of glue.
* If necessary, the fourth layer of glue can be applied to strengthen the design (after the third layer is dry).

8. Carefully cut the ball's tail so that the air from it began to go slowly.
* If necessary, get rid of excess dried glue using scissors.

Crafts from buttons for children: machines

You will need:
Pin
Buttons
Tube
Thin wire
Adhesive tape (tape)
Glue ordinary (if necessary)

1. Cut from the tube two pieces of 2.5 cm long.

2. Stretch the wires through the cut tubes and attach the buttons to the ends.

3. Make another such workpiece and insert both into the clothespin - one fixing in front, and one behind, where you need to secure the tape.
* You can make several such machines, and make a slide out of cardboard to let the cars.


Buttons Applique: Flowers

You will need:
Buttons
Wire
Felt, Drap (or other tight material)
Pliers

1. Prepare one wire and start to ride buttons on it (through one hole).
2. To fasten the buttons, the wire must be bent (see image) and spend in the opposite direction through another hole of each button.


3. Twist the wire after it passed through all buttons.


The fact that letters can be not only in the books, we learned a few years ago. It was, then, the letters of Latin, and less often the Russian alphabet, words, phrases, the names of the owners, actively began to appear in the works of designers.
They decorate the walls, cots and sofas, make welcoming inscriptions on the floor, choose as a wedding decor on the table. There are many options for location. It depends on the stylistics of the room, your wishes and creative gusts.

An inscriptions are performed in the interior from different materials and the form of expression of creative ideas for each one. Despite the fact that the inscriptions on the walls in the interior can be found in the photo in magazines, the Internet, copyright interiors of design masters, creative personalities, this way of registration is still unusual, with a claim on originality.

This excellent way will help you quickly, without much financial costs, to transform a dull, for example, the interior of the removable apartment, where to radically change something, you have no right. It will add to it unique, only inherent in the damn, particle of the soul and heat. After that, the room will become closer and relative, and if you put in the letters, a semantic load, the design will come out in the letters, then the design will come out by the author.


Content:
Letters and words in the interior: how and what to do
There are several interesting artistic techniques, how to make interior letters on their own, spending some time spending on them, makes something at hand. The move will go - cardboard, plywood, wood, napkins and foam, yarn and fabric and much more.

The place where you can hang, put or put a craft from the letters, emphasizing the individuality of its design, is determined by the relevance and material from which they are made.

Letter on the wall or shelf, open rack
Under the beaks and phrases, you can allocate both the whole and part of the wall. Fill the wall of the wall with interior letters drank from plywood, plastic or tin. The choice of material depends on the interior stylist. The wall will be accent if you make letters in different color, the size and style of writing, collect them in words.

Cardboard letters. They have a small weight, are attached to 2-sided tape. The manufacturing process is simple. On a sheet of dense cardboard, draw a sketch of the letter. Cut and apply to a new sheet. By analogy, we make several templates. From trimming cardboard, cut out small mugs, strips on the end of the letter. We wash the PVC glue of the workpiece, fasten. You must have a bulk cardboard letter. It can be painted with acrylic paints, salary with multi-colored wrapping paper, wrap bright threads and more. Cardboard stickers are interesting in use. The phrase-reminders collected in the words can be pasted on the refrigerator (on the back, on small magnets), a kitchen apron, over the shelves with products. Over the dining area it is appropriate to write phrases: "A pleasant appetite", "eat filed!", And on the refrigerator - "not after 6 hours.", "There is nothing, I'm on a diet!".

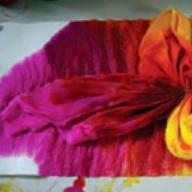
Soft colored paper or napkins.It will be an original addition to the decoration of a wedding celebration, a birthday, an anniversary or a different occasion. In the composition with other design solutions (floral compositions, shapes from balloons) will add creativity and freshness holiday. To begin with, the word pattern or numbers (for example, 3 years or family, love) cut out of cardboard. It is not glued with rolled out of napkins, roses boutons, tight to each other. The flower is formed by twisting. The napkin is going and the tip is tightened with thread. So that the bud to keep shape and not collapsed. Add a gloss, spraying with glitter on the cradle.

From salt dough.Excellent option for joint creativity with a child. Knead the dough. There are many recipes on the Internet. Cut out small letters and dry in the oven. The resulting product color paint, apply the pattern or glue beads, rhinestones. Make a hole in the letter under the braid. Now it can be hanging on the Christmas tree, like a Christmas decoration.

Letters like decoration of a festive table, input or headboard bed
From foamflast. A weightless and easy-to-handing material that is cut by a sharp knife, the edge is poured with sandpaper. Decor letters is selected in accordance with the theme of the celebration or the overall stylistic of the room.

From plywood. Requires certain carpentry skills and the presence of a jigsaw, to dry out smooth circuits of letters. To write beautiful, use the stencil. If, for example, you wish to decorate the living room to the new year or Christmas, then drink the phrase of the "Merry Christmas" from the plywood or any other, place it on the fireplace shelf, on the floor or in the bedroom. Press the magic flavor - garland, branches of the needles that can be decorate the phrase. Drinking out of wood names of children over a bedroom, writing desk or closet, are popular and love. When words and phrases stop being relevant, writing new ones.

Soft letters for sofa in the living room and children's cradle
Fabric samples pick up colorful, with a complex and soft texture that are suitable for a sofa upholstery, and for baby cots - natural, not causing allergies.

Air and volumetric letters stuffed with syntheps, replace sofa pillows, will become accents in the interior. They are easy. Cut the pattern, cut out, with a bunch on the seams. We flash from the wrong side, stitching cotton or syntheps. Soak and decorate embroidery, appliqués from felt, buttons and beads.

Deciding to make a crawl-letter with your own hands, you will decorate the corner in the house, you will be able to captivate the child with an interesting case, which will help to reveal it and your creative abilities. Being a decoration, inscriptions and letters in the interior, able to express the image of the thoughts of the owners, their judgments and views.
Stock Foto Selection of homemade crafts in the form of letters