You won’t envy the doctors from the emergency rooms now - they have begun a busy time of bruises and fractures. And the reason for this is icy conditions, housing offices that did not have time to prepare for winter, and ill-chosen shoes.
Proper shoes for icy conditions, special linings for shoes to protect against icy conditions
Selection rules anti-slip shoes quite simple:
- We focus not on the trend and the height of stilettos, thanks to which our legs visually lengthen, but on protection from falls and reducing the risk of lying in a cast for a couple of months. It is better to choose the country of origin that is familiar with cold weather. – Russia, Scandinavian countries, Ukraine.
- Let's study the sole. Requirements: tread – with a uniform deep pattern directed towards different sides(for better grip on icy roads).
- We put on shoes and try to feel the grip on the slippery floor of the store. Remember that the sole hardens in the cold, and low-quality shoes will be slippery and hard in the cold.
- We pay attention to everyone’s favorite ugg boots only if they adapted to Russian winter and have improved soles (comfort, tread).
- No smooth soles! Even if you don’t want to take off this “charm”, and the feeling in the boots is “like in slippers.” Of course, you will learn to balance in them (by the end of winter), but at first you will have a hard time.
- Checking the softness of the sole. The softer it is, the higher the grip on frozen surfaces.
Video: How to walk properly in icy conditions?
Can't afford expensive quality shoes? We buy removable soles made of high-quality rubber
equipped with steel spikes. Not particularly elegant, but the risk of falling will be minimized. 
Another option - anti-ice pads in different options
(hoops, chains, etc., put on the soles). 


Slippery shoes - what to do: the best home remedies for ice on the street
A properly prepared sole means a successful winter experience.
What “grandmother’s recipes” are used today to protect shoes from untimely slipping?
- Felt. We cut a couple of pieces from old felt boots, and then glue them (or nail them with small nails) to our sole. This protection against ice will last you for a week, maximum 10 days.
- Glue Moment. Apply with a neat snake onto the soles, dry, and spread with a smaller zigzag. After a day, rub with coarse sandpaper until it becomes rough. This “antilde” will last for a week.
- Glue several plates to the sole classic large patch . For a day or two you may feel more confident. As in this case, as in all others that involve gluing fabric “safeties” to the soles, you should remember: in rainy weather and snowfall, these devices turn your shoes practically into skates. Therefore, they are not suitable for “wet” weather.
- We buy special sanding strips (available in any household/store) on a sticky base, glue it to the soles, and for 2-3 days forget about the tightrope walker’s pose.
Folk craftsmen also rub their soles raw potatoes, sprinkle sand on top of freshly applied glue, glue sponges for washing dishes, etc. But such products are short-lived and are not aesthetically pleasing. Therefore, it is better to immediately choose high-quality shoes, taking into account all the nuances of “anti-slip.”
What can a shoe workshop offer to protect shoes in icy conditions outside?
- We install soft polyurethane heels in the shoe workshop and we move around cheerfully and without fear all season long. To be sure, you can also stud the soles there.
- We install metal heels(around the perimeter, with spikes, with nails, etc.). Clicking on them in the subway and other public places is not very decent, but on the street you can be calm.
How to properly walk in icy conditions outside?
As soon as ice appears on the roads, we begin to move along the streets as if with crystal vases in hands (from a sideboard with family treasures). And it is right! You shouldn’t count the remaining bullfinches and study yourself in shop windows - look at your feet(ice does not forgive roteness). 
Therefore, we remember Rules for proper movement in icy conditions:
- We change our gait. We don’t run after the bus, we don’t rush, we walk slowly, in small steps, stepping on the entire sole.
- We don't keep our hands in our pockets. In the event of a sudden fall, this recklessness can cost not only a fracture, but also a traumatic brain injury. Busy hands? Distribute the weight evenly on your hands.
- Don't forget about the right shoes.
- We calculate dangerous sections of the route and change the route in advance (or go as carefully as possible).
- We move along the roads with caution – we reduce the risk of flying directly under the car.
- Learning to fall correctly. We do not fall on our hands to avoid fractures and sprains. If we lose balance, we try to group ourselves, bend our knees (in the direction of the fall) and press our hands to our body, and when we touch the ground, we roll to “dissipate” the force of the impact. We avoid falling on our back with any acrobatic tricks.
- Hold your body while walking slightly leaned forward .
- We don't kick back , if someone hurt your shoulder while being late for their business.
- Don't ignore a visit to the doctor , if the fall did occur, and the blow was strong.

If you are not particularly careful, recommendations fly out of your memory immediately after reading, and you will never take off your stilettos, then carry them with you in your purse. a pair of cotton tights or stockings
- You will need them at the emergency room. A stocking stretched under a cast will protect you from itching, skin irritation and the feeling of tightness in your hair.
New boots, especially those with leather soles, can be very slippery on smooth and wet surfaces. And it also happens that your old favorite shoes make you dance on the ice. If you encounter a problem like this, don't treat it as something insignificant. Slippery shoes can cause serious injuries, not to mention the discomfort you may experience. Before throwing slippery and uncomfortable shoes into the trash, try making the soles less slippery with a minimum of effort.
Steps
New shoes
- Go to new shoes on uneven surfaces:
- Concrete (not smooth)
- Gravel
- Rocks, stones and so on
- Textured metal gratings, walkways and so on
- You can also take off your shoes and, holding them in your hands, rub the soles well on an uneven surface.
-
Rub the sole with sandpaper. Are you unable to walk on rough surfaces? Try scratching the sole with sandpaper; just take off your shoes and rub the soles with sandpaper. Now put on your shoes and evaluate the result.
Use a nail file. If you don't have sandpaper, a nail file or similar tool may be a good alternative. Use it in the same way as sandpaper. Use a nail file to rub the sole to make it rougher.
- You can use a file. This is a more convenient tool that will help you cope with the task. As with sandpaper, choose a file with a higher grit.
-
Wear shoes and the soles will wear out over time. Another way to make your boots less slippery is to wear them as often as possible. Walking is The best way make your shoes less slippery. It will take you anywhere from a few days to a few weeks to fix this problem. Put on your new shoes or boots and walk in them as much as possible.
- If you decide to use this method, be careful if it is very slippery outside. In this case, it is better to wear another pair of less slippery boots (rain or ice). This will help you avoid unnecessary injuries.
Additional funds
-
Purchase a special coating for slippery soles. If your old boots are bothering you, the problem is not that you haven't worn them enough, but that you've worn them out too much. In this case, you can use special pads that need to be glued to the slippery surface. Undoubtedly, the best option will be the use of special pads designed for this purpose.
Buy anti-slip spray. This product significantly reduces the risk when walking on slippery surfaces. However, before purchasing such products, consult the seller or read reviews. Choose only high quality products.
- Typically, anti-slip spray can be purchased at the same store that sells sole pads. However, the price may be higher.
-
Use hairspray. Don't want to spend money on purchasing special anti-slip products? Use what you have at home. However It is important to note that the use of these tools does not guarantee good results. Such a product is hairspray; simply spray a coat of polish onto the soles of your shoes. Let the polish dry for a minute or so. Now you can put on your boots.
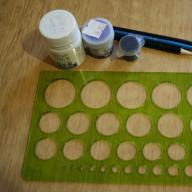
Use voluminous paints. This paint is often used in children's art kits. In addition, this paint is used to apply patterns on T-shirts. Under the influence of temperature, the paint expands and a three-dimensional image is obtained. Therefore, it is appropriate to use this product in our case, since loose dried paint will create a rough surface on the sole. Simply apply a thin layer of paint to the sole, leave it for a few hours to dry, and appreciate the result!
- After a while, you will need to repeat the process, since the effect of the paint is also temporary. However, the process should not be repeated as often as with hairspray.
- If you have time, you can paint a picture on the sole; This is a great way to make your boots truly unique and show off your creativity.
-
Use masking tape. Stick two pieces of adhesive plaster with rough on the sole fabric base. Stick two strips crosswise for best effect.
- However, change the adhesive tape periodically as it loses its adhesive properties over time.
-
Take help from a professional if you are dealing with a very expensive pair of shoes. If your pair of shoes is expensive enough to be subjected to various experiments, take them to your local shoe repair shop. The specialist will offer you more gentle options that will not ruin your favorite boots.
Put on new shoes and walk in them, preferably on rough surfaces. If your shoes are brand new, they are probably very slippery because the soles are still perfectly smooth. Walk on the floor in new shoes. Contact with the surface will cause slight roughness and scratches on the sole, making the shoes less slippery. So put on your new shoes and walk around the house in them as much as possible.
Now, in winter, the main danger is ice. Ice appears on roads and sidewalks when a strong thaw gives way to equally severe frosts. Therefore, in order to avoid injury during this time, you should wear shoes with non-slip soles. If your shoes have slippery soles, then there are several options to make them safer. Previously, we talked about one such method. What other options are there? This is what we will talk about.
Making shoes safe in icy conditions
There are several options for achieving this goal. All of them are quite simple and do not require any expensive materials.
Option #1
Degrease the soles of your shoes. Next, apply a thin layer of glue on it, for example, the same “Moment”. After applying it, immediately, while the glue has not yet dried, sprinkle it with sand. The duration of such coverage is approximately four weeks.
Option No. 2
One of the most common and at the same time simple and cheap methods is to simply stick an adhesive plaster to the sole. For these purposes, it is best to use a wide adhesive plaster and this should be done crosswise. Of course, the duration of such coverage is short, about three days, but still this option should also be kept in mind. And in order to prevent it from being visible on the sole, simply paint over it with a black marker.

Option No. 3
You can also rub the sole of your shoes with a raw potato half. The method is also very effective.
Option No. 4
You can improve the durability of your shoes by getting help from a professional. The specialist will install small plates on your sole. They will make your sole non-slip and also protect it from wear. This method is quite durable.
It really is possible to make your shoes non-slip. To do this, it is best to contact a shoemaker who will either offer attachments for shoes or make the surface of the sole more rough. But what if there is ice outside the window and you need to go outside? In this case, they will come to the rescue traditional methods, tested by several generations. Today we have collected 6 simple home remedies that will save you during icy conditions, as well as several radical options that can be used in the long term. So, let's go!
How to make shoes non-slip at home: 6 life hacks
1. Sandpaper can come to the rescue. Moreover, there can be several ways to use it. Firstly, coarse paper allows you to rub the sole, thereby making it less smooth. Secondly, you can cut out a few pieces of paper and glue them onto the heel and forefoot. The gluing option works like a charm!
2. You can glue felt or adhesive tape to the sole, but this method will only help you run to the nearest stop. In some cases, this is quite enough.
3. Raw potatoes will help you overcome a short distance. All you need to do is cut the potato in half and rub the sole with it.
4. And if you are sure that prolonged icy conditions are approaching, you can thoroughly prepare. You will need Moment glue and sand. Have you already guessed what's going on? You need to apply glue to the boot in the form of a snake and sprinkle it with sand. This must be done in advance so that the glue can dry. If you decide to do this before going out, the life hack will not work. After a few days, the glue will wear off and the sand will disappear, so don’t worry about the future of the sole. You should never use salt, as it has a negative effect on leather shoes.
5. Sand can be used in other ways. When hot, it tends to stick to the sole. You can heat it up using the oven. Keep it at high temperature it takes about an hour, then you need to take out the baking sheet and immediately place the boots on top. Keep in mind that the sand will stick for a long time.
6. Hot silicone can also be used. It is applied using a special adhesive gun and then allowed to harden. This option will help make the smooth surface of the sole more prominent.

How winter shoes make it non-slip for a long time?
Home remedies are good in emergencies, but in the long run it’s worth considering more reliable methods of protection. In stores that offer shoe products, in winter various devices for moving in icy conditions appear. As a rule, these are structures made of rubber or silicone with spikes or chains. Such pads are convenient to put on boots and after reaching your destination (work, home) they can be conveniently removed and hidden in a bag.
It is necessary to think about walking in icy conditions when purchasing shoes, so next time When you buy a winter pair, give preference to a model with a textured sole. In addition, it should be stable and not too high. It is better to put aside shoes with wedges or heels, or at least save them only for dry weather.
How to make sports shoes non-slip?
Sneakers may slip just because they are new. Walk on embossed surfaces and scratches will quickly appear on the sole, which will prevent slipping. If the sneakers are old and have only just begun to slip, it means that the sole has worn out and become too smooth. It will be difficult to fix this problem using the previous method, so it is better to use special pads,
sold in stores. They are attached using glue, such as Momenta, and cost pennies.
You can find it in the store special remedy anti-slip, but make sure it is effective before purchasing. Regular hairspray can provide approximately the same effect. The disadvantage of this method is the need to regularly repeat the application procedure.
If your sports sneakers are quite expensive or simply too expensive for you, you can take them to a shoemaker and he will offer solutions to the problem.
When choosing shoes, people pay attention to the design, materials and comfort of the product. Few people think about how shoes or boots will behave on ice. And manufacturers of special sports equipment also do not always sell products with the ideal characteristics stated in the description of a particular model. Let's talk about how to make shoes non-slip to eliminate the possibility of injury in different conditions pastime.
These tips from experts will help you approach the choice of winter boots or boots more thoughtfully:
- Pay attention to the protectors. High tread pattern geometric shapes- excellent prevention of injuries in the winter ice. Such shoes provide better grip on the road surface compared to regular ones.
- The base material also affects sliding. The slipperiest options are leather and rubber, and the most resistant are TPU and polyurethane.
- Carry out a simple stability test. If a shoe or boot bends easily at the sole, this is a sure sign that it will not be particularly stable. If the sole is not flexible, it will not slide much.
Important! Boots with high thin heels are certainly beautiful, but they are of little use for winter ice. Much safer for slippery sidewalks are UGG boots or short sports-style boots with fur soles.
How to make the sole of your shoes non-slip? — Professional way
So, you bought shoes. She is beautiful, comfortable, in a word, she suits you in every way, except for one thing: the boots are incredibly slippery. It would seem that the situation is, as they say, stalemate. However, a few tips on how to make your shoes non-slip in winter can solve this problem.
Special overlays in the workshop
Before the onset of winter cold, take your boots to a shoemaker's shop. The technician will attach special pads made of non-slip material (this can be rubber or polyurethane) to the sole. Overlays are selected depending on the size:
- The first size is for shoes with a size range from 35 to 38.
- The second is for sizes from 39 to 41.
- The third is for size 42 and above.
Important! Such overlays are convenient because they are perfect for both sports-style boots and boots. high heels. There are anti-slip removable pads with spikes that can only be worn in case of ice.
DIY repair
You can glue the anti-slip material yourself. Let's look at how to make shoes non-slip at home, in more detail:
- Thoroughly wash the soles of your boots or shoes clean.
- Dry the sole and treat it with a solution of ethyl alcohol.
- Typically, the adhesive is sold with the overlays, but any shoe adhesive can be used. Apply glue to the sole, press the overlay to it, and hold for about a minute.
- Wait a bit until the glue dries. Now you don’t have to worry about your favorite boots slipping.
How to make shoe soles non-slip at home?
Sometimes traditional methods help. Popular wisdom helps to avoid troubles associated with falling on ice.
Band-Aid
To experiment with friction forces, take a thick fabric patch. Bactericidal is not suitable for this purpose. Cut out 2 pieces of the patch and glue it to the sole of the shoe - in the toe and heel area.
Important! The method, as practice shows, is quite effective, but the patch wears out quickly and you have to change it often. This solution is suitable for both winter and sports shoes.
To prevent pieces of adhesive tape from being so noticeable, paint it before applying it with shoe paint or a waterproof marker.
Felt
Rough felt pads are a good alternative to plaster. Cut pieces of felt to the shape of the shoe sole and glue them in the toe and heel areas.
Important! Felt provides good grip on the soil and makes the shoes non-slip even in heavy ice.

Glue plus sand
This method also gives a good effect:
- Wash the sole well so that no dirt remains on it.
- After waiting for the sole to dry, apply a “mesh” or “snake” of “moment” or “superglue” glue to it. While the adhesive is still wet, sprinkle it with coarse sand.
- The shoes cannot be used for several hours until the sand sticks properly.
As a rule, such an “anti-icing” event is enough for 3-4 days, provided that the item is worn regularly. After this, the procedure should be repeated.
Important! If the sole is equipped with protectors, do not be lazy to clean it from dirt more often. The sliding effect will be greatly reduced. This is explained by the fact that when dirt gets into the raised ridges, the sole becomes smooth, and the shoes “ride” on the ice. To eliminate this problem, a simple caring procedure is sufficient.
Sandpaper
If you hate the idea of having to stick felt or adhesive tape onto the sole of your dress boots, try a good folk remedy. Rub the sole of your shoe with fine sandpaper and it will become much less slippery.
There is one more good way, but it requires the ability to handle shoemaking tools:
- Find old shoes with grooved sole.
- Use a shoemaker's knife to cut off a thin layer of the corrugated base.
- Treat the sole, which you are going to make non-slip, with a 5 mm layer of silicone, and then apply the cut out relief stencil. Once you remove the stencil from the sole, a distinct tread will be imprinted on it.
By drying the silicone with a hairdryer, you will get an excellent anti-slip effect.
Socks
Of course, the method is effective, but in terms of aesthetics it is quite dubious. Place thick socks on top of your shoes. True, you are guaranteed not only safe movement, but also puzzled looks from passers-by.
Ah, potatoes...
Regular raw potatoes help reduce the sliding properties of the sole. Cut the tuber in half and wipe the sole of your shoe. She will stop sliding on the ice.
Ice drifts
If you are not a fan of experiments, then your option is a special device called ice drifts. These are special rubber removable soles with small metal spikes. Such a device is inexpensive, and the safety of movement in icy conditions is much higher.
The advantages of ice drifts include:
- High efficiency, even on the slipperiest ice.
- The device fits perfectly on shoes of any size: from 35 to 45.
- Practicality, durability, reliability.
- Almost invisible while walking.
Today, there are many models of ice drifts, and all of them provide good protection when walking in icy conditions.
Video material
We hope that now you are armed with the necessary knowledge on how to make your shoes non-slip in winter, and in the cold season no icy conditions will be scary!