When it's raining outside, you can keep your child busy with exciting crafts. autumn theme. You can use available materials to get a voluminous umbrella. We use bright colors paper to make the craft colorful and bright.
Materials and tools for crafts:
- colored paper;
- PVA glue;
- scissors;
- a regular pencil for drawing craft details;
- long wooden skewer;
- adhesive tape to match the color of the paper.
How to make a paper umbrella with your own hands
1) The main part of the craft will be made of colored paper. We use any color. Draw seven to eight circles or use a stencil with holes different diameters. We cut along the contour of each part of the future umbrella.

2) First, fold the cut circle in half. Then fold it in half again to get the finished part.

3) We do this with each circle to get the necessary parts for the main part of the umbrella.

4) We glue each part in one place with a drop of glue.

5) We begin to connect the parts to each other.

6) Fill all the spaces to get the volumetric part of the umbrella.

7) Make a handle and a cane for the object. To do this, take a wooden skewer. We shorten it a little in length. We wrap it with tape, which will harmonize well with the main part of the umbrella.

8) Use the sharp end to thread the central part of the umbrella and leave a small part at the top. We bend the bottom part to create a handle. We wrap it in this place with green floral tape.
In order to do small miracle, sometimes you don’t need supernatural efforts and incredibly rare and expensive materials. Often paper and glue are enough.
An example of a very simple, but very colorful, bright and cheerful craft is handmade paper umbrellas.
Take a look, such a beautiful paper umbrella can decorate any composition or larger-scale craft, but to make it you only need ten minutes of time, colored paper, glue, a piece of wire and scissors.
Take a piece of colored paper, draw a circle on it using a plate or saucer and cut it out. Fold it in half, and then in half again. The resulting part is the main element of the paper umbrella dome. We need to make more of these blanks, preferably in several colors.


The picture shows the dotted part of the workpiece, which we lubricate with a glue stick, leaving the lower part dry. Please note that there is a part with a split edge at the bottom.

Alternating colors, glue the blanks together. This is how we form a dome. It is better to take a lot of blanks so that the paper umbrella turns out to be magnificent.
There is a small gap left in the middle. We insert a small wire into it, with a curved edge - this is the handle. For beauty, it can be wrapped in corrugated wrapping paper or foil.

Print Thank you, great lesson +5
When it rains, only a raincoat or an umbrella can save you. If you look closely at the umbrella, you can see that it is very similar to a mushroom - it has a cap and a thin stem. Of course, umbrellas come in many different shades and colors, as well as dome and handle shapes. This is explained by the fact that everyone can find something they like.
But to decorate your autumn card or as a craft, you can make such a wonderful paper umbrella. It consists of two parts - a dome and a handle.

- Sheet of paper for umbrella 8 x 8 cm
- Pen paper 3 x 8 cm
Step-by-step photo lesson:
Take a square sheet of paper to fold the umbrella. First we bend along the diagonals.

We bend the two upper corners in the middle to offset the sides.

Then we bend the bottom side up to offset the edges.

Fold it in half along the vertical midline.

Then we open it.

Take the lower left corner and bend it so that the fold line comes out from the left side corner.

We repeat the same steps only with the lower right corner.

Then we bend the bottom corner up.

We bend the side corners to the middle line, as when creating a “kite” shape.

Then we open it. At this stage we indicated the edges of the umbrella.

Turn it over and get the top part of the umbrella.

Let's take paper measuring 3 x 8 cm and start making the handle of the umbrella. Roll up a narrow strip of paper.

Press the bottom edge. We wrap it in an arc and get a finished umbrella handle.

Glue it to the top and get a finished umbrella made of colored paper using the origami technique.

Video lesson
1. Decorate an empty wall
To give the room a complete look, it is not necessary to place bulky photo frames and other weighty objects on the wall. Bright paper flowers made from fan pinwheels will become a stylish accent to your interior or bedroom. Pick up color scheme Fans can be made to match any wall color, but the composition will look best on a light background.


![]()


2. Decorate a children's party
Paper fans will be a good decoration for any occasion. These colorful circles delight all the kids and guests. Don't leave your child out of the holiday preparations and decorate the party room with him. I am sure that children will really enjoy making these pinwheels with their own hands.


3. Hang an aerial garland above the bed
Very successful paper garlands combined with window openings. You can place several fans on one ribbon or do it as shown in the photo. I really liked this decor option, I’m even thinking about decorating the windows this way for the New Year, just add a few touches to the blank with scissors and paper flower turns into a wonderful snowflake.


4. Use as wedding decor
Paper fans are an ideal decor option for a wedding. fresh air. A wedding arch made of such paper flowers will become the highlight of your celebration and will certainly be remembered by all guests. A composition of fan pinwheels on the wall will solve the issue of decorating a photo zone, and you can also decorate a restaurant with paper fans, using them not only as wall decor, but also as hanging garlands.


5. Make a beautiful background for a photo shoot
Well, to top off the list, you can make a very stylish panel or background for a photo shoot from fan turntables. Be sure to complement the composition with bright pom-poms and flags - this will help highlight your image.

How to make fan pinwheels with your own hands
Making fan pinwheels is not at all difficult. In return, you will get a lot of pleasure, both from the manufacturing process itself and from the result.

Materials:
- multi-colored paper for scrapbooking 30x30 cm;
- stapler, glue or double-sided tape;
- scissors or a figured hole punch if you want to apply a pattern;
- optional: cardboard or foam canvas.
Let's get started:
1. Fold a sheet of paper lengthwise in a zigzag pattern, leaving 2.5 cm between the folds.

2. Next, take the resulting accordion and fold it in half, as shown in the photo. Then staple the inside edges from the wrong side. Alternatively, you can cut the piece down the middle and glue the quarters together with glue.

3. Follow the same steps with two or three more sheets of paper and connect all the blanks together into a whole circle. To make the fan even more beautiful, the ends of the folded accordion can be rounded or trimmed with curly scissors, and using a hole punch, you can apply an ornament to the fan.
A beautiful and bright volumetric paper umbrella can be used as room decor, as well as interesting craft, which will appeal to all children. And the main thing is that it is absolutely not difficult to make such a variety of colors.
Materials you will need:
- Colored paper of various colors;
- Cocktail straw;
- Double-sided tape;
- A simple pencil, a compass, scissors, a glue stick.
If you need a small umbrella, you can save on colored paper by using multi-colored leftovers.

How to make a three-dimensional umbrella from paper?
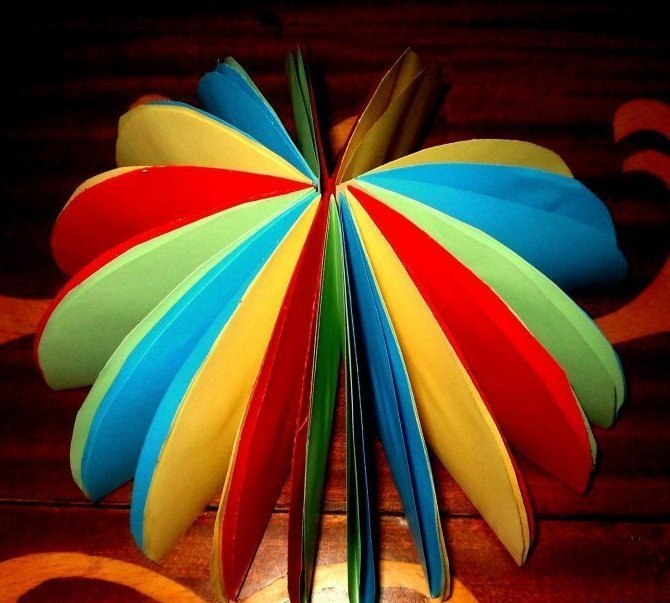
To work you need circles of colored paper. I have 20 circles, but 15 may well be enough, especially with a small umbrella size. For a large umbrella, you can cut out all 20, so it will appear at its maximum beauty.

Fold the circle exactly in half.

Then again to make a quarter circle.

Turn all the colorful paper circles into these quarters.

To prevent the parts from opening in the future, you need to secure them a little with glue. Open the quarter and apply a little glue on top. There is no need to use the entire half.

Glue the sides together. Now they will be fastened only in the upper part, without preventing the lower part from opening properly.

Glue all the quarters together.

Next, they need to be glued together, but not anyhow, but in a certain way. Place two quarters, split sides down, as shown in the photo. This is the position in which they need to be glued together - bifurcated side to bifurcated side, right angle to right angle.

Glue must also be applied between these two quarters.

But here, too, you should not completely fasten the entire side. Only the upper part is enough so that the lower part can open. In the photo, the quarter is divided into two parts, but this division is arbitrary so that it is clear where to apply the glue. As you can see, only the upper part of the quarter is involved.

Glue the two parts together.

And behind them come everyone else. You can stack them and press them firmly so that the glue is properly secured.


After this, close the circle by gluing the sides of the first and last quarter. Prepare a cocktail straw. Bend its edge in the area of the accordion, try it on your umbrella and, if necessary, shorten the tube.

Glue double-sided tape to the tube, remove the film and quickly place it in the hole in the umbrella. Can replace tape glue gun, glue moment. PVA and pencil do not interact well with plastic. There is a risk that the cocktail tube will not stick at all.

This is how a voluminous paper umbrella turned out. Very bright and positive.


Her skirt, or rather her skirt, was made using the same technique.