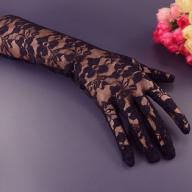
At the beginning of the last century, fingerless or classic gloves were a mandatory accessory for ladies from the noble and middle class. Now the fashion for them and mitts is returning. Openwork, made of beautiful guipure material, they adorn the bride’s hands. And some can be worn on other, no less solemn occasions.
Selecting an accessory to match your look
It's not just white models that are popular. It all depends on what image you need to create.
- Products in white, pink and its shades, ivory or ecru will match the romantic style.
- Black, gray, dark blue colors will appeal to teenagers and adults.
- For more daring women, bright colors are suitable. But children's ones can also be made in the same color.
Beauty guipure, you can evaluate the variety of its shades and choose the fabric to your liking in the “” store.
How to sew gloves from guipure?
The glove should fit your hand, but not squeeze it. Therefore, the material should be selected as elastic.

It is important to determine not only the size, but also the length of the hand and fingers. The size itself is the circumference of the base, expressed in inches. If you only have a measuring tape, then the resulting figure should be divided by 2.54.

Guipure gloves pattern. Where can I get it? You can undo old satin or any thin models. Or redraw one of the drawings suggested below. The first of them (1 square = 2 cm) is given for size 6. That is, the length of the base of the palm is 6 inches or 15.24 cm. The second one must be scaled to your measurements.

- Transfer the pattern to the fabric.
- Cut taking into account allowances.
- Make slits on the parts according to the markings.
- The wide part is the thumb. For ease of sewing, numbers indicate the places of alignment.
- The narrow and long part is the remaining fingers. You need six of these parts for each hand. They can be cut with a fold. Then you will need three double elements.
- Sew the thumb element to the main one. Start from the slot, matching the areas marked with numbers.
- Sew the pieces for the other fingers at the base in pairs if you did not cut them out with a fold.
- Sew the “fingers” to the top of the main element.
- Then do the same with the bottom part.
- Now you can make the external seams.
- Fold open edge and hem.

If the gloves need to be long, run an elastic band or a hat elastic along the outer edge.

As you can see, sewing guipure gloves with your own hands is quite simple.
How to sew mitts from guipure?
This variation is suitable for girls, women, and girls. There are two ways to sew.
- Take the glove pattern as a basis, cut off the fingers in the drawing and then follow the technology described above.
- The second one is much simpler. These fingerless gloves can be created while watching a movie.

Print the drawing or draw it with your measurements. Transfer to guipure and cut out.

- Place the two pieces facing inward and sew along the outer edge.
- Leave a hole in the seam for your thumb or grab the product along the top edge.

Ready.

You can make a more romantic variation in the wedding style. The pattern of fingerless gloves changes at the same time. You can extend it with a corner to the middle finger, make it longer.
Tip: before cutting out fabric, first cut out the scallop along the guipure so that the edge of the product is openwork. There is a second finishing method - processing the cuts with bias tape or a strip of matching lace.
Both gloves and mitts can be decorated to your liking. Glue on rhinestones, trim with beads, fur, and sew a hand-made bow from ribbon in the color of the item onto your wrist.
The fashion for such an accessory as gloves for an elegant dress appeared in the distant Middle Ages. At that time, only girls and ladies belonging to the upper class could afford it. Today everything has changed. Any young lady, even if she is in elementary school or goes to kindergarten, can flaunt in pretty gloves that are in harmony with her festive outfit. Let's try to figure out how to sew gloves for a girl to go with a dress.
Style options
Babies in ball gowns for children's parties look charming. A miniature handbag, jewelry and gloves will complete the look. You can purchase ready-made gloves or sew them yourself. Here are some options for styles:
- Mitts. This is one of the simplest, most popular and comfortable styles. The fingers remain open. The back of the hand and the arm up to the elbow or mid-forearm are covered. An option above the elbow is also possible, but it is not entirely comfortable, especially for a little fashionista. The product is held in place by a loop for the middle finger.
Important! The main advantage of mitts is their versatility. They look great with a chic ball gown or a more modest day dress.
- Gloves with completely closed fingers. Their length, as in the case of mitts, can be different. You can choose a model to the elbow or a short version.
Manufacturing materials
The most common fabric options when you need to sew gloves for a girl to go with a dress are:
- Guipure.
- Lycra.
- Chiffon.
- Brocade.
Naturally, each material has its own characteristics:
- The most comfortable products to wear are those made of elastic materials, such as lycra. These gloves fit your hand like a second skin, they fit your hand, so they are very comfortable.
Important! Despite the fact that lycra is an artificial material, it is highly breathable. Therefore, the girl will feel great, and accessories will not cause her discomfort.
- Inelastic fabrics, such as brocade, may be beautiful, but they will cause a lot of inconvenience to the young fashionista. In order for the accessory to fit well on your hand, you will need to insert elastic bands. The interval between the elastic bands is about 5 cm.
Important! The difficulty is that you need to select them so that the product does not slip off your hand and, at the same time, does not squeeze it.
- Currently, you can find chiffon, brocade or guipure with elastic thread on sale. These are the fabrics that should be used for sewing.
Decoration methods
You can decorate children's gloves in various ways. The most common and win-win option is decorative faux pearl buttons sewn in a row. You can use rhinestones, lace, satin bows.
Important! We must not forget that the finishing of the dress and gloves should be in harmony with each other. If, for example, you sewed a dress from rubber gloves with your own hands, then you need to select the appropriate accessories.
How to properly combine gloves with a dress?
Many questions arise here. Is it necessary for the accessory to be in the same color scheme as the dress? Or is a contrast possible? Are the lengths of gloves and dresses related to each other? Is it necessary for the texture of the materials to match?
Here's what to take into account:
- There is one rule: a short-sleeved dress goes well with long accessories. For an outfit with puffed sleeves, items up to the wrists or mid-forearm are appropriate.
- If the texture of the dress and accessories coincide, then such an ensemble looks especially elegant. But this is not at all necessary. Modern fashion is very democratic; there are few too strict rules in it.
- Another interesting option is to use gloves as an accent color. In this case, you need to support the color with some other accessory. This could be a handbag, belt or shoes.
Important! The main thing is to observe moderation. There should not be more than 3 colors in one image, otherwise it’s easy to slip into eye-catching variegation.
How to sew gloves from guipure? Pattern and master class
Let's consider the simplest option - mittens made of guipure with stretch.
To work you will need:
- Wide stretch lace. The length of one piece is equal to two palm circumferences plus a small seam allowance.
- Threads in the color of lace.
Operating procedure:
- Cut two blanks taking into account 0.5 cm seam allowances.
- Fold the workpiece in half.
- At the top, secure the seam over the thumb.
- Then leave an unstitched area for the thumb.
- Since the palm is wider than the hand, narrow the product under the thumb, the width of the hand.
- Adjust the width carefully.
- Sew the workpiece using a sewing machine using a zigzag seam or sew by hand.
- Secure the flaps of the fabric in the finger hole area.
It is best to sew your first gloves from GOOD STRETCH fabric. When you become ace, you can sew from anything
Next. How to make a pattern? If you are sewing gloves for medium-sized ladies’ hands, then an A4 sheet of paper will be enough for the pattern. Fold the sheet in half. Place your hand on this sheet so that your thumb is on the fold side

and trace it along the contour (I think many had fun with this in childhood). In this case, it is necessary that the fingers are not pressed against each other and are not spread apart. They should be in a free and natural position. In addition, everything is outlined except the thumb, which will be cut out separately. Next, mark on the fold point “A” - the upper base of the finger and point “B” - the lower base of the finger.

After this, you can cut out the pattern without unbending the leaf. Don't forget that you don't need to cut the fold. You just need to cut out the pattern along the outline and cut out an oval on ONE side of the pattern. The result should be this:


Cut out an oval.

Now the pattern can be transferred to the fabric. Don’t forget that we have a RIGHT hand and a LEFT hand, that is, we need to cut out two parts in a mirror image.
The thumb is cut out separately. The thumb pattern looks something like this:

The length of the “CFD” line should match the full length of the oval cut on the main pattern piece.
Further, since our fingers are not flat, but have a certain volume, then for the fingers we need to cut out an additional ribbon (or several ribbons) to sew them on the inner sides, where the fingers touch each other if they are pressed against each other. The width of the tape should be approximately 0.8 - 1.0 cm (in general, this depends on the thickness of the fingers and seam allowances, and is selected according to the situation)
Now, onto the actual sewing. If you are cool and very good at sewing very small details on a machine, then you can sew everything on a machine using some kind of knitted stitch. I personally am not capable of such virtuosity, so I sew gloves by hand using a “back needle” seam.
It’s convenient to start sewing with your little finger (although you can also start with your index finger). If you start sewing from the little finger, then you must first sew PART of the side seam of the glove.

I draw your attention to the fact that you should not sew the entire side seam at once if you later plan to somehow decorate the edge of the glove (for example, sew lace to it)
You can sew a single ribbon, or you can make separate ribbons (three in total for each glove) at the spaces between the fingers. It makes sense to make separate ribbons if your fingers are thin. In this case, it is advisable to bring the ends of the ribbons “to nothing” at the ends of the fingers so that the fingertips of the glove do not turn out thick. If the fingers are quite large or simply plump and even from base to tip, you can sew a single ribbon along the entire length from the little finger to the index finger.


Once you have sewn all four toes, you can begin sewing on the thumb. First you need to fold the part in half with the wrong side out, aligning
points “C” and “D” sew the part along line “CE”. Then I recommend basting the finger to the hole cut out for it, and only then carefully sewing the needle back with a seam.
After the thumb has been sewn in, you can decorate the bottom of the glove with lace, or decorate the glove itself in some other way. At the end, sew the side seam to the end and the glove is ready.


In the last photo, I had to move the edge of the glove towards the hand, because photographing my own hands is very inconvenient, and the entire glove does not fit into the frame.
I hope that my instructions will help someone learn how to sew gloves
I already figured out how to sew an elastic band beautifully, and now from the depths of the Internet:
Sewing ball gloves - step by step guide
So, the first thought: it is best to sew your first gloves from GOOD STRETCH fabric. When you become an expert, you can sew from anything :)
Next. How to make a pattern? If you are sewing gloves for medium-sized ladies’ hands, then an A4 sheet of paper will be enough for the pattern. Fold the sheet in half. Place your hand on this sheet so that your thumb is on the fold side
and trace it along the contour (I think many had fun with this in childhood). In this case, it is necessary that the fingers are not pressed against each other and are not spread apart. They should be in a free and natural position. In addition, everything is outlined except the thumb, which will be cut out separately. Next, mark on the fold point “A” - the upper base of the finger and point “B” - the lower base of the finger. 
After this, you can cut out the pattern without unbending the leaf. Don't forget that you don't need to cut the fold. You just need to cut out the pattern along the outline and cut out an oval on ONE side of the pattern. The result should be this: 
Next, draw an oval equal in height to “AB”, and in width to about half “AB”. 
Cut out an oval. 
Now the pattern can be transferred to the fabric. Don’t forget that we have a RIGHT hand and a LEFT hand, that is, we need to cut out two parts in a mirror image.
The thumb is cut out separately. The thumb pattern looks something like this: 
The length of the “CFD” line should match the full length of the oval cut on the main pattern piece.
Further, since our fingers are not flat, but have a certain volume, then for the fingers we need to cut out an additional ribbon (or several ribbons) to sew them on the inner sides, where the fingers touch each other if they are pressed against each other. The width of the tape should be approximately 0.8 - 1.0 cm (in general, this depends on the thickness of the fingers and seam allowances, and is selected according to the situation)
Now, onto the actual sewing. If you are cool and very good at sewing very small details on a machine, then you can sew everything on a machine using some kind of knitted stitch. I personally am not capable of such virtuosity, so I sew gloves by hand using a “back needle” seam.
It’s convenient to start sewing with your little finger (although you can also start with your index finger). If you start sewing from the little finger, then you must first sew PART of the side seam of the glove. 
I draw your attention to the fact that you should not sew the entire side seam at once if you later plan to somehow decorate the edge of the glove (for example, sew lace to it)
You can sew a single ribbon, or you can make separate ribbons (three in total for each glove) at the spaces between the fingers. It makes sense to make separate ribbons if your fingers are thin. In this case, it is advisable to bring the ends of the ribbons “to nothing” at the ends of the fingers so that the fingertips of the glove do not turn out thick. If the fingers are quite large or simply plump and even from base to tip, you can sew a single ribbon along the entire length from the little finger to the index finger. 


How to sew such wonderful gloves? Find out in the master class below.
How to make a pattern? If you are sewing gloves for medium-sized ladies’ hands, then an A4 sheet of paper will be enough for the pattern. Fold the sheet in half. Place your hand on this sheet so that your thumb is on the fold side.
and trace it along the contour (I think many had fun with this in childhood). In this case, it is necessary that the fingers are not pressed against each other and are not spread apart. They should be in a free and natural position. In addition, everything is outlined except the thumb, which will be cut out separately. Next, mark on the fold point “A” - the upper base of the finger and point “B” - the lower base of the finger.
After this, you can cut out the pattern without unbending the leaf. Don't forget that you don't need to cut the fold. You just need to cut out the pattern along the outline and cut out an oval on ONE side of the pattern. The result should be this:
Next, draw an oval equal in height to “AB”, and in width to about half “AB”.
Cut out an oval.
Now the pattern can be transferred to the fabric. Don’t forget that we have a RIGHT hand and a LEFT hand, that is, we need to cut out two parts in a mirror image.
The thumb is cut out separately. The thumb pattern looks something like this:
The length of the “CFD” line should match the full length of the oval cut on the main pattern piece.
Further, since our fingers are not flat, but have a certain volume, then for the fingers we need to cut out an additional ribbon (or several ribbons) to sew them on the inner sides, where the fingers touch each other if they are pressed against each other. The width of the tape should be approximately 0.8 - 1.0 cm (in general, this depends on the thickness of the fingers and seam allowances, and is selected according to the situation)
Now, onto the actual sewing. If you are cool and very good at sewing very small details on a machine, then you can sew everything on a machine using some kind of knitted stitch. I personally am not capable of such virtuosity, so I sew gloves by hand using a “back needle” seam.
It’s convenient to start sewing with your little finger (although you can also start with your index finger). If you start sewing from the little finger, then you must first sew PART of the side seam of the glove.
I draw your attention to the fact that you should not sew the entire side seam at once if you later plan to somehow decorate the edge of the glove (for example, sew lace to it)
You can sew a single ribbon, or you can make separate ribbons (three in total for each glove) at the spaces between the fingers. It makes sense to make separate ribbons if your fingers are thin. In this case, it is advisable to bring the ends of the ribbons “to nothing” at the ends of the fingers so that the fingertips of the glove do not turn out thick. If the fingers are quite large or simply plump and even from base to tip, you can sew a single ribbon along the entire length from the little finger to the index finger.
Once you have sewn all four toes, you can begin sewing on the thumb. First, you need to fold the part in half with the wrong side out, aligning points “C” and “D” and sew the part along the “CE” line. Then I recommend basting the finger to the hole cut out for it, and only then carefully sewing the needle back with a seam.
After the thumb has been sewn in, you can decorate the bottom of the glove with lace, or decorate the glove itself in some other way. At the end, sew the side seam to the end and the glove is ready.