Preparation for the upcoming New Year holidays in all is in full swing.
We decorate our home, make up a new year menu, choose festive outfits.
But you need to think about your little family members who begin the matinees and in kindergarten and in the elementary school schools.
. And then the New Year's Children's Christmas trees will go, in which your baby wants to look like a prince or king.
Moreover, this New Year's matinee in kindergarten for Goosh was the last. When will he put on the crown and present himself a real prince?
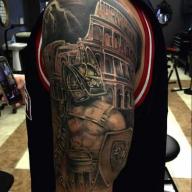
And that's what suit in the end I got:
carnival costume prince king do it yourself master class for the manufacture of a carnival costume Prince or king for a boy
carnival costume prince king do it yourself master class for the manufacture of a carnival costume Prince or king for a boyWell, Gosha is standing without golf and shoes, because he just came to her grandmother behind the costume. And on the Christmas tree, of course, he was at full parade.:

In principle, I did not have to buy cloth, because I had the remains of the sewing of the lambrequins. I believe that the color for this suit will suit any, the main thing is that the fabric is not transparent.
And so, I started with the manufacture of a raincoat.
Folded the cloth in half on the transverse thread. In the middle cut the neck. The radius of the neck can be calculated according to the following formula: R \u003d L / 2π, where R is a radius, L is the length of the circle, which, in our case, is equal to the neck of the neck, and π is a constant value equal to 3.14.
When the neck was cut, the shelf is cut in the middle. I did the length of the shelf of the ravine, than the length of the back. All edges rounded. The neck and the bottom edge processed the gold oblique baker. (Such a rubbish, I will tell you, elasticity at all, falls around the chances. Therefore, I do not advise it to apply it in the sewing of the lambrequins).

I also made a tarfarthte, and the acrylic gold paint had an ornament for two shelves and a back:


How to make crown Princess for the girl to the new year in the technique of "Kanzashi", you can see


She sewed purchased in the store fastener on a magnet:


On this, the production of a raincoat is completed.
Go to the manufacture of pants and belt.
Patterns for clothes I have not built manually for a long time. Already ready-made patterns can be downloaded on the Internet and fit under the desired size. I swear pants here!
On this site there are other patterns for clothes. Downloads in the form of pdf-book. Then you just need to print it on the printer. The leaflets on which the pattern is drawn and are given instructions, glue according to the scheme and cutting the full-sized pattern.
I repeat, check the sizes and customize if necessary for you.
The bottom of the pants I processed the oblique baker, then sewed to the wrong side of the gum, the leggress length in this place, which you will have the length of the pants, plus 2 cm for processing.
Photo Master class for the manufacture of pants and belts, see below.
Then she sewed everything along the seams, made a scene at the site of the belt and went into it a gum, the length of which was (in not stretched) the waist girth plus 2 cm. For processing.

Now we make a beautiful belt for our king.
Crow 2nd flat of phlizelin, 4 cm wide and length equal to waist girth + 2.5 cm. On the fastener.
Flizelin bands are glued using an iron to the irons of the fabric, and we cut two bands with a reserve for processing 1 cm. On each side.
Then this stock in strips in 1 cm I was sinked by a papuscle on a paper basis from the wrong side of the fabric. He took off the paper, turned the stock, and punctured the stripes. I squeezed one of the bands around the perimeter again by a web on paper. He took off the paper and glued two stripes between themselves (using the iron). Refreed the gold braid around the perimeter of the belt, and for a fastener, glued on both sides on a piece of tape Velcro.
Beautiful Golden Circle Blyhak, who was in the past life of earring, I was glued to the belt using hot glue:

Sequence of tailor sewing and belt for a prince suit or king in pictures (To enlarge the picture - click on it):
Let's make a shirt.
For this suit, you need a large, solid collar with a rack treated with lace or beautiful braid. I bought it ready. It is possible to make themselves from the bands of the fabric, the edges of which to treat all the same gold baking. And then these bands are collected in an assembly or warehouse and decorate them and a shelf of shirts and collar.
That's what a shirt turned out to be - envious that Gosh was satisfied:

The pattern of the collar I built here in this picture:

The pattern of a shirt for a boy drank on the same site as the pattern of trousers.
See photo Master Class for the manufacture of shirts:
Now we need to make the most important attribute for a suit of a prince or king-a corona symbol of royal power.
This is what she got her:

Of course, I planned to make it completely gold, covering it with gold aerosol paint (universal), but it chose not suitable material -Flizelin for this, which simply absorbed all the shine and became an ordinary brown color.
But she glistened is not worse than gold, because the whole was decorated with golden-starred candy and gold braid. In the middle of the crown, I glued a smaller earrings than on the belt, and decorated it with pebbles, and their hot glue. I think the pattern for the crown you awake, how to build.
And this is a photo process of manufacturing this important attribute:


And so, the outfit is ready, and Gosha is very satisfied and Gooshina Mom (my daughter), loves his prince very much:


Well, just a real king !!!
So long-awaited winter holidays approached.
Which parents do not remember the Christmas tree in kindergarten? How many unrest, experiences, and now, finally, your New Year's suit is ready! Remember who you were? Snowflake? Bunny? ..
But it is in the past. I want something new, unusual and ... simple. Please the baby! "Nanny" offers you uncomplicated carnival costumes for a boy and girls of six-seven years old.
Suit little prince
For a suit of a small prince you will need:
Blue fabric is 1 m with a width of 150 cm, a blue fabric - 35 cm with a width of 140-150 cm, yellow tissue - 40 cm with a width of 150 cm, rubber tape - 80 cm, cardboard.
Draw parts cut in full size. All distances are indicated in centimeters.
Number of details:
1. Front Half Trousers - 2 Details.
2. Rear Half Trousers - 2 Details.
3. Front of a raincoat - 2 details.
4. Rear half of the raincoat - 1 part with a fold.
5. Belt - 1 part with a fold.
6. Cuff trousers - 2 details.
All parts to carve out of the fabric, placing them on the share of the filament, with 1,5 cm seam letters.
Processing sequence:
1. Start the side and stepper seams of trousers. Introducts on the rear halves.
2. Start the middle seam of trousers.
3. The top edge of the trousers and the lower edges of the pantian will be survived.
4. Start the side seam of the belt, leaving a small hole for inwing the "lightning", the allowance of the seam will be found in one direction. Belt folded along in half the invalid side inside and triggered fold. Attach the belt to the front side of the top edge of the trousers, aligning sections, and dangle. The seam allowance to wash the zigzag or manually on the machine. The belt is unscrewed on the front side of the trouser, root. Lowned in the side seam of the pants hole to hide the "zipper".
5. Similar way to handle cuffs on the bottom of the pantian.
6. Start the side seams of the raincoat, the allowances of the seams to spend and snow around the rear half.
7. The lower and side edges of the raincoat twice unscrewed on the wrong side, root and strain.
8. Lock on the upper edge of the raincoat, unscrewed on the wrong side of 1 cm, and then another 2 cm, root and strain. In the allowance to turn a ribbon or lace, pull the edge of the raincoat on it.
9. From the yellow or gold fabric, cut the stars of arbitrary shape and put them on a raincoat manually or a zigzag seam. Instead of fabric, you can use gold paper, in which case the stars can be simply pasted on the fabric.
10. From a dense cardboard, cut a rectangle in length, equal to girth of your child's head plus 2 cm, the top edge cut into teeth. The crown can be saved with gold paper or cloth. You can also paint it with yellow paint (for example, Gouacheva, which is probably found at the baby), after drying the paint covered with a crown with glue and sprinkle with sparkles that can be done, grinding the Christmas toys broken on the last new year. After that, it remains only to glue the sides - and the little prince can go to the ball!

Fairy footage suit
For the manufacture of a fabulous fair costume you will need:
White tissue 120 cm long with a width of a fabric 140-150 cm, blue fabric - 80 cm, transparent light blue fabric for veil - 100 cm, braid or - 130 cm, 1 button, cardboard, sequins or beads.
Number of details:
1. Back - 2 parts.
2. Shelf - 1 part with fold.
3. Sleeve - 2 details.
4. Front Plot Skirt - 1 Detail.
5. Rear Plot Skirts - 1 Detail.
6. Collar Rack - 1 part with a fold.
7. Cuff - 2 details.
From the blue fabric also carve a waide 12 cm wide (with letters) and about 150 cm long.
All parts to carve out of the fabric with the cutting on the seams of 1.5 cm.
Dress processing sequence:
1. Start (folded the details of the front sides inside and sew) the middle seam of the back, not reaching 8-10 cm to the neck, the seam allowance is irip.
2. Start the shoulder and side seams shelves and backs. Swiss allowances start in the side of the back.
3. Fold the collar along in half the front side inside, staggering its short sides, turn out and rest.
4. Switch the collar in the neck (folded the collar with the neck of the front sides inside, strain, allowance to spend and start it).
5. Start the sutures of the sleeves. Introduction allowed.
6. Sleep the sleeves and turn them into the armies, aligning the center of the sleeve with the shoulder seam. Introducts on the sleeve.
7. Start the side sutures of the cuffs, the allowance willow. Folding the cuffs along in half the inside and root.
8. The lower edges of the sleeves will dwell. Fold cuffs with sleeves front sides inside and strain. Swiss allowances to spend and start the sleeves.
9. Start the side seams of the lower and top skirts. Introducts on the sides of the rear cloth.
10. The bottom and upper skirts to invest in one another, the upper edge will dwell.
11. Cut the skirt to the lifetime (fold the skirt with the bodice of the front sides inside and sew). Package starting in the direction of the bodice.
12. Skip the bottom of the skirt.
13. At the bottom of the lower skirt, sew a braid or lace.
14. On the right side of the cut on the back to sew a button, on the left to make a loop.
15. The belt lay down along in half the front side inside, stack its open sections, leaving a small hole. Through the left hole, turn the belt, root, the hole is gently sewn manually. He is observed behind a big bow.
16. From a dense cardboard, cut a triangle with a height of 30 cm, the base of which should be equal to the circle of your head of your plus 2 cm. Clear it with a blue cloth and after drying to glue the sides to make a cone. The top edge of the veil is strongly docked and attaching to the top of the cone. On the basis of sticking sequins or sewing several bead rows - a headdress for a small fairie is ready!
17. Bit dresses, belt, cuffs, collar and bodice squeeze sequins and beads. You can put various beads, more beautiful braid and lace - finishing options are limited only by your fantasy and patience.
Now the little fairy is ready to make little miracles - just do not forget to make her a magic wand. You can go bright paper simple pencil!
If there is no pair of "crystal" shoes, not a single pair of "crystal" shoes, do not matter - decorate casual shoes with sparkles or tinsel. You can attach small bows from the remaining fabric dresses.We offer to visit the online store of our partner Tobebride.ru - evening shop for all occasions! Beautiful, comfortable, elegant models, new 2014 -2015 years.
Preparation for the New Year is not only shopping in search of a gift to the baby. To create a festive mood, a carnival costume is required. This simple master class will show how fast from the girlfriend, do it yourself, make a beautiful prince costume for a boy.
Details of the suit "Prince"
Prince costume is the perfect option for speaking in the garden or school. This romantic image is suitable for boys of any age.Prince costume can be in several variations. It is similar to a musketeer suit, king, a group or cat in boots. So some details can be used for other speeches and roles.
The suit "Prince" for a boy consists of short pants, white spacious shirt, vest, golf, mantle and crown / beret. In addition to the suite of a prince for a boy, you can make a beautiful sword with your own hands. 
Cloth for suit picks bright. Beautifully looks suit from velvet or satin fabric. Pants and mantle can be made of blue, green or golden fabric. Red fabric is more suitable for a king suit, so it is better not to use it.
Sewing the suit "Prince" on the boy with his own hands
Sewing suit begins with sewing shirt, vest and short trousers.
Step number 1 Tailoring of a vest for a prince
Where to take a pattern? We take any child's t-shirt suitable size and outline it on paper. Paper parts are transferred to a bright fabric and outravel with letters on the seams.The vest for the prince is sewn along the side and shoulder seams. We process the bottom, the armies and the neck. Soak item on the front side. Vest ready.
Step # 2 decor the prince's shirt
To faster and easier to sew the costume, take any white shirt. It can be with a short or long sleeve, but spacious.We begin to decorate a shirt with white lace. We will be sewed at the bottom of the sleeves. We cut off the amount of tight lace and are tucked for a typewriter.
Step number 3 sew Prince pants
To sewing pants you can circle any comfortable pants of the child or take this pattern. It can be reduced or enlarged to get the desired size.
Paper parts lay out on satin fabric and cut out with letters on the seams. We fold the pants face inside and sew on the side and walking seams. The top of the trousers wech up 2 cm and spend. Measure the circumference of the child's abdomen, cut off the desired amount of gum. We insert it into the top edge of the pants. Finished trousers will not subscribe during the performance.
The bottom of the stanner can be decorated with lace or just to entertain the gum by retreating from the edge of 5-7 cm. Then the pants will look at voluminous and elegant.
How to make a mantle for a prince
Cape on the shoulders can be made from velvet fabric to a tone costume. Then the finished costume will look noble and romantic.For mantle, you will need:
Cutting fabric 1x2 meters;
Sewing tools.
Progress
1. For starters, we draw a semicircle on paper. So that it turns out to be smooth, tie the rope marker, the length of which is equal to the width of the fabric. Install it in the middle of the cut. Like this. 
2. Cut the workpiece, transfer to the fabric and cut out. In addition, we cut two stripes from a width of 5 cm wide.
3. On the one hand, the strips make Kant, smooth and tighten.
4. We rush the strip to the neck of the mantle, lay the seam on the typewriter. 

Finished mantle decorate royal sign. It can be sewn on a raincoat or sew ready.
What to make crown prince
The crown for a suit of a prince on the boy will be made with her own hands from the rest of lace and jewelry.Materials:
Dense wide lace;
Beads and various jewelry;
Acrylic paint silver or gold color;
Gelatin;
Hard cardboard.
Progress
1. Cut the lace you need the length and stitch the ends to get the ring. 
2. The crown needs to give the necessary rigidity. To do this, we use gelatin. 1, 5 h. Gelatin is warm water and leave to swell 40 minutes. Place the crown in a solution for 30 minutes.
3. Now, from hard cardboard, make a blank need size to pull the lace. Cut the strip need size and glue the ends. 
4. We stretch the lace and dried in a microwave for 30 seconds, periodically immersing again to gelatin. So we do until the crown becomes tough.
5. The dried product is removed from the blanks. 
6. Decorate the root of the root of silver or gold color. We apply it to the tassel for dried lace, drier on the windowsill. 
Finished crown decorate nonsense beads, rhinestones or jewelry. All small details are neatly glued with an adhesive gun.
Takes for a prince with feathers
When sewing a suit of a prince for a boy with his own hands, a headdress can be made in the form of a luxurious beret with feathers. Some boys will like this idea more than the crown. Make it quite easy.Materials:
Tissue to the costume and mantle;
Feathers for decoration;
Progress
For tailoring, you can use the specified pattern. 
1. Cut paper parts patterns and transfer to fabric.
2. To lend the details of the Tuly and the bottom, strain on the typewriter.
3. The workpiece to dwell, evenly distributing it along the edging of the beret.
4. Map the line on the typewriter.
Ready takes to twist on the front side and decorate feathers, lace or rhinestones. They are neatly glued to the side of the beret, closing this place a big brooch. 
You can use not only for a prince suit. It is indispensable in the image of a cat in boots, marquis, musketeer and other fabulous heroes.
Supplement the image of the prince needs white golf, shoes and sword.
Sword for prince do it yourself
The sword for the prince is an indispensable suit attribute. It can be made of window staple or wooden rail. And for young children, you can make a sword from cardboard.Materials:
Wooden rail;
Plastic cover;
For swords you need a wooden billet for at least 1 meter. It must be well cleaned with sandpaper and paint the paint silver color.
After the paint is dry, proceed to the decoration of the sword. To begin with, we make a handle. In the plastic lid, we do a hole and wear it on the sword. Paint paint and let dry. We are taking a bright rain or tinsel to the finished sword at the handle.
For young children, we make a sword from cardboard. On dense cardboard, we draw two blanks of future swords and handles. Gently cut them out and glue with each other. Such a sword does not break during the performance.
Ready and dry detail paints, we say a bright rain. Carton sword is ready!
So, from the girlfriend, you can sew a prince suit for a boy in a few evenings, without having special skills. All you need is a step-by-step master class, a desire and a little fantasy.
Prepare for New Year holidays - it means not just to go shopping, picking up the child gifts. To create him a festive mood, my mother needs to turn into the most real Mari-Primer and prepare a prince costume for the Son.
Compounds
This outfit is the perfect option in order to speak at the New Year's matinee. Moreover, not only in kindergarten, but also at school. For this romantic image there are no restrictions on the age of the child. Having decided to make the prince with their own hands, you need to keep in mind that there may be several variations. It is largely similar to suits of such characters like a musketeer, a pack or cat in boots. Therefore, a number of details are quite useful for future speeches.
The main components of the outfit are short pants, a white loose shirt, vest, golf, mantle, crown (takes). You can add it again again with your own hands with a beautiful sword. The fabric must be certainly bright. A tribe's carnival costume looks great, for the manufacture of which is taken velvet or satin tissue. For pants and mantle can be taken blue, green or golden matter. Do not stop on the fabric of red, as it is still better suitable for the royal dress.

Prince costume: Getting started
We start working with sewing such details of the dress as a shirt, vest and short pants.
If you start working on a vest, you got worried about the fact that you urgently need a pattern of a prince costume, not trouble. Any children's T-shirt will help out, the main thing is that its size is appropriate. T-shirt need to outline on paper. After being done by transferring parts to the fabric (above, we said that it should be bright) and abolation, leaving the stacks for the seams. We start sewing vest. After the treatment of Niza, the breakdown and the neck. It remains to turn the finished part.
Prince suit for the boy is a shirt will be decorated. The length of the sleeve does not matter. We take a white dense lace. It is sewn at the bottom of the sleeves. Slicing you need the amount, sew it on the typewriter.
Sewing pants
To sew pants, you can also circle those pants in which the child is convenient to walk. The finished pattern to obtain the desired size is reduced or vice versa increase. When transferring paper parts to the fabric, leave the allowance. Stuffed pants from the wrong side. The upper part of the trousers should be subjected to two centimeters and strain. Measuring the Circle of the waist of the boy, prepare the desired cut of the gum. It is inserted into the top edge of the pants. To decorate the Niza, the pantian will use the lace or in a wet gum, retreating from the edge of five to seven centimeters. This will give pants with volume and grace.
Mantle for Prince

For the manufacture of the mantle, a fabric cut size is 1x2 m and tools for sewing. On the sheet of paper you need to draw a semicircle. After the workpiece is cut, it is transferred to the fabric and cuts out. It is also necessary to carve a couple of tissue bands, their width should be five centimeters. On the one hand, the band needs to make a kant, then smooth and shoot it. It will remain to make a strip to the neck of the mantle, use the machine to lay the seam. The royal sign is what is perfect for decorating the finished mantle. It can be embroidered on the raincoat or will be sewn ready.
Mastery crown
What else will we need from the details, if we are preparing a prince costume? Of course, the crown. The remains of lace and jewelry are the basic materials that will go to the manufacture of a headdress. You also need to stock acrylic paint (its color should be silver or gold), gelatin, hard cardboard.

Cutting off the lace (with a length of determined in advance), you need to sew ends to obtain a ring. To make the crown, the necessary stiffness will need gelatin (and a half teaspoons). To breed it, prepare warm water. We leave for swelling for forty minutes. After we put our part into the solution for half an hour.
Next, we take hard cardboard. It makes a disc from it necessary to pull the lace. Having stretched it, we leave to succeed in the microwave oven thirty seconds, from time to time rearming to the solution of gelatin. And so until I feel that the crown has become tough. Do not worry if something sometimes does not work. After all, quite soon the suit of the prince for the boy is ready.
After drying the product, it needs to be removed from the blanks. To decorate the crown, we brush on the lace with silver or gold paint. We move the headdress on the window sill so that it is completely back. Light beads, rhinestones, jewelry - these things can be perfectly decorated with a finished part. For their gluing it is better to use a glue gun.
Prince in take with feathers
A fairly simple version of the headdress, which for some boys may even be preferable to the crown, this is a luxurious takes with feathers. Be sure to make sure that the fabrics are available (its tone should coincide with the tone of the costume and the mantle), feathers (will be decorated) and brooches. Picture prepaid in advance. After cutting paper parts, they are transferred to the fabric.
An indispensable attribute of a suit is a sword. The necessary materials for its manufacture - this is a window staple or wooden rail. Kids will wear a cardboard sword (it is safer). We make a wooden blank (one meter is its minimum length). Cutely cleaned with sandpaper and paint silver paint. We give paint time to dry and decorate the sword. But first add a handle. We take a plastic cover. It makes a hole. Nadiv on the sword, to dry it and let me dry.

We worked well: the costume printed to fame. Screw materials, a little time, a step-by-step scheme, own fantasy - and the child will definitely remember the New Year's view.
The king costume looks beautiful and spectacular. However, a lot of money will be requested in the store for him, and craftsmen who can sew, easier and cheaper to make it with their own hands. This work only at first glance may seem difficult, but if you remember what a suit consists, then everything will be much easier. And step-by-step master classes only make it easier to work.
To make a New Year's costume of the king, you need to know its main components. From this and you need to repel when working. Most often, carnival costumes consist of:
The main details that distinguish the king from other characters are crown and mantle, which can be put on any trousers and a white shirt. In order for the image to be more spectacular, the bright color shirt is put on the eye and ride with a wide belt.
Tsar costume: how to sew cape
It's easy to carve out the mantle. If you repel from the color of matter, the product can become a princely cloak or a trap king's costume with your own hands, choose a red, gold or blue fabric with ornaments and decorated with a white fur.
To create a mantle, you need to prepare dense red fabric, artificial white-colored fur, brooch or shiny buttons, lining fabric.

Work starts with painting pattern. It is necessary to draw a semicircle whose radius should be equal to the desired length of the product. From the same center, the second semicircle is drawn, the radius of which is calculated, separating the neck of the neck to the doubled 3.14.
The mantle is cut out of red cloth, adding 1.5 cm from all sides to the allowance. Separately on the white fur I cut the pellerine. Next, the details must be sewn. In the neck area you need to perform a fastener: make a loop and sew a bright button or a beautiful brooch. Now the king costume is almost ready, it remains for small - to make a headdress.

Production of the Crown
At the children's matinee, it is impossible to imagine without the crown. The easiest way to buy ready, but the child will be much more interesting and it is more useful to make it independently (with the help of dad or mom). The crown can be done not only from cardboard or paper, for these purposes felt is also suitable. The beautiful product will complement the general appearance and give the boy individuality and sophistication.
It is best to use cardboard in the work. It is more dense and will better keep his shape. A wonderful idea is to use the template or an example of a beautiful product. Decorate the crown with artificial stones, which can be found in jewelry stores.

A beautiful alternative to the crown can be a red hat, destroyed by the same artificial stones purchased in a sewing store.
Original crown of lace
Such a bright element will make the king's costume original, the child will remember it for a long time. Also, such a headdress is perfect for a suit of a small princess. For the manufacture of an exquisite and unusual crown, you need to prepare:
- lace;
- jewelry;
- acrylic paint silver or gold color;
- brushes, pencil, scissors, tape, bowl;
- gelatin;
- cardboard or cardboard tube.
The first thing should be prepared by a segment of lace required length. Ends are stitched and attached to the product rigidity. For this, a 1.5 teaspoon of gelatin is diluted with warm water and leave for swelling by 30 or 40 minutes. Next, the mass is heated in a water bath and placed there lace for half an hour.
Lace is put on the paper base and placed in a microwave for 30-40 seconds at a maximum temperature. Having delivered the product, apply a second sequence of gelatin and again sent to the microwave. Such actions need to be repeated at least 7-8 times until the crown becomes rigid enough.
The crown is removed from the cardboard base and dried in the microwave last time about 30 seconds. When the product is dry, it needs to be painted with a brush in a gold or silver color. The crown is left for drying on the windowsill or outdoor. When the paint dry well, the finished product is decorated with non-heavy jewelry (rhinestones, beads, etc.).

Maintaining a king's costume with your own hands, you need to know about its main advantage: such an outfit is suitable for both the baby for 4 years and for children of senior or adolescence. The choice of such an image is an excellent option to look bright, smart and effectively.