Beautiful and well-groomed nails always make a good impression, so every woman takes care of this. In almost every women's cosmetic bag you can find nail care products - nail files, nail polish removers, varnishes, etc. But this is not enough to keep nails always in perfect condition. Often they break, exfoliate, and then their appearance leaves much to be desired, despite all efforts.
In this case, build-up will save, which will give the hands a perfect look, despite all their problems. You will not need to worry about the imperfection of your manicure, the nails will be of sufficient length and with a beautiful design.
What is acrylic extension
Acrylic build-up is considered the most acceptable way. Many beauty salons offer fake nails, but you can actually do a great job at home if you learn how to extend your nails with acrylic. Try to make your pens look perfect!
The substance acrylic is a polymeric material, which contains derivatives of two acids - acrylic and methacrylic. There are many types of acrylic, it depends on the reagents used. As a result of the interaction of various substances, a durable transparent material is obtained, which makes nails beautiful and strong. A new nail is formed from this material, and it does not have a negative effect on the nail plate. Acrylic nails last for a long time.

This substance was used in manicure quite by accident. One dentist wanted to strengthen his nail with a substance that he used to treat teeth. And he succeeded. When you visited the dentist's office, you probably remember that specific smell.
Since then, acrylic extensions have existed in many salons. Now every girl can learn how to build up acrylic nails at home. The polymer and monomer in its composition give this substance a special plasticity and speed of drying, just like a tooth filling. But still, do not forget about safety precautions and do not allow the substances used to enter the respiratory or vision organs. This could damage them.
Recently, they prefer to use a monomer for building, as their smell is not so persistent. A type of acrylic called ethylmethacryate is the safest material, but its price is higher than other materials used for building.

Any woman can make acrylic extensions if she has all the tools necessary for this. In fact, the nail extension technology is pretty simple. There are special frames or tips that serve as a base and are attached to the plate itself.
For acrylic building paper blanks can be used - building forms. They are removed when the acrylic dries. Such forms are more often used in salons, since it is easier to correct them there. At home, you will need an assistant who will make the correction. It is quite difficult to perform this procedure with one hand alone. Therefore, it is better to take ready-made tips that you can simply stick on easily.

Required materials for building
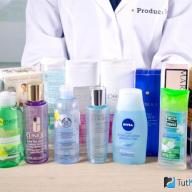
To make acrylic extensions yourself, you will need to visit a specialized store and purchase the following materials there:
- acrylic powder is a fast-setting substance that can be both transparent and multi-colored. This makes the manicure especially attractive;
- liquid serves for polymerization of acrylic coating;
- primer promotes better adhesion of acrylic to the nail. If the extension takes place on tips, then this tool is not necessary;
- solvent - a liquid that removes the previous coating;
- the decontamination agent helps to effectively clean the surface;
- brushes are one of the main tools, their shape depends on the preferences of the master;
- monomer;
- tips and forms;
- tipsorez - a tool that allows you to reduce tips;
- files (one of them must be made of an orange tree);
- polishing block to adjust the nail plates.
There are whole sets that contain all the necessary tools for building.

Acrylic nail extension step by step
Acrylic nail extension on tips
There must be enough free space for the procedure, otherwise it will be difficult to carry out. All necessary items must be prepared in advance. The light needs to be bright enough, so take care of a bright lamp to illuminate your work.

- The skin of your hands must be clean, so wash them thoroughly and wipe them with a degreaser or lotion containing alcohol. This will degrease the surface of the skin, which is quite important for further work.
- Take care of the cuticle removal. Orange tree sticks perfectly remove it without a trace.
- The surface of the nail should not remain shiny, so it must be polished with nail files. For the tips to be well fixed, the nail plate must be rough. But do not overdo it, too much treatment can damage the nail. Only work one way with the files to prevent this from happening.
- Tips come in a variety of shapes, so you can choose any shape you like. Even if the tips are a little wide, this is not critical, since the file will help correct all the inconveniences.
- Tips need to be glued to the nail plate tightly, leaving no empty spaces.
- Long tips are cut with a tip cutter. If you are doing extensions for the first time, then do not make your nails too long. Let them be half a centimeter longer.
- With a file, you can give any shape to the nail.
- Primer your nails and let them dry.
- Get brushes and acrylic powder. The brushes need to be kept in monomer, lumps are made from the powder. The lump needs to be crushed on the nail plate. It is necessary to make small strokes, slightly pressing, a thicker layer should be obtained at the edge of the nail than in the cuticle area. Tips should be well glued to the nail so that they do not peel off during work.
- The brush and monomer will help to make the plate absolutely smooth, so that later on it will be easy to apply any design to it.
- Finish the surface with files and buffers when 100 percent dry.
- Before you design, paint your nails with clear polish. Do not place your hands in too strong sun to prevent the acrylic from turning yellow.
- After all this, you can create any nail design.

Extension of nails on forms
Consider how to build acrylic nails on forms, step-by-step instructions will help you figure it out.
- Wash and disinfect hand skin. Rough the nail plate with a file.
- Remove cuticles with a fine grain file.
- Primer your nails until they have a beautiful shine.
- Take the mold and slide it over your finger so that it is at the corners of the nail. This way they will hold on tighter. In the middle of the nail, the shape must be pressed harder.
- Primer the plate with the mold again. Then apply acrylic on the brush and spread it.
- Two balls are applied to the plate itself, one and them to the cuticle.
- When the acrylic is dry, the mold is removed, the plate is leveled. Use a coarse file to work the sides of the nails and then the end. Then the surface must be properly sanded with a fine file.
- To avoid scratching, take the oil and process the nail plate. See how the work done looks in bright light.
- Apply clear varnish.

Positive and negative sides of building
Positive sides
Many girls doubt and think about how to build nails, because they can be done with acrylic or gel. Consider the positive aspects of acrylic coating:
- There is no need to paint your nails all the time.
- Acrylic adheres firmly even when applied in a thin layer, which makes it look more natural.
- Removing the acrylic coating is quite easy and the nail remains intact. A special liquid dissolves the composition.
- All cracks and irregularities are quickly eliminated without the need to replace them.
- Any pattern and design can be applied to acrylic nails.
- Acrylic extensions are also done on the legs. As a result, much less money is spent on manicure and pedicure, since there is no need to do it too often.
- Such material gives room for imagination and imagination. To carry out building with acrylic, you should look at photos of various drawings, and you can embody one of them.

Undesirable consequences of building up
- If cheap materials are taken for acrylic extensions, then the nails then have an unpleasant odor.
- After a while, acrylic still leaves. In this case, the gel is more persistent.
- Some components cause allergies.
- Too much housework can cause tarnishing of the nail plate, which will force the use of shiny varnishes in addition.
Contraindications:
- Damage to the nail plate
- fungus,
- intense sweating
- treatment with hormonal pills,
- bronchial asthma.
Post-extension nail care
It is necessary not only to know how to build up nails with acrylic at home, nor how to take care of them later. They require adjustment every two weeks to maintain their beautiful appearance. You should carefully look after the cuticle, get rid of excess skin in a timely manner so that it does not spoil the whole effect of a beautiful manicure. Nails grow in two weeks, so they need to be filed.

When you decide it's time to remove your extended nails, you should treat them with nail polish remover to get rid of them. Next, cut short with scissors. To remove the acrylic coating, you will need a special liquid for this. It is necessary to maintain the nails for a few minutes in this liquid. Orange wood sticks can be easily removed by liquid acrylic.
After that, the nails will take a little work. Use special regenerating agents that will care for them and promote their health to restore the outer layer. Glycerin, oils, aloe, vitamin are great for this. Chamomile baths soothe the skin and promote quick recovery. It is better to let your nails rest for a while and do not use varnishes and any other substances with acetone, do not file them.
Many visitors to the site are interested in how to build up nails with acrylic at home and are asked to post visual photo and video lessons with step-by-step training on nail extension with acrylic for beginners. Well-groomed and aesthetic nails are an important part of the image of any woman who looks after herself. We are accustomed to the fact that nail extension is a procedure that is performed exclusively in beauty salons. However, it is possible to build up nails in a comfortable home environment.
Most often, nails at home are extended using gel or acrylic. Both techniques are in equal demand among women. Today you will find out what materials for nail extension are needed to perform a home manicure with acrylic. And clear photo and video tutorials for beginners will help you build nails quickly and without mistakes.
Acrylicdries quickly enough. A flawless manicure will look like real nails. The special powder consistency brings the nail color as close to natural as possible. Another plus of acrylic is that it is easy to remove. A specialized solvent liquefies the mass, after which all that remains is to erase everything. In the process of extending nails with acrylic, you will feel a specific smell, like in a dental office, but after a while it will disappear.
If you decide to build up nails with acrylic at home, first of all, you should buy everything you need in the process of work. Decide what tools you will use: tips (false nails) or special molds. After that, you can start preparing for the procedure.
You need to buy the following building materials: tips, liquid and form in which acrylic will dissolve, two files - for polishing and for filing a decorative nail, acrylic brush (only natural). You will also need acrylic powder, it can be transparent, pink, or white. As for the French manicure, white powder is perfect for it, plus you will need to buy a pointed brush. On the table there should still be a liquid (alcohol) removing varnish, a small glass dish, cotton swabs.
PHOTOS AND TIPS FOR BEGINNERS:
WHAT IT IS IMPORTANT TO KNOW ABOUT THE HOME EXTENSION OF LONG NAILS WITH ACRYLIC .
A PHOTODIFFERENT VARIANTS OF ACRYLIC NAILS WITH FASHIONABLE, STYLISH DRAWINGS, WHICH ARE PERFORMED IN HOME CONDITIONS .
Step-by-step photo master class for beginners:
We start the procedure by preparing the nail plate. If it is in good condition, just cover the surface with acrylic and at this time the nail becomes longer. All residues of varnish must be removed, as well as burrs, hardened cuticle particles. The plane of the plate with which we are working must remain absolutely clean. Then, with an ordinary nail file, we form the desired shape of the nail, not forgetting to leave at least a millimeter of its overgrown part, so that it is easier to fix the shape. Next comes the polishing and degreasing of the nail surface. Then the form (tips) is fixed. Dip the brush in a liquid that dissolves acrylic and acrylic powder and cover the nail with a mixture. When everything is dry, the form must be removed. The procedure is over and you now have beautiful acrylic nails. As you can see, there is nothing difficult in home nail extension.
Today, acrylic nail extension technology has made a significant step forward and is in no way inferior to gel extension. It is safe to say that every woman can grow nails with acrylic at home. If you have never done acrylic nail extension at home, then the master classes that are posted on this page will help you complete this procedure yourself. After the formation of long nails, you can easily apply pictures on them, paint them with beautiful drawings and patterns. Below you will find detailed information on how to grow acrylic nails at home and what materials you need for the procedure.
Now you can build your nails yourself at home, saving money on the services of beauty salons. Prepare for the procedure and purchase all the materials necessary for the procedure, and video tutorials for nail extension with acrylic will help you to make graceful and beautiful nails without leaving your home!
VIDEO MATERIALS:
Acrylic nail extension has become an integral part of the life of the vast majority of the fair sex. For various reasons, many of us do not visit salons, so it is important to know how to carry out this procedure yourself at home. In fact, there is nothing difficult in this, you just need to follow all the rules, and over time, both practice and experience come on their own. 
What you need for acrylic nail extension
In fact, the choice of materials required for building is very large. It is worth saying that it is better to choose products from one manufacturer, since their compatibility with each other will be maximum, and thanks to this, the manicure will last much longer.
List of funds that are required for work:
- A medium hard file, buff.
- Depending on your preference, shape or tips.
- Acrylic Powder. You can choose it transparent or in different shades of beige.
- A liquid monomer called liquid, which is best chosen from the same company as the powder.
- Primer. Needed in order to process the nail before applying a layer of acrylic.
- Brushes for applying an acrylic layer. It is better to stock up on options with different sizes, because a small one will be inconvenient to apply on the thumbs, and vice versa. You also need a large brush to remove dust after cutting the smooth layer.
- Two glass containers into which liquid will be poured.
- Finishing gel polish. It is required to complete the extension procedure.
Tip: Choose natural bristle brushes as they are smooth, smooth and absorb liquid well. This will ensure comfortable application and maximum results.
Method advantages
Acrylic build-up has a lot of advantages. The most obvious ones are:
- due to the composition of the coating, acrylic nails have a rather high strength: they are difficult to break, so with such a manicure you can safely do household chores and perform other active actions;
- in case of any damage, they are easy to fix: there is no need to carry out a new build-up from scratch, it is enough to add a broken piece using the form;
- acrylic nails have good elasticity, which makes them look like natural nails. They also do not have a deforming effect on their own nail plate;
- one of the main advantages is ease of removal: just hold your nails in a special tool, and they will soften.

Step-by-step instructions for beginners to build at home
Before you start building acrylic at home, you should consider this process step by step. The instruction will be useful not only for beginners, but also for experienced craftsmen to make sure that every time they did everything correctly or just to repeat the information once again.
Read also 7 most beautiful women in Russian history
On forms
Extension with acrylic on forms is well suited for those girls who have at least small nails of their own. This is necessary so that the free edge protrudes slightly, because it is under it that the form will be glued. If the nail is too long, it should be trimmed or filed, otherwise the extension procedure becomes more complicated. With the help of forms, manicure turns out to be more natural, since this method involves an individual selection of the shape for each finger. It is only worth noting that to carry out this procedure, you need to have at least minimal experience and skills, otherwise you risk getting not the result you expected. But no one bothers to resort to the help of relatives and friends.
- The first thing to do is to wash your hands with soap and then disinfect with a special spray. It is necessary to remove the cuticle and remove the burrs. Then the nail plates are sanded until the shine disappears on them. But note that this must be done with extreme care so as not to cut off too large a layer. Further, the forms themselves are glued under the nails, which can be made of various materials: plastic, metal or paper.
- The next step is to apply a degreaser, and after it dries, a primer. Next, the nail itself is modeled: the product is applied with a brush in small strokes. Movements should be directed from the cuticle to the edge. Please note that the acrylic gel layer should be thicker in place of the natural nail, and thinner on the plate itself.
- Each layer dries in about 4–5 minutes. It is recommended to perform at least 4 applications in order to form the nail with sufficient strength. It depends not only on the thickness of natural nails, but also on the quality of the gel used. Once all layers are dry, you can start filing and sanding. You can apply powder that has a color to create a jacket. Next, a transparent gel polish is applied and dried in a lamp.

Acrylic nail extension on the forms is done. If desired, you can apply color gel polish and get a manicure.
Weakened and thin nails are strengthened according to the same principle. At home, you can carry out such a procedure, following the same steps, only without forms. Natural nails will thus become denser and stronger, less breakage and less damage to the manicure.
Work on video
On tips
Nail tips are plastic templates that are glued to the edge of the nail, creating a surface for the acrylic to be applied. They are different in the presence of a contact area, in shape and color. There are three parts in tips: the free edge, which is usually the thinnest, forming the tip, and a space in the form of a notch that overlaps the nail itself. It is important to choose exactly those templates that fit your type of nail, otherwise the procedure will not work. 
So, let's look at the process of performing the build-up step by step:
- Before starting the procedure, you must disinfect your hands with an antiseptic spray. This is necessary in order to protect yourself from various infections caused by bacteria and fungi. Next, the cuticle is softened with an emollient or bath and removed with an orange stick. Degrease the nail plate.
- Use a file to form the free edge of the natural nail. Keep in mind that it should not protrude much, 1–2 mm should be sufficient. Grind the nail plate until it becomes matte. This must be done with extreme care so as not to cause damage. The resulting dust is shaken off with a large brush.
- The most important stage is the choice of tips. There is a rule that their width must necessarily be the same as in the central part of the nail. Also, make sure that the shape of the free edge matches the notch in the plastic template. Tips must necessarily overlap the nail plates from one corner to another. After choosing the best option, they are glued to the nails. The fixing agent is applied to the back of the template. Then it is slowly applied and pressed firmly against the plate at an angle of 45 °. After 15–20 seconds, the tips are already firmly attached. If there are glue residues, remove them with a lint-free cloth.
- The required length is formed with the help of the tip cutter. You need to trim the templates with a small margin, because when filing, they will be shortened a little more.
- The file is given the desired shape. The edge of the transition of the template into a natural nail must be carefully cut down so that it is not noticeable that the tips have been glued. There should be no gaps when you slide your finger across the plate. The nail is coated with a primer, which evaporates after a few minutes. After this step, you can proceed to the next.
- Acrylic is gently applied with a brush. Layers must be made at least 4. After the plate has reached sufficient strength, apply a finishing gel polish and dry it in a UV lamp. The sticky layer is removed with napkins.
Thus, nail tips are extended at home.
Video instruction
Which is better: gel or acrylic
Recently, there has been more and more controversy about the harm of acrylic coating. There is a myth that its composition, in contrast to the gel, harms the nail plate. In fact, this is not true, since they are the same in effect.
Many people choose acrylic because it is easier to apply because the gel tends to run. In its consistency, it is similar to ordinary varnish, which is sometimes not very good for forming a thick plate, since you have to make too many layers. Also, for its hardening, a catalyst is needed - the light of an ultraviolet lamp. The main advantage of gels is the absence of any odor.
Acrylic is a powder that is mixed with liquid and monomer, as a result of which it turns into a viscous, thick mass. It dries quickly in air; no special agents are needed to harden. But this adds inconvenience to the application: you need to work with it quickly. Acrylic has a strong enough smell, not for everyone.
Everyone can answer the question which is better on their own, since everything is determined purely by the convenience of working with this or that tool.
Photo gallery: choosing a design


Every woman dreams of beautiful, neat, well-groomed nails. Thanks to such a modern procedure as nail extension, women have the opportunity to prolong their beauty by about 3-4 weeks. It is worth noting that one of the advantages of nail extension is that the procedure can be easily performed at home, only you need to purchase all the necessary tools and means for this.
Pros and cons of acrylic extensions
Any artificial materials, including acrylic nails, have positive and negative sides in their arsenal that every woman, girl who is going to make her nails more beautiful with this procedure, needs to know about.
So let's find out what are the benefits of acrylic extensions.
- Acrylic is able to dissolve well in liquid (this is the name of a special liquid). Thanks to this, it is possible to easily remove the nails themselves or unnecessary build-up layers. To do this, you just need to soak them in a solution. Then the acrylic coating is removed using a napkin or orange stick.
- Extension with acrylic makes nails stronger, stronger, which allows you to safely clean, wash, and do other household chores.
- Time is saved. Simply put, a manicure does not require a daily update.
- Nails look natural. There is an opportunity to constantly experiment with patterns, painting nails.
- Acrylic is able to cure on its own without the help of an ultraviolet lamp. In addition, it protects nails from the negative effects of the environment.
- In the event of a nail breakage or crack formation (which happens quite rarely), it is possible to repair it.
Disadvantages, contraindications for building with acrylic
Such build-up is prohibited for those women and girls who suffer:
- bronchial asthma;
- allergies;
- diseases caused by fungi.
Let's list the main disadvantages of artificial nails extended with acrylic:
- For some time after the procedure, they have a persistent specific smell.
- If there was a crack on the nail plate, you will have to do the extension again.
- Extension with acrylic should not be worn for a long time. The reason for the ban is that the natural nails that grow on you do not breathe at all under the covering made of artificial material. This factor causes considerable harm to health.
- When you need to use decorative varnish to cover the nails extended with acrylic, resort to using a remover that does not contain acetone in its composition. As you know, acetone has a bad effect on artificial nails, contributes to their fragility and dryness.
We present to your attention a PHOTO, where you can consider various design options made on nails that have undergone the acrylic extension procedure.
Materials
To start building, you need to prepare special materials. The master chooses the brand of ingredients that he thinks is the best.
The kits should include:
- Tips or forms. Which of them are preferred for women, says the master. Forms are Teflon (used many times), paper (used only once). Tips are glued to nails. They represent an extension of the nails. As for the forms, after the build-up is over, the master will certainly remove them. Other materials that are needed for the procedure include:
- Acrylic powder, with all kinds of shades or colorless.
- Monomer of liquid consistency. Its name is liquid. It is best to buy the same brand as the acrylic powder.
- A special liquid used to treat the nail before applying acrylic. Its name is primer.
- 2 glass beakers required for liquid. In any of the glasses, the specialist pours the liquid necessary for the work process. It is he who prevents the formation of sediment in the main tank. In the absence of a glass, you can resort to a pump designed to supply fluid in the required quantities. In the second glass container, it is worth placing the brushes during a break in the work process.
- Brushes of different sizes for acrylic. Brushes should have a smooth, even bristle. They should also absorb liquid well.
- Files, blocks for polishing. It is necessary to take files with varying degrees of abrasiveness. In order to form the edge of the marigold when building, you should take a very hard file. To remove the natural shine, you need a very soft nail file.
In addition to the above, you will need:
- degreaser;
- acetone-free brush cleaner
- nail polish remover (no acetone);
- a tool that softens the cuticle;
- antiseptic;
- varnishes;
- oil for cuticles, nails;
- respirator;
- orange sticks.
In stores specializing in the sale of such goods, you can find ready-made building kits.
Acrylic nail tips

This method is quite simple even for a beginner. You need to take tips of such a thickness that will suit your nails. Then you should give them the desired shape and glue. The glue is applied in the smallest quantities, then spread evenly over the edge, carefully.
Tipsu is applied to the nail, hold until it sticks. Then they make the natural nail area less noticeable using polishing. With its help, smoothing of unevenness that has at the gluing site is performed. They process the nails, start building with acrylic.
Forms for building
The form should be put on under the nail, or rather under its free edge. Therefore, it is necessary to bend it between two fingers: thumb and index. It is necessary that the form completely goes under the corners of the nail. Paper, used only once, is not very rigid. For this reason, some experts make it harder, using, for example, another mold.
In order not to face the fact that the acrylic mixture is clogged, you should not leave even the slightest gap between the mold and the marigold.
The Teflon mold is also placed under the nail. Wire is used for fastening. A natural nail is treated with a primer. It should be noted that the primer is not applied to the form itself.
At the end of the acrylic building procedure, the mold is removed. To do this, look for a free edge, pull it towards the palm, then pull it out completely.
Polymer balls are applied on top of the nail. Large ones are put on the area where the natural nail ends, medium-sized - on the free edge. The smallest are located near the cuticle.
In order for the nails after building with acrylic to have a natural look, you need to properly distribute the acrylic, push the ball with the help of poking movements. The acrylic layers closer to the cuticle should thin out.
Acrylic nail extension technology
The duration of the extension is approximately 2-3 hours. The technology is as follows:
- Disinfection is carried out, that is, the treatment of the hand, the nail plate. This is necessary in order to destroy harmful microorganisms. These include bacteria, fungi, etc.
- A soft file is taken and the surface of the nail is treated with its help. It will improve the connection with the acrylic mass, as well as eliminate the natural shine.
- Then the nail plate should be formed. For these purposes, they resort to the fact that you can use your nails, strengthen the molds that are removed, or resort to gluing tips. The master will advise the best option. Then a primer is applied to the nails in one layer. Remember that the primer is a preparatory layer before acrylic coating.
- Next, a layer of acrylic is applied. If you mix the two composite materials, you get a kind of mass of plastic consistency. It hardens quickly under the influence of air. In order to obtain an artificial layer, you should distribute the mass over the surface with confident, quick movements, creating an even, thin layer.
- Then the alignment of the nail plate is performed. For this, files are used with varying degrees of abrasiveness. Use nail files to remove existing irregularities, then grind the surface.
- The final stage is registration. Cuticle oil is used to treat cuticles and nails.
Next, grinding is performed again. A drawing or varnish is applied. In the modern world, it has become popular to apply a layer of gel over acrylic nails. Such a manicure with a transparent layer, which is applied on top of the nail plate, better protects against the effects of all kinds of external factors.
Please contact only experienced professionals!
Leave your comment
Svetlana Markova
Beauty is like a precious stone: the simpler it is, the more precious!
Content
Recently, this procedure has become in demand among many women. Just 1-2 hours of time - and you have beautiful, well-groomed, strong and strong nails. Any girl can become a master of creating artificial manicure by studying the technology of this process.
Acrylic nail extension technology
Studying the technique of nail extension, it is important to follow the sequence of the procedure step by step. First you need to decide how to build up: on forms or tips. Choosing the last option, select them according to the shape and width of the nail plate, glue them with special glue. The lower molds already have an adhesive base, so it is only important to stick it straight.
Acrylic nail extension technique consists in the interaction of acrylic powder (monomer) and liquid, in which it dissolves, forming a ball. It is applied to the prepared surface, stretched from the middle to the edges. Several such balls will be required: until they are completely covered. Then a rigid nail file is given the desired shape, length. The last steps are grinding and polishing.

It is easier to remove the acrylic powder coating than the gel coating, which can only be cut off with a nail file. The powder dissolves perfectly with the help of a monomer (liquid) - liquid for removing artificial turf. Sometimes acetone or nail polish remover is used for this purpose. You need to hold the nails in the solution and remove the remnants with an orange tree stick, then strengthen them.
On tips
It is better for beginners to choose nail extension with acrylic on tips: it is easier to model the shape, the process takes less time. The tips are made of plastic, have a contact area on the inside, which is attached to the nail plate with glue. Next, the desired length is selected, and the excess part must be cut off. Tips come in different colors, you can make a transparent manicure, white, colored jacket.
Coating the nails with acrylic helps to strengthen the plate - you can feel free to do any work around the house. When acrylic build-up is performed on tips that differ in size (from 1 to 10), the shape and size are selected strictly individually for each client, depending on the size of the nail plate. There are tips with a ready-made design, which allows you to make any manicure original.
On forms
It is a little more difficult to build nails with acrylic on forms that are made from two types of material: paper and teflon. Paper forms are made from disposable materials and can be discarded after use. There are a number of advantages in their application: it is easy to work with them, to give any shape to a manicure, they have an attractive price. Teflon molds are reusable, have a wire frame, with which they are attached to the plate.

Acrylic nail extension at home
After studying the step-by-step video and photo lessons, instructions, after completing the training, any woman can master the acrylic nail extension at home. Before building them up for a client, ask about his health. Such a system for creating an artificial manicure can harm girls with herpes, diabetes mellitus, and fungal diseases. It is necessary to abandon manicure and people with allergies to harmful bulk substances and components of materials.
Start by preparing the plate: move the cuticle aside, remove the top layer with a nail file. Attach the form or glue the tips, give the desired length, go over it with a file. Degrease the surface, apply a primer. Dip the brush in monomer and then in acrylic for nail extension. When a ball is formed, attach it to the middle of the plate, distribute it towards the edges with pressing movements.
Repeat this process until complete coverage. In the middle, the layer should be thicker, and come to naught towards the edges. At the end of the procedure, dip the brush in monomer and smooth the surface with patting movements. When the coating is dry, remove the molds (if any). Start filing, flattening the plate. The final stage is grinding and polishing.
An important point is the process of removing such a coating. To do this, you need a cleaning agent: a cotton swab is moistened in it, applied to the plate, and everything is wrapped in foil on top. After 15-20 minutes, all materials are removed along with the coating. Use a manicure spatula if necessary. After removal, you need to properly care for the nail surface. Good means for strengthening it are glycerin, aloe, lemon oil.
What you need for acrylic nail extension
If you have carefully studied the technology, video and photo lessons, make a list and buy the necessary inventory, materials for nail extension with acrylic: liquid, primer, brush, nail files, tips (forms), grinder, orange sticks, glue, acrylic for nails. You can also purchase a ready-made set in online stores, where you can see photos of the products offered.