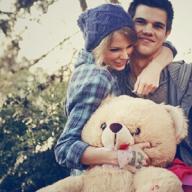
Children love to dress up in costumes of their favorite characters. literary works, cartoons, movies. One of the most popular images for many decades is the brave Indian. New Year's carnival– a place where everyone wants to stand out with their exclusive outfit. We suggest you do it yourself new Year costume Indian for your child. The presented master class will tell you in detail how to make an Indian costume for a boy, but on its basis you can make a girl’s Indian outfit if you wish.
DIY Indian outfit
A complete set of Indian attire consists of two main parts: the costume itself and the original headdress made of vertical feathers - a roach; without it, the image of an Indian warrior or a wise Indian leader will be incomplete.
How to sew an Indian costume?

 |
 |
Please note that the Indian costume involves a lot of decor! Used as finishing different kinds braids, small wooden decorations, beads, beads, coins, etc. Moreover, the processing of accessories is quite rough, as required created image, and the colors are discreet, corresponding to the ethnic style to which the outfit belongs.
 |
 |
DIY Indian Roach
The costume will be incomplete without the traditional Indian luxurious roach. Despite the apparent intricacy, making an Indian headdress with your own hands is not particularly difficult.

Of course, it’s great if you have real bird feathers to make a headdress. They can be painted with aniline dyes and sewn on wide braid. But if you don't have large feathers, you can make a roach with paper decorations.
This is the easiest costume to make. It can be made even without availability sewing machine simply by sewing or even gluing the necessary parts. This costume consists of pants or shorts, a T-shirt, a cape and a headdress.
In order to make DIY Indian costume you will have to sacrifice one of the T-shirts and pants or shorts.
It is better to choose a T-shirt in sand, yellow or another warm color. On the sleeves and bottom of the T-shirt, cut off the hem seams, and cut the edges with fringe 3-4 cm long; you can also sew fringe on the side seams of the T-shirt.
Pants or shorts for DIY Indian costume It’s better to choose beige or brown ones too. Long fringe and braid are sewn onto the side seams.
Sew a round or square cape around your neck from linen or other material with a similar texture, cut out a square. It is positioned diagonally so that two corners of the square fall on the front and back of the future Indian, and the remaining two cover the shoulders. A hole for the head is cut in the center of the square. The cape is trimmed with fringe and decorated with feathers, braid, beads and beads.


And of course, DIY Indian costume wouldn't be complete without a feather headdress! Prepare a wide elastic band (so that the headband does not slip off the head) and sew feathers onto it, overlapping one another. Sew patterned braid, tassels, beads… on top. It is better to secure the headdress on the head with ties, because the Velcro gets tangled and pulls the baby’s hair. If you don't have feathers, don't be upset, just cut a wide feather from tissue paper in the center, stick a piece of straw or thin wire and cut it thinly, simulating fluff. You can make a leader's feather cap using the following video:
For shoes, preference should be given to beige or brown moccasins.
Complete your Indian costume with your own accessories: baubles and leather bracelets, a bow and arrow or a tomahawk. And of course, war paint to intimidate the pale-faced!

You may like:
- TURN A BORING T-SHIRT INTO AN EXCLUSIVE OPTION...
- SHE DIDN'T WANT TO PART WITH HER OLD FUR COAT, AND...
- IDEA FOR KNITTING LOVERS. JACKET WITH SPOKES IN TECHNIQUE...
- BOHO STYLE: PATTERNS FOR DRESSES, SKIRTS, SUNRAFANS,…
What is an Indian without a headband, a bow and feathers?
It would seem that the Indian costume contains a real secret, a peculiar complexity, which forces you to buy it in a specialized store. However, this is far from the case and you can easily make an Indian costume with your own hands, with only a minimum of effort. All that is required in this case is a little free time, materials at hand and a drop of imagination, relevant for any such event.
Option one - a headdress made of real feathers
In order to create a high-quality, and most importantly original Indian headdress, the following materials will be needed:
- bird feathers
- Ribbon
- Paint in several colors
A set of white feathers is selected so that you can easily color them later and create a design of the desired color, adding a bright palette of shades. For these purposes, the optimal solution may be chicken feathers, or, as a last resort, ordinary pigeon feathers, which can be found everywhere; this should not pose any problems for parents who decide to sew an Indian costume with their own hands.
The ribbon is selected blue to ideally contrast with other design elements, but you can make a choice in favor of something completely different color scheme, the main thing is that it fits perfectly with other elements of the design. The feathers will need to be painted in different colors, blue, red, green, yellow, some will need to be left white, without any changes. Using scissors, light processing of both feathers and ribbon is carried out until the desired shape of the product is obtained, after which the structure is easily fastened together using glue. Another point worth mentioning is that the tips of the feathers need to be trimmed to make it easier to strengthen the structure in the future.
As a result, it can be created original costume DIY Indian for a boy or girl without much effort.
Option two - a headdress made of plain paper

The second version of the Indian headdress involves the creation of a headdress, which guarantees the use of a relatively small reserve of time for its production. What’s remarkable is that to create the design you only need a set of colored paper, glue, and scissors, and you can do all the work directly with your baby.
Initially, the set of feathers itself is cut from colored paper; each one must be different color, which will allow you to create a real rainbow extravaganza on your child’s head. You can make the central feather slightly larger in size than the rest so that it stands out against the general background of the headdress. The optimal solution when thinking about how to make an Indian costume with your own hands would be to cut feathers from paper so that they completely imitate the original product, which will take a little time and effort.
A cardboard hoop is also prepared, onto which feathers made of colored paper are later attached. For these purposes, ordinary glue is used, which can reliably fasten the structure.
Option three - headdress and powerful bow

You can try to slightly diversify the overall style of the design, adding a bright and stylish look to it that will catch the attention of others, and achieve a complete combination with the chosen image.
Headdress
In fact, the headdress is no different from the options presented above, with the exception that a fabric headband can be used as a base, onto which feathers of various designs are also attached. It is worth noting that there can be a different number of feathers, from four to ten, depending on the availability of time and the available capabilities of the parents. As the photo shows the DIY Indian costume, the design can turn out impressive in its quality characteristics and design, which will make it unique. The elements are connected in the same way using standard glue.
Onion
The design of the bow can also be different, depending on the preferences of the parents. It is based on ordinary branches and twigs, which are specially cleaned, additionally processed and a ribbon is attached to them in the area of the connection, the place where the bowstring is held. For the arrowhead, ordinary fabric or paper specially designed in the appropriate form will do just fine. On the other side, plumage is specially created, for which pigeon or chicken feathers are traditionally used.
Fans of American history and culture will appreciate this image. A brave and independent character, a native of the American continent - an Indian. Choose this outfit for the holiday and learn a little about the traditions and customs of ancient tribes. You can buy a ready-made outfit. But we will tell you how to make an Indian costume. It's easy to do and looks great! You can also create a South Asian outfit using a similar method.
Stage 1: Tunic
Neckline. The clothes of the Indians are made in brown, just the same color as the bags we are used to. Get one, a pillowcase or a small duvet cover in a matching shade will also work. Cut out an oval neckline. The hole should be wide so that you can put the item on.

Making armholes. Make oval cutouts for the arms on the sides of the bag. Check if there is enough room for your arms and if you are comfortable with such an armhole.

We decorate the armholes with fringe. To make an Indian costume with your own hands, you need to decorate the armhole. For this we will make a fringe. Cut the fabric around the entire circumference of the neckline, to a depth of about 4 cm.

Adjusting the length. Try the tunic on the person who will wear it. If necessary, trim off excess length.

Decorate the bottom edge. Fringe will also come in handy here. Similar to the armholes, cut evenly across the bottom. We recommend making cuts about 7-8 cm deep.

Decorate the neckline with fringe. Prepare the fringe in advance - buy it or make it yourself.

Decorating the tunic. We offer simple and quick way how to make an Indian costume for a girl, decorated in ethnic style. To do this, you need to sew on flaps or decorate it with triangles.
To decorate the costume, you will need special clothing paint, sew on patches - fabric and sewing equipment. Let's focus on the first option.
To paint a girl's Indian costume with your own hands, get a piece of foam rubber from which you can cut out several triangles. Make the size of the figures within 4-6 cm. You can decorate their edges with large teeth or leave them even.
Prepare paints of different colors and pour them into a container.
Dip the foam into the paint and press it onto the tunic. Repeat the action, thus drawing triangles in a row. Step back 12 cm from the neckline, let the figures be at a distance of about 2 cm.
Duplicate the row by changing the direction of the triangles. If the first one was facing up, then this one will “look” down. Also move the triangle halfway across the shape, meaning the bottom one will be located exactly halfway between the top two.
Cover both sides of the tunic with triangles.
Stage 2: Pants

Find unwanted pants to match the color of your suit top. It will be ideal if the colors of the items completely match.

Making stripes from fringe. Prepare two long strips of fringe along the entire length of the pant leg.

Attach the finished fringe to the pants. You can glue it or sew it. Attach the fringe along side seam along the entire length of the trousers.
There is room left on your strip down to the cuts to attach it to the pant leg.
Stage 3: Selecting accessories


Choose a belt. You can do without it, but using a belt, you can emphasize your waistline and make your look more sophisticated and stylish. The belt will be over the tunic, at waist level.
Find a ready-made belt Brown made of leather or suede.
You can also use a rag belt or a piece of rope. In this case, take enough material to tie it beautifully.
Stage 4: South Asian Indian Costumes

Sari. This is a draped cape, the ethnic wear of Indian women. They also wore massive bracelets along with their saris. precious metals, headbands and low-top sandals.

Let's make lungi. These are pants that look like a cape. They can also be used if you want to make a DIY Indian costume for a boy. A loose shirt is worn over the lungi.
Buy a ready-made outfit or make it yourself. It will be easier than making an Indian costume with your own hands. You will need a piece of fabric the length of the trousers, so that you can wrap it around itself four times.
Wrap starting from the middle of the back and bring the ends to the front.
Make sure the material is wrapped tightly around the waist and drape it nicely.
Now the edges of the material must be tied into a tight knot and tucked into the belt.
If you decide to do baby suit DIY Indian or South Asian outfit, the wearer should feel comfortable in it. Try on a ready-made suit or put it on a child and make sure it is comfortable. If you are not sure that the knot will last long, wear tight knit shorts before tying the lungi.
Important!
To avoid falling flat on your face, take an interest in the traditions of the Indians. Knowing the history and customs of the people, you will avoid awkward situations with their representatives. Remember that a DIY Indian costume is traditional clothes an entire culture. Handle it with care, this will show respect for the people.
You will need
Ready-made fringe or suitable material for it
Boots, moccasins, shoes or sandals
Hot glue gun
Today I’ll tell you how to make an Indian headdress with your own hands. Moreover, on the nose New Year's Eve parties. The Indian costume is very popular among children. But what is an Indian without a headdress?
DIY Indian paper roaches
For work, please prepare:
- colored paper,
- glue,
- scissors.
Colored paper should be thick. It’s better to take not a traditional set, but paper colored in bulk - several sheets of the same color.

1. Fold a sheet of paper into an accordion shape.

2. Having assembled the accordion, cut out a blank that looks like half a feather. Leave a small straight part at the bottom - it will make a strip on which the feathers will be held.

3. Make cuts from the top and somewhere up to half of the feather. They should not be too long, otherwise the feathers will not stay firmly on the head.

4. Unfold the feathers. As you can see, they are located far from each other.

5. Move the pen a little, coat the curves of the workpiece with glue (it’s good if you have a glue stick), press firmly.

6. If the resulting blank does not fit the front of the head, glue the same one to it and try it on.
Glue a couple more multi-colored blanks on top.

7. Now you need to hide the places where the feathers are attached. To do this, cut out a colored paper strip and glue it to the bottom of the feathers. Decorate with colorful circles.

8. To make ties you will need a hat elastic.

Here you go! The Indian's roach is ready. By complementing your look with a stylish vest or poncho, you can safely go to the New Year's carnival.
Here's what it might look like Indian headdress made of feathers or felt for the little ones.

Making a headdress for an Indian chief
The most important of the Indians is, of course, the leader. Let's make him a luxurious headdress.
You will need:
- colorful corrugated cardboard,
- precision collet knife,
- wood glue in a tube,
- cutting backing,
- scissors with curly blades,
- colored thick thread,
- glasses with a diameter of 4 and 6 cm,
- flat elastic band,
- multi-colored wooden beads (8 pcs.).
1. Print the template. Cut out parts from corrugated paper using a collet knife:
One red feather A,
Two orange feathers B,
Two golden yellow feathers C,
Two lemon yellow feathers D,
One blue feather D,
Two green feathers E,
Two lemon yellow feathers F,
Two blue G feathers,
Two green feathers H.
And also cut out the blue headband using curly scissors.
Feathers for pendants are indicated in red on the layout.

2. Glue the first row.
Glue the largest feather in the center of the headband, 2 cm from the bottom edge. Layering the feathers on top of each other, glue them to the headband in descending order. Remember to leave 2 cm at the bottom of the bandage.

3. Glue the second row.
Glue the remaining feathers in the same way as the first row. From the largest in the center to the smallest at the edges.
4. Assembling the roach.
Cut out the red bandage using curly scissors so that the stripes are positioned vertically.
Now cut out a golden yellow circle with a diameter of 6 cm and glue it at a distance of 11 cm from the center of the headband. (Glue the same circle on the other side). Using a thick thread and a gypsy needle, sew the circles to the red headband with a cross.

5. Sew the red headband to the blue one with a cross stitch, making four holes with a needle every 2 cm of the headband for stitches. Start making crosses from the center so that the embroidery is even.

6. Attach a small flat elastic band to each end of the roach so that the headdress stays well on your head.
7. Make pendants from wooden beads and feathers, indicated in red on the model. Sew to the yellow circle. Cut out a red circle with a diameter of 4 cm, and puncture four holes in it in the middle, sew it to the yellow one with a cross.

Oh, what a beauty it turned out!
How to make feathers for an Indian headdress
If you don't feel comfortable wearing a whole Indian "crown", make a couple of bright feathers and enjoy active play!
You will need:
- linen fabric,
- fabric paints,
- glue web,
- iron,
- brushes, pencil,
- scissors.
1. Fold a linen strip of fabric in half and put it inside glue web. Iron the workpiece with an iron.
2. Now draw the contours of the feather, lightly paint over the middle of the feather with white paint.
3. Using a flat brush, make stripes: blue and black.

4. Use a thin brush with black paint to outline the feather and draw details in the middle.
5. Cut out the feather along the contour. To make it more natural, make cuts.
6. Sew the feather to the embroidered ribbon. That's it - the Indian headdress is ready.