Hello, friends.
Previously, we considered the construction and
Today on the agenda is the construction of a sleeve for a children's dress.
Through point 5 we draw a straight horizontal line - the line of the bottom of the sleeve.
From points 2 and 3 we draw vertical lines down to the intersection with the bottom line.
We draw the bottom line of the sleeve with a smooth line, lengthening the middle of the back by 1 cm and shortening the middle of the front of the sleeve by 1 cm.
We connect point 4 with points 2 and 3. We make out the line of the sleeves, as shown in the figure,
The design of the sleeve is ready.
It remains to transfer the pattern to tracing paper or a sheet of paper, put control marks, and you can cut out on the fabric.
Here's what I ended up with. I reduced the length of the sleeve, made it shorter.

I advise you to check it, as well as the entire design of the dress, by cutting out a trial model of the dress from an unnecessary piece of fabric.
So you specify all the lines of the pattern, the fit of the sleeve, the lines of the bottom of the dress and the sleeve. then, having corrected all inaccuracies, transfer the changes to the pattern, using it in the future and achieving a perfect fit on the figure.
I hope everything was clear. The most important thing is not to be afraid and believe in yourself, and the rest will follow.
If you have any questions during the construction process, then write in the comments to the article, I will definitely answer you.
With best wishes, Elena Krasovskaya:
- How to sew a baby hat with "ears". We sew…
- How to sew a skirt in the assembly on an elastic ...
- How to sew a poncho with cuffs and a collar ...
Hardworking - a bright light burns through life, lazy - a dim candle
A bodice for a children's dress is quick and easy. Part 1.
visibility 28463 views
Good afternoon my dear mothers. Today we will be with you make a bodice for a children's dress. The bodice is the upper part of a detachable dress - that is, a dress where the hem is cut separately, the bodice is separate and then the bodice is sewn to the hem. We will create with you one and only a bodice pattern - and then, based on it, we will sew with you a lot, many children's dresses with a detachable bodice.
You may be surprised by my statement that based on one patterns of the bodice, you can sew several dresses. Now below you will see evidence of my words in the form of photographs. And at the same time, using the same photographs, we will see what kind of bodices are on children's dresses:
The bodice is higher than the waist. We will get his pattern if we take the classic bodice pattern (we will learn to draw it in this article) and cut it off at a level above the waist line.

Most often we meet a bodice along the waist line - it is also modeled from a classic bodice pattern, like this:

Yes, the most common bodice is above the waistline or to the waistline. But it’s not in vain that today we will draw a pattern of a bodice that reaches right up to the hip line, because there are dresses with a bodice below the waist line:

And there are also dresses where the hem starts only at the hip line, that is, the upper part of the dress, our the bodice is extended to the very line of the hips , that's how this elegant prom dress has ( how to sew this elegant dress I have already told in this master class).
As you can see same the pattern of the bodice will allow us to sew many different dresses and please our baby with a new thing sewn by mother's hands.
We have already made several one-piece dresses, and now having mastered the technique of constructing a bodice, we also have a bunch cutting models.
We make a pattern of a bodice for a children's dress.
Well... it's time to get down to business and create this pattern for a classic bodice for a baby dress. Especially for moms, I created a simplified way to create a bodice pattern.
We take measurements.
To build a pattern, we need take the following measurements(pic 1):

We get each measurement by clasping the baby with a centimeter
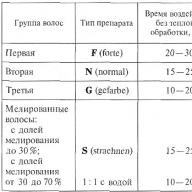
Merck T — at waist level,
Measure B - at the level of the hips(the most protruding part of the priests),
Measure G - at chest level(under armpits)
Measure Sh - at the base of the neck(measuring tape runs at the very bottom of the neck - it lies at the base of the neck, as a string of beads would lie if it were exactly right next to the baby's neck).
I labeled these girth measurements with the initial letters B, T, D, W (hips, waist, chest, neck). For all calculations we need incomplete the magnitude of these girths - and only half – SEMI girths or whatever i called them HALF TIGHTS- half of the hips, half of the waist, etc. THEREFORE, WE IMMEDIATELY DIVIDE EVERY GIRTH BY 2 - AND GET HALF-GIRTH.
Back measurements:
merka s- the length of the back from the protruding cervical vertebra to the twine tied at the baby's waist (be sure not to be too lazy to tie the twine in this way, most likely you will find the level of the waist on the child's usually pot-bellied tummy) - this measurement should not be divided in half (this is not a girth) - it write in full, not in half.
Merck L- the width of the back at the level of the shoulder blades, measured from one freely hanging arm to the other.
Why this way
you will draw a pattern in 10 minutes.
We will draw the pattern very quickly and simply - because ...
1.) the whole pattern is inside the rectangle
2.) The pattern of the bodice consists of five lines - the neck line, the shoulder line, the armhole line, the waist line, the hip line
That is, we draw a rectangle, then draw 5 lines inside it - and you're done. 10 minutes of work and we have a professional bodice pattern that is suitable for all dresses.
So let's get started.
We draw a pattern.
We draw a rectangle inside which we will draw our pattern.
Rectangle Height - measure C + half measure C- this is the distance from the neck line to the hips (you can remember for the future that the distance from the cervical vertebra to the hip line in a person is always 1.5 measurements of the back - that is, measure C + half measure C)
Rectangle Width - half measure G+ 3 cm- i.e. half bust with an additional 3 cm for a loose fit (so that the dress does not dig into the body)

So, inside the resulting rectangle (Figure 2), we will draw the entire pattern of the bodice - from the shoulders to the hips. We will draw the pattern very quickly and simply - it only consists of five lines - the hip line, the waist line, the neck line, the shoulder line, the armhole line - and that's it.
We already have a hip line is the bottom side of the rectangle.
Waist line is easy to find - you need to measure down our measurement C from the top of the rectangle - (that is, the length of the back from the cervical vertebra to the waist) we measure this distance on both sides of the rectangle and draw a horizontal line) - Fig. 3 - so we found our waist line.
Finding the edges of the neck
We find the middle vertical axis of the pattern - that is, we divide the width of the rectangle in half and divide it in the middle with a vertical line - this center of the whole pattern and the center of our future neck (Fig. 4).
Now on both sides of the line set aside classic neckline . It is calculated like this:
Divide the half-girth of the neck by 3 + 0.5 cm. The resulting distance is set aside to the right and left of the center line - Fig. 5. - and mark this distance with dots. Here, we have found the width of the classic neckline.

But the points of the edges of the neck should be located a little higher - we slightly lift up- for this from the points we measure upwards 1/10 of the half-grip of the neck + 1 cm- and we raise the points to this distance (Fig. 6).

Draw the lines of the shoulders
Now from the same central point (from which we measured the neck in both directions) we will measure in both directions extreme borders of the shoulders - it's simple - we measure in both directions, half measure L. The points obtained are the extreme boundaries of the shoulders of our pattern (Fig. 7).
Now we remember that people have different types of shoulders - sloping, high and normal.
From the point of the extreme boundaries of the shoulders, lay down the distance 2.5 cm for normal shoulders(1.5 cm for high shoulders or 3.5 cm for sloping shoulders) - fig. 10.

Hooray - the most tricky is already behind, now to draw a sloping shoulder line, you just need to connect the point of the high edge of the neck and the lower point on the line of the shoulders (Fig. 11). And so we drew the line of the shoulders.
And don’t be afraid that these shoulder lines on the pattern turned out to be so very sloping - that’s right, that’s how it should be. The lines of the shoulders on the pattern are always more inclined than the natural shoulders of the child. You don’t have to think: “Oh, some kind of strong slope turned out, my girl’s shoulders are not at all as sloping as they are on the pattern here, the author of the article has done something here.” It's okay, a tailor-made product with such sloping shoulders will perfectly match your child's shoulders when you put a tailor-made dress on him.
Draw the neckline

Now we will draw the neck line at the BACK and at the FRONT.
Back neck line in a classic pattern lies on the top line of our rectangle (Figure 10).
And the classic front neck deepens down the central axis by almost the same distance as to the right / left of the central axis (Fig. 11).
I.e neck depth (classical) is calculated by the same formula: half measure W divided by 3 (i.e. equal to 1/3 of the half circumference of the neck)
To make the neckline symmetrical you can first draw the right side of the neck, then fold the pattern vertically in half, just along our center line - and mirror our right side of the neck on the left (through carbon paper or piercing holes with a pin)
Finding the chest line
We need to find the chest line in order to draw the armholes. Because the armholes end exactly at the chest line. Without this chest line, we won't know to where exactly we need to draw these armholes - will there be a hole for the arms of sufficient size or will the armhole dig into the armpit of the child. Therefore, we find the chest line - and then we can be sure that the armhole lines will be perfect for our child's arms.
That is, the level of the chest line is the height of our future armholes.

The chest line (it is also the height of the armhole) is always calculated from the measurement of the half-girth of the chest - Divide the bust by 4 and add 7 cm. We measure the resulting distance down from the extreme point of the shoulder (Fig. 12).
Draw an armhole line.
All now we can boldly draw armhole line (arm holes) - from the shoulder down and smoothly round to the side of the rectangle along the chest line (Fig. 13).

I make a rounding to the armpit by hand and by eye. If you are not sure what you are drawing correctly, you can follow this armhole rounding rule: start smooth rounding at a distance of 2/3 of the armhole height - that is, 2/3 of the armhole height, the line just goes down vertically, and not reaching 1/3 to chest line begins its smooth rounding to the armpit.
In the FRONT part, the armhole usually bends more towards the central axis (Fig. 14). But if the dress model is sleeveless, then the front and back armholes can be the same in outline (just vertically down and rounded to the armpit).
To draw the armholes the same on the left and right you can do this: first draw the line of the right armhole, then fold the pattern vertically in half (along the centerline) - and mirror our right armhole line on the left (through carbon paper or piercing holes with a pin).
Draw the side lines + round the line of the hips
Here are the patterns almost ready - or rather, it is ready for those mothers whose girls eat well and they still do not have a waist. In your case, you don’t need to fit the dress - it will be cut in a straight line under the armhole line (that is, it will coincide with the sides of our rectangle) - Fig. 15. And to be honest, all girls under 5-6 years old do not have a waist but have a round belly - This is the physiological norm. Therefore, the side lines on the bodice for this age are usually always straight and do not have a fit.

If your child has a significant difference between the measurements of the circumference of the hips and the circumference of the waist, then we will now reflect this difference on our pattern - Figure 16.
For example, let's say the hips are 70 cm and the waist is 62 cm - i.e. the difference between these values \u200b\u200bis 8 cm. Then the waist line should be 8 cm shorter than the hip line on our pattern.
And in theory, we should remove 4 cm on the right and 4 on the left from the sides - but here we remember about the freedom of fitting and remove not 4, but only 3-2 cm each - and we get a small waist bend, just for beauty .
And if your girl is already over 10 years old and has curly shapes with waist curves or she already has breasts, then you are welcome to my other
Now we must not forget to do the bottom line of the pattern - on a straight horizontal - and slightly round off- that is, down from the center line - measured 0.5 cm and drew a smooth roundness to both corners of the rectangle.
So, we just made a classic pattern with you (Fig. 17) - namely CLASSICAL, because the outlines of its neck and armholes are classic (the neckline is right under the child’s neck), the armholes are even on the child’s arm.
And now from this classic bodice pattern, every new time we will get a new and new bodice for the dress.
Each time for each new dress, we will take this finished bodice pattern and slightly modifying it to get a new bodice pattern just under the dress. All we will change is the neckline, armholes, and the length of the bodice itself (up to the waist, above or below the waist) - and each time we will get a new dress model with a new interesting bodice. Like in the picture below...

Good luck with your tailoring.
Olga Klishevskaya, especially for the site "".
Hardworking - a bright light burns through life, lazy - a dim candle
Sleeves for children's clothing - do it yourself!
visibility 19254 views
Hello dear moms! In this article, I will show and tell you what principles are used to create sleeves for children's clothing (to be honest, the same principles are acceptable when creating sleeves for adult clothing).
I used to sew exclusively sleeveless dresses, because I thought that I would never master such a complex (as it seemed to me) sleeve pattern. But one day I sat down and spent the whole day studying all the sleeves in my wardrobe, read all the manuals for building a sleeve pattern - patiently lined up a sleeve drawing, first in one way, then in another.
And as a result I chose the most convenient and fastest way to draw a sleeve. You will not have to suffer as much as I do, I will tell you everything in simple human language (without abstruse tailor's terms).
I will provide the story with the most detailed diagrams - so clear that even a fifth grader can sew the sleeve himself. And labor teachers, by the way, will be able to use these pictures as visual material in their lessons.
After this series of articles, you will be able to come up with any design of sleeves for dresses, T-shirts, blouses for your baby.
The following is on the agenda:
- Classic sleeve, its components.
- Construction of a sleeve pattern with step by step pictures.
- Flashlight sleeve.
- Puff sleeve
- Sleeve - wing.
- Visor sleeve.
- Flounce sleeve
- Round neck sleeve.
- Striped sleeve.
- One-piece sleeve (sleeve, as part of a one-piece front and back pattern).
So let's get started...
First, I want to introduce you to the basic terms: sleeve length, sleeve height, etc.
Let's look at the first diagram:

In figure 1 we see simplified image of a short sleeve. This is what it looks like before it was sewn on. I must say right away that a long sleeve differs from a short one only in length - therefore, here we will learn how to make a short sleeve, and you can always lengthen it yourself if you wish.
The upper rounded line of the sleeve (with which it is sewn to the armhole) is called OKAT (Fig. 1).
Sleeve Width- this is the distance between, roughly speaking, its "axillary" corners (Fig. 2)
The length of the sleeve- the distance from the armpit to the level we need (to the middle of the shoulder, to the elbow, to the wrist, etc.) (Fig. 3). Or the length of the sleeve can be calculated not from the armpit, but from the top of its collar (that is, from the shoulder seam - Fig. 5 (b)). As you prefer.
Okat is high and low(Fig. 4) (it depends on the design of the dress, on the shape of its armholes) - but most often in clothes a standard armhole cutout and a standard classic sleeve with a standard eye height are used.
Classic sleeve pattern
This standard sleeve we will now draw with you. And we will create the rest of the variety of sleeves using this standard pattern-template.

To create a sleeve, we need to take only 2 measurements (see the diagram above):
- Merck A- The circumference of the child's shoulder in the armpit area (depends on this value) sleeve width)
- Merck B- the size of the armhole on the dress to which we make the sleeve (it depends on this size eye height)
Now that we have measurements, we need to calculate the width of the sleeve and the height of the eyelet.
Sleeve width = measurement A + 7 cm(for a loose fit so that the sleeve does not dig into the arm)
Eye height = 34 measurements B, that is, measurement B: 4 x 3
My two-year-old daughter (height 85, weight 11) has a handle circumference of 17 cm, and the size of the armholes on all her dresses is 12-13 cm.
Means sleeve width= 17 cm + 7 cm = 24 cm.
BUT eye height sleeves = 12 cm divided by 4 and multiplied by 3 = 9 cm
As you can see in the diagram above, I gave sleeve calculations for it as a sample. If your baby has approximately the same parameters, you can use my calculations for the height of the eye and sleeve width and all subsequent ones for your girl.
So, we got the height of the eye (I have 9 cm) and the width of the sleeve (I have 24 cm).
Now let's draw a rectangle 9 cm high and 24 cm wide (as shown in the diagram above). Ready? It is in this rectangle that we will draw a smoothly curved line of the eye.
To begin with, we Divide the rectangle into 6 equal parts vertical lines (24 divided by 6 = 4 cm - distance between lines 4 cm) - see diagram below.

We will need these lines in order to quickly and easily draw our circle along them, we will first draw points on these lines at which our future circle should intersect with these lines.
All we need for this is to know the height of the eye, and we already know it (I have 9 cm).
Each point on the line is calculated based on their eye value - everything is described in detail in the diagram below

Point P1 \u003d divide the height of the eye by 3 and subtract 1 cm
Point P2 and P3 \u003d divide the height of the eye by 3 and subtract 1 cm 8 mm
Point P4 \u003d divide the height of the eye by 6
It's so simple, because we all know how to divide and take away.
On our vertical lines, these points were marked at the desired (just calculated) distance (in the diagram above, everything is described using the example of a sleeve for my daughter).
And now we will connect the dots together and get an eye - see the picture below. We connect with smooth rounded lines. Do not be afraid if it is slightly crooked - a couple of millimeters back and forth will not play a special role. It still makes a nice sleeve.

Everything, the okat is the most difficult thing that we needed to draw in the sleeve pattern. Then everything is simple.
We draw side lines, as long as we want the sleeve to be (meaning the length of the sleeve from the armpit) - see the figure below.

And also draw the bottom line of the sleeve. It will not be straight, but curved - at the front half of the sleeve it will be curved up (by half a centimeter), and at the back half of the sleeve it will be curved down (also by half a centimeter).
See the diagram below for how to do it. First, we simply draw a straight bottom line of the sleeve. And then on the front half of the sleeve, in the middle, above this straight line measure up half a centimeter, and on the back half of the sleeve, in the middle, under this straight line measure down half a centimeter. And as in the figure below, we connect these points with smooth lines.
The bottom line of the sleeve always has this curved line, especially if the sleeve is short.
You ask why, why such a curved line ... the sleeve will be curved on the dress ... But no - now you will understand everything ...
I'll tell you now why wise fashion designers around the world
came up with the idea of drawing such a curved bottom line of the edge of the sleeve ...
The fact is that according to the laws of physics - the sleeve sewn to the armhole - in front slightly goes down by itself ... and slightly lifts up from the back ...
because… we have such an inclination of the shoulder joint in the body God made ...You can draw a straight edge on the sleeve - and sew it on... and when you put on the dress - you will see that...
... from the side of the back, your line went up - and from the side of the front, it went down ... that is, it was ugly skewed ...and in order to hide such an ANATOMICAL behavior of the sleeve on the body ... fashion designers came up with such a trick ...
where the sleeve stretches, crawls half a centimeter up - make an allowance-increase by these very half a centimeter
and where the sleeve goes down, it crawls down - on the contrary, make a decrease-reduction by these very half a centimeter ...As a result, we draw a curved line - and when we put the sewn sleeve on the body - it crawls according to its own laws - and we end up with a straight line of the sleeve ...
This is such a tricky life...
Everything has a reason... you just have to dig and find it...
Fun, in short))
Everything, our sleeve is drawn- this is how it turned out (see the picture below). Now do not forget the allowance for the seams, the allowance for the sleeves is usually 1.5 cm. Drawn, all the sleeve pattern is ready.
This is a simple classic sleeve pattern. We will use this pattern as a template when we model puff sleeves, puff sleeves, wing sleeves, and all the rest.

You can make any sleeve easily and simply with this template. Therefore, do not throw it away after sewing the first dress, it will serve you for other models.
Sew the sleeve to the armhole.
Now I will tell you how to sew the sleeve to the armhole. Our sleeve is divided into 2 halves (right and left). This section runs along the line that goes down from the top of his eye (on the pattern this is line L3, remember?).
The left (it is also the back) part of the sleeve is sewn to the armhole of the back, the right (it is the front) part of the sleeve is sewn to the armhole of the front. Here's how it's shown in the diagram below:

So that the center of the sleeve falls exactly on the shoulder seam, I begin to sew it from the top of the eyelet to the armpit, first one half, then the second.
To do this, lay the dress with the shoulder and side seams already sewn face up, attach the sleeve face down to it (fig. 2) - the top of the okolka to the shoulder seam. And moving from the center to the armpit, sew by hand (Fig. 2, 3). Yes, yes, first sew the collar of the sleeve by hand with simple coarse stitches, turn it inside out (Fig. 4), make sure that it turned out good, rejoice - you yourself made the sleeve to the dress, just like a real tailor.
And then put it under the foot of the sewing machine and boldly scribble.
It was stitched both in front and behind (Fig. 3), now it can be folded back (Fig. 4) and in order to connect the side seam of the sleeve (Fig. 4 is shown by an arrow), it is necessary to turn the dress inside out. And on the wrong side, connect the side seams of the sleeve.
Now it remains to process the lower edge of the sleeve - bend and stitch or process with an oblique trim. How to process the edges of the product with an oblique trim, read the article "Straps for dresses and tops - we do it ourselves."
As you can see, everything is very simple.
In the second part of our article “Sleeves for children's clothes - we do it ourselves. Part 2" I will tell and show how to make lantern sleeves based on our standard sleeve pattern. Puff sleeves, wings will be in other articles of the cycle
I will be glad to see your questions, wishes and comments. in the comments to the article. You can also post photos of dresses you've made (or photos of dresses you'd like to make but don't know how).
Good luck with your sewing!
Dressing up daughters is a favorite pastime of mothers. To please the girl more often with new dresses, you can sew them yourself. To do this, you do not need to spend time on the construction of time-consuming drawings. With the help of basic, simplified patterns, correctly selected fabrics and beautiful decor, you will quickly sew a spectacular outfit. Most children's styles do not require a strong fit - which means that you do not need to design many darts.
The comfort and safety of the child are paramount, therefore loose silhouettes are especially popular: dresses are not narrowed in the armhole and neck, skirts do not follow the curve of the body, but expand from the waist or even from the armpits. Therefore, you can sew outfits in a one-piece way - simply and quickly. The pattern of a children's dress in this case is not designed according to the drawing-base, but according to the finished T-shirt, which will sit well on the child. Having simulated the circuit, you can later change it to make many new products, guided by your own preferences and imagination.
The second option, suitable for beginners, is to build a basis for the dress and sleeves according to the standards of the child (based on the classic one-seam model). They can also be adjusted as the child grows or to model products of different styles - with a cut-off waist, A-shaped silhouette, extended sleeves. By sewing a fluffy frill or frill to the bottom of the basic dress, you will get a festive outfit, and by changing the neckline and adding thin straps - clothes for the beach and for hot summer.
belmodel.by
How to take measurements for one-piece models based on a sample shirt
When sewing one-piece models for children, it is enough to take one measurement - the half-girth of the chest. It determines two main parameters of the product - the width along the armpit line and the size of the armhole from the armpit to the shoulder. From these values depends how the clothes "sit down", whether it will fit the size. To calculate the half-girth, you need to measure the circumference of the child's chest with a centimeter tape, and then divide the resulting number in half.
To calculate the width between the two axillary lines, you need to add about 5-6 cm to the half-girth of the chest. So the fit will be free, and the thing will not squeeze the body. If you need to design a thing “for growth”, make the increase larger - up to 8 cm. The armhole height is calculated as ¼ of the half-girth of the chest plus 6-8 cm. The length of the thing is determined by the chosen model and depends on the height of the small owner.
To build a base pattern, you need to take a lot more measurements.
In addition to the half-girth of the chest, you will need:
- the length of the front and back to the level of the waist - RTA and DTS, respectively;
- back width;
- armhole depth front and back;
- shoulder length;
- half neck.
There is an established tailor's standard for allowances. For shoulder seams, it is necessary to leave up to 20 mm, armholes or necklines - up to 15 mm. To make the hem look beautiful, “lay” about 4-6 cm on the hem, depending on the “flowability” of the material. Fabrics that shrink a lot during the first wash (for example, natural linen for summer dresses) must first be wetted and ironed.

shoppingmall.com.ua
Construction of patterns based on children's T-shirts
To sew a beautiful dress for a child, you can not build a pattern, but use T-shirts as patterns. Everything is drawn in “life size”, so it is better to take a large-format paper sheet - whatman paper, graph paper. For sewing summer dresses from knitwear, you can use a T-shirt - this will make it easier to draw the line of the shoulder and short sleeves. They are also suitable for modeling sundresses and sleeveless products. It is enough to mark a line on paper along the sleeve seam with a pin. Having made several punctures on the sheet through the T-shirt, you will get control points for drawing the outline of the armhole.
Before transferring the lines from the samples to paper, things must be carefully ironed and straightened, secured on the sheet with pins. Now circle the T-shirt or T-shirt around the outline and set aside - they are no longer needed. On top of the lines obtained, it is necessary to carefully and symmetrically draw the silhouette of the future product. A couple of centimeters retreat from the contours and allowances are made for seams (on the sides and shoulders), hem hem and armhole and neck processing. So you get the final lines of the pattern of children's dresses. To make the silhouette look proportional, it is not necessary to calculate the length along the shoulders, but it is better to make their lines slightly beveled.

clothing.beautysay.net
On models of a simple trapezoid style, the lines of the side seams from the armpits diverge to the sides. The width at the bottom will be greater than the size of the half-girth of the chest. The hem should be drawn smoothly and roundly - a tailor's pattern is useful for this. The armhole and neckline are outlined along lines that are different from the contours of the T-shirt. If there is any doubt whether the pattern of a children's dress made is suitable for a child, first experiment on an inexpensive fabric, and after trying on and adjusting, make a thing from the main material.
- The finished drawing is folded in half along the vertical axis of the center, the shoulders and axillary lines are combined.
- The resulting fold is a guideline for cutting the circuit into two shelves, left and right.
- The drawn pattern of a children's dress is transferred to the fabric with only one half, so you don't have to worry too much about the equality of the sides.
- To make the finished product symmetrical, you need to go twice along one side when cutting the fabric and then use it to cut out the back. For the back of the product, a separate drawing is often made, which differs in the shape of the neck and armholes. You can sew a children's dress with bare shoulders according to the same patterns, and for a model with sleeves, it is better to make the back not as deep as the front.

piknad.ru
Building a base drawing
If you want to sew a dress according to your own pattern, you will need to make a basis for it. In the future, the drawing can be used to model outfits of any style. After taking measurements, it is necessary to build a base rectangle on paper - the “skeleton” of the drawing. Its large sides correspond to the length of the thing, and the smaller ones correspond to the half-girth of the chest with an increase of 4 cm. If the clothes are tight, the allowance is reduced to 3 cm.
- A segment equal to the depth of the armhole with an increase of 0.5 cm is laid down from the upper left vertex.
- From its end, a line is drawn to the right side of the line and the intersection is marked.
- From the upper left vertex, measure down the length of the back to the waist and mark the segment.
- From the designation made, draw a horizontal line to the right side, marking the intersection.
- Set aside half the width along the back (with an increase) from the end of the armhole to the right side and put a mark.
- From the mark just made, draw to the right side a segment equal to the width of the armhole with an increase of 2 cm.
- From the two points made above, draw straight lines to the upper horizontal of the rectangle, putting marks on it.
Be sure to check the size of the drawn lines. The drawn segment along the armhole should be equal to half the width of the chest plus a centimeter. If the values match, you can draw the outlines of the sides. A point is placed in the middle of this segment, and a line is drawn down from it to the lower horizontal of the rectangle.
To design the rise on the shelf you need:
- postpone from the line along the waist up the length along the front to the waist;
- lower the perpendicular from the horizontal on the left side of the drawing.

thebestfashionblog.com
Front and back design
Having built the base, you can model the details for cutting out the fabric.
Back shaping
- Model the neckline from the upper left point of the base rectangle - set aside ⅓ of the neck half-girth plus 1 cm to the right, measure 1.5 cm from the resulting notch and connect to the left vertex (the outlines should be concave, so you should use a pattern).
- Draw a slope and a line of the shoulder, drawing a segment along the neckline through the slope, equal to the length of the shoulder.
- Draw the outlines of the armhole along the back.
- Make a side seam 2 cm to the right of the line on the pattern, not reaching it by 1 cm (when sewing straight models, the sides do not go to the sides).
- Draw a smooth bottom line.
When building a transmission, they act similarly. First, the neckline is formed, then 3 cm is measured down to the slope of the shoulder. Next, draw lines along the shoulder and armhole (from G3). The last stage is the design of the sides, retreating 1 cm from the drawing line.
Building models according to the basic pattern
With a basic pattern handy, you can design many types of beautiful clothes that children will love to wear. You will also need a drawing for the sleeve - the base is usually built on a single-seam part. To make a cotton dress with darts and a hidden zipper, you will need to make an increase of 2 cm to the half-girth of the bust. So the finished thing will fit the body tightly and not restrict movement.
Working process
- Shorten the shoulder by 1 cm and draw the armhole line along the front and back again.
- Set aside 15 mm on the sides and waist and fit the product - draw new outlines.
- Make tucks - from the center of the waist along the back and in front, set aside 7 mm.
- Draw two darts (front and back) 10 cm long and 1.5 cm deep.
- Measure from the waist down the desired length of the skirt.
- Remove the neck facing separately (width - 3 mm).
- Based on a single-seam sleeve, model a narrowing along the bottom, a tuck about 50 mm long and up to 20 mm deep.
- Shorten the sleeve to the elbow line and check the collar - its length should be equal to the length of the armhole.
Also, according to the base pattern, you can sew a beautiful festive dress with decor from bulk fabric - for example, organza. After cutting out the front and back according to the basic drawing, the skirt is modeled separately. For her, you need a shuttlecock made of fabric that falls in voluminous folds.
Working process
- Cut out the skirt from the main fabric.
- Make additions “by volume” on the drawing and outline the shuttlecock, which will be made of organza or similar material.
- Cut the part along the marked lines.
Using the base, you can model sundresses with straps, beach dresses with elastic bands on the chest. You can easily sew sleeveless school dresses that are worn with a turtleneck or a strict shirt. It is enough to spend a little time on the careful construction of the basic pattern. In the future, you will be able to sew clothes literally in the evening, without much difficulty pleasing the child with new outfits.

If you have a little fashionista, I mean a daughter or granddaughter, then you just need to master the technique of building patterns for girls. Children grow out of clothes very quickly, and every time you want to update your children's wardrobe, you will have to build a new pattern. It may seem difficult at first. But I assure you, the second, third time will be much easier. And the fifth time, starting to build, you will know all the calculations by heart. It's not difficult at all. Moreover, we offer STEP-BY-STEP instructions for constructing a pattern drawing. Line by line and the pattern is ready. Everything is simple.
For the manufacture of the correct pattern, it is necessary to have accurately taken measurements. If mistakes are made when taking measurements, the drawing will turn out to be inaccurate and the dress will not sit well on the figure.
Measurements are taken with a measuring tape, which is not loosened or pulled tight. A girl dressed in light clothing or underwear should stand without tension, in a normal position. A lace or a thin belt is tied along the waist line.
When taking measurements, you need to specify the height of the shoulders. Shoulders are high, normal and sloping. Everything is like adults.
The correct construction of the drawing largely depends on this measurement.
As an example, we will build a pattern for the 32nd size. You are taking measurements on your young lady.
Girl's dress
To build a pattern drawing, you will need the following measurements:
Half neck
14
Measured at the base of the neck. The measurement is recorded in half size.
Half bust
32
This measurement determines the size of the figure. The measuring tape should run along the protruding parts of the shoulder blades on the back and along the highest part of the chest. The measurement is recorded in half size.
Half waist
28
Measure at the narrowest point of the waist. The measurement is recorded in half size.
Semi circumference of the hips
38
Measured at the highest part of the hips, taking into account the bulge of the abdomen. The measure is written in half size.
chest center
7
The distance between the high points of the chest.
The measurement is recorded in half size.
Back Width
14
Measure by placing a centimeter tape from the left hand to the right at the level of the protruding parts of the shoulder blades. The measurement is recorded in half size.
Back length to waistline
29
Measure from the seventh cervical vertebra to the lace at the waist. The measure is recorded in full.
Length of the product
60
Measure from the seventh (protruding) cervical vertebra in the middle of the back to the required length (8). The measure is recorded in full.
Shoulder length
10,3
Measure from the base of the neck to the shoulder joint. The measure is recorded in full.
Arm circumference
21
Measure around the arm at the armpit. The measure is recorded in full.
The length of the sleeve
38
Measure from the shoulder joint to the wrist. The measure is recorded in full.
Allowance for free fit along the chest line 6 cm (for older girls, add 5 cm for free fit), along the waistline 2 cm (for older girls add 1 cm), along the hips 3 cm (for older girls 2 cm).
On the left side of a piece of paper
stepping back from the upper cut of centimeters by 7, draw a vertical line on which set aside the measurement of the length of the dress and put points A and H. Draw horizontal lines through points A and H to the right. 
Dress width.
From point A to the right, set aside the measurement of the half-girth of the chest plus 6 cm for a loose fit (for older girls, add 5 cm for a free fit) and set point B.
AB \u003d 32 + 6 \u003d 38 cm.
From point B, lower the perpendicular to the intersection with the bottom line. Mark the intersection point as H1. 
Back length to waistline.
From point A down, measure the length of the back to the waist plus 1 cm (for older girls plus 0.5 cm) and put a point T.
AT \u003d 29 + 1 \u003d 30 cm.
Draw a horizontal line through point T to the right. Mark the point of intersection with the BH1 line as T1. 
Hip line.
From point T down, set aside 1/2 measurements of the length of the back to the waist and set point B
29:2=14.5cm
Draw a horizontal line through point B to the right until it intersects with line BH1. Mark the intersection point B1. 
Back width.
From point A to the right, set aside the measurement of the width of the back plus 1.5 cm and put point A1
14 + 1.5 = 15.5 cm 
Armhole width.
From point A1 to the right, set aside ¼ chest measurements plus 1 cm (for older girls plus 0.5 cm) and put point A2.
A1A2 \u003d 32: 4 + 1 \u003d 9 cm.
From points A1 and A2 down draw vertical lines of arbitrary length. 
Back neck cut.
From point A to the right, set aside 1/3 measurements of the half-girth of the neck plus 0.5 cm and put point A3.
AA3 \u003d 14: 3 + 0.5 \u003d 5.2 cm.
Draw a perpendicular from point A3 upwards, on which set aside 1/10 measurements of the half-girth of the neck plus 0.8 cm and set point A4.
A3A4 \u003d 14:10 + 0.8 \u003d 2.2 cm.
Divide the angle at point A3 in half, from point A3 along the dividing line of the angle, set aside 1/10 of the measurements of the half-girth of the neck minus 0.3 cm and set point A5.
A3A5 \u003d 14: 10 - 0.3 \u003d 1.1 cm.
Connect points A4, A5, A with a smooth concave line. 
Back shoulder line.
From point A1 down, set aside 2.5 cm for normal shoulders, (1.5 cm for high shoulders, 3.5 cm for sloping shoulders) and set point P. Connect points A4 and P with a straight line on which
from point A4, measure the length of the shoulder plus 1.6 cm for the tuck and put point P1.
A4P1 \u003d 10.3 + 1.6 \u003d 11.9 cm. 
Back shoulder tuck.
Set aside 3.5 - 4 cm from point A4 to the right and set point O. Draw a vertical line from point O down, on which set aside 6 cm and set point O1. From point O to the right, along the line A4P1, set aside 1.6 cm and put point O2. Connect point O1 with a straight line to point O2, on which set aside the value of segment OO1 from point O1 and set point O3. This construction can be done using a compass (see Fig. 10).
By connecting points O3 and P1 with a straight line, we complete the design of the shoulder line. 
Armhole depth.
From the point P down, set aside 1/4 measurements of the half-girth of the chest plus 7 cm and put the point G
PG \u003d 32: 4 + 7 \u003d 15 cm.
Draw a horizontal line through point D to the left and right. Designate the point of intersection with the AN line - G1, the point of intersection with the armhole width line - G2, with the line BH1 - G3. 
Back cutout.
Set aside 1/3 of the distance PG + 2 cm from the point G upwards and set the point P2
GP2 = GP: 3 + 2 = 15: 3 + 2 = 7 cm.
Divide the corner at point G in half and, along the division line of the angle from point G, set aside 1/10 of the width of the armhole plus 1.5 cm and set point P3.
GP3 \u003d 9: 10 + 1.5 \u003d 2.4 cm.
Divide the width of the armhole GG2 in half and put a point G4. Connect the points P1, P2, P3, G4 with a smooth line. We get the armhole line of the back. 
Front armhole cut.
From point G2 up, set aside 1/4 measurements of the half-girth of the chest plus 5 cm and put point P4.
G2P4 \u003d 32: 4 + 5 \u003d 13 cm.
From point P4 to the left, draw a horizontal line, on which set aside 1/10 measurements of the half-girth of the chest and put point P5.
32:10 = 3.2 cm.
From the point G2 up, set aside 1/10 of the value of the segment G2 P4 and set the point P6.
G2P6 \u003d G2P4: 3 \u003d 13: 3 \u003d 4.3 cm.
Connect points P5 and Pb with a dotted line, divide it in half, set aside 0.8 - 1 cm from the division point to the right, and mark this point with the number 1. Divide the angle at point G2 in half. Set aside 1/3 of the armhole width plus 0.8 cm from point G2 along the division line of the corner and set point P7.
G2 P7 \u003d 9: 10 + 0.8 \u003d 1.7 cm.
Connect points P5, 1, P6, P7, G4 with a smooth line.
We have finished building the armhole in front. 
Shelf neck cut.
From point G3 up along the line H1B, set aside 1/2 measurements of the half-girth of the chest plus 3.5 cm (for older girls, plus 2-2.5 cm) and put point B1.
G3V1 \u003d 32: 2 + 3.5 \u003d 19.5 cm.
From the point G2 along the line G2A2, set aside the value of the segment G3B1 and set the point B2. Connect points B1 and B2.
From point B1 to the left, set aside 1/3 measurements of the half-girth of the neck plus 0.5 cm and put point B3.
B1Bz \u003d 14: 3 + 0.5 \u003d 5.2 cm.
From point B1 down, set aside 1/3 measurements of the half-girth of the neck plus 2 cm and put point B4.
B1B4 \u003d 14: 3 + 2 \u003d 6.7 cm.
Connect points B3 and B4 with a dotted line and divide it in half.
From point B1 through the division point, draw a line on which set aside 1/3 measurements of the half-girth of the neck plus 1 cm and put point B5
B1B5 \u003d 14: 3 + 1 \u003d 5.7 cm.
Connect points B3, B5, B4 with a smooth line. We get the front neck line. 
Center of the chest.
From the point G3 to the left, set aside the measurement of the center of the chest plus 1 cm (for older girls plus 0.5 cm) and put the point G6.
G3G6 \u003d 7 + 1 \u003d 8 cm.
From point G6, draw a perpendicular to the line B1B2, mark the intersection point B6. 
Shoulder cut and tuck lines.
Set aside 1 - 1.5 cm from point B6 down and put point B7. Connect point B7 with a straight line to point B3 and a dotted line to point P5.
From point P5 to the right along the dotted line, set aside a measurement of the length of the shoulder minus the value of the segment B3B7, minus 0.3 cm and put a point B8.
10.3 - 2.8 - 0.3 = 7.2 cm.
Connect the points G6 and B8 with a straight line, on the continuation of which from the point G6 set aside a value equal to the segment G6B7, and set the point B9. Connect points B9 and P5 with a straight line.
(This construction can be done using a compass. From point G6, as from the center, we draw an arc through point B3 to the left, until it intersects with a straight line and set point B9). Choose the option convenient for you. 
Side seam line.
From point G to the right, set aside 1/3 of the width of the armhole and set point G5 (9: 3 \u003d 3 cm).
From point G5, lower the perpendicular to the bottom line, mark the intersection points with the waist, hips and bottom lines as T2, B2 and H2.
To determine the total solution of tucks along the waistline, add 2cm to the measurement of the half-circumference of the waist, for older girls 1cm (28+2=30cm), then subtract this value from the width of the dress between points TT1 (38-30=8cm).
The size of the solution of the front tuck is 0.25 of the total solution of the tucks along the waist line (8x0.25 = 2cm), the side 0.45 of the total solution (8x0.45 = 3.6cm),
back 0.3 total solution (8x0.3 = 2.4 cm).
To calculate the dress along the hip line, add 3 cm to the measurement of the half-girth of the hips (for older girls 2 cm) for a free fit, subtract the width of the dress obtained when constructing the drawing between points BB1 (38 + 3-38 = 3 cm) from the resulting value.
Distribute the result equally between the shelf and the back (3:2 = 1.5 cm).
Set aside 1.5 cm from point B2 to the left and right and put points B3 and B4.
From point T2 to the left and right along the waist line, set aside half of the side tuck solution (3.6: 2 = 1.8 cm) and put points T3 and T4.
Connect points T3 and T4 with straight lines to point G5 and extend the line up to the armhole line.
Connect points T3 B4 and T4 B3 with dotted lines, which you divide in half.
Set aside 0.5 cm from the division points to the left and right and connect them with smooth lines to points T3 and B4, and, accordingly, T4 and B3. 

Front waistline.
Set aside 1.5 cm from point T1 down and put point T5. Connect points T5 and T4 with a smooth curve. 
Hip line.
Set aside 1.5 cm from point B1 down and put point B5. Connect points B3 and B5 with a smooth curve. 
Decoration of the tuck on the back.
Divide the distance between the points GG1 in half, mark the division point as G7. From point G7 lower the perpendicular to the line BB1. Mark the points of intersection with the line of the waist and hips, respectively, T6 and B6. From point T6 to the left and right, set aside half of the solution of the back tuck (2.4: 2 \u003d 1.2 cm) and put points T7 and T3. Set aside 3 cm from point B6 up. Connect the resulting points. 
Making a tuck on a shelf.
From point G6 down draw a vertical line to the intersection with line B3B5. Mark the points of intersection with the line of the waist and hips, respectively, T9 and B7. From point T9 to the left and right, set aside half of the solution of the front tuck (2: 2 \u003d 1 cm) and put points T10 and T11. From point G6 down, and from point B7 up, set aside 4 cm and connect them to points T10 and T11. 
The design of the side seam line.
Draw vertical lines down from points B3 and B4, mark the points of intersection with the bottom line as H3 and H4. If the dress should be extended, then set aside 3-5 cm from points H3 and H4 to the left and right and connect them with straight lines to points Bz and B4. 
The bottom line of the dress.
From H1, set aside 1.5 cm down and mark the point H5. Point H5 and H3 (and in the extended version, the lower point of the side seam 3) connect with a smooth curve. If the dress is extended to the bottom, it is necessary to correct the line of the bottom of the back. Set aside 1-1.5 cm from point H down, put point H6 and connect it with a smooth curve to the lower point of the side seam of the back 3. 


Everything. The construction of the pattern is completed
I remind you that this is a dry drawing, a kind of frame from which you can model a style of any complexity. The simplest thing you can do yourself is a yoke on the bodice, or cut the dress along the waistline and gather the lower part of the dress (skirt), or make a frill along the bottom of the dress, etc.
source www.newsewing.com Internet resource "Sewing master"