Today we will talk about Bruges lace. Belgium is the birthplace of Bruges knitting, it was there that this type of needlework was born, which is used by craftswomen to this day. Having begun to use lace for finishing tablecloths, bed linen and other household items in wealthy families, the Belgians gradually transferred it to outerwear. The thing trimmed with this lace distinguished its owner from the rest by prosperity and luxury inaccessible to others.
Bruges knitting differs from other types in that it is a continuous lace braid, connected as needed in places of patterns. In general, if we consider Bruges knitting separately, we will find that its background is a fine mesh and braid on it, wriggling so whimsically and playfully, forming a pattern.
Bruges lace: patterns for beginner needlewomen
Lace is knitted according to the schemes, which indicate the sequence of knitting and methods for assembling its individual elements. The letter or number on the diagram indicates that the lace consists of several motifs, and refers to the beginning of each motif.
Master class on knitting a simple pattern
Your attention is invited to Bruges lace master class for beginners and amateurs.

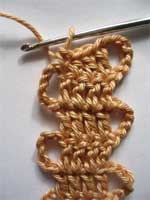
To knit such a lace, you need pure white cotton yarn and hook number 2. We start with a set of four air loops.
 Then from these four loops we knit five air loops and four double crochets.
  Again we repeat five air loops, turn the work and knit four more double crochets. All the same - we repeat the same for the third row.
  For the next five rows, you need to make a rounding. To do this, we knit a beveled row: two columns with a crochet, one half-column with a crochet and a column without a crochet.
Then we tilt the rows to the other side. To do this, we repeat the sequence in reverse: a single crochet, a half crochet and two double crochets.
 We knit three more rows in this way, in total there should be five of them.
 The next two rows should not be beveled, four columns with a crochet and arches of five air loops.
 We knit three more times alternating two air loops.
 We turn the work and knit again in the same pattern.
In the next row, we knit three arches of five air loops, attach them with single crochets.
 We continue to knit the second motive identically to the first

 At the end, you should have the following.
  Congratulations, you have learned to knit Bruges lace!
We knit products from Bruges lace (diagrams are attached)
Based on the materials of the Brugge lace crochet scheme, you will succeedtie such a charming napkin. It will take several hours to make such a napkin, but the delight from the work done will last longer. You can also use video tutorials or articles from Japanese magazines to create unique items.


If you are experienced enough and know how to create more complex things, we suggest you look at the technique of knitting a charming dress, which also comes with a handbag. You will definitely like the Bruges lace technique in the video if you like to create and wear unique clothes.
- one of the most refined and airy lace. The alternation of columns and chains of air loops gives lightness and weightlessness to finished products. The basis of knitting is a curved strip, neatly laid out in fancy patterns. The lace is smooth and even, it resembles knitting on bobbin. Bruges lace is crocheted and requires special attention. It is knitted without interruption, the processing of knitted products is carried out with vilyushki. To create it, you need a thin thread and a hook up to 2 mm.
Lace features:
Lace is made in one piece, the elements are connected in the process of knitting.
A feature of lace is the absence of volumetric elements. This type of lace is ideal for tablecloths, napkins, pillowcases, shawls.
Bruges lace has a rich history, because at the moment there are many techniques for knitting such lace.
Knitting the main tape
The Bruges lace technique is the laying out (knitting) of a ribbon into complex patterns or elements. The basis of lace is a ribbon consisting of double crochets and air loops.
The traditional ribbon is 4 double crochets and 5 air loops, however, the number of loops and columns can be any. The more columns, the wider the braid, the more loops, the more delicate the finished product.
To knit a ribbon, we collect 14 air loops, insert a hook into the 8th loop of the base and knit a double crochet.  We knit columns with a crochet to the end of the row. We get 7 columns.
  We turn the knitting over, we collect seven air loops, we connect them with a double crochet in the last column of the previous row.
  In the second row we knit 7 columns with a crochet, counting the first connected.
  Repeat to desired height.
 We get a ribbon consisting of openwork edges and a dense middle. The tape is traditionally laid out in the form of a snake.
Ribbon Turn Knitting Options
Several techniques are used to rotate the tape:
- uneven columns;
- single crochet with air loops;
- columns without a crochet.
Combining techniques allows you to create new original patterns.
Columns of different heights
When the ribbon is tied to the desired height, we collect half the loops from the required number for knitting the openwork part of the ribbon. In this case, the tape is connected from 7 columns and 7 air loops, that is, to start turning, we collect a chain of four air loops. 
We connect with a single crochet in the first openwork loop.

In the technique of Bruges lace, only openwork parts (half rings of air loops) are connected, crocheting columns in the middle of a semicircle, and not loops. The second connection is made with a single crochet, then with two, three and four. But we knit them incompletely, leaving the last loop on the hook, and then we begin to knit the next column with more yarns. The following connections are made with a column with 3 crochets, then with two, one. Those. in the opposite direction, to decrease.  When performing the columns, you should not close them, only after knitting the last column (single crochet), you need to close two loops to make the turn neat.
  Turning with unevenly high columns forms a wedge.
Connection with single crochets and air loops
The connection of the ribbon occurs due to the adhesion of lace elements with the help of single crochets. To get a larger circle diameter, air loops are knitted between the columns. 

 This connection technique will help create a larger element that is easy to fill with a knitted motif. The connection of loops and columns forms a circle. The middle of the circle is connected with chain patterns or a finished motif is placed in the middle.
Single crochet connection
It is most preferred for making a sharp semi-circular turn and for knitting dense motifs. To complete the connection, knit columns in each semicircle until a turn is formed (5-7 connections). 
The turn is preferably used for knitting the wads used to create the openwork edge of the knitted fabric.
Joining two pieces of tape
It is customary to connect ribbons in the knitting process. This is the hallmark of lace.
To continue knitting the tape after turning, you should perform the usual number of air columns on the outside, and on the inside dial half of the required number of air loops, fastening them with single crochets with air loops of the other part of the tape.
For a ribbon of 4 double crochets and eight air loops, we knit 4 air loops, connect them with a double crochet, knit 3 (three) more double crochets, continuing the braid. 


We collect eight air loops, turn knitting,
 knit 4 stitches.


Connection techniques allow you to adjust the size of the pattern and turn the braid in any direction at any stage of knitting.
Shell element
To tie a small round element, we knit a braid and continue knitting in a spiral. We twist the tape, knitting according to the principle of connecting two parts of the braid. 


The peculiarity of knitting is that it is necessary to make two connections in one half ring of air loops. This motif is suitable as a basis for a napkin, it can become an element of clothing.
We hope everything worked out for you.
Share with us your result and leave comments.
Your Kryuchkom.ru!
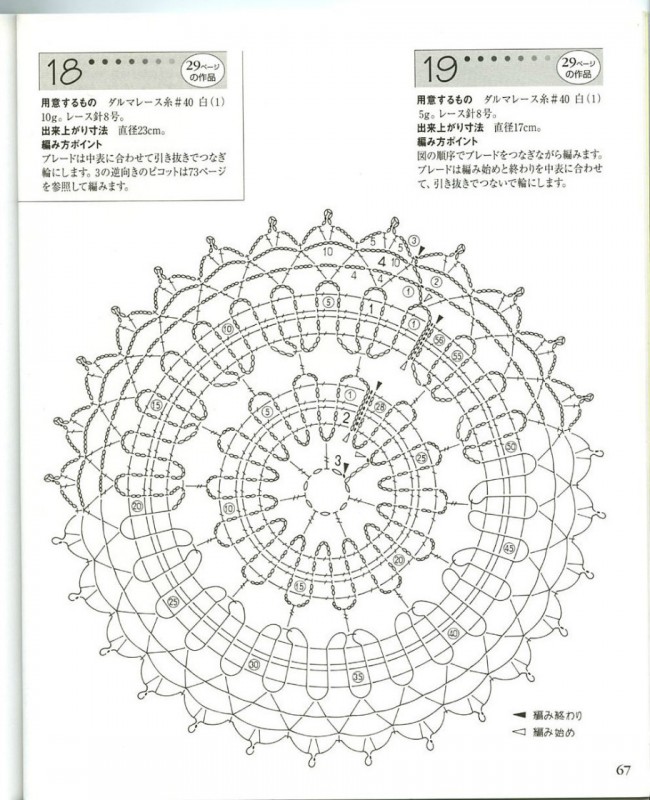
For beginners to learn to crochet, it will be useful master class of knitting napkins using the Bruges lace technique. You will learn how to knit beautiful flower-shaped doilies and how to make large and small curls from knitted braid, which are the main embellishment in Bruges lace.
The napkin is knitted continuously, a large curl is made from the braid for the first petal, then a small one in the opposite direction, so seven petals of the napkin flower are knitted sequentially, the last petal is connected to the first in the process of knitting in a circle and the ends of the braid are sewn together.
To start knitting the braid, cast on a chain of 10 stitches and knit 4 double crochets, starting from the 7th loop from the hook. On the side you get a loop of 6 air loops, resembling an eyelet.

For the second row, dial 6 air.p. and knit 4 sts s / n over the previous ones. A second ear is formed from 6 air.p. on the other side of the string. Continue knitting braid like the second row.


Tie 34 rows of braid so that there are 17 ears on one side of the braid; when knitting the 18th eyelet, we connect the beginning and end of the braid into a large curl.

To do this, when knitting the 18th ear on the inside of the braid, make 3 air stitches, insert the hook into the second eyelet from the end of the braid, knit a connecting column, 3 air stitches, then 4 sts s / n along the braid row.

After a row, repeat the connection, once again connecting the eye on the inside and the first eye from the beginning of the braid. You will get a large curl, connected along two ears at first with a void inside.

To make a small tight curl, to turn the braid in the opposite direction, knit 4 more rows of braid and when making the next eyelet from the inside of the curl, make 3 air loops, insert the hook into the last 3 braid ears and knit through them the connection, 3 air.p. and knit the next row of braid 4 sts s / n.


For the next large curl, knit another 34 rows of braid, connecting four loops with the first petal on the side.


Next, make a small tight curl, turning the braid in the opposite direction, like the previous one.
Tie 7 large and 7 small curls, they form the base of the napkin - a flower. Sew the beginning and end of the braid.

To fill large curls and the center of the napkin, you can choose threads of a different color.
Attach the thread to the first loop, make 8 air loops, knit alternately from each free loop a column with 3 yarns and 1 air loop, then make a connecting column into the first column with 3 yarns, 8 air loops, connect in the last free loop of the braid, secure and cut the thread.

To obtain figured lace from a simple straight braid, the braid is connected in the knitting process with side arches in the necessary places.
The first rule needed for making rounded braids is making beveled rows!
Technique for making beveled rows.
To complete the semicircle, 7 beveled rows are knitted. Dial in the first row 6 v.p., turn knitting and knit 2 double crochets, luster, single crochet, dial ch 6, turn knitting (fig. 1). In the next row, knit a single crochet, a half crochet and 2 double crochets, dial 6 ch, turn knitting.
rice. 1 fig. 2 fig. 3
Alternate these two rows. Thus, it turns out that short columns (columns without a crochet) of all rows are located on the same inner side and lead to a rounding of the braid! In total, it is necessary to knit 6 rows, and in the 6th row, knit 3 air loops for the arch (Fig. 2), insert the hook under the previous three arches (Fig. 3), pick up the working thread and stretch it through all the loops on the hook, knit more Ch 2 (fig. 4), and knit another (7th) beveled row (fig. 5).
rice. 4 fig. 5
METHODS OF CONNECTING THE BAND
1. Using a connecting column or single crochet.
Opposite arches can be connected as follows. When knitting the opposite arch, 3 air loops are performed, the hook is inserted under the desired arch (Fig. 6), the working thread is captured and pulled through all the loops on the hook, dial 3 ch. and continue knitting the braid (Fig. 7). Either pull the working thread through the arch, pick up the working thread again, pull it through both loops on the hook and knit 3 ch.
Rice. 6 fig. 7
2. With the help of columns of different heights.
If it is necessary that the connected arches be located at a certain distance from each other, columns of different heights are made at the junctions of the arches. On fig. 8 shows the execution of a double crochet. Ch 3, yarn over, insert the hook under the arch and knit a double crochet (grab the working thread and pull through 2 loops on the hook. Grab the working thread again and pull through the remaining 2 loops on the hook). Dial 3 v.p. and continue knitting braid.
On fig. 9 shows the execution of columns of different heights to connect opposite arches. Accordingly, starting from the inner rounding of the braid, the arches are connected using a single crochet, double crochet, 2 crochet, 3 crochet, 4 crochet. This leads to a change in the distance between opposite sides of the braid. In the schemes, the numbers between the arches indicate the number of crochets in the connecting column.
rice. 8 fig. 9
3. With the help of cruciform columns on the leg.
Consider this method using the example of knitting "Double Snake". First, one snake is knitted. Then the second, and the second is connected to the first during knitting.
Cross connection technique:
1) We dial 3 ch. (Fig. 11), we make 4 yarn overs, insert the hook under the lower left arch (Fig. 12), grab the working thread and pull it through the arch, grab the working thread again and pull it through 2 loops on the hook, grab the working thread again and we stretch it through 2 loops on the hook (Fig. 13).
rice. 11 fig. 12 fig. 13
2) We make 2 yarn overs and insert the hook under the upper left arch (Fig. 14), grab the working thread and pull it through the arch, * grab the working thread and pull it through 2 loops on the hook *. Repeat from * to * 2 more times.
Rice. 14 fig. 15 fig. 16
3) We make 2 yarn overs and insert the hook under the upper right arch (Fig. 15), grab the working thread and pull it through the arch, * grab the working thread and pull it through 2 loops on the hook *. Repeat from * to * until 1 loop remains on the hook. Dial 3 v.p. (fig. 16) and continue knitting the braid.
In this way, you can get a variety of types of snakes.


Crocheted Bruges lace - only at first glance it seems to be a complex knitting technique. As it turns out in practice, complex schemes are just a connected braid, folded into patterns in a certain way. Yes, it is difficult for beginners to read diagrams, but experienced craftswomen, who already had the opportunity and joy to embody several complex and lace products, cope with the craft simply.
Bruges lace basics
Bruges lace is more similar to Irish lace - here you also have to form a pattern for a detail, for example, a blouse on a template. The similarity lies in the need to knit a mesh - it is important to collect the braid folded into a pattern into a single canvas, which is sometimes difficult, but possible.
This type of knitting requires accuracy in calculations, so it is impossible to refuse to use a pattern - you can not guess with the size or violate the necessary symmetry of the pattern.
It should also be noted that the Bruges lace braid is especially knitted - each rise column is an air loop. It is further combined with the rest of such “columns” of lifting, which usually occurs in the process of knitting. Therefore, the base should be drawn in advance. If you mean crocheting a dress, you can use the patterns of that outfit that sits flawlessly on the figure - without pulling the figure together, and without sticking out. Using a pre-drawn base, knitting of the product begins. The article will further discuss the knitting technique for beginners.
knitting braid
To begin with, you should familiarize yourself with the technique of knitting braid and its connection to each other in a pattern. There is no need to talk about the knitting pattern for a long time - these are ordinary short rows of double crochets. The exact scheme of some patterns is presented below - it will not be difficult for beginners or experienced needlewomen to figure them out.


The only difficulty that beginners may have is the rounding of the braid, which is carried out immediately during the knitting process. Use the following instructions here:
- To knit a semicircle, you will have to knit 7 beveled rows, perhaps, depending on the selected braid pattern, more rows will be required.
- The example will be considered based on a braid with 4 double crochets. On the first slant row, work 2 double crochets, one half crochet and one single crochet.
- The second row is knitted in the reverse order - single crochet, half crochet and 2 double crochets. In each row, a rise of 3 air loops should be made - a shortened arch is knitted only from the rounding side. Otherwise, 6 air loops are also knitted.

- In this way, a total of 6 rows are knitted - this will allow you to round off the braid, which should then be fixed.
- To fix in the 6th row of a shortened arch, all arches are connected. So, having made one lifting air loop, insert the hook into the 3 previous arches, grab the thread and stretch it through all the loops on the hook. Knit the remaining 2 air loops.


- At the end, make the last 7 beveled row according to the resulting pattern.


The schemes for connecting the rows of the presented braid are presented - the main thing is to accurately calculate the dimensions of the resulting ribbon, since the method of connecting the rows depends on this. A detailed master class for connecting the braid is presented in the video, which will help in mastering the technique.
Bruges lace doilies


It is advisable to study Bruges lace on the basis of knitting napkins. There is a field for the manifestation of fantasy, so you can start knitting simple patterns. The following selection of crochet napkin patterns based on Bruges lace is proposed.
Knitting blouses with Bruges lace
Bruges lace makes excellent models of blouses, only here you have to work hard to try on the required size. For example, the technique of studying Bruges lace can be disassembled on two miniature tops.
pink top

Knitting a pink top begins with a coquette, where a flower is first knitted according to any similar pattern presented below. In the future, for a coquette, a braid is knitted, which is connected to a flower - as if enveloping a previously connected flower. For such a knitting coquette, you can use the presented scheme.


After the yoke is ready, start knitting the middle part. To do this, you can use the following diagrams shown in the picture. The scheme differs only in the presence of a rounding of the braid, which in this case is not required for knitting the top. As soon as the required length of the middle part has been reached - and this is the waistline, you can start knitting the lower part. Here we offer a braid with roundings and a connection with the main fabric in the knitting process. You can use the following scheme. At the end, you should tie a yoke - along the line from above, as well as the armhole line. You can use any strapping - the main thing is that the product looks finished and neat.
Turquoise top

Turquoise top is not as complicated as it looks at first glance. But knitting must adhere to the following sequence:
- To begin with, knit a yoke, which will later allow you to calculate the required height for knitting the middle part. Coquette can be any, but you can use the proposed scheme.

- Having knitted the yoke, ironed it, you need to try it on yourself - this will allow you to determine the required length of the armhole and the entire middle part. For knitting the middle part, you can use any simple pattern. In this case, the following variation is proposed.

- After knitting the middle part, you should “let” the Bruges lace ribbon horizontally - the separation of patterns.
- Then they start knitting the lower part, consisting of 2 "rows". The first is knitted according to the scheme.

- Then another ribbon is let in, which is also a separator of two Bruges patterns.
- At the end, a pattern is knitted, according to the presented scheme.

Thus, it becomes clear that Bruges lace is a combination of numerous patterns and knitting techniques. Further, for fantasy and inspiration, a selection of knitted products based on the considered type of lace is offered. Who knows, maybe after the implementation of simple models, you will proceed to more complex ones?


