Even if there are still frosts ahead, let's start preparing for spring.
Let's sew a light jacket using padding polyester. (although it can be made warmer if desired.)
We will sew something like this:
This is, of course, a down jacket, but ours will be even more beautiful.
Let’s not worry about quilting the fabric; there are plenty of fabrics on sale already quilted onto synthetic padding. Beautiful...
When choosing a fabric, pay attention to whether there is a thin interlining between the main upper fabric and the padding polyester. If there is, then very good. The synthetic winterizer will not come to the surface.
It's rare, but it happens.
We will need fabric: jacket length + sleeve length + 20 cm for hem and seam allowances. If your size is from 50, then add another 15-20 cm to the collar.
I still couldn’t buy pre-quilted fabric, so we’ll do the quilting ourselves.
ready-made ones were either expensive: 2,500 rubles per meter, or lining fabric was quilted onto the padding polyester. This was passed off as a “jacket” at 650 rubles per meter.
The raincoat for stitching needs to be thin.
The girls asked about natural fabrics. They are usually denser and quilted with insulation to “stand up”. Natural jacket fabrics are more suitable for men's jackets and for sewing parkas.
So, my expenses:
raincoat fabric (250 rubles per meter) - 1.5 m
padding polyester (60 rubles per meter with a width of 1.5 m) - 2 m (just in case, 1.7 m is possible)
The basic fabric costs 540 rubles.
You will also need lining fabric.
Take an ordinary synthetic one, inexpensive, durable, which does not fall apart in your hands. The same as raincoat fabrics.
If the fabric is an unusual color, the tone of which is difficult to match with a zipper, then first find a suitable zipper, and then adjust the length of the jacket to it.
If the jacket is black, white, gray, etc., then it will be easier to choose a zipper to match it.
We'll buy it later, the right size.
When the jacket is long, it is convenient if the zipper has 2 sliders. When you sit down, you can unzip it from below.
Sintepon can be thinner, thicker - plumper. Please note, the thicker the padding polyester, the plumper your jacket will be.
There is also holofiber and some other insulating materials. Take any insulation except batting. With batting, the jacket will be too heavy to lift.
We will quilt the already cut pieces.
There was a question about what threads are suitable for stitching. I have seen jacket fabrics on sale quilted with thick threads, the same as those used to stitch jeans. Beautiful.
But can you quilt just as beautifully?
Thick threads usually create problems when sewing. If you apply a weak tension, loops appear on the front side of the fabric; if you apply a stronger tension, it tightens the fabric.
So most likely we will quilt with the same threads that we use to sew.
I can’t say for sure yet. I’ll open my jacket, try different threads for stitching, and then I’ll tell you.
Some girls asked about knitted cuffs on the sleeves. Not every city has ready-made cuffs for sale; you can, of course, knit it yourself, but I planned sleeves without cuffs.
Taking measurements
Get ready, taking measurements is a very important stage.
Let me remind you that you need to tie a lace or elastic band around your waist to fix the location of the waist line. We have many measurements just from her.
To create a pattern for our quilted jacket, we will need the following measurements:
1. Chest circumference (measured horizontally through the most protruding points of the chest, on the back the protrusion of the shoulder blades is taken into account)
2. Waist circumference (horizontally at the narrowest point of the figure)
3. Hip circumference (horizontally across the widest part of the hips through the most protruding points of the buttocks, taking into account the protrusion of the abdomen)
4. Neck circumference (horizontally along the base of the neck)
5. Shoulder length (measured from the intersection line of the shoulder and the neck circumference line to the end point of the shoulder)
6. Shoulder circumference (measured across the fullest part of the arm)
7. Front width (measured along the front between the armpits)
8. Back width (measured along the back between the armpits)
9. Back length to waist (measured from the starting point of the shoulder to the waist line).
10. Length of the front to the waist (measured vertically along the front from the point of intersection of the base of the neck and the shoulder line through the most protruding point of the chest to the waist)
11. Side height (measured from the waist to the armpit)
12. Sleeve length (measured along a slightly bent arm from the end point of the shoulder to the wrist)
13. Wrist circumference
14. Oblique shoulder height (measured along the back from the spine at the waist line to the extreme point of the shoulder)
15. Length of the product from the waist (measured from the waist line to the line of the desired length of the product)
The girls asked how to take measurements of themselves.
Difficult. Some measurements are completely impossible. For example, the width of the back.
You'll have to ask someone.
Show your assistant a picture of how to take the required measurement, and check the correctness in the mirror.
If you don’t tend to change your body size often (well, at least the length :))), then taking measurements once can be useful for sewing several things.
Constructing a pattern
I won’t torment you with the theory of selecting and calculating increases for a jacket.
I offer ready-made figures. If you have doubts, or you are used to checking everything, then measure some finished jacket, the degree of fit of which suits you. You can take your own increment values.
In any case, increases and their distribution according to standards are not a constant value. Only you determine what degree of freedom your jacket will have. Larger increases mean greater freedom of fit, smaller increases mean the jacket will fit you more.
1. I suggest taking an increase in chest (to the whole chest girth) from 15 to 20 cm. No more than 20 cm. If you take 20 cm, then the jacket will be very loose.
2. Increase in hip circumference - 10 - 15 cm. If you take a smaller increase for the chest, then take a smaller value for the hips.
3. The increase in the waist will happen by itself, then you will see from the construction.
4. increase to the width of the back 4−5 cm, to the width of the chest - 3−4 cm.
I write about the remaining increases in the formation.
Write the increments on the measurement plate right away so as not to get confused.
I do this: opposite the name of the measurement, I write the exact measurement from the figure, and next to it the measurement with the increase and circle it.
And it is clear that when constructing we use a measurement from a circle, and a measurement from a figure will be useful for checking or for constructing another pattern.
Shelf
1. Draw a horizontal line. This is the waist line. We sign so as not to get confused.
2. Stepping back 5 cm from the right edge of the paper, place a point on the waist line through which we draw a perpendicular. This is the mid-front line.
3. From the waist up along this line of the middle front, we set aside the measurement Dtp + 1 cm, the so-called increase per package - by the thickness of the quilted fabric (front waist length + 1 cm). Let's call the resulting point A3.
4. Draw a perpendicular to the left to point A3.
5. Along this perpendicular we plot the value (Osh (Neck circumference): 6). Let's call the resulting point A4.
6. Down from point A3 we set the depth of the neck. It is 1 cm larger than the width. Point A5
We are increasing the width and depth of the front neckline by 1.5 cm so that the collar does not pinch :)
8. From the resulting point, set aside 4 cm down to bevel the shoulder. Let's call point 4.
9. Draw line A4,4. Extend a little beyond point 4.
10. From the waist down along the middle line of the front, set aside the value (About (hip circumference): 5).
Draw a perpendicular to the left from the resulting point. This is the hip line. Let's sign.
That is, the distance from the waist line to the hip line is calculated using the formula (About: 5).
Back
1. From the middle of the front along the hip line, set aside the value (Chest circumference) plus Increase in chest: 2) (Og + Pg): 2.
From the resulting point we draw a perpendicular upward. This is the line of the middle of the back.
2. Along the line of the middle of the back up from the waist, we put aside the measurement Dst + 2 cm, an increase due to the thickness of the quilted fabric (Back length to waist + 2). We call the resulting point A.
3. From point A to the right, draw a perpendicular. We set aside the value (Osh (Neck circumference): 6). We put point A1.
4. Place 2 cm down from point A. This is the depth of the neck.
After drawing the neck line, widen it by 1.5 cm. This is necessary for outerwear.
We increase the back neckline only by 1.5 cm in width. Leave the depth at 2 cm until fitting.
5. From point A1 to the right, set aside the measurement DP plus 1 cm for a good fit and plus 1 cm for freedom (Shoulder length + 2 cm)
6. From this point downwards we set aside 3 cm for the shoulder bevel. We get point 3.
7. Draw line A1,3. Place the measurement Dp + 3 cm on it again.
Create a dart in the middle of the shoulder. The middle of the dart is perpendicular to the shoulder line. The length of the dart is 8-9 cm, the opening of the tuck is 2 cm.
8. We check whether the measurement in the drawing corresponds to Vpk (the height of the shoulder is oblique). We measure from point Tc to point 3. If it is more, leave it like that until trying on. The main thing is not less. If it is less, then reduce the bevel of the shoulder (from the horizontal line of the shoulder we put not 3 cm down, but less. As much as is needed according to your Vpc measurement).
9. From the waist line, place the measurement Wb (Side Height) up. Draw a line from the middle of the back to the middle of the front. Let’s label it “chest line.”
At the intersection of the chest line with the line of the middle of the front we get the GP point, at the intersection with the line of the middle of the back we get the GS point.
We calculate the width of the shelf and back along the chest line.
Og (Chest circumference) plus the increase in the chest divided by 4. If your chest is not large, then for a jacket, I recommend making the front and back the same in width. In a jacket we need a fairly large increase in the back for freedom of movement.
For example, Og is 100 cm. Plus an increase in the chest of 16 cm.
It turns out (100+16):4=29. The width of the shelf will be 29 cm. The width of the back will also be 29 cm.
We set aside the resulting values along the chest line. Let's call the resulting point G3.
At the waist line we make the shelf and back 1-1.5 cm narrower than these parts at chest level. This side dart. We won't do any other darts - we have a tie at the waist. On quilted fabric, stitched darts create more thickness.
We set aside the resulting values along the waist line.
10. Calculate the width of the shelf and back along the hip line.
It is calculated in the same way as for the chest: (About (hip circumference) plus the increase in the hips divided by 4). We set aside the resulting values along the hip line.
For example: hip circumference 108 cm plus an increase of 10 cm = 118. 118 divided by 4 equals 29.5.
We set aside 29.5 cm from the point Bp to the left along the hip line. We move from point BS 29.5 to the right along the hip line.
In the example, the hips are wider than the chest, so the drawing shows an extension towards the hip line. If the hips are narrower than the chest, then there may be a narrowing of the side line towards the hips.
Draw a side line by connecting the corresponding points on the line of the chest, waist and hips.
Armhole line
11. Along the chest line from the point GP, set aside the value to the left ((Chest width + Increase to chest width) divided by 2 (Wg+Wg): 2)). We put point G2. From this point we draw a vertical upward until it intersects with the shoulder line. This line is our guide. We will determine the width of the shelf at this level during fitting.
12. Draw a line for the front armhole by hand from point 4 to point G3. The main thing is to make sure that this line does not go beyond the line from point G2. So that the chest width is not already measured as the chest width + an increase in the freedom of fit.
13. Along the chest line from the GS point, we put the value to the right (Back width + Increase in back width divided by 2 ((Ws + Pshs): 2)).
14. Draw a line for the back armhole by hand from point 3 to point G3. The main thing is to make sure that this line does not go beyond the line from point G1. So that the width of the back is not already measured as the width of the back + an increase in the freedom of fit.
The entire pattern of the shelf and back is ready.
Necessarily! After construction, we check the drawing. We measure all the widths and lengths and check the measurements.
Work calmly, we are in no hurry. The main thing is that we enjoy the process, praise ourselves more often and let our loved ones know how smart you are and what successes you have already achieved.
Sleeve pattern
Trying on and wearing a finished item for the first time are my favorite stages of sewing things. The rest have to be endured out of necessity.
Please take your time. After construction, check everything carefully. If something doesn’t add up or you don’t like, check again to see if you calculated and drew everything correctly, and then write to me.
We are building a sleeve.
1. Draw a vertical line. We put point O at the top.
2. From point O, put down the Sleeve Length measurement (Druk) and draw a horizontal line through the resulting point. This is the line of the bottom of the sleeve.
3. From point O, we set the height of the sleeve cap down.
calculation of the rim height:
We measure the length of the armhole of the front and back, dividing the resulting figure by 3.
For a jacket, it is better to reduce this number by 2-5 cm, depending on the degree of “drop” of the shoulder.
Look at the picture of our jacket, here the shoulder is considered “in place,” that is, not lowered.
If you decide to lower the shoulder, for example, by 2 cm (on the pattern you drew a shoulder 2 cm longer than your own), then reduce the height of the sleeve cap by 3 cm, etc.
We designate the resulting point O1 and draw a horizontal line through it.
4. Sleeve width is equal to Shoulder circumference plus increase (Op + P).
Increase in sleeve width for jackets from 10 cm. I took 10 cm for my jacket. You can’t wear a thick sweater. If you wear your jacket over some bulky clothing, then measure the girth of your arm in this clothing and add 10 cm to the resulting girth. You can’t go wrong.
If the arm is full (more than 36 cm), then you can reduce the increase to 6 cm (this is the minimum) so that the jacket looks better and does not make your figure look fat.
Place half on both sides of the mid-sleeve line. We get points P and P1
5. Connect points P and P1 with straight lines to point O. Line P,O- the front part of the sleeve cap, line P1, O - the back part of the sleeve cap. We divide these lines into 4 parts. The deflection in the middle between points P and p is 2 cm, put point 2, between points p and O is 1.5 cm, put point 1.5, etc.
6. Draw the curve of the sleeve (look at the drawing) through points P, 2, p, 1.5, O and then O, 1.5, s, 1, P1
7. Bottom of the sleeve.
Divide the wrist circumference (as measured) plus an increase of 10 cm in half and set it aside on both sides of the midline of the sleeve. We get points H and H1.
8. Connect points P and H, P1 and H1.
9. We measure the cuff line of the sleeve and check that it matches the length of the armhole. The length of the sleeve cap should be 3-4 cm longer than the armhole, then the sleeve will fit well.
We check the front part of the sleeve cap for compliance with the length of the front armhole, and check the back part of the sleeve cap for compliance with the length of the back armhole. They should accordingly be 1.5-2 cm longer than “their” armhole parts.
If the length of the sleeve collar is not enough, then check the height of the sleeve. If you think it is sufficient (you calculated it correctly, as I wrote to you above), then increase the sleeve width.
We sign the pattern: “Sleeve, 2 parts” and mark the direction of the grain thread. It coincides with the line of the middle of the sleeve.
Construction of a stand-up collar
1. Construct a right angle at point O. Up from point O we set the height of the stand. For jackets from 5 centimeters. We put point B
2. Set the length of the collar to the right (measure the length of the neck according to the drawing). Place point B2
3. From point B2 up, set aside 0-2 cm, depending on the desired degree of fit of the stand. We put point B3.
If you take the number 0, then the collar will be visually slightly distant from the neck. If the number is 2, then the collar will fit more closely, as if inclined towards the neck.
4. Draw a line for stitching in the stand from point O to point B3
5. Draw a perpendicular to the stitching line from point B3. We set the height of the stand on it.
6. Draw the flying part of the stand
If it’s not entirely clear, there is a video on the blog of constructing a stand-up collar for a shirt. First video.
The structure is the same, only the numbers are slightly different.
Cutting and stitching
The hardest part is over. There are only pleasures left
Uncover
Before cutting, be sure to check the fabric for defects. It is ideal to do this during purchase or upon receipt from a client. But before cutting, we inspect the fabric again, in case we missed something or something new appeared.
If you are worried that you may have constructed the pattern incorrectly, or are afraid of ruining the fabric, then cut the jacket from unnecessary cheap fabric, from an old sheet, for example.
Try it on, make sure that the jacket still “fits” you, that the sleeve fits into the armhole, etc., and only then cut your raincoat fabric.
We place the patterns on the fabric, observing the direction of the grain thread, the direction of the pattern (if any) and the pile, and pin it with tailor’s pins.
We trace each pattern with chalk along the contour, drawing the second contour by retreating to the seam allowance.
Since the jacket is outerwear, and even with synthetic padding, and if you also quilt yourself, then make 2 cm seam allowances along the shoulder, side seams, armholes, and the middle seam of the sleeve, 1-1.3 cm along the neckline, hem allowance for hem and hem sleeves at least 5 cm.
Cut out without detaching the pattern from the fabric.
Small parts must also be placed on the fabric, check that everything fits, but do not cut out. During fitting, sometimes you have to change the length of the collar, or even the shape. It’s better to cut out small details after fitting.
Stitch
For quilting, we draw lines on the front side of the cut parts with a sharpened soap (chalk can be difficult to clean off from the fabric) along which we will quilt. These can be rhombuses, squares, just horizontal or vertical lines. Don’t come up with a very complex pattern, it will be very difficult to quilt.
We place a part, for example a shelf, on the padding polyester and cut out the padding polyester along the contour of the part with a small allowance, 2-2.5 cm.
We chop off the cut piece and padding polyester along the contour and along the stitch lines quite often so that it does not move during work.
First, we sew a line along the contour of the part, departing 4-5 mm from the edge, trim off the excess padding along the edges, then quilt the entire part along the pre-drawn lines.
Stitch length is maximum.
Fitting
I think everyone has already cut out their jacket. Let's move on to the fitting.
For fitting you need:
1. sweep the shoulders and side seams, middle sleeve seam, tuck in sleeves. “Assemble” the product.
2. We don’t baste the collar, pockets, cuffs, but we prepare at least the patterns
Fitting
We pin the product as it will be in finished form.
What you need to pay attention to when trying on:
1. Overall balance of the product.
Let's see if the shelf or back is too tight. This may happen if the measurements of the length of the back to the waist or the length of the shelf to the waist are taken incorrectly.
2. Position of shoulder seams.
We look to see if the shoulder seam line extends too far onto the front or back
3. Shoulder length.
The length of the shoulder should be proportional to the silhouette of the product (a loose silhouette corresponds to an elongated shoulder)
4. Shoulder height
We look for diagonal folds in the shoulder area, which disappear if you raise the shoulder.
5. Neckline
The fabric should not “run” onto the neck.
The neckline should not be too large, but it should not be tight either.
6. Side seams.
They should be vertical unless the model specifies anything else.
7. The degree of fit of the product in the area of the chest, waist and hips.
Perhaps we are discussing it with the client.
8. The width of the product is at the measurement level of Chest Width and Back Width.
Move around a little to determine the degree of freedom in this area.
9. Bottom of the product.
We check that the bottom line is horizontal, unless the model specifies otherwise.
10. Sleeve fit.
Let's see if the sleeve fits well. I indicate an incorrect fit of the sleeve by diagonal creases on only one side of the sleeve.
We check whether the height of the sleeve cap corresponds to the armhole. The height of the rim needs to be changed if it has diagonal creases on both sides.
11. We specify the length of the product and the length of the sleeve.
12. We specify the shape and size of the collar by applying the pattern.
13. We specify the shape and size of the pocket and valves. If it is an invoice, we pin the pocket pattern in place; if it is a welt, we simply mark it with lines.
We mark all changes by pinning them with tailor’s pins, and additionally make
clarifying entries.
We make changes to the cut based on the pinned pins and the notes you made during
fitting time.
A second fitting is necessary if the figure or model of the jacket is complex, and after the first fitting it is not clear whether the product will fit well after making changes to the cut.
The second fitting is carried out in the same way as the first.
Basics
After fitting, we make adjustments to the cut. Mark the location of the pockets.
I decided to simplify it - we’ll just make a pocket with a leaf, without a zipper.
Such a pocket can be made on both shelves at the bottom, and as an internal one - on the lining in the chest area.
Be sure to practice making a pocket on a piece of fabric. Do 1,2,3 practice pockets until you get a good one.
The finished width of the pocket (leaves) is 2 cm, the length is 14−15 cm for a women's jacket, 16−17 cm for a men's jacket. The main thing is that your hand fits freely into your pocket.
We will need to cut out:
leaflet (a rectangle made of the main fabric of the fabric 4 cm longer than the entrance to the pocket and 6-7 cm wide),
valance (a rectangle made of the main fabric the same size as the leaf), pocket burlap (from the lining fabric, or from the main fabric)
Glue the leaf adhesive cloth.
1. draw the entry point to the pocket:
width, pocket length and center line (turquoise line)
2. on the piece of paper and on the valance, at a distance of 1 cm from the edge, draw stitch lines
3. from the side of the middle of the shelf, attach a leaf to the middle line face to face, from the side - a valance
3. Topstitch the leaf and valance
4. make a cut along the midline not reaching 1-1.5 cm to the end of the lines, at the ends - diagonally towards the corners (pink line on the pocket markings)
Be careful not to cut 1-1.5 mm to the last stitch so as not to damage the thread
5. turn the valance and the leaf inside out, sweep out the leaf, folding it to the desired width - up to 2 cm
6. sew 1 piece of burlap pocket to the leaf (in the seam of attaching the leaf to the shelf)
7. Unscrew and sweep the burlap as it will be finished, sharpen the pocket along the face on the side where the leaves are stitched (for fastening and finishing). You can sew a stitch by stepping back 1-2 mm, or on the presser foot.
8. stitch 2 pieces of burlap pocket - to the free edge of the valance
9. secure the pins (along the width of the pocket), which we got when notching to the corners, with a stitch, as if sewing them to a piece of paper
10. stitch together the burlap pocket details
11. stitch the remaining 3 sides of the pocket
Even if you don't welt pockets on your jacket, learning how to make this pocket will be very useful to you.
Sewing the top. Lining
The jacket is easy to sew:
1. sew shoulder seams
2. sew the top collar into the neck of the jacket
3. attach a zipper to both shelves
4. sew the sleeve into the armhole
5. sew the side seam and the sleeve seam at the same time
Lining
The lining is cut out using the same pattern as the top of the jacket, minus the lining and back facing (I highlighted them in pink).
From the main fabric we cut out the lining and back facing
From the lining - the rest
Seam allowances on the shoulder, side seams and lined sleeves are the same as on the top of the jacket.
Seam allowance at the bottom is 1.5 cm, at the bottom of the sleeve - 3-4 cm
1. stitch the edge to the shelf
2. sew the back facing to the back part
3. sew the shoulder seams on the lining
4. sew the lower collar (from the main fabric) into the neck of the lining
5. sew the sleeve into the armhole of the lining
6. sew down the side seam of the lining and at the same time the sleeve seam
You can make a pocket on the lining in the chest area. You can use an invoice or don’t be lazy and make a slotted one with a leaf, such as I described in the last post.
The jacket is ready!
Stop being lazy, let's finish the jacket. I've walked mine a couple of times already.
This is what happened
And this is how the lining is sewn to the top of the jacket:
1. Fold the top of the jacket and the lining face to face, stitch along the middle of the front, where the zipper is, and along the collar. We lay a finishing stitch (stepping back on the foot) along the zipper and along the flap of the collar.
2. Turn the sleeve inside out and straighten the lining on the sleeve. If necessary, we trim the sleeve lining; it should be the same length as the finished folded sleeve.
3. We process the bottom of the sleeve into a hem with a closed cut (tuck 1 cm, tuck another amount as you left for the hem). We simply put the lining in the fold.
4. Sew the upper and lower collars together according to the seam allowance (the one between the collar and neckline)
If you need a warmer option, cut out the lining additionally, insulate the lining with non-woven fabric, and also lengthen the sleeves of our jacket. You can see how to sew the lining in, steps 14+15. For the lining and non-woven parts, cut out the details of the shelves (up to the hems), the back with a fold, parts of the sleeves and the hood to the facings.
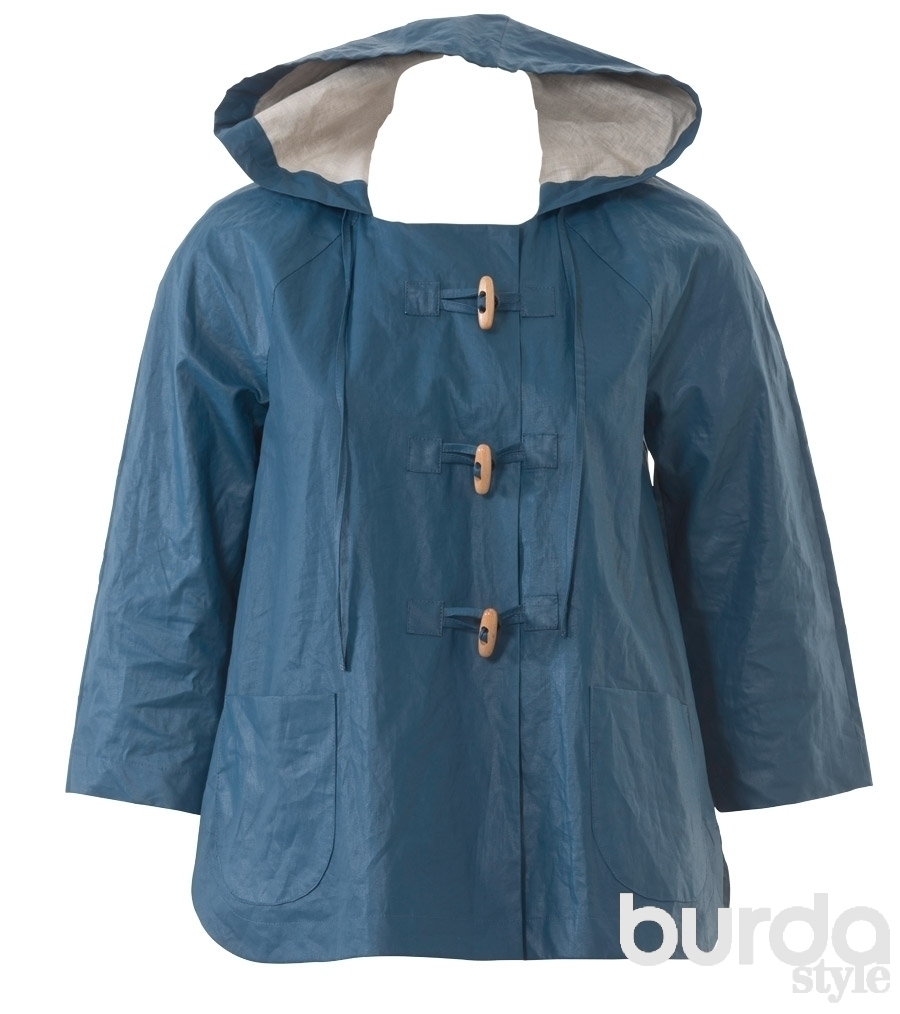
Sizes 34, 36, 38, 40, 42, 44
Back length approx. 68 cm
The sleeve is approx. shorter than standard. 8 cm
You will need
● Coated linen 130 cm wide and 2.20 m long for all sizes● 3 oblong buttons
● 1 large button for sewing
● 2 blocks with backing washers with a diameter of 8 mm
● Sewing threads
● Silk paper

Before opening:
All data is shown in a frame with a reduced drawing of the pattern details. Cut out the pattern pieces along the contour lines of the appropriate size. Pay attention to the lines and data specifically for the 3 V model.On parts 1 and 2, the bottom facings are drawn for size 34. For sizes 36-44, draw the bottom facings again to the same width as for size 34.
1st hem drawn on the detail and 1st and 2nd hemlines on the detail, highlighted gray, reshoot as separate parts.
On part 1, the marks for sewing on the parts of the brake fastener are set for size 34. For other sizes, put the marks again: the mark for the upper part of the fastener is at the same distance from the edge of the neckline as for size 34; the mark on the bottom of the fastener is the same for all sizes; the last mark is in the middle between the upper and lower marks of the fastener parts.
Uncover
Layout plan:
Shows the most rational way to arrange the details of a paper pattern on the canvas. Make sure that the grain direction arrow is parallel to the edge or fold of the fabric.
Important: for the middle part of the hood and the lining of the hood, as well as for the cords and parts of the brake fastener, special paper pattern details are not given on the pattern sheet. You can draw them directly on the canvas (dimensions including allowances).
Coated linen fabric:
1 Shelf 2x1 Pick 2x
1 Hemming of the bottom of the shelf 2x
2 Backrest with fold 1x
2 Lower back facing with fold 1x
3 Front sleeve 2x
4 Back sleeve 2x
5 Side hood 2x
7 Pocket 2x
8 Stitching the neck of the shelf 2x
9 Back neck facing with fold 1x
a) middle part of the hood length: size. 34 - 51.5 cm, size. 36 - 52 cm, size. 38 - 52.5 cm, size. 40 - 53 cm, size. 42 - 53.5 cm, size. 44 - 54 cm and width 11 cm, including allowances;
b) hood facing 79 cm long and 6.5 cm wide, including allowances;
f) hood tie with a total length of 130 cm and a width of 3 cm, including allowances;
g) 6 brake cords, 13 cm long and 3 cm wide, including allowances;
h) 6 pieces of brake fastener measuring 4 x 4 cm, including allowances.

Allowances:
Around the details of the paper pattern, mark allowances on the canvas using a ruler and tailor’s chalk: for the hem of the bottom of the sleeves - 4 cm, for all other cuts and seams - 1.5 cm. Cut out the details along the drawn lines.Seam lines and markings:
The contours of the pattern pieces (seam and bottom lines) and the markings, except for the direction line of the grain thread, are transferred to the wrong side of the cut pieces using a copy wheel (for coated fabrics/canvases using a copy wheel without teeth) and copy paper (see. detailed instructions on the paper packaging). Transfer the mid-front lines, fold lines and pocket alignment lines, as well as the marks for sewing on parts of the brake fastener to the front side of the fabric using large running stitches, see stitches in.Sewing
When basting and stitching, fold the cut pieces right sides together. At the beginning and at the end of each seam, perform a bartack. For coated fabric/canvas sewing machine insert Microtex needle.To baste the cut details, use the same threads as for stitching and a thin needle. If possible, use a needle to pierce the fabric in the area of seam allowances, since when removing running stitches, marks may remain from the needle. Seam allowances do not need to be overcast. Iron only from the wrong side, setting the iron thermostat to a moderate temperature, or from the front side through the ironing iron.
Step 1: sew in the sleeves
Pin the front halves of the sleeves into the sections of the armholes, aligning the transverse marks 2 and the seam lines. Sew in (picture below).
Pin the back halves of the sleeves into the back armholes (control mark 3). Sew in (picture below). Cut the seam allowances to a width of 1 cm, overcast them together and press onto the sleeves.

Step 2: Top Sleeve Seams
Place the front halves of the sleeves with the back halves right sides together, pin and stitch the upper sections of the sleeves (control mark 4, picture below).
Cut the seam allowances to a width of 1 cm, overcast them together and press onto the front halves of the sleeves.
Step 3: Hood Tie and Brake Cords
Fold the hood tie and brake cords alternately in half lengthwise with the wrong side inward. Iron the fold. Lay the tie and cords flat again, fold the longitudinal sections toward the fold. Iron. Fold the tie and cords in half again lengthwise, stitch the open edges to the edge (picture below). Set the tie and cords aside.Step 4: Hood
Insert the hood into the neck from cross mark to cross mark (control mark 5) face to face and sweep in (picture below).
Step 5: facings and hems
Place the front neck facings with the back neck facings right sides together, pin and stitch the shoulder sections (check mark 6, picture below).
Cut seam allowances to a width of 1 cm and press. Pin the front edges of the facings of the neck of the shelves from the top edge and the front edges of the edges of the bottom of the shelves from the bottom edge to the inner edges of the edges, right side to the front side. Stitch to the width of the allowance (1.5 cm, picture below).

Iron the seam allowances, press the allowance along the inner edge of each hem (1.5 cm) to the wrong side. Stitch the front edges of the facings to the edge. Place the facings of the bottom of the shelves and the hem to the corresponding sections of the fronts, right side to right side, pin the facing of the neck to the cut of the neck, aligning the shoulder seams with the upper seams of the sleeves and securing the hood.
Place a stitch along the side sections of the shelves from the cross mark, along the bottom sections and sides, as well as along the neckline. Cut the seam allowances close to the lines, notch in the rounded areas, and cut diagonally at the corners (picture below).

Leave the facings and hems lying on the jacket right side to right side for now. Place the facing of the bottom of the back with the back, right side to right side, pin and stitch along the side edges from the cross marks and along the bottom edge. Cut seam allowances close to the stitching and notch in the rounded areas (picture below).

Leave the facing of the bottom back for now lying on the back, right side to right side. The upper ends of the facings of the bottom of the shelves and the back at the transverse marks are alternately turned down and pinned (picture below).

Step 6: Side seams and bottom sleeve seams, finish piping the bottom and sides
Fold the shelves right sides together with the back, fold the sleeves lengthwise. Pin the side sections from the cross marks and the bottom sections of the sleeves, aligning the sleeve seams and seam lines. Sew the side seams and bottom seams of the sleeves by stitching at the bottom edges of the sleeves from the marked bottom line diagonally to the edges (picture below).
Cut seam allowances to a width of 1 cm. Remove pins. Turn the bottom facings, as well as the hemming and neck facings to the wrong side. Iron the edges. Press the allowances of the side seams and bottom seams of the sleeves forward; at the lower ends of the side seams, press the allowance diagonally to the back so as not to cut (picture below).

Sew the bottom and side edges of the cut, as marked on the pattern, to a width of 3 cm, and at a distance of 1 cm above the end of the cut, sew a stitch across. Cut off the hem allowance at a distance of 5 mm from the finishing stitch line. Sew the neck facing to the sleeve seam allowances.
Step 7: Bottom of Sleeves
Turn the hem allowance for the bottom of the sleeves to the wrong side. Topstitch the bottom of the sleeves to a width of 3 cm, stitching the hem allowance at the bottom.Step 8: Patch Pockets
Turn the one-piece facing of the upper edge of each pocket to the wrong side and iron it. Iron the seam allowances on the remaining pocket edges to the wrong side. This will work best if you use a motive. To do this, remove the paper pattern piece (without a one-piece facing) onto a thin one thick cardboard. Cut out the motif and place it on the wrong side of the pocket. Iron the allowances along the edges of the motif to the wrong side, notching in the rounded areas (picture below). Pin the pockets to the shelves along the alignment lines and stitch to the edge.
Step 9: Brake Clasp
Iron the cuts on the parts of the toggle fastener (h) on the wrong side to a width of 7 mm, the size of the fastener parts in the finished form is 2.5 x 2.5 cm. Pin the parts of the fastener to the shelves according to the markings, leaving the front edges free. Thread one cord at a time into an oblong button. Insert the ends of the cord to a length of 1.5 cm under the front edges of the fastener parts of the left shelf and pin. Sew the parts of the fastener along the perimeter to the edge (picture below).
Fold the remaining cords in half, fold the ends together, and insert a length of 1.5 cm under the front edges of the fastener parts of the right shelf. Sew the parts of the brake fastener along the perimeter to the edge.
From the inside of the right shelf, to the place where the upper part of the brake fastener is sewn, sew the upper part of the button, without bringing the needle to the part of the brake fastener. Place the right shelf on left shelf, aligning the lines of the middle front, put a sewing mark on the bottom of the button on the left shelf. Sew the bottom of the button to the left shelf.
Tip: instead of toggles, you can punch one or two rows of buttons, including on the pockets. How to pierce rivets, snaps and buttons, see
| Russian size | Bust | Waist circumference | Hip girth | |
| size 40, height 168 cm | 80 | 62 | 86 |
Payment for goods Buy |
| size 42, height 168 cm | 84 | 65 | 92 |
Payment for goods Buy comment = "42 female" |
| size 50, height 168 cm | 100 | 82 | 108 |
Payment for goods Buy |
| size 52, height 168 cm | 104 | 85 | 112 |
Payment for goods Buy |
| size 54, height 168 cm | 108 | 88 | 116 |
Payment for goods Buy |
| size 58, height 168 cm | 116 | 97 | 124 |
Payment for goods Buy |
| size 60, height 168 cm | 120 | 101 | 128 |
Payment for goods Buy |
* As a result of payment, a file with a pattern is automatically sent to your specified email. If the file has not arrived within 30 minutes, then you need to send. No need to pay again!
Patterns are given without seam allowances.
Pattern contents:
The quilted jacket fits well thanks to front and back reliefs. The originality of the model lies in the technically well-thought-out oblique shelf with a strip covering the zipper. The collar is a high stand-up collar that serves as an excellent alternative to a scarf in windy weather.
Difficulty level - above average. Practical skills and experience in sewing are required.
Pattern measurements sample sizes (measurements of unpublished sizes are determined as the arithmetic mean between adjacent sizes):

To sew a quilted jacket, prepare necessary materials:
. jacket or raincoat fabric;
. non-woven fabric synthetic winterizer with a density of 150 g/sq. m (thickness 1.5-2 cm);
. non-woven fabric synthetic winterizer with a density of 100 g/sq. m (thickness 1-1.5 cm);
. tractor detachable zipper - 1 pc.;
. interlining for duplication;
. snap buttons or Velcro;
. lining fabric.
Clarifications: different densities of padding polyester require distribution of seam density and freedom of movement. On the details of the sleeves and collar, you need to quilt the fabric with a padding polyester of lower density.
To make a practical fastener, take a high-quality tractor or spiral zipper. For the lining, you can choose a fabric of your choice: fleece, quilted insulated lining, viscose, polyester.
pay attention to important point! Assess the real possibilities of your sewing machine. Not every stationary unit can adequately handle stitching fabric on thick synthetic padding. Pay attention to the jacket fabrics finished sample You may be able to buy ready-made quilted fabric right away. Then for the leaf you need to choose an unquilted material to match the main one.
Stitch
Let's immediately deal with the most important starting point. The stitch can be done on a whole fabric or on separate parts. The main fabric is laid over the padding polyester so that its edges protrude a few cm around the perimeter. This is difficult, since it is necessary to paint the surface with precise lines at equal distances.
The second method is easier. The cut parts must be laid out on padding polyester, secured with pins and sewn perpendicular lines, periodically checking the coincidence of the stripes on adjacent cut parts. The quilted parts should be stitched around the perimeter and cut out, leaving a small padding pad gap - approximately 0.5-1 cm.
Uncover
From the main fabric:
- central part of the back - 1 child. with fold;
- back side - 2 parts;
- shelf side - 2 pieces;
- the central part of the shelf with a beveled front cut - 1 piece;
- the central part of the shelf to the half-skid line (marked as a dotted line) - 1 piece;
- cutting part of the beveled front half to the half-skid line (marked as a dotted dot) - 1 piece;
- bar - 1 child. with fold;
- collar - 2 children. with fold;
- sleeve - 2 parts;
- folded leaflet - 2 pieces;
- burlap - 2 pieces;
From padding polyester:
. central part of the back - 1 child. with fold;
. back flank - 2 parts;
. shelf side - 2 pieces;
. the central part of the shelf with a beveled front cut - 1 piece;
. the central part of the shelf to the half-skid line (marked as a dotted line) - 1 piece;
. cutting part of the beveled front half to the half-skid line (marked as a dotted dot) - 1 piece;
. bar - 1 child. with a fold (from thin padding polyester);
. collar - 2 pieces. with a fold (from thin padding polyester);
. sleeve - 2 pieces. (from thin padding polyester);
. leaf with fold - 2 children. (from thin padding polyester).
From the lining:
The central part of the back - 1 child. with a fold (+ 2 cm away from the fold for an oncoming fold - for a loose fit along the back);
- back side - 2 parts;
- shelf side - 2 pieces;
- the central part of the shelf to the half-skid line (marked as a dotted line) - 2 parts;
- sleeve - 2 parts;
- burlap - 2 pieces;
When cutting out parts, do not forget to add seam allowances and mark notches to ensure proper alignment of the parts. Allowances for raised seams, neckline, armhole - 1 cm, side allowances - 1.5 cm, placket and front center cut - 1 cm, lower cuts of back and front, as well as sleeves - 3 cm. Immediately mark the location of pockets in raised seams . Duplicate the leaves.
Operating procedure
1. Stitching parts. How to do this is described at the beginning of the article in the thematic section.
2. Sew the center and side back pieces separately from the main fabric and separately from the lining. Immediately place a central fold on the lining and secure. Then do similar actions with sleeves. Put the finished parts aside and proceed to the next operation.
3. Pockets. Sew the side seams of the leaf and iron using steam. Take burlap from the main and lining fabric. Align the fabric burlap with the notches on the relief cut of the side of the shelf, placing the piece face to face. Sew on 0.9 cm. Turn the seam towards the burlap, and secure with a finishing stitch at 0.1 cm. Place the finished leaf with an open cut on the front side of the central part of the shelf, sew on 0.9 cm. Place the burlap on top, sew the seam into the seam , turn the burlap towards the shelf, secure it, and perform the finishing stitch. Stitch the burlap sections and iron using the steam function.
4. Stitch raised seams side and central parts of the shelf made of the main fabric. Repeat the operation with the lining parts. Make notches, not reaching 0.1-0.2 cm from the seam. Perform an OBE.
5. Duplicate the strip with non-woven fabric. Fold it in half, right sides facing in, and topstitch the top and bottom edges. Cut the allowances to 0.2-0.3 cm. Turn the strip inside out, straighten the corners and stitch the open edge with a straight stitch of 0.5 cm. Sew the finished strip into the bias half of the shelf.
6. Sew the shoulder seams separately on the main fabric and lining pieces.
7. Sew in sleeves from the main fabric, aligning the control notches and evenly distributing the piping along the armhole. Repeat the operation with the lining parts.
8. Lightning. Sew one half of the zipper to the cut part of the half zipper, folding the tape face to face on the cut side. Sew the second part to the other half of the shelf.
9. Sew the strip to the beveled edge of the shelf, and with it a simulated “edging”, that is, cut it to the half-skid line with a zipper on the second side. Give a finishing stitch along the cut piece.
10. Sew the parts of the shelf with the lining. Give a finishing stitch along the zipper.
11. Sew the top edge of the collar and press the seam. Then sew the side sections together, folding the collar face to face. Trim the allowances. Iron the collar using steam, then sew into the neckline. Perform an OBE.
12. Turn the garment inside out and slightly open the seam of one sleeve on the lining. Sew the bottom edges of the sleeves of the main fabric and the lining. Fold and hem with blind stitches. Iron.
13. Turn the jacket inside out and connect the bottom edge of the lining and jacket machine stitching. Secure the hem with blind stitches.
14. Turn the jacket inside out through the sleeve and stitch up the ripped area by 0.1-0.2 cm.
15. Sew Velcro or insert buttons to secure the oblique part of the shelf. The jacket is ready!
According to this pattern:


The pattern for the Casket website was prepared by Anna Ivina.
How to sew a windbreaker with your own hands? How to make a windbreaker pattern yourself? Master class: how to sew women's jacket- a windbreaker without lining will show step by step the entire sewing process with full description. You can sew a light corduroy windbreaker with a hood for spring very quickly. Just do everything according to the instructions, and sewing a summer windbreaker with your own hands will be as easy as shelling pears!
To sew a windbreaker, you will need:
- Corduroy fabric with a width of 150.0 cm (or other fabric of your choice) = windbreaker length + sleeve length + 20.0 cm.
- Knitted fabric for hood = hood length + 10.0 cm.
- Buttons - 8 pcs.
- Cord - 50.0 cm.
- Cord ends - 2 pcs.
- Threads - 4 pcs.
- Adhesive fabric - 20.0 cm.
- Sewing supplies.
It all started with the fact that one day I bought the last piece of corduroy at a wholesale fabric warehouse. I wasn't exactly sure what exactly I wanted to make from it. But this fabric caught my attention, and the idea to sew a simple windbreaker came to my mind by itself. I wanted to sew a windbreaker with a hood, in a sporty style, with decorative seams and double finishing lines. And now I see that I was not mistaken with my choice.
As always, the fabric sat in my stash for a long time before being transformed into something special. And then one day it happened! I took the plunge and cut out the vest. Why a vest? Because the original idea was to sew a country-style vest and skirt. But since I didn’t want simple banality at all, I decided to dilute the suit with knitwear.
I knitted the trim myself, not specifically for the costume. I'll tell you a secret, these were the sleeves and belt for my denim jacket. I wanted to diversify somehow an old denim jacket, but the result did not please me. So we lay there knitted details without causes. And then I think: “I’ll put the dike into action, and the color matches!” By the way, take a look at my master class: .
Some time later, I remembered my forgotten project and decided to finish it. This time my costume underwent a number of changes: sleeves, a collar and a hood appeared. This is how the vest turned into a jacket, or in other words: a summer sports jacket-windbreaker with your own hands. Has this ever happened to you? In my opinion it turned out much better than the original idea.
Model review: Women's windbreaker jacket with a hood for spring
Women's windbreaker with a semi-fitting silhouette due to reliefs on the front and back. There are shaped yokes at the front and back, a set-in turn-down collar with a hood made of thick knitwear. Fastening with button straps, stitched waistband at the bottom. Two-seam set-in sleeves with stitched cuffs at the bottom with buttons. The jacket is light without lining, the seams are double-stitched, the edges are overlocked with an overlocker. Lined skirt with a stitched elastic waistband.
I selected the buttons specifically to match the silver with the image of an eagle. Ends for the hood cord under the buttons. At first glance, sewing a windbreaker from corduroy may seem difficult. Believe me, sewing a women's windbreaker with a hood with your own hands is simple and quick. Also, how to sew a light, unlined women's jacket yourself.
What fabric should I use to make a windbreaker? Caring for corduroy
As I mentioned earlier, I bought corduroy fabric called “ribbed” for the summer windbreaker.
- Material composition: cotton and elastane. Cotton allows the body to breathe and keeps its shape, and elastane makes the product elastic. This means that a women's windbreaker jacket will not create discomfort when moving.
- Natural fabrics wrinkle a lot, but if you add elastane, the wrinkles will decrease.
- Corduroy is a nap fabric, so it retains warmth in cool weather.
- Due to the dense weave of the threads, it does not allow the wind to pass through.
- Clothes made of cotton corduroy can also be worn in warm weather and are not afraid of overheating.
- Cotton is hygroscopic and does not retain moisture.
- In addition, cotton is hypoallergenic, which does not cause irritation or itching on the skin.
- Due to the direction of the pile, corduroy products have a pleasant shine that shimmers when moving.
- Cotton corduroy shrinks after washing, so it should be well decated before cutting.
- During ironing, the pile on the fabric may be crushed:
- place a terry towel or a piece of similar fabric on the ironing board;
- It is better to iron from the wrong side so that the pile lies on a rough surface;
- if you iron the product from the front side, add more steam without touching the fabric with the iron;
- try to iron the finished product in a vertical position with steam;
- If the pile has become wrinkled after ironing, it can be restored with a brush with fine bristles.
- It is recommended to wash corduroy on low temperatures 30-40 degrees (machine washable) with the “delicate wash” function:
- at the same time, turn off the drying, otherwise the pile will be damaged and the product will shrink;
- After washing, straighten and dry away from sunlight so as not to spoil the pile.
- Corduroy quickly absorbs dust “like a vacuum cleaner”, so it needs to be given special care:
- items made of corduroy can be cleaned of dust manually;
- make a soap solution using a sponge and go over the entire surface.
- Due to its loose structure, corduroy pile quickly gets crushed, especially on the elbows, bends, and back, losing its shine.
To restore the pile:
- clean the item from dust;
- make a light solution of ammonia and water (1 tbsp. Ammonia for 5-6 l. chilled boiled water);
- soak the product for 10-15 minutes, remove it and dip it in a soapy solution with foam;
- rinse (do not rub or scrub);
- remove without squeezing and rinse in clean water;
- remove and place on a soft towel;
- wrap in a towel to absorb moisture;
- hang on hangers and pull the seams to restore shape;
- express cleaning: to freshen corduroy clothes, you can use regular wide tape and a brush.
What material should I use to make a windbreaker?
- Products made from natural corduroy fabric wrinkle easily, so first decide on the model.
- Also, when choosing a fabric, pay attention to its composition.
- In addition, corduroy has several types: cord, ribbed and shaped corduroy.
- When purchasing, make sure that the material suits you and will not fill you up.
- Despite the problems in wear and care, no matter how you look at it, corduroy looks noble.
- It adapts perfectly to everyday wear.
Women's windbreaker pattern with description
Here you will learn how to cut a windbreaker jacket with your own hands using a basic pattern.
How to cut corduroy
Corduroy is cut in one direction, with the pile directed from bottom to top. Thanks to this, the product acquires an unobtrusive play of light. If you cut the finishing pieces in opposite directions, they will change the shade. This option can be used for combined models.
Pattern women's windbreaker with a hood, you can do it yourself simply and quickly at home. You will need a basic pattern of the required size: a front with a chest dart, a back (to the waist) and a sleeve. The hood pattern can be transferred from a sports jacket.
Translate basic pattern on paper, which was convenient to model. Apply on the front and back, yokes and reliefs. First cut off the yokes, then the reliefs. Close the chest dart on the front yoke. Distribute the remaining chest dart into reliefs. To make the jacket fitted, make darts along the reliefs and reduce them along the side seams.
Layout of windbreaker pattern on fabric
- Lay the fabric out on a flat surface with right sides facing in, edges facing you.
- Lay out the pattern pieces and apply allowances:
- along the side seams - 2.0 cm;
- along the reliefs, middle seam, yoke, shoulder seams and armhole - 1.5 cm;
- along the bottom, neck, front fastener - 1.0 cm;
- along the hem of the sleeve - 1.5 cm;
- at the seams - 1.5 cm;
- at the bottom – 1.0 cm.
- On the sleeve, mark the center at the top and bottom of the collar.
- Cut out a hood from knitted fabric (optional).
- Cut out the cut pieces with all allowances, draw chalk lines onto symmetrical pieces (this can be done using a chalk board and a cutter).
I modeled and cut out the sleeve directly on the fabric, this simplifies the work.
Preparing for the first fitting
Sweep the reliefs on the back and shelf. Use copy stitches to mark the center lines on the shelves. Baste the yokes, sweep the side and shoulder seams. Baste the right sleeve.
If you didn't like my windbreaker model with knitted inserts, you can replace them with a similar fabric or something else.
How to try on a women's windbreaker for the first time
- put a windbreaker jacket on your figure;
- guide seam allowances;
- pin the shelves in the center, aligning the bottom and top;
- will adjust the volume of the product due to the side seams, and if necessary, reliefs;
- pay attention to the position of the shoulder seam and front yoke;
- if the armhole protrudes strongly, then you need to take away the seam of the yoke, and then the front will acquire a clear outline of the chest;
- if a bubble has formed on the back, the excess can also be taken into the seam of the yoke;
- after that, level the bottom relative to the floor;
- check the length of the windbreaker taking into account the stitched belt;
- pin the sleeve into the armhole on the right side, aligning the center of the sleeve cap with the shoulder seam;
- will adjust the sleeve in width and length, taking into account the stitched cuff;
- deepen the neckline and armhole (if necessary);
- split the shelves and carefully remove the product so that the pins do not fall out.
How to sew a women's windbreaker with your own hands step by step
A complete description of sewing a corduroy windbreaker without lining at home.
Making changes after the first fitting
Lay out the product and mark with chalk where the pins are chipped. Remove the pins and open the shoulder seams and yokes.
How to sew all the parts of a women's windbreaker
Sew the seams on the back and shelves, and press the edges together. In my case, it was not possible to overcast the reliefs on the shelves due to the thickness of the knitting. Therefore, I had to overcast it completely.
Iron the relief allowances on the back towards the middle seam, on the fronts towards the insert. On the front side, place double finishing lines along the seams. To give the seam a distinct look, sew two-thread stitches. Place two spools of thread on top and pass them through a needle, so the seam will be tight and textured.
Baste and stitch the yoke on the back and shelves.
Overcast the edges, press the seams up onto the yoke and topstitch the seams.
To create a clear angle when joining the yokes, place notches in the corners of the seams.
Make changes to the side seams (if any), stitch, overcast and press seam allowances.
Have you come across unfamiliar words? Then refer to and.
Processing fasteners with straps
- the width of the placket depends on the diameter of the button, the approximate width of the placket is 3.5 - 4.0 cm when finished;
- in the cut, the width of the strap ((3.5 - 4.0) + 1.0) X 2, where 1.0 cm is the allowance;
- strip length = length from the neck of the shelf to the bottom;
- There are 2 pieces of trim in total, they are cut in the direction of the jacket pile.
On the wrong side, glue half the width of the planks with adhesive fabric. Fold the strips in half lengthwise and iron.
Sew the strips to the shelves from the adhesive side, with a seam width of 1.0 cm.
Trim the plank allowances to 0.2 cm to avoid thickening the seams.
Place the strips around the seams, bend the edges by 1.0 cm and baste, overlapping the stitching seam of the strips by 0.1 - 0.2 cm. Iron the strips and add finishing stitches.
Before adding finishing stitches, hem the corners at the top of the overlap strips. Make 1.0 cm rips in the center of the strips, and stitch the corners until the seams are 1.0 cm wide.
Windbreaker jacket basics
- lay the base of the jacket on the table;
- pin together the side seams, reliefs and yokes;
- straighten the product and secure with pins around the neckline, shoulder section and armhole;
- align the armhole with the chalk points, as well as the neckline and hem (if necessary);
- apply allowances, cut off excess;
- measure the armhole and neckline (without shoulder allowances), for comparison with the sleeve and collar pattern.
Split the pins, double stitch the shoulder seams, overcast the edges, press to the back and add finishing stitches.
Trimming parts
At this stage, you can do a second fitting of the jacket. Cut out a collar template from mock-up fabric, baste the hood and do a second fitting.
How to cut a collar for a jacket
Cut out the collar from the main fabric, taking into account the direction of the pile. I cut out ready-made template which I always use. If there is enough fabric, I make a folded collar in one piece. Before cutting the collar, I first measure the bottom cut of the collar and compare it with the size of the neckline. The collar is 1.0 cm larger than the neck - for fit (1.0 cm for half size). The collar template can be subtracted/added in the center directly on the fabric. Allowances for the collar are 0.7 - 1.0 cm. Glue half the width of the collar (upper collar) with adhesive fabric for shape stability.
Stitch the edges of the collar 0.7 cm.
Turn the collar right side out, straighten the corners, sweep out the piping and place finishing stitches along the collar.
How to sew a hood
Sew the seam of the hood, it is best to do this on a carpet using a knitted stitch. If you don't have a carpet lock, then stitch and overcast as usual.
Slide the hood into the neckline.
Sew the collar and hood in one seam.
Overcast the cut, baste the seam allowance to the product.
On the right side, secure the seam allowance with a stitch equal to the width of the foot.
How to sew a belt to a jacket
The belt is cut in the same direction of the pile as the product. The length of the belt is equal to the circumference of the jacket at the bottom + 2.0 cm for turning. Belt width from 4.0 – 5.0 cm, + 2.0 cm (allowances). Glue half the width of the belt with adhesive fabric. Iron the waistband in half lengthwise.
If you don't have enough fabric for a one-piece belt, it can be made from several parts. It is recommended that the seams on the waistband coincide with the middle and side seams.
Secure the belt with pins to the bottom edge of the product and stitch it 1.0 cm from the side of the adhesive pad.
Stitch the ends of the belt and straighten the corners.
Baste the free cut of the belt, as when processing strips.
Place double finishing stitches along the waistband.
Sleeve processing
In this section you will learn how to process set-in sleeves in a product.
How to make a sleeve clasp
Sew the elbow seams on the sleeves up to the fastener (the opening for the fastener is 10.0 - 12.0 cm).
If you were unable to leave an allowance for processing the fastener. It's no problem! Now I'll show you how to fix everything. Cut strips from the main fabric with a length = fastener length + 3.0 cm, width 2.0 cm.
Overcast the elbow seam allowance (like a vent) so that the raw edge of the strips falls under the overcasting.
Before finishing the seams on the sleeves, first check the measurements of the sleeve with the armhole. I make the edging larger than the armhole by 3.0 cm, in extreme cases 4.0 cm. This depends on the drape of the fabric: the softer and looser the fabric, the better the edging is ironed. The denser and stiffer the fabric, the more difficult it is to iron the okat. Therefore, when soft tissues I choose a higher value, and less for hard ones. An exception is when the girth of the arm in the shoulder area requires additional freedom (in larger sizes).
How to make a cuff on a jacket sleeve
The cuff is cut out in the same way as a stitched belt: width = width of the belt, length = width of the sleeve at the bottom + 2.0 cm (for allowances).
Number of cuffs – 2 pcs.

The processing of the cuffs and the bottom of the sleeve is the same as the processing of the stitched waistband along the bottom.
This original jacket can be sewn from quilted material as in the photo, or try other options: sew a fur jacket, thick fabric etc. The originality of this trigger is both in the volume of material and in the simplicity of execution. But at the same time, this idea will look interesting when using other fabrics, turning the trigger, for example, into . In addition, you can sew a raincoat using a similar method, see photo below. Simple patterns clothes allow you to experiment and sew easily.
It’s easy to sew such a jacket: depending on your volume, prepare a square or rectangle of fabric with a height equal to the desired height of the jacket + 15-20 cm for the collar, and a width equal to the circumference of the hips + 30-40 cm “for the wrap”.
Next, make cuts for the armholes and sew in the sleeves. Then decide whether you need to sew on the belt or use a removable one. Perhaps the ties on the collar, as in the original in the photo, will be enough for you. You can also sew on buttons, hidden buttons or snaps.