The creation of tanks from paper may interest not only boys, but also girls. First, such figures will become excellent toys for them. Secondly, the process of creating a figurine itself causes unprecedented interest in children, develops motor skills. And thirdly, many parents throughout the process of formation of such figures tell children about great wars and their characteristics, attracting kids to the history of their state. So how to make a tank from paper and where to find the layout and drawing?
Creating tanks from paper may interest not only boys, but also girls
The appropriate tank tank 34 of the paper can be glued with finished sweeps. To do this, you will first need to print the necessary scan on dense paper. Then you should cut all drawn parts.

 To make T 34 of the sweep, you must follow the instructions:
- On the cut elements, the fold lines should be found. A ruler is applied to each of them, and then the free edge of the paper is lifted and stroked. So it turns out even fold.
- After all the bends are indicated, you can move to the model gluing.
- First of all, it is required to glue the main body of the tank. To do this, it is desirable to use transparent acrylic glue or quick-drying PVA.
- Then all secondary parts are glued to the housing.
- Next, you can go to the cannon. First of all, its basis glued, and only after that gun is complemented by secondary elements. The finished model is glued to the main body of the combat vehicle.
- After that, caterpillars are going. First, the internal circles are made, and only after that they are framed by a single caterpillar strip. Finished caterpillars are attached to the sides of the case.


It is worth considering that there are various sweeps of tank 3, which may differ from each other. color decision and conventional. If it turned out to print only the black and white version of the machine, before assembling it should be painted using acrylic paints. Similar cardboard processing will allow you to purchase a future toy like a natural coating tank.
Gallery: a tank of paper (25 photos)


IP 7 paper tank
To make this tank, you should also use the finished scan.


- All elements of sweep are cut with a stationery knife.
- Next, with the help of the ruler, flashes are made on all places marked for these purposes.
- Made reference design for the case. It is done from two rectangles installed in parallel to each other and fixed with 3 transverse planets located at an equal distance from each other.
- The body is glued to the resulting base with a circle carved in it.
- The hull is placed by the sides, niches for the caterpillar are formed. Formed a tank bottom.
- The basis for the cannonal installation is manufactured. It is done in a similar way, as for the body. A manufactured tower is installed on the housing. Machine gun and additional elements are glued to the tower.
- Next, tracts are made: medium - smooth, rear - with teeth.
- Tracks are glued to the bottom of the main body, fasten the caterpillar clove.
This model is characterized by a fairly high complexity of assembly, so when it is created with children, it is necessary to provide them with extensive help. When it is built with children, you can refuse several small details, thereby simplifying the gluing process.
How to make a tank tank 9?
T 90 can be made in the Origami technique. To do this, you will need only paper: A4 sheet and a small note sheet.

T 90 can be made in the Origami technique
How to do:
- First there is a sheet A4. First of all, he bend in half along.
- Perpendicular sides of the sheet bend, connecting with each other. First, the short side is applied to the bottom long, and then to the top. Similar manipulations should be performed on both sides of the sheet.
- Sheet turns over. The angles of the short side bend to the ends of the crosses formed from the folds line.
- The sheet turns over and bends over the obtained lines, forming a base form double triangle.
- Long sides are folded to the middle so that the resulting double triangles are on top of them. As a result, it turns out a double arrow.
- The flexible edges have just been fucked up to the external sides of the rectangle.
- The side corners of one of the triangle are bend to the top.
- The billet turns over and is conditionally divided into 3 parts so that as a result, the top of the folded triangle concerned the middle of the base uncovered.
- The free corners of the triangle are bibes inside.
- "Ears" from the bent earlier triangle are commissioned into the resulting pockets.
- As a result, it turns out the tower.
- The small sheet of paper is folded into the cylindrical barrel with the help of the needle or culinary sipes.
- The barrel is inserted into the hole in the tower and is glued.
A figurine assembled in this way can be decorated using thick paints, markers or pencils.
How to make a tank from origami modules?
To create tanks, you can use the assembly scheme, which offers modular origami. To begin with, the collector will need to prepare 1688 triangular modules.
How to collect:
- The first thing is going to the tower. Her first and second row closes in the circle. Each series consists of 30 modules.
- The billet turns inside out, is complemented by a third layer consisting of a similar number of elements. In this way, the tower is built up to 8 layers.
- The ninth row is collected out of 30 modules, but they should be installed backward.
- Next, it is necessary to proceed to the caterpillars. A chain of 4 rows is done, each of which is 50 modules.
- The fifth row uses 46 elements. The reduction should be carried out in the bend of the caterpillar.
- 7 Row consists of 46 elements set by the ass in advance.
- The same scheme is used to create a second caterpillar.
- For each caterpillar is made 3 wheels. For this, a circle is made of 2 rows, in each of which 10 modules are involved. The figure is turned inside out and complemented by 5 rows.
- Wheels are put inside the caterpillars. These elements are connected by a medium bar made of 34 rows: 1 - 5 modules, 2 - 4 elements. Further the rows alternate.
- A slightly bent item is inserted between the tracks.
- Top put tower.
- The gun is made of 20 rows, the width of which alternates: 1 row - 2 elements, 2 row - 1. The last three rows increase to 4, 3 and 4 elements.
- A machine gun is inserted into the tower.

2. You must get from each end of the fold rectangle in the form of the letter X. Now it follows each angle to form so that the resulting multi-layer triangle is. To do this, it is necessary to add each of the two inner corners to the center of the letter x, the angles to collect together and give them a bit.
3. For the second end of the rectangle, repeat the same actions. This, with the "Innoral" side, should be done so that a two-way arrow, having sharp ends, is formed, but these ends should be located in opposite planes to each other.
4. The angles of the upper part of the "arrows" are bend in such a way that the rhombick is formed in one edge, which consists of two corners.
5. Severate one of the corners on the opposite side so that it is connected to the bottom, and bend it to the top. You will have a valve that bend in the opposite direction. Repeat the same action with another corner. From this side, you also have a rhombick as a result.
6. Put the product to yourself a wide face, lift its side parts and insert one part to another. An arc is formed with paper valves, fixed from above. The educated arc is your paper tank, at the top of which is the most real "tower".
7. Tank is almost ready. It remains only to add caterpillar to him and a blow (gun). The missing details just make enough: the side edges of the tank are adjusted and form the caterpillars from them. For the paper, roll the tube and insert it into the hole, which is in the tank of the tank.
Now paper tank is made!
Also watch the video as you can do other tanks from paper!

If you use knowledge to create tanks from paper from this article, then you will always succeed. Successful creating tanks from paper!
To make an incredibly beautiful, interesting and original tank you need to try and give a sufficient amount of time. In this article we will look at: how to make a paper tank in style modular origami do it yourself.
You will need: Sheets of colored paper, scissors, 6 match boxes, glue, round blank for base (for example: Block from perfume).
Master Class
- Fold the modules according to this scheme. For all the tank, you will need 1408 modules.
- Collect a circle of 24 modules, then add 24 modules to the second range of the circle and 24 modules on the third row.
- Place the center of 12 modules.

- Make in this way of only 7 wheels - 6 for caterpillars and one for the tower.
- Make a caterpillar tank, prepare 204 modules - the width of the caterpillar 6 modules The length of the almost complete circumference of the caterpillar 34 module.
- Place the 3 wheels into the almost complete circumference of the caterpillar, then continue to work, adding 56 modules above it.

- Make the second caterpillar in the same way.
- Take the tank tower in this way: do the hole in the 4 match boxes as shown in the picture and glue them with each other.
- Plue with colored tower base.

- Insert the round billet into the hole and glue 2 matchbox as a towers stand.
- Collect the front of the tank of 42x modules - width 7 modules, length 6 modules.
- Collect the back of the tank of 30 modules - width 6 modules, length 5 modules.
- Enclose the front and back to the base of the tower.
- Get caterpillars.
- Take the seventh wheel and add 192 modules - 24 in length and 8 in width. Do not forget to leave a hole for the gun.

- Collect guns from 36 modules - width 3 module, length 12 modules.
- Stick gun to the tower.
- Attach the tower on the base, it can rotate.
Such a tank will undoubtedly attract the attention of everyone. The main thing is to patience in creating modules, and the collection of the tank will only bring pleasure. Create masterpieces with your own hands!
All guys love to be managed with toy military equipment - invent operations plans, send soldiers to intelligence, export tanks to certain positions. Most often, these are toys purchased, interesting, expensive, but often breaking in children's handles. And if your child started a large-scale battle, and toys missed - work together with the baby and explain to him how to make a paper tank with your own hands.
Tank from ordinary paper
Beginners should try to make a tank. You can try to make a standard model with your own hands.
To do this, you need a leaf of simple A4 paper.
Step-by-step instruction:

Such an instruction will help you understand how to make a paper tank with your own hands. Most often love to make a tank KV-1 from paper, but it is very difficult for children, so it is worth starting with simple craftsthat you are able to do with the baby.
Craftsmanship
 Many want to create a tank more And you are interested in how to make such a toy from cardboard or strong paper. The main procedure of manufacture, of course, each person may have its own. In addition, the technique of creating some models will not be understood by the beginning. But this model of a tank of cardboard will be under power to any person, even who has no experience.
Detailed job description
Detailed step-by-step instruction It will help you cope with any task. Create a tank made of thick paper or cardboard as follows:

 That's all, the work is completed. Similarly, you can make a tank tank "Tiger". Having learned to create standard cars, you can try and more complicated design. Magnifier in the form of a first toy tank from cardboard, the boy will go to the next hand. This may be not only certain types of armored vehicles, but also motorcycles, mopeds, jeeps, vans, helicopters, airplanes and airplanes.
Who knows maybe the baby will become a few years a real sea ship engineer or bulk spacecraft. And it all started with a regular toy, which in appearance was more like a simple box, and not a model of military equipment. Therefore, it is necessary since childhood to instill the ability to think correctly and develop the desire to embody their fantasies into life.
Hello all lovers glue! Today we offer make a paper model Legendary Tank of the Soviet Army of the Second World War - T-34. To do tank T-34 of paper It will be not more difficult than the tank models of previously published: "", "".
Tank T-34, thanks to the high combat tests demonstrated during testing technical characteristicswas adopted by the Red Army at the end of 1939. In the spring of 1940, two prototypes of T-34 tank from Kharkov in Moscow and back were performed as one of the tests. During the trip, the tank confirmed its high technical qualities. After this test, it was decided to produce T-34 at the main major enterprises of the USSR.
Glue tank T-34 of paper
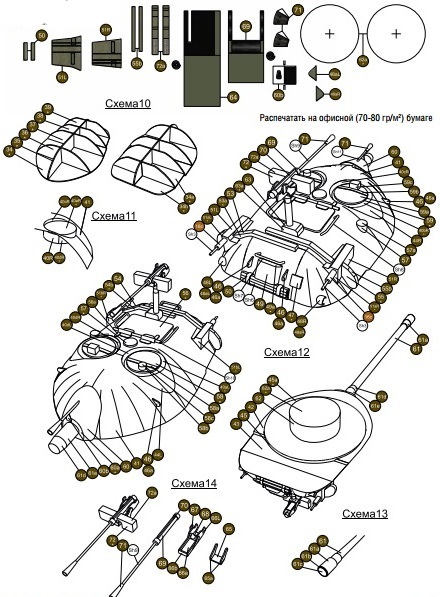
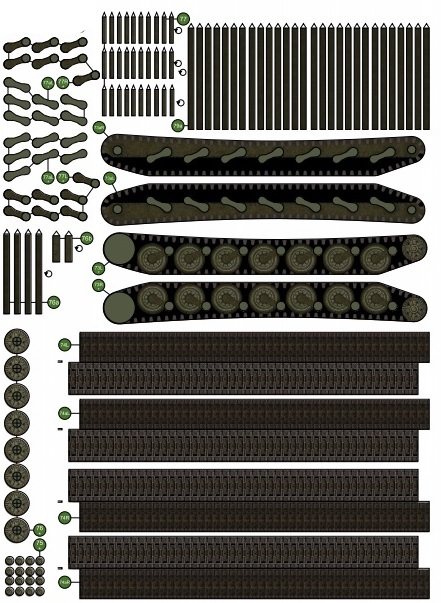
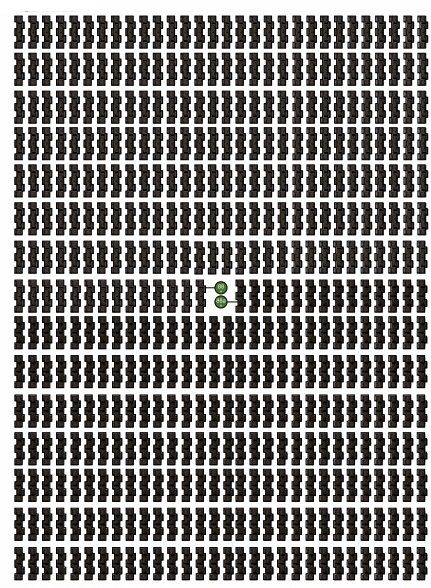
To create a paper model of the tank, you will need to print the schemes of the tank parts, cut them and glue.
- Any printer is suitable for printing schemes, because Black and white tank details can be painted with paints.
- Use thin cardboard or photo paper for printing large parts.
- For small parts you can use conventional office paper.
- To create smooth bends, attach a ruler to the bend line and spend the back side of the scissors or the suicide handle.
- For cutting parts, use scissors and a stationery knife.
- Cut and glue parts preferably sequentially, moving from one glued part to the above.
- If the item has an internal circle, then it should be cut primarily, and then the item itself.
- To glue the details of the tank, use the transparent acrylic glue "Moments" or any other than its analog.
- Before gluing, you should paint the ends of the part, it will improve appearance Models.
- During the gluing tank, follow the instructions
Schemes of parts T-34 tank out of paper
Instructions for gluing tank T-34