Double-sided cross stitch is an interesting embroidery technique. Using this embroidery method, the front and back sides of the work are the same. This embroidery method is more suitable for single-color patterns. The thread consumption when embroidering with this method doubles compared to embroidering in the usual way with a “perfect” back.
Double-sided embroidery with an even number of crosses
Double-sided embroidery is done using two-fold thread (unless the pattern provides for another option). Stitches are laid diagonally across one square. When performing double-sided cross stitch with an even number of threads at the end of the row, in order to go back and maintain the diagonal on the wrong side, a quarter of the cross is made. To embroider one row of crosses, you need to go back and forth four times. At the end of the embroidery, the thread is secured both on the front side and on the back.
Double-sided embroidery with an odd number of crosses
Double-sided embroidery with an odd number of crosses is performed in the same way as a row with an even number of crosses. The only difference is the order in which the quarter cross is performed at the end of the row. See our video tutorial for more details.
By alternating on the canvas you can create a real masterpiece. Such stitches can be made by threading a needle and thread through the holes of the fabric in a certain sequence. The distance between the holes determines the stitch size. Many such stitches give a fairly smooth image on the fabric.
First necessary steps.
Before you start cross stitching, you should iron the fabric to remove folds. The iron you use for this must be clean. If you are using a sewing machine, then you have the opportunity to add a stitch along the edge of the fabric. This prevents the fabric from fraying.
It is very important to sort the threads by color and loop them on the color chart. Many people choose complex cross stitch patterns that have different shades of colors. You must label the threads with the color number. Many stores sell thread cards, but you can always make your own. You should have several needles so that when you embroider with different colors, you can use several needles for several primary colors.
Learning the cross stitch or cross stitch
Cross stitch is not difficult, and it's a lot of fun. Usually this is mainly the most common type of needlework. Select the pattern you want to embroider. Buy all the colors of thread you need for embroidery. Choose your fabric. Professionals and experienced people use Aida14. This is the most common fabric.
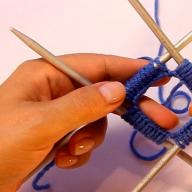
Fold the fabric lengthwise and define the bottom and top. Take the needle and the required colors of thread. Next, fold the thread in half, twist the two ends and thread the needle into the eye. together.
Place the needle on the wrong side and bring it out through the starting point of the embroidery. Leave some of the thread on the wrong side, then make half a cross stitch and pass the needle through the remaining part of the loop thread and pull tight. Next, insert the needle into the adjacent hole in the canvas and finish with a half-cross stitch in the other direction.
The most popular cross stitch techniques
Backstitch the needle. This technique is not difficult. It is mainly used to give an outline to an object. The contour always emphasizes and highlights the image well. In order to make a line or contour on embroidery, you need to mark successive points along which you will move. For example, points "D", "C", "A" and "B". We fasten the thread at the starting point, from the wrong side we pass the needle and thread through point A to the front side, then through point B to the wrong side. From the wrong side, we pass the thread and needle through point C, then return to point B. From the wrong side forward, a distance of two stitches, we pass the needle through point D, again we return to the stitch back at point C, and so on.
Rail cross stitch technique. When embroidering with this technique, the stitches look more neat, they lie evenly and smoothly on the fabric. In this case, you must work with 2 threads; in the process of embroidering the stitch, the threads are specially separated from each other. Thread the needle through the fabric as you normally would, and then insert the needle exactly between the two threads of the previous stitch to separate the threads.
Embroidery technique with multi-colored threads. This cross stitch technique means that you can mix different thread colors and create a new one. There are many commercial designs that use this technique, but you can make your own custom designs using the software and experiment with variations of colors and shades.
Double-sided cross stitch. In this technique, the stitches look the same on both the front side of the fabric and the back side. To be honest, this pattern is very difficult to master. Only very experienced needlewomen can work with this technique.
Partial cross. This technique includes both a simple stitch and a non-traditional one. Half stitch is half simple cross. The stitch direction can be either forward or reverse.
By using different cross stitch techniques, you add character and life to your work. These five techniques are a small part of what you can do if you are truly a master, because there are many different interesting techniques. Either way, they can become your favorites and make your work exceptional.
18 September 2011 held Master class on embroidering a napkin "Blue Frost" with a double-sided Tambov cross.
The master class was conducted by E.M. Dubrovskaya. Tambov embroidery designs are very ancient. It took shape long before the Mongol invasion. The color scheme is noteworthy: white and black, rare gold and silver threads, leading red in various shades, which are combined with light ocher, cream, greenish, burgundy-blue. The ornaments mainly use a square. “Tambov mob” - double-sided embroidery. This seam is very rare in folk embroidery
, they used it to embroider the most important things - hats, towels for weddings and icons. The Tambov cross is used to make ornaments on pillows, towels and napkins (where a beautiful reverse is needed), to create an effective volume: when filling the background, clothing details on icons, etc. Linen bags embroidered with a Tambov cross in two tones look very beautiful. This seam consists of two crosses, which are performed differently.
First cross
1. First vertical stitch - from bottom to top, prick the needle to the right side in the lower right corner of the square.
2. The second stitch is from bottom right to top left and prick the needle in the top right corner of the square.
3. The third stitch - along the front side from top right to bottom left and in the opposite direction along the wrong side.
4. The fourth stitch is from top to bottom vertically and prick the needle in the lower left corner. 5. Fifth stitch - horizontally from the left bottom corner
to the right and prick the needle in the upper right corner of the square.
6. The sixth stitch is horizontally from the upper right corner to the left.
Second cross
1. The first vertical stitch is from top to bottom and along the wrong side in the opposite direction.
2. The second stitch is diagonally from top left to bottom to right and in the opposite direction along the wrong side.
3. The third and fourth stitch - horizontally from the upper left corner to the right, prick the needle in the lower left corner and make a second diagonal stitch.
4. Poke the needle in the lower right corner, then make a bottom horizontal stitch along the front side from right to left and along the back side in the opposite direction.
5. Sixth stitch - vertically from bottom to top and prick the needle in the upper left corner. Make another horizontal knit stitch from the top left to the right and prick the needle in the bottom right corner.
11th And all subsequent stitches of the 3rd cross in the same way as in the 1st cross. Make all odd crosses according to pattern “a”.
Make the 4th cross and all even crosses according to pattern “b”, with all the upper diagonal stitches placed from bottom left to top right.
Tambov double-sided cross:

|

|

|

|

|

|

|

|

|
|
Embroider your products with a Tambov cross and we will post your work on our website. |
| Works by Elena Mikhailovna Dubrovskaya |
||
 |
 |
|
| The first side of a double-sided napkin. | Second side. Simple, Russian, Bulgarian crosses were used. | |
 |
 |
|
| Purple colour pattern matches the pattern on the saucer | ||
 |
 |
|
| A double-sided napkin made with a Russian cross, which is the basis of Tambov embroidery. | The red color of the design matches the design on the glass | |
| Works by Tatyana Valerievna Dronova |
Lesson #1. Cross-stitch.
A simple cross is the most common embroidery technique. This type of embroidery is, of course, less valuable than double-sided embroidery, which causes our admiration and surprise at the sight of wonderful works found everywhere and continues to inspire embroiderers. In addition to the cross and its varieties, a double-sided “painting” seam, also called the Holbein seam, is also used. There are many works in which cross stitch is combined with “painting” and tapestry stitch, with embroidery with stars, braids, etc. It is through the use of various types of seams that the embroidered pattern acquires special beauty. In lesson No. 1 I want to tell you about the embroidery technique of “Simple cross” and “Double-sided cross”.
The seam is a simple cross.
 Fig.1
Fig.1
Simple cross (Fig.1) formed by two oblique stitches crossing  in the middle. If the fabric allows you to count threads, then the seam is made directly along the fabric; if, on the contrary, the fabric is very dense, an auxiliary outline is applied to it and a pattern is embroidered along the outline. When the work is finished, the threads of the canvas are pulled out. It should be recalled that when embroidering on an auxiliary canvas, you should lay it along the grain of the base fabric and baste it at such a distance from the edge that, upon completion of the work, you can grab and pull out the threads of the canvas. To get a beautiful seam, the needle must be inserted and withdrawn strictly along the line of already laid stitches.
Double sided cross.
To embroider a pattern with a double-sided cross (Fig. 2,3,4,5,6 ) , perform rows of crosses in straight lines, passing twice forward and twice backward.
 Rice. 2
Moving from left to right, introducing thread without a knot; make several small stitches, which are then closed with the first stitch of the cross. The needle is passed, pointing it to the right, over the four threads of the canvas, diagonally to the end of the row of stitches.

Rice. 3
 Rice. 4
Having reached the last stitch, the thread is returned to the middle of this last stitch, from where it is taken out, then with an additional stitch to the right, returned to the middle on top of the two threads and the reverse stroke is performed, from right to left, completing the row of started crosses. Often both additional stitches are closed with a long stitch, as shown in Fig. 3 and 4. After the last stitch made on the reverse stroke, the thread is again brought to the right, filling in the unembroidered places with a half-cross when performing the first two rows of stitches. The extra stitch, which helps move to the fourth round of stitching, will have a double thread on the front and back sides. In Fig. Figure 4 shows how to move to the next row of stitches. The described double-sided cross stitch technique is not suitable for making a pattern with broken lines consisting of individual elements.

A B C D
Rice. 5

D E F
Rice. 6
In Fig. 5 and 6 show the order of stitches for this type of embroidery. In Fig. 5 under the letter A shows the place where the thread is inserted into the fabric and the position of the needle for the first stitch; under the letter B the first half-cross, c, is shown, with the thread drawn to the right, and the position of the needle for the third stitch, completing the cross, is shown; under the letter I the completed stitch is shown (started under the letter B) and the position of the needle for the stitch moving to the right is shown; An embroidered cross is shown under the letter G and the beginning of the next one, located under the previous one, is shown. In Fig. 6 under the letter D demonstrates the technique of making crosses moving to the left; under the letter E there is an additional stitch for moving to a separate cross, to the right; under the letter Z additional stitches are shown between two separate crosses; and finally, below the letter Z, the second and last additional stitch is shown, which serves to complete the cross. This technique of double-sided embroidery requires a certain skill and, in addition, a lot of attention to position the stitches correctly and not make unnecessary ones that could distort the design.
 In the next lesson No. 2, I will tell you the embroidery technique with “Italian double-sided cross” and “Montenegrin double-sided cross”.
There was a desire to embroider a towel. But a towel is such a thing, there shouldn’t be any “confusion.” And I want it to be beautiful and neat.
I accidentally came across this technique on the Internet. double-sided cross. Now I don’t remember from which site - I just copied it to my computer. I share with you
Until the middle of the 19th century. embroidered mainly with a double-sided cross, the same on both the face and the back of the fabric. It is found in ancient embroidery and on items whose reverse side should look as beautiful as the front side: on towels, curtains, blouses.
A double-sided cross was performed in four moves and in one.
Double-sided cross in four moves. First, they sew a “file” in two moves from left to right and from right to left (Fig. a, b), and then overlap its stitches with cross stitches of the third move from left to right (Fig. c) and finish the row, overlapping the gaps from the face and back from right to left ( Fig. d). You can end the row with half stitches.
The double-sided cross is embroidered in one step, each separately from left to right using additional half-stitches.
Start working from the middle of the future cross, securing the tip of the thread (1-2), then lay the first diagonal double-sided stitch from the lower left corner to the upper right (2-3) and bring the needle out at the beginning of the stitch (3-4) (Fig. a) . To the second diagonal stitch, move using a half-stitch from the lower left corner to the middle of the cross (4-5) and bring the needle to the lower right corner (5-6) (Fig. b). The second double diagonal stitch is laid from the lower right corner to the upper left (6-7), and the needle is brought out from the wrong side to the lower right corner of the cross (7-8) (Fig. c). The second cross and all subsequent ones begin with a double diagonal stitch from left to right (8-9-10) (Fig. d). Then, using a half-stitch (10-11) and a purl half-stitch (11-12) (Fig. e), move on to the second diagonal stitch (12-13-14) (Fig. f) and all subsequent ones (Fig. g).
This method is a little painstaking and requires attention and accuracy when laying stitches. 
I chose a small picture for testing. If anyone likes it, here's the diagram 
The most interesting thing is that I liked the second method, although it is painstaking, more.
Of course, it takes twice as much time and thread, but if you get the hang of it, it turns out very nice.
I understood a simple truth - for such a technique you need to split the threads. I embroidered my first project using 6 threads. Not easy. How to sew jeans by hand.
I’ll be embroidering a towel at three.
I wanted to show the finished work, but at the request of the workers I am showing what I have at the moment.
This face 
But this is the wrong side - a mirror image 
The crosses are not very even. But I'm trying, I hope it gets better