1. PRACTICAL AND COMFORTABLE CHILDREN'S JACKETS
Knitting sweaters for young children is one of the most favorite leisure options for moms. On the forums on needlework, you can find photos of fashionable and modern blouses for girls connected by needlewomen. In fact, knitting the same patterns is not at all difficult - it is enough to master the basic knitting skills with stockings and circular knitting needles. And step-by-step master classes and clear video lessons will help you knit even complex patterns correctly and consistently.
Option number 2:
Option number 3:
WE KNIT A JACKET FROM MERINO YARN.
Option number 4:
KNITTING WITH SPOKES FOR CHILDREN. WE CAN WEAR IN SUMMER AND EARLY SPRING (MODEL FOR GIRL 8 - 12 MONTHS). WE KNIT WITH SPOKES No. 2.5 FROM SOFT ACRYLIC YARN.
Option number 5:
STYLISH, MODERN SWEATER FOR A GIRL 5-6 YEARS OLD. WE KNIT WITH THICK SPOKES NUMBER 5. DESCRIPTION, SCHEMES AND PATTERNS OF THE MODEL.
Option number 6:
HOW TO TIE A WARM ELEGANT JACKET FOR A GIRL 1-1.5 YEARS OLD WITH SPOKES No. 3.5. STEP-BY-STEP DESCRIPTION OF THE KNITTING PROCESS, SCHEMES AND DESCRIPTION OF SYMBOLS.
Option number 7:
KNITTED SWEATER FOR LITTLE GIRL. STEP-BY-STEP DESCRIPTION OF KNITTING WITH HOSTS, CIRCULAR SPOKES AND TABLE.
Option number 8:
4. VIDEO LESSONS. KNITTING FOR LITTLE KIDS ON KNITTING needles
Knitting sweaters for a little girl-
Every mother wants her baby's clothes to be not only beautiful, but also comfortable. Therefore, craftswomen knit clothes for any season. Every little fashionista's wardrobe should have a knitted sweater. For both a boy and a girl, crochet and knitting you can create an incredible number of interesting patterns.


Before starting the execution of the model you like, you need to decide on the choice of yarn and knitting needles... Indeed, not only the appearance, but also the heat-preserving qualities of the thing will depend on this choice. It should be remembered that the size of the knitting needles will affect the density of the product.
For example, it is better to knit a heavy sweater with knitting needles with a smaller diameter, and a light openwork blouse is knitted with those that are much thicker than the thread itself. For a girl, you can knit any model with knitting needles.
Seamless blouse for a newborn baby
If you don't know which model to choose, we offer you a win-win option. The blouse, made with a continuous fabric without seams, is comfortable to wear. This option is suitable for the smallest beauties. And even not very experienced knitters can cope with knitting.
Since knitting is performed with one fabric, you will have to stock up on different types of knitting needles:
- knitting needles with fishing line;
- 5 pieces. circular knitting needles;
- 2 long needles of smaller diameter;
- 5 more circular needles, the same size as the long ones;
- hook;
- scissors;
- yarn of any color and texture.

The work begins with the execution of the neck. To do this, cast 40 loops on the needles with fishing line.
By the way, if you want to knit a thing of a larger size, just dial the required number of loops from the beginning. The principle of knitting will not change from this.
Knit one and a half centimeters with 1 × 1 elastic.

Raglan is in progress. Loops in work are distributed as follows: 5 loops for 1 shelf, 2 loops for a raglan, 5 loops for a sleeve, 2 loops for a raglan, 12 loops for a back, 2 loops for a raglan, 5 loops for a second sleeve, 2 loops for a raglan, 5 loops for a second shelf. Knitting with an elastic band continues, but a yarn should be done before and after each raglan. In the purl rows, no addition is made.

After a few centimeters, raglan lines will be visible. Continue working until these lines reach the desired length - to the baby's armpits.

At this stage, the product looks like this:

Now you need to lower the buttonholes for the sleeves onto the auxiliary thread, as shown in the picture below.


Distribute the loop for sleeves with auxiliary thread evenly on 4 circular needles.

The sleeve is knitted with an elastic band to the beginning of the cuff, here the needles of a smaller diameter are used. This allows the elastic at the end to be flexible and comfortable to use. Close the hinges in a convenient way.

We finish the second sleeve in the same way as the first.

It is necessary to strap the shelves. On the edge of the product, dial the loops on a long knitting needle, knitting one front loop from each loop.

Make holes for buttons on one side.

The second side is tied exactly like this, but without holes. It remains only to sew on the buttons and hide the threads that have come out.

The principle of implementation is now clear, on this basis, various options can be performed. Instead of an elastic band 1 × 1, any patterns are allowed... Some knitting patterns with knitting needles are shown in the following images of children's sweaters, knitted for girls.


We knit an openwork sweater with long sleeves
This section will show you how to knit a sweater.

To complete a blouse for a girl of 2 years old it will take:
- knitting needles number 3;
- 200gr. any yarn.
Knitting begins with the back. Cast on 70 stitches on long knitting needles and make an elastic band 1 × 1 with a height of 3-4 centimeters. Continue knitting according to the provided pattern.
For each shelf, cast on 40 loops, knit an elastic band so that its height coincides with the back. Then continue working according to the scheme.
To make the sleeves, 42 loops are typed. Start again with a 1 × 1 elastic band up to a height of four centimeters. Continue as indicated.
Every five rows in the sleeve, add one loop on both sides. Knit to the required height, close the loops. It remains only to tie the straps. On the edge of the shelves, dial the loops and make 2 cm of elastic. On the right side, knit the holes for the buttons. To decorate the neck, you should also dial along the edge of the loop, but through one. Then knit three centimeters with an elastic band.
To assemble the product, you must choose the usual way. You can use a crochet hook or needle.
We must not forget about the protruding threads, they need to be pulled to the seamy side of the work. Cutting too short threads is not recommended, as the loops may begin to unravel.
Sew buttons to the finished product, steam and dry the blouse.
Knitting lessons of original blouses
Video tutorials will help you master important knitting principles. In them you can learn useful techniques, as well as learn new techniques for making knitted products.
Little children always look surprisingly cute, no matter what clothes they are dressed in. And parents try to dress their babies elegantly and beautifully always. Many types of needlework allow you to create amazing things for kids. For example, knitting for girls 1-2 years old with knitting needles is a universal opportunity to dress up a child both in winter and in summer.
Unpretentious beauty
Knitting needles can be an outfit for any season. How to knit a summer outfit, for example? If you take a beautiful natural yarn, cotton or linen, of pure light shades, and use a simple knitting in knitting, for example, knitting, then a sweater for a crumb will turn out to be unpretentious, but very cute. So, you need:
- 100% natural cotton yarn. A skein weighing 50 grams includes 110 meters of thread;
- knitting needles number 3 and number 4;
- 1 large button.
Payment
Knitting for girls 1-2 years old with knitting needles should begin with the calculation of loops, so as not to be mistaken with the size. The selected yarn knits a sample of 20x20 loops + 2 edging loops. Then the length of the resulting canvas is measured and the number of loops per 1 centimeter is calculated. By the size of the child, the required number of loops is calculated for the product as a whole, and then for the front and back.
Scheme of work
On the thinner knitting needles (No. 3), you need to dial 74 loops for the back. Knit 3 rows in garter stitch. Starting to knit the 4th row, change the needles to No. 4. And, including the row of changing the needles, knit 39 rows with the front satin stitch, making such subtractions: on each side, subtract 1 loop in row 7, in row 23 and in 39. There should be 68 stitches on the needles. Continue knitting until the part is 20 centimeters high. Next, you need to issue a raglan. To do this, close 4 loops at the beginning of the next front, and then the next purl rows. Tie the next two rows without changes. Then knit 14 rows, making decreases of 1 loop, first in the 1st row, and then in every second. There should be 46 stitches left on the knitting needles, which must be removed onto a knitting pin.
Shelves for blouses
It is also easy to knit shelves for a simple blouse, because knitting for girls 1-2 years old with knitting needles allows you to make parts in a matter of minutes. For the left shelf on the needles No. 3, 40 loops are typed. Just like on the back, the first three rows are knitted only with front loops. Then the knitting needles are changed to thicker knitting needles, and knitting continues with the front stitch, with the exception of 6 loops on the inside, which are knitted with the wrong stitch. These loops are knitted all the way to the beginning of the neckline. Decreases for bevels on the sides are made in the same way as on the back.
The raglan is knitted at the same height as the back, but at the same time the neck is knitted with it. So, for the raglan, close the first 4 loops. Then knit 3 rows. Now in the next front row, first subtract 1 loop \u003d 32 loops remain. In the purl row, remove the 6 purl stitches with a pin. Then, in the same way, first subtract 1 loop \u003d 25 loops. Then the raglan is knitted as for the back, and for the neckline, 5 loops should be closed in every second row until 15 loops remain on the needles. Then decrease 2 loops in every 2 row until 2 loops remain on the needles at the height of the back. The thread must be cut off, the loops on it removed and tightened. The right shelf is knitted in the same way.

Sleeves
A blouse for a girl, knitted with knitting needles, even for summer, will not do without sleeves. To work on them, you need to dial 46 stitches on the thinner knitting needles. Tie 2 rows of garter stitch, and then change the needles for thicker ones - # 4. Since the summer blouse has short sleeves, the raglan begins immediately after the cuff. To knit it, you need to close 4 loops at the beginning of the front row and 4 loops at the beginning of the purl rows. Knit 2 rows straight. Knit the next 14 rows, decreasing 1 loop at the end of each row. There should be 24 loops on the knitting needles, which must be removed with a pin.

Assembling the blouse
Moisten all parts, straighten them on a flat surface and let dry. Then sew the raglan lines. For the neckline, transfer the loops of all parts to the needle No. 3 in this order: 5 loops of the strap (2 loops at the neckline knit together), dial 19 loops around the edge of the neckline, 24 loop loops, 46 loops of the back, 24 loops of the second sleeve, dial from the edge of the neck 19 loops and again 5 loops of the strap (2 loops at the neck, knit together). There should be 144 stitches on the needles. 5 rows in garter stitch.
Knit the next row as follows: 9 loops, 2 together, * 3 loops, knit 2, subtract 2 *, 9 loops. From * to * repeat 25 times. 118 stitches remain. Add 3 rows of garter stitch. Then knit a row in this way: * 1 front loop, 2 yarns *, repeat throughout the row.
The next row is knitted with front loops, but all yarns go down without knitting. Elongated loops are obtained. Then add 4 rows again with a shawl satin stitch. In the 5th row, decreases are made: 14 loops, 2 together, * 1 loop, 2 together *, 15 loops. From * to * repeat 29 times. There are 88 loops left, knit 4 rows and close. Sew side seams and sleeve seams. Make a buttonhole and sew on a button. If you provide 5-6 loops right on the bar, and make the sleeves long, then the blouse will turn from a summer one into a warm wardrobe item.

Patterns
Kids love bright things. Decorate sweater for girls you can use a pattern by knitting it with colored threads. Favorite cartoon or fairy tale characters will decorate a sweater or sundress.
AT knitting sweaters for girls you can make it interesting if the product is made simply with the front satin stitch, but before decorating with a pattern. For example, like this.

To keep it warm
Children don't like to put things over their heads. How to make it so that to dress up the baby in sweater for a girl without causing a storm of protest and a sea of \u200b\u200btears? After all, a sweater with a neck hides very well from the cold, protecting the baby in bad weather. Universal knitting for girls 1-2 years old will help. Everything is very simple.
Having knitted all the details of the sweater (front, back and two sleeves), you first need to sew only the right shoulder. Then, having typed a certain number of loops with knitting needles along the edge of the neckline, you should tie a 1x1 elastic band to the canvas of the desired height. Close the loops, but do not break the thread, but use it to dial the required number of loops around the edge of the collar and tie the bar from the front and from the back, providing loops for buttons. Such a fastener on the shoulder will allow you to simply dress up the baby in a sweater with a neckline. Buttons can be chosen decorative, children's themes.

Vintage outfit? But no!
Toddlers need to be dressed up comfortably. A blouse, a badlon, a T-shirt, and a sundress on top is a practical and comfortable outfit. Knitting will allow you to create such a versatile wardrobe item for a little fashionista.
The presented model is knitted from which a 50-gram skein contains 180 meters of thread. Knitting needles for such yarn are taken No. 3. A sundress skirt is knitted with one fabric for the back and front. For her, you need to dial 216 loops on the knitting needles. Since the number of loops is quite large, it is best to choose knitting needles with fishing line. Knitting is done in openwork according to the scheme.

At a skirt height of 29-31 centimeters, 68 loops should be evenly subtracted. Knit the next 3 rows only with the front stitch. Mark each 74 loop with colored thread - the sides of the sundress. Knit 3 centimeters with front satin stitch, and then knit the shelves and back separately, removing 1 loop from the marks in one direction or the other. There will be 72 loops on the front and back. For back armholes, close on both sides: 1 time in 3 loops, 1 time in 2 loops, 3 times in 1 loop \u003d 56 loops. Knit straight to the height of the back 40-42 centimeters. Close the middle 20 loops, for the neckline, close 2 loops 1 time from the inside. Remove 17 shoulder loops onto a pin. Knit the second shoulder of the back in the same way.
For the front of the armhole, knit in the same way as the back, but start knitting the neck at a height of 34-35 centimeters from the edge. Close the middle two loops, and to bevel the neck, reduce 1 loop in every 2 rows until there are 17 loops on the needles. Tie the second half of the front similarly.
Sew the shoulders. If the skirt was knitted in a circle, then nothing needs to be done, if it is not tightly circular, then sew a skirt seam. Crochet or knit the edges of the armholes and necklines, dialing the required number of loops and knitting 3 rows of garter stitch.

Knitting is both fast and fun. Little things can be very simple, but look surprisingly interesting. For knitting children's things, you can use all the techniques that are available to the craftswoman - openwork, jacquard, braids. The yarn, which is produced for knitting a children's assortment, is always of high quality, pure shades, and has a pleasant texture. And knitting for babies from good yarn is a pleasure!
This poncho is tied as a present for little fashionista Ninochka on her first birthday.
To knit a poncho with knitting needles, we need:
150 grams of white yarn (Gjestal Superwash Sport, 50 gr. \u003d 100 m.);
- 200 gr. pink grass "grass" yarn (Gjestal Orkide, 50 gr. \u003d 85 m.);
- pink beads for decoration;
- knitting needles number 2.5 and 3;
- hook number 3.
Knitting description:
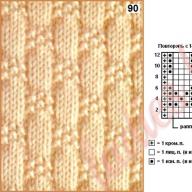
1. Cast on 128 loops with white thread and knit in a circle with a 1 by 1 elastic band about 12-14 cm. Neck;
2. Knit all loops as follows: * 2 purl loops, 6 front loops *. Repeat * 16 times. Knit 6 circular rows in the same way. [\u003d 128 stitches]
3. In the next row, knit a weave of braids and add 1 loop to the left and right of each braid: * 2 purl loops, 1 yarn over, remove 3 knit loops on an additional knitting needle and place before work, 3 knit loops, 3 knit loops from an additional knitting needle , 1 yarn *. Repeat * 16 times. [\u003d 160 stitches]
4. Knit the next 7 rows, repeating * 4 purl loops, 6 front loops * (repeat * 16 times in each row) [\u003d 160 loops]
5. Knit a weave of braids and add 1 loop to the left and right of each braid: * 4 purl loops, 1 yarn, 3 knit loops on an additional knitting needle and place before work, 3 knit loops, 3 knit loops from an additional knitting needle, 1 yarn *. Repeat * 16 times. [\u003d 192 loops]
6. Knit the next 7 rows, repeating * 6 purl, 6 front loops * (repeat * 16 times in each row) [\u003d 192 loops]
7. Knit a weave of braids and add 1 loop to the left and right of each braid: * 6 purl loops, 1 yarn over, remove 3 knit loops on an additional knitting needle and place before work, 3 knit loops, 3 knit loops from an additional knitting needle, 1 yarn *. Repeat * 16 times. [\u003d 224 stitches]
8. Knit the next 7 rows, repeating * 8 purl, 6 knit stitches * (repeat * 16 times in each row) [\u003d 224 loops]
9. Knit a weave of braids and add 1 loop to the left and right of each braid: * 8 purl loops, 1 yarn, remove 3 knit loops on an additional knitting needle and place before work, 3 knit loops, 3 knit loops from an additional knitting needle, 1 yarn *. Repeat * 16 times. [\u003d 256 loops]
10. Knit the next 5 rows, repeating * 10 purl loops, 6 front loops * (repeat * 16 times in each row) [\u003d 256 loops]

Figure 1. Scheme of the transition from the "Braids" pattern to knitting with "Grass" (click to enlarge)
Knit the "Bumps" pattern as follows (click on the picture to enlarge):

12. Divide all knitting into 4 parts (front, back, 2 sleeves) of 96 loops and knit each part separately, continuing to make increments, to the desired length.
In order for each part to turn out to be semicircular, it is necessary to knit in shortened rows, i.e. in each row, under-tie several loops and start each next row with a yarn.
You can read more about knitting in short rows.
Note!
1. The length of the product after knitting in shortened rows should be 3-4 cm less than the required length of the finished product, since then it will be necessary to knit several smoothing rows around the entire circumference of the product and crochet the product along the edge.
2. The back must be tied 3-5 cm longer than in front.
13. After all parts of the poncho have been knitted to the desired length, it is necessary to knit a smoothing row by connecting the yarns and adjacent loops together.
Note!
1. To avoid the formation of holes between the hinges in left side backs (front or sleeves) yarns must be knitted together with follow loopand in right side - together with previous.
2. The smoothing row can tighten the product, so I recommend knitting only each one together with the adjacent loop second yarn.
14. Work 3-4 more rows around the poncho.
15. Close all loops (you can crochet the loops).
16. Tie a poncho around the edge with a crochet pattern

Figure 2. Crochet strapping scheme
17. Crochet flowers: close 3 air loops in a ring and knit 12 single crochet stitches. Knit the second row, alternating single crochet and arches of 2 air loops.

Figure 3. Pattern of knitting a flower
18. Sew flowers along the edge of the poncho, decorate the product with beads.
The knitted poncho for the girl is ready!
Advice:
 In the place where the front (back) goes into the sleeve, sew on the buttons on the inside. So the poncho will not twist and it will be more convenient for the baby to move and bend in it.
Additional photos:
 The front of the poncho
 The seamy side of the poncho.
Evgeniya Smirnova
To send light into the depths of the human heart is the artist's purpose
In cold weather, knitted children's blouses even replace a jacket, and in addition, a loose fit does not hinder the baby's movements. It is not necessary to go to the store for such a product, because many instructions will help you knit a sweater for a girl or boy yourself. Choose a model for every taste - pullover, raglan, bolero, suits and more.
How to knit a baby sweater
Before knitting a sweater with knitting needles, decide whether the clothes will be smart or more casual, what is the density of the knitting, whether you need embroidery elements. There is a great range of products in this heading. For a thing with an openwork pattern, a thin one-color yarn is well suited, for example, pink for a girl or blue for a boy. The best option for children is cotton threads or wool with the inclusion of acrylic and mohair.

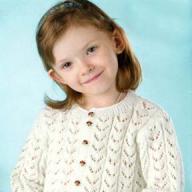
Knitted sweater for girls
Instructions on how to knit a children's sweater with knitting needles for a girl are given for a product 49 cm high and 39 cm wide. This is reflected in the pattern drawing. The steps to create such a knitted sweater for kids are as follows:
- Cast on 71 loops (p.), Knit 2 rows (r.) With 1x1 elastic, then go to white thread.
- Tie the elastic up to 3 cm, then do 14 p. according to the picture in the photo, using the main blue thread, and around the edges and the pattern itself making purl loops.
- Repeat step 2 except for the elastic, making the main thread white. The height will be approximately 33 cm.
- Remove 1 pt on both sides for the opening under the sleeves.
- After 8 p. cut 17 more loops, only in the center of the canvas. Then, through each knitted strip, remove 3 more times. Repeat this 3 times. Then the same thing, only with 1 loop.
- The height of the canvas is 49 cm, so close the remaining 16 loops.
- Tie the back in the same way, only without the neck.
- On the sleeve, dial 49 sts. Then knit the elastic again.
- Knit in the same pattern as the main fabric. After 14 p. in each subsequent add 1 loop. Finish when the sleeve reaches 15 cm. Tie the second one in the same way.
- Sew the details, transfer the neck loops to the knitting needles and tie a 1x1 elastic of 8 white and 2 blue p.

For boy
The next knitted jacket for a boy can also be used as a jacket in the fall, because it has a hood. The size of this model is designed for a baby 2-3 years old. For knitting you will need the following:
- buttons - 4 pcs.;
- gray yarn - 400 g;
- the remains of a thinner gray yarn.
Knitting occurs only with front loops. The sequence of work is as follows:
- On needles No. 4.5, dial 102 sts, make 12 cm of the shawl surface.
- After 5 p. follow this sequence - knit 3 loops, close 2 (in the next row they need to be restored), 8 p., again close 2, and reach the end. After 12 cm, repeat again.
- After 22 cm of knitting, divide it into a back in 42 loops and 30 shelves.
- For armholes under the sleeves, close 3 sts on each edge both at the shelves and at the back. After 16 cm, connect 11 sts of these 2 elements and remove them by knitting 1 from each knitting needle. These will be the shoulder seams. Then the back will have 36 - 22 \u003d 14 p., And each shelf has 27 - 11 \u003d 16 p.
- Transfer the rest to separate knitting needles, adding 2 more loops at the shoulder seams. The result will be 50 p.
- Knit, adding through 4 rows on both sides of 2 center loops, 1 extra.
- After 21 cm, divide the fabric into parts, close as the shoulder seams.
- For sleeves, dial 25 sts, knit 6 cm, then start adding 1 from each edge, doing this 12 times after 5 p. You should get 49 sts. With a height of 32 cm, close the knitting.
- Connect the details, sew on the buttons.

Crochet sweaters for children with diagrams and job descriptions
If knitting sweaters for children is more classic, then the hook allows you to make complex openwork elements. The product does not have to be summer - it can be warmer for the winter cold. It is easy for a boy to knit a sweater, jumper or beautiful vest. A bolero or a model in the form of a tunic, the length of which is longer than that of a regular sweater or cardigan, is more suitable for a girl.
Jacket with a hood
This version of a knitted sweater for children is done like this:
- Crochet under No. 4, make a chain of 106 air loops (VP), complete the first strip with single crochet (RLS).
- Knit the back with shelves, as in the photo, up to 22 cm (26 rapports).
- Then divide the knitting into 3 parts in a ratio of 6.5: 13: 6.5 rapports. This will be the back with the front. Continue to knit them separately.
- Bring the shelves to a height of 31 cm, then close 1.5 from the center, then 2 times 1 rapport, doing this every 2 p. After 36 cm, finish knitting.
- From the back at a height of 34 cm, close the 6 neck rapports in the middle. Tie up to 36 cm.
- On the sleeve, complete a chain of 40 VP, perform the first line with RLS, then follow the pattern (10 rapports). For bevels, add 0.5 rapport after 4 rows, and then in each 6 - 3 times, also 0.5 times. After 22 cm of knitting, complete it.
- On the hood, dial 76 VP, again make a RLS strip. Next, knit in 19 rapports. After 13 cm around the edges, remove 5 rapports, continue to knit 9 medium ones. After 2 lines of the pattern every 2, close on the sides 0.5 rapport, repeating this 5 times. After another 12 cm, finish knitting.
- Tie in front of the RLS, making holes for the buttons on one. Connect the parts.

Children's sweater with buttons
This knitted sweater for children is made of acrylic yarn. It only takes 100 g, because the model is designed for a newborn. Additionally, you will need a hook number 3 and 3 buttons. Knit a blouse like this:
- Dial 57 VP, knit scheme 1. After 17 cm along the edges of the product, close 2 points for the armhole. When the total height reaches 27 cm, finish knitting.
- For each shelf, complete a chain of 23 VP, continue knitting as in step 1. After every 6 knitted lines, add 1 st from the side of the fasteners. After 17 cm, remove again 2 sts from the side seam. Close 1 loop at the same time after 8 rows from the opposite side, and also after 2 rows - also 1 each. But only 3 times. Finish knitting at a height of 27 cm.
- Start the sleeve with 35 VP and a 2-cm elastic band according to scheme 2. Go to the initial pattern, adding 4 points, and then 3 more, but one after 4 p. Finish the part after 16 cm.
- Connect the elements, leaving 1 cm at the shoulder, side and sleeve seams. Tie the bottom, neckline and shelves with an elastic band according to scheme 2, making 5 lines. Sew on the buttons.

Openwork bolero for girls
This model will require 150 g of Puffy Fine yarn 440m / 100 g white, hook number 5. The knitting instructions are as follows:
- For the back, make a VP chain 0.3 m long, knit the main pattern.
- When the canvas reaches a height of 0.15 m, in accordance with the pattern, remove 2 loops per armhole on both sides. Continue knitting another 0.15m, finish.
- Knit the shelves symmetrically. For each, type a chain of VPs 0.08 m long, follow the pattern of the pattern, adding and subtracting according to the pattern.
- To create the sleeves, sew the shoulder seams, then start from the armhole to knit the main pattern. Complete in 0.15 m.
- Connect the parts, tie the edges of the product near the RLS, and then with a pico strip every 3 columns.

Boy's cardigan for cool weather
This knitted sweater for kids is knitted in cold weather according to the following instructions:
- Back. Take a thread of the same color, in this case beige, dial 78 VP. Work 52 rows in 1 pattern.
- Shelves. For one, make 40 VP, and then tie 45 rows, too, in 1 pattern. Then, inside each one, first subtract 8, then twice for 4 and 2 loops. Through the 2 knitted lines, secure the thread.
- Sleeves. Each start with 46 VP, then knit 1 circuit again, adding 1 loop around the edges after 4 knitted lines, and finish at 25.
- Hood. Perform both halves like this - dial 11 VP, knit 4 strips, making 2 sts inside the addition, then combine the parts with a chain of 52 VP, continue knitting in 1 pattern until 28 rows after connection. Secure the thread.
- Pockets. Make a chain of 24 VP, knit all the same pattern, adding 1 loop in even rows. Finish in 10 strips. Tie the edges with 2 rows of embossed elastic from 1 convex and 1 concave column, and then sc. When doing this, use a different color of thread.
- Sew the details, tie the hood and shelves with a raised elastic band. On the left, make holes for the buttons, replacing the column with VP. Tie the edges of the product in 2 patterns.
Find out how to tie