Interest in patchwork is growing, gaining momentum, and becomes more and more interesting among lovers of needlework.
Patchwork, in my opinion, is an inexhaustible topic at all, but there are some patchwork sewing techniques that still amaze me.
What seems to us difficult and unique at first glance, in fact, turns out to be not so mysterious, if you delve into the basics of patchwork technique.
Today I will talk about a rather interesting patchwork technique - sewing from stripes. This patchwork method is a treasure trove for patchwork makers! Sewing from stripes presents such a variety for making blocks and patchwork compositions, which, in my opinion, is not found in any other technique.
I have always been attracted by unusual things, and at first it seemed impossible to me how to sew a wavy path from straight stripes. But only at first, until I got to the bottom of the truth, and I must admit, I succeeded!
So, today we sew a winding patchwork path from the stripes.
I took several photographs along the way in my experiment, gained some experience, which now I will tell you with pleasure.

Frankly, when I started sewing this track, I had no idea how it would end and what would happen in the end.
This, by the way, is the amazing patchwork that you never know exactly what the result will be. Much depends on the color of fabrics, stitches, and the shape of the patchwork. Especially when trying a new sewing technique for the first time.
In order to obtain such a winding patchwork pattern, you only need to position the stripes in a certain way when sewing, determine the width of the stripes, and correctly cut the fabric sewn from the stripes.
It is also very important to keep the same seam allowances when sewing - this is the basic rule for all high-speed assemblies. That is, if, for example, you are used to making allowances for the seams of 0.75 cm, then when trimming the details, always strictly observe this allowance. I sewed stripes and all parts with an allowance of 0.5 cm.
So let's get started. For a small track, like mine, (1 m long and 27 cm wide) we take 7 strips of fabric, each 1 meter long. We sew strips of fabric sequentially into a single fabric.
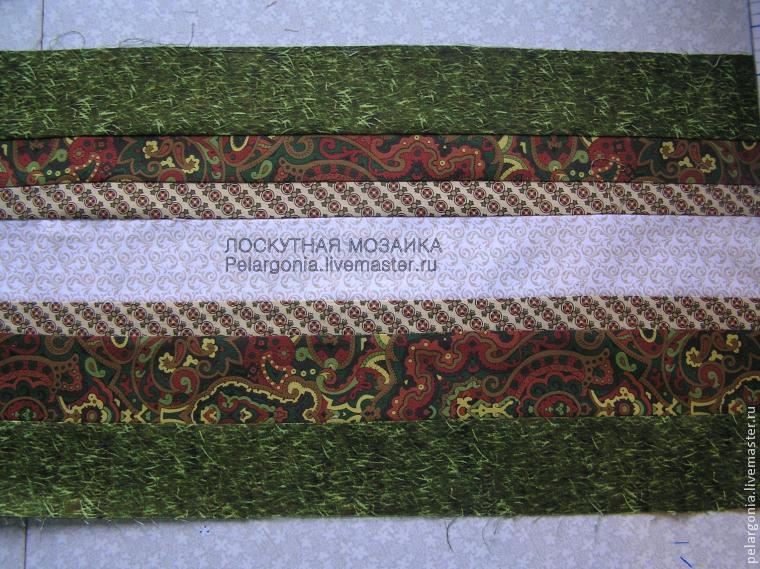
The stripes can be of any width and length. If you want to sew a wide track, or a cape for a chair, then take the stripes wider, and I took strips of this width for the finished track 27 cm wide - we look at the photo above and count from top to bottom:
1st green - 6 cm
2nd brown - 4 cm
3rd - peas - 3 cm
4th - white - 6 cm
5th - peas - 3 cm
6th - brown - 6 cm
7th - green - 6 cm
We sew all the stripes in sequence, smooth the seams - light fabric to dark, so that the allowances do not shine through.
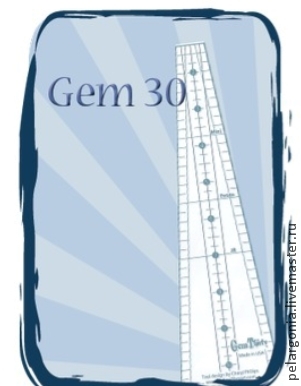
I don't have such a ruler, but I made a template for myself from cardboard, and with it I made markings and cut the details.


Anyone who has such a ruler can immediately cut it, and I first made the markings, and then I cut the parts using a simple ruler.


As you can see, we flip the template up and down, and this is how we make the markup.
This is what happens in the end.

Then we cut the canvas along the outlined lines.


Then you need to lay out the parts so that the rectangles on the patchwork cones are staggered, as it were, and start sewing the blanks for the track. We will sew the cones in 4 pieces, leave two cones at the ends of the path, as in the photo.

Now we lay out the sewn blanks from 4 cones so that the narrow sides of the sewn cones look up, at the next blank - down, and thus we sew everything. For clarity, I put pencils in so that you can see how the details are sewn.
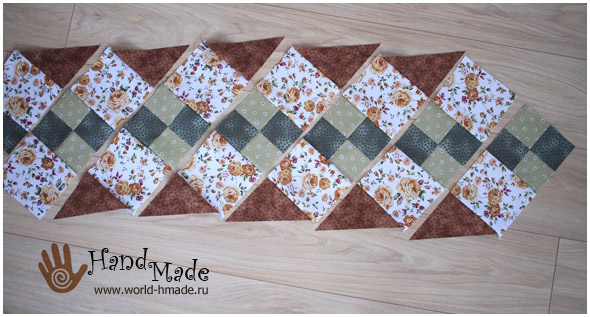
Well, that's probably all. Sewing all the details, quilting and making edging along the edges of the track, we get the finished product. This is how it looks. Here is such a winding patchwork path, which I named - "Garden Path".
Seeing once runner (runner) executed in the technique of patchwork, I fell in love with him forever. Then I didn't even know the exact name of this table runner and called it just a narrow tablecloth. In our time, the runner, I think, plays a purely decorative role. But it was not always so. In the Middle Ages, some of the nobles of Europe did not differ in particular accuracy and during a meal they pretty dirty snow-white tablecloths. You can imagine what it was like for the poor laundresses! Probably the runner is the invention of one of these unfortunate women. A table runner was laid over the tablecloth, so that the latter remained clean after a meal. Nowadays runners are widely used for table setting in restaurants. Certainly not because the visitors are sloppy, but rather to decorate and create an appropriate atmosphere.
In my opinion, patchwork Is just the perfect technique for creating a table runner. How to do this will be described in this master class.
Runner dimensions: length = 122 cm, width = 35 cm. The size of the tablecloth, of course, can be changed by increasing or decreasing the size of the squares underlying the motive, or by changing the number of blocks.
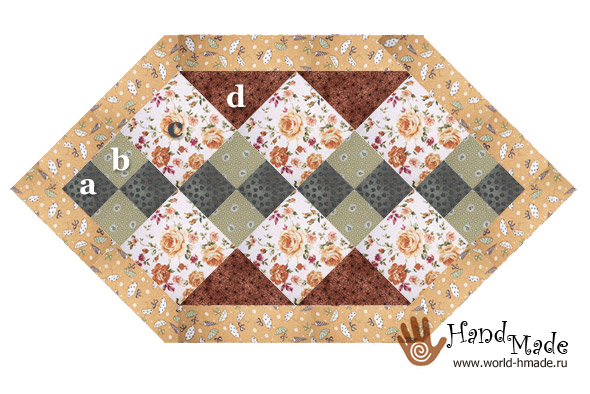
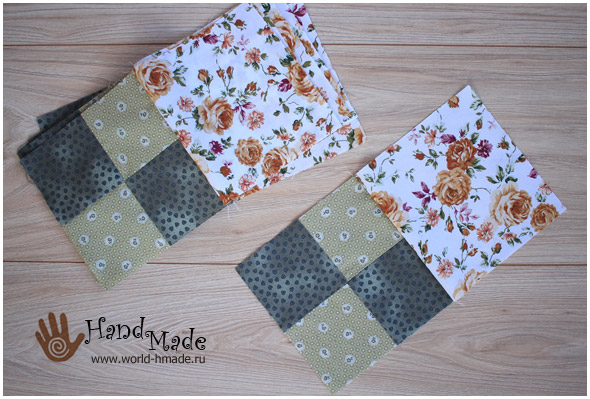
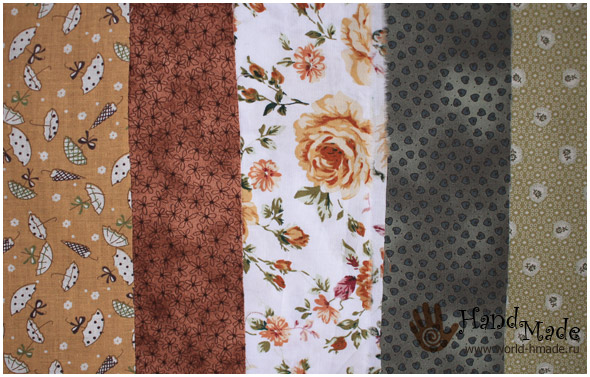
So, for sewing a runner, we need a fabric of 5 colors (shown in the photo): 4 for sewing a block and 1 for decorating the edge of the tablecloth.

Fabric consumption:
- fabric a (dark gray-green with a small pattern) - 25x45 cm.
- fabric b (light green) - 25x45 cm.
- fabric with (light fabric with roses) - 55x40 cm.
- fabric d (brown with a small pattern) - 45x45 cm.
For convenience, fabrics in the diagram are designated by letters of the Latin alphabet.
From fabrics a and b we cut out 14 squares with a side of 8 cm.

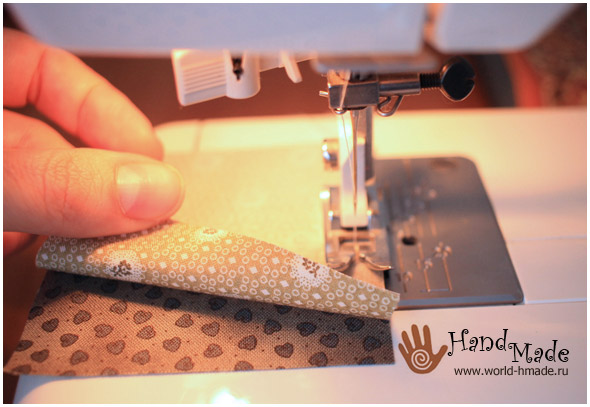
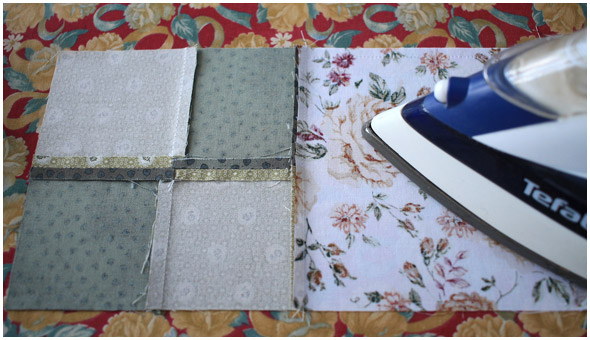
Now you need to sew a dark and a light square by machine stitching on one side. To do this, fold the squares with the front sides inward and sew. My seam allowance is equal to the width of the machine foot, i.e. about 6-7 mm.
After all the squares have been sewn, you can iron the seam. Smooth the seams on the side of the dark fabric.

From the received half we will collect a large square. To do this, fold the halves as shown in the photo, i.e. the dark square should be located above the light one, and the light one should be located above the dark one.
Sew the halves.

Smooth the seam by unrolling the fabric on both sides.

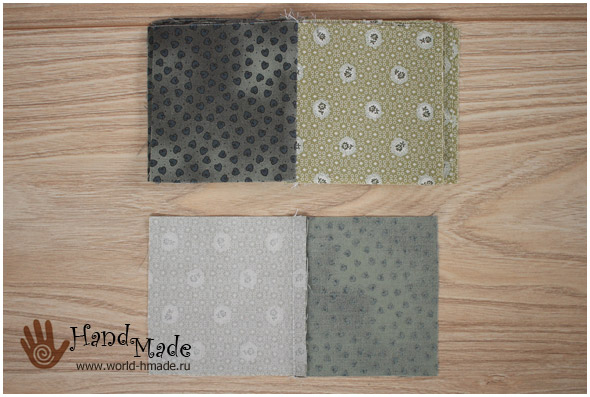
So, we got big 7 squares, assembled from small ones. The photo also shows the wrong side of the block.
All uneven edges must be trimmed. To do this, we apply a ruler to the edge of the square, align its position with a grid on the rug and cut off the excess with a roller knife. It is best to start aligning with the curved block itself. It will cut more tissue, we will trim the rest of the squares along it.
We got a square with a side of 14 cm. You can get a different side size. For example, if your seam allowance was less than mine, then the resulting square will be larger (about 14.5 cm). There is nothing wrong with that. You have two ways: 1) cut off the extra 5 mm, thus making a square with a side of 14 cm; 2) leave everything as it is, and cut out the following details with a side of 14.5 cm. The choice is yours!

From fabric C we cut 12 squares with a side of 14 cm.

Fold the squares as shown in the photo.

Sew on one side.
We smooth the seams on the side of the block, assembled from small squares.
Now take a close look at the photo below. The two outer blocks consist of two sewn squares (a square made of fabric c and a square made of fabrics a and b), while the rest of the blocks consist of three squares. That is, we put two blocks aside (they are already ready), and to the rest we sew one square of fabric c.

From fabric d we cut out 5 squares with a side of 14 cm, then cut them diagonally.

Sew on the triangles.

How to sew the edging and quilting the canvas is described in detail in our other master classes: Block "Pinwheel" in the patchwork technique. Hot stand or oven mitt. Master Class.
Enjoy your sewing! With best wishes in creativity, master class author Anna Lavrentieva.
This master class was written specifically for the site, so copying the entire material is PROHIBITED!
In case of partial copying, be sure to post a link to the source.

Popular Categories
Crochet toys have recently become very popular among needlewomen around the world. And it is deserved! Is it possible to remain indifferent to miniature amigurumi or fluffy animals knitted from pile yarn?
If you consider yourself one of the fans of knitted toys, then perhaps the following master classes will be of interest to you.
Evgeniya Smirnova
To send light into the depths of the human heart is the artist's purpose
Content
Floor covering for the home can not only be purchased, but made with love with your own hands. Many needlewomen can sew a rug from shreds with their own hands in just a few hours, if they use a little tricks in its manufacture.
How to make do-it-yourself patchwork rugs

There are many techniques for making a DIY fabric rug. Each allows you to fantasize and get creative about flooring. In special classes and master classes, they teach how to create voluminous or flat rugs, pleasant to the tactile or the simplest, "rustic" ones. When choosing any technique, it is important to prepare many scraps of fabric for which old things, unnecessary yarn, or even T-shirts and T-shirts bought for a minimal price will come in handy.
Basic rug making techniques:
- Knitting - here natural yarn or narrow strips of fabric are prepared, which are knitted according to the classic pattern.
- Patchwork is the creation of a mosaic from different patches that are sewn together into one piece.
- Weaving is similar to knitting, only crocheted knitting needles are not used here, but there is a base on which threads or shreds are applied.
- Sewing - either patch braids are used, or balls with padding polyester inside - this is how volume is obtained.
DIY knitted patchwork rug
To make a rug from strips of fabric with your own hands in a knitted style, follow the instructions:
- Prepare the material for work - you can take old T-shirts, T-shirts, from which the lower seams are cut.
- The material is cut into long narrow strips with scissors. Cutting goes in a spiral or like this: strips are cut in a folded product (a little short of the seam), then the thing is opened and cut into one continuous tape.
- You can use knitting needles, but it is more convenient to crochet.
- The rug is knitted from the simplest air loops with single crochet columns - you get a rectangular shape of the product.
- If you take 5 loops, close in a ring, and add loops on each row, you get a round shape.
- For a change, you can mix colors - the rug will turn out to be bright, intricate.
Do-it-yourself rugs using the patchwork technique

Patchwork products are beautiful and original. Do-it-yourself patchwork rugs from fabric scraps are easy to make. To make them, follow the instructions:
- Prepare the material - scraps of fabric, scraps, thematic pieces with prints specially purchased in stores or on the Internet.
- Wash and steam new fabrics, and starch old scraps and iron them.
- Thick fabrics are perfect for rugs - tweed, gabardine, drape.
- For a longer service life of the product, take a lining - it can be foam rubber, synthetic winterizer, batting or a dense carpet base.
- Bring all pieces of fabric to the same size and shape, for this use a template; seam allowances for thick fabrics are not needed.
- Take a base, stitch all the pieces of fabric onto it in a random order or following certain patterns and images. Patchwork patterns can be found in specialized magazines or on the Internet.
- Once you have mastered simple sewing, you can try rugs with curved lines or intricate patterns.
- A kind of patchwork is a knitted type, in which the patches are not stitched together, but tied together.
- To obtain a soft, voluminous rug, you can use the quilting technique, in which 2 canvases are stitched together, and a synthetic winterizer is laid between them.
How to weave a patchwork rug without a crochet
If you are not a master of crocheting, then you have the opportunity to weave rugs from scraps of fabric with your own hands without it, using a little tricks. How to do it:
- Take a special large frame for photos or make a base for the future product according to the desired dimensions from wood.
- On two opposite sides, stuff the studs in 1/4-inch increments.
- For threads, use all the same old T-shirts or T-shirts, preferably knitted.
- Pull the threads over the studs for the base.
- Take a working thread - let it be contrasting, skip it by alternating under the base and above it.
- Continue to weave threads, incorporate different colors.
- To get a fringe, you can tie the threads together and not cut the ends, for smooth weaving, it is better to cut them.
- Periodically, weaving will need to be pulled up to the first row in order to obtain the desired density.
- After finishing weaving, remove unnecessary parts to the wrong side, remove the finished product.
- You can decorate the rug if you wish.
Oversized patchwork rugs

It will take more time and fabric to make voluminous rugs from scraps of fabric with your own hands, but it's worth it. The coating turns out to be original, fun and children like it very much. There are several types of making volumetric rugs:
- Pom-pom base - for it, take square pieces of fabric, form them into balls filled with padding polyester, sew together.
- Grandma's rug - pigtails are woven for him, which then need to be sewn together in a spiral or in any other order with a thick strong thread.
- Cut the thick knitted fabric (sweaters) into strips and let them curl on their own - to speed up the process, you can wash the strips in the washing machine only with water. The swirling strips are sewn together to form a bulky rug.
- You can knit a long ribbon of yarn 10 cm wide and several meters long, in each row, knit the last loop as a purl, so that the fabric twists. Then lay the material in the desired order (spiral, circle) and sew together.
- It is possible to immediately knit a spiral - for this you need to grab and knit the extreme loop of the finished fabric.
- To create a grass rug with your own hands, you need to prepare a base - a rigid mesh, which is sold in hardware stores. Better to take with large cells, where the hook would go. Cooking fabric - knitted strips or cotton. It is better to start weaving from the center - you need to place the strip under the mesh and crochet both ends to the front surface, then tie a tight knot on the cell wall with a braid. After filling in all the cells, you will receive a fluffy doormat.
Seeing once runner (runner) executed in the technique of patchwork, I fell in love with him forever. Then I didn't even know the exact name of this table runner and called it just a narrow tablecloth. In our time, the runner, I think, plays a purely decorative role. But it was not always so. In the Middle Ages, some of the nobles of Europe did not differ in particular accuracy and during a meal they pretty dirty snow-white tablecloths. You can imagine what it was like for the poor laundresses! Probably the runner is the invention of one of these unfortunate women. A table runner was laid over the tablecloth, so that the latter remained clean after a meal. Nowadays runners are widely used for table setting in restaurants. Certainly not because the visitors are sloppy, but rather to decorate and create an appropriate atmosphere.
In my opinion, patchwork Is just the perfect technique for creating a table runner. How to do this will be described in this master class.
Runner dimensions: length = 122 cm, width = 35 cm. The size of the tablecloth, of course, can be changed by increasing or decreasing the size of the squares underlying the motive, or by changing the number of blocks.
So, for sewing a runner, we need a fabric of 5 colors (shown in the photo): 4 for sewing a block and 1 for decorating the edge of the tablecloth.
Fabric consumption:
- fabric a (dark gray-green with a small pattern) - 25x45 cm.
- fabric b (light green) - 25x45 cm.
- fabric with (light fabric with roses) - 55x40 cm.
- fabric d (brown with a small pattern) - 45x45 cm.
For convenience, fabrics in the diagram are designated by letters of the Latin alphabet.

From fabrics a and b we cut out 14 squares with a side of 8 cm.

Now you need to sew a dark and a light square by machine stitching on one side. To do this, fold the squares with the front sides inward and sew. My seam allowance is equal to the width of the machine foot, i.e. about 6-7 mm.

After all the squares have been sewn, you can iron the seam. Smooth the seams on the side of the dark fabric.
From the received half we will collect a large square. To do this, fold the halves as shown in the photo, i.e. the dark square should be located above the light one, and the light one should be located above the dark one.

Sew the halves.
Smooth the seam by unrolling the fabric on both sides.

So, we got big 7 squares, assembled from small ones. The photo also shows the wrong side of the block.
All uneven edges must be trimmed. To do this, we apply a ruler to the edge of the square, align its position with a grid on the rug and cut off the excess with a roller knife. It is best to start aligning with the curved block itself. It will cut more tissue, we will trim the rest of the squares along it.

We got a square with a side of 14 cm. You can get a different side size. For example, if your seam allowance was less than mine, then the resulting square will be larger (about 14.5 cm). There is nothing wrong with that. You have two ways: 1) cut off the extra 5 mm, thus making a square with a side of 14 cm; 2) leave everything as it is, and cut out the following details with a side of 14.5 cm. The choice is yours!

From fabric C we cut 12 squares with a side of 14 cm.

Fold the squares as shown in the photo.

Sew on one side.

We smooth the seams on the side of the block, assembled from small squares.
Now take a close look at the photo below. The two outer blocks consist of two sewn squares (a square made of fabric c and a square made of fabrics a and b), while the rest of the blocks consist of three squares. That is, we put two blocks aside (they are already ready), and to the rest we sew one square of fabric c.
From fabric d we cut out 5 squares with a side of 14 cm, then cut them diagonally.

Sew on the triangles.
How to sew the edging and quilting the canvas is described in detail in our other master classes: Block "Pinwheel" in the patchwork technique. Hot stand or oven mitt. Master Class.
Enjoy your sewing! With best wishes in creativity, master class author Anna Lavrentieva.
This master class was written specifically for the site, so copying the entire material is PROHIBITED!
In case of partial copying, be sure to post a link to the source.
Popular Categories
Crochet toys have recently become very popular among needlewomen around the world. And it is deserved! Is it possible to remain indifferent to miniature amigurumi or fluffy animals knitted from pile yarn?
If you consider yourself one of the fans of knitted toys, then perhaps the following master classes will be of interest to you.
Patchwork or patchwork sewing is a type of needlework, with the help of which a wide variety of pieces of fabric are sewn into a single, original and unique product. This art has been known since very ancient times, when not whole pieces of fabric were used for sewing, but small scraps. Using patchwork sewing, needlewomen create a wide variety of products for the home and themselves: blankets, bedspreads, tablecloths, covers for chairs and sofas, curtains, decorate the walls of rooms, make clothes, accessories and much, much more. All this wealth will help to make your interior more comfortable and warm, and you - bright, elegant and unique.
Patchwork is becoming more and more popular among craftswomen. The reason for this was that the products come out very colorful and original, and this style also provides an opportunity to realize the most creative dreams and ideas. Also a huge plus is that patchwork sewing does not require large financial costs.
 Patchwork is very exciting in itself. As soon as you make at least some small thing with your own hands and that's it, you can no longer tear yourself away from this art, it will completely swallow you up. This is how many unnecessary scraps and scraps lying around the house can be used and turned into useful household products? Here is such a fascinating and useful piece of the patchwork technique.
 Today, patchwork is gaining more and more popularity. Bright napkins and extraordinary table tracks in this style look very impressive in the home interior.
Patchwork kitchen textiles
 Kitchen textiles will always add coziness, comfort and warmth to the interior of your kitchen. Nowadays, the choice of napkins, tablecloths, table runners, curtains, kitchen towels is very large, you can buy them for every taste and color. But the paths on the table and napkins can be made with your own hands, and they will add great sophistication and originality to the table setting.
Patchwork napkins and runners can be made in different shapes and colors. The main thing is to turn on your imagination, and give free rein to your most daring ideas. All you need to make these textiles are scraps of fabric, suitable thread, scissors and a needle.
Patchwork napkin making technique
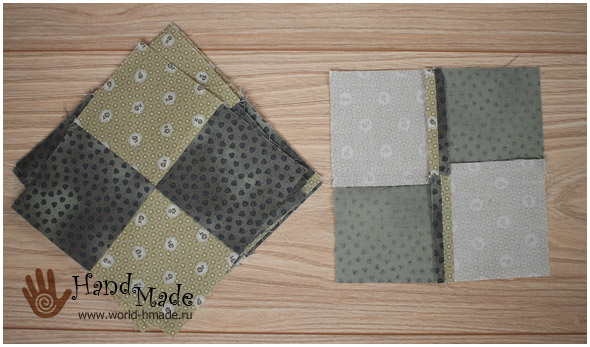
We start by cutting seven strips about three cm wide from the prepared shreds.
 In the selected sequence, we sew the strips together, thus creating one solid canvas.
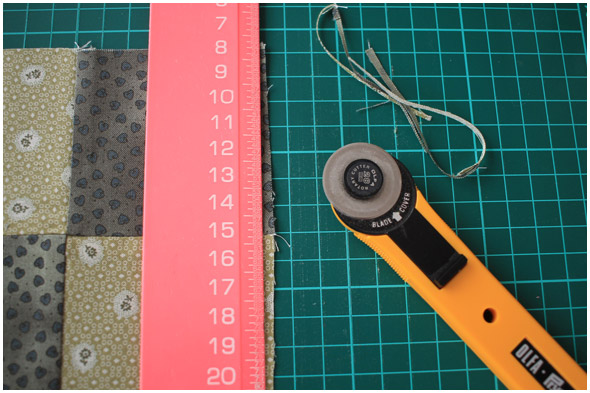
 Align the edge of the canvas with the ruler, and cut off the first segment of the napkin. Turn the ruler over and cut off the next piece.
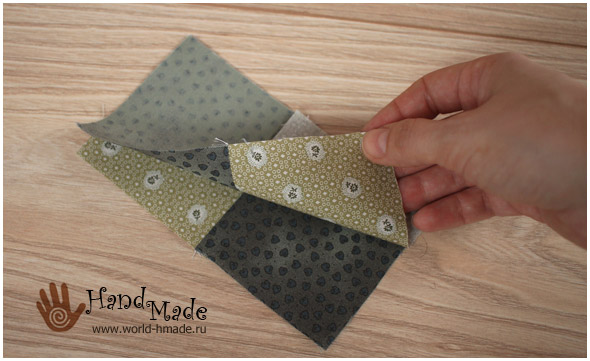
 We take six parts and sew them together, so we get a hexagon. We put fabric under the upper part and surround it.
 Then we iron the product and our napkin is ready.
Track on the table
The paths on the table are a practical and beautiful piece of furniture made by hand; it has a special value and often becomes a family property.
 Do-it-yourself track on the table can be sewn from shreds of various shapes. Consider an example of making a product in the form of squares. For convenience, it is better to first make a template from cardboard, for example, 20 * 20 cm, along which it will be easier to make a track. We use it to cut out squares from different scraps of fabric. After that, we process the edges of the squares, and fold the parts in any shape and sew them into a canvas. Sew the fabric to the finished canvas, which will serve as a lining. We iron the resulting product. That's all, the path for your dining table is ready.
 By making such wonderful kitchen items, you will add a unique and original look to your dining table!


