A beautiful hairstyle is not necessarily a complex hair design. In order to look stylish and neat, a couple of minutes is enough. That's why owners of long hair often wonder how to make a bun on their heads. It's quite simple, if you wish. And, of course, there is a difference between the two. There are a lot of different options.
Tourniquet
The classic bun is a smooth and neat tight bun. It is usually done using a tourniquet. How to make a bun on your head in a classic style? You will need several hairpins, the number of which varies depending on the length of the hair, as well as an invisible hairpin. The step-by-step process only takes a few minutes.
Step #1 - combing
The secret to a good bun is smooth and even hair. To do this, you can sprinkle them with a little gel or mousse. Take your hair at the base and comb it until it is perfectly smooth and even. If static electricity occurs, spray your head with water from a spray bottle.
Step #2 - twisting
After the hair is combed, you need to twist it into a braid. How to make a bun in this case? Gradually twist your hair clockwise, keeping it at the base. The tighter the harness, the smoother the bun will be. While curling, secure the curls with hairpins. This will give the necessary rigidity and prevent the bun from unwinding during the day.
Step No. 3 - consolidation
When the tourniquet is ready, it needs to be secured to the back of the head. An invisible pin can be useful for this. Pin the tourniquet with it and spray it with hairspray. The same bun can be done not on the back of the head, but on the top of the head, but then you need to comb your hair with your head slightly tilted back. The tip of the tourniquet is hidden under the bun itself.

Elegance is always in fashion
The second classic is an elegant, smooth bun on top of the head. This technology is somewhat more complicated, but with frequent practice it also does not cause difficulties. How to make a bun on your head in an elegant style? Follow some simple rules.
Step #1 - preparation
Wash your hair, dry it slightly, apply styling foam. This gives the hair smoothness and evenness. Comb your hair, divide it into three unequal strands. Leave a large one on the back of the head, and two smaller ones in the bang area. The future bun will be made from them. Secure the front strands with bobby pins to keep them out of the way.
Step #2 - tail
Comb the hair on the back of your head well and put it in a high ponytail, otherwise you won’t get a bun hairstyle. How can I make it smoother? Only at the expense smooth hair. The higher the tail and the stronger the elastic, the smoother and stronger the bun.

Step No. 3 - loose tourniquet
Leave the side strands aside for now. Distribute the tail into two equal strands, twist each into a loose strand. This is required to give the hairstyle stability and staticity. Wrap the rope around the elastic band without pressing too hard. Be sure to leave a small loop. You need to hide the tip of the tourniquet in it so that it does not unravel. You can secure it with an elastic band or use an invisible pin.
Step No. 4 - side strands
Let's look further at how to make a bun on your head for any occasion. It is almost ready, you just need to arrange the side strands correctly. First, remove the hairpins and comb your curls. Second, improvise. For example, the strands can be left free. This will add romance and some artistic negligence to the image. Or tuck them behind your ears, securing them with hairpins at the base of the bun. This image will be somewhat stricter and more serious. You decide. It is advisable to spray your hair with hairspray to make it last longer.

Headbands as decoration
How to make a hair bun for romantic date? Use accessories! For example, headbands. With their help, you can create a unique look for a meeting with your loved one or a walk with friends. The hairstyle is quite simple to do. First you need to wash and dry your hair, then comb it thoroughly and put it in a high ponytail. A tight elastic band is the key to ensuring that your hairstyle will last a long time.
Slightly loosen the tension in the frontal part so that the bun looks slightly careless and adds a romantic touch to the look. Wind the tail around the elastic band, tightening it slightly. It is not necessary to wind the tourniquet, unless it is very weak. Secure the finished bun with a hairpin or bobby pin near the elastic band. The tip can be hidden under it, or you can leave it.
Next, put two headbands on your head: place one closer to your forehead, the other a few centimeters further than the previous one. It is advisable to choose thin hoops, otherwise the whole point of the hairstyle is lost. How to make a bun from hair with a thick rim? Using the same technology, but you will need one accessory with beautiful decor. This will be an excellent finishing touch to the image of a sophisticated and romantic young lady.

Flagella
How to make a bun using several hair flagella? Everything is simple, and most importantly - fast. Many Hollywood stars have appeared on the red carpet with this hairstyle more than once.
Divide your hair into several equal strands. For example, five or six. Twist each into a rigid flagellum, one that resembles a twisted loop. Then collect all these strands into one bundle, fastening them with hairpins or bobby pins. The bangs can be left casually tucked behind the ear, for example.
Double tourniquet
There is nothing easier than making a bun from a double strand. To do this, comb your hair smoothly, gathering it into a ponytail. High or low? You decide. Divide the ponytail into two strands, twist each into a rope, and then weave them into an impromptu braid. It can be secured at the tip with a thin elastic band. Next, simply twist the resulting braid onto the base of your ponytail. To hide the ends and strengthen your hair, use bobby pins or bobby pins. This bun looks even more unusual if you choose bright accessories. For example, hairpins with rhinestones or hairpins with an unusual ornament. Depending on the situation, of course.
You can improve your hairstyle in the following way: increase the number of strands. For example, a bun made from three or four twisted strands will become larger and more unusual than one made from two. At the same time, you can experiment with the way they are intertwined with each other. This will also give the hairstyle its own charm and originality.
Who is the bun suitable for?
Absolutely any owner of long hair can afford a bun, regardless of whether she has straight or curly hair. Moreover, it is much easier for girls with curls to curl their hairstyles to create an original and stylish hairstyle. There is no need to intentionally straighten the strands.
You can create classic, smooth buns with just a hairdryer and a good comb. After washing your hair, simply sprinkle the strands with foam, dry, constantly combing. Girls who are thinking about how to make a bun with an elastic band should remember one thing: the elastic band must be tight. Otherwise, the technology is no different from that described above, since almost every option is based on a tail, which is simply impossible to make without an elastic band. But there is another tricky move. Gather your hair, twist it into a large loose rope, then secure it with an elastic band. This careless option on a quick fix ideal for walks around the house or to the nearest store. But it’s hardly worth going to a serious event with such a hairstyle.
Experiment, use your imagination, add various accessories to make your look unique and fashionable.
Svetlana Markova
Beauty - how gem: the simpler it is, the more precious it is!
Content
Everyday, most simple hairstyle, collecting hair of medium and above average length into an orderly structure - a ponytail. What to do if it makes you bored, and the “looseness” on your head does not suit the situation? Leave this invention of mankind behind by easily and quickly creating an elegant, always stylish ponytail bun.
How to make a bun on your head

Dulya, bun, onion, cone - this is the unconventional name for a bun. It consists of hair gathered into a voluminous structure on the back or top of the head, and looks extravagant on the side. The base for execution is always the tail. Before you make a bun from your hair, you will need a set of accessories - for the simplest and quick option- elastic bands, hairpins or bobby pins, hairpins, to create a blow-out in a strict French style - additionally a roller or donut.
This bun is perfect for decorating the head of a housewife heading out for an evening out or down the aisle. An airy, chic look at a wedding or special event will be given by jewelry - jewelry with rhinestones, flowers, beads. Modern ways There are many designs for the cone - the classic one involves carefully pinning all the strands until a perfectly even shape is achieved; the hair can be braided into plaits and braids, which creates an unusual, romantic image.
The free method is preferred by girls who are focused on a fast-paced lifestyle in the spirit of fashionable urbanism, in which there is no place for conventions. This hairstyle is specially given a careless, sloppy, and sometimes shaggy look. It’s paradoxical, but such a sloppy, and from the point of view of lovers of the classics, even untidy design, brings orderliness to the appearance of its owner, and creates original style, combined with both a dress and jeans.
Before you do beautiful bun on the head, keep in mind that done on the top of the head will not work tall girls. In addition, he emphasizes by stretching his neck - he will become someone with narrow, thin shoulders, and Long neck. An overly fluffy tall bump looks ridiculous on short girls, making it look even more down to earth. Low ones have a short lifespan - strengthen them with fixation agents. The peculiarity of this hairstyle is its versatility. It can be worn both while doing everyday things and in a formal setting, and with just a few touches, it can go straight to the ball.
Simple hair bun
To construct such a structure, you do not need any special devices, complex hand passes or the help of a hairdresser. A short educational program on how to properly make a bun on your head without a donut, for a simple hairstyle with quick implementation:
- Gather your hair into a ponytail with your hands, thread it into an elastic band, then twist it once, and pull half of the resulting ponytail through the second turn. You will get something like a short ponytail with the ends wrapped in an elastic band. If the hair middle length, then use two elastic bands - use one to make a tail, and put the second on top - pulling the strands from under it, form the so-called muzzle.
- By pulling the strands with your hands from the resulting hairstyle, create the required volume in the front, upper and back of the head.
- Secure with pins and bobby pins along the edge, giving shape and hiding the ends sticking out from under the elastic.
- To prevent your hair from becoming disheveled and wearable, spray it with hairspray.

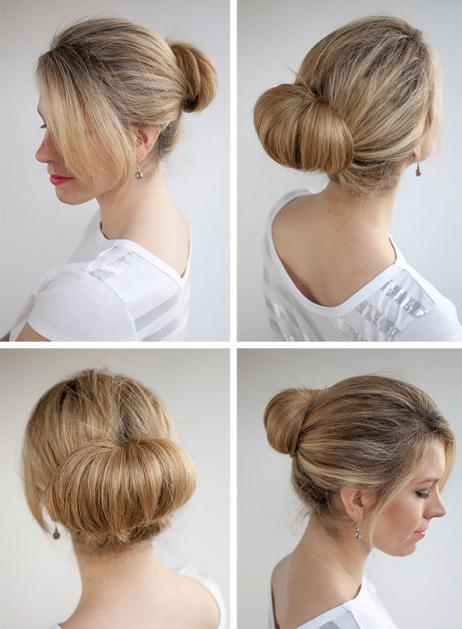
How to make a bun for long hair
It is best to use a donut to create a bun hairstyle from long hair. The longer the length, the more magnificent and voluminous the design is, so a base is required to hold the shape. How to make a beautiful bun with long hair, step by step guide:
- Make a ponytail, tie it with an elastic band, put a donut roller on top, smooth the hair on it, dividing the ponytail in the middle.
- Carefully wrap the strands around the donut, tucking it under it, twist the ends with a rope, wrapping it around the roller.
- Secure the structure along the edge of the donut with hairpins and bobby pins. For decoration on top you can wear beautiful elastic band, or use a hairpin.
How to make a hair bun with jewelry
A huge assortment of unusual hair accessories on sale will not leave anyone indifferent. If you don’t like anything, then with a little imagination, you can make the decorations yourself, without having any special skills. For example, from beads, wire, bows, flowers from bright ribbons, attaching them to a base - a comb, a hairpin, a regular hairpin.
How to make a beautiful bun of hair, what decorations can be used? The muzzle itself can be anything - low, high, free, French. Among the decorations, the use of elegant elastic bands, headbands, combs, and hairpins with beads is common. How to make a bun on the head, decorated with jewelry and braids on the side, instructions:
- Divide the mop into three parts - two front sides and a back one, pin the front ones with hairpins.
- From the back, form a low ponytail, tie with an elastic band, make a bump in any way.
- Release the side strand from the hairpin, braid the braid, following the principle of the spikelet: adding strands to it gradually, from top to bottom. For volume, stretch them slightly. Secure the end of the braid with a hairpin. Apply the same to the second strand.
- Take the resulting braids one by one and wrap them around the pine cone, tucking the ends under it.
- Secure everything around with pins with beads, or stick in an elegant comb. The result will be a masterpiece worthy of admiring glances and any special event.

How to make a fashionable bun on your head from flagella
This hairstyle has several advantages: it is fashionable, neat, and suitable for all occasions. There are many options for its implementation. You can form a bun either from one tail, weaving several strands from it, or from several. The second option is more convenient:
- Divide your hair into two parts along a straight parting.
- Make two ponytails out of them, as close to each other as possible, secure with elastic bands.
- Divide each ponytail into two strands, then twist them in one direction.
- Weave them like a braid, together in a different direction - you get a tourniquet. Pull the strands slightly if you need volume. To prevent the flagella from unraveling, secure the ends.
- Place the resulting bundles into a bun, securing them with hairpins or bobby pins.
How to make a bun hairstyle with wavy hair
From curly hair you can make a lush bump on your head, no worse than that of those with straight hair. There is no need to straighten anything with an iron. On the contrary, a little mess on the head adds charm and romance. How to make a wavy hair bun:
- Apply foam or styling gel to damp hair and dry, forming curls with your hands.
- Lightly backcomb the front to add volume.
- Pull the ponytail, carefully divide it into several strands, twist it, alternately wrap it around an elastic band, and secure with hairpins.
- Pull out small curly strands to frame the sides of the face.
Video: how to make a beautiful bun on your head
Found an error in the text? Select it, press Ctrl + Enter and we will fix everything!What could be more beautiful than loose hair? Only a stylish and fashionable bun! Do you want to add a new “recipe” to your beauty arsenal? Learn how to create a donut bun and experiment with your own style.
What do you need for beautiful buns?
You won't believe it, but the creation of this stylish styling you will only need a few minutes and a minimum number of tools. It's simple perfect solution for the morning or quick preparation for a party.
So, you will need:
- Hair comb;
- 2 thin elastic bands;
- Invisible;
- Sophist twist (aka twister), bagel (aka roller), heagami or a regular thin sock - your choice;
- Medium hold varnish;
- Hairpins;
- Ribbons, bows, headbands, false braids and other decor.
Bun with a roller or sock - option 1
This option is an undoubted hit of the last two seasons. How to twist it correctly and what does the sock have to do with it? Everything is very simple. The most ordinary thin sock can easily replace a purchased bagel - the effect is the same, but what a savings!
- Trim the sock at the heel level.
- Turn the product inside out.
- Roll it into a tight and dense roll.
- Comb your hair and collect it in a ponytail. Low or high? It all depends on the length of your hair and your preferences.
- Place the roller at the base of the ponytail on top of the elastic band.
- Straighten your hair exactly as shown in the photo.
- Secure the bun with a thin elastic band.
- From the free ends we braid two braids - neat or careless, classic or French.
- We wrap each braid around our bun and secure it with hairpins or bobby pins.
- We carefully correct all flaws.
- Want to create a tight bun using a donut bun? Spray it with varnish. For artistic chaos, loosen some strands with a pencil or other thin tool.
The styling is ready!

Option 2
You can create a hair bun a little differently. You will need the same materials, but the procedure will look different.
How to do:
- We comb our hair and collect it in a high ponytail.
- Raises the tail up and inserts its tip into our donut.
- We begin to turn the donut out until it reaches the base of the tail.
- We correct imperfections in the form of gaps or strands overlapping each other.
- We fix the styling with hairpins and varnish.
How to make a bun (video):
Option 3
This great way gather medium-length strands into a bun.
Step 1. Comb your hair and collect it in a ponytail.
Step 2. Place a donut or sock on the base of the tail.

Step 3. Separate a not very thick strand, comb it with a thick comb to achieve maximum smoothness. You can use mousse, foam or gel.
Step 4. Wrap the strand around the sock, carefully tucking the ends inward (under the base of the sock). We secure everything with invisible.

Step 5. Repeat the same procedure with the rest of the hair.

Step 6. We form a flower from the middle strand. Fix the bun with varnish.

Option 4
How to style a bagel for an evening out? Nothing could be easier!
- Comb your hair and collect it in a ponytail.
- We put the roller on the base of the ponytail.
- We distribute the hair around the donut and smooth it on all sides.
- We put a thin elastic band on top.
- We divide the remaining strands into two equal parts.
- We braid one of them, wrap it around the corresponding side and secure it with a bobby pin.
- From the second part we make a bow. We divide the strand into three parts. Lightly comb the outermost hair and twist it into a ring. We secure it with a bobby pin in the middle and straighten it out.
- We braid the middle part and wrap it around the other side of the bun. We fix it with an invisible pin or a hairpin.
- Spray your hair with hairspray and decorate it with rhinestones or beautiful hairpins.

Any questions? Watch the video:
Unusual sock bun
Are you getting pretty tired of regular buns? Add variety to this hairstyle with braids. This option looks very beautiful and is even easier to do than the classic version.
Step 1. Comb the strands and tie them into a high ponytail.

Step 2. Place the donut on the base of the ponytail.

Step 3. Distribute the hair around it.

Step 4. Separate a not very thick strand and weave it into a braid - regular, reverse or fishtail.


Step 5. Wrap it around the sock. You don't need to do it very tightly.

Step 6. Attach the ponytail remaining from the braid to the next strand. We make a second braid and wrap it around the sock again.

Step 7. Repeat this algorithm with the rest of the hair.

Step 8. We tie the last braid with an elastic band and wrap it around the sock as many times as necessary to hide it.

Step 9. Stretch the braids so that the braids completely cover the sock. We connect them with pins.


Step 10. Decorate the bun with a ribbon, bow or decorative hairpin.

Bun with twisted strands
Another one evening styling, with whom you are not ashamed to go on a date or a romantic dinner.
1. Comb your hair and divide it with a horizontal parting into two parts.

2. Tie the second part into a low ponytail.
3. Place the roller on the base of the hair.

4. Do a light backcombing.

5. Distribute the hair around the donut and put a thin elastic band on top.

6. Divide the upper part of the hair into three thin strands. We twist each of them into a rope.

7. Secure the harnesses with bobby pins at the base of the tail.

8. We twist the hair remaining from the bun into another bundle and wrap it around the bun.

9. Fix the hairstyle with varnish.

Twister is a worthy alternative to a bagel
Twister is a foam rubber pin with a slot in the middle and a thin wire inside. Known since Soviet times, it was unfairly forgotten for many years. Now the twister is back in fashion. Let's try to make a beautiful bun with it.
1. Comb your hair and gather it into a ponytail in the place where the bun will be located.

2. We pass the end of the ponytail into the hole of the hairpin and wrap the hair upwards to the very base.
3. Place the hairpin horizontally and bend it so as to completely cover the base of the ponytail.

4. Distribute the mane around the twister. The hairstyle is ready!


Heagami for stylish buns
Heags are a device made of two plates, fastened on only one side. Using this device, you can easily gather your hair into a bun.
- Comb the strands and collect them into a ponytail.
- We clamp the ends between the plates.
- We rotate the hairpin, dragging the entire hair along with it, to the very base of the tail.
- We bring the ends together with heagami.

A bun with heags is not as fluffy, but more natural. It also does not weigh down the hair, which will certainly be appreciated by those with long and thick manes.
This concludes the theoretical part of our master class. It's time to start the practical section. Good luck with your looks and beautiful buns!