Parents who have already been able to make a dollhouse on their own or bought it in a store, having spent a significant amount, are thinking about how to make furniture for dolls with their own hands. Toy furniture isn't cheap, so why not save your family budget. You can easily make it with your own hands from improvised means.


Types of materials commonly used
To equip your daughter's dollhouse, you may need those materials that we most often throw out:
- trimming plywood sheets;
- matchboxes:
- plastic jars and boxes from cosmetics;
- shoe boxes;
- colored sponges for dishes;
- viscose napkins;
- plastic bottles;
- egg tablets;
- textile;
- foil
- wire and many other little things, the place of which we often determine in the trash can.


When choosing materials, everything will depend only on your imagination.
Plywood
Plywood and wood are the most popular and durable materials for making doll furniture. However, the process of creating interior items from them is laborious; skills of working with them will be required. But if you still make such furniture, it will serve the dolls for a very long time and will delight your daughter just as long.

In order to make miniature plywood furniture you will need:
- plywood sheets;
- jigsaw;
- sandpaper;
- small carnations or screws;
- glue;
- sheets of cardboard;
- pencil;
- ruler;
- varnish or acrylic paint;
- scissors;
- attributes that you will use to decorate each type of furniture: fabric, beads, pieces of leather, and much more ...

Stages of work common for all types of furniture:
- Think over or find on the Internet suitable furniture design diagrams for printing.
- Draw on cardboard or use ready-made prints of furniture parts, cut them out.
- Attach the resulting templates to the sheets of plywood and circle.
- Use a jigsaw to cut the parts out of the plywood.
- Sand all parts with sandpaper, the surfaces will become smooth.
- Putting the structure together. We glue the parts or fasten them with self-tapping screws.
- We cover the finished item with paint or varnish and let dry.
- If necessary, we cover with textile elements and decorate.
So one piece of doll furniture has been made.


Cardboard
It is very easy to make cardboard furniture for a dollhouse. You can also involve a child in the manufacturing process. Cardboard is the most affordable material for work. You can use both sheets of cardboard and take small cardboard boxes as a base.


Necessary:
- cardboard or cardboard boxes;
- white sheets of paper;
- pencil;
- ruler;
- scissors;
- glue (if necessary);
- details for jewelry.

Stages of work:
- We think over the details of the future piece of furniture and make templates on paper.
- We transfer the templates to cardboard.
- Cut out the details.
- We make the necessary cuts at the joints of the parts.
- Putting together a piece of furniture. We glue where necessary.
- We give a finished look by decorating the structure.
You can decorate the dollhouse with a new piece of furniture.


Matchboxes
You can design almost any piece of furniture from matchboxes. The advantage of such furniture will be drawers. It is enough to show your imagination and think in detail about the image of future furniture.


We need:
- matchboxes, the number depends on what piece of furniture you will make;
- glue;
- decorations for future furniture.

Stages of work:
- We prepare the required number of matchboxes.
- We glue them together in the sequence that is necessary for the interior details.
- We decorate the resulting piece of furniture. Acrylic paint and varnish are suitable for staining.
Your daughter's dolls will be happy with the new thing.

You can make a rack for dolls from matchboxes yourself by watching the following video.
Plastic jars
Plastic jars can be a great piece of furniture in your dollhouse. Sometimes, you don't even need to do anything with them. In finished form, they can be used, for example, as a bath. The child will be able to truly bathe his dolls, the water will not pour out of them anywhere. You can construct more complex interior items from plastic jars, toothpaste tube lids, and other little things. They can simply be glued together in the required sequence.


For a master class on making a toilet bowl for dolls from a shampoo container, see the following video.
Wire
From wire that bends easily, you can decorate the interior in the Provence style. Beds will look very elegant, the frame of which will resemble a forged product. It will be possible to add a wrought iron candlestick, an unusual wrought iron chandelier. Almost any interior detail can be made using a wire frame. Your imagination will guide you in the right direction.


Egg tablets
Using egg tablets, you can perfectly equip the rooms of the dollhouse. Both plastic tablets and cardboard ones are useful in work. All that will be necessary is to carefully think over the composition and cut out the necessary parts of the tablets.

The work may require:
- egg tablets;
- scissors;
- glue;
- acrylic paint;
- double sided tape;
- helium pen rods
and much more. Everything will depend on how your imagination runs.

Master classes
In this section, you are offered some ideas for creating furniture for dolls with your own hands.
Bed with drawers for matchbox dolls
We will need:
- matchboxes;
- glue;
- pencil;
- scissors;
- a sheet of white cardboard;
- sheets of white paper;
- paints;
- beads;
- thin wire;
- decor elements according to your taste.

Step-by-step instruction:
- Measure the height of the doll for which the bed is intended. The number of matchboxes that will be required depends on this.
- We glue the required number of boxes with the side walls to each other. This will be the base of our bed.
- If you want to make the bed taller, then you can glue peculiar legs in the form of additional boxes to the extreme boxes from below.
- We glue the base of the bed with white paper so that the pull-out elements remain open.
- On cardboard we draw the desired shape of the headboards and cut out.
- We glue the backs to the sides of the base.
- We paint the bed in the desired color.
- We fasten the beads to the pull-out elements of the boxes at the base with a wire. These are the handles of our bed.
- We decorate, cover with bedding and you can put the doll to sleep.

In the next video you will see a master class on making a bed for a cardboard doll.
The bedside table can be decorated in the same style.
We will need:
- 2-3 matchboxes;
- glue;
- White list;
- the same paint and decor elements that adorned the bed;

Step-by-step instruction:
- We glue the boxes together, placing them on top of each other with bases.
- We glue it over with white paper, leaving the pull-out elements open.
- We paint in the style of an already made bed.
- We attach the beads to the boxes.
- We decorate.

See the next video for a master class on making a bedside table from matchboxes.
Sofa for dolls made of plywood
We will need:
- plywood;
- jigsaw;
- glue or small nails;
- sandpaper;
- cardboard;
- pencil;
- ruler;
- varnish or acrylic paint;
- pieces of fabric;
- cotton wool.

Step-by-step instruction:
- We decide on the design and size of the future sofa. We make drawings for the back, seat, side backs on cardboard. We take into account that with the help of the back and side backs, the sofa will gain stability.
- Cut out.
- We apply the resulting templates to a sheet of plywood and circle them.
- Using a jigsaw, we cut out the details of the sofa.
- If you want to make upholstered furniture, then at this stage we wrap every detail of the sofa with a thin layer of cotton wool and sheathe it with fabric. If the sofa will not be sheathed, it is necessary to process the details with sandpaper.
- We attach the sofa parts to each other with glue. If you have a soft sofa, then you need to fix it with small nails.
- We cover the parts not covered with fabric with varnish or paint.
- We sew small cushions for the sofa.
- We decorate to our liking and give it to the doll for use.
Chairs can be made in the same way.

You can see how to make a sofa for a doll with your own hands in the next video - a master class.
Floor lamp
For manufacturing you will need:
- thick cardboard;
- glue;
- pencil;
- lace strips;
- empty helium pen refill;
- thin wire;
- a small lid in diameter (lids from jars of medicine, from ketchup are suitable)

We draw a blank of a cone on cardboard. Cut and glue it. Cut off the top of the cone. It turned out the base of the floor lamp shade. We glue it with lace. We bend the wire in half and pass it through the rod. We attach the lampshade from above to the wire, from below to the lid - to give stability to the floor lamp. The lid can be decorated with a lace skirt. Instead of a rod, you can use beads as a stand by passing a wire through them. In this case, we also decorate the lampshade with beads.

Watch a master class on making a floor lamp in the next video.
Chandelier
To make a chandelier, we need a small container. You can use measuring cups for medicines, disposable plastic shoots, the simplest candles in a metal case.
Does your daughter play with dolls? Loves to change clothes, feed and potty? Then it's time to think about expanding the scope of the game and making things for dolls.
What can be made of things for a doll
Think about how much time your daughter spends playing, what is she talking about, what is she interested in? Your observation will help determine and understand where to start. If a child wants to put the doll to sleep and tries to build a crib from a cardboard box, this is good idea make a whole baby room for the doll.
Let's make children's furniture for a doll together:
- Furniture can be made from empty matchboxes, cardboard, and cardboard boxes. This is the fastest and easiest option.
- If you have collected a sufficient number of matchboxes, they need to be glued together, and then pasted over with colored paper or a beautiful cloth. Thus, you can make chairs, an armchair, a sofa with a back, a bed, a chest of drawers and a wardrobe.
We make a chest of drawers from matchboxes:
- you will need 4 matchboxes;
- glossy self-adhesive paper;
- 4 beautiful beads, rings or satin thin ribbon;
- scissors;
- pencil;
- ruler.
How to make furniture:
- We glue the matchboxes together, glue the walls with PVA glue, press well so that the sides connect.
- A 4-drawer chest of drawers is almost ready. It remains only to carefully paste over new furniture for the doll with beautiful glossy paper.
- Separately, you need to take out the boxes and also glue the paper. You can use paper in a contrasting color to make the boxes stand out.
- The handles of the chest of drawers can be different: we glue beautiful beads in the middle of each drawer. Or we make a neat incision with scissors, thread the ribbon, tie the ribbon on a knot from the inside, and push the free loop out.
- It turns out a pretty chest of drawers for a doll.
How to make things for dolls - chaise longue
With a little imagination, you can literally make unusual furniture for a doll in 5 minutes - a chaise longue.
What to prepare:
- wooden clothespins - 12 pcs.;
- glue "Moment-crystal".
Assembling the sun lounger:
- All clothespins must be divided into 2 parts.
- We glue together 6 halves to make 2 blanks - this is the back and seat of the chaise longue.
- 4 more clothespins need to be glued together 2 pcs. the flat part to each other is the legs.
- The chaise longue needs to be assembled, the legs must be glued to one workpiece, then on the other side it must also be glued.
- Attach 1 piece to the right and left - these are the armrests of the chaise longue.
- Wait for the glue to set.
- It turns out to be a pretty chaise longue. It can be painted over or left as it is.


How to make things for dolls - iron
Play is good, but dolls should not only rest, but also do their homework. Just in order for Barbie to be able to iron her things, she will need a miniature iron.
What can you make an iron from:
- the body is made of a plastic milk or juice lid. It needs to be painted with shiny nail polish;
- the iron handle is a part of the ballpoint pen cap;
- thermostat - red beads;
- you will also need hot glue to connect all the parts together.
And this is done simply:
- We take out the plastic cover from the tetrapak (it is oblong).
- We disassemble the handle cap, glue the handle to the base-sole.
- The sole can be coated with a colorless nail polish with glitter immediately or later after assembling the iron.
- We glue a red bead in the middle of the iron - this is the temperature control.
- The iron for the doll is ready, you can start ironing the doll clothes.

The doll itself is just a toy. When she has her own little house with a crib, a TV and a piano, when she can be seated at a doll table and given a tiny iron in her hands, then her beloved Barbie turns into a fabulous staff with her own life and her incredible adventures. Moreover, it is very fascinating activity- do things for Monster High dolls with your own hands.
Vintage suitcase
All small things for dolls, accessories do not have to be made of the same material as for people. You just need to turn on your imagination and use any materials at hand.
To make a suitcase, we need:
- box;
- two beautiful stickers;
- the cloth;
- black narrow braid;
- openwork braid;
- 4 beads;
- glue, scissors, paper knife.
Work order
We glue a rectangular box about 9x7x3 cm in size completely, tightly, without leaving a lid. Then, carefully using a razor or a sharp knife, cut it in half lengthwise.


Sun lounger
A person without imagination will never guess how to make a desk for dolls or a chaise longue from ordinary old wooden clothespins. But it’s very simple.


Iron
When designing things for dolls, we plan their lives. A good Barbie cannot go and rest all the time, let her work a little. Let's make an iron for her.

The iron can be made from anything: from salt dough, from a beer cork, and even from an eraser.

How to make a TV for a doll
I did a little work, let her watch cartoons. If you wonder how to make a TV for dolls quickly, then you can immediately use matchboxes. This is a ready-made "Sharp" puppet. We glue the screen with a splash screen and draw buttons. Everything. Separately, you can cut out a small remote control.

Accessories in a toy interior
In the hall, Barbie must have a piano, and it is imperative to put a vase or lamp on it. But how do you make a doll light? It turns out to be very simple. To design a lamp, it is enough to cut the short end of the cocktail tube into 6-8 strips, straighten them, glue a paper lampshade and a bead lamp. Cut the long side of the tube shorter and insert it into the bottle cork, after having drilled a hole in it.

Step-by-step master class 2
Girls love to play with dolls and these games are very diverse. Dolls, under the guidance of their mistresses, dress, cook and receive guests, go to work and visit and do many more things that are typical for ordinary people. In general, children, while playing, copy us adults. Therefore, to play, children very often need not only dolls, but also accessories for them. Original crafts, created specifically for dolls, occupy the thoughts of many mothers, whose daughters ask them to do such things with their own hands.
Doll accessories can be incredibly varied. This includes doll furniture, hangers for toy dresses, dishes, household appliances, and transport. Lots of options also represent the professions of the dolls. If such a beauty "works" in the office, she may need a computer, if she is a doctor - medical instruments. In general, the scope for imagination in this area is endless. The only problem is that in the store such doll accessories are very expensive, and their choice is small.
Now all over the world, monster-high dolls are becoming very popular. These are dolls representing the representatives of the afterlife, amazing otherworldly beauties who learn magic together and go through many adventures. They, like other representatives of the puppet world, need accessories - furniture, kitchen utensils, transport and much more. Therefore, among mothers, do-it-yourself crafts for monster-high dolls are now common, helping to furnish the game the way the kids want. It is quite possible to make doll furniture and accessories yourself. Such things are suitable for monster high dolls, and for Barbies, and for many others.
Consider original examples of ready-made doll rooms

Rooms for dolls are a real space for imagination. They can be very whimsical and difficult to manufacture, or they can be created quite simply. Purchased doll rooms despite high price are often primitive. They are made of plastic, all accessories are of the same color, most often pink. But if parents decide to have their children play in a makeshift room, they usually try to make it with love and bring its image as close as possible to real human habitation. An example of such a doll's living room is do-it-yourself furniture for dolls made of foam.
We make a beautiful living room for dolls made of styrofoam with our own hands
The foam is very light and, at the same time, quite dense, at least for doll rooms, material. It is easy to cut, paint, parts can be glued together. Depending on the color and style chosen by the craftswoman mom, the foam can serve as the basis for the pink bedroom of the Barbie princess, and for the mysteriously otherworldly living room of monster high dolls.
With the help of knives and scissors, it is easy to make such a slide in the living room, where various doll things, a TV, can fit, for example:
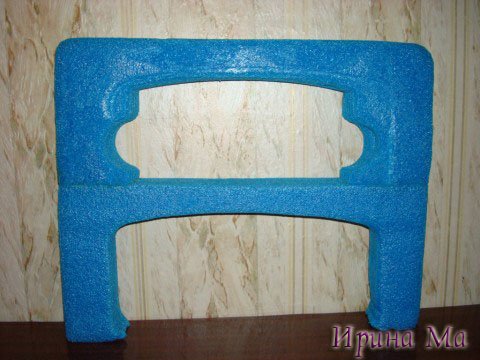
Chairs, which are made by cutting out the backrest, armrests and a thicker piece - the seat. We glue them together.
The coffee table can also have a round shape, but in this case it is different, in the style of constructivism.
A very simple and interesting addition will be ottoman pillows that are placed under your feet.
Such a room can turn out in literally an hour. And how much joy it will bring to children, how many ideas for games!
Together with the baby, we create the necessary kitchen utensils
Of course, for a real young lady, one living room is not enough. Many girls dream of a doll kitchen in which, like their mother, dolls will create their culinary masterpieces. It is good for the kitchen to have not only furniture, but also utensils for cooking. Crushers and scoops, knives and graters - all this is quite possible to do on your own. Here's what we need:
Tin cover tin can... It is better to take one that opens on its own, with a handle:
Metal scissors;
Small pieces of wood.
We need to cut knives and knives out of a tin different shapes... From a piece of wood - handles for them. If the piece of wood is not thick, you can cut the handles with a regular knife. We make slits for the blades in the handles and insert them.
We make a cutting board for the doll's kitchen from half an popsicle stick. Using a knife, we give it the desired shape and cut a hole.

A doll dishwashing brush is easy to make from a toothbrush that is sold in pharmacies. Cut off a brush of the required length from it and attach it to a piece of wood.
A puree whisk is made from a paper clip and, again, a piece of wood.
And if you still have an old Soviet grater, then by cutting it with metal scissors, you can get a doll grater.

These amazing things are created from seemingly unnecessary nonsense. Be creative and amaze your beloved kids! Below you can find a video master class on crafts for dolls.
Related videos
All the girls play with dolls. These toys are one of the first to appear in the children's room; teenagers, and sometimes even quite adult ladies, are in no hurry to part with them. In addition to the dolls themselves, on sale today you can find a variety of accessories for them, as well as furniture and entire houses. But the store does not always have exactly what you need. And therefore, many doll lovers prefer to create some kind of objects for them with their own hands. What can you do at home without being a master? Anything: clothes, furniture and a variety of play and interior stuff - everyone can create such crafts for dolls.
Doll wardrobe
Even if you don't plan on creating a special place to play, or you already have a miniature house, the dolls will need clothes. It is not at all necessary to be a skilled tailor - many wardrobe items can be easily sewn without sewing patterns, cutting out fabric details "by eye". Invite your child to make doll crafts together. The T-shirt is easy to sew from a T-shaped blank with a neck cut in the middle of the short crossbar. Skirts can be modeled from rectangles of fabric directly on the figure, collecting the belt at the waist with a needle-first seam or by inserting an elastic band. Just try to make such crafts for dolls, and the process will surely drag you out so much that very soon you will have a whole toy wardrobe for any occasion.
Household little things

It is much easier to beat a variety of everyday situations when you have miniature food, dishes and other accessories at hand. Many of these items can be created with your own hands. The biggest problem usually comes with filling the kitchen. Purchased furniture sets usually come with a small amount of crockery; miniature sets can be purchased separately. But what to fill the plates and glasses with? Try making groceries and ready-made meals out of plasticine, or polymer clay... Other sculpting masses are also suitable, for example salty dough... It is not at all difficult to create dishes, vases, candlesticks and cups for the interior from these materials. Children will also like to create such, if you wish, you can do a lot - from an orange and a piece of cheese to a plate of scrambled eggs or a vase with a bouquet.
from waste material

So, you already have clothes for dolls and a variety of accessories for the game, which means that it's time to move on to making more complex items. Doll furniture is something that is always lacking in your daughter's household. And even if you purchase several ready-made sets, you will soon need another small sofa or bedside table. For the manufacture of doll interior items, you can use anything you like: cardboard, foam rubber, packaging for food and souvenirs made of plastic and paper. When making such crafts for dolls, use your imagination and all your skills in various needlework techniques. Finished furniture can be painted and varnished, decorated with stickers or covered with fabric. Try decoupage decorating tables and cabinets. If you have wallpaper left over from the repair, or use these materials as well.
Matchbox and cardboard furniture
The easiest way to make paper crafts for dolls, but this material is quite fragile and short-lived. The situation is completely different with its main analogue - cardboard. Cutting and bending cardboard sheets is not much more difficult, the finished furniture turns out to be quite strong and beautiful with high-quality design. Use any boxes or purchase sheets of cardboard from your stationery. Original functional furniture can be assembled from matchboxes. Chest drawers are best made from them (just glue the required number of boxes in a suitable configuration). Shallow shelves can be made using only the inside of the matchbox. If desired, you can learn how to make products that are quite complex in shape from cardboard. Attention: it is more convenient to cut corrugated cardboard with a clerical knife, and individual elements can be glued on PVA.
Monster High style

Until recently, all girls dreamed of Barbie dolls living in pink houses. But not so long ago, the main miniature blonde had worthy rivals. created based on the cartoon "School of Monsters", today are incredibly popular all over the world. According to the creators, the cartoon teaches tolerance. It tells about the life of the children of various monsters who, despite their extravagant appearance and habits, like ordinary teenagers, are friends, quarrel and reconcile, fall in love and pass exams. If you have such dolls, you will probably want to make them. However, furniture and accessories for such beauties cannot be completely “toy” or similar to their real counterparts. Each heroine has her own unique style and preferences. Get ready to make coffin beds and decorate tables with carnivorous plants - everyone loves Monster High (dolls. Video Crafts for Monster high"- this is another source of inspiration, believe me, many needlewomen are already doing something with their own hands for fashionable dolls. Main theme: black and pink color and skulls. However, variations are also possible, among the characters there is a daughter of a sea monster, and children of a werewolf, and a daughter of a vampire.
Crafts for dolls "Monster High": furniture and accessories

Interior items and pleasant trifles it is best to make, taking into account the image and characteristics of a particular doll. If there are several characters, and the playing space is limited, you can choose the general style of the series for decoration: dark colors with bright finishes, the use of skulls and bats in the decor. It is not necessary to create complex shapes, even the simplest pieces of furniture look impressive and stylish when they are painted in the corporate colors of "Monster High". Add solemnity to the interior: use canopies, translucent draperies, lace and shiny fabrics.
Dollhouse

If you have enough space and time to work, you can try creating a doll house. You need to start by preparing the foundation. The easiest option is to use for decoration cardboard box from household appliances or a few small ones. The structure will be much stronger if you create it from plywood or chipboard. A great option for the lazy is to use a ready-made old bedside table or shelf. So, you have the basis of the doll house, if you wish, you can now install partitions (glue or nail - depending on the selected material) and outline the location of the stairs. Then proceed to finishing work: cover the walls with wallpaper or decorative film, you can put real linoleum or oilcloth on the floor. Cut out the windows as you wish, or make them using the applique technique using suitable pictures from magazines. Furnish the finished house with homemade furniture - and you can celebrate a housewarming. Making crafts for dolls with your own hands is actually not difficult at all. The main thing is just to start, after which new ideas will arise by themselves. This is a useful and interesting hobby for the whole family that does not require significant material investments.