For the hardworking - a bright light burns through life, for the lazy - a dim candle
Constructing a base pattern - THE MOST CLEAR METHOD (for beginners)
Good afternoon I would even say a beautiful day. Because we are finally starting a series of articles on tailoring for adults. We have already sewn a lot of things for little girls - both dresses and bodysuits are different - now we will sew for big girls. That is, for myself. And since you and I have already practiced sewing, the fear of the pioneer has passed.
THAT MEANS IT'S TIME TO TAKE A NEW FRONTIER. And master the wisdom of sewing using real adult patterns yourself, with your own hands and your own brains. We will draw the base pattern ourselves - new the easy way(I spent more than one week creating this lightweight method for creating a base pattern). And then we will sew a bunch of all kinds of dresses, tops and tunics.
No- I won’t give you a single finished pattern!
I'm not Madame Burda. I am Madame Klishevskaya.))) And the main harmfulness of my character is... That I will make your head work and give birth to bright and clear discoveries in the field of sewing. The easiest and most understandable of all types of art. Believe me, this is true.
Yes- sewing yourself is very easy and simple!
Right from scratch you will get more and more beautiful and well-tailored things.
Moreover, you will do everything yourself, without a state of hypnosis, and in sober mind and blessed memory. YOU will DO it - moreover, you will UNDERSTAND what exactly you are doing.
I will tell you the secrets that I know. Moreover, I will teach you to discover more and more secrets of the world of sewing and clothing design.
I will not lead you (blind and stupid) by the hand in the chaos of letters and numbers denoting the intricacy of numerous lines of the design drawing. NO, I WILL NOT TAKE YOU HERE:
Well, you must admit, one such picture can instill fear and make a girl who doubts her own abilities really, really wants to sew a dress- But I wasn’t very good with geometry and drawing during my school years. Even I, who adore both of these school subjects, beat around the bush for several years, not daring to start delving into the construction of such a drawing: “How long will it take to draw something like this, and after all, everything must be calculated correctly and not get confused in the letters...”.
And, nevertheless, today we will draw a pattern.
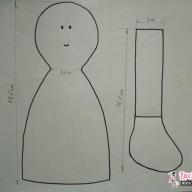
We will draw a base pattern (you see a piece of it from above.))))
But - don’t be afraid - we will create our pattern a little differently. Away from the engineering design method - and closer to human understanding.
We will draw one for you - just one- pattern.
And then from it we will create more and more new dress models. And it will be very easy and simple.
- No confusing formulas
- No confusing calculations.
- And without the letter-number cobweb.
So how? Have I already alleviated some of your concerns?
I'll relax now - we won't start drawing right now. First, we'll take a nice stroll through the pattern. The purpose of the walk is to get to know and become friends with the pattern and remove the last doubt that you can sew any dress.
So... what is a pattern - the basis?
To put it figuratively, this is a cast of your body. This is your individual imprint. Any item sewn according to YOUR base pattern will fit YOUR figure perfectly.
Yes, you heard right - ANY THING can be sewn on the basis one single pattern. All dress models are born, modeled, and sewn from one source - this is the base pattern.
I will now prove it to you with an example. Even with three examples - in the form of photos and pictures.
Here is the first photo (below). Our pattern base is essentially your sheath dress (the one that fits your body perfectly). Dress made by yours pattern base, will follow all the curves your his bodies. This simple sheath dress is sewn using a regular base pattern. You see, it’s like a plaster cast of a girl’s figure.
And today, having drawn the base pattern, you can safely cut it on the fabric - and you will get a dress like this. The only thing you can change is the neckline - giving it the shape that suits your face shape.
All other (any kind) dress models are just a modification of a sheath dress - fantasies on a free theme.
This is how it happens in the fashion world.
One day a fashion designer thought...“What if the bodice of the dress at the top is held on the shoulders by a round yoke (yellow outlines - figure below), and the bodice itself is made in the form of overlapping intersecting triangles (red outlines - figure below). The result is what we see in the photo below.

Beautiful? Beautiful! What did the fashion designer base his fantasies on? Based on a pattern. And you can come up with something of your own. We women have just a lot of imagination.
By the way - since we're talking about round yoke— on this site there is already one of my articles on creating and
And another fashion designer thought: “What if you give the sheath dress more loose fit- make it wider. And make the shoulder line longer so that it hangs over the arm.” And as a result, a new model is born (photo below) - also very beautiful. And it's very simple.
You can do this too. If you will UNDERSTAND what the base pattern consists of. And by what laws does it exist?
That is why I don’t want to stupidly give you instructions on creating a base pattern (like “draw a line from point P6 to point P5 and mark the place where it intersects line X with the next point...” - ugh!).
I want to awaken you bitch. I want you to feel the pattern, to know its soul. Haven't learned to see what a simple drawing hides behind a photograph of any dress, even an intricately tailored one.
Therefore, for the next 30 minutes we will not draw anything - we will walk through the pattern itself. Let's get acquainted with all its elements - find out what each line serves, and why it is located here and drawn this way.
After such an “educational walk” you will feel a joyful clarity of understanding of everything, everything, everything. It's as if you've already drawn basic patterns many times. And you will take up the drawing with the feeling that this is a couple of trifles. Ha! Business!
As the sage said: “We are afraid only of what we cannot understand and explain logically. But as soon as the thing that frightens us becomes clear to us, it ceases to cause us fear.”
So let’s go and tame this “terrible beast” - the base pattern. Let's tame and draw in 20 minutes. Yes, yes, in 20 minutes - because after a walk - the pattern drawing will seem old and familiar to you simple drawing- like a grid for playing tic-tac-toe.
Where does the base pattern come from?
So where does the base pattern come from - usually it is obtained from the following drawing:
The drawing contains half of the back part + half of the front part.
We will also draw a similar drawing with you - only more simple and understandable.
And what these halves are needed for, and where to use them - now I will clearly show everything.

Here (!) I dug up a wonderful sample - below - in the photograph of a black and white dress, our halves are very clearly visible - both the back half and the front half. So to speak - clearly and understandably.
Yes, in the Potnovian language the halves are called “shelves”. Today we will draw these same front and back shelves. But first, let’s take a closer look at what elements each shelf consists of. And most importantly, I will tell you why each element is needed and what it serves.
To make everything as clear as possible, I will illustrate each of the elements both in pictures and in photographs of real dress models.
First, let's get acquainted with two incomprehensible words: DOT And ARMHOLE.
Of course you may know them. Or maybe not. My job is to introduce you.
So, meet - PROYMA
When drawing a base pattern, you will create exactly that bend and size armhole that suits you – when the armhole does not pull or dig into your arm.
That is, the pattern base contains acceptable minimum size armholes. You can model the armhole to your taste, in any configuration. But your fantasy armhole should not be smaller than on the base pattern. That is, the armhole is based on a pattern - These are the boundaries beyond which your imagination should not cross.
Your model armhole can be as large as you like - but it cannot be smaller than on the base pattern. More - yes, less - no - otherwise it will dig into the armpit. This is the rule in modeling designer armholes.
Now let's get acquainted with the darts.
BACK DARTS – shoulder dart + waist dart
In the picture above, I wrote everything about the back darts - and in the photo of the dress you can find 2 waist darts - one to the right of the zipper, the other to the left of the zipper.
But you don’t see the shoulder dart on this dress. And many dresses don’t have it either. Because for convenience and beauty, this dart is moved from the middle of the shoulder to the zipper (or along the edge of the armhole, where the sleeve will be, a corner is simply cut off). That is, the excess fabric is not pinched at the middle of the shoulder and is not sewn inside the dart. And the extra fabric cut in the form of a corner at the edge of the shelf, where the zipper is sewn in, or at the edge of the armhole - where the sleeve will be sewn in.
Also, darts are not necessary if you sew from stretch fabric - it itself follows the curves of your body and shrinks both in the shoulder and waist areas.
Let's get to know each other next... DARTS ON HALF FRONT
Oh, I could write a whole poem about her.
I spent a long time wondering how to explain more clearly - why it is needed and by what laws it lives. I thought and thought... and came up with an idea.
The fact is that a woman has breasts.))) That is, in front adult girl no longer flat. This means that the dress should be convex in the chest area. The dart on the front shoulder gives the dress that same bulge in the bust area. Now I’ll show you everything in pictures. How does this happen.
For example, we have a flat piece of fabric, but we need to make a convex piece out of it. To do this, you need to make a tuck on it. For example, this flat circle of cardboard will now become convex with the help of a dart.
And here's how a bust dart creates a bulge on the front detail
You will notice that the top of the convexity (that is, the peak of our round pyramid) is at the tip of the dart. Pay attention to this. Because when we draw the bust dart, the point of our dart will be at the top of the chest(where the nipple or bra cup is usually located).
Remember that sometimes you tried on a dress in your size in a store, which somehow strangely skewed on the chest - this is because the dart in the dress with its point was directed by the tops of your chest. So the breasts did not fit perfectly into the bulge of the dress. This product was not cut at the factory to suit your breast shape.
But that is not all, what I want to say about the chest dart.
The fact is that in almost all dresses this chest dart is located not on the shoulder- A on the side just below the armpit. This is done for beauty. The dart on the shoulder catches the eye more, but on the side, and even covered by the hand, it is not noticeable.
When creating a base pattern, we draw a chest dart on the shoulder only because it is more convenient to draw there from the point of view of constructing a drawing.
And after the drawing of the base pattern is ready, we very easily and simply transfer the dart from the shoulder area to the armpit area. Don’t think that you need to make new drawings for this. Nope, everything is simple here - like opening a carton of milk - one minute and that’s it.
Here, in the picture below I schematically depicted transferring the bust dart from the shoulder to the side seam under the arm.
Well, do you already feel how wiser you have become in these 15 minutes?))) Or there will be more... Let's continue our walk through the pattern and now let's get acquainted with the lines. Horizontal lines
CHEST LINE
The first acquaintance is the chest line. (It’s a beautiful dress, isn’t it? We’ll make it for you. Don’t even hesitate)

The bust line is the most remarkable line on the pattern. It is so convenient to focus on it when drawing a base pattern because:
- We know that we finish drawing the back waist dart at the bust line.
- We know that we finish drawing the front waist dart not reaching 4 cm from the chest line.
- We know that the shoulder dart is in the front - we finish drawing it at the chest line.
- We know that the lower edges of the armholes also follow the bust line.
Well, no, of course, you don’t know that yet. I will give all these simple rules when we start drawing. And now I just want you to know that when drawing many elements of a pattern, you can simply focus on the chest line (and there is no need to painstakingly put down these letter-number dots).
As you can see, there’s a lot of everything!! Therefore, go ahead - study, sew and enjoy life)))
WHAT TO DO NEXT - WITH THE PATTERN BASE? - you ask
And we will start sewing according to the base pattern of the TOP. Namely tops, T-shirts, tunics and then dresses.
You might ask, “Hey, why not just dresses?” I give the answer to this question in the first article of the series. So to be continued)))
Happy sewing!
Take the following measurements:
For example, I use the standard size 48, and you take measurements from your figure or from the figure of the person for whom you are going to sew this dress.
Name of measurements and symbols |
cm |
Taking measurements |
|---|---|---|
Half neck circumference |
Measure at the base of the neck. The measurement is recorded in half size. |
|
Half chest |
This measurement determines the size of the figure. The measuring tape should go along the protruding parts of the shoulder blades on the back and along the highest part of the chest. The measurement is recorded in half size. |
|
Half waist |
Measure at the narrowest point of the waist. The measurement is recorded in half size. |
|
Half hip circumference |
Measure horizontally along the most protruding points of the buttocks, taking into account the convexity of the abdomen. The measurement is recorded in half size. |
|
Measure from the seventh cervical vertebra to the waist line. The measurement is recorded in full. |
||
Measure by placing a measuring tape horizontally between the back corners of the armpits at the level of the protruding parts of the shoulder blades. The measurement is recorded in half size. |
||
Front length to waist |
Measure from the shoulder line at the base of the neck through the protruding point of the chest to the waist line. The measurement is recorded in full. |
|
Bust height |
Measure from the shoulder line at the base of the neck to the protruding point of the chest. (This measurement is performed simultaneously with the previous one.) |
|
Center of the chest |
Measure along a horizontal line between the protruding points of the chest. The measurement is recorded in half size. |
|
Shoulder length |
Measure along the shoulder line from the base of the neck to the shoulder joint. The measurement is recorded in full. |
|
Arm circumference |
Measure around the arm at the armpit. The measurement is recorded in full. |
|
Wrist circumference |
Measured at the wrist joint. The measurement is recorded in full. |
|
Sleeve length to elbow |
Measure from the shoulder joint to the elbow. The measurement is recorded in full. |
|
The length of the sleeve |
Measure from the shoulder joint to the hand. The measurement is recorded in full. |
|
Length of the product |
Measure from the seventh (protruding) cervical vertebra in the middle of the back to the required length. The measurement is recorded in full. |
|
Loose fit allowances: |
||
On the left side of the prepared sheet of paper, draw a vertical line on which to mark the length of the dress, in our case 110 cm, and put points A and H. Draw perpendicular lines through A and H to the right.
From A to the right, set aside half the chest circumference plus 5 cm. and place point B (48+5=53cm). Draw a line from B down to the intersection with the bottom line and place point H1.

Rice. 2
From A down, set the length of the back to the waist plus 0.5 cm and put T (38 + 0.5 = 38.5 cm). From T to the right, draw a line to the intersection with line BH1, at the intersection place point T1.

Rice. 3
From T down, set aside 1/2 of the length of the back to the waist and place B (38/2=19cm). From B to the right, draw a line, mark the intersection with BH1 as B1.

Rice. 4
From A to the right, set aside the width of the back plus 1.5 cm and put A1 (18 + 1.5 = 19.5 cm).

Rice. 5
From A1 to the right, set aside 1/4 of the half-circumference of the chest plus 0.5 cm. and put A2 (48:4+0.5=12.5). From A1 and A2 down, draw lines of arbitrary length.

Rice. 6
From A to the right, set aside 1/3 of the half-circumference of the neck plus 0.5 cm and place A3 (18:3+0.5=6.5). For figures with fat deposits in the area of the seventh cervical vertebra, the neck width is increased by 0.5 cm. From A3 up, set aside 1/10 of the half-circumference of the neck plus 0.8 cm and place A4 (18:10 + 0.8 = 2.6 cm). Divide the angle at point A3 in half and draw a line. On this line, set aside 1/10 of the half-circumference of the neck minus 0.3 cm and place A5, (18:10-0.3 = 1.5 cm). Connect the resulting points A4, A5 and A with a smooth curve.

Rice. 7
From A1, set down 2.5 cm for normal shoulders, 3.5 cm for sloping shoulders, 1.5 cm for high ones and place point P. Connect points A4 and P. From A4, set aside the shoulder length plus 2cm for the dart and put P1 (13.5+2=15.5cm). On the resulting line A4P1 from A4 to the right, set aside 4 cm and place point O. From O down, set aside 8 cm and place O1. From O to the right, set aside 2 cm and place O2. Connect points O1 and O2. From point O1 through point O2, set aside a value equal to the segment O.O1 - 8 cm (so that the sides of the dart are the same length) and put O3. Connect points O3 and P1.

Rice. 8
From P down, set aside ¼ of the half-circumference of the chest plus 7cm. (for stooped figures plus 7.5 cm, for kinky figures plus 6.5 cm) and place point G (48: 4 + 7 = 19 cm). For overweight women(size 58 and larger) the armhole depth is made 1 cm less. Through G to the left and right, draw a horizontal line until it intersects with AN, denote G1, with the line of the armhole width G2, with the line BH1, denote G3.

Rice. 9
From G up, set aside 1/3 of the distance PG plus 2 cm and place P2 (19: 3 + 2 = 8.3). Divide the angle at point G in half and set aside 1/10 of the armhole width plus 1.5 cm and place point P3 (12.5:10 + 1.5 = 2.8 cm), divide line GG2 in half and place G4. Connect points P1, P2, P3 and G4.

Rice. 10
From G2 up, set aside ¼ of the half-circumference of the chest plus 5 cm (for stooped figures plus 4.5 cm, for kinky figures plus 5.5 cm) and place P4 (48: 4 = 5 = 17 cm). For overweight women (size 58 and larger), the front armhole cut is 1cm smaller. From P4 to the left, set aside 1/10 of the half-circumference of the chest and put P5 (48:10 = 4.8 cm); from G2 up, set aside 1/3 of the size of the segment G2P4 and put P6 (17:3 = 5.7). Connect P5 and P6 with a dotted line, divide in half and set aside 1 cm to the right at a right angle. Divide the angle at point G2 in half and set aside 1/10 of the width of the armhole plus 0.8 cm, put P7 (12.5:10+0.8=2.1 cm) connect P5,1,P6,P7,G4.

Rice. eleven
From G3 up, set aside 1/2 of the half-circumference of the chest plus 1.5 cm and place B1 (48: 2 + 1.5 = 25.5 cm). For stooped figures, set aside 1/2 of the half-circumference of the chest plus 1 cm, for kinky figures plus 2 cm. For obese women (size 58 and larger), the neckline cut is 1 cm smaller. From G2 up, set aside the same amount and put B2. Connect B1 and B2. From B1 to the left, set aside 1/3 of the half-circumference of the neck plus 0.5cm and place B3 (18:3+0.5=6.5cm). From B1 down, set aside 1/3 of the half-circumference of the neck plus 2cm and place B4 (18:3+2=8cm). Connect B3 and B4 with a straight line and divide it in half. From B1 through the division point, draw a line on which set aside 1/3 of the half-circumference of the neck plus 1cm and place B5 (18:3+1=7cm). We connect points B3, B5 and B4 and get the line of the neck of the shelf.

Rice. 12
Center of the chest. From G3 to the left, set aside the measurement for the center of the chest and place G6. From G6, draw a line upward until it intersects with the line B1B2. At the intersection, place point B6.
From B6 down, set aside the chest height measurement and put G7

Rice. 13
From B6 down, set aside 1 cm and place B7. Connect points B3 and B7. Connect points B7 and P5 with a dotted line. Along line P5 B7 from point P5 to the right, set aside the length of the shoulder minus the value of the segment B3B7 minus 0.3 cm and put B8 (13.5-3-0.3 = 10.2 cm). From point G7 through point B8, draw a segment equal in length to segment G7B7 and place B9. Connect points B9 and P5.

Rice. 14
Start of construction. From G to the right, set aside 1/3 of the armhole width and place G5 (12.5:3 = 4.2 cm). draw a vertical line through point G5. At the intersection with the armhole line, place point P; at the intersections with the lines of the waist, hips and bottom, place points T2, B2, H2.

Rice. 15
Determination of the dart solution along the waist line. To the half-waist measurement, add 1cm for a loose fit (38+1=39), then subtract this value from the width of the dress along the TT1 line (53-39=14cm). We get a total dart solution of 14 cm. The size of the front dart opening is equal to 0.25 of the total dart opening (14x0.25=3.5cm), the side 0.45 (14x0.45=6.3cm), the back 0.3 (14x0.3=4.2cm).
Determining the width of the dress along the hip line. Add 2cm to the hip circumference for a loose fit (53+2=55cm). From the resulting value, subtract the width of the dress along line BB1 (55-53=2cm). Distribute the result equally between the shelf and the back, i.e. 1cm each
Let's start building darts. Set aside 1 cm from B2 to the left and right and place B3 and B4. From T2 to the left and to the right, set aside half of the side dart solution (6.3:2 = 3.2) and place T3 and T4. Connect point P to points T3 and T4. Connect points T3 B4 and T4 B3 with a dotted line, divide it in half, set aside 0.5 cm from the division points to the side and connect them with a smooth curve to points B3 T4 and the other side with B4 T3.

Rice. 16
NOTE: If the semi-circumference of the hips plus the increase in loose fit is less than the width of the dress, the result will be negative. For example, if with a half-circumference of the chest of 48cm, the half-circumference of the hips is 50cm, then when calculating we will get a negative value (50+2 – 53= –1cm). We distribute this value equally between the shelf and the back (-1: 2 = - 0.5 cm) and set aside B3 and B4 from point B2 to the left and right, 0.5 cm each. See figure "If the result is negative"

Rice. 17
If during the calculation you get zero as a result, then points B3 and B4 will coincide with point B2.
See figure "When the result is zero"

Rice. 18
From B1 down, set aside the length of the front waist plus 0.5 cm and put T5 (43 + 0.5 = 43.5 cm). Connect T4 and T5 with a smooth line.
From B1 down, set aside the value of the segment T1, T5 and place B5. Connect points B5 and B3 with a smooth line.

Rice. 19
Divide the distance G, G1 in half, mark the division point as G8. From G8, lower the line down until it intersects with line B, B1. At the intersections with the waist line and the hip line, place dots and label them T6 and B6. From T6 to the left and to the right, set aside half of the solution back dart(4.2:2=2.1) and place T7 and T8. From G8 down, set aside 1 cm; from B6 up, set aside 3 cm. Connect these points to T7 and T8.

Rice. 20
From G6 down, draw a line until it intersects with line B, B1. Mark the intersections with the lines of the waist and hips as T9 and B7. From T9 to the left and to the right, set aside half of the front dart solution (3.5:2 = 1.7) and place T10 and T11. From G7 down, and from B7 up, set aside 4 cm, place points and connect them with T10 and T11.

Rice. 21
Shelf bottom line. Draw lines from B3 and B4 down to the intersection of I with H, H1 and label H3 and H4. If the dress should be widened downwards from H3 and H4 to the left and right, set aside 3-7 cm and connect with B3 and B4. In the drawing these lines are shown as dotted lines. From H1 down, set aside the value of the segment T1T5 and place point H5. Connect points H3 and H5.

Rice. 22
All. The pattern for the base of the dress is ready.
This is the basic drawing on the basis of which you can design any style from the whole variety of dress styles.

Rice. 23
I wish you all creative inspiration!
Download in one file | Turbobit | | |
The rights to this article belong exclusively to the author. Full or partial use of the materials of this article in electronic publications on the Internet is possible only if the following conditions are met:
Information about the author must be preserved. In the title or at the end of the published reprint the source must be indicated: www.site, the Internet resource "Sewing Crafts Master" with a direct, active, visible to the user, not blocked from indexing by search engines hyperlink to this article.
Republication of texts in newspapers, magazines or other replication outside the Internet is possible only with the written consent of the author.
When sewing simple clothes, you can do without a pattern; for clothes with complex styles, you will already need a pattern - a paper template from which fabric parts are cut out. If you choose between a finished pattern and a design drawing, I would recommend the second option.
Modeling a basic dress pattern. Step by step construction patterns
Even if you are new to sewing, pattern making will help you quickly understand and master the principles of clothing design. In addition, the pattern is made according to your individual measurements, which means that the future product will fit well; ready-made patterns do not guarantee such a result, since each of us has our own anatomical features figures. And lastly, pattern making is an interesting and exciting process!
In this article, we will learn how to model a basic pattern for a dress using Tatyana Roslyakova’s method. In the last article we learned what we will need to sew a dress pattern. Let me remind you that the design drawing is made only for half of the figure, so measurements of volume and width are recorded in half size.
In addition to measurements, we will need allowances for loose fit (FO). These increases are added to almost all measurements when drawing a structure; they are needed for freedom of movement and breathing. Depending on the silhouette of the product, the allowance for a loose fit varies in size. The allowances for clothing styles (trousers, jackets, coats, etc.) also differ, moreover, for different types tissues there are separate increases. Different methods for creating patterns indicate different increases for the same silhouettes and styles, so it is very important to pay attention to the increases that are indicated in the method. But for now we are learning how to build the basis of a dress, so I offer you several silhouettes:
INCREMENTS FOR A LOOSE FITTING ALONG THE CHEST, WAIST, HIPS

INCREASES FOR LOOSE FITTING ON THE BACK AND SHELF AREAS

INCREASES TO THE LENGTH OF THE BACK TO THE WAIST, TO THE DEPTH OF THE ARMROOM, TO THE WIDTH OF THE NECK

EXTRAS FOR LOOSE FITTING TO SHOULDER CIRCUMSTANCE

Explanations for the tables:
- PG – increase along the chest line
- Fri – increase along the waist line
- Pb – increase along the hips
- Pshs – increase in back width
- Pshp - increase in floor width
- Pspr – increase in armhole freedom
- Pop – increase in shoulder circumference
- Pshgor - increase in neck width
- Pdts – increase in the length of the back to the waist
- Pdtp - increase in the length of the front to the waist
- Pvpk – oblique increase in shoulder height
Below is a list in which I have written my measurements as an example. Using these standards, I will make calculations, and you must substitute your data.
- Half neck circumference (Ssh) - 15 cm
- Half chest circumference (Cg) - 40.5 cm
- Half waist circumference (St) - 29 cm
- Half hip circumference (Sb) - 44.5 cm
- Back length to waist (Lts) - 40 cm
- Back width (W) - 16.5 cm
- Front length to waist (Dtp) - 42 cm
- Chest height (Bg) - 25 cm
- Center of the chest (CG) - 9 cm
- Shoulder length (L) - 13 cm
- Product length (Di) - 85 cm
I will indicate all allowances for loose fit to these and other measurements in the formulas when creating the pattern. In this article we will build a dress with a fitted silhouette.
Modeling a basic dress pattern. Step-by-step construction of a pattern
Let's start with the drawing
It is necessary to prepare a sheet of paper, the length of which should be 10-15 cm greater than the length of the future dress. If you have never made patterns before, I would advise you to make all the drawings on graph paper in a roll, which can be purchased at an office supply store. It's a pleasure to draw on this paper! The drawings are accurate and smooth.
Dress length. In the upper left corner of a sheet of paper, draw a right angle with its vertex at point P, departing 5 cm from the top edge. From point P down in a straight line we put aside a value equal to the length of the dress and put a point H (segment PH = Di = 85 cm).

Dress width. From point P to the right, we will set aside the half-circumference of the chest + 3 cm (increase for a loose fit), and put point P1 (segment PP1 = Cr + CO = 40.5 + 3 = 43.5 cm). From point H to the right we will set aside a segment equal to PP1 and place point H1 (segment HH1 = PP1 = 43.5 cm). Connect points P1 and H1

Waistline. From point P downwards, we put the measurement of the length of the back to the waist + 0.5 cm and set point T (RT = Dts + CO = 40 + 0.5 = 40.5 cm). From point T to the right we draw a straight line until it intersects with straight line P1H1 and denotes the intersection point as T1.

Hip line. From point T downwards, we will set aside 1/2 of the length of the back to the waist and place point B (TB=1/2Dts=40:2=20cm). From point B to the right we draw a straight line until it intersects with straight line Р1Н1, and we denote the intersection point as B1.

Back width. From point P to the right, set aside the width of the back + 0.9 cm and place point P2 (PP2 = Шс+СО=16.5+0.9=17.4 cm). From this point we draw down a straight line of arbitrary length

Armhole width. From point P2 we will set aside 1/4 of the half-circumference of the chest + 1.5 cm and place point P3 (P2P3 = 1/4Cr + CO = 40.5: 4 + 1.5 = 11.6 cm). Attention! The segment P2P3 is the width of the armhole, therefore, you need to select the resulting value of this segment for yourself; in the future we will use this value. Draw a straight line of arbitrary length down from point P3.

Back neck cut. From point P to the right, we will set aside 1/3 of the neck half-girth measurement + 0.5 cm and place point P4 (PP4 = 1/3Csh + CO = 15:3 + 0.5 = 5.5 cm). From point P4 up, we will set aside 1/10 of the half-circumference of the neck + 0.8 cm and put P5 (P4P5=1/10Сш+СО=15:10+0.8=2.3cm). Divide the angle with the vertex P4 in half and draw a straight line, on this straight line we will set aside 1/10 of the half-circumference of the neck - 0.3 cm and place point P6 (P4P6 = 1/10Сш-СО = 15:10-0.3 = 1.2 cm). Let's connect points P, P6 and P5 with a smooth line, and the angle at point P should be straight.

Shoulder section of the back. From P2 we will set aside 2.5 cm for normal shoulders, 3.5 cm for sloping shoulders, 1.5 cm for high ones and put point P. Connect points P5 and P, and on this straight line we will set aside the length of the shoulder + 2 cm for the dart from P5 and put P1 ( Р5П1=Дп+2cm=13+2=15cm). Again, on this line from point P5 we will set aside 4cm and place point O (P5O=4cm). Down from point O we will set aside 8cm and place point O1 (ОО1=8cm). To the right of point O, set aside 2 cm and place point O2 (OO2 = 2 cm). Let's connect points O1 and O2, on the resulting straight line from point O1 we will set aside 8 cm at the top and place point O3 (O1O3 = 8cm). Now let's connect points O3 and P1.

Armhole depth. From P downwards we will set aside 1/4 of the half-circumference of the chest plus 7cm (for stooped figures plus 7.5cm, for kinky figures plus 6.5cm) and put point G (PG=1/4Cr+CO=40.5:4+7.5= 17.6 cm). Through point G we draw a straight line to the intersection with straight line РН, denoting the point of intersection G1, to straight line Р1Н1, denoting the point of intersection G3, and the point of intersection with the straight line from point P3 we denote G2.

Back armhole cut. From G upwards we will set aside 1/3 of the distance PG + 2cm and put P2 (GP2=1/3PG+CO=17.6:3+2=7.8cm). Divide the angle at point G in half and set aside 1/10 of the armhole width + 1.5 cm and put point P3 (GP3 = 1/10Shpr + CO = 11.6:10 + 1.5 = 2.6 cm) divide line GG2 in half and put G4. Connect points P1, P2, P3 and G4 with a smooth line.

Front armhole cut. From G2 upward we will set aside 1/4 of the half-circumference of the chest + 5 cm (for stooped figures + 4.5 cm, for kinky figures + 5.5 cm) and put P4 (G2P4 = 1/4Cr + CO = 40.5: 4 + 4.5 = 14, 6cm). From P4 to the left we will set aside 1/10 of the half-circumference of the chest and put P5 (P4P5=1/10Сг=40.5:10=4cm). From G2 up, we will set aside 1/3 of the segment G2P4 and put P6 (G2P6 = 1/3G2P4 = 14.6:3 = 4.8 cm). Let's connect points P5 and P6 with a dotted line and divide them in half; set aside 1 cm from the division point to the right at a right angle. Divide the angle at point G2 in half and set aside 1/10 of the armhole width + 0.8 cm and mark point P7 (G2P7=1/10Shpr+CO=11.6:10+0.8=1.9). Let's connect points P5,1,P6,P7, and G4 with a smooth line.

Shelf neck cut. From G3 up, we will set aside 1/2 of the half-circumference of the chest + 1.5 cm (for stooped figures + 1 cm, for kinky figures + 2 cm) and put P7 (G3P7 = 1/2Cr + CO = 40.5: 2 + 1 = 21.2 cm). From G2 we will set aside the same amount upward and place point P8 (G2P8=G3P7=21.2 cm). Connect points P7 and P8. Now from point P7 to the left we will set aside 1/3 of the half-circumference of the neck + 0.5 cm and put P9 (P7Р9=1/3Сш+СО=15:3+0.5=5.5cm). Down from point P7 we will set aside 1/3 of the half-girth of the neck + 2cm and place point P10 (P7P10-1/3Сш+СО=15:3+2=7cm). Let's connect points P9 and P10, and divide the resulting segment in half. From point P7 we draw a straight line through the division point of the segment P9P10, and on this straight line we set aside 1/3 of the half-circumference of the neck + 1cm and place point P11 (P7P11=1/3Сш+СО=15:3+1=6cm). Let's connect points P9, P11, P10 with a smooth line, maintaining a right angle at point P10.

Shoulder section of the front and breast dart line. From G3 to the left, set aside the measurement of the center of the chest and place G6 (G3G6=Cg=9cm). From G6 we will draw a line upward until it intersects with the line P7P8, and we will denote the intersection point as P12. From P12 downwards, we will set aside the measurement of chest height and put point G7 (P12G7=Bg=25cm). From point P12 we will put 1cm down and put P13 (P12P13=1cm). Connect points P9 and P13. And we connect points P13 and P5 with a dotted line. Along this line from point P5 to the right, we will set aside the length of the shoulder minus the value of the segment P9P13 and minus 0.3 cm, put point P14 (P5P14=Dp-P9P13-0.3=13-3-0.3=9cm). From point G7 through point P14 we draw a segment equal to segment G7P13 and place point P15 (G7P15=G7P13). Connect points P5 and P15.

Line side seam. From G to the right, set aside 1/3 of the width of the armhole and place point G5 (GG5 = 1/3Shpr = 11.6:3 = 3.8 cm). Draw a vertical line through point G5. At the intersection with the armhole line we will put point B, at the intersections with the lines of the waist, hips and bottom we will place points T2, B2, H2.

Determining the solution of darts along the waist line. We add 1cm to the half-waist measurement (St+CO=29+1=30cm), subtract this value from the width of the dress along the TT1 line (43.5-30=13.5cm). Thus, we calculated the total amount of dart solutions along the waist line, i.e. 13.5 cm.
the size of the front dart opening = 0.25 of the total dart opening (13.5 x 0.25 = 3.4 cm),
side tuck opening size = 0.45 of the total opening (13.5 x 0.45 = 6 cm),
back tuck opening size = 0.3 of the total opening (13.5 x 0.3 = 4.1 cm)
Determining the width of the dress along the hip line. Add 1 cm to the half-circumference of the hips (Sb + CO = 44.5 + 1 = 45.5 cm). From the resulting value, subtract the width of the dress along line BB1 (45.5-43.5 = 2 cm). We will distribute the result equally between the shelf and the back (1cm each).
Side dart. From B2 to the left and to the right, we will set aside the resulting difference (in my example, 1 cm) and put points B3 and B4. From T2 to the left and to the right, set aside half of the side dart solution (6:2 = 3cm) and place T3 and T4. Let's connect point B to points T3 and T4. Let's connect points T3, B4 and T4, B3 with a dotted line, divide these segments in half, set aside 0.5 cm from the division points to the sides and now connect them with smooth lines to form a side cut through points T3, 0.5 and B3 and through points T4, 0 ,5, B4.

If the difference between the half-circumference of the hips with an increase for a loose fit and the width of the dress along the hips line is negative, for example, the half-circumference of the hips + CO = 47 cm, and the width of the dress along the hips line is 45 cm, then the difference between these values will be -2 cm. This result is also equally distributed between the back and the shelf (-1cm). And the side seam line will look like this.

If the difference is zero, then points B3 and B4 will coincide, i.e. the side seam line will connect at point B2.

Shelf waist line. From point P7 downwards, we will set aside the measurement of the length of the front to the waist + 0.5 cm and put T5 (P7T5 = Dtp + CO = 42 + 0.5 = 42.5 cm). Connect points T4 and T5 with a smooth line, maintaining a right angle at point T5.

Shelf hip line. From B1 downwards we will set aside the value of the segment T1T5 and put B5 (B1B5=T1T5. We connect points B3 and B5 with a smooth line, maintaining a right angle at point B5
Dart on the shelf. From G6 we will draw a straight line down to the intersection with line BB1. The intersections with the lines of the waist and hips will be designated by points T9 and B7. From T9 to the left and to the right, we will set aside half of the front dart solution (3.4:2 = 1.7 cm) and put T10 and T11. From G7 down, and from B7 up, set aside 4 cm, put points and connect them with T10 and T11.

Dart on the back. Let's divide the segment GG1 in half, and denote the division point as G8. From G8 we lower the line down until it intersects with the line BB1. At the intersections with the waist line and the hip line we will place points T6 and B6. From T6 to the left and to the right, set aside half of the back dart solution (4.1:2=2cm) and place T7 and T8. From G8 downwards, set aside 1cm, from B6 upwards, set aside 3cm. Let's connect these points to T7 and T8

Shelf bottom line. From B3 and B4 we will draw lines down to the intersection with straight line HH1 and designate points H3 and H4. From H1 down, we will set aside the value of the segment T1T5 and put the point H5 (H1H5 = T1T5). Connect points H3 and H5 with a smooth line, maintaining a right angle at point H5.

And now we can congratulate ourselves, our pattern for the base of the dress is ready!

Once again, I draw your attention to the fact that I made all the calculations according to my own standards, so be sure to include your data in the calculations. Good luck with your sewing and creative inspiration!
Do you ever have situations when you want to create something that is not related to generally accepted standards? For example, have you dreamed of sewing clothes not according to a ready-made pattern from a popular women's magazine, and according to your own pattern? If you have ever had such thoughts, it means that you are an extraordinary, creative person and it’s time for you to start modeling. What it is and how, for example, dress modeling happens, we will tell you in this article.
general information
Modeling is a process that allows you to modify the finished pattern according to at will. This also includes creating a pattern from a photo or visual image taking into account the replacement of some parts.
For example, you really liked the dress that your favorite movie star wore during the next awards ceremony. However, you know that the parameters of your figure are far from ideal, therefore, you need to model the dress. This means that the clothing model you like can be modified to your liking or modeled taking into account your own physiological characteristics.

Basic concepts in modeling
When using modeling techniques, you can often come across the term “basic pattern”. What it is? This concept implies a universal pattern-pattern, on the basis of which you can create a new one that meets your requirements and figure. There are also such common and already familiar concepts to many as “joint”, “darts”, “seams”, “side cut”, “hip line”, etc.
Along with these concepts, new ones arise. For example, “tighten”, which involves removing excess edges and creating a kind of convex shape through wet-heat treatment. The word “stitch” means connecting two parts of suitable size using machine stitching. All these concepts are worth knowing for those who are planning to sew or sew for children.

What are the main stages of modeling?
The entire modeling process can be divided into stages such as assessment and development of a future project, transfer of basic elements to fabric and joining of parts. This means that during the evaluation process, you must mentally divide the chosen model into separate parts, think about how to construct them together, taking into account the characteristics of your body. Then, you need to take measurements and correctly transfer them onto paper and fabric.
What methods of clothing modeling exist?
Currently, there are several methods for modeling clothing:
- fake;
- tattooing methods;
- settlement;
- proportional-calculated;
- andropocentric and client-oriented.
Dummy method for modeling clothes
When designing and modeling clothes, one cannot help but remember such a wonderful method as the fake one. This is an excellent option for processing the selected shape of a product to display it in real size. At the same time, to create a form, you can use a variety of standard patterns and patterns, as well as an option with the construction of a design structure.
In addition, the dummy method is relevant for routine fittings during tailoring.

The “tattoo” method for modeling
The most ancient method, which was used by our grandmothers and great-great-grandmothers many centuries ago, is considered to be “tattooing”. It involves modeling and sewing clothes directly on a mannequin or person. This is done using pins and bobby pins.
What is a computational modeling method?
The calculation method is conventionally divided into four subtypes: proportional-calculation, calculation-analytical, client-based and calculation-graphical. When using these methods, as practice shows, the values of a conventionally typical figure corresponding to certain dimensions are used. In the future, based on this type, you can create patterns of other sizes.
The calculation and analytical method is based on the principles of constructing a drawing using geometric calculations.

What is the proportional calculation method?
Modeling a dress is impossible without correct calculations. Therefore, when sewing clothes, a proportional calculation method is often used, which has several “ramifications” of its own. In particular, it includes the version with the German cut of “Müller and Son”. It involves tailoring clothes according to a pattern designed for a standard European figure. Let us remind you that the European body type is a long back, medium-sized breasts, small hips and buttocks.
The second option, related to the proportional-calculation method, is called the Lin Jacques technique. It involves the construction of a basic framework corresponding to a conventionally standard figure. In this case, all information about a particular measurement can be found in a special table, which contains approximate designations. Thus, the tuck size for women with a chest volume of 80 cm corresponds to 6.5 cm.
When modeling a women's dress, we should not forget about the third version of the proportional-calculation method, called the method of the Russian Republican Fashion House. The main advantage of this option is its simplicity. This means that complex calculations and formulas are not used when creating a pattern.
What are client-oriented and andropocentric techniques?
You can also find customer-oriented and andropocentric tailoring techniques. As these names indicate, they are based on individual approach when creating a particular image. This group also includes such methods as “Lubax”, “Cutting Genetics of Galia Zlachevskaya” and “Unimex”.
When creating dress patterns using the Lyubax method, horizontal and vertical lines are taken into account, and a certain standard is established for different types of figures. In addition, when creating a pattern, it is customary to take a certain pattern as a basis, the values of which are adjusted in accordance with the parameters of your body.
The “Cut Genetics of Galia Zlachevskaya” method is based on the principles of the so-called golden section. With its help, you can quite accurately create a pattern for a skirt or dress. “Unimex” assumes the simplest cutting and sewing technique, aimed at speed work and focused on individual characteristics every client.

What rules should be taken into account when modeling?
If you want to easily create any dress patterns, you must follow three simple rules modeling. First, try to take measurements as accurately as possible. Secondly, to build a basic pattern and modify it at your own request, use as much accurate calculations. And finally, thirdly, do not forget to allow for a loose fit when creating the base pattern in accordance with your chosen dress silhouette.
How to transfer an image from a photo or image?
Let's assume you have already decided what kind of clothing design and modeling you will do. You chose a photo, visually assessed it and mentally guessed what kind of base pattern you need. What's next? Next, you need to transfer the image of your model onto tracing paper. What is needed for this?
To do this, draw a main line corresponding to the so-called midline of the shelf. In this case, take the following indicators as a guide:
- jugular fossa;
- the size of the middle between the two protruding areas of the chest;
- the middle of the distance between the general details and the vertical decorative and structural lines of the selected image.
Then, when modeling the product, draw a transverse line on tracing paper that corresponds to the design marks of the drawn image. Let us remind you that these include the lines of the chest, hips, shoulders, knees and waist.
And it is with the help of these lines that you can create base grid, determine the depth of the neckline for the shelf, the height of the knee, chest and hips. Using the grid, you can then compare your actual dimensions and the dimensions of the image transferred to the tracing paper.
And of course, do not forget to write down all the data in a separate notebook or notepad.
Selecting and Creating a Basic Framework
Modeling a dress involves creating a basic pattern. We remind you that such a pattern is created according to taken measurements. Accordingly, the more accurate the measurements are, the better the dress will fit and fit your figure. Therefore, when taking measurements, do the following:
- straighten up, stand straight;
- take measurements taking into account the tummy (do not pull it in, as in finished product you won't be able to relax him);
- do not underestimate or increase the size of your breasts and hips (in otherwise you simply cannot wear such an outfit);
- when creating dresses for plus-size people, take into account the increase in fit (it is better to take this data from the standard increase table);
- Recheck your calculations and measurements several times.
In a word, be careful and don’t be lazy to review all your notes. This will save you from possible problems in the future.
How does the modeling process work?
In order to understand exactly how the modeling process occurs, we will give a specific example. We will take the pattern of a simple dress with long sleeves as a basis. We replace the darts with reliefs, and make the sleeves shorter and add cuffs. New style Dresses with cuffs are ready.
In the second case, we shorten the sleeves again and lower them to the limits of the shoulders and add a yoke above the chest. The result was a new dress model with a yoke and short sleeves. In the third case, you can again work with the sleeves and expose the shoulders by adding straps. Here we will add a seam at the waist.
In the fourth option, you can change the neckline to a V-shaped one, and add additional horizontal divisions at the bottom of the dress. New model ready.

How to create a pattern for obese people?
At the next stage, as a rule, a pattern is constructed. Let's say you are interested in a dress model for plus size, classic size 54. In this case, the increase will be only 3 cm, of which 0.5 cm is an increase to the back (its width), 1.5 cm to the width of the front part of the product, and 1 cm to the armhole itself. Next, we take measurements and begin to build a pattern.
Take a pencil and tracing paper. From its top, make a small indent (about 10-15 cm) to the left and mark point “A”. From it, move the vertical to the right and place a point “H” equal to the conditional length of your product. Next, draw the depth of the armhole. This is done like this: draw a line from point “A” down (taking into account an allowance of 0.5 cm for a loose fit) and place point “D”. In this case, this distance will be equal to 21 + 0.5 = 21.5 cm (where 21 is the actual measurement of the armhole depth in centimeters).
Next, modeling the dress involves determining the length of the back of the product (to the very line of your waist). In this case, a distance equal to the previously taken measurement is set aside from the starting point. For us it was 39 cm. Let’s put a point “T”. From point “T” we set the height of the hips down (also according to the measurement you made) and place point “L”. Then, from the created point, draw a horizontal line to the side. After this, all that remains is to determine the width of the back (taking into account the 0.5 cm increase), the size of the armhole, side line product, shoulder, neckline, mark the auxiliary points of the armhole and correctly mark the dart locations in the resulting drawing. The modeling of skirts, trousers, shorts and other wardrobe items is done in the same way.
Where can you learn the basics of modeling and design?
The basics of modeling can be learned by completing training at highly specialized higher education institutions. educational institutions cutting, sewing and design. For example, you can contact the Textile Moscow University named after A. N. Kosygin. The faculty of clothing design, modeling, design, and applied arts works here, and practical classes are held using real fabrics from the fund of the state university museum. Approximate time Studying at this university will be about 5-6 years.
Alternatively, you can enroll in training at the Moscow University of Design and Technology. Here you can gain knowledge regarding the basics of sewing technology, management and economics, master the basics of industrial ecology and chemical technology. The full duration of study at this state university is 6 years.
An interesting option is the British Higher School of Design, founded in 2003. It is located in Moscow and allows its students to receive knowledge and a British diploma without leaving the Russian Federation. There are such faculties as “Illustration and Graphic Design”, “Fashion Design”, etc. The duration of study at this university is 3-5.5 years and depends on the faculty you choose and the level of workload.
Is it worth taking a fashion design course?
And finally, it will be much faster and easier to learn how to come up with new clothing models if you enroll in modeling courses. The benefits are obvious. The duration of such training ranges from 1 to 12 months. Upon completion of the courses, you can receive a certificate, and sometimes find a job immediately.
For example, you can enroll in similar courses at the School of Art and Design, the duration of which is only 10 months. Interestingly, after completing your training, you will have a real fashion show of the clothes you created.
In addition to stationary cutting and sewing courses, you can sign up for virtual ones and take training online. For example, this can be done at Osinka. This is where distance learning in the basics of the “Tattooing” technique is carried out. The training course consists of 14-16 lessons containing videos and photo files.
You can also learn modeling at the Moscow School of Fashion Design, located on Varshavskoye Shosse. Here you will learn how to sew children's clothes, evening dresses, model and design products, you can take a short course in cutting and sewing.
In a word, if you wish, you can learn how to create any clothes, even non-standard sizes. And then modeling a skirt, blouse, trousers and any other item of clothing will become available to you.
23:36 Unknown 69 Comments
Hello, dear readers!
When sewing simple clothes, you can do without a pattern; for clothes with complex styles, you will already need a pattern - a paper template from which fabric parts are cut out. If you choose between a finished pattern and a design drawing, I would recommend the second option.
Even if you are new to sewing, pattern making will help you quickly understand and master the principles of clothing design. In addition, the pattern is made according to your individual measurements, which means that the future product will fit well on your figure; ready-made patterns do not guarantee such a result, since each of us has our own anatomical features of the figure. And lastly, pattern making is an interesting and exciting process!
In this article, we will learn how to build a basic pattern for a dress using Tatyana Roslyakova’s method.
In the last article, we learned how to take measurements that we will need for a dress pattern. Let me remind you that the design drawing is made only for half of the figure, so measurements of volume and width are recorded in half size. Below is a table in which I have written my measurements as an example. Using these standards, I will make calculations, and you must substitute your data.
Name of measurements and symbols | cm |
|---|---|
Half neck circumference (Ssh) | |
Half chest circumference (Сг) | 40,5 |
Half waist (St) | |
Half hip circumference (Sb) | 44.5 |
Back length to waist (Lts) | |
Back Width (Shs) | 16,5 |
Front length to waist (Dtp) | |
Chest Height (Vg) | |
Center of the chest (CG) | |
Shoulder Length (Dp) | |
Product length (Di) |
In addition to measurements, we will need allowances for loose fit (FO). These increases are added to almost all measurements when drawing a structure; they are needed for freedom of movement and breathing. Depending on the silhouette of the product, the allowance for a loose fit varies in size. The allowances also differ for styles of clothing (trousers, jackets, coats, etc.), moreover, there are separate allowances for different types of fabrics. Different methods for creating patterns indicate different increases for the same silhouettes and styles, so it is very important to pay attention to the increases that are indicated in the method. But for now we are learning to build the basis of the dress, so I offer you two silhouettes: fitted and semi-fitted with the following increases:
Please note that the increases shown in the table are added entirely to half measurements. That is, if the chest girth measurement is 81 cm, then the half chest girth = 40.5 cm; for a close-fitting silhouette, an increase in loose fit of 3 cm is added to 40.5 cm, this means that the future product along the chest line will be 6 cm larger. In addition, the increase along the chest line is distributed among the pattern pieces in the following ratio:
back width - 30%
shelf width - 20%
Armhole width - 50%.
distribution of increase along the chest line
I will indicate all allowances for loose fit to these and other measurements in the formulas when creating the pattern. In this article we will build a dress with a fitted silhouette.Let's start with the drawing . It is necessary to prepare a sheet of paper, the length of which should be 10-15 cm greater than the length of the future dress. If you have never made patterns before, I would advise you to make all the drawings on graph paper in a roll, which can be purchased at an office supply store. It's a pleasure to draw on this paper! The drawings are accurate and smooth. Dress length . In the upper left corner of a sheet of paper, draw a right angle with its vertex at point P, departing 5 cm from the top edge. From point P down in a straight line we put aside a value equal to the length of the dress and put a point H (segment PH = Di = 85 cm).


- the size of the front dart opening = 0.25 of the total dart opening (13.5 x 0.25 = 3.4 cm),
- side tuck opening size = 0.45 of the total opening (13.5 x 0.45 = 6 cm),
- back tuck opening size = 0.3 of the total opening (13.5 x 0.3 = 4.1 cm)


Shelf
- front part of the product
Neck
- neckline
Armhole
- cutout for sleeves (cut from shoulder to side seams to connect sleeves to bodice)
Dart
- excess fabric tucked into the seam. Using darts, the necessary shapes are given to the product.
In addition to the dress, you can create a pattern for a single-seam set-in sleeve.