November 27, 2016  Anna Chebotareva

With the help of this one, crocheted, owl appliques can be effective. It was my children who inspired me to do this ... And today I invite you not to get bored, but to be inspired and get up with me funny applique owl crochet
I tried to make this master class quite detailed, step by step and understandable even for beginners. So, make yourself comfortable, let's get started !!!
Materials required for knitting an Owl applique:

Alize Baby Wool yarn (40% wool, 20% bamboo, 40% acrylic) in St. gray and white;
hook number 2.5;
semi beads black for the peephole - 2 pcs;
bead - heart - for a beak - 1 pc .;
tapestry needle;
orange floss threads for embroidery of the feet;
knitting marker;
scissors;
inspiration and good mood.
Operating procedure.
I. Torso (1 piece).
1 row : knit in a sliding loop 8 half-columns with crochet (hereinafter psn) ... This is done as follows: wind the thread around your index finger:

We hold the end of the thread with our thumb and insert the hook into the resulting loop:

Now we hook the working thread:

And we drag it into the loop:

Once again we grab the working thread and pull it through the loop, which is on the hook (for fastening)

Our sliding loop is ready for further work !!! Hooray!!! Now we knit the first row, in which 8 psn. The half-column itself with a crochet is knitted in this order - we make 1 crochet:

Insert the hook into the sliding loop:

Grabbing the working thread:

And we stretch it through the sliding loop. As a result, there are already three loops on the hook:

Grab the working thread again:

And we stretch it through all three loops:

We've got the first half-crochet, knitted into a sliding loop. We knit 7 more of these and tighten the magic loop:

2 row. 16psn
We knit in a spiral in each rear half loop 2 psn
... In this case, the beginning of each row, for convenience, will be marked with a marker:

... * 2 psn. 1 psn * - repeat to the end of the row, i.e. 8 times (24 loops) :


... * 1 psn, 1 psn, 2 psn * - repeat 8 times (32 loops) - knit the first loop of the row and mark it with a marker, if you do everything correctly, then the knitting of the row will be finished before the marked loop:

... * 2 PSN, 1 PSN, 1 PSN, 1 PSN * - repeat 8 times (40 loops):

6 row. * 1psn, 1psn, 2psn, 1psn, 1psn * - repeat 8 times (48 loops):

7 row. * 1psn, 1psn, 1psn, 1psn, 2psn, 1psn * - repeat 8 times (56 loops):

At the end of the series make a connecting loop :

It turned out the BOLO And we need an OWL !!!
therefore now our task is to tie the ears
... We recruit 5 VP lifting (this is instead of a column with 3 yarns - ss3n)
:

We knit into the same loop column with 2 crochets (ss2n)
, then into each next loop - ss2n, ssn, ssn, ssn, psn, ssn
.
Here we got 1 eyelet:

Now we knit the second in the reverse order: psn, ssn, ssn, ssn, ss2n, ss2n, ss3n.

Cut off the thread, thread it into the needle and tangle the tip:
The owl's body is ready !!! URAAAAA !!!

II. Eyes (2 parts) and beak.
1 row.
We knit into a tightening loop 6 single crochet
(Further sbn
)

We tighten the loop:


And we drag it through the loop on the hook:

Please note that we run the end of the thread along the knitting, so we will hide it.
For the beginning of each next row, we knit 1 air lifting loop.
2nd row: 12 sb.
: * 2 sc, 1 sc * repeat 6 times (18 loops).
: * 1 sc, 1 sc, 2 sc * - repeat 6 times (24 loops).

In order for the last row to turn out nicely closed , do the following: cut the thread (leave the segment longer, because we will sew an eye on it in the future), thread into the needle, step through one loop, now draw the needle under the loop :

We return to the same point :

We knit the second eye in the same way.

Sew on eyes:

And we hide the ends of the thread:


We take glue and fix the beads to the floor (or you can sew on ordinary beads):

Sew on the beak (if there is no suitable bead, just embroider a small triangle with floss threads):

Of course, you can fix the bead eyes and arrange the beak at the very end of the work, But this is how our Owlet gets charm, and we have a mood to create further !!!

Looking at such a HORROR, a song of fears from a children's cartoon is spinning in my head:
We are not mice, we are not birds, 
We are night ahi-fears!
We fly, we spin
We are catching up with horrors, horrors ...
We will make the coward tremble
The brave will look - we will melt.
We are afraid of the brave
We scatter in fear ...
We are attic, stove,
Fears are dark, night
We fly, we spin
Catching up horror, horror
And after the beauty salon - well, it's a completely different matter:

IV. Wings (2 parts). Each wing consists of from 5 loops, connected by air loops.
1 loop. Introducing the hook in the fourth loop from the ear , grab the working thread and pull out the loop ... We lay the short end of the thread along the work:

We knit 12 VP and 1 SBN into the next loop:

2 loop. 15 VP and 1 SBN;
3 loop. 18 VP and 1 SBN;
4 loop. 15 VP and 1 SBN;
5 loop. 12 VP and 1 PRS.
We confuse and cut off the ends of the threads - we have got the first wing:

Second wing fits similarly , only the hook is inserted into the 9th loop from the ear !!!

V. Legs (2 parts). We embroider small triangles with a floss:

Crochet appliques "Teddy Bear" 
Teddy Bear is one of the favorite children's characters. Girls especially love him. Soft toy Teddy keeps the baby sleeping all night, but what about the day? Here our application will come to the rescue.
For work, we need to prepare: 50 g of blue and gray yarn (composition 40% wool, 40% acrylic, 20% bamboo), 4 black beads, hook number 2.5, and a needle with a wide eye.
We collect a chain of 3-5 air. pet., we close it in a ring and begin to knit in circular rows, as the diagram shows. 
In the first row we knit 10 single crochets, then we connect them with the first half. In the second row, we collect 2 air. pet., after which we knit with a double crochet. To form a circle, the number of loops must be increased. We finish the row again with half columns.
The last circular row of the muzzle must be tied to the pillar. without a crochet, alternating with 2 and 1 single crochet. Finish a row of half columns.
We turn to knitting ears. To do this, cut off the gray thread, and fasten the blue one. We knit 4 sts without a crochet, then we turn the product with the wrong side and make 4 more posts. without a crochet. We fix the thread, cut it off.
We tie the ear with gray yarn with a single crochet. On the tops in the extreme left and right blue pillars. we knit 3 pillars without crochet. without a crochet. We do not break the thread, but we knit 3 pillars. without a crochet on the head of the product.
We thread a blue thread through the loop and knit the inside of the ear, then we tie it in the same way as the first. Fasten the thread, then cut.
The bear is almost ready. It remains only to make a muzzle. We fold the blue thread in half, then thread it into the needle. We sew 5 stitches where the nose should be. Mark the mouth with a couple more stitches. Sew the beads in place of the eyelet and that's it, the Teddy Bear is ready. Now he will always be with the baby.
Crochet applique "Owl"

The image of a little owl bird can decorate the clothes of both boys and girls. Tying her is not at all difficult.
So, we need to prepare: brown, yellow, black yarn; matching hook, needle, and 2 small buttons.
We collect 4 air. loops of brown yarn, then we close the chain into a ring. We will knit in circular rows, each of which ends with a connection. post. We tie the resulting ring to 2 pillars. without a crochet in each loop.
We do the second row in the same way as the first.
In the third row and further, between the double pillars. without crochet we knit 1 column without crochet. Then we continue knitting an owl according to the scheme.

When the body and head of the owl are ready, we make the beak with two stitches of yellow yarn, after which we sew the buttons in place of the peephole. Now the owl can take its place on clothes or toys for children.
Crochet appliques "Ladybug"

« ladybug"Or simply" The Sun "is a small insect that delights children. In wildlife, it can only be found in the warm season, and in the form of clothing decoration, it will always delight the child.
For work, you need to prepare: the remains of black, red yarn, the corresponding hook and black sequins for finishing.
We begin to knit "Sun" from the wings. They, in turn, consist of two petals. How to knit a petal, the diagram shows.

We fold the finished petals with the front sides inward and, slightly receding from the edge, connect them on one side with a single crochet. We open the wings and without tearing off the threads, we tie the whole part around the column without a crochet.
In the place where the head will be, align the application "Ladybug" pillar. with crochet and conn. post. with 2 yarns. We knit the head in a black pillar. single crochet, half crochet and post. with a crochet.
To make the butt, attach the thread from the inside out and knit 1 air. loop, 6-8 posts. with a crochet in one loop and conn. post. in one loop. Decorate the wings with sequins. The ladybug is ready.
Crochet appliques "Anchor"
An anchor is an irreplaceable construction in the life of a real sailor. Every young sailor will definitely be delighted if the anchor becomes an ornament of his clothes.
For work you need to prepare yarn and a crochet hook for it. In the scheme, the anchor is knitted with a pillar. without a crochet, but in order for the product to be openwork, we will replace them with a connection. columns. 
The names of the anchor elements, they will be used later in the text. 
We make a sliding loop into which we knit a 6 post. without a crochet. Then, after 4 air. pet., knit 1 pet. lifting and 3 connections. post. This will be our left armature rod.
Then we knit a spindle. We make 6 air. pet., then 1 pet. lifting and returning along the chain, 6 connections. post. Further from 3 air. pet. knit picot.
We pass to the right horn. Do 6 air again. pet., then a lifting loop and 6 connections. post.
We knit the anchor further - now we make the spindle again. We return along the chain, creating 6 connections. post., after which we proceed to knitting the left stock.
We start it with 3 air loops, then we knit a lifting loop, go back along the chain and finish its connection. post.
Completing the knitting of the product, we make a connection. post. in a chain in front of the ring, cut the thread and hide it from the seamy side
Crochet applique "Machine"
Every boy will always like this accessory for clothes in the shape of a car. Knitting consists, as usual, of chains.
What do we need to work? Remains of yarn different colors and a hook for them.
For knitting the main part, we collect 13 air. pet., and then we continue according to the scheme.
Knitting pattern of the applique "Machine"

When the main part is ready, we do not break the thread, but proceed to tying it around the post. without a crochet in each loop. In the corners we make 3 pillars. without a crochet in each loop. In the arches from air. loops in each of the air. we knit loops along the pillar. without a crochet.
Those. where 5 air. loops should get 7 pillars. without a crochet, and where is 8 air. loops - 8 pillars. At the end of tying the thread is cut and fastened.
We knit the wheels according to the scheme and sew them to the main product.

That's it, the machine is ready!
Crochet applique "Dolphin"
Dolphin is an intelligent mammal. He is said to have intelligence. In addition to the fact that the dolphin knows how to perform various tricks that delight children, he is also a healer for many diseases.It is this wonderful animal that we will try to knit. Following the scheme, you will get a charming applique that will become a pleasant memory for your baby or even a secret friend.
Crochet pattern "Dolphin"

As it turned out, applications crochet much more beautiful than woven. It is very pleasant to create them with your own hands and sew on your baby's clothes.
A selection of 20 applique patterns


Crochet appliques "Teddy Bear"
Teddy Bear is one of the favorite children's characters. Girls especially love him. Teddy's soft toy protects the baby's sleep all night long, but what about the day? Here our application will come to the rescue.
For work, we need to prepare: 50 g of blue and gray yarn (composition 40% wool, 40% acrylic, 20% bamboo), 4 black beads, hook number 2.5, and a needle with a wide eye.
We collect a chain of 3-5 air. pet., we close it in a ring and begin to knit in circular rows, as the diagram shows.
In the first row we knit 10 single crochets, then we connect them with the first half. In the second row, we collect 2 air. pet., after which we knit with a double crochet. To form a circle, the number of loops must be increased. We finish the row again with half columns.
The last circular row of the muzzle must be tied to the pillar. without a crochet, alternating with 2 and 1 single crochet. Finish a row of half columns.
We turn to knitting ears. To do this, cut off the gray thread, and fasten the blue one. We knit 4 sts without a crochet, then we turn the product with the wrong side and make 4 more posts. without a crochet. We fix the thread, cut it off.
We tie the ear with gray yarn with a single crochet. On the tops in the extreme left and right blue pillars. we knit 3 pillars without crochet. without a crochet. We do not break the thread, but we knit 3 pillars. without a crochet on the head of the product.
We thread a blue thread through the loop and knit the inside of the ear, then we tie it in the same way as the first. Fasten the thread, then cut.
The bear is almost ready. It remains only to make a muzzle. We fold the blue thread in half, then thread it into the needle. We sew 5 stitches where the nose should be. Mark the mouth with a couple more stitches. Sew the beads in place of the eyelet and that's it, the Teddy Bear is ready. Now he will always be with the baby.
Crochet applique "Owl"
The image of a little owl bird can decorate the clothes of both boys and girls. Tying her is not at all difficult.
So, we need to prepare: brown, yellow, black yarn; matching hook, needle, and 2 small buttons.
We collect 4 air. loops of brown yarn, then we close the chain into a ring. We will knit in circular rows, each of which ends with a connection. post. We tie the resulting ring to 2 pillars. without a crochet in each loop.
We do the second row in the same way as the first.
In the third row and further, between the double pillars. without crochet we knit 1 column without crochet. Then we continue knitting an owl according to the scheme.
When the body and head of the owl are ready, we make the beak with two stitches of yellow yarn, after which we sew the buttons in place of the peephole. Now the owl can take its place on clothes or toys for children.
Crochet appliques "Ladybug"
"Ladybug" or simply "Sun" is a small insect that delights children. In wildlife, it can only be found in the warm season, and in the form of clothing decoration, it will always delight the child.
For work, you need to prepare: the remains of black, red yarn, the corresponding hook and black sequins for finishing.
We begin to knit "Sun" from the wings. They, in turn, consist of two petals. How to knit a petal, the diagram shows.
We fold the finished petals with the front sides inward and, slightly receding from the edge, connect them on one side with a single crochet. We open the wings and without tearing off the threads, we tie the whole part around the column without a crochet.
In the place where the head will be, align the application "Ladybug" pillar. with crochet and conn. post. with 2 yarns. We knit the head in a black pillar. single crochet, half crochet and post. with a crochet.
To make the butt, attach the thread from the inside out and knit 1 air. loop, 6-8 posts. with a crochet in one loop and conn. post. in one loop. Decorate the wings with sequins. The ladybug is ready.
Crochet appliques "Anchor"
An anchor is an irreplaceable construction in the life of a real sailor. Every young sailor will definitely be delighted if the anchor becomes an ornament of his clothes.For work you need to prepare yarn and a crochet hook for it. In the scheme, the anchor is knitted with a pillar. without a crochet, but in order for the product to be openwork, we will replace them with a connection. columns.
The names of the anchor elements, they will be used later in the text.
We make a sliding loop into which we knit a 6 post. without a crochet. Then, after 4 air. pet., knit 1 pet. lifting and 3 connections. post. This will be our left armature rod.
Then we knit a spindle. We make 6 air. pet., then 1 pet. lifting and returning along the chain, 6 connections. post. Further from 3 air. pet. knit picot.
We pass to the right horn. Do 6 air again. pet., then a lifting loop and 6 connections. post.
We knit the anchor further - now we make the spindle again. We return along the chain, creating 6 connections. post., after which we proceed to knitting the left stock.
We start it with 3 air loops, then we knit a lifting loop, go back along the chain and finish its connection. post.
Completing the knitting of the product, we make a connection. post. in a chain in front of the ring, cut the thread and hide it from the seamy side
Crochet applique "Machine"
Every boy will always like this accessory for clothes in the shape of a car. Knitting consists, as usual, of chains.What do we need to work? Remnants of yarn of different colors and a crochet hook for them.
For knitting the main part, we collect 13 air. pet., and then we continue according to the scheme.
Knitting pattern of the applique "Machine"
When the main part is ready, we do not break the thread, but proceed to tying it around the post. without a crochet in each loop. In the corners we make 3 pillars. without a crochet in each loop. In the arches from air. loops in each of the air. we knit loops along the pillar. without a crochet.
Those. where 5 air. loops should get 7 pillars. without a crochet, and where is 8 air. loops - 8 pillars. At the end of tying the thread is cut and fastened.
We knit the wheels according to the scheme and sew them to the main product.
That's it, the machine is ready!
Crochet applique "Dolphin"
Dolphin is an intelligent mammal. He is said to have intelligence. In addition to the fact that the dolphin knows how to perform various tricks that delight children, he is also a healer for many diseases.It is this wonderful animal that we will try to knit. Following the scheme, you will get a charming applique that will become a pleasant memory for your baby or even a secret friend.
Crochet pattern "Dolphin"
As it turned out, crocheted appliques are much more beautiful than woven ones. It is very pleasant to create them with your own hands and sew on your baby's clothes.
A selection of 20 applique patterns
Between big knits, sometimes you want to rest and knit something small and at the same time useful for further work. In knitting a warm suit for the winter, you can take a short break and knit an applique for this suit, besides, it won't take much time. The plus in such a transition is that the hands will rest from one hook and relax on the other. IN this master class the process of creating an applique in the form of an owl is considered. For work, you will need the following materials and tools:
- yarn in three colors colors owls, in this case brown, yellow and black;
- hook for the selected yarn;
- needle;
- 2 small buttons.
Scheme
Recommendations:
- select yarn of the same thread thickness;
- if there are no buttons, then the eyes can be tied using the torso knitting scheme - make a ring from 4 VP, tie it up to 2 rows (including it).

We take brown yarn and knit the beginning - we collect 4 air loops (VP), which we close into a ring using 1 connecting post (CC).

Following the principle of knitting in a circle, we knit in each loop 2 single crochet (RLS), and at the end of the row 1 CC. Further, in the course of work, at the end of each row, you will need to knit 1 SS.

In the second row, we knit everything the same way - 2 sc in each loop.

Starting from the 3rd row, between double sbn, you need to do 1 sbn each, that is, in the third row, the row is a sequence - 2 sbn, 1 sbn. 2 sc, 1 sc, in the 4th there is already 2 sc, 1 sc, 1 sc, 2 sc, 1 sc, 1 sc and so on.

Now we turn to knitting the head of the future owl. We make 3 lifting VPs, in the same loop at the base of a chain of 3 VPs we knit 2 from a column with 1 crochet, into the next loop - a magnificent column, then 1 RLS in each of the 2 subsequent loops. Then we knit PS, and in the next loop we make 2 CCHs.

We turn the work and knit the 2nd row - 2 PS, 4 SBN, 3 PS in accordance with the scheme.

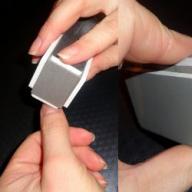
It remains only to sew on the eyes-buttons and embroider the nose-beak. Our owl applique is ready. Now you can use it to decorate clothes or as an element to create an educational toy such as an educational cube. Several of these owls can be attached to such a cube for learning counting. You can also make owls of different colors so that you can use them later to explain what kind of quality it is - color.
The use of a crochet hook in knitting practice greatly expands the creative possibilities of the master. With the help of this versatile tool, needlewomen create not only hats, scarves and sweaters, but also unusual interior items, toys, flowers and jewelry.
In this article we will show you how to knit a cute and funny "Owl" with your own hands. It will become the highlight of any thing: cardigan, snood or jackets, will easily decorate a children's room as a bright cheerful panel, will serve as an expressive element of decor for home textiles: pillowcases, blankets or bedspreads.
Preparation for work: selection of tools and materials
Beginner needlewomen can easily knit a funny "Owl" applique, guided by our instructions and diagrams. And step-by-step photos will help you figure out the difficult moments.
To work, you will need to prepare the following tools and materials:
- acrylic yarn "Children's novelty" from the "Pekhorka" factory in several colors, with a density of 200 g by 50 m;
- hook number 2.5 or number 3;
- scissors;
- needle and sewing thread (white, black).
The colors of the yarn can be any, select at your discretion. The main thing is to remember: you need a main color for the body and head, contrasting color for the wings, white and black for the eyes, yellow or orange for the beak and paws.

Stage one: head
In the description of the process of creating an "Owl" crochet applique, we will use the following abbreviations:
- half-column with a crochet - PRSP;
- single crochet - RLS;
- double crochet - C1H;
- a column with two crochets - C2H;
- air loop - VP;
- connecting loop - joint venture.
We start work with making the head. With a thread of the main color, we make an amigurumi ring and two air loops. In the first row we knit according to the scheme: 2 PRSP, 3 C2N, 6 PRSP, 3 C2N, 3 PRSP, we close it with the help of the joint venture into the second loop of the initial circuit.
We start the second row with 2 VP, in the first loop of the base we knit 1 PRSP. We continue to work. We carry out 2 PRSPs in the second loop, from the third to the fifth - 2 C2N each. Sixth - 2 PRSP , from the seventh to the tenth - one PRSP each, in the eleventh - 2 PRSP, from the thirteenth to the fifteenth - 2 C2N each, in the sixteenth - 2 PRSP and, finally, 1 PRSP. We complete the row in the same way as the first, using the joint venture.
We start the third row with three lifting eyes. In the first four loops we perform one C1H, in the next five - two in each. The next eight - one at a time, the next five - two. It remains for us to do 1 C1H each in the last loops. We finish SP in the third loop of the VP of the previous row.

We continue to work with an oval blank
We start the fourth row in the same way as the third, with three VP, in the same loop we knit 1 С1Н, in the next two - one С1Н each, then - 2 С1Н. We repeat the rapport six times: 1 С1Н (in the first loop) - 2 С1Н (in the second). Then we knit in two loops, one С1Н, two С1Н in the next, we repeat. Again we use the rapport 6 times: 1 С1Н - 2 С1Н. In the next two loops we perform one С1Н, then 2 С1Н. Then we knit 1 С1Н to the end of the row. We close the joint venture (similar to row number 3).
Fifth row: 3 VP and 1 C1H (in the same loop). In the next two - 1 C1H each, then - 2 C1H in one loop. We repeat this simple pattern until the end.
We close the row using the joint venture. We carefully cut and fasten the thread. The head of the applique crochet "Owl" is made by hand. See, it's not difficult at all! The main thing is to carefully follow the instructions and count the loops.
Stage two: owl ears
We knit the ears according to the following scheme. We attach the yarn of the main color to the side of the head (from the center of the workpiece we count 14 loops to the right). First row: 2 VP, 1 C1H in the next 4 loops, 2 half-columns, connected together, the first in the same loop as the last of the four C1H, the second in the next. Turn the knitting over.
We start the second row with 2 VP. First, we knit 2 PRSPs, connecting them together, then 1PSSN. In the last two loops, we make 2 PRSPs with one vertex. We turn the workpiece.

Third row: 2 VP and a group of half-crochets with a common top, in all loops of the base. Congratulations, your first ear is ready. The second is performed from the other side, by analogy.
When both ears are ready, carefully shape the edge. To do this, we attach the thread of the main color to the head and make the strapping with single crochets.
Stage three: torso and eyes
We continue to work on our crochet. A description of the method of knitting eyes, beak, wings and legs is presented below. We make the body of an owl according to the scheme that was used when making the head, using a thread of the main color. We get an oval blank.
Let's start knitting owl eyes. We take a white thread, make an amigurumi ring, 3 VP and 12 C1H in a ring. We close the joint venture in the third loop of the initial chain.
We knit the second row from 2 VP, 1 PRSP (in the same loop), 2 PRSP (in each next loop of the circle), SP (in the second loop of the chain). The first blank for the eye is ready. By analogy, we perform the second.

Let's start knitting the pupils. We take the thread in black. We make an air ring, 1 VP and 8 single crochet in a circle. We close the joint venture, fix the thread. We perform the second pupil according to the same scheme.
Stage four: beak
We start making the beak. For this we will use yellow or orange yarn. We carry out an amigurumi ring, 3 VP, 2 columns with a crochet. We do not connect in a circle, we turn the workpiece.
In the second row, we make 3 VP and a group of double crochets, connected at one vertex (in all loops). We fix the thread. Congratulations, the beak is ready! Crocheted application "Owl" acquires recognizable outlines.

Stage five: wings
To make the wings, we take a thread that is contrasting in color to the body. We make an amigurumi ring, 3 VP and 2 С1Н, do not connect in a circle, we turn.
We knit the second row from 3 VP, 1 С1Н (in the same loop), in the next - 1 С1Н and 1 С1Н - into a chain from VP. We turn.
In the third row we make 3 VPs, 2 С1Н in the same loop, in the next two - one С1Н each, and finally 1 С1Н into a chain from VP. We turn.
Fourth row: 3 VP, in the same loop and in the next - two double crochet, connected at one vertex. In the other three - one C1H, and 1 C1H - at the top of the chain. We turn.
Fifth row: 3 VP, in the same loop 1 С1Н, in the rest, except for the last one, one С1Н. The row is almost ready. In the last loop and at the top of the chain, we knit double crochets, joining them together. We turn the workpiece again.
Sixth row: 3 VP, 1 С1Н (in the same loop), in all the others - one С1Н and into the loop of the chain too. We turn.
Seventh row: 3 VP and 1 C1H (there), one column with a crochet - in all loops, except for the last two. Now do the single-vertex double crochets in the last sts. We turn the wing.
Eighth row: we perform 3 VP and a group of double crochets with a common top in all base loops. Do not cut the thread yet. We proceed to the wing strapping along the edge. We make 1 VP, using single crochet, make out the workpiece around the entire perimeter. Now you can fasten and cut the thread. The first wing is ready.

We carry out the second according to the same scheme. An important point: after tying the wing, it will need to be rotated and strapped on the other side. This is necessary in order for the details to be the same. Our beautiful knitted applique is almost ready. It only remains to collect and add paws to the body.
Stage six: feet for the owl
In order to knit the last element of the applique, take a yellow or orange thread. We attach it by stepping back three loops to the left from the center. We carry out three VPs, 1 C1H (in the same loop), 3 VP and 1 half-column without a crochet (in the same loop) and one more (in the next). We repeat this pattern twice. The first foot is ready. We knit the second by analogy, departing from the center of the body to the right six loops. Congratulations, all the details are ready. Now you know how to crochet an owl applique.

Stage seven: assembly of the finished product
We pass to the final stage of work - assembling the product. We carefully sew the wings to the body.
We take a needle and white sewing thread. We embroider a white dot on each pupil. We fasten the white blanks of the eyes to each other. We sew the pupils to the white base. We do it with black thread beautiful eyelashes... Sew the eyes and beak to the head, and the head to the body.

The work is done! What a cute and funny craft we have. Using our descriptions, you can easily link yourself beautiful applique crochet "Owl". The master class turned out to be simple. I wish you creative success!