In a series of stories about the new, the forgotten old - lunar manicure.
The most fashionable nail art of our time was born almost a century ago, in the 20s of the last century, and it was popularized by Hollywood film stars Pola Negri, Mary Pickford and Jean Harlow.
They say that the lunar design arose because women were afraid to paint their nails completely - they would suffocate! However, even today many believe in the ability of nails to “breathe”.
Whether it was a mistake or something else that caused the birth of one of the most elegant nail art of the century, it doesn’t matter. The main thing is that it exists. And the design came out of oblivion in 2007 thanks to the Cristian Dior fashion show and the retro craze.
Since then, moon manicure has confidently competed with all trends, sometimes changing color and shape, but always remaining faithful to the content.
What is a moon manicure? In the classical interpretation, there is an unpainted lunula (a semicircle on the nail) and red varnish beyond its border. Today the design has been reincarnated into a huge number of interpretations.
- Firstly, the lunula began to be painted over and marked with all available means - foil, rhinestones, glitter and stickers.
- Secondly, it’s not that they forgot about red, but quickly began to work on other colors, combining sometimes incongruous things. But the main metamorphoses affected the shape and size of the hole.
Natural lunula is no longer echoed. The art hole can occupy half of the nail, be reverse (in the shape of an edge adjacent to the cuticle), triangular or double. It is outlined with lines, waves, dotted lines and blurred into a gradient. They do whatever they want with her, and they have every right.
There are no canons, and even trends are a hint of complete freedom. Everything is allowed.
Except, perhaps, for one thing - it is naive to believe that modern fashion exceptionally fresh in trends and trends. We all come from retro.
As for technology, everything is simple - gel polish and no options. Fashionable moon manicure with gel polish sits confidently on the nails, even if its owner is engaged in not lunar, but quite earthly affairs. By the way, about earthly matters and the practical length of nails.
Lunar manicure gel polish on short nails It is advantageous to “plant” it, depicting the hole as concave, adjacent with a thin edge to the cuticle, or making it more convex than usual. Let's talk about how and how all this is done.
Through thorns to the stars: how to do a lunar manicure step by step
Fashionistas of the past depicted the classic moon manicure with just three brush strokes - in the center and on the sides, leaving the moon area unpainted.
We will need more time because we will be working with gel polishes, which are not only durable to wear, but also durable when applied.
Let's look at how to manipulate brushes, and don't forget about stencils, which will help out if your hand categorically refuses to paint beautifully and evenly.
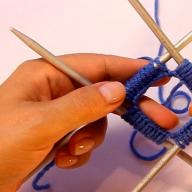
Lunar manicure with brushes
- Let's start with nail preparation. We process the free edge and give it the desired shape. Carefully remove the cuticle. We buff the surface, removing the gloss. Apply fresher (dehydrator), removing excess fat and moisture.
- Cover the nails with a base. A thin layer is enough to create the conditions for a molecular bond between the natural nail and the next color coating. Dry the base - 2 minutes in UV or 30 seconds in an LED lamp.
- Apply colored gel polish in the background color to the base, painting the nail plate completely. Dry and duplicate the layer for color density. After the next drying, we take a thin brush in our hands, for example, a column for painting, and paint the border of the hole with gel polish of a different color. The hand does not tremble, but confidently leads a smooth and rounded line. We remember that the hole can be classic (convex), reverse (a thin month adjacent to the cuticle), geometric or any other.
- After drawing the border, fill the hole with color, correct the errors with a brush dipped in prep or ordinary alcohol, and send the design to the lamp. We duplicate, increasing the color density, and dry.
- The final touch is covering the design with topcoat. We choose a thick and self-leveling topcoat to level the surface on which a “step” has formed from the drawn lunula. We dry it and admire it.
VIDEO REVIEW
Lunar manicure “joint to joint”
The lunar nail design can be painted end-to-end, without creating a “step” on the nail, and there is no need to level anything with a top coat.
There is no need to be afraid of joining gel polishes - they join without problems. There are no fundamentally new moments in the execution, except for the junction itself.
- So, after standard nail preparation and applying the base, we draw the lunula, correcting errors with a brush dipped in prep or alcohol.
- After drying, paint the nails with background gel polish - from the line of the drawn hole to the free edge.
- We correct the border of the joint, wiping off excess, drying it and duplicating the previous steps. Hole, drying. Background, drying. Wipe where necessary.
- On top is the top, which no longer needs to be leveled. The boundaries closed, forming a perfectly smooth relief.
Moon manicure with stencils
As for stencils that will save you if your knees and hands are shaking, everything is simple with them.
- We completely paint the prepared nails twice with gel polish in the color of the future hole.
- After removing the sticky layer from the gel polish, we seal the lunula with a stencil. We make sure that the fit is tight and complete.
- Where necessary, we help with an orange stick or a gloved finger.
- Having sealed the lunula, we paint over the free space with gel polish of a different color. Without removing the stencil, we send it to dry and duplicate the layer again.
- After the second painting and drying, we remove the stencil with tweezers, apply the finish and rejoice at how cleverly we solved the problem of lack of experience in drawing smooth and beautiful lines.
You can do whatever you want with your nails, even plant succulents on them. But classics are classics. Goes with everything and never goes out of style. The basis of success and good taste. Try it!
Girls always like to implement new and unusual ideas manicure, delighting those around you with your unique sense of style. So, one of the most popular ways to decorate your nails is a moon manicure. You will learn about the features of this design and how to implement it in this article.
What is moon manicure
This type of nail decoration got its name due to the fact that the drawing at the cuticle line resembles half moon outline. Lunar manicure is an excellent alternative to the once popular French manicure, winning the hearts of fashionistas all over the world. There are absolutely no restrictions regarding the choice of colors. When creating a newfangled lunar manicure, you can use both calm nude shades and bold, extravagant combinations of colored gel polishes.

Lunar manicure with gel polish photo new 2017
You can complement the elegant design with rhinestones, kamifubi, shiny rubbing and much more. The main rule is that the final result should fit harmoniously into everyday looks and not look overloaded with unnecessary elements. Strictness and simplicity are what are relevant in 2018.
Photo of moon manicure idea


How to do a moon manicure with gel polish: step-by-step instructions
When performing a lunar manicure, it is important to follow the sequence of actions and maximum accuracy. The lines should be clear, without sharp transitions or irregularities. Before you start designing, you need to complete the following mandatory steps:
- The nails should be carefully prepared: remove the petrigium and cuticle, give the free edge the desired shape.
- Before applying any material, nails must be sanded and degreased.
- Then a base is applied to the nail plate, which should be dried in a UV lamp for 30-60 seconds.
Now you can start designing. To perform a lunar manicure, two main methods are used:

The final stage will be coating the nails with the finish, drying them in a UV lamp and removing the sticky layer. An ultra-modern and truly feminine manicure is ready!
Now you know how to do a moon manicure with gel polish, and you can surprise others with your unique and inimitable style. Experiment with color combinations and decorative elements, each time creating small masterpieces on the nails.
Video: how to do a moon manicure with gel polish
Discussion: there is 1 comment
I used a lot of ways to create a reverse hole in manicure design: Stencils, brushes, tools for dotted manicure and even matches. But still for me the most The best way- This is painting with thin brushes. I don’t like to paint with a stencil because it’s not reliable and gel polish often runs under it. Well, maybe of course it depends on the quality of the stencil. And with brushes it is very convenient to draw holes, both reverse and upper: First I draw the outline, and then I paint it over. Very comfortably.
Answer
beautiful, well-groomed nails- the pride of any woman. Regardless of whether she goes to visit or to work, a manicure is a must. Currently, with the advent of gel polishes that last quite a long time, it has become possible to develop such a direction as nail design.
There are a lot of ideas for creating a great manicure. A huge selection of colors, the use of various combinations, decoration with rhinestones, sparkles, and foil. You can paint your nails in different colors, which was simply unacceptable before. Now there is complete freedom of action - everything is limited only by one’s own imagination and artistic capabilities.
Using various stencils and stickers, you can create entire pictures on your nails. A perfectly executed manicure attracts attention, makes the owner proud and envy the surrounding women. The best thing, of course, is to go to a salon and get a manicure from an experienced master. But it's quite expensive.

Is it possible to make holes on your nails with gel polish at home? Yes, any woman can do this.
Design with gel polish holes
One of the most beautiful and uncomplicated manicures is a manicure with holes.
There are many different techniques for performing this type of nail design with gel polish. Let's look at some of them; they are not so complicated and do not require special skills. But you definitely need to have skills in working with gel polish, a drying lamp, a full set of colored gel polishes, primer, base and other attributes. Be sure to purchase a thin brush.

Using a stencil
Before work, you need to prepare your nails for coating with colored varnish. Apply the base, prepare two bright varnishes, topcoat and stencils.
Apply colored gel polish to the base and let it dry. Depending on what color you want to get and the consistency of the varnish, apply 2 or 3 layers. There is no need to smear it too thickly; a thick layer may become deformed during drying. For this reason, they are applied in a thin layer.

After this, the desired stencil is pasted on. You can leave the natural shape of the hole open or an inverted jacket when sticking the stencil not on the base of the nail, but on its tip.
The stencil prevents the layers from mixing. The drawing turns out clear and even. No need to paint with a brush. But a bright-colored varnish is applied to the free surface, dried, and the stencil is removed. Nails are covered with a finishing topcoat.

You will get an excellent result in a fairly short time and the manicure will be no different from the salon one. The most important thing is to do it slowly and follow the entire sequence when working.
Using transfer foil
- Cover the nails prepared for painting with base coat and dry.
- We cover the nails with gel polish in 2 or 3 layers and dry them.
- Apply top coat and dry under lamp. The base coloring is ready.
- After applying the glue, apply the foil with the matte side, let it dry, smooth it out, and then tear it off
- If for some reason it was not possible to glue the foil, you can try again until a good result is obtained.

The manicure looks very beautiful and stylish. Silver and gold foil are used.
Manicure with holes using gel polish using a thin brush.
Need to prepare: base, gel polish different color, top and thin brush.
After the base, we proceed directly to the design.
Paint your nails with 2 layers of the chosen varnish and dry.
With the second color, using a thin brush, you need to make holes with gel polish.
having previously outlined the crescent. Apply varnish to the hole area 2 times and dry.

The second way to make holes with gel polish
Using a brush, we first draw the holes and then cover with varnish. After applying 2 layers of varnish to the hole area, dry it well. After this, apply the main color to the nail up to the edges of the hole. After drying, apply the finishing coat.
Third way
First we draw the boundaries of the hole, then apply the main varnish in 2 layers, let it dry. After this, we make holes using gel polish along the drawn borders.
Transparent wells
In order to make transparent holes, you only need to prepare varnish of one color. After applying the base to the prepared nails, dry it well under the lamp. Glue the stencil onto the nail. Then we take the main color, cover it in 2 layers and let it dry. We remove the stencil. A manicure with colorless holes is ready. Nails are well-groomed and unusual. It is very good to use pink or peach, white. For those who like contrasts, you can use bright colors or even black varnish.

French moon manicure
Delicate, unique design that will not leave anyone indifferent. To create the base layer, use pink, beige, peach tones. White varnish is used for the holes.
Creation technique
It is better to use stencils to ensure that all the holes are the same. Stencils are practically not used in the salon, because experienced craftsmen make holes using a brush.
Apply pink or beige color. Let it dry under the lamp.
We paint in White color not only the base of the nail, but also make a smile, as when creating a French manicure. After drying decorative elements, remove the stencil, apply topcoat and secure it.
Combination of colors to create a moon manicure
The choice of color depends on your own preferences, for what purpose the manicure is being done - for a celebration or everyday. Making holes with gel polish in a salon is quite expensive.
Doing a lunar manicure yourself is absolutely not difficult, but very interesting. It really takes a lot of time, but the result is worth it. Now your nails always look well-groomed and beautiful.
Very practical, but also beautiful and allows you to do different types designs. Let's consider an option that, with a light touch from Dior, has become a recent trend fashion seasons and promises to stay on the pedestal for many years - moon manicure with gel polish.
Necessary varnishes, tools and accessories
To create it you will need:
Ultraviolet lamp.
Base for manicure.
Gel polishes. The design involves using at least 2 colors (or even 1 if you plan to leave the hole transparent). You definitely can't go wrong if you choose classic combinations to start with. You can create them to your taste using varnishes of red, black, white, gold, beige, gray, and wine colors.
Top coating.
File, orange sticks, discs, buff.
ZhDSL or a special liquid for degreasing and removing the sticky layer.
Primer (if it is needed specifically for your varnishes).
Depending on the type of technology (this will be discussed later), also purchase a paint brush or stencils. Select if desired necessary elements decor.
We begin the manicure as usual by removing excess tissue, filing the free edge, polishing the nails, and degreasing.
Let's look at the technologies and stages of creating a classic lunar manicure using red and white colors.
Manicure using stencils
If you do not want or cannot draw the necessary highlight by hand (highlight the necessary zones), use a simple device - stencils for a French jacket. The step-by-step process looks like this:
Apply and dry the base.
Apply and dry 2 coats of red background.
Using tweezers, very carefully secure the stencil so that the area you want to highlight remains open. Press the stencil as hard as possible, especially on the sides, otherwise the smile line may not be clear.
Apply white polish to the desired area. Make sure that the layer is not too thick, otherwise removing the stencil after polymerization will be quite problematic. Dry your nails in a lamp.
Remove the stencil with tweezers. Do not make sudden movements so as not to damage the clarity of the lines.
Apply top coat, dry and remove the sticky layer.
The technology requires care in attaching and removing stencils. Please note that they need to be glued equally on all nails, leaving equal areas of the hole.
Brush manicure option with layering
Let's try gel polish with a highlighted hole and a free edge. This technology does not require the use of stencils - only a brush for drawing, as well as basic skills. Here's what it looks like step by step:
Apply a background color to the nails (in our case, red). Dry for 2 minutes.
Apply another layer and dry - the background should be very dense and deep.
Using boiling white varnish using a thin brush (this is a special brush for drawing small details, it is slightly thicker at the base and becomes thin towards the end), select the hole.
Using a brush to accentuate the free edge (hair brush) with the same white varnish, paint a thin highlight with a curved smile line. Dry the nails in the lamp for 2 minutes.
Apply a layer of top gel, dry for 2 minutes.
The main thing in this technology is to carefully and clearly draw the white areas. Practice on your own nails or tips before doing the actual manicure.
Do everything slowly and very carefully - the combination of so many contrasting varnishes is very impressive, but requires extreme caution in execution.
Butt-to-butt manicure technology
Another option is to apply white accents and a red background directly to the base with a brush. For this:
Let the base dry for 2 minutes

Using a thin brush, apply white varnish to the hole. First draw the border and only after that paint the area completely. Dry your nails.
Apply red along the smile line with a thin brush so that the colors form an even, clear border. Then, using a regular brush, paint the rest of the nail up to the free edge. Dry your nails in a lamp.
Apply top coat and dry. Remove the sticky layer.
The advantage of this technique is that such a manicure can look neater if done carefully. Firstly, there is no layering of colors, and secondly, you do not have to paint with white varnish at the base, going beyond the red background.
We recommend that before doing a moon manicure with gel polish, you decide exactly what design you will make, what colors to use, how strongly the hole will be highlighted and what method you will use. Sketch a manicure or design on 1 nail (tip) and make sure you are happy with everything.
Fashionable ideas for lunar design with gel polish The most interesting ideas Lunar manicure can be implemented using one of the three listed technologies. You can choose the original one you like, stylish design

from our selection:
Leave the hole clear, but place a small stone on it.
Make the background or hole matte. The combination of 2 effects in one color looks very impressive. Make a hole on a shiny background, curved in reverse side
. In practice, it looks like a strip applied along the nail growth line at the base. In this case, it is better to make the hole glossy or matte, but not shiny.
If your nail plates are short, the selected area should be small and curved, and if it is elongated, then it can be with a straight smile line and quite large.
Opaque varnishes are more suitable for this manicure. rich color. At least one of the ones used must be exactly like this.
The decor is very convenient to attach directly to the sticky layer. Volumetric elements can be secured with 2 layers of topcoat.
Lunar design is a beautiful and simple solution for fashionable manicure for all occasions.
Probably every girl already knows this type of manicure. Thanks to its beauty and simplicity, its popularity is rapidly growing. It is done both in nail design salons and by manicurists working at home. Performing a lunar manicure yourself is also not difficult. To create a classic lunar manicure, two varnishes in pastel or contrasting colors and special stencils in the form of circles are used. The crescent at the base of the nail is usually applied with white or other light-colored varnish, although other options are possible, of which, by the way, there are quite a few.
Lunar manicure with gel polish: 10 options
At the very beginning, let's see what types of lunar manicure there are. Ten most popular designs including classic design nails and more creative and daring ideas for modern manicure. Recently, lunar design has undergone dramatic changes, especially under the influence of such a fashionable trend in nail art as geometry and minimalism. Sometimes, looking at a manicure, at first glance you may not recognize that this is one of the classic types of design. A lot of futuristic and non-standard drawings appeared. Although the classics also have their place.
Photo of a classic version of lunar manicure

A manicure in which the semicircle at the base of the nail remains uncoated. The border where the varnish begins can be decorated with bouillons, rhinestones, small pearls or metal rivets. It takes very little time to create such a cute nail design, and if you also use long-lasting gel polish, which instantly cures under the influence of UV rays, then such a manicure is just a lifesaver for very busy girls. You won’t have to spend a lot of time on it, and your hands will look very well-groomed and fashionable.


Colored moon manicure
In general, this is a classic moon manicure, but using bright contrasting shades of varnish. The color scheme can be very different, and it is not at all necessary to match it to the clothes. Such a manicure may well be an independent unit.


It differs in shape. The standard crescent is replaced by a triangle. This version of the moon manicure is more suitable for long oval or slightly pointed nails. You can also do it on short nails, but this design will look less impressive in this case.


You can create a gold or silver coating using special foil, glitter, dust, polish with a shimmering effect and other nail design products. A gold or silver moon manicure looks best in combination with black, dark blue, emerald, purple or burgundy polish. For everyday manicure, you can use lighter shades. In general, gold and silver are universal and can be combined with any colors of gel polish, and are also perfect for performing.


Not so long ago, matte nail coatings came into fashion. This new product did not bypass the lunar design. You can apply finishing varnish with a matte effect to both the semicircle at the base of the nail and the rest of it. Matte moon manicure looks better in dark colors.


Nail painting now decorates almost any type of manicure. The drawing is selected individually. You can use various stickers and applications for nails, the varieties of which are now countless. Lunar manicure with a pattern is a spectacular finishing touch to your look.


Moon manicure with 3D accessories
Any type of manicure can be diversified with accessories. Recently, volumetric 3D applications for nails have become fashionable. Most often, bows are used as decoration for lunar manicure, which look very cute and flirty.


Floral moon manicure
A lunar manicure with flowers that are painted instead of the standard crescent looks attractive and unusual. This manicure goes well with light, bright colors. summer sundresses or dresses. Fashionable this summer, floral prints will most likely remain popular for many more seasons.


Another variation of the moon manicure that looks great on short nails. In this manicure, the stencil shape is replaced with a more elongated one. White varnish is applied almost along the entire edge of the nail. With this manicure, your fingers and nails visually become longer and thinner. that is why this design is recommended for owners of short nails.


Fashionable blue gel polish
Blue is the color of the fall-winter 2020 season, and any variation of it: from light shades and bright blue to deep dark color. The trend is smoky blue and a combination of blue and gray in nail design. Blue does not lose its relevance “ cat eye”, which can be given even greater expressiveness using an additional layer of transparent stained glass varnish. In general, the combination of magnetic and stained glass shellac is now very popular; a similar design option can be supplemented with rhinestones or mosaics. Well, don’t forget about the classic New Year’s lunar blue manicure with iridescent snowflakes sprinkled with shimmering acrylic sand.


Beige lunar nude design
Beige manicure is a wonderful everyday option for nail design. Powdery shades are very popular now. This spring, the TNL brand released an amazing universal collection of base colors for creating French manicures, nude manicures and other types of nail designs, called Color Base. The same brand also has another collection that has pretty golden beige shades. It's called Morocco. There are interesting beige tones in the OPI “Soft Shades” and “Infinite Shine” lines, as well as the IRISK brand in the NUDE collection, etc.
Now let's see what can be painted on nails using beige gel polish.


In pink
Pink, just like beige, is a universal color for everyday manicure. It is indispensable for designing short nails, because... Light shades visually lengthen nails. Pink is the color of spring and summer. It goes well with floral patterns and monograms. If you wish, you can also do geometric pattern, for example, line it with “broken glass” foil; it looks very stylish on pink gel polish.


How to make the perfect moon manicure: instructions for implementation
It's actually very simple. It is enough to prepare your nails in the usual way, stock up on time, a set of gel polishes and round stencils. It is preferable to choose varnishes from one brand, this will make it easier to choose the right one color scheme for lunar manicure. The sequence of coating application is as follows: the first layer on the entire surface nail plate white varnish is applied or the one you chose for the crescent, the second layer is the main color. To make the manicure more durable, you can use it as a finishing layer. clear nail polish. If you want an unusual lunar manicure, then in addition you will need brushes and various nail decoration elements. If you don’t want to invent it yourself, then examples of photos of the original lunar manicure can be found on the Internet.

There are also non-standard approaches to performing lunar manicure. For example, first of all, the nails are covered with varnish of the main color, and the hole is woken up with sparkles or shimmering powder. Also, a lunar manicure can be done in one color. To do this, you need to have a glossy gel polish and a matte finish in your arsenal. First, gloss is applied, and then the main part of the nail is covered with a matte top.
4 most popular ways: how to do a moon manicure at home
Now there are many ways to perform this design even on short nails. Here step by step photos instructions for some of them.
- 1 METHOD: HOW TO DO IT WITH Stencils

METHOD 2: HOW TO CORRECTLY DRAW A HOLE WITH GEL POLISH

METHOD 3: HOW TO MAKE A MOON DESIGN WITH REGULAR VARNISH

METHOD 4: HOW TO QUICKLY MAKE A DIRECT DESIGN

Lunar manicure is created for everyday life and festive occasions. Depending on the chosen design, it is perfect for both a business meeting and some holiday. Moon manicure is universal and therefore suitable for various occasions.
In summer, variegated shades of varnish are used to create lunar nail designs; in winter, cooler colors are used. Although general rules no, here everyone chooses a color palette for themselves: according to the occasion, according to their mood or in accordance with current trends.
New items and fashion trends in lunar nail design: what is popular in 2020?
Minimalism, naturalness and non-standard forms have come into fashion. These three trends were also reflected in lunar manicure.
There are also very unexpected solutions in the technique of performing lunar manicure. Thanks to the rich imagination of nail art masters, more and more new forms of lunar manicure are appearing. Various shapes and patterns are drawn on the nails. Sometimes it becomes difficult to recognize a classic moon manicure behind these designs.
NEW FORMS: GEOMETRY


DESIGN WITH UNPAINTED AREAS

In 2020, it is fashionable to leave unpainted areas on the nails. In a lunar manicure, this can be a hole or the nail itself, when two arcs are applied with colored varnish (at the base and at the edge of the nail), and the rest remains uncovered. Either there is stylish option, when only stripes are applied as “markings”.
TEXTURED 3D DESIGN


FASHIONABLE NEW – INLAY


DESIGN WITH STRIPES

There are many options for moon manicure. By experimenting, nail art masters create new types and update classic versions. Lunar manicure provides complete scope for creativity, the main thing is to take into account the basic canons, but otherwise you can invent anything you want.
Collection of photos with moon manicure ideas
Looking through photos of other artists, we get inspired and find some of our own design solutions. The photo collection includes different options for lunar manicure, among which you can find one suitable for almost any occasion.
- heart shaped for Valentine's Day


- With rhinestones


- With blue gel polish


- for short nails


- on long nails different shapes: triangular and square