Summary of the lesson "Snowman" (from salt dough)
Software content:
To form the ability to roll the material in a circular motion, roll it out, flatten it, connect parts, slightly moistening the joints with each other. Create conditions for encouraging children to speech activity.
Develop fine motor skills of the hands; develop imagination, creativity when decorating crafts. Raise interest in dough modeling, independence and accuracy in work;
Material: A snowman figurine, blinded in advance from snow. Salted dough, sticks - knots, oilcloths, napkins, strips of fabric for scarves, plastic corks (instead of a bucket) and other details.
Preliminary work : Observing the snow: it is cold, you can mold it, it melts. Games on the site, making snowballs. Examination of pictures, illustrations. Reading poetry and stories about a snowman.
Course of the lesson:
The teacher gathers the children into a circle on the carpet: “Children, look at the guests, greet them, wave your hand to them. Now join hands, say hello to each other. Saying hello means wishing good health to each other. Let's sit on the carpet and listen to the riddle. "
The cold has come
The water turned into ice.
Long-eared bunny gray
He turned into a white hare.
Who will say who knows
When does this happen?
Children: In winter!
Educator: Well done! Correctly! What time of year is it?
Children: It's winter now.
Educator: How did you know it was winter?
Children: In winter there is snow, frost, ice.
Educator: What can you do in winter?
Children: Skiing, ice skating, sledding, making a snowman.
Today we will sculpt with you from salted colored dough. And what we will sculpt, you will tell me now, having solved the riddle:
I have a carrot nose
Instead of handles - branches.
In the yard in winter me
Children sculpt together.
Guess who I am? (Snowman)
That's right, we will make a snowman with you, from salt dough. And what does the Snowman have on his head? What is he wearing?
Educator: Do you want to make a snowman?
Educator: Tell me, children, what does the body of a snowman consist of?
Children: From snow balls.
Educator: Are the balls the same?
Children: No, different - one big and two small.
Educator: Do you like the snowman?
Educator: Get on your feet. Now we will play with you(physical education).
Snow, snow is spinning
The whole street is white
We gathered in a circle
Spun like a snowball.
Educator: Walk quietly and sit at the tables
(Children sit down)
Educator: We will make a snowman from salt dough. To make a snowman, you need to divide the dough into three parts. One part is large, another is smaller and the third is the smallest. Now roll the balls in a circular motion. Show me how we are going to do? Remember, we also sculpted a kolobok with you? Then all the balls need to be connected: put the smaller one on the big one, and the smallest one on top. Take lumps of dough and start sculpting... (During the work of the children, the song "White snowflakes are spinning in the morning" is played by music by G. Gladkov, words by I. Shaferan. After the balls are ready, the teacher helps the children connect them with toothpicks or matches)
Educator: Here Natasha is rolling a lump,
It will be a lump of a snowman.
And Seryozha rolls a lump,
It will be a lump of a snowman.
Three lumps connected
And they stuck the carrot
Corners inserted
And they put a broomstick,
The snow woman is standing
And looks at the kids
They sculpted the Snow Baba,
They forgot to put on her shawl.
And the woman has no hair,
And not a woman - my grandfather came out.
(We put the sculpted snowmen on a tray covered with white paper (snowy clearing), on the clearing there is a paper Christmas tree, around which the snowmen dance in a circle).
Educator: Well done children, they did a good job! Tell me, what did we do in class? What did we sculpt snowmen from? Did you enjoy sculpting from salt dough? (children's answers)
Educator: Thank! All good fellows! The lesson is over. Snowmen, do not be bored, we are going to wash our hands and will definitely continue the game with you.
Do-it-yourself dough snowman Such a beautiful holiday is approaching - New Year. If you do not understand what new crafts to decorate your Christmas tree, home, what to give unusual family and friends? We will help you. Let's create with our own hands, without the help of others, one of the main signs of the upcoming holiday - a snowman made of dough. He is catchy, beautiful, extraordinary, everyone will be in ecstasy. Use the step-by-step photo annotation described carefully below. For work you need For the production of crafts from salt dough, it will come in handy: a bowl of flour (2 cups) salt (1 cup) water (depending on the flour, about 1/2 part of the flour) 2 cups (large and small) a teaspoon dull paint varnish ribbon Step by step annotation: Let's start with dough production. We take the prepared bowl and add the ingredients for the dough (flour, water, salt) there. All this should be mixed well until smooth. Having looked at the resulting consistency, track the required amount yourself. If the dough crumbles when you take it, add a little water. If the dough sticks to your hands, add a little flour. You can add hand cream (1 tablespoon) or vegetable oil to our dough, then the dough will be more flexible, yielding and plastic. When adding any component, stir the dough so that the mass remains homogeneous. The dough comes out firm and pliable. If it is soft, then add a little more flour and salt, stir and check the resulting result, repeat as necessary. It is better to put the prepared dough in the refrigerator for 2-3 hours (but by all means wrap it in a bag, from drying out), so that it is infused. If you want to give your craft a certain smell, then drop it into the dough or add just a little spice. The dough we made dries out pretty quickly in the air, so you must always cover it with dishes or keep it in a bag (if you are going to make a lot of crafts). Now we will take and roll out two pieces of dough, using glasses (one more, the second much less), create two circles. To do this, squeeze out the dough of a suitable shape with a glass. Put a circle on top, which is smaller, leave a large circle at the bottom. The body and head of the snowman are ready. Now we take a teaspoon and gently lightly draw a smirk with the end, pressing a little. We've got such a cute mouth. Now let's take a little more test and blind our snowman at first with a hat. To do this, we roll out the dough, squeeze out a circle with a small glass and cut a hole in it for the face, put it on our face. Then put a strip on top of the cap (our edging). Using a spoon, create two eyes and carefully shape a nose out of the dough. If the parts do not adhere well to each other, then you can slightly moisten them with water at the base. Then we will sculpt a snowman from the dough, and also glue it to the base (our body). Now we blind two small balls, glue them to the body - these are our buttons. And in order to later hang our decoration in the hat, we will create a hole for the ribbon. Our figure is ready, now we bake it in the oven. This should be done at a not very high temperature, so that our snowman does not burn out or burns. He can also change color, shape. It should be cooked for about 30 minutes, everything depends on the thickness of the figure, the time can go up to an hour. We recommend that you hold the product a little in the air, so that it dries up at first, and when it gets into the oven, it does not crack. After we took the figurine out of the oven, let it cool. And we begin to give it color and brightness. Let's paint our craft with paints. You can use any colors that suit your taste. After the paints are dry, cover the craft with a dull varnish. Let's also let it dry one hundred percent. Now we pierce the ribbon into our hole prepared in advance. Our beautiful snowman is ready! It is catchy, eye-catching and extraordinary. Imagine, create your images from the dough, use paints of other different colors. Make your own family and friends happy! Fortune at work!
Such a wonderful holiday is approaching - New Year. If you do not know what new crafts to decorate your Christmas tree, house, what to give an original gift to your family and friends? We will help you. Let's make our own hands one of the main symbols of the upcoming holiday - a snowman made of dough. It is bright, beautiful, unusual, everyone will be delighted. Use the step-by-step instructions with the photo described in detail below.
To work you need
To make crafts from salt dough you will need:
- bowl
- flour (2 cups)
- salt (1 glass)
- water (depends on flour, about ¾ part of flour)
- 2 glasses (large and small)
- tea spoon
- colorless varnish
- paints
- ribbon
Step-by-step instruction:
- Let's start by making the dough. Take the prepared bowl and add the ingredients for the dough (flour, water, salt) there. All this should be mixed well until smooth.
- Having looked at the resulting consistency, track the required amount yourself. If the dough crumbles when you take it, add a little water. If the dough sticks to your hands, add a little flour. You can add hand cream (1 tablespoon) or vegetable oil to our dough, then the dough will be more flexible, yielding and plastic. When adding any component, stir the dough so that the mass remains homogeneous.
- The dough is firm and flexible. If it is soft, add a little more flour and salt, stir and check the result, repeat if necessary.
- It is better to put the prepared dough in the refrigerator for 2-3 hours (but be sure to wrap it in a bag to keep it from drying out) so that it is infused.
- If you want to give your craft a certain smell, then drop it into the dough or add just a little spice.
- The dough we make dries quickly enough in the air, so you must constantly cover it with dishes or keep it in a bag (if you are going to make a lot of crafts).
- Now we take and roll out two pieces of dough, with the help of glasses (one more, the second smaller) we make two circles. To do this, squeeze out the dough of the desired shape with a glass.
- Put a circle on top, which is smaller, leave a large circle at the bottom. The body and head of the snowman are ready.
- Now we take a teaspoon and gently lightly draw a smile with the end, pressing down a little.
- We've got such a cute mouth.
- Now let's take some more dough and blind our snowman first with a hat. To do this, we roll out the dough, squeeze out a circle with a small glass and cut a hole in it for the face, put it on our face. Then put a strip on top of the cap (our edging). Using a spoon, make two eyes and carefully sculpt a nose out of the dough. If the parts do not adhere well to each other, then you can slightly moisten them with water at the base.
- Then we will mold a snowman from the dough, and also glue it to the base (our body)
- Now we blind two small balls, glue them to the body - these are our buttons. And then to hang our decoration in the hat, we will make a hole for the ribbon.
- Our figurine is ready, now we bake it in the oven. This should be done at a not very high temperature so that our snowman does not burn out or get burnt. He can also change color, shape. It should be cooked for about 30 minutes, it all depends on the thickness of the figurine, the time can go up to an hour. We advise you to hold the product in the air for a little so that it dries first, and when it gets into the oven, it does not crack.
- After we took the figurine out of the oven, let it cool. And we begin to give it color and brightness. Let's paint our craft with paints. You can use whatever colors you like.
- After the paints are dry, cover the craft with colorless varnish. Let it dry completely as well.
- Now we pierce the ribbon into our previously prepared hole.


Salted dough snowman. Master class with step by step photos
Master class "Snowman" from salt dough.
Shigapova Gulnaz Ilyazovna, teacher at MBU DOD DSHI, Atninsky district of the Republic of Tatarstan.The audience: the master class is designed for children of senior preschool and primary school age, their parents and teachers.
New Year's riddles about snowmen
Appeared in the yard
It's cold December.
Clumsy and funny
Standing at the rink with a broom.
I'm used to the winter wind
Our friend ...
We made a snowball
They made a hat on it,
The nose was attached and in a moment
It turned out ...
He's made of snow alone
From a carrot his nose.
A little warm, she will cry instantly
And it will melt ...
In the yard of a pile of snow
I erected a structure!
How like a man
This cute ...
This lump is like a white house
And there is a smaller lump above it.
A small lump on top
Eyes, nose and handkerchief.
Used to the blizzard, to the cold
Tempered...
Not an easy man:
Appears in winter
And disappears in the spring
Because it melts quickly.
And we will try to make a Snowman that will never melt.
Materials
- dough
- foil
- PVA glue
- art acrylic paints
- brushes
- a jar for water
- narrow ribbon
- pearlescent nail polish
Dough recipe: flour - 200 g, salt - 200 g, water - 125 g, a little PVA glue (about half a teaspoon). Knead the tough dough so that it does not stick to your hands, it is elastic. In order not to dry out, the finished dough must be stored in a plastic bag.

Step by step description of work
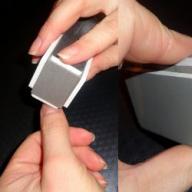
First stepRoll up two balls: one large (for the body), the other smaller (for the head). We flatten them with our fingers, put crumpled pieces of foil in the shape of a ball (large and small) on them. Leaving the foil inside the dough, roll up two balls again. We connect these balls with a toothpick. Before attaching a small ball to a large ball, we apply PVA glue to the junction.


Second step
We roll up two balls for the legs, flatten them and attach to the main product. Then, with a toothpick on the head, we designate the eyes and nose.


Third step
Roll up small balls for the eyes, a drop for the nose from the pieces of dough. After wetting the marked places with glue, we attach them. When connecting the nose, give the shape of a carrot. For the mouth, we blind the flagellum, bend it slightly upward with an arc and attach it to the Snowman's face.


Fourth step
We roll up two thin sausages for hands, two mittens, flat cakes. After applying glue to the junction, we attach them to the body. We form cuffs from two balls.


Fifth step
For a hat, roll up a ball, press it down a little with your fingers, make a depression, put it on your head from above and mark the veins diagonally with a stack. We roll up the sausage, press it down with a stack, making vertical veins. Then we fix this sausage on the head along the edges of the cap. Decorate the hat with a pompom.
The last detail: we roll up two balls, flatten them and, pressing down a little, attach them to the body of the Snowman. With a toothpick we make 4 grooves-holes on them. Thus, we form two buttons.
So our Snowman is made. We put it under the battery and wait for it to dry.


Sixth step
We start painting the dried product. Paint the legs, torso, face with light blue, and the nose with red. Eyes, mouth, hands will be brown, mittens will be pink, buttons will be dark blue.


Seventh step
We paint the hat, mittens with white paint. Draw snowflakes on the mittens. We will also paint the pompom and the cuff of the hat with white paint.


Eighth step
We make a scarf from a piece of pink ribbon and decorate it with pearl nail polish.


Made a funny Snowman from salt dough, which will never melt and will delight everyone.
I don't shiver in the cold
I hold my nose like a carrot
But I'm not complaining, I'm used to it.
And I am called Snowman.
How beautiful they look together with Snow Maiden in a red coat!

The Snow Maiden figurine in a red fur coat is made using the same technology. I suggest step by step photo for its manufacture.