Useful Tips
A soft toy is a good gift for a child, and if you make such a toy with your own hands, then there will be many times more joy and satisfaction.
Follow the tips, use your imagination and create your own stuffed toys that will delight you and your children.
DIY soft toys. Matryoshka.

Such a doll is very easy to sew, so it has become popular among those who like to make a stuffed toy with their own hands. An experienced craftsman can make a tilde doll in less than an hour. You can involve children in the process - they will definitely be interested.
1. You can use a tilde cloth for a more colorful effect. But if you have not found a similar fabric, then two pieces of cotton will help you different colors, dense calico or satin.
2. Sew one piece of cotton with another and iron with an iron.
3. You can use the printer to print the pattern or draw it yourself to the size you want.


* In this example, the matryoshka doll pattern is shown for three sizes, namely large, medium and small.
5. Now you need to sew the fabric along the previously drawn contour. In doing so, you need to leave a hole at the bottom. It remains to cut and turn out.


6. Prepare white cotton fabricto paint your doll's face on it. Now cut and glue on the spider web to the matryoshka.
7. Using acrylic paints and a thin brush, you should paint the portrait, and after the paints have dried, sew the doll's face along the contour to the main part using a decorative stitch.


* If you sew this doll correctly, then it will be able to stand on its own. Pay attention to the images to understand how to sew and wrap the bottom corners inward, thereby creating a stable rectangle for both toys.


How to sew soft toys with your own hands. Photo lessons.
Kid

As in the previous example, this doll can be sewn with your own hands pretty quickly. Despite the fact that the soft toy immediately turns out to be dressed, you can come up with separate clothesso that you can change clothes.

It is advisable to use soft but durable fabrics. In this example, the toy is made using American flannel and knitwear. The height of the "Kid" is 27 cm. The arms and legs were attached with the help of a button fastening.
Snake

The pattern of this toy is not at all complicated, but if you pay attention to the images, you can see how the toy was cut in a spiral and sewn using an external decorative seam.
The view from the back is beautiful and simple.

It is advisable to use bright fleece or felt. Then you can decorate the soft toy with colorful circles, flowers, etc.


Elephant

In this photo tutorial, you can learn how to sew an elephant from a sock. You will need 2 pairs of warm socks for this soft toy.


The sun is a little animal

The name of the toy may sound a little strange, but it cannot be denied that the product itself is very cute and children will really love making and playing with it.


DIY soft toys (video)
Make a stuffed toy with your own hands. Kitty.

Such a bright, soft cat can be used not only as a toy, but also as a pillow.
1. Prepare a special tildo fabric, or thick cotton that does not fade or shrink after washing.

The main part of this toy is easy to sew - just circle along the pattern, stitch along the contour and cut with zigzag scissors so that the fabric does not wrinkle when you turn it out.
2. Making a face

2.1 Take a close look at the image to see where to fill with filler. Next, you need to sew up and decorate.
2.2 Cut out an oval for making the face. Sew the muzzle with threads and then make petals for the face, which then need to be turned out and sewn along the contour of the oval - this must be done from the inside.
2.3 The entire structure prepared in paragraph 3 must be sewn from the main part of the toy cat.
3. Making a flower


3.1 First you need to cut the petals for the flower.
3.2 The cut petals must be folded, turned out, and a fold made at the base. After that, just sew them together.
3.3 In the middle you need to attach a button upholstered with fabric and decorate the head of the cat (see picture).
* To make the ears more voluminous, you can use a thin synthetic winterizer.
This is how you should do it
This is a tilde pattern

This is the second half of a toy cat

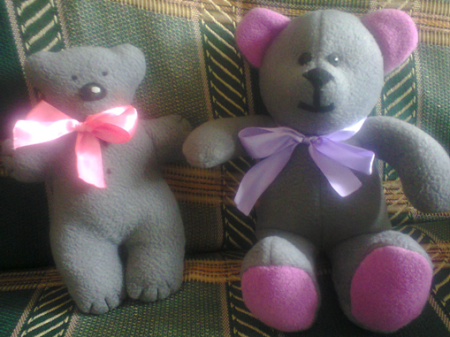
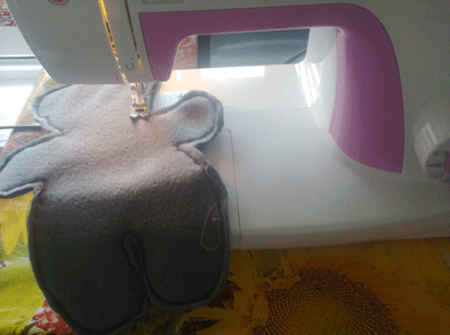
How to sew a stuffed toy with your own hands. The bear is a midget.

Unlike previous soft toys, this bear is not easy to make, but the result will pleasantly surprise you.
To make this toy you will need knitting needles # 2.5 and 100% acrylic threads (100g - 230 meters).
1. Prepare a thread in the color of the dress of the toy (in this example, the color is red) and begin to cast on 20 loops. It is worth noting that the first loop of the row must always be removed, and the last one must be knitted with a purl, while tight knitting must be done.


Structure:
Row 1 & 2 - knit all - thread color: red
Row 3 - purl all, start introducing white thread and alternating colors: red loop - white loop.
Row 4 - all knit - thread color: red.
The next 6 rows need to be knitted with the front stitch.
Row 1 - Purl All - Thread Color: Beige
Knit the next 8 rows with a beige thread (wrong side with purl loops, and front side with front loops).
2. Now all the loops need to be collected on the auxiliary thread. At the same time, pass another auxiliary thread where the red and beige threads meet (wrong side - see image).

3. The face must be embroidered with a dark thread. Prepare a backing cloth and cut a small diameter circle out of it.
4. Prepare the band on which you want to hang your toy. Tie a knot at the bottom of the ribbon and secure it to the toy. Next, you need to pull off the upper auxiliary thread.

5. Making the ears of the bear. First you need to cast on 3 loops. Knit once and close the loops.
6. We attach the ears to the head of the toy. Use a needle and thread to knot inside the toy.
* To make the neck, thread and pull the thread between the bear's head and his dress.
7. We make the arms and legs of the bear in the form of a cord. Cast on 4 stitches using 2 knitting needles and then knit 6 rows in a circle.
* Who does not know how to knit in a circle, watch the video tutorial below.
8. Loops at the end need to be collected on one thread, namely the one with which you knitted. Next, using a needle, pass through the limb to the first thread, thereby two threads will be next to you. You need to make 4 pieces of such blanks.
* If you want to make the handles more neat, try to thread them tightly into the body, and tie the threads together with a tight knot.
9. It remains only to fill the head and body of the bear with filler, and sew on the back along the seam. The handles must be attached to the dress and a knot must be made inside the toy, and the legs, along with the hem of the dress, must be sewn at the bottom.
DIY soft toys. Flying cat.

Such a cat can be easily sewn and dyed at home, while using a small amount of materials.
Prepare a piece of plain light fabric (its size depends on the size of the toy).
1. The image shows a pattern. You need to make a tail, a foot, a half of a muzzle, and a torso.


2. Using a simple pencil, trace all the details on the fabric, applying them to the fabric in advance. Small parts can be sewn right on the main piece and then cut out. You will need: 2 legs, 1 tail, a back with a head, a belly without a head and the muzzle of a future plush cat.
3. Sew the middle of the toy's face and cut it out.
4. Sew the ponytail and feet, making sure to leave a small hole where you want to make a straight seam. Next, cut out the back and tummy.
Toys are what attracts both adults and children, they are completely different and for different purposes.
Cloth or textile toys do it yourself - these are some of the safest and most attractive types of toys for children. They can be played by children from the very early childhood, but in adulthood, soft toys do not lose their relevance. For example, now it has become fashionable to give and decorate home comfort with handmade interior toys. As a rule, such toys are not cheap, so many consider them a sign of luxury and prosperity.
Even the most simple toy made with high quality and with love can become very valuable and necessary in someone's family!
For example, my daughter has become a favorite toy - the owl Angela, which I made for her a couple of years ago, she now does not part with her and takes her to sleep with her and for a walk, and to the store, to the dacha, (at least they bathe separately)) in in general she fell in love with her. I think most children either have a favorite toy, or really want to have it.
Therefore, today I propose to do a beautiful toy for a gift, and for whom it will be up to you to decide!
Below I have collected templates with a pattern of toys, as well as a step-by-step master class on making.
How easy it is to sew a stuffed animal. DIY soft toys for beginners with templates
For beginner craftswomen, the easiest way to sew will be from a simple pattern.
For example, take a bear template and print it on a printer, increasing it to the desired size, but you can also redraw it on paper, for this, increase the template you like to a suitable size on a computer monitor, attach a white sheet of paper to the screen and carefully trace all the contours of the pattern with a pencil.

Then cut the paper template along the contours.
Choose a beautiful fabric for your toy.
If this is not a complex toy, for example, like a bear in the photo, then here you need to fold the fabric in two with the front side inward, you can fix it with pins for convenience so that it does not slip, then attach a paper template to the fabric and trace the contours of the fabric with soap or chalk.
Cut out fabric blanks, leaving seam allowances.
We sew on a typewriter with the usual straight stitch, leaving a small hole in order to then turn the toy onto the front side.
Notches should be made in the places of the folds so that the fabric does not pull in these places.

Now everything is turned inside out on the front side and stuffed with padding polyester, padding polyester or other similar fillers.
It should not be stuffed too tightly, but so that there are no empty areas, the filler must be distributed evenly.
The hole through which they were stuffed at the end is sewn with a blind stitch.
We glue or embroider the toy's eyes and mouth, nose.
We add beautiful details, for example: a bow, a flower, a scarf, buttons, or you can even sew clothes. There is a huge field for creative experiments.

Implement the idea!
A simple fabric cat pattern.
Another easy-to-sew model is a kitty.
It is sewn and cut according to the same principle as the bear, only here two parts are cut out.
This is the cat itself in two parts and the tail, also in two parts.
They are sewn separately, small holes are also left for turning out and for stuffing with filler, then the tail is sewn to the base of the cat.
You can decorate as you like to your liking.

I got such a kitty.
I gave it to my sister for home comfort)

How to sew a complex toy? DIY fabric ball, an interesting idea
A toy that is more difficult to make is one that contains many parts and is assembled in a certain order.
One night I had an idea, why not sew a ball out of fabric, it seemed so simple in my head, but when the idea got to the point, without an example it was difficult to understand what to cut, how much to cut and how then all this is correct sew.
Therefore, I share an example by which I did.
You will need two templates, a hexagon and a pentagon. We transfer them to paper, or even better to cardboard.

We need to cut 20 hexagons and 12 pentagons from the fabric. I used the fabric in two colors, but this is not necessary, you can make it completely monochrome or, on the contrary, colored, this is at your discretion.
As you cut the required number of polyhedrons, it is better to expand them so that you can visually understand how you will sew.
This is what the ball layout looks like. 
Another layout option

This version of the ball is made of felt, it is easier to sew.
I chose to sew from coarse calico and on sewing machine, therefore, you should also leave seam allowances on the fabric. And iron the seams. You don't need to do this on felt.
All parts are simply sewn into two halves, and then these two halves are joined together. You need to connect from the seamy side, and then leave a small hole not sewn up and turn it through it.
Fill tightly with padding polyester, and sew the hole with a blind stitch.

Such is the ball - I turned out handsome!


See also - article felt toys
Fabric toys step by step master classes with patterns.
I offer some more ideas for interesting toys with step by step wizard classes.

Fabric rainbow fish


A boat made of fabric.


What kind of soft toy you will not find in the store today - the choice is simply enormous. But you must admit that a toy made with your own hands will be unique, valuable and even more “soulful”. What kind of soft toy is popular with both girls and boys? Of course, the bear cub! I suggest not to put on the back burner and sew one or even a couple of cute teddy bears.
Popular patterns for sewing soft toys
At all times, bears were in the greatest demand among soft toys.
Traditionally, cubs are sewn from plush or any other fabric with soft pile.
A classic teddy bear can be sewn using this pattern:

For fans of cartoons about Winnie the Pooh, I propose to sew this funny bear cub in our Soviet

or Disney version.

If you have your own rich imagination, then you can independently come up with a pattern for your own bear.
DIY master class on sewing soft bears
Fleece is my favorite for making soft toys. This material is delicate and pleasant to the touch. Moderately stretching, easily cut, does not warp when cutting.
In addition, the seams on it are less visible and look neat.
I suggest sewing one of the proposed bears of your choice.
One of them is quite simple - even a novice needlewoman can handle it, the other is a little more complicated.
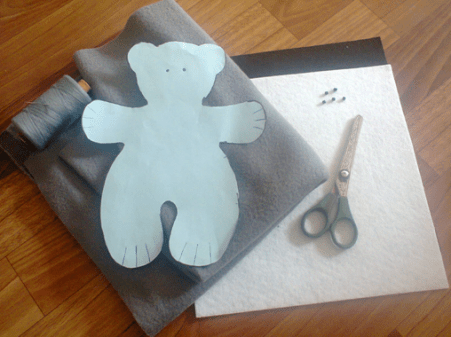
Necessary materials
For the simplest and lightest bear, I needed:
- Fleece.
- Two pieces of felt, black and white.
- Sintepon for stuffing.
- Scissors.
- Needle and thread.
- Four black beads.
We take a pattern, if necessary, increase or decrease it to the desired size

and cut out two identical parts, not forgetting to retreat along the edges a small distance for the seams.

Step 1. We circle the pattern, leaving a distance for the seams
After we cut out both parts, we baste them by hand with thread.
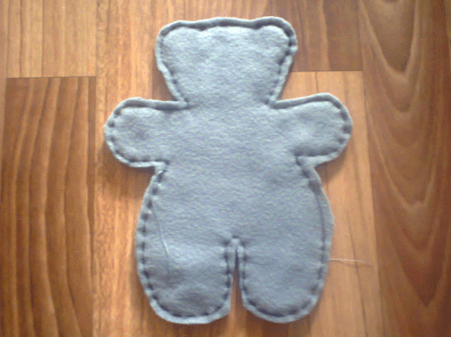
Step 2. We connect two parts and sew with a basting stitch
Then we sew both parts. Better, of course, to use a sewing machine,
Step 3. Sew on the estimate
but you can also sew neatly by hand.
We do not sew until the end. Do not forget to leave in accordance with the pattern, a small hole on the side, so that you can then turn the workpiece out.
We turn the bear onto the front side, gently and carefully straighten it.

Step 4. Turn the workpiece out onto the front side
Then we take a synthetic winterizer and stuff the toy.
Instead of padding polyester, you can use foam rubber, cotton wool, holofiber or any other filler that will be at your fingertips.
It is very important to thoroughly and evenly fill the toy, try to avoid the formation of thickenings or, on the contrary, too free places.

Step 5. We fill the bear with padding polyester
After filling, sew up the remaining hole with a blind stitch.

Step 6. Sew up the hole with a blind seam
We cut out an oval - a nose from black felt, from white a very small speck on the nose, and sew or glue it with a special glue for fabric.
I used Moment Crystal glue.
We embroider the legs with black thread.
Sew on beads - eyes and buttons.
Step 7. Sew the paws and make a face
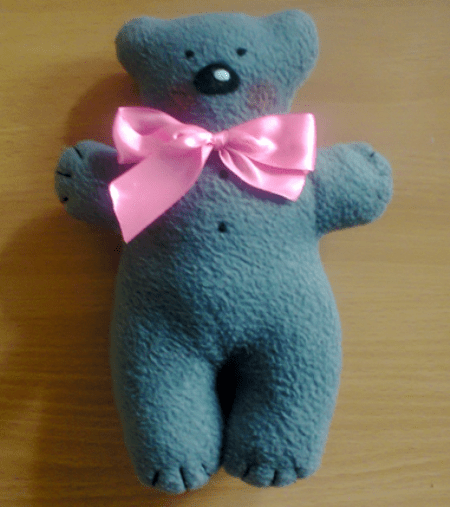
We will tie a beautiful satin ribbon bow, brown the cheeks. The bear is ready!
The second bear is already a little more difficult.
To make it, I used this pattern and took again my favorite fleece.
You can use whatever material you like best. This can be: faux fur, velvet, wool, velor, terry cloth or even knitwear.

I took fleece in two colors (I needed a small pink piece for the ears and legs of the bear), thread, a needle, scissors, synthetic winterizer or any other filler, two buttons or two ready-made eyes (they are sold in handicraft stores).

Material for the second bear cub
We will prepare all the necessary patterns, according to which we will cut out all the details of our bear cub.

Step 1. We make a pattern and cut all the details
Now we start stitching.
First we sew the head: ears, two back parts of the head, two front ones. Then we collect all three resulting elements together in accordance with the pattern.

Step 2. Sew the head
We proceed to the body.

Step 3. Assembling the torso
It turns out like this:

Step 4. You should get the same workpiece.
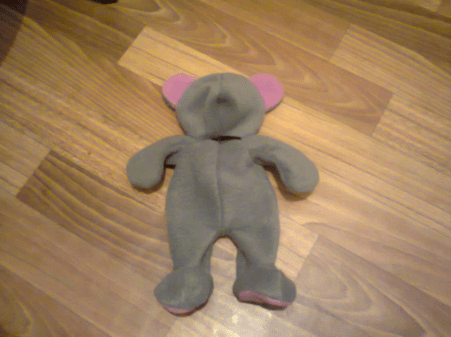
Sew the upper legs and sew them to the body. We also sew pink feet to the lower legs.

Step 5. Sew on the upper and lower legs
We attach the head, leaving a hole in order to fill the toy.
Step 6. Sew on the head, leaving a hole
We fill it evenly and carefully.
From a piece of black felt, cut out a nose and two stripes to form a muzzle and sew them on.
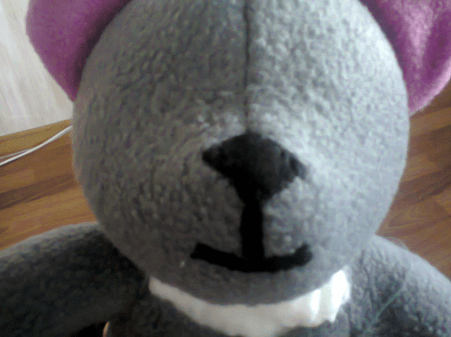
Step 7. Stuff the bear and sew on the face
Then we sew on the eyes. Once again, check the uniformity of the packing and sew up the remaining hole with a blind stitch.
First, you should choose patterns. First of all, their complexity should be taken into account: if you are not too experienced in sewing, you should give preference to the most simple options with a minimum set of parts. Skillful needlewomen, on the other hand, can choose complex toys. Particular attention should be paid to the size of the patterns: working with both very small and too large parts is quite difficult, and such work requires special skills. That is why beginners should choose medium sized toys.
Transfer the patterns to cardboard and cut them out, and then transfer them to the chosen material using chalk, soap or pencil. The use of cardboard will make your task easier: the pattern made from it fits snugly to the fabric and does not wrinkle, so it will not be difficult to outline its outline. Cut out all the pieces and sew them along the indicated lines. Remember that the elements that make up soft toys need to be stuffed with a special material, so when sewing, leave holes through which you will fold a synthetic winterizer or synthetic winterizer inside.
Toys are best made from natural materials: knitwear, cotton, wool and felted fabric. Photo: thinkstockphotos.com
The choice of materials for the manufacture of soft toys should be discussed separately. Beginners are advised to pay attention to knitwear, cotton, wool and felted fabric. All of these fabrics are fairly easy to use and latest material also ideal for making small non-printed parts, including legs, beaks, tails. Fur, velor, velvet, etc. can be used to make more original, bright, but also more complex products. As for the filler, it must be of high quality and, naturally, environmentally friendly, harmless to health. You can use foam rubber, synthetic winterizer, synthetic winterizer, holofiber and even cotton wool. The choice of option directly depends on the desired quality of the toy, as well as on how much you are willing to spend on making it.
After filling with a special material and sewing each part, proceed to connecting the elements and making small parts of the toy. You can use buttons, buttons, and other items to make the eyes, mouth, clothing details of the soft toy. Do not be afraid to deviate from the given scheme and show imagination when choosing and using such elements. For example, you can complicate the process of making a toy bunny by placing a bouquet of artificial flowers made from wire and rolled up pieces of paper into the toy's paws. As a result, the toy will turn out to be even more unusual and beautiful. Of course, if you want to give a product to a child, it is important to make sure that all parts and small elements are carefully secured and that they do not have sharp parts on which the baby can get hurt.
Become the most best parents: keep your children busy and then you will have at least a little time to relax! Or try making something with them.
1. This wonderful tool storage device was a regular old bedside table.
You can also paint it in some other color.
2. The box from the refrigerator turns into a slide.

The main thing is that the children do not build a fortress out of it!
3. And from old sheets, slats and two screws, you get a campground.

These tents fold down for easy storage.

4. Hang the bathroom curtain on the hoop and the tent is ready!
 Manufacturing guide
In order to make a tent you will need:
- hoop;
- safety pins;
- twine or rope;
- tulle or ribbons;
- sheets;
- scissors;
- pillows and blankets.


Don't forget to throw a blanket and pillows on the ground.
In rainy weather, such a structure can be made at home, if there is somewhere to attach it.
5. From branches, reels, magnets and other materials at hand you will get this kind of fishing.
 Manufacturing instruction
For a fun fishing game you will need:
- branch (or stick);
- old wooden reel;
- wire;
- rope
- magnet;
- felt (or other stiff fabric);
- needle and thread.

6. And from recycled materials you can build a water wall.

To do this, drill a fence in several places, thread the screws and put different plastic containers on them (you can cut drinks bottles), secure with nuts.
And even if for us it is just rubbish on the wall, for children it is a magical device that allows water to run in different directions.
7. Did the carpenter suddenly wake up in you? Make a dollhouse!

But the house is simpler. It is made from a CD shelf.

Another option is to upgrade the closet.

In fact, you can make a dollhouse out of anything!
8. Make such an unusual chalk and your kids will be creative in the fresh air!
9. A skateboard for a kid can be made by hand.

First, prepare everything necessary materials and tools:
- 4 furniture casters (it is better to take with rubber wheels, because plastic ones can scratch the floor);
- 1 wooden disc (you can find it in the lumber section of any hardware store)
- 16 screws;
- drill;
- rope or twine;
- scissors.

10. A puppet show is also a great idea!


This one, for example, is made from a cardboard box.
For a puppet theater, you will need the following materials:
- large cardboard boxes;
- long cardboard rolls from gift paper;
- lightweight curtain fabric;
- glue;
- paints;
- thick white cardboard.
- Unfold the cardboard box and cut the sides to form a large rectangular sheet.
- Glue the "waves". If your child prefers princesses, then the waves can be replaced by a castle wall, and the dinosaur lover will appreciate the mountains and volcanoes.
- Fold the outermost folds of the cardboard sheet. At the top of the scene, glue the blank cardboard rolls on both sides. They will not only play the role of theatrical columns, but also reliably fix the stage in a stable state.
- Wrap both rolls in a long rectangular sheet and fix this position with glue.
- Make a curtain. Glue the curtain fabric to the top sheet. And don't forget to give the theater a nice name.
- Prepare pictures for the puppet dolls. Ask your child to draw favorite characters or print the drawings on a printer.
- Connect the drawing with a thick piece of cardboard and cut the figure along the outline.
- Fill the figurine with cotton balls.
- Glue a wooden stick to the finished puppet.


11. You can cook toy food in the toy kitchen.


12. Or in such a kitchen, made from the same old nightstand.

13. Arrange a competition with balls on the aquapark cut in half!

14. Immerse yourself in art with this huge board!

Ideal for your backyard, chalk dust will not scatter all over your yard.
15. And creativity again! Now in the bathroom.

Such homemade voluminous paints are easily washed off the tile.
How to make voluminous bath paints1. Prepare all the required ingredients.
To prepare bulk paints you will need:
- 1 glass of soap shavings (it is better to take baby soap without additives);
- ½ teaspoon of liquid watercolor;
- ¾ a glass of hot water.
2. Prepare a soapy mixture.
Combine the soap shavings and a small amount of water in a blender bowl. Add hot water gradually so that no excess foam forms. ¾ glasses of water give both thick and soft texturewhich is very easy to draw.

Divide the soap mixture into portions and place in ziplock bags or ice cream containers. Add watercolor and mix well.


And voila - voluminous paints are ready!

16. Cardboard boxes are the best invention!
 How to make such a house
You can play with this house even in small and tiny apartments, because it folds into a flat sheet with one hand movement.
To create a cardboard house, you will need:
- 2 cardboard boxes;
- colored tape.


17. Rug "road", sewn from scraps of fabric. It even has a zoo. In general, it can be anything you want - it all depends on your imagination.
 Manufacturing instruction
Agree, it is much more interesting and cheaper to make your own road than buying a ready-made carpet with a standard route.
- canvas (or similar material);
- colored tape;
- acrylic paints;
- transparent aerosol coating;
- small paint roller;
- squares cut from multi-colored felt.
Optional:
- transparent soft plastic (or thick film);
- wooden figurines and houses.


18. How do you like this option made with decorative tape?
 How to do it?
You will need:
- white foam;
- colored tape (or adhesive tape made of japanese paper);
- scissors;
- black marker;
- wooden cubes or building toy blocks.


19. Plastic tubes can be easily converted into bows and arrows!
 Manufacturing instruction
To do this, you need:
- pVC pipe 100 cm X 1.3 cm;
- wooden dowels 0.9 cm X 40 cm;
- insulation for pipes made of foamed polyethylene, diameter 16 cm;
- thick nylon thread;
- lighter for sealing ends;
- scissors;
- a hacksaw or jigsaw with a fine tooth;
- insulating tape;
- plastic ties;
- triangles made of insulating polyurethane foam (approx 7.5 cm X 7.5 cm).

Tie a large knot at the end of the nylon string. It must not slip through the slot in the pipe. Light the tip to prevent loosening and chafing of the thread.
2. Insert the string into the bow.

Make a 1.5 cm cut at each end of the pipe. Place a knot in the upper cut and pull on the string to make sure it does not pop out of the slot. Tie a knot at the other end of the string (about 7 cm from the end of the pipe). Bend the pipe and insert the second knot into the slot.


Wrap the ends of the pipe with electrical tape so that the string, when pulled, does not jump out of the grooves.

Wrap the middle of the pipe with insulation and fix with ties. Cut the ties as close to the handle as possible.

Insert a wooden dowel into the foam triangle and pull it straight out. Now dip the end of the dowel in hot glue and paste into the foam again. The other end of the wooden rod can be cut to make it easier for the child to position the boom.
20. You can also run water or sand through such pipes.

To do this, you only need screeds, funnels and a board with holes (you can drill them).
21. Allow kids to spy on neighbors with a plastic periscope.
 You will find detailed instructions on how to make it.
 22. Experiment with markers and rubbing alcohol. And you will get such a bright ribbon!

You may not have to buy a game console. May be.
Preparation methodMaterials:
- markers of all colors of the rainbow;
- white tape (thick and wide enough);
- strong branch;
- keychain ring;
- medical alcohol;
- eye bolt;
- pipette;
- glue gun;
- plastic tablecloth (to protect your work surface).
- Begin by drawing thick lines in rainbow order with markers.
- Then take an eyedropper, fill it with alcohol and apply to the tape.
- Watch the colors blend into a beautiful and vibrant rainbow. If the tape is thick enough, you can paint on both sides.
- Let's get down to the branch. Take an eyebolt and screw it into the branch.
- Insert the keychain ring into the eyebolt. Then pass the colored tape about 5 cm into this ring and secure with glue.
Your feed is ready!
23. Let the trash bin turn into a pirate ship!

You can also use a cardboard box, laundry basket, or something else.
24. Another advanced piece of furniture is a wardrobe.

Look, this will encourage your child to fold clothes!
25. And this is something like a big constructor.
Make such a disassembled house!
26. And from the old keyboard you can make a children's laptop.

This way your child will help you send letters without touching your computer. To make such a toy, you only need a cardboard folder, an old keyboard and Moment glue.
27. Scraps of fabric can make wonderful cubes.

It's great that you can throw them! And no one will be hurt.
For the cube you need the following materials:
- 6 squares of fabric measuring 10 X 10 cm;
- 4 pieces of tape 5-7 cm each;
- fiber for stuffing.


28. Or let them play classics!

Reversible hot glue can be used here.
29. Here's what you can take with you on a trip by car.

Switches, knobs, buttons screwed to the board - everything you need to be happy!
30. Let the child be a doctor with such a felt set.

All you need is a needle and thread, felt and Velcro. Simple and interesting!