If you have a lot of old clothes in your closet, it's time to give them a second life! Believe it or not, these practical and eye-catching rugs are woven from discarded T-shirts.
To create such a rug you will need loom. You can make such a machine with your own hands from available materials. You will need a picture frame and nails.
Galvanized finishing nails with a diameter of 1.8 mm and a length of 5 cm (50 mm) are best suited. This is enough for a frame measuring 35 by 25 cm. Place the carnations along the frame at a distance of about 1 cm, departing from the corners by about 3 cm.

The number of nails in each row should be odd.

Cut the fabric into long narrow strips and sew them together to create a ribbon several meters long (take into account the length and width of the frame and the number of rows in each layer of flooring). WITH knitted fabric It’s easier to work because it stretches better.
Stretch the straps onto the frame. Start with the cross deck. Make a loop at the end of one of the ribbons and hook it to the second frame stud on the long side from the edge. Stretch it to the opposite side, hook it to the second nail from the edge on the other side, pull it back. Wrap around the loose stud, skipping one, and pull the ribbon to the opposite side. Once you've filled the entire frame, secure it to the last nail.

Complete one more flooring in each direction. That is, if the first time you started with the second nail from the edge, start with the first, and wrap the tape around the nails you missed last time.

Pin the layers together. To do this, remove the top (longitudinal) decking strip from the outermost nail, duck under the lowest crossbar strip and put the loop back on the nail (on top of the second crossbar strip). Fasten the loops on each nail in the same way. Move the tapes of the first longitudinal flooring (second layer) so that they are always between the tapes of the top layer.

Now remove the tape from the opposite side, pass it between the longitudinal rows (diving under the bottom and covering the top) and put the loop back on the nail. Pull all remaining ribbons between perpendicular rows in a checkerboard pattern. As in the previous step, do not forget to move the tapes of the second layer.

When all the weaves are done, remove the rug from the frame, crocheting each stitch through the previous one.

Use the finished rug in the hallway as a hot pad or as a bedding for chairs and stools.
For more information on how to weave a rag rug on a frame with nails, watch the video master classes:


Weaving such a rug will not be difficult. If you love unusual wicker things, then this master class is for you. The rug is dense and warm. You can weave it from old knitted items, but you can use strips of any fabric. The edge of the rug is crocheted. We will need a frame with nails. The size of the rug depends on the size of the frame. The distance between nails depends on the thickness of the yarn used and the desired density of the rug. In the photo, the distance between the nails is approximately 1 cm. 
Watch the video of how these rugs are deftly woven:
Another option for weaving a rug from T-shirts on a frame with carnations 
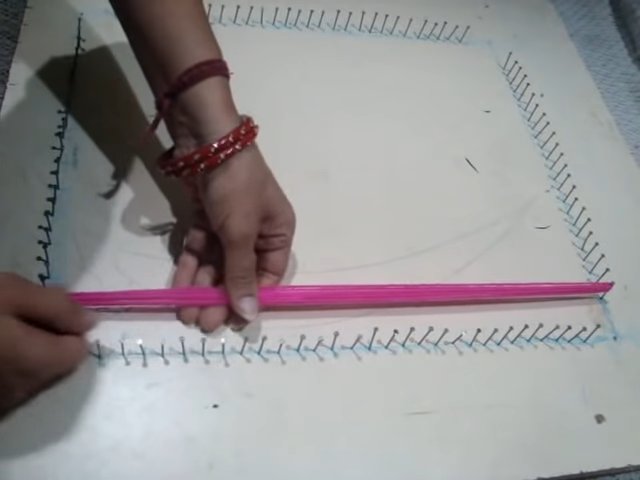
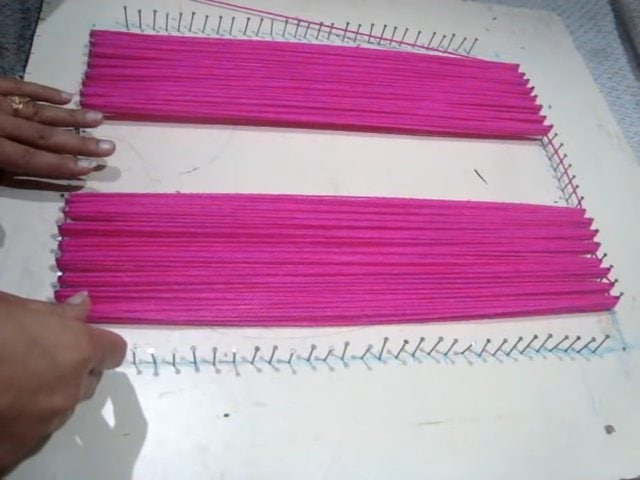
To weave a rug, you will need a frame (a photo frame will do). You can make it yourself in dimensions of 30 by 45 cm with rows of nails with small smooth heads stuffed along the long sides. The distance between the nails is 2.5 cm. Please note that, unlike the first option, the nails are driven in only on two opposite sides of the frame. 
We stretch the warp threads onto the nails in pairs. The base can be a neutral color. If you pull the rows tightly together, it will not be visible at all. If you weave loosely, then keep in mind that it will be visible. 
Now take the working thread and begin to pass it either under the warp thread or above it. 
When the first row ends, pass the thread through the last warp thread and direct it to reverse side. At your discretion, make the desired number of rows.
When you decide to change the color of the working thread, simply cut and tie the end with a thread of a different color. If you want to make a rug with fringe, connect the ends of the working threads different color, leaving “tails”. 
Periodically pull the woven rows towards the very first row. Place all knots and seams on the wrong side and carefully remove the item from the frame. Cut the loops in half that were secured to the nails, tie knots - this way the weaving will be fixed and you will get tassels.
The braided rug is ready! 
But we don’t say goodbye to you here, come back again!
Weaving such a rug will not be difficult. If you love unusual wicker things, then this master class is for you. The rug is dense and warm. You can weave it from old knitted items, but you can use strips of any fabric. You can learn how to make knitted yarn from T-shirts
The edge of the rug is crocheted. We will need a frame with nails. The size of the rug depends on the size of the frame. The distance between nails depends on the thickness of the yarn used and the desired density of the rug. In the photo, the distance between the nails is approximately 1 cm.

Watch the video of how these rugs are deftly woven
Another option for weaving a rug from T-shirts on a frame with carnations

To weave a rug, you will need a frame (a photo frame will do). You can make it yourself in dimensions of 30 by 45 cm with rows of nails with small smooth heads stuffed along the long sides. The distance between the nails is 2.5 cm. Please note that, unlike the first option, the nails are driven in only on two opposite sides of the frame.
We stretch the warp threads onto the nails in pairs. The base can be a neutral color. If you pull the rows tightly together, it will not be visible at all. If you weave loosely, then keep in mind that it will be visible.

Now take the working thread and begin to pass it either under the warp thread or above it.

When the first row ends, pass the thread through the last warp thread and point it in the opposite direction. At your discretion, make the desired number of rows.

When you decide to change the color of the working thread, simply cut and tie the end with a thread of a different color. If you want to make a rug with fringe, connect the ends of working threads of different colors, leaving “tails”.

Periodically pull the woven rows towards the very first row. Place all knots and seams on the wrong side and carefully remove the item from the frame. Cut the loops in half that were secured to the nails, tie knots - this way the weaving will be fixed and you will get tassels.
The braided rug is ready!

A very simple way to make a soft and beautiful rug without knitting is to weave it on a frame with nails. Making it is not difficult: for this you will need a frame or just a sheet of chipboard/board into which nails are driven, forming a square or rectangle shape, depending on the size and shape of the rug you need. The weaving technique itself is not at all complicated, even a beginner can do it! The result of the work is a very beautiful, dense and soft man-made rug.
So, you will need a work surface (a frame with nails) and two colors of yarn.

We make a loop from the yarn and tie it with a knot. Throw the loop over the first nail vertically, pull the yarn over the opposite nail, wrap it around, and return to the first nail. Repeat 15-20 times. It turns out to be such a stretched thick “string”.
Then we wrap the yarn around the adjacent nail, pull it onto the opposite nail, repeat 15-20 times. In total, we need to make 8 such rows (we visually divide the frame horizontally into 3 parts). Then we skip 8 nails, wrapping the yarn behind them, move on to the next nail, repeat the work until the end.

It turns out to be such a preparation. We tie the edge of the yarn with a knot and fasten it to a nail, cut it off.
We take yarn of a different color, make a loop and weave exactly the same rows in the missing nails.

Now we move on to weaving vertically. There are already more nails here, so you can make 4 rows, it will work out rectangular rug.

Now we move on to interweaving the rows. At one edge we pinch the yarn with a clothespin, and at the opposite edge we fasten it with a pin for convenience.

We intertwine yarn through one in the bottom rows. Unfasten the pin and put the yarn back on the nail.

Repeat with all rows.

All that remains is to sew the edges of the rug. To do this, thread the yarn through a needle, secure it with a knot at the edge of the rug, and sew the rows together (see the video below for more details).

The rug is ready! All that remains is to remove it from the nails and cut the edges of the yarn to make tassels.

Job finished!
For more information on creating such a rug, watch the video below:
Spring is time general cleaning. Therefore, we should look into our closets and go through everything to get rid of the old things stored there. But don’t rush to get rid of it for good, because everything has the right to a second life. For example, you can create rugs from old things with your own hands and give yourself new emotions and memories.
Rugs made from old things, what techniques can be used
Old things are an excellent material for creativity, which a thrifty housewife can always find. T-shirts, unusable towels, and any wardrobe items can always get a second life. But it is still very important to understand that in order to create new things from old ones, it is necessary to pay attention not only to the material for creativity, but also to the technique that we choose for this.
After all, rugs from old things can be:
- weave,
- to tie,
- sew.
And we will try to create a rug from old things with our own hands step by step, using detailed master classes and getting an excellent result.
Weaving
One of the oldest and most proven techniques for creating carpets is weaving. After all, this does not require a lot of knowledge or skills. And sometimes the simplest tools are required, easily replaced with something that is always at hand. And therefore, it’s worth starting to create your first rug with weaving or weaving.
Weaving according to the principle of macrame
If you think that macrame is only suitable for creating small elements, then now we will dispel this belief. After all, if instead of a thin lace you take something more voluminous and dense, then the result will be completely different.
There are no difficulties or tricks in weaving rugs from old things that are inaccessible to novice craftswomen. As in any technique, the main role here is played by the sense of taste and the desire to create. Therefore, any set of old things can easily be turned into a charming bedside rug with a little effort.
Basic knots and pattern combinations are great for weaving. But it is worth considering several factors:
- The rug is used actively and therefore needs to be washed from time to time,
- they will not only trample on it, but can sit, lie or use it as a bedding on a chair,
- it must fit into the overall interior.
That is why when choosing knots, do not forget that the rug should:
- look like a new, not well-worn rug,
- have a dense structure so as not to crumble in your hands and not turn into a string bag,
- not be easily soiled or bulky, for ease of cleaning.
And therefore the most common way of weaving at present is to use the principle of knitting with a French bracelet.

Such a charming rug will definitely not go unnoticed in the house and will highlight the interior and taste of the owner. And to create it you won’t need much:
- wide strips of old things,
- adhesive tape,
- scissors,
- thread and needle.
To begin, arrange the 5 strips in the order you like best. Next, fold 5 more strips, but in a mirror image.
It is most convenient to fasten all the ends from the beginning side with adhesive tape. This will allow you not to be distracted during the weaving process, and also clearly define the sequence.
So, when all the ribbons are laid out, we take the leftmost one, take it to the side and fold it so that it lies on top of all the others, creating the number “4”. We place the working tape behind the adjacent one and tie the first knot.

We continue to tie the same knots on the next 3 ribbons, and then move to the opposite side, starting to weave towards the first series of knots.

When both working strips meet in the middle, tie them and continue weaving from the edge. Once you've reached your desired length, simply tie the last knots with a strong thread and trim off the rest to create a cute fringe.
Don't forget that you don't have to twist the braid, you can fold it like a snake or lay it parallel to one another to get a charming rectangular rug with fringe.

Knitting rugs from old things
It is not necessary to weave rugs from old things; knitting is considered a more common solution for creating them.

Even if this is your first time picking up a hook, you will be able to create a charming and practical decorative element. After all, it is the large knitting that will help you quickly understand the intricacies of crocheting. And a pattern made from the simplest single crochets can look very bright and original if you choose the right yarn.
Moreover, yarn is also made from old things. This is how things can go:
- old T-shirts,
- jeans belts,
- just thin strips of fabric left over after sewing outfits.
It is enough to know and be able to knit increases, and then it’s a matter of technique.
If the yarn taken for the rug seems loose or thin to you, you can use an excellent trick - at the beginning of knitting, insert a strong cord into the stitches and continue tying it. This way your spiral will keep its shape perfectly.
To get a more openwork rug, knit with double crochets, increasing their number in each row. But keep in mind that although such knitting will be beautiful, it will be less dense.

Openwork rug

It is worth noting that you can knit a rug from old things without a hook - an interesting technique of knitting from rings on your fingers will help you cope with the disposal of small pieces without spending extra effort and without forcing you to buy any special tools.
You can learn how to knit from rings from Olga Popsueva. In her video master class, she explains in detail how to weave a braid and then form it into a rug.
Patchwork
When talking about using old things to create rugs, it is difficult to ignore sewing. After all, they started a long time ago and independently of each other in different countries.

As now, women did not throw away old things, children's dresses or their husband's worn-out shirts, preferring to collect them so that they could then sew bedspreads, curtains and, of course, rugs. It’s no longer a shame to trample such rags, cut them and assemble them into various intricate patterns.
Fluffy rugs on mesh
In the last few years, fluffy rugs have become very popular, making it so much fun for children to play and crawl in them. And it’s just nice to immerse your feet.

The high pile and soft texture won the hearts of craftswomen and housewives, and bright colors attract the attention of household members. But what’s most pleasing is the fact that you can make such a rug without using any special tools.
A fluffy rug can be created in different ways:
- tying the cuts in knots,
- using a carpet hook,
- using the simplest crochet hook.
Our basis will be a mesh from a hardware store with a large mesh or a bath mat with holes.

In addition to the basics, we also need:
- fabric ribbons,
- scissors,
- hook (optional).
To begin with, cut short ribbons, but do not skimp on their length, because you need to take into account that they will be folded in half, and even tied or otherwise fixed to the mesh. Therefore, it is better to make them longer, and then cut them as you want.
When everything is ready, you will be left with the most important task - thread a strip of fabric into the cell so that both ends remain on the front side, and then you can tie them together simple knot, or pass through a loop using a hook.
When the flaps completely cover the mesh, all you have to do is cut them to the desired length and the rug made from old things is ready to delight you and your feet.
Fluffy rugs using a sewing machine
If you don’t want to waste your time tying each individual ribbon, or you haven’t found a suitable mesh, then you can go more in a simple way, for which we need:
- an old pillowcase or piece of fabric that will become the base,
- all the same ribbons from old things,
- scissors,
- sewing machine.
Knitwear is best suited for such rugs, as it is more elastic and soft. In addition, it is easy to sew on without fear of breaking the needle.

Bright carpet made from old knitwear

Heart shaped rug
After you cut the required number of ribbons, pull them lengthwise so that they curl a little, and then simply apply them to our base and sew them in the middle, row by row.
Don’t worry if the strip doesn’t lie flat, you can always trim the entire pile, leveling it to the desired length.
Rugs made from old things, what will be used?
We learned about techniques for creating a rug from old things, now it’s worth talking about what can serve as material for them and how best to bring your idea to life.
Taking into account the density, quality and size of the old item, you can choose the method of its transformation. That is why we would like to tell you a little about how and what rugs are made from by modern needlewomen.
Rugs made from old jeans
The first thing that comes to mind that requires regular disposal is jeans. Denim has long conquered our hearts and there is not a single fashionista or fashionista who does not have jeans in her wardrobe. Moreover, despite their strength and versatility, they still wear out, stretch, or otherwise become unusable.
Of course, it’s a shame to throw them away, so we collect them on a separate shelf so that we can sew something later.
But sewing requires patterns, a sewing machine, and sometimes also space. While making a rug from old jeans with your own hands will not be difficult at all - everything from the canvas to the pockets and belt will be used.
Just choose a technique and select flaps for it:
- cut them into long strips and weave a rug on a loom,
- weave long braids and gather them into a round rug,

- arm yourself big hook and knit any shape using cut strips instead of yarn,
- weave the strips together using the braiding principle and sew on a machine or by hand.


And the cat liked it)
Considering the strength of the material, such a rug will serve you for more than one season.
Rugs made from old T-shirts
But we wear out T-shirts more often than jeans. After all, we use them every day, grow out of them, stretch them, get dirty with paint and simply get tired of them over time.
You may not be able to wear them anymore, but the knitwear used to make T-shirts can be an excellent material for creativity. They make great potholders, coasters, bags and, of course, rugs.
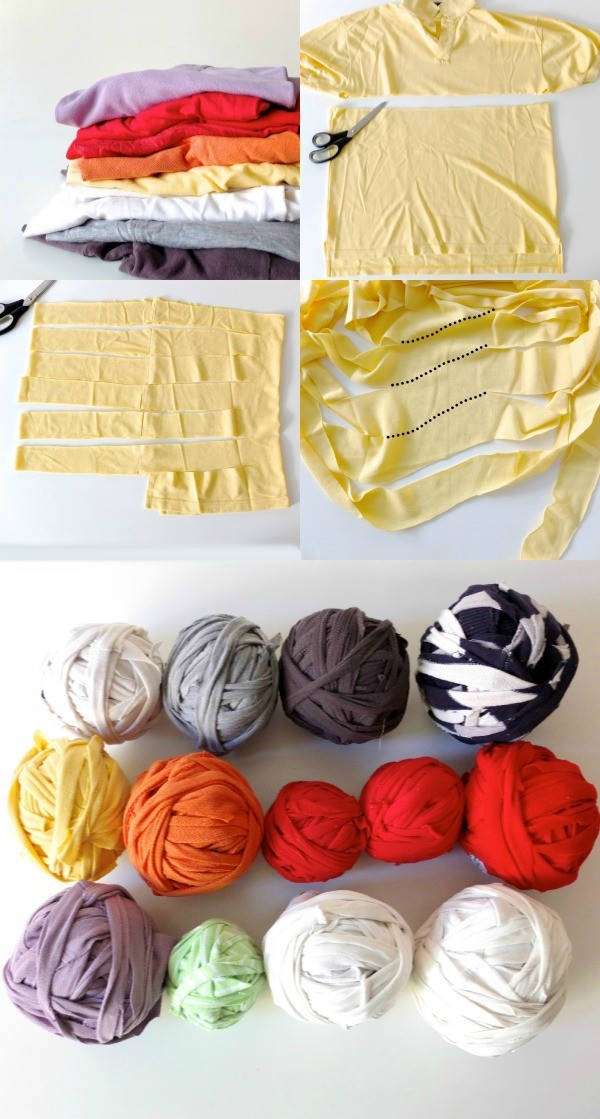
How to make knitting yarn with your own hands
When we look at these DIY rugs made from old T-shirts, at first we can't believe what they're made of! After all, craftswomen knit with crochet from something very similar to yarn, and not like an old T-shirt.

However, do not be surprised by this and do not think that there is some kind of trick here. Anyone can turn old T-shirts into knitting yarn.
To do this, just follow detailed video master class on the Utilitarian Crafts channel, in which we will be taught how to make as much yarn as possible for new rugs from an old T-shirt.
A T-shirt is a universal material for creating your own rug
And after preparing the yarn, you can already try your hand at creating rugs from old T-shirts with your own hands. After all, they can be:
- to tie,
- weave,
- cut for fluffy rugs,
- sew pre-braided braids from them.
And all you need is a couple of T-shirts and a desire to create.
Moreover, any patterns of napkins or lace are suitable for crocheting, and you can weave according to the previously described principle of a French bracelet.
Or select your favorite T-shirts, cut out pieces from them and sew a rug according to the principle patchwork quilt, so you save memories and don’t throw anything in the trash.

Rugs made from old tights
The most consumable wardrobe item of all time is tights. They tear and become unusable so quickly, and even have some seasonality, that at some point we all think about whether we should come up with something after they have served their life.
And we found the answer - rugs from nylon tights that you can make with your own hands! After all, they can be an excellent yarn for knitting or weaving a new rug - durable and practical.

The main thing is to know a few tricks:
- to get a long strip from one pair of tights, you just need to cut off the socks and panties, and then cut the remaining tube in a spiral,
- do not tighten the knitting so that the rug made from old tights does not deform and lose its shape over time,
- nylon can be dyed to make your rug brighter - just use fabric dye and follow the instructions on the pack.

You can create rugs from old tights with your own hands and without a hook. They can be:
- sewn from braided braids,

- woven on a loom,

- woven on a hoop.

And children's tights, which are most often collected in our bins, are perfect for knitting on fingers. All you need to do is cut them into rings, and then use the video tutorial from Marina DIY Dolgih:
Rugs made from old towels
And even old towels have a use in the world of rugs. Due to their density, length and ability to absorb moisture well, they can give us an excellent accessory for the bathroom, bathhouse or balcony, where you always need to keep your feet warm and dry.

Making a rug from old towels with your own hands is as easy as any other. It's easy:
- trudges
- fits
- weaves
- curls up.
In general, it is created in such a way and using the technique that lies on your heart.
And if you want to give life to terry towels in this way, then try making a fluffy rug on a construction mesh.


As you can see, when cleaning the house, you should not rush to throw away your used items. Old T-shirts, towels and even tights can inspire you to create something new and no less useful than their original purpose. Just be smart and your home will be filled with new, soft and fashionable rugs that you can create without spending anything but your time and getting a charge of emotions and good mood!