Who knew that in our time Christmas decorations from the childhood of our parents and grandmothers would be fashionable, and that people would buy them for unrealistic money. One of these toys is Santa Claus made of cotton wool, who stands under the tree and brings us gifts on New Year's Eve.
It turns out that you don't have to run around flea markets and overpay money. You can make such a Santa Claus yourself. To do this, you need to stock up on patience, time and mood.
For work you will need
Materials:
- cotton wool (it should be in layers, not lumps);
- glue (starch + water);
- wire for the frame;
- toilet paper (for papier-mâché);
- foil for a blank;
- paints (acrylic and watercolors);
- wooden stand;
- synthetic winterizer;
- threads.
Tools:
- nippers;
- brushes (hard - for glue, synthetics No. 6 flat, No. 1 round - for painting);
- scissors;
- sewing needle.
Before starting work on the manufacture of Santa Claus, we prepare a mass of papier-mâché. Add a tablespoon (no top) of starch to half a glass of cold water, bring to a boil. Separately tear the toilet paper into small pieces. Add paper to the resulting warm glue, and rub the resulting mass well with your fingers. It should be like dough.
Beginning of work
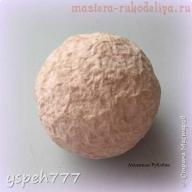
Head ... The best option if we find at home a head from an old Santa Claus doll. But it is not always possible to find such wealth in our apartment, so we will use what we have at hand. We need food foil 50-60 cm long. We make a large ball out of it, and begin to soften it to the size and shape of a chicken egg.
Where the eyes of Santa Claus should be - we press the beads. We put a layer of papier-mâché on our disc. It is very important to know! - each layer of papier-mâché should dry well. Then we sculpt a "carrot" from the mass and apply it where the nose is. We make small balls - we get cheeks, chin, forehead. Don't forget to dry.
Now we put some of our mass in the area of \u200b\u200bthe eyes, and shape the eyelids. After the face is ready, we sculpt the back of the head. We dry everything well, and grind the face of Santa Claus with sandpaper.
The head is ready, now we need to make a face painting. We take white or ivory acrylic paint, add pink color to it. You can add watercolors. Stir and get the color we need for the face of Santa Claus. Apply the paint with a flat synthetic brush # 6. We make 4-5 layers. Dry each layer well. Paint the eyes with a round brush # 1. Apply pink paint on a sponge or a piece of foam rubber and tamp the cheeks.
Torso ... We calculate the proportions as follows: six of our heads should fit into the height of Santa Claus. For the frame, we need, preferably, a three-core braided copper wire.
Cut the braid between the wires from above to shoulder level. At the top, we will put on the head on the middle pin, and bend the two side wires horizontally - we get the shoulders, then we bend it down, and we get the frame under the arms. In the area of \u200b\u200bthe palms, we make a loop. From below we cut the braid to the line of the hips, bend it horizontally - we get the hips, and bend the wire down - these will be our Grandfather's legs. We lift the middle part of the wire up, strengthening the spine. We immediately bend our arms a little at the elbows.
We cut the synthetic winterizer into ribbons 3 cm wide.And we begin to tightly wrap our frame. We wrap the neck, shoulders, arms (separately), the body. The hands of Santa Claus will be in mittens, therefore, at the ends of the wire, at the same time, we give the desired shape with a padding polyester.
In the lower part of our Santa Claus doll, the legs from under the suit will not be visible, so you should wrap the two legs with padding polyester together until you get a blank for the suit. For this procedure, we need 50-60 cm of padding polyester. We take a needle and thread and fasten our structure with stitches. Having received such a torso, we see that our Grandfather Frost begins to take on a human form.
clothing ... Now we start working with cotton wool. This technique is called cotton papier-mâché. To begin with, we prepare the glue in the same way as for papier-mâché, only we add a little blue or blue watercolor paint to the glue. As a result, when the cotton wool dries, it will have a cold, bluish tint, like snow.
- We put the first layer of clothing on the doll itself. We spread the cotton wool in a thin layer (5-7mm) on the table, and, with a brush, coat it well with glue. The pieces of cotton wool should be small. First, we form a hat on the head of Santa Claus. We iron it with our fingers so that the joints are not visible. Important: we dry well. Following the same principle, we make mittens, sleeves (from mittens to shoulders) and a suit on the body of Santa Claus. We iron our dress well and dry it.
- Second layer. Before doing it, you need to prepare a cotton layer of 50 * 50 cm in size. We lay out the cotton wool on the table with a thin layer (5-7 mm), coat well with glue and leave to dry. While the cotton wool dries up, on a separate sheet of paper we draw up costume patterns for our Santa Claus. We transfer these patterns to an already dried layer of cotton wool.
We will get the following details:
- hat, hat lapel;
- eyebrows, mustache, beard;
- sleeves, cuffs for sleeves;
- mittens;
- the front half of the suit;
- back half of the suit;
- cuffs on the bottom of the suit;
- lapel on the side of the suit;
- collar;
- belt.
The above details must be cut out with scissors, again soak well with glue. This will already be the final, top layer of clothing. We begin to "dress" the doll, immediately laying out the folds and draperies of the clothes. Iron it well with your fingers and let it dry.
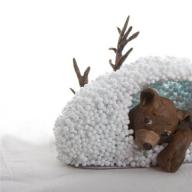
Stand ... We take a wooden plank 15 * 15 cm in size, make two holes in it (to glue the wire from the legs). We prepare a cotton layer, 20 * 20 cm in size, impregnate it with glue and put it on our stand. If necessary, there can be two or three such layers. Dry well. There is no need to paint the stand, cotton wool perfectly imitates snow.
We paint the clothes of Santa Claus, while taking into account that in this technique the natural color of cotton wool is highly valued. Apply shadows where necessary.
Completion of making Santa Claus
The final touch remains. We glue our cotton Santa Claus into a stand, give a staff in our hands - it can be a stick for sushi wrapped in thread, a bag with gifts - we make it according to the principle of cotton papier-mâché.
Also, for Santa Claus, a Christmas tree is needed, which can be made from beads. (How to do it, you can find out by).
We are pleased to admire the work done and celebrate the New Year.
On the eve of New Year's holidays, everyone is waiting for miracles, getting ready and trying to observe traditions. The kids are in a hurry to decorate the Christmas tree so that Santa Claus comes faster and gives gifts. Recently, hand-made crafts are becoming popular.
Consider master classes on how to make Santa Claus with your own hands from scrap materials. The phased implementation is understandable for children, so they will create with pleasure and joy.
Fabulous Santa Claus made of felt and fabric seems so cute! I just want to quickly start creating such a beautiful character.

Materials:
- a piece of felt;
- the cloth;
- thread;
- a sprig of pine for decorating a hat.


Manufacturing process:
- First you need to take the Santa Claus template, attach it to the felt, circle it with soap and cut it out.
- Also, according to the stencil, it is necessary to cut out a hat, a beard. The cap in the upper part will have to be pulled off with a braid, so it will turn out to be voluminous.
- At the very end, connect all the parts together, securing them to each other with glue.
To prevent the glue from showing through the material, it is recommended to sew the parts together. However, this process will take a long time.
From the bottle
A beautiful big Santa Claus is made from plastic bottles. The grandfather figurine can be placed under the tree.
First, you need to take the bottle in your hands and visually determine where the body parts will be located: the head, the body, where the beard and belt should be drawn, the cloak. The figure should be proportional.

Paint the fur coat red, make the belt black, the face beige, and the beard white. After drying, put on a sewn cap on your head, attach a mustache and mittens.
From a light bulb
Used bulbs are suitable for creating various Christmas tree toys. To do this, you need to be patient, take a brush and acrylic paints, and get down to creative work.
You need to draw Santa Claus, a fawn, a pine cone or other characters and objects according to your imagination or to spy on similar drawings in the coloring pages.


You can do it in another way. For work, you need glue and semolina. First you need to coat the light bulb with glue, and then roll it in the cereal. After complete drying, paint with paints. You can decorate toys with sparkles, pompoms, rhinestones, beads.
Santa made of toilet paper rolls
A roll or sleeve from toilet paper or paper napkins will be needed to make a pipe through which Santa Claus goes down into the house. The craft turns out to be so bright that children are happy to take on its implementation. Moreover, they have a hope that Santa will come down to them to pamper them with gifts, because the New Year is a holiday of hopes and miracles.

Materials and tools:
- roll of toilet paper;
- cardboard;
- scissors;
- glue;
- paints.
Manufacturing instruction:
- Crafts for the New Year Santa Claus pleases with the ease of implementation. You need to take cardboard, wrap a roll with it and measure out a suitable rectangle. Then cut out the stencil, paint it with red paint and draw black lines - these will be bricks. The result is a blank for the pipe.
- After drying, you will need to glue the workpiece to the roll, wrapping it tightly. You can do without unnecessary steps and immediately paint the roll itself. This will be much faster, but with extra cardboard the craft will be more stable.
- Next, you need to make blanks for a hat with a pompom, socks and mittens made of black cardboard, ordinary strips of red cardboard paper will serve as legs.
- First, let's create a composition when the fabulous grandfather descends into the pipe. To do this, you need to make sure that only legs and a stuck bag of sweets peep out of the pipe.
- And the second composition shows how Santa Claus gets out of the pipe. To do this, you need to slightly raise the grandfather's cap above the level of the pipe and bend and fasten the mittens so that you can see that it rises outward.


The black gift bag can be decorated in a different color, usually it is red. To prevent the gift bag from merging with the pipe, you can draw a black strip along the edge of the red bag.
Santa Claus from ice cream sticks
Previously, ice cream was sold only with wooden sticks, now an excellent material for creativity is available commercially. With a little imagination, you can create a beautiful Christmas wall decoration.
You can make a simple and complex character figurine from sticks. To make a simple figurine, you need to take a stick, paint it accordingly, draw eyes and glue a fur or cotton beard.
To make a complex figure of Santa Claus at home, you need to take several sticks, draw Santa Claus on cardboard. Then glue one stick horizontally - there will be grandfather's eyebrows, and from 5 sticks make a beard. Attach the loop to the horizontal stick, glue the mustache.
From a paper plate
Christmas is a delightful holiday for which you want to thoroughly prepare. Santa Claus can be made from a regular paper plate. By the way, if someone cannot buy a ready-made one, you can do it yourself from papier-mâché.

Materials:
- a plate of paper;
- brush;
- acrylic multi-colored paints;
- red velvet paper - 1 sheet;
- white paper;
- eyes;
- scissors;
- glue.

Manufacturing process:
- First you need to prepare the necessary templates: a triangle of red paper, white balls, eyes, pompom, glue.
- Next, you need to switch to working with a plate. It is necessary to visually divide the plate into 3 transverse parts and cut off the top one. The middle should be painted over with beige paint to match the face.
- Then the finished part for the face must be glued to the triangle in such a way that an image is obtained. The proportions must be chosen independently.
- It remains only to glue an eyebrow strip made of white paper (it also covers the cut line of the plate), nose, mouth, eyes.
Wonderful Santa Claus is ready. You can safely celebrate the New Year!
Ded Moroz beard decor made of old tulle and organza
To make a beautiful door pendant you will need:
- a circle;
- tulle or organza;
- red riding hood (ready-made).

Manufacturing process:
- You will need to cut the tulle or organza into long strips, and then, using the macrame technique, make a beard. You need to fasten the strips with a knot.
- First fold the organza strip together. The side on which the loop was formed, insert it under the circle inward, and then wrap the circle itself, stretch it through the loop and tie it tight.
- The process will need to be repeated until you get a beard.
Put on a cap on top - the suspension is ready. Let it protect your home and bring happiness!
Paper Santa Claus
The art of origami is a complex but fun creative process. It was born a long time ago. From childhood, we remember how our parents made boats for us, and we let them along the streams. They themselves also tried to learn this craft.
Over time, more and more complex compositions began to appear, which require logical thinking, are designed to develop fine motor skills, memory. Therefore, the child must first perform origami toys under the guidance of adults, and then independently.
Materials:
- colored red paper;
- scissors.
Manufacturing process:
- To make a cap, you will need to cut out a rectangle of the required size from paper.
- Then, on both sides (which are longer), make longitudinal folds 1.5 cm wide.
- Then turn the sheet of paper over so that the sharp corner of either side looks up and fold in a triangle - first one side inward, then the other.
It turned out to be an interesting hat for decorating a New Year tree or for Santa Claus. You can glue a cotton pom-pom.
Santa in the chimney
Young children are often told the story that Santa enters the house late at night through a pipe and leaves gifts under the tree. The kids love this fairy tale and are looking forward to the evening so that Santa brings them gifts.

For manufacturing, you will need thick cardboard for the pipe and soft felt for Santa.
According to the templates presented, you need to cut a pipe, details for Santa. Which color to choose is up to you. Then you need to glue the pipe, and sew the parts of Santa Claus and fill it with padding polyester to make the toy seem huge. Put Santa in the chimney like he's going to go down to the house and give me some souvenirs.
From old keys
There is nothing complicated. You just need to be able to draw or really want to learn how to do it. On old keys, use acrylics to paint the face of Santa Claus, a hat. And make a beard from small rhinestones, you get a shiny Santa Claus with a beard sparkling like frost.

From paint brushes
A cute Santa can be made from paint brushes. It can be hung on a Christmas tree or anywhere in the house in a conspicuous place.
You need to take a brush with good bristles, paint the handle with red polka dots - this will be a hat. The beard is the nap of the brush, and the metal strip connecting the brush will serve as a face, so you need to glue the eyes on it, just below the nose. Above the eyes, make a cool head of cotton wool, tie it with a ribbon and decorate with a bow or a composition of flowers.


Made of wood - for dacha decor
Many people celebrate the New Year in a house on a suburban area. We offer an idea for creating a festive mood, Santa Claus made of logs, who will stand and keep order.
Materials:
- even log;
- paints;
- material for a scarf.
Manufacturing process:
On the log you need to make a cut diagonally - this will be the face of Santa Claus. Then take paints and draw a beard, eyes, nose, mustache and red riding hood. Tie a scarf from a piece of material.
From socks
The socks make a creative Santa Claus with the Snow Maiden. Interesting ideas for a school art fair.

Materials:
- red, white and blue socks;
- threads with a needle;
- cotton pads;
- buttons for the eyes.
Manufacturing process:
- For Santa Claus and Snow Maiden, you need to cut off the bottom of the red and blue socks and fill them with rice. You can, of course, and sand, but it will wake up outside. Tie with a thread.
- To mark the head and body, you need to tie it again with a thread, but so that the parts are not equal.
- Then it remains only to put on a hat, glue or sew on eyes, a nose, a mustache made of cotton pads, and give Santa Claus a staff a staff. It can be made of wire and wrapped in tinsel.
And so that the long-awaited guests do not catch a cold, you can tie them with scarves from strips of socks.
From cotton pads
Is a cotton pad not a material for creativity? It is very light and you can make Santa Claus out of it for a Christmas tree or give a beautiful toy to your friends.

Materials:
- cotton pads;
- glue;
- velvet red paper.
Manufacturing process:
Everything is extremely simple. First you need to take one disc for the base. From the other disc, cut whisker curls and a round pompom for the cap. Cut out a cap and a circle for the nose from red paper. All prepared parts are applied to the main disk and glued together.


It turns out an elegant, beautiful toy that can be made with children in kindergarten.
From the remnants of plywood
Pieces of plywood remain after the repair. They do not need to be thrown away, they will be needed for the Santa Claus Christmas toy.
Materials:
- plywood;
- white felt;
- a piece of burlap;
- red cloth.
Step-by-step manufacturing process:
To make a toy, you need to make blanks in the shape of a square, a triangle and an asterisk from plywood. There are 2 options for making Santa Claus.
- On the prepared triangle, you need to stick white felt for the beard, make the face milky. Draw the eyes and glue the red nose. The cap is made in the form of an asterisk.
- On a rectangular base, glue a mustache, a hat made of round wood, decorate with a bow made of a strip of burlap.
It turned out to be nice toys from waste material. The first option can be hung on a Christmas tree, and the second will be heavy, so you can hang it on the wall or above the door.

Unusual, extremely simple and original crafts, such as Santa Claus with his own hands from scrap materials, are intended not only for decorating a Christmas tree or premises for the New Year and Christmas.
By doing them, children acquire skills and abilities to work with various materials, they develop thinking, creative imagination, fine motor skills, which is of no small importance in preparing a child for school, and also kids get great pleasure from work - this is perhaps the most important aspect to enable the child to realize their ideas into reality.
Always in anticipation of a magical holiday, the whole family takes on the manufacture of New Year's decorations for the green beauty and home. And the most beloved handicraft is considered to be the main symbol of the New Year's holiday - Santa Claus.
We suggest you make Santa Claus out of paper. With the help of such a simple material, you can create real masterpieces with your own hands. You just need to devote a little time to this activity and show all your boundless imagination.


Study our DIY master classes on making Santa Claus and you can please your loved ones with unique New Year gifts made with soul and attention.
Modular origami Santa Claus - master class


We will need: sheets of A4 paper: blue - 14 pieces for 211 modules, white - 13 pieces for 207 modules, pink - 1 sheet for 17 modules.
We divide each sheet into 16 rectangles, from which we will make modules.

Step one. Bend the rectangular sheet in half lengthwise. With the help of one more fold, outline the middle line.

Step two. Bend the edges of the folded rectangle to the middle, as shown in the photo. Turn the part over and bend the bottom edges up.

Step three. We fold the corners, bending them over the large triangle, and then we bend these corners inward. We bend the resulting figure in half - so we have learned how to make a module. Now, in the same way, we make the required number of modules, indicated above, from the rest of the paper.

Step four. We start making crafts. We take 5 white modules and place them, as in the photo (we place the module of the upper row with the smaller side up). Next, we collect a chain of 3 rows of white modules. Each row consists of 25 pieces.

Step five. We close the chain in a ring and turn it over. Next, we perform 3 rows with blue modules. From the seventh row we make a beard. To do this, insert 2 white modules with the smaller side out. Insert the rest of the blue modules of the 7th row as usual.

Step five. In the 8th row we fix 3 white modules, as usual, with the long side, the rest of the modules are blue. With each next row, add one white module on each side of the beard.

Step six. In row 11, we insert one red module in the middle of the beard - this is the mouth. The 12th row consists of white modules. We put them on blue modules with the smaller side outward, on white modules (beard) - with the long side, as usual. In the 13th row, opposite the red module, we dress the white with the long side outward, and 2 pink modules each with the smaller side (see the photo).

Step seven. In the 14th row, we put on 6 pink modules with the smaller side, and we put on the white modules as usual. 15 row - we put on 17 white modules and 8 pink ones. In rows 16 and 17, we put on all white modules with the smaller side out - this is a hat.

Step eight. The last 18th row consists of blue modules with the smaller side out. We collect hands from 3 white modules and 5 blue ones. We glue the finished eyes and insert the spout (detail of the children's mosaic). Santa Claus made of paper using the modular origami technique is ready. We hope that after studying the master class, the Snow Maiden will appear next to your Santa Claus, made in the same technique.
Santa Claus made of paper using origami technique - master class

We'll need colored paper and a little patience. We offer you several schemes according to which you can easily make Santa Claus with your own skillful hands. You can hang it on a Christmas tree, decorate a greeting card with it, or give it to your friends for the New Year.


Santa Claus with his own hands from colored paper - master class

We will need: red paper, pink for the face, white beard paper, cotton wool, felt-tip pens, scissors and glue.

Operating procedure:
- Using a compass or a small plate, draw a semicircle on red paper. We cut it out, fold it into a cone and glue it.
- We cut out an oval from pink paper, draw eyes and a nose on it with a felt-tip pen and glue the face of Santa Claus to the cone.
- Next, glue the beard and white paper hat. To do this, cut out white stripes, cut a fringe on them and twist it with scissors. We glue the strips with curled fringes to the cone in the lower part of the face in several rows, giving the beard a splendor. We make a hat from the same strip. The beard, hat and fur coat for Santa Claus can be made of cotton wool, which is glued to the cone along its lower edge, on the face and on the upper part of the cone. Do-it-yourself smart Santa Claus made of paper is ready. With the help of a cone, using imagination, you can also make a Snow Maiden.
Santa Claus from colored paper strips - master class

We need: thick colored paper, white corrugated cardboard, scissors and glue.

Operating procedure:
- We cut out 6 strips measuring 1 cm by 15 cm and 6 strips measuring 1 cm by 10 cm from red paper. Glue them into rings. We collect a ball from 6 large rings, fastening it with glue at the top and bottom. We collect a smaller ball from small rings in the same way. It turned out the body and head of Santa Claus.
- Cut out a small circle for the face from pink or orange paper. We cut out the mustache, beard and hat from corrugated cardboard of any size and shape the face with them. Cut out and glue the eyes and nose. We glue the face to a small ball, which we then glue to the body. Cut out mittens and felt boots from cardboard and glue them to the craft. The do-it-yourself paper New Year symbol is ready.
A few more ideas for creating Santa Claus with your own hands
Applying imagination and using the schemes we have proposed, you can make Santa Claus even from a paper napkin.

The paper cone allows you to make many options for Santa Claus with your own hands.


And this family of Santa Clauses is made of ordinary toilet paper rolls.

Santa Claus and Snow Maiden in the popular modular origami technique.

We hope that our master classes helped you understand the technique of making Santa Claus out of paper and encouraged you to be creative. Use a little imagination and create your own kind Grandfather or even several. They will decorate your holiday and create a magical mood!
Diagrams, printouts, drawings


Engage in making New Year's crafts with the children in advance, so that later on to celebrate the holiday in a special way. You can cut snowflakes and shiny stars from foil, prepare greeting cards, glue colorful garlands. But you can't do without the figure of Santa Claus.
There are many different ways to make the main symbol of the New Year. One of the simplest and most affordable is Santa Claus made of cotton wool.
Decades ago, voluminous toys, including Santa Claus, made of cotton papier-mâché, were very popular. Try to make a bright, original craft from cotton pads.


Master class: Santa Claus on the Christmas tree
To hang the toy on the tree, it must be light. Therefore, in addition to cotton pads, take:
- an empty plastic bottle, such as a vitamin bottle
- felt-tip pens, paints;
- scissors;
- glue.
If you plan to put the craft, and not hang it, then you need to make the bottle heavier or take a glass one.

The bubble will be the body of the craft; it must be carefully pasted over with cotton pads. To make hands, divide the cotton pad into two parts. Twist each thin part with a small bag and glue the wide part of the resulting bag on the sides of the body.
The head can be made in two ways:
- Blind from plasticine, it is better from light, and then glue over with cotton pads. Such a head will easily attach to the lid - the “neck” of the figurine. Make a hat for Santa Claus from plasticine.
- The head is made of cotton wool using the felting method. Roll up a ball of pieces of cotton wool, gradually forming a craft of the desired size with soapy hands. After the head of the figurine is dry, coat it with a 1: 1 solution of glue and water. Apply the solution with a brush. Glue the dried ball to the cap of the bubble. The hat can be made from a piece of material or knitted. For a better hold, place it on glue.

The craft is ready, but there is still not enough beard and fur coat for the figurine to take on the appearance of Santa Claus.
Prepare paints or gouache. Color the fur coat red, leaving a white edging on the clothes. If you want to add expressiveness to the craft, glue a white edging made of cotton pads on the sleeves and on the bottom of the fur coat on the dried paint. A large collar can be cut. Do not forget to paint the part of the hands where Santa Claus has "mittens".
Start painting your face. Add blush, gently highlight the eyes, nose. Cut and glue the mustache and beard from cotton pads. It is enough to use 2-3 layers of cotton pads for the beard to make it "fluffier". Start glueing the beard from the bottom layer. Draw a mouth between the mustache and beard.

A real Santa Claus does not come without gifts, so make a bag for the toy - take any colored paper napkin, put a tight ball of cotton wool in it and tie it with a bright thin ribbon. The gift bag is ready.
Crafts, which will surely become a decoration of the holiday, can be made not only using plastic bottles or glass bubbles. There are many options: paper, thread, clay, textiles. Be sure to involve children in the process of creating a Santa Claus figurine. Make a craft using cotton wool, colored paper or cardboard - this is one of the easiest ways, even kids will be happy to take part in it.
Before making the applique, draw out the outline of Santa Claus on paper, where you can show all your imagination. Choose the material for the cap, decorate the background of the applique. Underline the contour of the figure with paints, felt-tip pen or tape. Yes, and Santa Claus himself can be portrayed standing, walking.

Master class: the original figure of Santa Claus
The unusualness of the craft lies in the fact that the face is not painted, but sculpted. If an artist takes on the job, then the New Year's character will be similar to a real grandfather.
For this craft, you will need various materials:
- foil;
- salty dough;
- wire;
- beads, buttons;
- brush, paints;
- plastic bottle;
- synthetic winterizer.
The head frame can be made from foil. Wrap a piece of wire in a ball of this shiny material. Prepare a salted craft dough and place it over a ball. Insert beads or small buttons in place of the eyes. And start sculpting the face of your grandfather. Form cheeks and lips from pliable dough.
Using water, attach the pieces of dough - nose, ears. Make small wrinkles on your face. Make sure that the expression on your face turns out to be good-natured: Santa Claus is a kind character.
Then send the head to the oven to dry.
Now it's time to paint and varnish it.
The head must be attached to the body. To do this, select the appropriate size plastic bottle. Remove the cover from it and punch a few holes in it. Insert the wire into the holes and twist.
Screw the cap together with the head to the bottle; pebbles and pebbles can be used to make it heavier.
Wrap a thick wire around the bottle and "bring" it out on your hands. The frame for the hands can be wrapped with padding polyester, pasted over the entire body with cotton wool, and the hands, if desired, with cotton pads.
The main fairy-tale character, without whom the new year is impossible. How to make a figurine of Santa Claus under a Christmas tree, decorate windows with it and make a panel on the wall - teachers share ideas and talk about their experiences. Master classes on creating sculptures of Santa Claus in various techniques - papier-mâché, modular origami, knitting, the use of natural and waste materials. Ideas for children's creativity - New Year's crafts, cards, applications, Christmas decorations with Santa Claus. Everything to create a classic image of Santa Claus with your own hands.
Santa Claus has a job to his liking - he is needed in every house, on every floor
Contained in sections:Showing publications 1-10 of 405.
All sections | Santa Claus and Snow Maiden with their own hands. Crafts, templates, master classes
Master class summary for students in the studio of the Central House of Theaters "Making a souvenir-bell from clay" Santa Claus " Topic “New Year's story. Working with the reservoir. Grandfather Frost» . purpose: introducing students to the traditions and customs of celebrating the New Year in our country. Tasks: - teach to sculpt a toy Grandfather Frost from the cone; - to consolidate the skills of obtaining an even ceramic layer, harness; -...
Grandfather frost and snow maiden from paper napkins. purpose: to teach how to make flowers from napkins, stick them on a cone. Tasks: to form the ability to see beauty through the manufacture of products of arts and crafts; to form a desire to give gifts made by their...
Santa Claus and Snow Maiden with their own hands. Crafts, templates, master classes - Photo report about the lesson of plasticine painting in the senior group "Snegurochka"
Publication "Photo report on the lesson of plasticineography in the senior group ..."  We will create the image of the Snow Maiden, plasticine will help us with this. This type of productive activity of preschoolers develops attention, logical thinking and imagination in children. This sculpting technique is a painstaking process, it stimulates perseverance, patience, the desire to bring what has been started ...
 Library of images "MAAM-pictures"
 The goal is to create crafts using the flat facing technique. Objectives: 1. to acquaint with the technique of plane facing; 2. to teach the basic techniques of work; 3. develop hand motor skills, imagination, creative thinking; 4. cultivate interest in working with paper napkins, desire ...
 Master class Ded Moroz and Snegurochka Before the New Year, we held a master class for parents in the middle group on making decorations for our group: Ded Moroz and Snegurochka from "palms". Purpose: Creating a festive, positive atmosphere, attracting parents to a joint ...
 Purpose: acquainting children with the peculiarities of the art of Gzhel, mastering the elements of Gzhel painting. Tasks: - to give an idea of \u200b\u200bGzhel, its history and features; - to teach to depict a Gzhel flower from plasticine, to create a decorative composition for a specific form of an object according to ...
Santa Claus and Snow Maiden with their own hands. Crafts, templates, master classes - Integrated lesson on the application "Kind Santa Claus" (second junior group)
Purpose: Making an applique from cotton pads and developing creativity. Tasks: Educational: - to form children's skills to make an applique from cotton pads for face decoration; - to teach to create a beautiful compositional picture - a portrait. Developing: - to fix ...
 Santa Claus is our favorite fairy tale wizard. From young to old, from end to end of the Russian earth, every person is familiar with him. Santa Claus is the lord of the winter cold, snow and wind, frozen rivers, snowdrifts. Initially, he was presented as a mighty old man with a staff ...