I am professionally engaged in knitting caps.
I like to invent new models and make descriptions to them.
Knitted Hat "Chrysanthemum" - one of my favorite models.
But for some reason, there is no big interest. Probably because the description is posted in the open access. But a description has long ago, since then I have a little secret: how to make the hats fields do not flock, as it happened before.
Look and notice the difference.
I invite everyone to tie my favorite hat about me!
Usually I make challenge descriptions, but since you want to associate a little hat, and all the density is different, I will not paint around the rows.
You will need:
200g yarn 250 - 300m / 100 g
Hook №4, №5, №3.
Reduction:
V.p. - Air Loop
BTB - a column without Nakid
SS - connecting column
SS1N - Column with Nakud
CS2N - Column with 2 Nakidami
Also, when knitting the hat uses convex columns without Nakid.
Description:
Size 56.
Hat knits top down. Hat knit in 2 threads, flower knit in one thread !!!
Rodyshko Hats
Tie columns without a spiral on a spiral (without circular circular row by connecting column)
crochet number 4. Circle diameter 19 cm For a hat with a hat.
Check the beginning of each circular row with a marker or contrasting thread.
If your size is greater than 56, increase the circle diameter by 0.7 - 1 cm with increasing size (57 - 20 cm, etc.)
*** If you want the hat to be free in the upper part, tie a donyshko for 1cm more: 20 cm for 56 sizes, etc. .*** I like this option more.
Finish the last row of the bottom of the connecting column for the circuit circuit.
Tula (smooth part of hats)
Tie about 7 cm columns without Caid Circular rows with a circular circular circuit.
Start every new row with 1VP lifting and complete the connecting column.
***
Knitting Tuli Circular rows with a circle closure will eliminate the stack of knitted canvas.
The flower is sewn at the seam formed when the circular row is closed, so do not worry about the fact that your seam looks imperfect. ***
Crochet columns without cap circular rows with a circuit of a row. Smooth seam. http://shapkidesign.ru/blog.php?user\u003dolga9172&blogentry_id\u003d1363
Sick the hat. The last (lower) row should be about 2 cm below the eud's top. Cut the thread.
Determine the place for the flower. The flower is supposed to be made on the side, it will cover the seam formed during the transition in a new row.
Mark the middle of the rear of the hat - it will be the beginning of the next circular row.
Attach the thread to the marked place.
Continue knitting with circular rows with a circuit of a series by a connecting column.
Tie 3 rows by convex fails Crochet number 3.
4 rows convex fails Crochet number 4.
4 rows convex fails Crochet number 5.
Convex column without Nakid.
Enter the hook on the right left under the foot of the next page of the previous row from the front side, make the hook on the hook and stretch the thread from left to right under the foot of the column, check 2 hinges on the hook.
On the edge of the hat on the front side, tie a number of cocoic connecting columns No. 5.
Tie a number of connective columns along the line between the last near the failure and the first number of convex columns.
Flower
The flower consists of 4 parts that fit separately, then superimposed on each other and sewed into the hat.
Threads - Begonia, hook 2.1. 1 Motchka was enough.
I'll try to write how I knit (by memory)
Tied around the circle of the head strip from the fillet mesh (4 rows) - in a circle - the dressing unit turned out
Then joined the thread and tied the lane with a lane that from above. Trusted to her daughter. Holes were big baked their fans, but at the same time corrected the pattern so as not expanded, but on the contrary
Fields:
When switching to the fields, it knit 1 row of SSN (I always knit 2-3 rows of scan, and then it does not bneil and the hat does not stick to the head so tightly - it made it intentionally so that the hat has been going to get on the sea)
Then 3 rows of arches out of 5 V. P.
And then fans on her favorite scheme
Then plugged the double ring of the PLILILY PLILD, then a rachy step.
Hat "Little Lady"
Schemmer and Description of the side
Scheme Punchka and Tuli on OG 49-50 cm.
My yarn
My connected 13 rows Punches:
Up to 13 rows inclusive to all sizes knit the same.
* * *
ATTENTION:
When the pattern is tied in those places where the hook is rolled into the column, it is desirable to apply the "deep" rigging method. The hook must not be administered under the two top of the column, but in the body of the column itself. This method will not allow the pattern to be shifted when we knit the Tool.
* * *
Starting from the 15th row for all sizes knit according to the scheme. Rows 15-20 repeat two more times.
From the 15-20rd, they differ only on the last side. His instead of CH, I was leaked.
33-38 rows also knit according to the scheme.
The 38th row is a closer to each column.
Fields begin with the 39th row.
Finish the Tool and insert the first regheline equal circle of the head. I made one veil. This is where we complete the work of the failure. We excite.
Knit hats fields.
In the 39th row, we make an increase in each 3rd column,
In the 45th row - in every 4th, in the 51st - in every 5th.
The meaning is that in each row with additives it is necessary to add 56 CH (7 reports). That is, in 39th 168/56 \u003d 3, in 45-m (168 + 56) / 56 \u003d 4, etc.
Field strengthening.
After the last row of fields is associated, they need to sip well.
On the horizontal surface of the table, the fields must be of the shape of a flat circle.
We take the second regill (two veins at once) and we are tied up. The length of Regina does not die in advance !!! Just then cut up too much.
Well refrigerability fields.
Eat!
We are tied up again the same series of ISS. And we assign the last row "rachy step" through the column.
On the field plane, there are still a flat circle shape.
Once again, we move the field with an iron through a wet fabric !!!.
To give rigging used salvitosis, which is used in felting.
Dried on a balloon.
DECORATION.
It is necessary to make a removable-on pin or button.
Chamomile knit very simple.
You dial a chain of 2nd. P. In the first of them, there are 8 semi-solids and closed in a circle in the 1st half-hearth.
When the whole chamomile is ready, reinforce each shelter with connecting columns. This will allow them to keep the shape and not roll.
For the middle of the daisies, we make small pompons with the help of a conventional dining room.
We wake on the teeth fork thread. Then we tie the extra thread in the middle, remove from the fork and tighten the node. Further flush and cut. Send to a middle chamomile.
Two daisies are small, and one is a little more. For her, the scheme is the same, only for the petals, do not type 7, and 9th century. P.
I made a decoration on a button-buckle for bags.
We will need a button and a knitted circle, which camomiles will fifty:
In the finished form:
Fresh button on a hat
Scheme (only for petals):
Designations: Drawn points on the diagram is a loop that is on the hook; Figures in brackets are the amount of loops that stretch out of the connected column (in order to be easier to count the loop)
Deaf (connecting) loop
I knit from threads Soso (50g \u003d 240m) by the usual crochet number 13 (without handle)
Step-by-step photo of the process:
1. In a moving loop, I check 6 columns without Nakid
tighten the string, closer in the circle.
2. Capturing only the rear half of the loops is tied by 11 columns without Caida (1 STBN in the first half and 2 STBN in the following), connect to the circle.
The smaller semi-clutch will be needed for upper petals.
3. Knit arches for the lower lutets: We recruit 5 air loops (p), we skip 3 circle loops, fastened to fourth; We repeat 2 more times, the last arch is fastened to that loop with which the first arch.
4. We start knitting the first lower petal: score 4 in. p. If you turn a little knitting, the rear (invalid) jumpers will be visible
on the hook one loop (painted the point in the diagram), stretch from the involve jumpers on one loop (4 sticks), stretch the last stretch from under the arc (extreme stick)
on the hook should work 6 loops
5. Close the row: Capture a working thread and in pairs of hinges on the hook (captured the working thread stretched through 2 loops, captured the working thread stretched through the following 2 loops). We got the first row (connected column)
6. If a little rotate knitting will be visible in the coming jumper,
Slip one in. P.; Pull the hinges from the invalid jumpers (1 on the hook + 5 with the jumpers + 1 of the arches \u003d 7 loops).
We close a row in pairs.
7. Next, begin to cut the loops. In the sixth row, we start knitting with a deaf loop (we enter the hook in the first jumper, we grab the slave and stretch it through the loop on the hook). From further jumpers stretch over the loop and the last of the arch
We close a row in pairs.
To finish the first lower petal, we have a deaf loop in each hovering jumper, and one under the arch
We make one deaf loop in the next arch and start knitting the second lower petal in the same way. After taking all three arches, it turns out so
To go to the top petals, make 1 c. P We enter a hook to half the loop of a small circle and tie a deaf loop
It is necessary for a small circle to impose 3 arches out of 4 c. P (2 Arches for petals and 1 for the core)
8. Scour 5 V. P and knit the first compound. Top petal column
The first top petal:
Two petal
We are tied up the top petals by columns without a nakid (by contour I laid a thin wire so that the form was better to hold). The lower petals reinforced STBN (without wire). It turned out
Send beads, you can petty beads, and admire
Shocking hats
1. The hat is erased in warm water (degrees 30-40). For washing white hats, I use whitening washing powder, for color - powder for color things.
2. Cooking starch. To do this, in a bowl, we embarked 2 tablespoons of starch and weeping it 1/2 cup of cold water (to avoid the formation of lumps). Then pour boiling water, approximately 1 - 1.5 l, stirring constantly. The mixture should be thick and transparent. Leave to cool.
3. Fixed caps carefully starch, press (not twisting), removing extra starch.
4. For drying caps, I use ordinary inflatable balls, pre-inflammatory them up to the desired size.
5. In the process of drying, it periodically gives the fields the desired shape, the fields of openwork hats ironing through the layer of fabric.
Still hats and flowers to them with schemes
click on the picture to enlarge

DESCRIPTION
1 row 2nd air loops
2 row in the 2nd loop to lies 6st. without nakid
3 row 2 loops in each art. last row
4 row * 1 loop, 2pells in 1 past * from * to * 6 times, the last loop deaf connecting
5 Rows turn the work on the wrong side of knitting Art. b / n without adding * from * to * 6 times, the last loop deaf connecting
6 r. I am on the front 2pell at every past column and 2 loops in 1 past * from * to * 6 times, the last loop deaf connecting
7 r. Again turned to offline 3 tbsp. b / n each last and 2 tbsp. in 1 last * from * to * 6 times, the last loop deaf connecting
8p. 4 loops and 2 in 1
9 p. Again turned to the offline 5st. b / n each last and 2 tbsp. in 1 last * from * to * 6 times, the last loop deaf connecting
10p. on the front 6petel at each past column and 2 loops in 1 past * from * to * 6 times, the last loop deaf connecting
11r. Again turned to the offline 7st. b / n each last and 2 tbsp. in 1 last * from * to * 6 times, the last loop deaf connecting
12p. on the front 8petel at each past column and 2 loops in 1 past * from * to * 6 times, the last loop deaf connecting
13r .. Again turned 9st. b / n each last and 2 tbsp. in 1 last * from * to * 6 times, the last loop deaf connecting
14r. on the front 10petl at each past column and 2 loops in 1 past * from * to * 6 times, the last loop deaf connecting
From 15 to 22 rod knit without add-ons, only turning on face and wrong
23r. On the involving side, I will show * 10 tbsp. b / n and 2 tbsp. b / n past row together * from * to * 6 times, the last loop deaf connecting
24r. * On the front 9 long loops in each column of last row and 2 together *, i.e. E Ehe two columns of the past row we make 1 * from * to * 6 times, the last loop deaf connecting
25r. On the invalion side, they are proving * 8 tbsp. b / n and 2 tbsp. b / n past row together * from * to * 6 times, the last loop deaf connecting
26r * On the front 7 long loops in each column of past row and 2 together *, i.e. E IE of two columns of the past row we make 1 * from * to * 6 times, the last loop deaf connecting
27p. On the involving side, I will see * 6 tbsp. b / n and 2 tbsp. b / n past row together * from * to * 6 times, the last loop deaf connecting
28r. * On facial 5 long loops in each column of last row and 2 together *, i.e. EE two columns of the past row we make 1 * from * to * 6 times, the last loop deaf connecting
29r. On the involving side, I will see * 4 tbsp. b / n and 2 tbsp. b / n past row together * from * to * 6 times, the last loop deaf connecting
30r * on facial 3 long loops in each column of last row and 2 together *, i.e e EE two columns of the past row we make 1 * from * to * 6 times, the last loop deaf connecting
31p. On the invalion side, I will show * 2 tbsp. b / n and 2 tbsp. b / n past row together * from * to * 6 times, the last loop deaf connecting
32P * on facial 1 long loops in each column of past row and 2 together *, i.e. EE two columns of the past row Make 1 * from * to * 6 times, the last loop deaf connecting
33r. I bind a green thread and knit without burning and adding the desired length of the stem, it is possible through 6-7 rows of mating with green thread to divert 2 loops, so on. E.2 times
Listers I did 9 pieces for each flower, but in principle you can smallest, since half the flower legs are in a vase

Long loops themselves, if anyone knows I try to explain, I combined two drawings, i.e., I did not use the wand, but just pulled the thread.
I still forgot about the leaves under a flower knit them according to this scheme, but first I recruit a chain of 12 loops, and then into each loop of 2 tbsp. B \\ N and the last 4 row we bind with semi-brass.


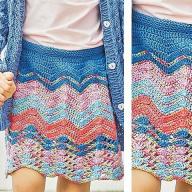
Summer hat is connected by crocheted white yarn. Decorative flower and satin ribbon decorate a hat, handing into a pattern hole.
The size: single
You will need: About 100g white yarn;
Hook number 2.
Patterns
Fantasy pattern: knit by Scheme
Used abbreviations:
V.p. - Air Loop
Seda. Art. - connecting column;
SBS - a column without Nakid;
C1N - a column with 1 nakid;
C2N - Column with 2 Nakid
Description of knitting
Crochet tie a chain of 8 in. n. And close it in the ring. Art.
1st p.: 30 C1N
2nd p.: 3 in. p. Lifting 2 in. p., * C1N, 2 V. p. *, repeat from * to * 14 times
Starch with a hat, unscrewing the edges, as shown in the photo. In the holes of the pattern to turn the satin ribbon and decorate with a decorative flower.
Capor Hat and Crochet Scarf

Size: 56.
You will need:
250 g of yarn (pan, "helen");
Hook number 2.
Implementation technique: crochet.
The main pattern "book": knit for crochet according to the scheme 19.1.
Knitting density: 7 rapports x 16 rows \u003d 10 x 10 cm.
Pattern model: 


Work description:
Execution of work: Tie on the pattern of Rodyshko (a), start from a narrow edge (\u003d chain of 12 V. P. + 3 V. lift) and knit the main pattern according to the scheme 19.1, gradually expanding to the 20th row to 30 p . Then knit a part covering the head (B), start from the bottom wide edge (\u003d chain out of 111 centuries. P. + 3 c. Lift) and knit the main pattern according to the scheme 19.1, gradually reducing the number of loops on both sides, gradually reduction The 20th row to fall up to 93 pp. The length of the parties A, B, and A1 should be equal to the length of the perimeter of the bottom without the length of its lower part. Connect the related parts on the front side (at the same time at the top of the dysheko, slightly dwells) with the help of a hook with one side of the columns without Nakid and 1 near the "raff" step ". On the edge of the facial part of the cap knit fields (c) the main pattern, evenly increasing the number of loops to 150 (\u003d 50 rapports). For side beeps on both sides, reduce in each row of 1 p. At an altitude of 6 cm from the beginning, it is necessary to finish, to tie the fields without lateral bevels "rachy".
Bow: Tie the main pattern according to the scheme 19.1. Rectangle, starting with a short side (\u003d 18 V. P. + 3 V. P. Limit), 12 cm long with a length of thread, tie "rachy". Send to the middle of the bottom middle of the bow, and the edges to the part covering the head.
Scarf.
Size: 26 x 135 cm.
Performance: Tie a chain out of 60 V. p. + 3 c. Lifting and knit pattern according to Scheme 19.2. At the end, to tie around the perimeter: 1st row - columns C / N; 2nd row - * 1 tbsp. s / n, skip 2 tbsp. previous row, 2nd P.*. By narrow edges, tie a fringe in scheme 19.3. On long sides, tie 1 row "rachy step".
A source:mailing --Darievna.ru.


Here is another description of this panama
Panamka for the girl "Chamomile" - Knitting
According to Scheme 1, perform the core of a yellow flower with a yellow thread. Next, tie 12 petals according to the white thread scheme. All petals Connect each other as follows: When the last petal is performed, then, without breaking the thread, take the 1st petal and reinstate it in three sides with. b / n. (one long side, rounding and one long side). So connect all the petals between themselves sequentially one by one. When the chamomile is linked along the contour, perform the second row of strapping with. b / n. In the center of chamomile, enter the core. Chamomile petals Refine around the edge:
1 r. - at 10 V.P. between petals, 2 s. b / n on top of the petal;
2 r. - 3rd. Lifting, knit the fillet grid, alternating 2 V.P. and 1 S.N. throughout the row;
3 r. - 3 V.P. Lifting, 2 s. n. Under the arc of the previous row, 1 S.N. In the column of the previous row, 2 V.P., 1 S.N. In the same column of the previous series, 2 S.N. In the next arc of the previous row, 1 s. n. In the column of the previous row, 2 c. p. And so to the end of the row;
4 r. - Fileeus grid (as 2 row). Tool Hats Tie the pattern according to the scheme shown in Fig. 3. The number of rows depends on the desired product size. Tie about 16 rows. For the full hats, tie 11 daisies for 9 petals on each.
To get fields, connect 11 daisies during their execution. Next, proceed to connect the fields and Tool hats with a crochet or needle and thread. Petals on the edge of the product Connect with a neat chain of air loops, as well as bars without an inlet.
Connect 11 chamomile for fields is needed in the process of their knitting. To make chamomile to lay correctly in a circle, make a template in size and connect chamomile on this template. When all 11 daisies are connected and interconnected, proceed to connecting the fields and Tuli Hats. Select a convenient method for you and connect the details of the crochet or needle with the thread. On the edge of the Hats, connect the petals among themselves with chains from in. n. and s. b / n. (Watch in the photo). 


The model is crocheted.
You will need:150 g of "Vista" yarn - equally blue and blue, slightly salad and green; wire; Hook number 23.
Knit a broken circle (Scheme 10): 6 r. - Salad color, 1p. - blue, 1 r. - Salatov, 1 r. - green
Sp. - Blue.
Then knit without adding: 4 p. - Blue, 4 r. - Salatov, 1 r. - blue.
Then tie 2 p. drawn loops (Fig. 96).
Refine a wire circle and attach to the fields. Side fields on a cap on the edge of the openwork stripes.
Model Olga Semikina According to the materials of the magazine "Caps" №455.
Schemes


The model is hooked.
You will need:150 g x / b yarn; Hook number 2.
Tie a hat to scheme 69., starting from a ring of 6 VP, and, starch hard, dry on the form.
Model of the faith of Kulikovskaya based on the materials of the magazine mod "Caps" №455
Schemes


Hat knitted crochet

Materials:
100 g of melange yarn "Paglia di Fiesole" Manifattura Mafil Di Ro Magna No Sesia
Hook number 5.
Types of loops:
VP - air loop
Seda. Art. - Connecting column
BTB - a column without Nakid
Saint - Column with Nakud.
Work description.
Crochet number 5 to score 4 VP and closure in the circle of compound. Art. 1st round. R.: In the resulting ring, perform 8 failures (replace the 1st failure in each r. 1 VP, and 1st Saint-3rd VP, finish this r. And the following rows of comprehensive. Art. in the port of the beginning of the row).
2nd round. R.: 2 TBI to each P.
3 and 5th Circle, R.: * 1 Sep, in the next. P. Slit 2 Sep *, Revat.
between **.
4th round. R.: ISP.
Bh Circle, R.: * 2 SBS, in the next. p. Slit 2 fails *, rep. between **.
7th Circle, R.: * 5 Sep, in the next. P. Slit 2 Sep *, Revat. between
**
8th round. R.: ISP.
9 and 11th Circle, R.: * 8 Sep, in the next. P. Slit 2 Sep *, Revat. between **.
10, 12, 14, 18, 20 and 22nd Circle, R.: ISP. 13, 15 and 23rd Circle, R.: Sen.
16th Circle, R.: * 2 SBS, in the next. p. Slit 2 fails *, rep.
Some **. 17th Circle, R.: * 3 Sep, in the next. P. Slit 2 Sep *, Revat. between **.
19th Circle, R.: * 4ssna, in the next. P. Slit 2 Sep *, Revat. between **.
21st Circle, R.: * 10 Sep, in the next. P. Slit 2 Sep *, Revat. between **.
Trim thread and finish work.
White takes a crochet (clichable scheme)


Summer Hate Yu_Yu.


Tips for performing hats when crocheted

Most often, the hats, performed by crochet, knit from above (from the top) down in a circle.
The circle is beginning to knit from the center, making additions in a certain order. There are several fairly common shapes of the caps.
Laws of flat circle
1 law. If the circle knit Art. b / n, then start in 1-p. with 6 tbsp. B / N, divide the circle on 6 wedges and add 6 columns in each row.
2 law. If the circle knit p / art., Then begin in the 1st p. With 8 p / art., Make a circle on 8 wedges and make 8 additives in each r.
3 law. If the circle knit Art. C / H, then begin in the 1st p. with 12 tbsp. C / N, divide the circle on 12 wedges and make 12 additives in each row.

Additions can be performed in several ways:
1 way. The increase is performed always on the last wedge column. Symmetric wedges with a noticeable line of additives between them will be obtained.
2 way. The increase is performed always on the first column of the wedge. Asymmetric wedges will be obtained, slightly spinning to the right, with a noticeable linte of the add-ons between them.
3 way. Additions are performed in each wedge so that they are not located on each other. A flat circle will be obtained without visible lines of freight.
What method of performing add-ons to choose depends on your desire and the planned model.
1. Classic round cap.
The selected columns knit a flat circle with a diameter of 12 cm, making absorbs in each row. Then the increase is made via a number to the desired sizes of the header equal to the scuffing of the head (OG). Further knit without adding to the required height of the header.
2. Cap slightly elongated.
The selected columns knit a circle, but with fewer additions. If knitted art. B / N, then begin in the 1st p. with 5 tbsp. B / N and make 5 add-ons in each row. If knitted art. s / n. then start with 10 tbsp. S / N in the 1st p. And they make 10 add-ons in each row. And so knit until the desired scribe of the head. Further knit without add to the desired height of the header.
3. Cap "Kubank".
The selected columns knit a flat circle to the desired scuffing of the head. The diameter of the circle is equal to the scuffing of the head, divided by 3. Further knit without adding to the desired height.

Accessses for hats, practical advice


Knitting flowers with crochet or on the needles is not only an exciting hobby, but also the opportunity to get a unique accessory.
Multilayer chrysanthemum is a sufficiently difficult flower for knitting, requiring certain skills from Hendmadera. However, the result is worth their efforts - a bright flower will become an excellent decoration for clothes or hair. Crochet Chrysanthemum Knitting Schemes below.
Chamomile looks best when there are several pieces. A row of daisies can be decorated with a gate of the jumper, use as a belt or a bandage on the head. White flowers with sunny middings in any place will be given a cheerful summer mood.
Rose - Flower of lovers. That is why the knitted accessory depicting this flower is suitable for evening exit. Blind one or three flower to the lapel of the blouses - this will task the romantic style to your dress and make it original.
Light elegant dahlia is suitable for daily dressing. It will be great to look in dark loose hair or on the lap blouse. Contrast beads in the middle of the flower are beneficial to emphasize and shade the whiteness of the petals.
Below you will see the chamomile knitting schemes, roses and dahlia crochet.

Lush poppy bright red, as it is impossible to suit black clothes. Playing on the contrast you can make ethnic Latin motifs in any outfit. In the evening, it will be relevant to pinch poppy to the hair over the ear or decorate them a high tail.
Light and air magnolia will look great in the hair of a young girl. Lace petals as it should not be better combined with bright beads of the model of the flower. Together they create a fresh ensemble and symbolize youth and purity. See the schemes to these colors.

On the thick of the monotonous winter sweater will be appropriate for the "Mac" necklace. Pastel muffled tones of petals are perfectly combined with a bright pink flower and together serve as a reminder of warmth. A little bit of summer on a cold winter day - what else is needed?
Description of knitting this necklace.

Magic bouquet - excellent decoration for children's winter hats. A large bright flower with raspberry petals will allow the girl even in a gray winter day to feel elegant. For a small child, it is better to tie a more loose flower so that he does not waste the hats.