Some types of manicure remain popular over the years. One of the classic neul decor variants is the lunar manicure, which remains in demand and desired at any time. Today we consider it features and learn to perform this very beautiful design.
Features of lunar manicure
The lunar nyl-design was obtained due to the strip at the base of the nail - Lunule, which has a sickle shape of a young moon. In the West, this kind of Neil-Art is called "Hollywood Franch" because of the special love for celebrities. Modern stars Vanessa Hudgens, Beyonce, Rita Ora, Rihanna, Shakira and many others have been noticed with such a design of nails, both on red carpets and in everyday life.
In Russia, the lunar manicure is customary called "reverse french". When creating a traditional Franch on the tips of the nails draw a color or white arc, and with the reverse version of the Franch, a hole is released, located near the base of the nail.

In the classic design of the hole, it is separated in a contrasting color smoothly or arcuate, and in modern neil decor it is very often made in the form of a triangle, and also covered with a glitter, rhinestone or foil. Despite the fact that the oval shape of the nails was previously considered the most suitable for the lunar manicure, today it decorates and square marigolds of different lengths. 
Another interesting design variation based on Franch is Ruthfian:
What is nail design ruffian, manicure ideas, instructions
If you are from among the fans of Hollywood Franch, but before that trusted the creative process only to masters of the nail service, I hurry to delight you! Lunar Neil Decor can be done at home.
Preparing tools
Stylish Hollywood Frenc can be performed using the usual varnish of contrast colors and a set of stencils. However, I want to note that the Neil-Decor created in this way will please the eye very long. So that the results of your work are preserved for a long time, it is better to use a more resistant coating, such as gel varnish. But in this case, the list of necessary tools will increase significantly, since the gel polymerization will require a special fluorescent or LED lamp.
If you have a resistant and high-quality manicure, before you begin work on the lunar neil decor, you need to prepare:
- standard manicure set;
- degreasing means for the nail plate;
- base under gel lacquer;
- two contrasting shades of gel varnish;
- means for fixing the coating;
- tassel or set of stencils for lunar or French manicure;
- elements for decorating (glitter, rhinestones, translated foil);
- special lamp for nail drying.
 Technique implementation
Neil-industry professionals when creating a reverse french, use various decor appliances on the nail plate:
- With the help of self-adhesive stencils. The design is created using special stencils in the form of circles. For this purpose, you can also use conventional strip stencils for Franch.
- Using a thin brushes, which is convenient to draw wells from a nail base.

- With the use of colored foil from which the elements of the desired shape are cut and are attached to the lunule with a special glue. Given the decorative properties of the foil, it can be used to create an original festive or evening manicure.

- With the help of rhinestones, glytter, hembling and other decorative materials that can turn Neil-art to real artistic creativity.

How to choose shades for Hollywood Franch
To create the original moon manicure, you need to pick up two contrasting lacquer. It is possible to make a focus not on color, but on the texture of the coating. Often, a matte and glossy varnish of loved ones or identical shades are used for this purpose.
The most successful combinations of colors for the lunar manicure are considered:
- pink - white;
- blue - white;
- red - transparent;
- blue - transparent;
- lilac - silver;
- red - golden;
- gray - white;
- raspberry - brown.
For everyday lunar neul decor, bed shades are best suitable, such as light pink or coffee combined with white. When creating a manicure for holidays and celebrations, you can experiment with varnish bright colors with sparkles.

Lunke design
The Neil-Industry uses a huge number of modern design options. The classic view of the lunar manicure is a free or transparent well against the background of the red coating.
Most often, the wizard of the nail service make a neil decor with a concave well or a familiar hole in a natural form. Its filling is performed in various variations, for example, the well can be made double or triple. The size of the well is chosen taking into account the characteristics of the structure and shape of the nail.
A peculiar trend of recent years has become a lunar neil-design with a triangular well, which not only is varied with varnish or remains transparent, but also laid out or duplicated by rhinestones. To obtain an acute angle, two stripes are used, which are superimposed in the right direction.

Creative masters skillfully combine the lunar nyl-design with a fries. This combination is always beneficial and refined. If you are the owner of the nail almond-shaped, then this option is the most winning for you. Franch-Ombre or Frenc in the style of precious metals in combination with the lunar neil decor as it should not be emphasized by your personality.

Examples of execution with step-by-step instructions
Since the beautiful and neat lunar manicure is not always the first time, before you begin to work in creativity, you need to deal with the technologies and features of the application of the Neil Decor. So that the result did not disappoint you, you do not need to start with complex types of decoration, it is better to give preference to a classic style.
Step-by-step instructions for performing a Hollywood Neil decor using a set of stencils:
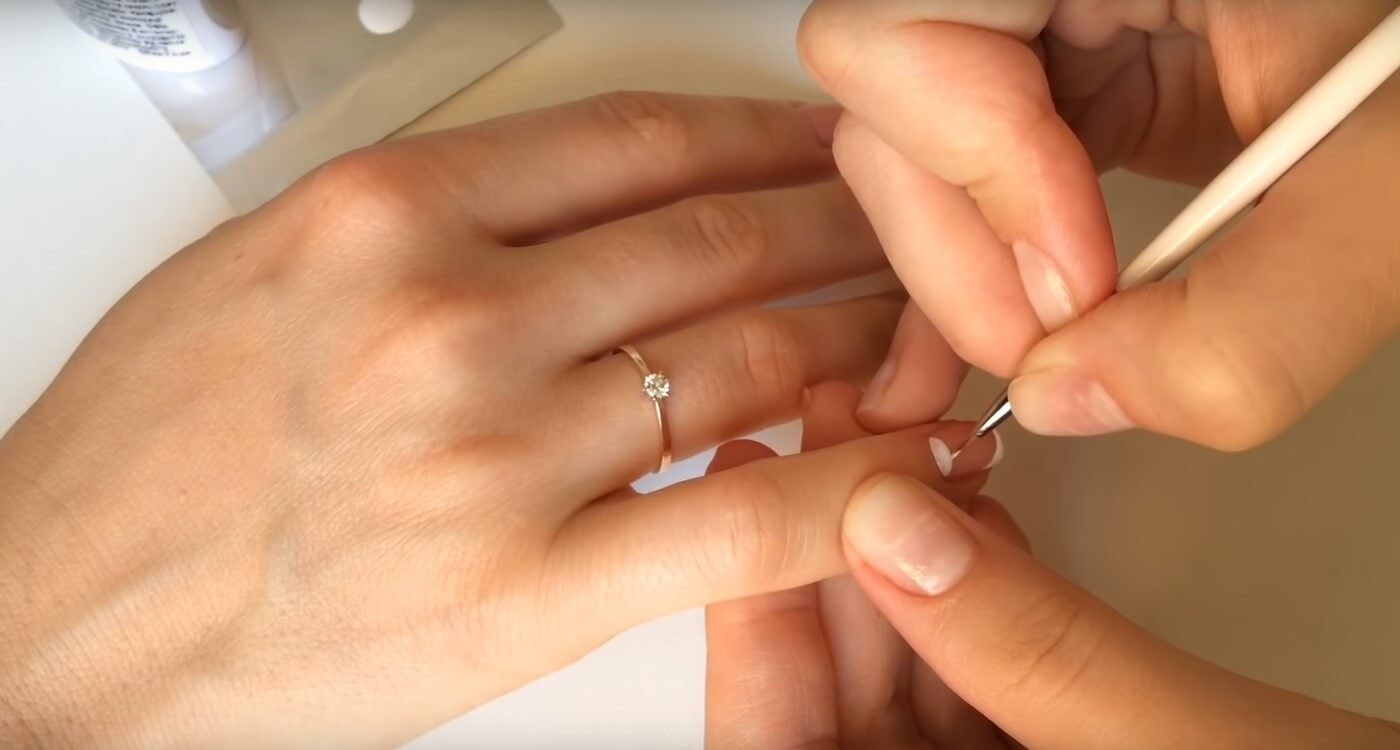
- To prepare nails to Neil Art, it is necessary to give them the desired shape using the saw, and then remove the cuticle. The surface of the nails should be pasted to remove the excess moisture, which may make it difficult to apply lacquer.
- To protect against color pigments and other harmful substances contained in varnish, nail plates need to be deguted. To do this, use a special base coating, such as SOAK-OFF GEL BASE.
- I dry nails under the UV lamp for a minute, 40-50 seconds for each hand.
- With the help of a tweezers, we separate round self-adhesive stencils from the base and glue them at the base of the nail, so that the wells are the desired width.
- Open parts of the nail plate are covered with a gel varnish of the primary color. So that it is more saturated can be applied in several layers.
- Spread stencils and dryly painted nails under the UV lamp. Duration of drying for each hand is 2 minutes.
- The unscrewed nail area in the form of wells is covered with transparent varnish or base.
- We had a classic view of Hollywood Franch, which is ideal for a business meeting or a romantic date.
If you easily cope with the first option, and you want to create an original and exquisite manicure for a special case, I suggest you combine the Lunar Neil-art with a classic journey.

Step-by-step instruction in the beautiful lunar french:
- Pour and degrease the nail plates using the base coating

- Hanging nails under the UV lamp for about two minutes.

- We apply for the entire nail area of \u200b\u200bthe lacquer of the basic pink shade. If necessary, repeat the procedure.

- We dry the applied layer of gel varnish under the UV lamp for 2 minutes.
- With the help of a thin bruster and white varnish around the edge of the nail, we draw a thin arc.

- Macaus brush in white varnish and planning an arc boundaries near the base of the nail plate. Then paint the well completely. At this step you need to be especially attentive and neat. The wells on all nails should be the same width, and their edges perfectly smooth.
- At the final stage of the nails we cover the finish fixing lacquer Topcoat and driving each hand under the lamp for 2 minutes.

Several uncomplicated tips will help you in creating a unique image. Here are a few tricks in order for the lunar Neil-Decor to be beautiful and elegant from the first time:
- After polishing the nails, it is better to remove the resulting dust with the non-pillows of the fingers, but a special tassel.
- Before applying a layer of varnish, check that all strips for Franch are pasted exactly, and the distance from them to the edge of the nail was the same.
- Cross the nail plate with a thin layer and do not go beyond the strips.
- If you want to decorate manicure by rhinestones or sliders, then do it on one or two fingers, otherwise Neil-art will be too vulgar.
- In order for the finished manicure to look neatly and well, the lining area has a cuticle with feed oil. It will help to recover the skin on the cropped areas.
Spring Trends of Lunar Neil Art
In the spring, when the sun pleases us with warm rays, and all nature wakes up from sleep, every fashionista wants to look like a special. Spring Neil-Design will help create a romantic mood and conquer the heart of a beloved man.
If you still do not know which manicure will decorate your gears in this spring, I propose to pay attention to several ideas of Moon Neil Art:


Lunar manicure is not a new trend in the beauty industry, it was popular in the 40s of the last century. In those days, it could often be seen on the hands of world stars. Perhaps that is why the lunar manicure is also called Hollywood joures. Now he also does not lose its relevance and looks stylish on modern fashionable. The technique of execution of such a manicure is simple, it is necessary to master it for each, it is necessary only to stock the necessary materials, tools and a little patience.
We prepare the necessary materials
Lunar manicure is often compared with the classic French manicure. They have a similar apparent technique. The only difference is that the edge of the nail is painted in the French version, and in the lunar - its base. It is there that the bright focus is made in the form of the moon. Hence the name. If you approach the interpretation of the name from a scientific point of view, it may have happened from the word "Lunula". This is the name of the nail base, which shape resembles crescents.
In the lunar manicure, unlike French, the focus is made not on the tip of the noggle, but on its foundation
No special tools and materials to perform this stylish manicure at home will be required. You can do even by ordinary varnish. However, for a longer result, it will be better to stop on the gel lacquer or other coating. But then you will definitely need a special LED or fluorescent lamp for the polymerization of gel coating.

In modern Neil-art, it is difficult to do without ultraviolet lamp
For the lunar manicure you will need:
- set for manicure;
- means for degreasing;
- base under gel lacquer;
- two contrasting gel varnish or similar shades (depends on the idea you want to embody);
- fixer;
- stencils (there are special, which are used for French manicure, but you can make them yourself) or a thin brush;
- special lamp for drying gel varnish.

With the help of gel varnish, you can create a wide variety of moon manicure
Getting started
Only at first glance it seems that the lunar manicure is impossible to do. In fact, everything is not so difficult. There are different techniques for its execution. Who knows how well draw, he will be able to apply the lunar drawing with a thin brush. Someone is more convenient at first to take advantage of special stencils or other handicapped materials (sometimes instead of stencils, they are advised to take ordinary tape). In any case, each can cope with the task.
How to make a manicure with brushes: step by step instructions
- We put your hands in order, we remove the cuticle, flatten the shape of the nails, slightly grind them with a sawn.
- We apply the basic coating and give a couple of seconds to dry below the lamp (in the UV lamp - 2 minutes, in the LED lamp - 30 seconds).
- Covered the estimated area of \u200b\u200bthe "Moon" by the first gel varnish (in our case - white). To get thick and rich color, you need to apply two layers.
- With the help of a thin bruster and contrast varnish (in our case - blue) draw the border of the "Moon". We do it slowly so that the drawing turns out to be neat and the same. If it is impossible to spend a flat line, try to put three pointing points on the nail: the first is in the center of the nail, and the other two - along the edges, where the line will begin and end. Now connect these points.
- Cover the nails with the top and dried under the lamp. Lunar manicure is ready.
Pain in a few layers the top of the nail.
Manicure with stencil
Mixing stencils are a real find for those who like to experiment at home. Special stickers greatly facilitate the task of creating a stylish manicure. With their help, it turns out even and flawless. And if you buy stencils of different forms, then also original.
You can find stencils of different types.

The main stages of the appliances of the lunar manicure using stencils:
- Apply the second varnish stencil. When it dries well, remove neat stickers. Cover your nails with the top.
Prepare basic varnish, top, two contrasting varnish and stencils.
Cover your nails with the basis (let them dry), then varnish, which is selected for the well. It is advisable to cover them all the nail record so that it is smooth and the second varnish was well on it.
Stick stencils when the main varnish is completely dry. If you have chosen curly stickers, try to glue them equally smoothly on all nails, otherwise the manicure will look carefully.
Photo Gallery: 20 ideas for lunar manicure
Lunar manicure fascinated fashionable worldwide
Rhinestones make lunar manicure more festive and elegant
Simple, but very attractive version of the lunar manicure
With stencils every fashionista can independently make a beautiful lunar manicure
Lunar manicure is easy to find out on the highlighted "crescent" at the base of the nail
Option for those who bought classic manicures
Red lunar manicure is doubly popular
To create a lunar manicure, it is fashionable to use not only bright, but also pastel colors
Moon manicure is able to emphasize the romantic image
For lunar manicure, not only oval, but also a square shape of the nail
Original and simple solution for everyday manicure
The lunar manicure with a double circuit is also simple
Sometimes moon manicure combined with french - it turns out unusual and stylish
White-pink manicure - a non-frosting classic
To make a double moon manicure, you need to use a stencil several times
Another fashion trend - making a lunar manicure with a transparent line
Moon manicure looks perfectly both on long and short nails
This version of the lunar manicure will help create a bright image for holidays and parties.
Extravagant and bold decision will emphasize your individuality
Original version of the bright lunar manicure
This is not a novelty in Neil Art. It has long been used fashionable worldwide. And he likes first of all for being able to visually lengthen the marigolds, make them even more elegant.
What is the difference from the ordinary lunar manicure?
The classic lunar manicure is the presence of a contrasting "crescent" nail. In the reverse lunar manicure, in addition to the hole, contrast varnish is still covered by the contour of the nail.

Reverse Moon Manicure Visually Landshes Nails, makes hands more sophisticated
Usually, two contrasting varnish are taken for such a manicure, one of which is white - they draw a kaym. You can often find a white-pink or red and white combination, but other combinations are not excluded. Recently, it became popular to use golden or silver lacquer for the contour strip.
Video: How to make the reverse moon manicure at home
Moon manicure is always fashionable, stylish and creative. He is appropriate on weekdays and holidays, ideally looks at long and short nails, suitable for fashionable all ages. Lunar nail design is an excellent addition to a strict suit, bright summer dress or exquisite evening wardrobe. But his main dignity is the simplicity of execution. Try and see for yourself!
It appeared several years ago and today is at the peak of popularity. This is not only a great way to revive the style and add a little extravagance to the image, but also the ability to create a bright accent, which will certainly pay attention to others.
What is the lunar manicure, and how to do it?
The well is a white section of the nail plate, which is located right near the nail bed. In fact, the technique of performing such a manicure is similar to Franch's technique. But, if the French manicure highlights the edge of the nail a kind smile, the lunar manicure emphasizes the hole. The semicircle should be optimal shape and must create the effect of a real well. The lunar technique is a great solution for those who want to emphasize the beauty of square or rectangular nails. Although, of course, the lunar manicure is able to beat absolutely any shape.
How to make a lunar manicure?
So, to create a lunar manicure, two or more colors are necessary. The most popular color scheme of the lunar Neil-art include the combination of red-black, beige-white and blue-purple shade. It will be appropriate to use and pearl tones, as well as gold and silver. Kaimka can also be formulated along the transition line by any decorative nail accessories.


Consider the technique of creating a lunar manicure step by step. Well, firstly, it is necessary to put the handles themselves. To do this, you need to make a manicure and remove the cuticle. The prepared marigolds are first applied to the base, it is necessary to protect the plate from the aggressive effect of coloring compositions, and also contributes to the fact that the lacquer or gel varnish lay down exactly - without spreads and bubbles. Next, it is necessary to draw the well - the color has already selected with the help of the brushes manually puts on the nail plate area. It is necessary to wait for a part of the projected nail to dry. After the master closes the already painted well and causes the second color to the remaining surface of the plate. On the finish line will only remain fixing the manicure final coating or a matte top. On top of this two-color design, you can apply a special ornament or draw some drawing, you can also cover marigolds with sparkles to create a flicker effect. Another decor variants are a piece of lace or grid over the border of two colors or on the edge of the nogot. The classic vintage lunar manicure in general assumes the game of one color - the hole remains a natural shade.
Bright lunar manicure
Bright lunar manicure has a lot of variations. The darker or rich color you choose for the lunar manicure, the brighter and more effectively will be your marigold. You can choose shades absolutely any, there are not the colors themselves as such as such, namely their combinations. Everything should be harmonious, because it will tell you about your taste and will emphasize the style. No stereotypes and templates are a master is free in experiments and the only one who can stop it is a client. Despite the lack of general rules, there are a number of unlawful recommendations. Well, for example, the combination of matte and pearl covering composition is not welcome in one manicure, for everyday socks it is better to choose classic shades and textures, but bright and daring combinations can be used to enter the light. From trend combinations, you can allocate a Tiffany style manicure (combination of turquoise and white) and Valentino (red-black base and well in any order). Bright and juicy shades, most often preferred in the summer. Moreover, many love to experiment with the design on different nails. The main rule: not to overdo it - everything should be in moderation, because the lunar manicure itself is already "accent."


Lunar manicure Shellak
If you want the manicure to keep as long as possible, then it is worth paying attention to long-term coatings. One of the most sought-after today is gel varnish. This is an innovative coating that can hold out without chipping and cracks for two to three weeks. In essence, the use of different compositions of the technique of performing the neur-art itself remains unchanged. Therefore, if you do such a complex design, then perhaps it is better to prefer resistant coatings. Lunar Frenc Shellac will make your marigold neat long. By the way, the lunar manicure is the most popular view of Neil Art.
2 in 1: Lunar Frenc
Another popular design is the combination of the lunar manicure and Franch, when the nail is framed and a smile, and a hole. It is very important to comply with symmetry so that the bends of the wells and smiles are the same and looked harmoniously.


How much is the lunar manicure - the price of the procedure
The price of the lunar manicure depends on the level of service and the competence of the wizard. In general, the cost of such a coating is not very different or is not different from any other Neil Art. Therefore, if you wondered how much the lunar manicure with Gelcomm is worth it, and what the price for the procedure is considered optimal, then we can designate the boundaries: 1000 -1500 rubles.
Share:Well-groomed female hands are that it is always nice to see anyone. One of the elements of hand care is a regular manicure and nail coating with varnish. Ideas for design is very much - from classic french to a gradient manicure, using magnetic varnishes and various stickers. One of the actual ideas of this season is the lunar manicure made by Shellac.


What it is
Lunar manicure is a view of a manicure, in which part of the nail at the base (lunula) is covered with varnish, different from the main color, forming the shape of the crescent. For the first time, he appeared in the 30s of the 20th century and was called "Reverse Frenc". The second wave of popularity began in 2010 after showing the fashion house of Christian Dior and continues until now.


The last few years is gaining the popularity of manicure, made using shellac. In this age, combining a gel to build nails and ordinary lacquers embodied the dreams of girls about the perfect manicure. Here are some of the most advantages of this type of cover:
- Can stick on the nails on average for 2-3 weeks and remain attractive;
- Resistant to external environmental impacts (not erased, it does not rock, does not scratch);
- The rich palette, which includes both basic basic colors and the latest fashionable novelties, which gives space for self-expression and experiments;
- Also one of its properties is the effect of strengthening, which can afford to be considered weakened and brittle nails;
- The composition of the shellac does not include formaldehyde, various resins and other hazardous substances - it is non-toxic.
The lunar manicure, made by the shellacus, will last up to 3 weeks, will delight with many color solutions and help restore the nail plate.


New design
When such a type of design appeared, the lunula was left in an impaired, and pink varnish were applied to the rest of the nail. Then became fashionable inverse Moon manicure, when the hole was wondered, unlike the execution, in the opposite direction adopted today. At the moment, the versions of both the color range and for options for additional decoration are very much and limited, mainly, only the fantasy of the master on a manicure or a particular girl (at home execution).
As Lunar manicure looks better on nails of medium length or longT. for short nails there is a solution - a seric manicure. To perform it, you need to repeat the contour of the nail base - it turns out a concave crescent.
This design will be especially stylish with the use of metal shades - they are now very popular.


If traditional wells seem boring, then you can refresh the image with triangular variant of manicure- Drawing at the bottom of the nail is not crescent, but a triangle. Such a design also visually extends the nail plate, and the use of contrasting colors will attract attention and makes talk about yourself.


For evening reception or dating, even triangular shape is not enough - then it will help Design using rhinestones. When performing a manicure in restrained shades, rhinestones will give the necessary solemnity and brightness, but they will not look superfluous.
For a more elegant image, designers advise the use of rhinestones not on all nails, but, for example, on one on an unnamed or unnamed and middle fingers - such a light accent looks very feminine.
Rhinestones do not always look appropriate in everyday life, but there are girls who love to be bright and noticeable even when a shopping and pay for purchases. For them, the way to stay so - manicure with sparkles.He has several versions - for example, covered only the lunula sparkles, only the main part of the nail or to use a brilliant coating as the top at the completion of the manicure. And as in the case of rhinestones, it is possible to cover sparkles not all nails, but one or two on each hand - for a moderate accent.
Very gentle design version using a light shade of primary color (for example, beige, pink, white, blue) and gold or silver elements - This is not the painting of the lunula completely, but only the designation of the boundary between it and the rest of the nail. It combines the last trend of the season - glitter, and the restned base allows you to wear such a manicure for a long time and combine it with all the elements of the wardrobe - from T-shirts and jeans to evening dresses.


In order not to redo the lunar manicure, made using a shellac, quite often (as the process of its application and removal, although not very complex, but still labor-intensive), if, say, the color or picture is no longer happy, you can exit the position with the help Simple nail polish. You can add a thin brush with it, you can add the finished manicure with additional design elements - for example, peas, lines of different directions, draw flowers or decorate the border of the manicure.
Such add-ons will be erected by a simple lacquer fluid, it does not take much time, and thus you can provide an update at least every day.


The trend of the combination of styles that are incompatible at first glance is supported not only in clothing, but also when designing nails. Lunar manicure with a jar with a fruit with the use of translational pictures on some nails, mixing the standard and reverse lunar manicure, the simultaneous use of the traditional and triangular design of the lunula - all this allows you to call the lunar manicure one of the most universal species of nail design.
Colors
The color execution options of the lunar manicure are almost endless - the main thing is that the colors are still combined with each other. The general recommendation before going to the Master on Neil-Artu is to analyze the flower palette of his wardrobe. Since the manicure made by Shellac is holding up to three weeks, wearing it will have long, so it is important that he harmonized with clothes.
Do not choose too bright neon colors, if there is no particular need, after a while they can start annoying.

The most natural version of the performance is transparent wells and the coating of the main nail with pink or white color. Pink is close to the shade to the color of the nail, and therefore such a manicure will be appropriate for those who work in the office with a strict dress code, and for a walk on a date, and for every day. Hands will look neatly, pleasant and feminine, while not attracting excessive attention to themselves.


If there is a desire to try something more saturated within the office, you can use red, blue color for nail well design.


Golden and black colors are one of the most successful combinations for a solemn event.It will suit almost any along and give a luxury image.

In order to create an image in the style of the 20-30s, most Suitable will be varnishes burgundy, cherry, red and scarves.It is important that the lipstick be sure to be the same shade - this is one of the conditions of the fashionable Neil-Art of this year.


This season in trend bright warm colors - yellow, red, orange and their shades.They will be fresh and in the summer to look in combination with white - no matter what kind of nail with some color to cover. It is interesting to use one color of different shades - for example, blue and blue.
Good addition - brilliant varnishes, gold and silver - hit this summer.
How to do at home
One of the advantages of the lunar manicure is a relative simplicity of fulfillment at home. Each girl, regardless of the material situation, if desired, can try the latest trends on itself and match the fashion.
Make the lunar manicure shellac at home can be three ways: using a stencil, with a foil or tassels.
Having considered how to make a manicure to make each of the proposed ways, you can choose the most optimal for yourself.


For domestic manicure, you will need:
- For pretreatment of nails, remedy for removing cuticle or special tweezers, sawmills of different hardness for the treatment of edges and nail surface, degreaser;
- Basic coating;
- Two gel varnish of contrasting colors;
- Top coating;
- Means for removing the sticky layer (suitable, for example, isopropyl alcohol);
- Lounge napkins;
- Cuticle oil;
- Stencils, transferable foil and glue for it or a manicure brush depending on the selected method;
- Ultraviolet lamp.

Using the stencil.
Stencils are a good solution for those who are just begins to comprehend the basics of manicure.They will help newcomers to achieve neat manicure and smooth lines. This method is most simple and therefore widely popular. It consists of the following steps:
- If necessary, you need to make a manicure: remove an excessive cuticle by any convenient way, to write the nails, giving them the desired shape, degrease the nail plate - this will provide the best grip with the nail surface and will last longer;
- Apply the basic coating and dry it in the UV lamp. Each layer of gel varnish requires drying for 2-3 minutes;
- Covered by varnish of the color, which is designed to paint the well all the surface of the nail and dried. If necessary, for a more saturated color, you can apply gel varnish in 2 layers, then each will be dried separately;
- Cover the place of the hole and apply the main color of the main color in the 1-2 layer gel lacquer, driving;
- Fix almost ready-made manicure with a top, last time place under the lamp and fashionable manicure is ready!


Using foil
Foil is also an option for those who want a neat manicure, but not confident in their abilities. A variety of bright, brilliant shades, ease of execution made this technique attractive. Foil design is made as follows:
- We repeat the paragraphs 1-2, as when working with stencils (manicure-base);
- Cover the nails with the main color of the varnish in 1-2 layers, we succeed;
- The place of the wells is processed by special glue (foil is imprinted with it);
- When the glue serves a bit, we apply a small piece of transferable foil to this place, keep a few minutes;
- With a sharp movement remove foil. If the hole turned out to be uneven, then repeat items 3-4 again. If the drawing turned out, we apply the upper coating and dried.
For a detailed manual for performing this manicure, see the following video.
Tassel
Tassel - tool for more experienced girls.It requires accuracy and a hard hand and is interesting in that, unlike foil and stencils, it offers more opportunities - for example, to make the reverse moon manicure. In order to make manicure tassel, you need:
- Treat nails and apply a database;
- Apply the primary color varnish in 1-2 layers, dry;
- With the help of tassels, paint the well at the bottom of the nail the desired color and dried under the lamp again;
- Apply a fixer and dry the last time.


There are several lacquer techniques when performing manicure with tassels, considering that you can choose the most suitable and convenient:
- 3 option - Apply the main cover, leaving the untouched place of the future well and dry, and then paint it and dry the layers.
1 option- Conduct the brush of the outline of the hole, paint it into two layers, drying each for 2 minutes, and then on the rest of the nail to apply the main coating and dry.
Option 2 - Use the main coating of 1-2 layers, dry, then draw the outline of the well and paint it. This method is most often found on the reviews of girls most convenient.
The techniques of fulfillment and lessons on them lunar manicure are largely similar, but at the same time they are different in terms of difficulty, which will allow you to learn how to perform a manicure shellac at home and gradually move towards more time-consuming technologies.

So that the manicure looked worthily and professionally, should be attentive during his execution and remember some rules and nuances that will help avoid mistakes. Properly made manicure will last long, if you follow some tips:
- When performing a manicure using a stencil before placing a hand under UV lamp, it should be carefully removed all stencils. If you shoot them after drying, when the lacquer becomes solid, then the edges will turn out with ripped, inaccurate.
To make a drawing, made with a manicure brush was smooth and neat, there are also stencils with a cut-out of the desired shape (heart, stars, drops). You can do them yourself, cutting out from ordinary paper.

- The optimal power of the ultrafaite lamp for drying varnish is 36 W. It allows for a short time (about 2 minutes) to dry the lacquer on the surface of the nails at the same time.
- Sometimes it happens that the hand under the lamp lies not quite exactly, and then the gel varnish flows a little one way. If it happened or other irregularities were found on the surface of the nail in the process of manicure - do not hurry to shoot it and do everything again. It is enough to cut irregularities, and the ugly look will be corrected with the application of the upper coating.
- Another reason for an uneven coating is the application of the layers too thick layer. It is better to apply two thin layers than one dense - the color of the manicure does not suffer from it, but it will look very better.
- After the last, fixing the layer of varnish is dry, it is necessary to wipe all the nails with a lint-free napkin moistened in the liquid to remove the sticky layer - it will give a shine manicure. It is not necessary to save and use a cotton disk - the villi drive can stay on the nail surface.
- It is important to know both how to remove the varnish. First, the nails are slightly processed with a pailer with an abrasiveness of 180 units. Then each nail should be wrapped with a cotton disk, moistened in a special fluid for removing the gel lacquer, and over the top to wrap it with foil and keep about 10-12 minutes. During this time, the varnish must move on its own almost completely, and its remnants are easy to remove the orange tree with a wand.
It is not necessary to replace the shellary for removing the shellac on alcohol, fluids for removing ordinary varnish with acetone content, vinegar and other solvents - they can cut the skin of the fingers and even leave behind the burns.


- Since the ultraviolet dries the surface of the skin of the hands and the skin close to the nails, do not forget about the care after the manicure. So that the hands remain well-groomed, it is worth using moisturizing cream and oil for the cuticle. A light massage of the skin will be useful, close to the surface of the nail - the influx of blood will provide additional nutrition, recovery and strengthening.
- It is recommended to give nails from time to time to relax from any coatings. Whatever restoring and strengthening properties would have a gel varnish, the nail plate need to be obtained for nutrition. Usually, no less than a week is required to restore the water-fat balance of nails. The best nail mode is two manicure cycles, then 20-25 days of recovery.
- If the lacquer exfoliates ahead of time, it is not necessary to blame the masters in this manicure or yourself if the manicure is made at home. The detachment may be due to the individual characteristics of the body, avitaminosis, the use of certain types of drugs, violations in the hormonal system.
- Also on stability affects the frequency of homework - cleaning, washing, washing dishes. The temperature change leads to a periodic expansion and narrowing of the nail plate, as a result of which microcracks leading to a subsequent detachment may be formed under the coating.
Remembering these simple rules, you can not doubt that the coating will delight your owner and will not weaken and will not damage the nail plate. These tips on the technology of applying gel varnish and nail care are suitable for performing any kind of manicure - moon, reverse, with rhinestones, with foil and many others.