Option number 1 (sitting zai) - well, a real man in pants).


Opening hours 4 hours. We will need two types of fabric, I chose gray linen for the calf, and red checked linen for clothes.
We transfer the pattern to fabric 
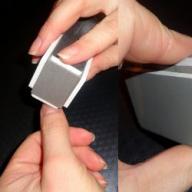
We cut out the parts of the hare, do not forget to leave allowances for the seams, about 0.5 cm.Then, after stitching the parts, we will cut it shorter, leaving about 0.3 cm. If the fabric is crumbled, you can process the edges with a solution of PVA + water glue in a ratio of 1: 1. The PVA glue is transparent and no traces will be visible, and in order for the edges to be not so hard, water is added. 
We sew parts, you can turn them out. Straighten the seams as we turn it out. 
Let us iron it and start filling, tear off small pieces from the filler and push it into the part, you need to do it tightly enough. 
Parts of the future hare, ready for assembly. 
We wrap and baste the fabric along the edge of the hare's body. 
We put the legs, make sure that both legs are the same length. We take the legs and sew the bottom of the calf together with the legs on a typewriter. Now we have a hare that can sit) 
With chalk we outline the place of sewing hands or what happens there with hares, paws? Sew on with a blind seam. 
Well, quite such an independent hare turns out, already with arms and legs.
We sew a hole with a blind seam, which we needed in order to turn out the ears. 
Sew on the ears 
Now we have a hare not only with arms, legs, but also ears.
We outline the place of the future eye and nose with a needle. We embroider the nose. With the back end of the brush, paint the eyes with acrylic paint + a little makeup. The cheapest blush was bought especially for such purposes, we shade it a little and apply it with a brush. 
From a bright fabric, we cut out a hat 2 parts and legs 4 parts. Cut out, leaving seam allowances. 
Sew two legs as shown in the picture. 
The side seams of the future pants have been sewn, now it remains to sew in the middle and the trousers. 
These are the pants turned out. Now the cap
Two pieces sewn together 
Now we screw one half of the cap inward. 
Here, it turned out to be almost a Napoleonic cocked hat)

Cut out the breast for the pants and the strap 
We sewed one strap and a breast of the pants about 5x5 cm. 
In order to sew the straps at the back, we put the pants on the hare and sew on it. 
We make the straps cross-to-cross and sew. And we dress the bunny. I tied a few straws around my neck. 
all the hare is ready! I don't know about you, but I definitely like it :)
even our bunny can be dressed up in this apron:


option number 2 (standing bunny) - and here is the girlfriend - baby Lucy))):

All we need: fabric for the body - linen (preferably with 5% elastane), for a dress - cambric, for ears - cotton, for a beret - fleece and yarn for a pompom, cotton lace, brads (decoration for a belt), floss threads for a spout, acrylic paints on textiles for peephole, glue (special for fabric), threads, needles, pins, scissors and filler. and of course good mood!
So ... we cut out, sew the parts and get one little body, two handles, two legs and one ears :) iron it, carefully turn it out. 
stick for sushi (most conveniently) plump and very carefully stuff the legs and handles so that they are free of bumps, but at the same time do not come apart at the seams! after we pin it with a pin and put it aside.
stuffed both legs, and in order to make sure that they are of the same length, we put them side by side and compare. the same? stand steadily? then let's move on :)
we proceed to stuffing the calf. the most dangerous moment is the neck. we must try to make it so that it is without creases. and when the body is completely filled with padding polyester, then the edge must be folded and stitched manually as shown in the last. photo, leaving room for the legs. 
then we try on the legs and, making sure to fix them evenly, sew with a blind seam. 
these are the straight legs, but, unfortunately, our bunny won't be able to sit .. it's a standing bunny :)
finished with the legs, go to the handles - we do everything by analogy. 
eyelet - one side beige, the other turquoise. leave a hole for turning out. 
start at the tip. and turn it around like removing the socks from the feet :))
twisted, ironed, admiring. if you like it, then we sew further. 
dress - room for imagination! I do something like the one shown in the pictures. tucked the fabric into a flower, sewed neatly lace and a strip-lining. dresses from my bunnies are not removed. but it will be possible to try somehow. 
top - measured the bunny's chest girth and cut off a piece of fabric, you can not stitch it behind, but stick it with textile glue. 
collect the skirt with a needle, fix it with pins, sew it on.
it turns out not always beautifully, so we make a belt. 
Sew a small piece of fabric on both sides, leaving room for a small pin with an elastic band. passed through, asked for. brads were attached in the center for beauty. 
take a large scotch tape and circle it, we get a beret pattern :) we do everything as shown in the pictures. not difficult! 
we know how to do pompom from school :) we sew it to the beret, for strength with a button. we attach to the head either with a blind seam or with textile glue. 
well and, in fact, the final chord - makeup :) we outline the future nose, mouth and eyes. we embroider the nose with satin stitch, draw the eyes with black acrylic paint, blush the cheeks with our own blush :) 
and now such a baby turned out :) height 36 cm, name is Lucy).

option number 3 - bunny in slippers:
says the author Tatyana Lebedeva http://i-missisleta.blogspot.com/2011/03/blog-post_343.html#more 
Pattern on A3 sheet 

We connect two fabrics and cut out the legs along with the slippers 
I cut out a sole from felt and sew to the foot 
I stuff my leg through the left side hole. I stuff it very tightly 

I use a button fastening to fasten the legs. I fasten the thread. I wrap it around my leg several times and tie it in a knot 


Dress - I sew side seams. I glue the neck. I put it on a doll) I have to put it over my head with an effort)
and glued to the body. I also coat the braid with glue and glue it to the neck 

Jacket. I cut out the jacket and lining one by one 
Sewing the hood and side seams 

i sew the hood to the neckline. I do the same with the lining. 
with the front side I connect the jacket and the lining 
I attach the jacket and lining. I twist it. With a blind seam I connect the jacket with the lining along the bottom edge 

Scarf. I connect two fabrics in a "sleeve", twist and tie bunnies on the neck 

I cut out the sleeve according to the pattern of the hand, only 1-1.5 cm more 
Pants. I sew, dress for a hare. The pants sat down very tightly, so I did not sew them to the body. I make a counter fold from the bottom of the legs and sew on a button 

Sew the arms together with the sleeves similar to the legs 
I cut out strips of fabric (like boots), glue it, and coat it with glue again. 

Glue it to my shoes. I sew flowers on the fasteners on the boot


I sew a badge on the dress 
Beret. Sewing and turning 
I made uniform ears, since it will not be visible under the beret. I sew a beret with a blind stitch and decorate 

I make a toy bunny and sew it to Tatoshka's handles 

That's it. The bunny is ready!
DIY toys: simple master classes, the best patterns, interesting ideas.
As the great Coco Chanel used to say, “Handmade things are a luxury. It is not necessary for everyone to have them. Anyone who wants to have them makes them himself or pays the master for his work. "
Stuffed Toy - The First Plush Association baby bear... But there is much more to the concept of a soft toy. This is an interior toy Tilda, and funny toys in the car, and whatnot. This article contains various types of soft toys, as well as techniques for their implementation and step-by-step master classes.


Types of soft toys with your own hands
Such toys can be divided into several subtypes: for children and adults, interior toys, with practical use (for example, a needle bed).


Also, toys can be divided according to the type of material used: fur, from cotton or linen fabrics, from felt, from fancy fabrics.


Folk toys, as well as soft toys made in national handicraft techniques, have gained particular popularity today.
DIY soft fur toy
A fur toy created by with my own hands especially warm and beautiful. Both natural and artificial fur can be used for its sewing. Of course, it is much easier to work with an artificial one, but if you decide to sew a toy from natural fur, you will receive a unique designer toy! First you need to decide on the pattern of the toy, the larger the finished product, the easier it will be to work with. Small details are especially difficult for beginners.


Circle the details and cut with a 0.5 cm margin per seam. Unlike fabric, it is best not to use scissors when working with fur. If you don't have a tailor's knife, use a sharp stationery knife. Cut with sharp, short strokes, do not drive the knife deeply so as not to cut the fur.

Sew the fur, it is necessary to apply two front sides to each other and straighten the fur outward. After sewing the toy, it is necessary to leave a small hole through which the toy is turned inside out and filled with filler. Previously, toys were stuffed with cotton wool, pieces of tissue remnants.
But this stuffing dries for a very long time during washing and often after cleaning the toy was thrown away only because the stuffing was not dry enough and mold appeared inside. Modern fillers are made of synthetic materials (synthetic winterizer and others), which dry quickly and well, do not go astray and retain their shape. After stuffing, it remains to sew a blind seam.


The final touch is the eyes, nose and mouth. You can embroider yourself, or you can buy ready-made accessories in a store.


Video: OFFENSIVE CAT / DIY SOFT TOY
Video: Warm cats toy, master class soft toy
DIY felt soft toy
Today felt toys are the most popular at children's master classes and handicraft circles. But they appeared not so long ago, and there is even an exact date of their appearance.

 Margaret Steiff and her first dolls
 An enterprising German woman, Margaret Steiff, came up with an idea in a magazine for housewives to sew a stuffed toy out of felt with her own hands. In the magazine absolutely free, Margaret published a pattern and detailed master class. But in a note she said where exactly you can buy felt for such toys.
Such a move in 1879 made it possible to found the toy empire in just a few years. The nuance was that the toys were both sewn at the factory, and blanks for toys that could be sewn on their own were sold. She left the empire to her children and grandchildren, and gave the world a fashion for a soft toy.


Master class felt dog


To work you will need: brown, white and black felt, scissors, a needle and thread, beads or eyes for toys and a hot glue gun.

We print the pattern, cut and sew every detail step by step.


Depending on the type of seam, you can create completely different textures of the toy.


If the parts are connected with glue, the toy can only be cleaned dry. When wet, the parts will separate.


DIY soft toys made of fabric
Cloth toys appeared much earlier than felt ones. But with the advent of fur and plush toys, they were unfairly forgotten for a while. With the advent of plastic, even fabric toys for children have gone out of use. But today with a new wave of popularity on manual work have rekindled the popularity of the cloth toy. The most popular interior toy today is Tilda.


When you look at the Tilda doll, you get the feeling that the roots of this toy go far back to the Middle Ages. Not at all. Tilda's appearance was in the 90s of the last century by the young designer Tony Finnanger. The girl was full of ideas and one of the many ideas was Tilda. Today it is impossible to imagine a gentle, home interior without her. And the craftswomen from all over the world are simply in love with Tony's idea and create prototypes to their taste.

 Tilda Angels
 Video: Tilda's master class
DIY soft toys animals: chicken, fox, horse, penguin, pig and others
With the advent of the crumbs, I want to change the world for the better, create a special atmosphere at home. And the child - he is perfection itself, and so you want him to play with unique toys filled with mother's love.
DIY toys are simple. We have collected master classes of various animal toys from the most various materials... Note that children under 2 years old pull everything into their mouths. Therefore, the material must be natural, preferably lint-free. Wonderful fur toys are best presented in the third year of life.


Chicken pattern, it can be sewn as for a baby and put in testicle toys. Or you can create a wonderful Easter basket.
Video: Learning to sew an author's soft textile toy Elephant


Video: How to Sew a Penguin Finger Toy
Aleftinka pig pattern.

Pattern of a giraffe and his company.

 Pattern Cheerful Giraffe
 Flower Elephant Pattern


Since the release of Despicable Me, the toy world has changed forever. Yes, everyone, as before, loves bears, but at the sight of cute minions, kids and adults are delighted. At exhibitions, toys minions are the first to disperse. Would you like to sew for the child yourself? As easy as pie! It remains to choose a favorite hero for your kid.
Video: We sew a minion master class
DIY simple soft toys

For beginners, many details may seem too complex and the desire to create will gradually disappear. For beginners, we have selected simple patterns, with the connection of which children can cope. These patterns are especially relevant in creativity lessons in schools.


DIY bouquets of soft toys photo

 Bouquets of soft toys Bears
 Conservationists struggled with the sale of fresh flowers for a long time, until someone introduced bouquets of candies or toys into fashion. Now this global trend is so popular that in some countries the sale of fresh flowers has halved.

 Bouquets of stuffed toys Kitty
 Gathered for a holiday? Make a bouquet of stuffed toys yourself! This is a unique gift that will take pride of place in the birthday girl's bedroom for a long time.
Video: Bouquet of toys. Master class for beginners
DIY soft toys pillows

 Garfield pillow toy
 Well, having touched on the world of toys, it is impossible not to remember about pillow toys that fill the sofas of all needlewomen. These are the favorite things of both family and guests. Please note that sitting down on the sofa, few people can resist not reaching out and touching the toy half. And children travel with pleasure with their favorite soft toys, falling asleep to the noise of the roads.

Video: Toy pillow owl
Video: Pechwork "Toy-Pillow"


Flat toys are the easiest to perform, most often made with felt. But there are different variations. Such toys attract with their prostate and laconic cut, interesting textures and the ability to take with you everywhere.
Video: DIY soft toys. Master class, we sew cats
DIY soft toys patterns for beginners
Novice needlewomen do not have to spend a lot of money on rags and tools. Sometimes simple tights or socks are enough to create beauty.
We have also collected the simplest patterns for beginners.
 The simplest patterns of toys for beginners Kitten
  The simplest patterns of toys for beginners Monkey Smeshariki Pattern
 Video: Soft toy "Bunny from a sock"
Earlier we showed a master class on sewing. The main difference between a rabbit and a hare (according to Tony Finnanger) is what do you think? It is in the ears. In a rabbit, they hang on the sides, and in a bunny, they stick up (the effect is achieved with the help of a wire). You can also say that rabbits are sewn mainly of linen, and bunnies are made of cotton or fleece. That, in fact, is all.
Today we will be sewing a Tilda bunny and we hope that this task will not be too difficult for you!
We spread the hare's pattern as usual for downloading or redrawing.


By the way, it's very convenient to just redraw everything on paper from the monitor.


We are planning to sew a bunny about 30 cm in size (plus ears). The length of the pattern of the torso is almost 19 cm, and the legs are 15.


We place the details of the calf (everything except the ears) on the fabric (folded in two layers with the front side inward) and outline it with a marker (or a regular pencil).


Sewing on a typewriter

We cut out everything with zig-zag scissors (or with ordinary scissors and make notches in the places of the folds), the indent from the seam is 5-7 mm.


Now we turn everything out with a wooden stick or pencil.


Now we fill all the details with holofiber. Holofiber is very convenient to work with, with dense filling, the details become smooth and beautiful. We slightly underfill the legs, arms and body so that the fabric sews well and the bunny can sit.

We sew up the arms and legs with a blind seam and sew them to the body.


Here is our handsome hare. He is missing something….


Oh, right - ears.
For the ears, we take the brown fabric and the second for the inner side - to match the dress. We have this fabric in a flower. And the pants will be in small polka dots.

We sew the ears as follows: fold the colored fabric and fabric for the body with the front side inward, circle the pattern, sew, cut out, turn out. On the one hand, they are colored with us, on the other, they are corporal.


Now the ears need to be sewn to the head, but not just, but so that they stick up. To do this, we take a wire (dense enough, but so that you yourself can change its shape if necessary) and insert it into the hare's head in those places where the ears will be located.

Then we put on the ear, sew it on with a blind seam and voila!


Now we will sew pants and a sarafan for the hare.
We take a pattern, circle it on the fabric, folded with the right side inward.

We bend the bottom and process it with an adhesive spider web. For those who come across it for the first time, we will tell you that an adhesive spider web is a great way to process the edge of a fabric without hemming. You just need to bend the edge of the leg, put the cobweb and run it with a hot iron. The spider web will melt and glue the two sides of the fabric together.


After processing the bottom with a cobweb, the pants will look like this:


The top of the pants can be processed in a similar way or simply stitched - in principle, it will not be visible under the sarafan. We sew the pants, turn them out.

We put it on a bunny, pin it off with pins and carefully sew it along the belly.

Here is our Tilda hare already in panties.


We sew a sarafan. We take a rectangular piece of fabric (in our case, somewhere 28-30 by 12-15 cm). We fold and sew the upper edge, sew lace to the lower one - we will have a bunny girl in a beautiful floral dress. Cut out a small rectangle for the top of the sarafan, hem it on three sides, turn it inside out. We make two ribbons in the same way.


We pin a small rectangle in the middle with a pin, and sew the ribbons together with decorative heart buttons. This is how everything will look like:


Sewing the top. Sew the side edges of the sundress, sew on ribbons and buttons.


Sew crosswise on the back of the ribbons. We dress the hare. We sew folds of the dress on the sides so that it looks beautiful and magnificent on the bunny. You can sew a sundress to the calf.
The final touches remain. We embroider the nose with pink floss threads. Blush the cheeks and draw (embroider) the eyes. For this we have such a special wonderful set.


That's all. Our hare Tilda is ready. It turned out to be a girl in gentle pastel colors. Perfect for decorating a children's room or as a gift for a girl.


Tilda hare (rabbit) video master class on making:
It is important for every child that there is a cute and cute bunny in his collection of toys.
Indeed, for almost every child, a bunny is associated with kindness. Seeing such a toy, the heart overflows with love for this tiny creature.
Today, you can find various bunnies in stores - Mi, Teddy, and others.
Make such a toy for your baby or babies are not difficult. The main thing is to prepare everything necessary materials, tools and bunny pattern.
In contact with
We sew bunny Mi
 For this type of toy, you can use any plain or not too variegated fabric.
As a filler you can take padding polyester, padding polyester, synthetic wool.
In addition to the main material, we will also need such devices as:
- buttons, they will be used to secure the arms and legs of the toy;
- sewing accessories;
- tailor's scissors.
Before starting work, you need to find a pattern for a toy. It's easy to do, it is presented just below, print it on and cut out every detail.

Download the pattern to your computer, print and cut
You should get the following details:
- half of the head - 2 pcs.;
- on the neck - 1 pc.;
- ear - 4 pcs.;
- shoulder - 2 pcs.;
- hand - 4 pcs.;
- tail - 1 pc.;
- leg - 4 pcs.
The finished bunny pattern must be cut out of paper. We apply each of the parts to the fabric and carefully trace, then cut out. Remember to leave 3 to 5 mm on each edge for seams.
 Now we add each of them in pairs and sew. Parts must be folded upside down.
The main thing is to leave a small distance through which we will turn the parts onto the front side, and also fill them with filler.
As soon as all the components of the Mi bunny (pattern above in the article) are completely ready, they must be filled with the filler that you choose. It is best to use a pencil or any plastic stick for this action.
It is necessary to stuff the details carefully from the far ends.

The main thing is that the filler does not crumple in one place, but is evenly distributed throughout the part, including in the corners themselves.
As you remember, we left room for easy to stuff bunny parts and turn out.
Now the places through which the stuffing was carried out must be sewn up with a secret seam.
The bunny's arms and legs are attached to the body with a button. Thus, the bunny is easy to plant in a certain position. We combine all the parts into a single toy. That's all the do-it-yourself bunny is completely ready.
Tilda hare
 To sew a hare, transfer the pattern to the base fabric (see below). We cut out all the details, not forgetting about the additional space of half a centimeter for processing the seams.
Some types of fabrics fall off heavily, in order to prevent this, it is recommended to process the edges with a special solution.
This requires mixing simple PVA glue and pure cold water in a one to one ratio. Moreover, traces of the composition will not be visible, and the fabric will become harder.

To make a Tilda bunny ourselves, we need:
- body fabric - linen;
- choose the fabric for clothes yourself based on your taste preferences;
- sewing accessories;
- simple pencil;
- scissors;
- printed pattern of a soft toy;
- synthetic winterizer.
Manufacturing steps:
- Finished parts need to be stitched with a machine seam, cut a little extra fabric by 2 millimeters. Remember to leave some room for turning and stuffing parts.

- Using a pencil, carefully turn out and straighten the seams with our own hands. We iron it and fill it with filler, we do it tightly so that there are no voids left. That's all, the components of the hare are ready.
- At the body of the toy, slightly bend the remaining fabric and sew it with your own hands basting stitch... Then carefully insert the legs and sew them together with the body, remove the excess threads. The main thing is that the limbs of the hare are the same.

- The feet must be sewn by hand, and the seam must be blind. We sew the ears in the same way, and only then attach them to the head of the soft hare.
- The soft toy is almost ready, there is very little left - to sew a nose, make eyes and a mouth. For a more expressive look, it is recommended to make the ruddy cheeks of the animal. Let's use a simple blush and a large brush.

- Now you need clothes for the ready-made soft bunny. If you have a large toy, then we measure it and make a pattern for panties, blouses. If it is small, then in this case you can use the Internet and download a ready-made pattern.

Bunny pants
- We cut out all the parts from a suitable material, not forgetting to leave additional space for processing the seams. First of all, we sew the pants. Better if it is a jumpsuit. Only then we sew the blouse, and if possible, you can make a beautiful hat.

The ready-made Tilda bunny will certainly delight any kid
- You can decorate the bunny's clothes with various decorative elements. These can be buttons, beads, rhinestones, and so on. That's all, the toy is completely ready.
For many people, the hare symbol is identified with something cute, innocent, soft, beautiful, kind, light and pure. You can see the hare pattern in our article - we have collected a photo and video selection that will be useful to you!
Nowadays, toys in the form of a hare from soft to hard are very common.

Each person will be pleased to receive a handmade bunny as a gift. It is this toy that can serve as a symbol of beauty and a benevolent attitude towards a person, therefore the appearance of bunnies is very popular today.
They can even be knitted, or they can be solid, which are molded from clay.
In this article, you can find a description of the patterns of hares of completely different sizes and styles. Let's hope you enjoy all of the hare patterns.
Toy bunnies delight the eye with their variety: with long ears, large and small, fluffy and lint-free.
The bunny and his image will be very relevant on the eve of the Easter season. The hare is believed to be a lunar beast.

Even such a beautiful animal as the bunny has its own ambiguous reputation. On the one hand, it is a fast, dexterous, very vigilant and prolific animal, but, on the other, it must be cunning, cowardly and deceitful.
Let's dwell on the good ones, and we will make beautiful good hares using the patterns from this article.
So let's get started.
At the moment, patterns of toys of the Teddy technique are gaining popularity. Therefore, let's not be old-fashioned and pay attention to this fashionable trend among needlewomen.
The next bunny making workshop will be in the Teddy technique. You will learn how to sew a hare with your own hands with patterns.
Features of Teddy toys is a wistful and sad look.
We study available patterns for creating a hare using the Teddy technique
In order to learn how to sew a hare with your own hands with patterns, you will need:- paper
- pencil
- the cloth
- threads
- sintepon
- two buttons
Draw hare patterns on paper with a pencil.
First, you need to decide on the size of your future animal. Therefore, think well before you start making a pattern.
- Two torso parts are made. It is enough to cut out one detail on paper, which will later be transferred to the fabric. Next, draw the paws of your future bunny, which will be legs, draw a handle, heel, palm. Long ears of your future bunny.
- Transfer the patterns to the fabric.
- Cut out the resulting silhouettes of the future Teddy bunny.
- Sew each piece together, folding them right sides up. Leave a small hole in the body in order to fill it with padding polyester. Also, leave in the legs, head, arms.
- Turn your future bunny onto the front side.
- Stuff future products with padding polyester.
- Sew the resulting parts together.
- Sew on eyes - buttons, make the nose and mouth of the future bunny with threads.
- Finish the piece by decorating with the necessary accessories.

Your Bunny Teddy is ready. You can even give such a nice toy to a child, he will be very happy.
Such a bunny can be a decoration for your home, it will serve as a decor in any interior. He will a wonderful gift for any adult and child. You can make your own craft, both large and small.
In the video tutorial you can find all the information you need.
Related videos