Nowadays, we throw a very large variety of packaging products into a trash can, however, some products are able to be a good source when performing different kinds of crafts with their own hands.
So as an example, you can take an empty jar of tin from Lemonade or beer. For the most part, crafts from tin cans perform the function of decor, but if you include your imagination and fantasy, you can build something useful and suitable for home.

Lighting devices do it yourself from cans
Almost any bank you can find useful use, for example, it is possible to make a very stylish and original ceiling for the lamp. Therefore, first of all, it is necessary to remove the top of the bottom of the bank, using conventional scissors or a stationery knife.

If you have a tendency to draw, then the jar can be colorfully painted or just paint it from the inner and outdoor side. After that, you need to build a cartridge with a light bulb to the jar. Everything, a bright and unique lamp ready for use.

You can also make an interesting and beautiful desk lamp from beer cans, which can decorate the room with your unusual look.

So for the manufacture of lampshar, it is necessary to use only tongues from cans, but for the rack of the luminaire you can use the tin jar itself. To connect all the tongues from cans in a solid and a single design, it is necessary to make a small incision on each tongue, after which all the tongues must be combined with each other, and then connect the place to connect again.


Decoration of country interior
Very interesting use of tin cans can be found for both country use. For example, they can be used in the manufacture of garden furniture, chair and a table. A very good idea to use empty aluminum cans.

So, in order to make a chair, all banks need to be combined with each other, using very powerful and reliable glue. For a more stable position of the chair, and so that it is not deformed by weight sitting on it, each jar after gluing is desirable to fill with sand.

Alcohol burner made of tin cans
Also, for many lovers travelers, it is very important to ensure all the necessary in campaigns, especially the burner. Therefore, many tourists independently make aluminum cans from aluminum cans, which are quite capable of replacing the usual gas burner.
It is worth noting that the weight of the self-made alcohol is hardly exceeded 50 grams, while the gas burner has a weight of about 3.5 kg.

Candlestick-lantern from beer bank
So, to perform such a craft, on the bank itself, it will have to make deep vertical cuts at a distance of 3-4 cm among themselves. This process is performed by a sharp knife, it is necessary to cut it carefully, if necessary, you can use a ruler for a more even cut.

After the bank is cut, it must be carefully pushed at the top, resulting in an interesting lantern design. If you do not like the color decoration of the candlestick, it can be painted independently with a special spray in the color you need.

Butterflies from beer cans and other figures
For the manufacture of crafts of this type you will need a lot of patience. So, from empty tin cans you need to remove two bottoms. As a result, it will be rectangular leaf of tin.


Note!

The finished shape neatly cut out with scissors along the contour of the picture for example butterflies.

When the shape of the butterfly is already ready for her, it is possible to give a more natural look, slightly give the wings of a living look and decorate a butterfly a little in a bright color.

Thus, before throwing out an empty aluminum can from beer or drink, think if you can enable your fantasy and imagination, you can make useful crafts from tin cans a lot of beautiful and useful things that will be able to appreciate your loved ones and relatives.

Photo crafts from cans


Note!


Note!


Empty tin cans from beer and different drinks can be the starting material to create a variety of crafts. Some crafts from beer cans are purely decorative, others can be a useful accessory for home and garden. See 5 ways to make interesting crafts from tin cans with your own hands!
Basket lamp
Tin cans from beer and lemonade can be turned into openwork plaffones for the lamp. For this, a discovery, scissors or a stationery knife must be cut off the upper part. Then outline the pattern of the pattern and make holes using nails of different diameters, screwdrivers and other acute items that will leave curly holes. So at the same time the bank does not remember - inside the paper can be very tightly. If desired, the jar can be painted both outside and inside. It remains only to attach the cartridge with a light bulb - and the original lamp of beer cans is ready.


The second option to create crafts from beer cans in the form of a desk lamp is to use for lampshar only tongues from aluminum cans, and the bank itself will serve as a feet of the lamp. In order for the tongues to connect to one cloth, make a cut on each tongue from above, twist them with each other and start the cut pliers. You can also use fine wire or threads.


Garden furniture - crafts from beer cans
Unusual, but quite functional use of aluminum cans from under beverages. Of these, you can make garden furniture - armchair and table. You can connect jars with a glue with a glue, and so that under the weight of the beer banks, the beer banks are not blocked, they can be pre-filled with sand.


Alcohol burner made of tin cans
The tourist community becomes quite popular to use a hiking alcohol instead of a gas burner. In addition, the weight of the alcohol burner is very small - about 10 grams! Alcohol make their own hands from beer cans.


Detailed master class with photographs and tips of the experienced tourist read.
House from tin cans
The house lined with tin cans is in Houston, Texas. Recently, he was officially recognized as a local attraction of the city, and not surprisingly. For construction, cladding and decoration of the house, more than 50 thousand aluminum cans from beer and lemonade were used! And this is not counting those that had to be replaced with new ones. The house was built by John Milkovich, born in the times of the Great Depression and therefore he knew how to save and not throw away anything. In the 1970s, when aluminum became common and fashionable material, John began finishing the house with the collected beer banks. In the mid-80s, Milkovich died, but the wife and sons continued his work, updating the facing. By the way, the banks are also made of fence, household extensions, mailbox and even a dog booth! In the 2000s, the house bought a charitable organization, completely renovated him and opened it for the general public.


Candlestick - lantern from beer can
In order to make such a craft - a garden lantern from the beer can, make an even cuts on the bank with a stationery knife every 3-4 cm. For convenience, you can use a ruler. Then carefully press the jar from above to get such a flashlight. If you wish, you can paint the candlestick spray-paint.

Decorative crafts from beer cans
It is necessary to warn it right away that crafts from tin cans need to be done very carefully and preferably in the housewaste knitted gloves until you get used to working with sharp as a razor edges. Therefore, young children are not recommended for work.
Volumetric stars from aluminum cans
Such crafts from beer cans as an asterisk will become an original children's room or a New Year tree.


Butterflies from beer cans and other figures
Cut the jar, cut the bottom and top to get a flat plate. Cut the image of the butterfly, birds, flower or other figures from the paper, redraw it on a tin plate and pinched in the nodal points. Cut on the lines of the butterfly. Press the figure slightly with a handle, screwdriver or pliers. Sell \u200b\u200blight contours where necessary, round the edges, bend the wings and so on. Coloring butterflies. To do this, you can use the paint in the canister or markers.


Crafts from cans - to help needlewomen
Separate attention deserve crafts from tin cans to help needlewomen - after all, they deal with many small and / or confused things. Probably, only the master must determine whether she needs something easier and more complicated, so for a start, we offer several photo-ideas of "cannon" organizers for needlewomen - and you can develop them in any direction.
By the way, the needle is also a mini-organizer, and it should be comfortable and roomy. 🙂
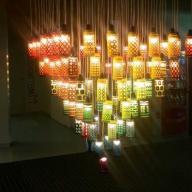
Lamps and candlesticks from cans
Luminaires made of tin cans are a matter of taste, they will fit far from every interior. But the person is typical of everything to improve, and now he is already cutting patterns ...
Perhaps tin cans are more suitable for a variety of flashlights and candlesticks. Examples
But what candlesticks from the cans we collected here:
I must say that there are also complex "canned" structures. In order to make such a lamp of cans, you have to work hard, but the result is very functional.
Interior crafts from cans
At these hours, the function is one - to be pretty or fun and fit into the color solution of the interior. They most likely it turned out.
Frames from cans - the solution is cheerful and unusual, and this is this example:
Mobile can be made from different objects, including both canned cans. The main thing is that acrylic paints be bougar. 🙂
This craft is not easy. But if you really want, then why not make such a dog from cans and other priest materials. Crafts from banks in the form of a dog are not so rarely found, and none of them look like another. Most likely, women and children fantasize that there will be a paws from which the ears, but without the male hands of such a tiny friend not to do.
If someone in the house loves an avant-garde decor, the idea of \u200b\u200bcrafts from aluminum cans in the form of a mask may well be useful:
Garden in banks - just one photo
We will not devote a lot of time in the banks in banks - the idea is quite simple and clear, the question is more in what the decor will be the decor and how they will be placed. Here is one of the options:
All sort of hand for garden and garden
Such an aircraft will not only decorate the garden in sunny weather, but also will allow you to determine the direction and strength of the wind. Very useful toy gets! 🙂


Many products are packed in tin jars, these are coffee, various canned vegetables and fruits. But how many crafts can be created from these cans, which can become a decorative decoration of an apartment or cottage. Consider examples how to make a craft from tin cans with your own hands.
Various crafts from tin (aluminum) jars.

Pots and vases
If you beautifully paint tin cans, they are perfect for growing seedlings and breeding indoor plants. You can paint the jars with bright colors, one in gold, the other - in the silver, third - in the blue shade, etc.


Beautiful crafts made of tin jars - vases. Cork cardboard need to wrap the container. Choose in advance stencil with a beautiful image of animals, birds, pattern. Then apply a drawing on the plug. The bright coffee tint vases are obtained with a black pattern outside, inside can be covered with the same ferrous paint.

Tip! Before painting a jar, it is necessary to degrease it to the means where the alcohol is contained. Suitable acrylic paints or in a canopy and a nylon small brush. Also, do not forget to make 2-3 small holes on the bottom of the banks (carnation and hammer).

Ordinary tape is easy to use as a stencil. With it, you can draw diamonds, zigzags and other patterns on a tin. You can first cover as the basis of aerosol paint, for example, gold, and when dried, with the help of the scotch mark the strips and draw them acrylic paints.

Original methods of application cans
If the bank is wrapped with a bark, then it will become unrecognizable and perfectly fit into the ecosil.

Dry twigs can be cropped the same length, then conventional twine tied up on 2 levels to tie the container, an unusual vase will be.

Capacities can be wrapped in various materials: leather, braid or metallized threads. Secure them with glue.

Lace, colored bows, ribbons and appliques on jars look interesting. Even the wedding can be decorate with small aluminum tanks, on top of closed snow-white lace and artificial colors.

Shelves and Original Organizers
There are quite a few ideas and instructions for making crafts from aluminum tanks.

In the hallway it is convenient to attach empty cans to the storage wall of the smallest things: gloves, keys, small hats. From above you can hang long scarves.

Original plates for towels can be created in the bathroom. Twisted towels of different colors are perfectly placed in separate compartments on the wall. On top of the tank can be decorated for a single tone of the walls of the bathroom.

This gift will be jars for craftsmen. On the wall you can place an organizer, where in each cell 1-2 skeins of threads and yarn. In the Kulka, always search for a long time, the yarn can get confused.


If you cut off the bottoms, the containers can be used differently. Volumetric scarves, socks, mittens and other accessories are conveniently stored inside cans.

An interesting option is a few cans, for example, 7 pcs. Connect a wide ribbon and hang on the wall (cabinet). Inside, you can put female silk scarves and scarves.


Tin stands
A small master class on making crafts from cans. To use tin in the kitchen, you need to carefully wash it, then in the presence of sharp edges well clean it. From above you can paint, stick with colored paper, decorate with bows (ribbons). It turns out an excellent storing for the storage of forks and spoons.

Creative Stand for Stationery for Schoolchildren and Students can also be created from aluminum tanks. "Pyramid" out of 10 cans bonded between themselves, and painted under the overall design will become a comfortable stand for pens, markers, mobile phone, pencils and other little things. Such a device must lie in a horizontal position.

For the kitchen, you can braid several tin tanks without the bottom to accommodate bottles.

Lamps and creative candlesticks
Designers and crafts offer another non-standard solution to the use of jars as plafoons for lamps. This option is suitable for design in the style of Loft, as well as an Indatarial or Rutsik.

You can create a candlestick, which, with a nail and hammer, decorate an unusual pattern, ornament (flower, sun, star). The outer side is better to paint in monochrome bright color.


Such night lights with handles can be twisted in the country as lanterns.

Original kashpo
Fantastic drawings, patterns appropriately express in vases or kashpo. There are no restrictions here. If there are small holes on the sides in the tanks, then suspended hidden porridge with plants, for example, on the balcony or cottage wall.

How to use covers from tin cans?
Folk creative craftsmen offer each lid to make an original, apply a drawing on it. Then hang on the cords a wand on which to fasten 3 long threads with covers. Between them consolidate beautiful beads.

"Kegley" for giving
Jars arrange bright mischievous pictures, face or animals. When friends gather, it is convenient to play bowling. Ball, paper ball can be thrown in turn in such containers. It is to upload guests in nature.

Plates in the garden
Another entertainment is to raise signs with names on branches. From the bottom you can suspend beautiful glass balls, metal elements to ring in the wind. You can implement any of your idea, we offer photo crafts from tin cans.


Stock Foto Crafts from tin cans


I want to present to your attention a detailed master class on making decorative (puppet) furniture from tin can
To do this, you need:
1. Canning bank
2. Scissors (any large stationery, not necessarily for metal)
3. Kruglogs
4. Sponge or felt or any other available material
5. Velor (velvet can) color at your discretion.
6. Glue (I use the "Moment of Crystal"
7. Paint spray is also at your discretion (I turned out to be a pink - metallic at hand)
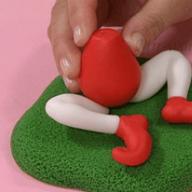
Olesya, my beloved sister, at your request for you!
I usually, if I make a chair or a table, I use the cans from under coffee, it is also sucking, so as metal is quite thin, it cuts easily and easily takes the right shape. Do not use banks from under condensed milk or stew - the metal is very tough and when twisting the strips bends, and not turns into a spiral and except to spread all your fingers !!! And one more thing: do not use stupid scissors, they are rolled the edges of the strips, which can also lead to cuts. The height of the banks in this case does not matter, so as you can change the height of the legs of the future table or stool, simply adding elements (sliced \u200b\u200bmetal strips from another bank)

This is the "Sun")) now it is necessary to calculate the number of sliced \u200b\u200bbands and divide the cross-crosswise to 4 parts and determine the location of the future legs. So that the small sharp elements that you will cut off did not bounce into different directions from the table and relatives did not remember you advancing them, undress something, I use a diaper, very convenient: everything turned out for 4 ends and removed higher from children))

After we decided on the legs and the back of the wheelchair, proceed to the formation of the contours of the back. The form can be anyone and in the process of manufacture you can change the form of the back as you please, round, square, puzzle .....

Now about the strength of the elements: Remember the fairy tale about sons and broom from the twigs, one they are stumbled and break and together make up a fairly strong design, if it is copped into a common beam)) so that the legs are not spread when you stick the needle in the chair all the spiring elements I I fasten here such brackets taken. As you see in the background from another bank, also sliced \u200b\u200bstripes or if I need to lengthen any element, for example, the rim back. We take a strip of metal, bend about the width of the strip, which we will be tightened and cut. It turns out such a bracket. (on scissors)

The arrows show already installed brackets for the elongation of the rim back. As you can see that the strips are not bile, I will cut them out, one went on the back next to the curls below and so on ...

As you can see, the elements of the legs are collected in a shared beam and fastened with a bracket, as well as curls on the back simply twisted from the metal strips and are attached to the back through the same bracket. The design as a result is quite durable.

The first picture shows a chairs with a not yet completed back. Figure, shape and position of curls at your discretion, how will your fantasy tell you. In the course of manufacture, I have up to three or four times I change the original idea)) I never do two identical products ...

When you did everything and at your discretion work is finished, we take a gearbox or a newspaper, the primer (I have spray) we go into the entrance and cover the three layers in the intervals indicated on the balconum (the dying period of the primer) three layers covering only because not There were drills and hind where I feel comfortable))

After the primer, we cover your product any available (for your taste) paint spray, I have a pink metallic (tipped my daughter is great after wintering on the balcony) and here I remembered that I did not insert the back. Apply a piece of cardboard, you can simply press with your fingers and cut out or bother with a handle ... Then we take the remains of the cans from which the future inserts are cut on it on the cut cardboard, do not forget to leave braces for fastening, let them be more authentic Then get driven and caulate in size. And the cardboard on which the inserts were cut using for marking on the lining. You can use a thin foam, a piece of felt, I used the micropor from the packaging in this case, usually turn on new TVs and other household appliances, sometimes it is found in the packaging of furniture, where there are glass. After stencils are ready, cut the velor in size and sample by contour. Glue in this case is a crystal.

This is how the insert is fixed ... On the back background, the daughter is engaged in the design of a gift on the DR grandmother)) Naturally, after it was necessary to cut off ...

Another photo is large ...

Finished almost the same: I am a chair, and she, under my leadership, his first decoupage)
Daddy dtsya))
It remains completely even a little ..

Insert the finished insert into the back ...

And the second insert ...

We also do the same with the chairs seat (a bit not in order, sorry, the installation order is not critical here) the same micropore from the package (it is also used as a lining, under laminate or parquet. The carved circle should be inserted into the contour of the seat and on the same size cut out. Micropor, I cut three, but considered that three are too much, because the seat is too high and left two. The needles and pins hold in it no worse than in the foam rubber.