Practicality has long ceased to be the main requirement that a woman’s bag must meet. The right accessory should not only be spacious, but also aesthetically pleasing. The ideal handbag should attract attention, while harmoniously combining with the rest of the outfit. Leather remains the most popular material for making bags, because things made from it are beautiful and easy to care for. However, prices for leather accessories are rising every day, and you always want to be stylish and attractive. That is why more and more fashionistas are wondering how to sew a bag with their own hands, and the leather version will look even better.
Leather is a little more difficult to work with than other materials. Leather is a dense and capricious raw material, which makes the sewing process labor-intensive. But the result obtained will far exceed all expectations, so the work is worth it. Let's try to take a closer look at the creation process and understand how to sew a bag with your own hands from leather or dermantine.
What might you need for a leather bag?
Let's figure out how to sew a bag, especially if you plan to make it from leather. The main thing to do before starting work is to evaluate the capabilities of your sewing machine. The device must be able to flash thick skin, sometimes folded in several layers. Special attention it is worth paying attention to the choice of needle, both in the machine and in ordinary darning. The needle must be sharp and strong, otherwise it may simply break during sewing.
For working with leather materials it is better to choose threads made of nylon, silk or nylon. Simple sewing threads will not work, because such seams will quickly come apart. When sewing individual parts, it is better to do two or three lines instead of one, this will eliminate the possibility of holes appearing.
For the main part, it is better to take high-quality leather or dermantin, made as a whole cloth. But for some models it is used patchwork technique when many pieces of leather are sewn together before starting work different colors and sizes. You can also make original decorations from unnecessary scraps to decorate your bag. You should stock up on rivets, zippers, braid and chains from a sewing accessories store. If desired, the bag can be decorated with rhinestones, beads and sequins.
You definitely need to prepare paper for making a pattern; you will need a measuring tape, scissors, pins and a knife for cutting leather.
Making a bag with your own hands from leather
Let's look at an example of making a leather bag. Execution principle different models self made the same, only the pattern of the bag will differ. Let's consider the simplest leather option, from which you can build on in the future. We draw a pattern on a regular newspaper or special paper according to the following scheme:

In the corners of the base we draw as follows if we want to achieve rounded edges.

The bottom of the bag is cut out exactly according to these details. Calculate the length using the formula: add its height to the length of the base and multiply by two. It is better to make indents for seams when transferring from paper to skin, adding one and a half to two centimeters around the perimeter.

To make the handles, you need to sew two rectangles, folding them in half. Do not forget about a reserve of three to four centimeters for sewing to the bag.

Using the same pattern we make the lining for the bag. You can achieve an interesting effect by using a contrasting color material for lining, for example, as in the photo below.

Let's move on to assembling the product
Once the cutting is completed, you can proceed to assembly. It is necessary to assemble the product and pin it with pins. To make stitching easier, it is better to tap the folds with a hammer.

It is better to sew with special ribbed needles. After assembly, you can sew on the zippers and start decorating.

This way you can create a wide variety of models. Worth a look fashion magazines, choose the appropriate option and start cutting.

Often, to give the desired shape, thick cardboard or a special seal is sewn between the lining and the base.
With a little practice, you can easily reproduce any pattern yourself. When transferring to the skin, every millimeter must be carefully measured, otherwise the final result will be skewed.

Using a special sealant is convenient because an adhesive layer is already applied to it.

But an additional layer of thick cardboard should be attached to the bottom of the bag.

The seams from the inside must be carefully glued with glue to avoid fraying.

It is better to glue the zipper first and tap it with a hammer, and then stitch it.
Sewing a bag from genuine leather with your own hands is quite difficult. Therefore, I recommend that beginners first sew a bag from artificial leather. The technology for sewing it is not very different from sewing a bag made of fabric or jeans, with the exception of finishing front seams.

Leather bag always looks elegant and fashionable and the price of a genuine leather bag is always high. Maybe that's why many people try to sew a bag or handbag, but, as a rule, they fail. The fact is that sewing bags and leather haberdashery is a separate direction in sewing, much like sewing shoes, so it’s not surprising that many people can’t sew a bag with their own hands.
In this article I will not explain how to sew a bag step by step. There are thousands of models of bags and it is impossible to make a universal video or master class in the form of a photo. But you can give universal advice on how to make a pattern for a bag model you like, perform one or another technological operation, how to install accessories with your own hands, etc.
How to sew women's bag made of genuine leather. Bag with lining and zip fastening. You will learn a lot useful tips how to work with genuine leather.

It is difficult to sew any products made of genuine leather, especially bags with a rigid frame. And this is due primarily to the special technology of sewing genuine leather, the presence of special tools and a sewing machine, the use of special applied materials, and, of course, the presence of experience.

First of all, you will need a sewing machine capable of sewing leather. Modern models sewing machines Do not use rough materials such as leather for sewing; read the instructions carefully. The only option is to find an old Podolsk-type machine from friends or relatives, maybe even with a manual drive. By the way, you can even buy it from an advertisement, but not more than 1000 rubles.


A construction knife with a replaceable blade can also be used for cutting leather. Do not forget that the blade of such a knife is not only replaceable, but segmented. Using pliers, carefully break off the dull part of the blade, and it will become sharp.
Paired with such a knife, you will also need a piece of plywood or board on which you will cut out the leather parts of the bag.

If your bag model has a lot of metal fittings, buy a punch like this in the store right away. Using it, it will be easy to make a neat hole for buttons, rivets and other accessories.

Instead of leather glue, you can use this adhesive tape.
This is not the entire list of tools necessary for working with genuine leather, but the most important ones. Without them, you will not be able to sew a high-quality leather bag. In addition, look at the general photo, you will need a special hammer, awl, thread, sewing needles, etc.

In addition to the main parts for the bag, you will also need many small elements, which are quite difficult to take into account at once. I will explain everything in detail as I assemble the bag. For now, just keep in mind that all skin scraps, even small ones, need to be saved; they may be useful to us in the future.

Make patterns for any parts of the bag immediately with allowances. Leather is quite an expensive material to forget about allowances when cutting and make other mistakes.
Seam allowances 0.7-1.0 cm.

The remaining parts have a rectangular shape and it is not necessary to make a pattern, at least use graph paper for them. However, perhaps you will decide to sew just such a model from fabric in the future, then ready-made patterns will make your work easier.
Two options for soft shaped bag patterns

It is not necessary to create a pattern for a bag from paper, but it won’t hurt to make a pattern of the main parts. The fact is that it is almost impossible to determine the size and shape of a bag using a paper pattern. In the sewn state, the bag acquires volume and, therefore, changes its calculated dimensions and shape. Therefore, make paper patterns of the main parts of the bag, pin or glue them and make sure that the shape and size of the bag suits you. If not, feel free to adjust the pattern and try it on again.

The consumption of genuine leather for sewing a bag must be calculated accurately. Moreover, you always need to buy more leather, since sometimes you have to “work around” various defects in the leather (crumpled areas, holes, abrasions, etc.)
But on average, to sew a bag made of genuine leather you will need a skin measuring 100-120 square decimeters or approximately 1.0-1.2 square meter.
Depending on the model, the presence of finishing elements, pockets and other details, and most importantly the size of the bag, you can keep within 180-100 dm/sq. But in any case, you need to lay out the details of the cut, since leather is often sold with defects (stains, holes, folds, dents, etc.)
Don't forget about the finishing details of the bag. Because if you don’t have enough of a small piece of leather, you won’t be able to buy a small piece. Genuine leather is sold only as whole skins. By the way, sometimes it is the size of the skin that determines the model and size of the bag.
If you don't have enough experience, don't start sewing a bag from new leather right away. Find an old raincoat or jacket in your wardrobe. Take it apart and try to match the remaining areas of leather for parts of your bag. As a last resort, such leather can be combined with pieces of artificial leather or fabric, such as corduroy.

The connecting seams are sewn down with allowances of 0.7-1.0 cm. Do not forget to check the degree of pressure of the presser foot on the fabric and the height of the rack. Leather is a fairly dense and rough material, and in order to avoid damage to a household sewing machine, it is better to sew it on an industrial machine or an old manual sewing machine such as Podolsk, Singer.
To make it easier to pierce several layers of leather, you can buy special sewing needles for leather at a sewing supply store. They have a special blade shape and such a needle does not pierce the skin, but cuts it.

Not always, but often, the seam allowances of the stitched parts of a leather bag need to be glued. For this operation, you can use regular rubber glue and a brush. But it is better and more careful to glue the allowances using adhesive double-sided tape.

Tear off the paper protective strip and press the seam allowance.

To ensure that the seams on the front of the bag look even and smooth, you will need a hammer. Tap lightly along the seam with a hammer or the handles of heavy metal tailor's scissors.

It is very difficult to make finishing stitches on leather, since a regular presser foot will “slow down” the top layer of leather, the stitch will be “shallow” and even a tear in the leather may form due to frequent piercing with a needle. This is a responsible operation; treat it as responsibly as possible, since the skin cannot be stitched twice. You must do the finishing stitch the first time without mistakes or rework.
So be sure to change regular foot on a Teflon-coated foot. There are a number of other devices for sewing leather, but this Teflon foot is the simplest and most inexpensive way.

And if you also play it safe and rub the seams with moistened soap, the seam will be flawless.
See Decorative stitching on a tricky area.

After the base of the leather bag is assembled along with pockets and other finishing elements, begin making the belt. Determine what type of clasp you will use, what hardware, and how you will attach the strap to the bag.

Do not use accessories that are too expensive and difficult to install. Metal zippers, metal rings, rivets, holniten, buttons are easy to install with your own hands. And they definitely need to be used when decorating a leather bag. Metal gives natural leather greater solidity and attractiveness, emphasizing the noble properties of natural material.

And to install the fittings you will need this kind of punch No. 3 or No. 4. You can even buy a set of these punches if you regularly sew leather items, especially bags.
Punching a hole in the skin, place it with reverse side dense wooden gasket. You cannot punch holes on a metal surface; the punch blade will quickly become dull. And make sure that other parts of the bag do not accidentally fall under the punch.
What woman doesn't dream about a stylish bag from a fashion store, or better yet, more than one? But constantly rising prices for bags do not allow this dream to come true. And even if you have the required amount, finding an exclusive, beautiful, and most importantly, suitable bag can take a huge amount of time. That is why many needlewomen prefer to make bags with their own hands, rather than running around many stores in search of the one and only. How to sew an exclusive and stylish bag from pieces of leather?
To sew fashionable and stylish bag, you can choose any pieces of leather you like. And it is not even necessary to clearly repeat a certain model. Let the bag be original, emphasizing not only the individuality of its owner, but also the style of its creator.
Handmade bag– an indispensable women’s accessory that allows you to create style and pay tribute to fashion. But, first of all, a bag is a useful thing in everyday life, because in it you can store various women’s things, bank cards, a diary, a wallet and much more that should always be at hand. It is not surprising that the development of services to offer new models of bags occurred simultaneously with the change in women's needs. As practice shows, popular models of leather bags have several compartments and differ quality material. Below you can find a master class with detailed description and a photo with the stages of work, with which you can sew a bag at home.
In this article we will talk about how to make bags with your own hands at home. After watching the master class, you will be able to make leather bags yourself ( patterns can be downloaded by clicking on the links posted under the photo of homemade bags).

PATTERNS:
DIY leather bags. Download patterns by clicking on the link. Pattern No. 1.
How to make a beautiful leather handbag. Download pattern No. 2 and make a bag.
We make leather bags ourselves. Download the latest pattern No. 3.
The most durable are bags made of genuine leather. Therefore, you should not throw away your old leather bag - it can still serve in another capacity. For example, its material can be used not only to make a “new” bag with your own hands, but also to create various crafts. It is not for nothing that processed leather was one of the first materials used by man. Moreover, leather is widely used in a variety of areas. For example, in everyday life you can find leather of various types, from tanned with natural fats or vegetable decoctions to processed with a combination of aluminum alum and table salt.
To create homemade women's bags, they usually use thick, rigid genuine leather. If ladies handbag, the wallet or cosmetic bag is made of soft leather, then you will have to additionally put a denser base under it, for example, cardboard, thick fabric or the like To practice, it is better to make your first bag from leather from old boots, bags or outerwear. If you manage to make a handbag once, then you can sew a fashionable and modern women's bag again without much difficulty.
There are a huge number of options for bags that you can make from leather yourself. You can easily find suitable patterns and master classes on the Internet. And it doesn’t matter whether your bag is made in vintage or ethnic style, the main thing is that it will be unique and inimitable.
Now let's see interesting master Class- how to sew a bag from leather. You can sew such an original, extravagant handbag from scraps of leather with your own hands, and simple patterns can be cut out of paper into a square, as shown in the photo in the master class. 
As you can see, fashionable and exclusive leather bags are not so difficult to sew. Agree that in order to purchase a handbag in some boutique, made in the same style, you will have to shell out quite a round sum...
Greetings to everyone gathered now on the blog! Today I will tell you how to decorate your life and the lives of those around you with the help of such a simple item as a handmade bag.
There are a lot of bags, handbags, clutches, etc., etc. sold in stores. But it’s so cool to do something like this yourself, to experience the process of creating a product, right? Many will agree with me, I think. Therefore, today we will make a bunch of handbags, cute and funny)
How to sew a bag with your own hands
First of all, I suggest you sew a cute fluffy handbag that you can give to a little girl or girl.
List of materials:
- faux fur (for the outer part of the bag);
- fleece (for lining and for covering buttons);
- threads in the color of the fabric;
- two round buttons;
- two small white rhinestones or half beads;
- padding polyester;
- paper for patterns;
- needle;
- second glue;
- pencil;
- pins (for pinning patterns);
- scissors.
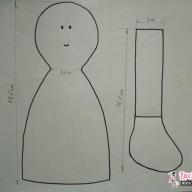
You can download patterns for the future bag here: eyelet And the basis. Let's deal with them.
What kind of patterns are there:
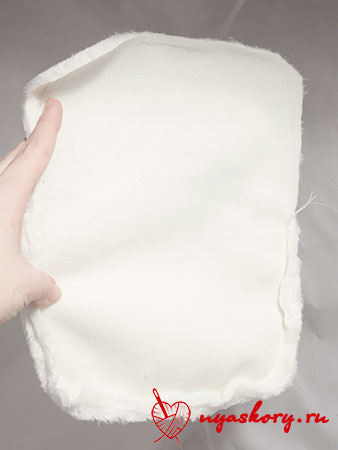
- one-piece bag pattern (lid + back) - the entire pattern area;
- the front of the bag is everything below the side insert;
- width of the side insert - we will sew the side part into the bag, this is its width. The length is the length of the outline of the front (excluding the straight top).
As for the side insert: it should consist of two equal parts, the direction of the pile of which will be directed against each other. But this is only for fur! From fleece, simply cut one strip of the required width; you can ignore the direction of the pile.
How to sew a bag: a detailed master class
First of all, we will work on the side of our product.
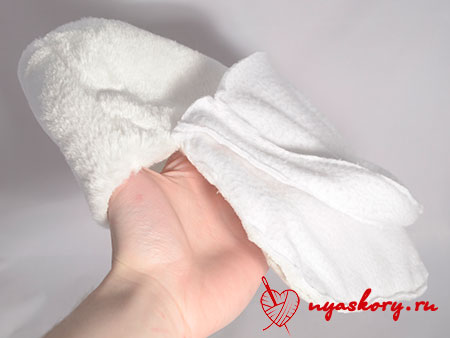
Take two pieces of fur side and sew them together along the edge. Sew them so that the pile of the pieces is directed towards each other.
Why do I suggest doing this? I answer: fur has a long pile, which should go in one direction. And this can be achieved just by sewing two pieces together

Trim off any excess. And sew the side part to the front of our future bag.
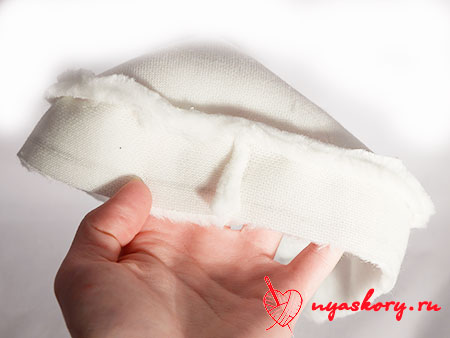

Now let’s sew on the back of the bag! The lid is already in sight

Trim the edges of the seam allowance. See why:
By the way, here's the back view of the bag:
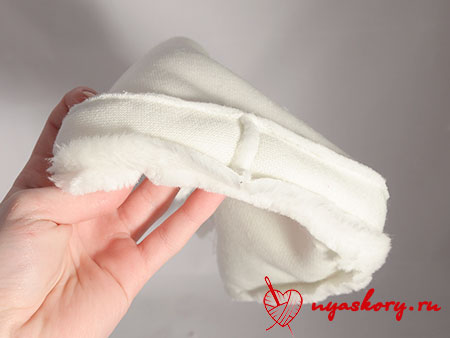
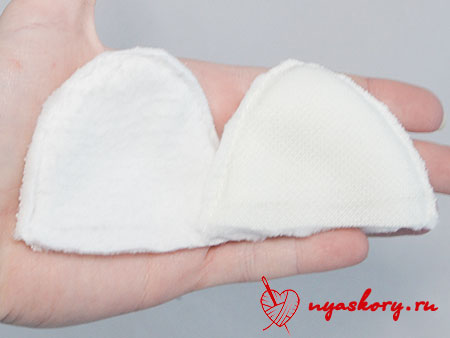
Sew a fleece “handbag” in exactly the same way. This will be the lining - the inside of the bag.

How to sew a lining to a bag? To begin, place the fleece and fur parts with the right sides facing inward.

This photo seems to make it clearer

And just sew the covers of both parts together.

Screw the inside into the bag.

Sew the remaining edges with a blind stitch.

To decorate our bag, I suggest you cut out these ears:
This is how you should get them:

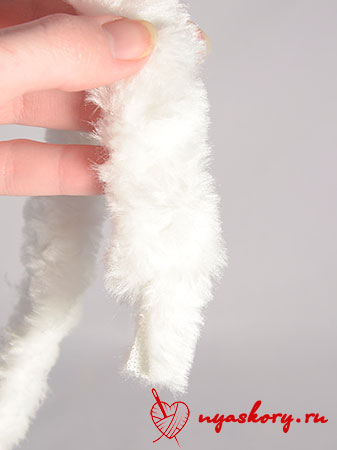
Now let's make a strap for the bag. To do this, cut three strips of fur of such length that it will be convenient for you to then put the strap on your shoulder. Weave them into a braid (tie at the end and at the beginning so that it does not come apart).

Remember we left holes for fasteners? Now you need to insert the resulting braid into them and carefully sew it up with a hidden seam.

But our bag doesn’t have fastenings yet! There are several options: you can sew in a zipper (which is better to do earlier), you can use Velcro and buttons.
I decided to go with the last option.
Cut two black circles larger in diameter than the button from black fleece and take the button.

Place a little padding polyester on the button.
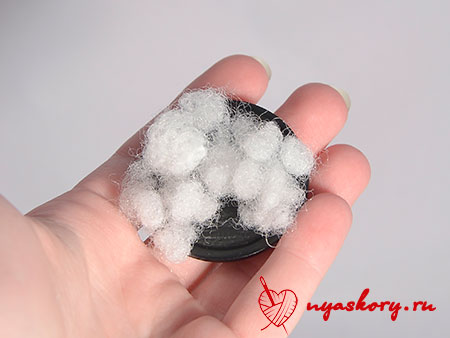
And into a fleece circle, along the edge of which run a running stitch without securing:

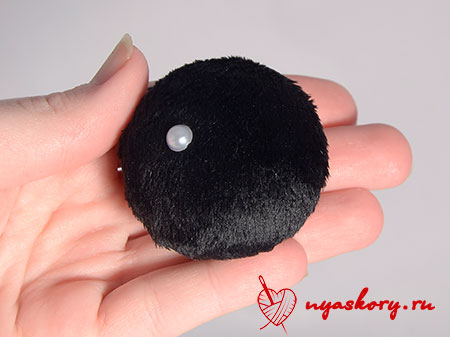
Put them together.

And pull the thread.

The button to secure the bag at the back should look something like this:

Glue a small rhinestone highlight on the front.
Now place the clasp on the lid of the bag to see where you will need to cut the loop.
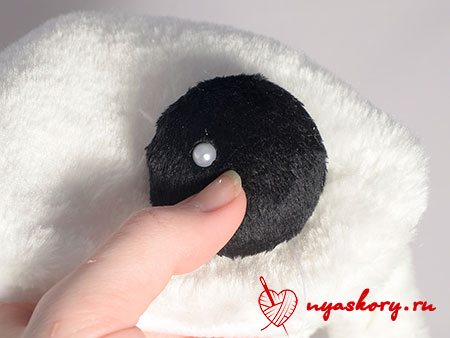
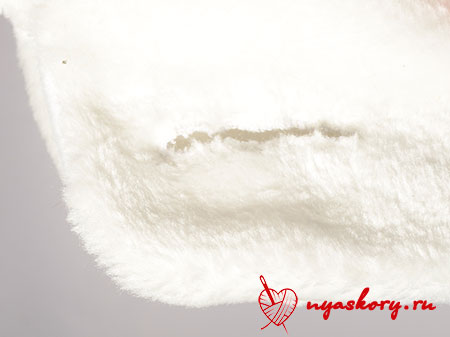
Draw a line down the center of where you want the button to be. Make a cut along the drawn line.

To make the cut beautiful and neat, sew it with a buttonhole stitch so that each stitch fits as closely as possible to the previous one.

This is what the bag will look like after finishing:
Sew button eyes to the bag:
Well, now let's get back to the ears! Fold and hem their edges.
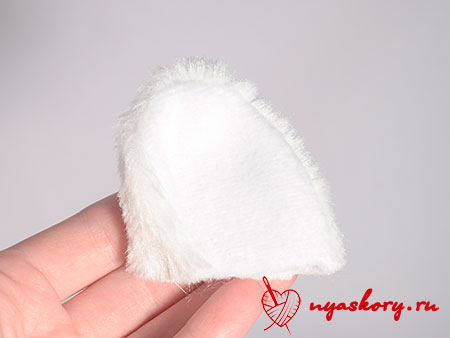
And sew them where you would like them to be.

Ta-dam! The bag is ready. It turned out to be a cute kitty)

DIY leather bags
Leather is one of the most interesting and durable materials for sewing bags. Therefore, I present to your attention several master classes using this material.
Bag - cat
For this simple but very cute model (somewhat reminiscent of the previous one), you will need leatherette, scissors, an awl, thread and a thick needle.
This can be worn by both a young girl and a small child.

The simplest leather bag
No, you definitely need to get one. You will need leather, scissors, a strap, tape, a marker and (optional) special tool for cutting several holes in a row (you can get by with an awl). All you really need to do is cut out a circle, make holes, pull the ribbon through them and attach a strap. All)

Envelope
Reminds me of the processing method of a cat bag.

Chanterelle
A lovely model)) Prepare leather or thick leatherette, braid and rivets for it. You don’t have to sew the chanterelle, just glue it along the edges and hide these places under the braid.

DIY jeans bags
However, the following models can be made from both jeans and old jeans.
Network
For this, cut the jeans into strips and weave the fabric, as in the photo. Sew it together in a bag (folding a piece of fabric in half) and sew on the handles.

Simple Denim Bag
If you have a denim leg, go ahead and make a bag! You'll need another buckle leather belt, scissors and thread with a needle.

Elegant handbag made of jeans
Here you will need two trouser legs, scissors, thread with a needle and a zipper.

DIY fabric bags
Rectangular
For it, take several pieces of cotton fabric, a zipper and accessories.

Clutch
An interesting idea is to use thick pieces of processed cardboard for the lining. I would recommend using plastic boards from Fix Price or juice packaging as a thick base.
Present such a handbag to your mother - she will definitely be happy))

Clutch in a semicircle
Cut two round pieces of cotton fabric and a circle of padding polyester from the fabric. Fold them into a “sandwich” and sew several times at right angles. Sew around the edge with bias tape. Fold the piece in half and sew a zipper into the bag. Decorate.

Handbag
This will come in handy cotton fabric, lining, fastenings and floral decorations. A young lady, say 17 years old, will definitely appreciate such a gift.

Sportswear bag
For it, prepare thick fabric, braid, scissors, pins, fasteners, zipper and thread. In addition to sportswear, you can also put camping things in this bag.

Mini handbag
Using the scheme described below, you can make both a very miniature accessory and a larger item.

Remaking old things
For the first of two photo workshops you will need a long soft cloth bag, and for the second - an old T-shirt.


Photos of handmade bags
I want to show you how using the same patterns you can get many bright and unusual products.
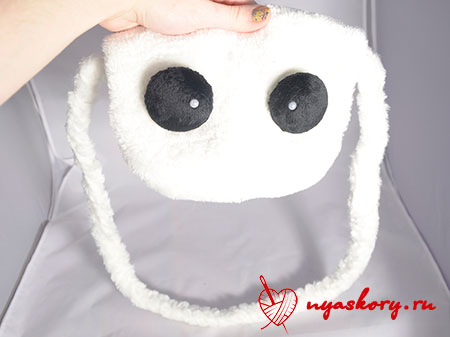
Sandwich bag
Cute handbag made of fleece. It's quite simple! And this design can easily be implemented into a cat bag.

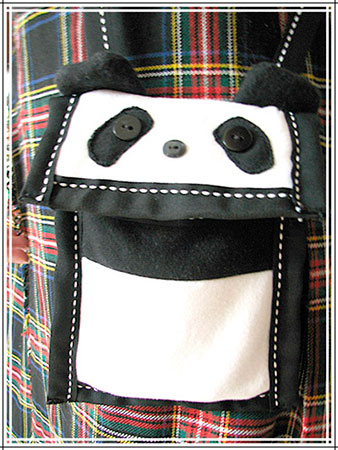
Panda bag
Cute panda design
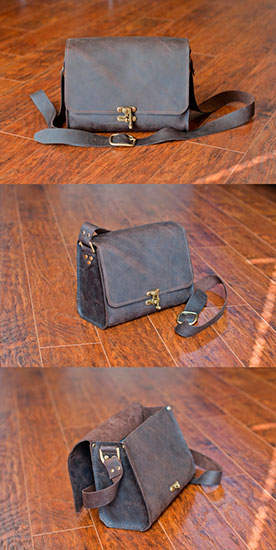
Simple and elegant bag
The handbag is quite simple and is made according to similar patterns from the very first one.

Knitted bag
Although this bag is knitted, its design can easily be implemented in fabric.

Leather bag
Octopus bag
The bag, again, is knitted. But it is very similar to the first one (at the beginning of the article). You just need to add tentacles to it and remove the ears.

By the way, I bought fleece for the eyes of the “cat” bag Here. You're unlikely to see one like this in a store.
This concludes the article. I hope you enjoyed looking at all the bags and took something interesting for yourself. See you soon!
P.S. Subscribe to updates!
Sincerely, Anastasia Skoracheva
Today it is quite difficult to be original. The range of products is so wide that it is sometimes very difficult to choose something unusual. That is why in this article we will talk about how to sew a leather bag, and what should be taken into account.
Rules for working with leather
Initially, you need to know the rules of working with this or that material. That is why, before figuring out how to sew a leather bag, you need to know all the nuances and precautions in the work.
- To work on sewing machine you will need special needles. In some cases, you can also install a special foot (with a roller) for sewing leather products.
- For each product you need to be able to choose leather. So, for bags it should be extremely thick, rough-made. Only in this case will the product be able to serve its owner for a longer time.
- When cutting parts, remember that leather stretches differently.
- Throwing or pinning skin is prohibited. After all, marks remain on it, which then do not disappear anywhere.
- The length of the machine stitch when working with leather should be as wide as possible. After all, if you sew a bag with a fine stitch, the leather may simply tear (press through) in the stitching areas, which will lead to the product tearing.
- It is better to cut the leather not with tailor's scissors, but with a special shoemaker's or stationery knife.
- The edges of the leather are not overlocked. After all, they do not have the property of rolling.
- Standard machine fastenings are not applied to leather. To prevent the product from coming apart at the seams, the thread on the wrong side must be tied into a knot.
- It is important to remember that high-quality sewing of leather products is simply impossible without the use of glue.
Ironing the product
Sewing leather bags necessarily includes the process of ironing the material. There are certain nuances here:
- The leather is ironed from the wrong side.
- When ironing you should use low temperatures, steaming should not be used. Overheating causes the skin to shrink and become hard. It will not be possible to soften it after this.
- It is best to iron the skin, even from the wrong side, through gauze or a special iron. This way you can protect the fabric from damage.
If the material is ready for work, you can begin the sewing process itself.

Envelope clutch
Today it is fashion accessory, which simply must be in the wardrobe of every self-respecting girl. In addition, making it yourself is quite simple.
To make a perfect leather bag with your own hands, patterns are a must. After all, it is much easier to create a product using a template than to sew it, as they say, by touch. In this case, the template is extremely simple: the design is based on a rectangle (its size is the size of the clutch). Next, you need to draw triangles in four directions from the sides. However, so that their edges do not coincide a little, they are wider (this is important, because when folding the clutch, things should not fall out of the bag).
Next, the product is cut out. At the next stage, holes are punched at the edges using a special device (a hole punch for fabrics). Three edges are folded to form an envelope. They are fixed with a rivet (threaded through the holes and secured on top with a round piece). The principle is something similar to a bolt and nut. The remaining piece of fabric is the “lid” of the bag, i.e. the part that will open in order to put or take something into the clutch.

Shopping bag
It is also extremely easy to sew this leather bag with your own hands. You don't even need patterns here. For sewing, you need two rectangular pieces of leather for the bag itself, two long narrow pieces for the handles. If you wish, you can make a lining.
At the very beginning, you need to sew two equal pieces of leather from the bottom and sides. This will be the bag itself. Next you need to prepare the handles. They are easy to make too. You need to fold a piece of leather in half, bend the edges of the handle into the middle so that everything looks beautiful on the outside. The handles can be initially glued with doublerin, which will significantly strengthen them. Next, they need to be stitched along the edge to secure them.
Then the handles should be sewn to the bag itself. To do this, the top of the product needs to be slightly bent into the middle. The handles are sewn a little along the length (to the top of the bag) and always along the width. In this case, threads for sewing can be chosen either to match the product or in a contrasting color. That's all. The leather shopping bag is ready!

Men's bag
The pattern of a men's leather bag can also be extremely simple. What does a guy need? So that the bag can fit a laptop or papers. That is why the technology for cutting and sewing such a product is also extremely easy.
The bag size may be slightly larger than A4. So, for this you need to cut out two corresponding pieces of leather. This bag will also have a slightly widened bottom and a sewn-in zipper. To do this, you need to cut out two narrow but long pieces of leather:
- on the bottom - a size slightly less than the sum of the three sides of the rectangle (the bag itself);
- on the top - slightly larger than the wide side of the bag (the lock will be located there).
You also need to prepare two narrow and long pieces of leather for the handles (guys rarely wear such bags on their shoulders, so the handle straps may not be long).
At this stage, you can sew all the parts together. So, first the bottom of the bag is sewn to one side, then to the other. The result is an almost finished cavity.
Now we have to work on the top. Initially, you need to sew a zipper into the strip. So, for this you need to first cut it in the center. When this is done, you need to fold the cavity of the bag itself, two handles (how to sew them is described in the previous version) and fold the top the way everything should turn out in the end. Since you can’t throw, you can first fasten everything from the inside with binders or loose clothespins (however, they also sometimes press hard on the skin and leave marks, it’s worth remembering). We sew a leather bag for a guy next. Now we need to fasten all the parts together. To do this, the product is turned inside out. You need to remember that in this case there will be difficult to pass places (where the handles are sewn on). So don't sew at high speeds. That's all. If desired, the bag can be decorated with pockets.

Barrel bag
You can also sew a “barrel” (leather bag) with your own hands. In this case, the following patterns will be needed:
- The first piece is the top part of the bag (two pieces - on either side of the zipper).
- The second detail is the bottom.
- The third detail is two stripes on the handles.
- Fourth - two side parts.
- Other elements: two fastenings, two connecting strips.
In this case, it is worth noting that the bag will be sewn not by machine, but by hand.
First step: handle straps
Let's figure out how to make a leather bag. So, initially you need to work with the straps for the handles. They can be pre-glued with glue, and only stitched on top with decorative stitching. If the work is done manually, the skin will first have to be pierced with an awl. The needle simply won’t pick up such fabric. The straps are initially sewn to the first part on both sides. First, you must remember to insert a ring into them, to which the handle itself will be connected.
Second step: sew the bag
We next consider the production of leather bags. At this stage it is necessary to connect the first parts together. So, to do this, you should slightly bend the ends where the zipper will no longer be sewn. Now we need to attach the snake. So, it can also be pre-glued to the skin with glue. Next you should go through it with an awl and stitch it with thread.
Let's move on to the next step in the process of sewing a leather bag. Now you need to connect the finished top of the bag with the bottom. It's easy to do. You have to sew from the inside. If stitches of a contrasting color were laid on top, you will have to do the same along the bottom.

Step three: handles
When the bag is almost ready, all that remains is to work with the handles. So, they must be extremely strong in order to withstand the weight of everything that may be in it. This is why they can be strengthened by the skin itself. To make the handle voluminous, strips of used leather twisted into a braid or tube can be inserted into the middle of it. Next, everything is stitched on the outside, first with a fastening stitch (you can also glue the handles with glue), then with a decorative stitch.
If desired, a lining can be inserted into the bag. It is sewn to the size of the bag, and after sewing it is glued in the middle so that the leather is placed on top of the lining fabric.
Stylish clutch
There is another option for sewing a clutch. In this case, you will also make a leather bag with your own hands. In this case, we will need extremely simple patterns. So, we only need to cut one rectangular piece of leather.
Initially, you will need to sew in a zipper. This is not difficult to do. So, it is worth noting that it can generally be glued. However, it’s still better to “walk” along the top decorative seam, which will also secure it.
At this stage the bag is almost ready! Now we need to make an unusual bottom. To do this, the leather should be folded in the middle at the corners of the bag. It will look like the clutch has been cut off a little. These folds are stitched from the inside. The rest of the bag is stitched along the outside with decorative stitching. For beauty, you can also bend the corners of the product along the top, securing them with buttons. That's all. A stylish and unusual clutch is ready!

Decoration
Almost any leather bag can be very unusual and original. A master class on decorating - that's what we'll talk about now. So how can you decorate a leather product? There are several options here:
- Rivets, buttons. These are metal parts. They can be gold or silver in color. Nowadays such elements are in fashion, so you can safely decorate your product with them. They pierce the skin quite easily, as they have sharp ends that bend and lock the part in place.
- You can decorate leather bags with zippers. It looks very nice. So, you can take one half of a zipper with intact teeth and sew it along the contour of the bag. Alternatively, you can twist the zipper in a circle (spiral) and make a very unusual decorative element. It can be either sewn or glued.
- Applications. You can also decorate the bag with leather or suede appliqué. Almost anything can be depicted. The picture can be sewn or glued.
- Embroidery also looks beautiful on leather bags.
That, in principle, is all that can be used to decorate a leather bag. This is what will look stylish and original. The main thing to remember is that it is important not to overdo it with decorations. After all, too much is ugly. Everything should be in moderation.
Leather bag care
Having examined various patterns of leather bags, photos finished products Finally, it must be said that any item made from this material requires special care.
You can revive a slightly tarnished or faded leather bag with a soap solution. However, before use, you need to add a little ammonia to it. After treatment with this product, the bag is thoroughly wiped and rubbed until shiny. soft cloth, soaked in castor oil or glycerin. Next, apply a thin layer of colorless cream to the bag. After it is absorbed, the product is wiped with flannel.
An onion can also be a good way to refresh your bag. To do this, you need to take half of this vegetable and rub the product with the cut. This product also perfectly hides scuffs on a leather bag, minor scratches and cracks.
If the leather bag becomes shiny, wipe this area with a mixture of milk and baking soda. Preparing the solution is simple. Mix a teaspoon of soda in a glass of milk.
If the bag is made of suede, i.e. reverse leather, it also needs to be properly cared for. Such a product should be periodically wiped with a rubberized cloth or an eraser. You should not wash the material, as this will make it rougher. However, if necessary, the suede should be washed in a soapy solution, wiping it thoroughly after the procedure.
And, of course, it is worth remembering that today there are many various creams and skin care sprays. They can be used if you want to extend the life of your favorite leather bag.