Patchwork, as a kind of needlework, has been known for a very long time. Its samples have been found in the Egyptian pyramids and in the excavations of a number of Asian countries. Developing independently in different parts of the world, this type of handicraft for many centuries has reached the level that is recognized as a kind of decorative and applied art.
Using the opportunities provided by patchwork, quilt, chenille, shoyle, yo-yo and other popular patchwork sewing techniques, you can create original and practical home products from the remnants of fabric with your own hands - blankets, pillows, curtains, tablecloths, rugs, panels, and also clothes, bags, cosmetic bags, notebook covers, toys and much more.


Patchwork quilt
The patchwork fashion has revived the popularity of patchwork quilts in today's world. The history of their appearance is associated with a lack of funds for the purchase of expensive products, as well as a shortage of fabrics. In addition, the patchwork quilt was of a sacred nature, acting as a talisman and a symbol of the connection between generations within the family. It is not for nothing that a patchwork quilt was a must-have wedding gift for newlyweds or a dowry for a newborn baby. Traditionally, chintz of bright colors was used for its manufacture, so the blanket had not only a practical function, but also an aesthetic one, decorating a home.


 The warmth and coziness that patchwork style blankets give have ensured their popularity today. When sewing them, they still use natural cotton fabrics: chintz, calico, coarse calico, flannel, and a bike. Only the filler has changed, now modern materials are used for the manufacture of blankets: synthetic winterizer, thinsulate, batting, isosoft, holofiber, etc.
When sewing quilts in the patchwork style, simple assembly patterns are used. Individual elements are mainly cut in the form of squares, which are interconnected in random order. This simplicity is explained by the fact that the clothes are most often used when tucking into a duvet cover, so there is no need for particularly complex patterns. The stitch remains an obligatory element of the patchwork-style blanket. Curly or simple, it connects 3 layers - the upper patchwork, the middle one consisting of insulation and the lower one - lining. Quilting can be done by hand with a buttonhole stitch, hand stitching or a goat stitch. But most often quilting has recently been performed on a sewing machine, using a curly or simple stitch along the contour.
Patchwork quilt
The bedspread, unlike the blanket, is thinner and more functional. It is used as a blanket to cover or wrap up while sitting in an armchair, on a sofa, and also as a cape to cover bedding or upholstered furniture. Like a blanket, it consists of 3 layers, only instead of bulky warming pads, when sewing bedspreads, flizilin or thin synthetic winterizer is used, which does not create a large volume. For the details of the top, when sewing it, denser materials are used - linen, jacquard, tapestry, mixed fabrics. Since the bedspread often plays an aesthetic role in the interior, more complex and interesting patterns and patterns are chosen for its sewing.


Patchwork patchwork patterns
Experts recommend starting the development of the patchwork technique with the creation of a large product - a blanket or bedspread. You can collect patchwork elements into a whole product arbitrarily, improvising during assembly, but products look much more interesting where patches sewn together form a certain pattern or color gradation. For this, a sketch or diagram is created in advance, where all the elements are drawn in detail. Then separate parts are procured, which are assembled in accordance with the scheme, first into blocks, and then individual blocks into a single canvas, which is connected to the lining. For convenience, when cutting flaps, cardboard or plastic templates are used, which make it easy to cut the required number of parts of the same size.


Patchwork technique and patchwork techniques
Patchwork is the most popular patchwork sewing technique, which involves the creation of a whole product by sewing together individual patches. Working in this technique, you can master several types of patchwork:
- classical or English assumes the assembly of a whole product from shreds of the same size and shape - a square, a triangle, a rhombus, a rectangle, a hexagon, etc.;


- crazy - a type of patchwork, in which products are created from patches of various colors, sizes and shapes, sewn randomly. The seams of such products are additionally decorated with ribbons, lace, and the products themselves are decorated with beads and beads;

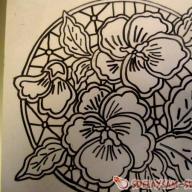
- Japanese patchwork - a technology for creating floral and geometric ornaments from a silk patch using sashiko stitches;

- knitted patchwork involves the creation of a product from scraps of knitted fabric, knitted or crocheted elements;


When creating products in the patchwork style, various techniques are used.
Those who are just starting to master this type of needlework should try the following techniques:
- squares - a method that assumes that the entire product consists of the same square or rectangular elements, assembled into large square blocks;
- stripes - a method of assembling rectangular elements of various sizes in a spiral, parallel, zigzag, ladder, etc.;
- triangles - a method in which triangular-shaped parts are used, collected in stripes, squares or blocks in the shape of a star;
- honeycomb - this technique is used when assembling hexagonal parts.

Having mastered the assembly of simple geometric elements, you can move on to more complex patchwork techniques - lapach, chenille, watercolor, yo-yo, shoyle, English park, rag quilt, bargello, patchwork corners, borough, shabby quilt, Australian stained glass, etc.


DIY patchwork bedspread
A beautiful, bright bedspread measuring 140 × 110 cm, sewn from squares of the same size, will work even for those who are just trying their hand at patchwork, the main thing is to be able to use a sewing machine. Work begins with the development of a sketch and the procurement of the necessary materials. As a pattern for the pattern of the future blanket, you can use the examples presented in this article or come up with your own.
For work you will need:
- cotton fabric of various colors, which must be cut into identical squares of 16 × 16 cm, 63 squares in total;
- a piece of padding polyester with a size of 115 × 145 cm;
- a piece of cotton fabric for lining measuring 120 × 150 cm;
- bias inlay 4.1 m;
- cardboard template;
- scissors, thread, pins, chalk;
- sewing machine;
- iron.

 1. Before cutting, the fabric should be washed to prevent it from shrinking later, ironed. Since the accuracy of the cut is the key to a neat product, a cardboard template should be used when cutting individual elements. Cutting with it 63 square blanks 16 × 16 cm (taking into account the allowance, in the finished form - 15 × 15 cm).
 2. Place 7 squares on the table in each row (9 rows) in accordance with the selected pattern.
 3.Sew individual elements, folding face to face, on a typewriter into strips of 7 squares. Press the allowances on one side.


 4. Sew the assembled strips into a single sheet, iron out the seams.
 5. Lay the part of the lining face down on the table, lay a synthetic winterizer or other insulation on top of it, cover with a patchwork cloth, so that it looks face up. Pin the product at the corners of the squares in each row.
 6. To quilt the blanket up and down on a typewriter, laying the lines in the seams connecting the squares, or in parallel with them. Remove the pins and sew along the edge.
 7. Cut off the excess synthetic winterizer along the edge of the product, and then process the cuts with an oblique inlay. To do this, turn a short cut at the bias tape, place it on the lining side of the blanket and stitch along the seam of the blanket edges. Before reaching 0.5 cm to the end, interrupt the line and turn the product, start a new line from the corner, laying the corner of the bias tape in the fold. Sewing it around the entire perimeter of the blanket, turn the tape on its front side, straighten the corners. Tucking the long edge of the tape over, stitch it onto the right side of the blanket. The blanket is ready.


 In more detail, the process of sewing a patchwork cloth can be seen in the video.
Patchwork crochet patchwork knitting


 Crochet patchwork provides great scope for creativity. In this technique, you can make a variety of products for the home, toys, clothes, accessories. When creating individual elements, traditional crochet techniques are used - grandmother's square, sirloin technique, triangular, round and hexagonal openwork motifs and dense patterns.
The individual elements are hooked together into larger parts. When knitting blankets and rugs, finished knitted fabrics can be lined or used without lining. Along the perimeter, such products can be decorated with a knitted border or scallops. It will be interesting to look at products that combine several crochet techniques, as well as crochet and knitting, or assembled from knitted and textile parts.
DIY patchwork pillows patchwork pattern
Decorative pillows are a great opportunity to add flavor to the interior of your living room or bedroom. Performing it in the patchwork style, you can choose not only simple natural fabrics, but also containing mixed fibers or having a rich texture.


 To sew a pillow 36 × 436 cm; in a patchwork style you will need:
- several scraps of fabric, harmoniously combined with each other;
- piece of fabric for the back of the pillow 40 × 40 cm;
- piece of non-woven fabric 40 × 40 cm;
- filler for a pillow;
- zipper 20 cm long;
- threads, pins, scissors;
- sewing machine and iron.
Wash and iron the fabric beforehand.
- Cut 9 11 × 11 cm squares, 5 smaller heart-shaped pieces, 4 30 × 8 cm strips and 4 8 × 8 cm squares.
- In 5 squares measuring 11 × 11 cm, cut out a heart-shaped notch, 1 cm smaller than the heart-shaped parts.
- Cut 4 squares 11 × 11 cm in size diagonally into 2 triangles, and then cut each triangle again, so 4 triangular elements are obtained from 1 square.
- Lay out the details on the table making up a pillow pattern, as shown in the diagram below (Fig. 1).
- Sew square blanks from triangles (Fig. 2 and 3), seam width 1 cm.
- Sew the details of the hearts into the squares with the corresponding grooves (Fig.4.5), iron the seams.
- Sew blanks of squares into strips of 3 pieces, observing the sequence of the pattern, iron the seams.
- Stitch the strips together into a whole canvas in accordance with the scheme, iron the seams.
- Sew on previously cut strips of fabric along the perimeter of the assembled canvas and sew square elements measuring 8 × 8 cm into the corners. Press the seams on one side (Fig. 6). Glue the entire part from the inside out with a fleece.
- Cut a piece of the flap for the seamy side of the pillow into 2 pieces. Sew them together along the edges, leaving a 20 cm opening for the zipper. Sew in the zipper (fig. 7).
- Fold the front and back of the pillow with the right sides inward, pinch off and sew along the perimeter.
- Unscrew the pillowcase on the front side, and put it on a ready-made sofa cushion of a suitable size or fill it with padding polyester, holofiber.

Patchwork Patchwork Bags
The bag is a must-have for any woman's wardrobe. Having mastered the technique of patchwork sewing, you can independently create original designer accessories. For self-tailoring of bags in the patchwork style, it is recommended to choose durable, wear-resistant fabrics.


Video patchwork patchwork
The video below demonstrates how to sew a clutch bag using the patchwork technique in a few hours.
Patchwork quilting
Quilting is one of the types of patchwork. Its characteristic feature is the curly stitch. Products made in the manner of quilting - quilts, are often complemented with embroidery, applique, decorate with beads, buttons, ribbons. Inspired by the ideas below, you can sew a quilt yourself by hand or on a sewing machine.


 Patchwork is a wonderful opportunity to unleash your creativity and develop your taste. A few scraps, imagination and a sewing machine will allow you to create original little masterpieces.
Even a beginner can sew a patchwork blanket from squares It is not sewn so quickly, and for beginners it may take much more time, but such sewing can be the first truly high-quality thing in the house that you have done with your own hands.
Do-it-yourself bedspread patchwork
Review more than one master class in order to determine not only how your product will look (you can see it in the photo gallery as well), but whether you can handle all this technology as a beginner. A detailed master class, of course, simplifies the work, but do not immediately take on a difficult task. The first sewing should be a pleasure, and wading through the jungle of unfamiliar technology can discourage you and further try yourself in patchwork.

Any high-quality handicraft not only decorates the room, but also brings to the interior an atmosphere of comfort, warmth and natural brightness
Where does sewing begin? Follow the instructions:
- Determine the size of the bedspread;
- Choose the color scheme that will be in the style of the interior of the room where the product is intended;
- Prepare the fabric: stripes, pieces, shreds, squares;
- Prepare the fabric that will become the seamy side of the product;
- From the tools you will need: scissors, needles / pins, thread, a sewing machine, a pencil and a square ruler (but you can also use a square template).
Let's say you are making a product from squares. Why from squares? It will be definitely easier for a beginner to do this - for beginners to cut different shapes with their own hands and then connect them patternedly is a real test.

You can choose any pattern for the bedspread that you can do.
Of course, if there is a photo or video of a master class, view it in detail. But even if you have only schemes in front of you, you can start sewing with them.
An important point: before proceeding with the preparation of squares, the fabric should be prepared for work. Just soak it in hot water for ten minutes, and then simply rinse it in clean warm water.
If we are to be completely consistent, it would be nice to show the real class and starch the fabric. It's worth doing - it will be easier to work with the material. And, of course, iron the fabric well.
Do-it-yourself patchwork bedspread made of denim (video)
How to sew a patchwork bedspread
A small workshop on making quick squares from fabric.
Just four steps:
- Take two different shreds of fabric and cut two equal strips out of them;
- Fold them on the wrong side and sew, secure by sewing by carefully smoothing the seam;
- Now measure the width of the resulting product, and cut the same strip (of the same width) from the third piece of fabric;
- You need to fold it with the received part already with the front side, and make the seams on both sides.
As a result, you should have a kind of double-sided sleeve. Put this canvas on the table and cut out squares from it according to a template or a special ruler.

In order to cut the squares correctly, it is important to use a template or ruler.
It is difficult to come up with such a simpler scheme; any beginner will repeat this master class. This will be followed by the stage of connecting the squares. From the details, you can get whatever patterns you want - simple geometric, and fantasy, and snakes, and mosaics. For the first time, you can lay out a simple ornament to make it easier to cope, and you do not get confused about what you are going to sew.
When you have decided on the pattern, the squares can be sewn. First comes the sewing of the longitudinal stripes, after which you must iron the seams. Then we sew the resulting stripes into one canvas. And again the next stage is a thorough ironing. After that, you will see that the finished front side is obtained.
How to assemble a block from rags (video)
Sew a patchwork bedspread: the final part
The front side is not the whole product. Next, with your own hands, you must sew the front part to the wrong side. Chintz is excellent as a purl fabric. Batiste can also be made from the wrong side.
- Lay the piece of fabric for the wrong side face down on the table;
- Put a synthetic winterizer on top of the seamy fabric, if your bedspread has a blanket function (otherwise, the synthetic winterizer is not needed);
- The next layer is the front side, that same patchwork of squares;
- Either sweep with your own hands, or you just need to pin the entire product with pins and quilt on a sewing machine.

In order for the cover to have a shape, it is necessary to use a sealing material in the form of a padding polyester
How to sew a thing correctly? The easiest way to do this is along the borders of the squares, but if you intend some kind of pattern, you can also quilt along the pattern. True, for beginners this is a rather difficult task (a separate master class on stitching will help you in this case).
The last step is edging. It's easy to do: take a strip of fabric about 8 cm wide, and the length should be slightly more than one side of the product. The fabric must be folded in half, attached to the front of the garment and sewn on. Tuck the excess edges of the edging to the wrong side of the thing, wrap the edging on the wrong side of the product and sew from the front side. The line will run across the canvas. The other sides of the thing are edged in the same way.

Having comprehended the basic basics of this skill, you can move on to more complex ornaments.
This is the simplest master class, in such a product and schemes are not particularly needed. The main thing is not to overdo it with the patchwork pattern.
Such a bedspread can be used to decorate a bed, sofa, and sometimes it is also used as a tablecloth. But what if you decide to make a patchwork product for a baby bed? Maybe it's worth taking the first step in patchwork sewing just from this?
Patchwork: DIY baby blanket
To decorate a baby's bed in patchwork technology, you need to prepare almost the same as for the previous work.

Fabulous colorfulness is the main distinguishing feature of children's interior items
You will need:
- Fabric (4 types);
- Fleece;
- Sewing machine;
- Needles;
- Threads;
- Scissors;
- Ruler or templates.
You can sew a baby blanket from 48 squares. The side of one square is 8 cm. Do not complicate your opening work, a patchwork quilt of 48 squares is easy to sew, and most importantly, everything will be clear, it is difficult to get lost.

A colorful patchwork bedspread can become a bright piece of furniture in a child's room.
- The resulting squares need to be slowly, carefully sewn and ironed very well;
- Put the patchwork fabric on the fleece, it will be the wrong side of the product;
- Cut off all unnecessary, and round the corners;
- Stitch both canvases along the edges, the indent is 1 cm.
That's all, this cute DIY patchwork bedspread is ready! It will also decorate a child's bed, and will look great as a cape while walking in a stroller. You can sew it literally in a week, just do not rush sewing - all the squares should be even. Patchwork sewing does not tolerate rush.
Free stitch for beginners (video master class)
With your own hands, you can also sew a blanket for a child, and capes for a chair in a children's room. A patchwork master knows how difficult it is to stop when the first product is successful, and as soon as we “take over”, we are already sewing a lot, and in a more complex technique. Do not be lazy to post a photo of your debut product on the Internet, and inspire beginners to their first feats.
DIY patchwork for beginners (photo)

The tradition of finding application for each piece of fabric appeared back in the days when clothes and interior items were sewn on their own. Everything in the house was done and decorated with our own hands. Now the patchwork technique is experiencing a new surge in popularity, but already as an opportunity to make a unique thing for the home that expresses the taste and talents of novice and experienced craftswomen. Bedspreads, rugs, a do-it-yourself patchwork quilt, created without much hassle and expense, can become a bright spot in the interior, a good gift for new settlers or a young family.
Sewing and assembling a patchwork quilt or bedspread begins with preparing the workplace, because a huge number of patchwork requires significant space, for example, a large table. When choosing fabrics, first of all, the material for the front side is selected. Experienced craftsmen combine silk and chintz, linen and satin, satin and drape in one product. For beginner needlewomen, it is better to sew bedspreads, rugs or a patchwork quilt with your own hands from chintz, satin, flax, coarse calico, knitwear.

You can buy ready-made sets of fabrics for patchwork, which are offered by the fair of craftsmen, but for novice needlewomen it is more interesting to audit cabinets, selecting unnecessary things and leftover fabrics.
An original blanket can be made from cut-out denim pieces. Before starting sewing, the fabric must be prepared - cut out thickened seams (on old clothes), shabby areas, wash, iron, make patterns.

Even if everything that comes to hand goes into business, you need to think over the color combinations and the general composition of the blanket. It is advisable to depict your ideas on sketches - sheets in a cage, painted with pencils. For beginner needlewomen, this technique is convenient: take as a basis one fragment, assembled from several parts, and then duplicate it several times. When choosing color combinations, it is important to take into account the color of curtains and tablecloths so that the new textiles harmoniously complement the interior. For sewing lining and edging, they usually take a solid, durable fabric.
In addition to the lining and top, in the structure of the patchwork quilt there should be insulation - batting, synthetic winterizer, holofiber. The filler can be natural (cotton, wool, semi-wool) or synthetic. The most popular synthetic winterizer is light, warm and moderately voluminous. For sewing blankets, choose a fabric with a density of 150-200.

For novice craftswomen, as an economy option, the master class suggests using an old blanket as insulation, if it is not too heavy. The rest of the assembly and sewing are the same.
To sew bedspreads, rugs or a patchwork quilt, as in the photo, you need to prepare:
- Quality threads No. 45 or No. 50. The color is chosen to match or by contrast. You will also need simple thread for sweeping.
- Sample made of thick cardboard or plastic. The shape - round, square, hexagonal, rhombus, striped - is chosen in accordance with the idea. For beginners, the easiest way to sew the first blanket is from squares using patterns. The size of the part depends on the overall size of the product and is 5 - 10 cm + 1 cm for the seams. For example, for a blanket of 8 x 8 cm squares, you need to add a 1 cm allowance on each side and arrange a frame 1 cm wide. The total size of such a template will be 10x10 cm.
- Instruments- in addition to an iron and a sewing machine, you need needles, pins, chalk or soap, scissors and a tape-centimeter.
Sewing technique "strip to strip" (video)
How to sew a patchwork quilt correctly
Having sorted the flaps, you need to make patterns using a template. It turns out many identical squares with a seam line marked inside. For example, you can take a baby blanket 110x140cm. Taking into account the border for it, you need to make 192 squares measuring 8x8 cm.

A convenient technique for assembling the bedspread is to sew square blanks first into long strips, and then connect these rectangles to each other. If the circuit is in the form of triangles, they are sewn in pairs in the form of rhombuses or squares, in the future the assembly is similar to the first option.
In order for the seams to be accurate, neat, without distortions, before sewing, the flaps must be ironed along the contour of the intended seam.
We fold the two squares with the wrong side up, pin them off and sew. All seams must be ironed from the inside out, placing them in different directions so that there are no thickenings.

When the most laborious part of the work is finished - assembling the top, you can assemble blankets, blankets, bedspreads using the diagrams. On a flat and hard base, lay out the ironed lining with the wrong side up. For fixing it can be secured to the table (or floor) with tape.
From above, the filler is laid out and leveled so that the lining protrudes from the interlayer and the upper part by 5 cm.

Now quilts, blankets or bedspreads need to be properly quilted. The machine stitching technique involves starting from the center, sewing the squares diagonally to the edge (see the diagrams in the photo). To do this, you need to install a special embroidery foot on the machine. In addition to the usual stitching, you can also choose a curly contour - the sun, hearts, etc. the upper thread is selected to match the flaps, the lower thread is tucked into the tone of the lining. We sew with a weak thread tension. After finishing work, you need to trim the edges of the blanket. If the stitch is done by hand, the edge of the blanket is sewn over first.

Assembly technique:
- All layers of the blanket and the border are sewn on from the long sides;
- Everything is also sewn from the short sides;
- With a blind seam, it is necessary to process the corners of the blanket, hiding the extra pieces.
If there was no machine stitch, a hand stitch is performed after the piping. To do this, you need to take strong threads and quilt around the perimeter of the parts with a seam of 3-5 mm or at the joints of 4 squares, pointwise.
Ladder patchwork quilt (video)
Sewing a patchwork quilt: master class
The master class "How to sew a patchwork quilt with your own hands", which is offered by the fair of craftsmen, is suitable for both beginner needlewomen (with step-by-step descriptions) and experienced craftswomen, who can quickly navigate the instructions and save time. In the finished form, the size of the product is 1.2 x 1.3 m. The technique is also used for sewing bedspreads, only instead of a patchwork set "charm pack" you need to take "layer cake", cutting pieces 11.2 x 12.5 cm in size. blankets or blankets with stitches of about half a centimeter. This master class uses fabric 112 cm wide.
Tools and materials:
- 80 shreds 12.5 x 12.5 cm or 2 charm packs.
- One-color fabric in two shades (all-light and dark) - 120 cm.
- Border in a suitable color - 45 cm.
- Lining textiles - 1.3 x 1.4 m.
- Sintepon - 1.4 x 1.3 m.
- Iron and sewing machine.
- Cutting mat, circular knife and tape measure.
- Sewing accessories.

Step-by-step instruction:
- Cutting technique. 9 strips of 6.25 cm in width and 80 pieces measuring 6.25 x 11.25 cm should be cut from a light monochromatic fabric. From a dark fabric - the same number of the same blanks. (A set of "charm pack" - 160 pieces of the same size.) Prepare patterns from the fabric prepared for the border - 5 stripes 5.6 cm in width. See the diagrams.
- Parts procurement... Fold the printed and plain fabric patches together and sew along the long side. Prepare 160 rectangles in the same way. Iron the seams, folding the seams towards the printed fabric.
- Top assembly technique. Expand the rectangles so that the monophonic halves lie in steps (right-left, etc. - like the diagrams in the photo). Assembly: alternating 2 fragments with a light border and 2 with a dark one, it is necessary to form a row of 12 blocks.
- In the next row we sew the first block, laying so that the plain fabric is perpendicular (either from the side, then from above). For the next block, the border should be chosen in a contrasting color.
- Ironing. If you expand all the details, taking into account the diagrams, you get 13 rows of 12 blocks. Iron the top first, and then the rest of the blanket.
- Blanket assembly technique. Lay the lining on the floor with the wrong side up and secure. Lay the insulation and patchwork top sequentially on top. When the assembly is complete, pin everything off and make a 3-layer stitch.
- Stitch. You can quilt the blanket both in straight lines and in irregular zig-zags, like the diagram in the photo. The zig-zag technique in the second version will make it softer and acquire a cozy bulge.
- Border. Sew all the details of the border in one strip, smooth the seams in different directions. Fold the strip in half lengthwise with the right side out and iron in 2 layers. In the middle of either side, you need to fix the strip to the edge, leaving a tail up to 30cm. it is advisable that the joints of the strips do not fall into the corners of the blanket. Sew a border around the perimeter (stitch width - half a centimeter). Overlock the edges of the interlayer, wrap the hem and stitch on the other edge.
A master class for novice needlewomen with detailed tips for designing a patchwork quilt and assembly diagrams can be seen in the following video.
DIY patchwork quilt (video)
We hope that the master classes offered by the fair of craftsmen, photos and videos have inspired you to create your own masterpieces of patchwork sewing.
Happy product!
DIY patchwork quilt (photo)


Since ancient times, mothers and grandmothers made their own blankets from rags, which had incredibly beautiful patterns and colors. This skill has survived to this day. Today, in order to independently make a patchwork blanket, it does not take a lot of effort, since there are sewing machines and special devices, so it takes a minimum of time to make them, and the result is simply incredible.

Features and Benefits
For those who like to do needlework and make things with their own hands, there are always pieces of fabric that are a pity to throw away, and in order to sew something out of them, there is not enough of the same material. But do not be upset, there is an opportunity to create a beautiful and unique blanket-bedspread in the style called patchwork.
This applied art has existed since the times of ancient Egypt, women took scraps and created something beautiful with their own hands. Some scholars argue that this style of sewing appeared much earlier in the East and in Japan. There were found leather and fabric products dating back to the 9th century BC. NS.

Later in Europe, this trend in sewing was "reborn". When the time of the Crusades began, with the help of patches, canvases and flags were created, which were so necessary. But most of all, the patchwork style was appreciated by the inhabitants of the UK, as it helped to save on material, and in the end it turned out to be a decent product. Plus, British craftswomen were able to come up with a wide variety of patterns and ornaments that are embroidered to this day.
Such blankets and bedspreads, as mentioned earlier, have been sewn since very ancient times, due to the lack of an alternative. To create them, you can take solid or multi-colored pieces of materials. Sewn together, they create a unique pattern that will add comfort and good mood to every day.


The peculiarities of this product is that it consists of different-colored fabric cuts, which have the same shape and are sewn together. Thus, a large canvas is created with which you can hide or decorate the room.
Also, a patchwork quilt, as a rule, is made without an inner filler, so there is a possibility of making it from thin and delicate materials such as tulle, silk or satin.


Patchwork canvas has a number of advantages:
- Its creation does not require extra spending or large investments. Any leftover fabric or old T-shirts and jeans will do.
- Absolutely the same patchwork quilt you will not meet or see from anyone, we can say with confidence that this is a designer item in a single copy.
- In the process of making it, you calm down and enjoy the work, which always has a beneficial effect on your mood and inner state.
- The created blanket will be no worse than a store blanket, it will always warm you up and will also be an excellent bedspread.
- Such a patchwork quilt can be made in any size, which greatly simplifies the situation when, for example, there is a large non-standard sofa, and it is very expensive to sew a custom-made bedspread.


Views
From fabric cuts, you can sew not only a high-quality and warm blanket, but also many other things that can decorate the house, as well as make the interior unique and unforgettable. Often, if the craftswomen make a blanket, then they make a whole set with pillows. Thus, the room is filled with coziness, home simplicity and softness.
By itself, such a product can have many purposes, so many varieties appear.
For example, if a patchwork quilt is intended for decorative purposes (to serve as a bedspread on a sofa or bed), then it can have a very unusual applique, which is made based on a fairy tale or a beautiful story.
For children's rooms, they often make thematic drawings in the patchwork style, for example, for a boy's bedroom - it can be a boat, a horse, a car, and for girls - flowers, dolls, kittens, etc.


Plus, mothers make soft bedside rugs for their children so that they can get up comfortably in the morning. And for very little children, interactive patchwork carpets with paths, stones, flowers and a lake are made. Thus, a whole playing field is created, which is sometimes interesting to play for adults themselves.


Very often they make a double-sided blanket, which, on the one hand, can have winter motives and colors, and on the other hand, summer ones. So, depending on the season, you can change the atmosphere in the room.
As a rule, a patchwork quilt can perform not only a decorative function, but also a practical one. Very often, needlewomen make a rather simple, warm and voluminous blanket that will warm you even on very cold winter nights.


Not only blankets and pillows are made in the patchwork style, but also many other amazing things. For example, avid lovers of sewing something on their own make envelopes of incredible beauty for discharge from the hospital. For a girl, it can be made in pink, peach colors, and for a boy in blue or green. This is not the end of the fantasy. Various napkins, cup holders, even curtains for the windows are made from rags.


In this style, you can do not only things, but also decorate the wall. There are a large number of patterns for sewing panels or envelopes for newspapers or magazines.


The most important thing is not to overdo it in decorating the room with such things, otherwise the room can be full of and it will be uncomfortable to be in it for a long time (especially for the bedroom).
Some patchwork lovers make their own clothes using this technique (skirts, pants, T-shirts).


Styles
Even at the stage of conceiving and planning a future patchwork product, it is necessary to think over its dimensions, as well as the style in which the work will be performed. This is very important, as a conflict of patterns and textures can result. Patchwork products are most often suitable for rooms made in Provence, country or Scandinavian style, but with the right choice of colors, material and ornament, such a patchwork quilt can successfully fit into the minimalism and high-tech style.


Today, there is a wide variety of directions and themes in the design and manufacture of patchwork blankets. Typically, each style adheres to a specific idea and color scheme.
Basically, there are classic, oriental, custom and knitted styles.
Classical
In the classical direction, it is necessary to observe the clarity of forms and a calm, and even in some details conservative approach to the choice of color. There is not much emotionality and a riot of shades and colors here, very often this combination is from 2 to 5 colors no more. As a rule, the shape of the flaps is square or triangular.


Non-standard
In a non-standard or crazy direction, all the variety of ideas is observed, as well as an abundance of decorative elements. The patches can be of different shapes and sizes, very often beads, beads or buttons are sewn on. It may seem that this is a rather chaotically made product without observing the rules on color matching, but often with the help of decorative elements, the general idea or pattern is visible.
For example, for a little boy in a crib, an excellent solution would be to make a patchwork quilt in a nautical style, where blue-green shades will dominate, as well as the shape of an anchor, maybe even a ship. It is always interesting for a child to look at such a blanket, as well as touch the sewn buttons or decorative knots.
In this style, you can make a "rustic" patchwork. It is sometimes distinguished by inconsistency of colors or the dominance of green, earthy or red-burgundy shades. Moreover, the pattern on the patches themselves can be either ordinary peas or "Indian cucumber".


Oriental
The eastern direction in the patchwork style is due to the presence of more refined fabrics (silk, satin), and also has a certain similarity with the classical direction. There are golden, ocher, silver and metallic shades here. There is also a fringe around the entire perimeter of the edge or tassels at the corners.
As for the ornament, small details and small patterns on the fabric itself prevail. Most often, not only blankets are made in this style, but also napkins, pillows. They complement the interior very beautifully, making it more refined and sophisticated.


Knitted
Knitted patchwork is a very original style, as it combines simplicity of shape and soft texture. Craftswomen who know how to knit and crochet are advised to take a thread of acrylic and wool, mixed with each other in half, and also so that it is of the same thickness. Such a product is unpretentious to use and clean. It will be very voluminous and warm.
Experienced craftsmen know how to knit various motifs on separate squares, for example, New Year's or dedicated to Valentine's Day, Easter, etc. These can be all kinds of snowflakes, deer, hearts of different colors, angels, cakes and much more.


Technique
Today there are a huge number of ways to create patchwork quilts and more:
Of the stripes
Perhaps the most common and simplest option is the technique of stitching long strips of equal width. This blanket will resemble a cobbled fence, especially if you choose the color.


Well
One of the old techniques for creating a unique pattern is the American square or well. This style of tailoring was very popular two centuries ago in America and, accordingly, in Europe. This ornament is based on a square, which is sewn from stripes that gradually increase in length. This creates the illusion of a well of logs when viewed from top to bottom.
There are several options for creating such a picture.
- At its base and beginning there is a square, which is trimmed with a strip of fabric from each edge, and each subsequent "log" is sewn overlapping each other in a circle. The stripes can increase in width or remain the same, the main thing is to change the shades of the tiers so that there is a volumetric well effect. You can also make a dark middle, and closer to the edge, sew on lighter patches.
In order not to confuse what color of the fabric follows, it is better to first make a sketch of the future product and number the "logs". This is the easiest way to avoid mistakes when stitching.


- The second technique for creating the American square is also based on the square, which is the core and base. Pre-cut and processed flaps are sewn on each side like a ladder. It turns out that the cuts of each side touch each other at the corners. Here, too, it is worth remembering the color transition in order to maintain the visual effect.
Do not forget that this technique can also be experimented with, it can be either color, shape, or an offset of the center, to any of the edges, due to which a unique design will be obtained.


From squares
One of the oldest and easiest ways to create a patchwork quilt is by stitching squares. They can be large, medium-sized, or up to 1-4 cm in area. The main visibility of the pattern is created by the color and sewing sequence of the patches. The ornament can have 2 colors and resemble a chessboard, but the version with a wide variety of color palette looks more interesting. Some artists are adept at creating portraits from rectangular cuts, reminiscent of a pixel photograph.
Any geometric figure, for example, a triangle, can be taken as the basis of the pattern to be sewn. It is very easy to work with it, since you can make a rectangle from it, the same square, and even a circle or rhombus.
For work, isosceles triangles are most often cut out (it is very important to ensure that the direction of the threads in the fabric is in one direction).
The most common ornaments made from this figure are "mill", "star", "flower".


Watercolor
The watercolor technique is very creative. The product can be made from patches of different shapes (squares, rectangles, etc.), but the most important thing is the color. The cuts are selected in such a way that the tones are approximately in the same color scheme. In the finished, sewn form, this canvas resembles a canvas on which they painted with watercolors. These blankets look very delicate and airy.
Of hexagons
The honeycomb technique is very close to nature. To do this, hexagons are cut out and stitched together, moreover, most often, the entire blanket is made of beige or light patches, and only some hexagons are made honey or yellow, so as not to look too clumsy. You can sew small bees on top for a more atmospheric product. But such a figure is not always used to imitate a honeycomb, very often hexagons can be multi-colored and lay out a whole, bright product.


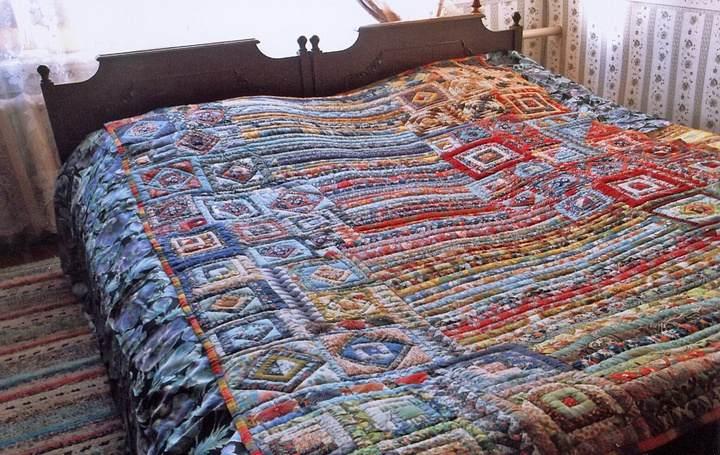
"Lyapochikha"
One of the most beautiful and voluminous patchwork sewing techniques is called "Lyapochikha". If a very impressive amount of old and unnecessary knitted T-shirts or T-shirts has accumulated, then you can make an amazing patchwork quilt out of them. First you need to buy a fabric on which everything will be sewn. Then things are cut into pieces (preferably rectangular) and, without processing the edge, sewn layer by layer onto the base.
To make the product more voluminous, the cuts can be twisted into tubes. The result is an amazing and colorful patchwork quilt or whatever.
If you disassemble the cut pieces of fabric by color, then you can lay out a drawing or pattern. Most often they make flowers or imitation of sheep's wool or fish scales.


All other techniques for creating ornaments are based on the above. Weaving and stitching of the flaps alternate, resulting in a colorful and original design.
An interesting solution would be to make a plaid or blanket crocheted in a patchwork style. Thus, a very beautiful ornament can be knitted using many colors. Usually, threads made of wool, acrylic, or a mixture of these are used. But the most interesting thing is that as a thread, you can use the remnants of fabrics that are thinly cut and fastened together. For this kind of knitting, you will have to use a larger crochet hook.


Materials (edit)
In order to sew a high-quality patchwork quilt that will last for many years, you need to think in advance about which material to use. Usually, craftswomen take leftovers from past projects and tailoring, thereby saving money and time in finding fabric. These can be scraps from old jeans or from children's things, from which the child has already grown.
But you should be aware that not all fabrics are suitable for sewing together. For example, if you sew a blanket from cotton and knitted patches, it will be inconvenient, since the knitwear stretches a lot and the seams may be beveled.


Fabrics are divided into artificial and natural.
Of course, it is always better to give preference to high-quality linen, cotton or silk, but these materials are not cheap, therefore they are very often replaced with synthetic cuts.
Recently, you can find in the store special patches for patchwork. They are usually made from 100% cotton. Such matter will not fade, wrinkle and "shrink" from washing. It also comes in polyester or synthetic fibers.
It is very convenient that the material for sewing is sold in patches, so you can take the required number of cuts of different colors and pay relatively inexpensively.


In order for the patchwork quilt to be warmer, airy and textured, craftsmen use a special cushioning material between the upper and lower layers of the patches. It is also called insulation or filler.
It is very important that the thickness of the inner liner is not too large, otherwise the sewn flaps can be quite hard or bulky.
It is easy to find such insulation in fabric stores, rolled into rolls. Like regular canvas, it is also sold by meter.
The filler is made from various materials that have special characteristics:
- If it is made of cotton, then after washing, wrinkles may appear on the already sewn blanket. But its advantage will be its ability to "breathe" and pass air, which means that moisture will not linger inside.
- There is an improved option - a blend of polyester and cotton. Such a layer sits well without pulling the material, and keeps heat well, which is very necessary in winter.


- Pure polyester lining is a readily available material that is not attacked by moths or mildew. Due to the fact that it is an artificially created fiber, it is impermeable to air and at the same time very resilient and lightweight.
- Flannel is often bought as insulation. This is a fairly thin and durable material that has poor elasticity, which makes it difficult to sew a patchwork quilt for inexperienced and novice craftswomen.

If it was conceived to sew a sufficiently warm blanket, then it is better to purchase a woolen filler. The product will be slightly voluminous, but thanks to this, it will be very warm and comfortable under such a blanket. Also, it is easy and comfortable to work with such a filler both by hand and on a sewing machine.


Dimensions (edit)
Blankets for beds come in completely different sizes, but there are standards, just like sheets and duvet covers. There are children's, one-and-a-half blankets, double blankets (there is a kind of euro - double blankets) and non-standard blankets that are sewn and made to order:
- Usually, blankets for children are 110 cm wide and 140 cm long, and for newborns they are usually square - 120 by 120 cm or 140 by 140 cm.
- One-and-a-half blankets can be 135-140 cm wide and 200-210 cm long. This option is suitable for one person or for a couple sleeping on a small sofa. As for the Euro version, each parameter is increased by 10-15 cm.
- Double models have dimensions of 170 by 200 cm or according to the European standard 200 by 220 cm. As for large and non-standard blankets, then sizes can start from 220 cm in width and 250 in length.


Based on the required size of the future product, it is necessary to calculate the number and parameters of the flaps, as well as their shape. Do not forget that the finer the stitched cuts, the harder the patchwork quilt will be, and vice versa. Of course, a medium-sized square or triangle will look more beautiful and aesthetically pleasing on a large product, and it will also save time for its production.
Small parts are more suitable for small or baby blankets. It is easier to make a high-quality ornament or a figurine of your favorite character or animal from them.

Colors and patterns
As a rule, a patchwork-style blanket is distinguished by its clumsy, and sometimes excessive riot of colors. Therefore, in order for the finished product to look aesthetically pleasing, you must first select a pattern in which the meaning will be seen, as well as select the necessary colors. Experienced craftswomen in the industry choose colors intuitively, find the right shades and correctly combine them with each other. Of course, everything comes with experience, but where do you start?
To get a beautiful result, you should familiarize yourself with the basic properties of color, namely, refer to the color wheel, with which it is easy to identify compatible and incongruous colors.


After all, it is the color, first of all, that conveys the general mood of the originally conceived creative drawing. If the palette of materials is chosen incorrectly, you may end up with an overly multicolored blanket, which will irritate over time. There should be harmony in the color choice.
The most important thing is not to overdo it with the color variety, it is best if 1 or 2 main colors are chosen for the main ornament or pattern, and the remaining 2 or 3 colors will be background and less bright compared to the dominant ones.


Also, to help novice lovers of cutting and sewing, there are special programs that will quickly help you find the right color scheme (one of the most popular is ColorLab).
Drawings on the product can be either with a conventional geometric ornament or with a solid plot.
Most often they sew from square, triangular or polygonal patches, since this method is much easier. With the help of such figures, you can make a blanket with stars, with multi-colored flowers, rhombuses, or simply - in the form of a checkerboard.
Recently, schemes with animals, birds, and fish have been gaining popularity. If a patchwork quilt is made for an exhibition or as a decoration for a home, then whole plots from fairy tales or favorite books, as well as ancient mosaic layout of ancient times, can be taken as a basis.
High-level craftsmen can carry out works of a complex order, so you can find products in the patchwork style on a religious theme. These can be various faces of Christian saints or ancient gods. It looks very beautiful, and most importantly, such a masterpiece will decorate any room.


The main thing is to be patient and do everything carefully step by step, then each finished work will delight you not only with its beauty, but also with warmth for many years.
The best ideas in the interior
Of course, a patchwork quilt is one of the decor elements in the room, so you should be careful when sewing it, choosing the optimal colors and materials.
For small rooms, patchwork blankets made in light, light colors are suitable, so the sleeping place will not seem large, but, on the contrary, very compact. A great addition to the interior will be the same pillows and chair covers, if they are in the room. Often they make bean bags from scraps, they look very interesting in the room, and also delight with their practicality and softness.


If it was decided to make a bedspread from scraps for the living room, then here you need to proceed from the general atmosphere. For example, a room is decorated in the Provence style and has enough free space, then you can create a voluminous bedspread in turquoise-pink tones, as well as make the same pillows that can be laid out on free-standing chairs, creating a complete picture. The blanket can also be made using watercolor or checkerboard techniques.
As you can see from the interior of this bright room, a knitted patchwork bedspread perfectly complements the space, and it does not at all distract unnecessary attention to itself, leaving the room very calm and harmonious.

Despite the large abundance of colors in the patchwork quilt, they are very harmoniously combined with the overall environment. The room is conducive to complete relaxation and wonderful sleep.


An incredible sense of style is shown here. The duvet is sewn in a way that blends in with the rest of the room, and there are curtains in the same style. Despite the fact that there are a lot of patchwork items in the room, it does not seem pretentious. This is achieved due to the color and texture of the fabric itself.


For information on how to sew a random color patchwork quilt in 30 minutes, see the following video
The patchwork quilt is considered a symbol of home comfort and maternal care in many countries. The tradition of sewing bright, beautiful canvases arose at a time when there was a real need for it: solid fabric was in short supply. Now the tradition has returned with renewed vigor: patchwork quilts and things made using the patchwork technique have been at their peak of popularity for several years.
If you seriously decide to do patchwork, it is recommended to prepare all the necessary materials in advance. Judging by the set of tools, patchwork is an unpretentious matter available to everyone.
Mastering patchwork is not at all difficult. More about the patchwork technique for beginners in the material:

To start quilting, you need:
- Textile. Of course, you can traditionally use old scraps of textiles from your grandmother's chest, but you will have to tinker with them before using them in business. The best option, which promises guaranteed success, is to choose special patchwork fabrics. These are sold at almost any fabric store.
- Sewing machine. There are no special requirements for a patchwork machine. An amateur home sewing machine is quite suitable for this business. It is desirable that the working surface to the right of the needle is as large as possible. This will make it easier to sew large items such as a blanket.
- Dispenser. This item is indispensable for highlighting clear squares. The best alternative to patchwork scissors.
- Iron.
- Pins and needles. You will need a lot of these little patchwork helpers. Choose thin quality pins and needles: they will last you longer, and will not break or bend.
- Sewing scissors. 2 pairs are useful: for large appliqués and for small details and threads.
- Threads. You should buy threads of different colors.
With such a set, you can safely start work without fear of losing sight of any significant trifles. Visit a specialty store and you will find all these gizmos there.
It is useful to have a magnet or a magnetic needle bar with you when doing patchwork. This will make it easy for your pins and needles to find and neutralize your jobsite.
How to sew a patchwork quilt using the patchwork technique
You will be happy with your decision if you get serious about making your patchwork quilt. This bright spot in the interior will complement the atmosphere of home warmth and comfort.

In general, a patchwork quilt consists of 4 parts:
- outside, sewn from pieces of fabric;
- seamy side, consisting of a single canvas;
- border around the perimeter of the product;
- filler (for example, synthetic winterizer).
If you want to make a very warm blanket, you can use holofiber as a filler. But remember that working with such a thick material can give you a lot of unnecessary trouble! Quilting a thick product can be difficult for both a novice craftswoman and a modest sewing machine.

How to match colors and textures for a patchwork quilt.
To make the blanket look flawless, you need to choose the right materials for the front of the product. It is important to follow the rules for combining color and pattern, as well as the compatibility of textures.
In general, a patchwork quilt assumes a slight tackiness and negligence, but some recommendations are necessary for compliance:
- The thickness of the shreds must be exactly the same, otherwise the product will look ridiculous. Together, the pieces sewn together should resemble a single colorful canvas, and not several dozen multi-colored scraps.
- There should be some logic in the pattern of your blanket. To do this, it is convenient to sew shreds into identical blocks or stripes, and in turn, sew them together, forming the front side of the blanket.
- In advance, you should think about the style in which the canvas will be made. The classic lurid patchwork is somewhat different from the modern style, where more emphasis is placed on geometrically clear and monochromatic blocks. You can also make a decorative element using this technique for shocking art deco, modern, kitsch trends.
- When choosing colors, pay attention to the color wheel and the order of the shades. Nearby, either contrasting colors (for example, blue and yellow) or nuanced combinations (for example, different shades of green for one block) look best. Do not forget about the general color scheme of the room in which your blanket will "live".
- Don't go overboard with patterned segments. Too many different patterns on one blanket can disrupt the composition.
If you decide to use recycled fabric for your work, then you need to prepare it. Wash, starter and iron the material.
The combination of colors and textures when sewing a patchwork quilt (video)
How to sew the patchwork quilt itself: a master class for beginners
So, if you have completed all the necessary preparations, have gained patience, creative energy and strength of inspiration, then you can!

Below is a step-by-step instruction with which you can sew a 1 square meter blanket. m. in the patchwork technique:
- For such a blanket, 25 squares measuring 20 by 20 cm should be made. To make the details even and identical, it is recommended to cut them out according to the pattern. Draw a square of the indicated size on the cardboard, and then outline it with a larger square, leaving 1.5 cm from the first line. This will be a seam allowance. Cut out the resulting frame.
- Draw the fabric according to the pattern: the outer square will serve for cutting out the part, and the inner one for the seam. For the first blanket, take 4-5 colors. Cut 5-6 squares of each type.
- Now place the squares as they should be on the piece.
- Now we start sewing! To do this, fasten the first 2 pieces with pins and sew along the seam line. Iron the seam and start on the next piece. So you should connect pieces of 5 pieces in a line, and then sew these lines together into a single canvas.
- When the assembly of the bright part is over, we begin to hem the insulation and the back of the blanket. Take a thin layer of padding polyester or fleece, which will be 3-5 cm larger than the finished front part on each side, as well as a plain cloth of the same size.
- Sew them together along the inner square (about 97 x 97 cm). Then start joining the resulting part to the front side.
- Pin the backdrop with a few pins; the bigger, the better. Make sure that the materials fit snugly together so that the product turns out to be even.
- Now you need to properly quilt the blanket: go along all the seams and around the perimeter. It is important that the new seam deviates slightly from the first: about half a centimeter.
- Now carefully cut off the excess pieces of fabric and insulation. It is important that the sides coincide with each other.
- To close the edges of the blanket, you need to make side stripes. Cut 4 identical pieces of plain fabric (in contrast to the back) measuring 110 x 10 cm.
- Now you need to outline the stripes: leave 2 cm on the folds for the seam on both sides and 6 in the middle for the visible border of the blanket.
- Use safety pins to secure the hem. Fold over 2 cm on each side and wrap the rest over the edge. You should end up with 3 cm of fabric, framing the duvet on both sides.
- Sew the 4 sides neatly, folding over the excess fabric at the corners.
- Your blanket is ready!
Of particular importance in patchwork is pinning and ironing the edges. If something was done inaccurately, then the whole composition may "float" to the side.
How to sew a patchwork quilt (video)
There are different schemes for creating original patterns using the patchwork technique. Having mastered the technique, you will be able to sew blankets and bedspreads from different fabrics. Like jeans or knitwear. Assembling and sewing will seem like a creative and interesting experience. Love handicrafts, and the home crafts fair will open before you in all its glory!
DIY patchwork quilt: diagrams (photo)