Beautiful crafts made of cones made by their own hands are often found at children's competitions and exhibitions. This natural material is available, working with it is convenient and safe. The main thing is to catch it in time and properly prepare.
Forest resident from cones


Topicia from acorns and cones
What cones are suitable for children's crafts
To make crafts from cones to school or kindergarten, you need to know the following rules:
- it is necessary to collect more unpacked bumps - they take less space;
- if it is necessary that the bump be revealed, it is simply not covered;
- if it is planned to make a craft from an inconspicuous shore, immediately after collecting it needs to be dipped into the glue composition.

Original Topiary
The most reliable to cover the cones for crafts with a joinery glue, which was pre-diluted with water to the liquid consistency. You need to take a blank with forceps and dip in the adhesive solution several times. Then put on the loaf. Periodically, the bump must be turned over. Wave it will be about three days.

Composition of cones
How to make a big bump for craft
Not always the natural shape of the cone is suitable for creating a specific composition. So, it happens that you need a swept material. To soften the surface of the workpiece and give it a concrete shape, you need to put a bayer in boiling water and cook about 5-10 minutes. After a little cool, "roll up" with your hands aside and fix the rope or adhesive tape.

Little cones wreath
What crafts can be made of cones
Baby crafts from cones can be different. Funny figures of animals and men, decorative elements for home, compositions and paintings - this material gives freedom to work. On the eve of the New Year holidays, it is possible to make christmas decorations.

Beautiful wreath

New Year's decor

Balls decorated with balls

Gift from cones with your own hands
Crafts from cones for elementary school - hedgehog
If the child was instructed to make a beautiful cradle from the cones with their own hands, the parents must be prompted to him in which direction to move. Pretty just this is such a hedgehog:

Hedgehog from the shishk
You need to take a bump, plasticine. To shape out of the last face and attach to the back of the wooden base. Eyes and spout is better to produce a darker color from plasticine so that they are well released on a general background.
Needle Hedgehogs should be decorating herbs, leaves. You can make fungi and carefully attach them from above.

Funny hedgehog with sharp needles
It is interesting to see the exercise, in which several pine cones are involved:


Big hedgehog
Tree of pine cones on the exhibition
To make a Christmas tree made of pine cones, you need to prepare:
- cardboard;
- acrylic paint;
- glue pistol;
- cones;
- decorations for homemade forest beauty.

Christmas tree made of cones with their own hands
From the cardboard it is necessary to make a cone, and then you can go it with the help of hot glue by open cones. It is advisable to decorate from above the Christmas tree with some colors, beads, sparkles, tapes so that she looked more elegantly. If you want to change the color of the homemade Christmas tree, before decorating you need to spray the paint from the canopy.

Another method of manufacturing forest beauty from cones is possible. Materials will need the same, but the order of work will be somewhat different. Here you do not have to make the basis in the form of a cone - you just need to cut the circle from the cardboard and start it as follows:

Making Christmas trees from cardboard and cones
Bear from cones
A beautiful bear is easily made of cones.

Its body must be formed from the longest workpiece, the paws are of four shishechs of small size, the nose is made of peas pepper, ears - from the heads of the acorns. If some of the natural materials necessary for the design of a forest resident, at home did not replace it. So, ears, nose and eyes can be made of plasticine, crotone, painted dough.

Bear from different cones
It's great if cedar, pine and fir bumps will be combined in one composition. Then it will look more interesting and gently.

Huge bear

Small Mishka
What other craft can be made of cones
With bumps you need to experiment. Since it is very simple to connect them with each other, you can create figures of various shapes.
Very quickly, this bunny is done:

Hare from the bump
For its manufacture, you will need:
- one revealed bump;
- multicolored plasticine;
- toothpicks (can be replaced with spruce needles).
Forest white ...

Protein do it yourself
There will be only two cones for the execution of owls:

Sovice from cones
If the child asks to make penguins to the exhibition in school or kindergarten, it is not necessary to scare this task.

Penguins from cones
Make the body of animals white will help the watercolor paint covered on top of varnish.
Baskets from cones
A basket from cones can be made both to the exhibition in the garden or school and for the design of the apartment's interior. For its manufacture, you will need flexible wire. You need to alternately connect the bumps with each other, and then form rows of them.

Making basket

Decorative basket

Little basket

Large tank made of pine cones
You can decorate a basket with flowers, acorns, dry grass.

Concept Baskets
Press the class
Tell VK
Corses - affordable and eco-friendly material for creativity. A little earlier we have already made of them and. But the human inspiration does not stop and therefore this article was born. I share with you a selection of ideas that can spur your fantasy and creativity.
And also - it will be a good help to all parents, who should urgently need to do or.
The bumps are well combined both with each other and with other eco materials, such as the acorns, seeds, cotton and dried flowers. Also, they are well amenable to staining with gouache, acrylic or aerosols.
Therefore, there are so many options for products. So, proceed to the selection.
Let's take one bump and look at her. Turn up and lower down. She alone is very beautiful. I propose first to use its natural beauty. And most often we create from this material in the winter, then I propose to make a suspension on the Christmas tree.
It will take:
- cone,
- tape,
- rope,
- thermopystole.

A bump can look up and down. Let's start with a more classic option. So, we take the bump and cut off all the top scales with a wide part. It should be deepening.
From the rope or the twine cut 7 cm and turn it with her loop. The edges are glued with the help of thermo guns to the deepening that we have done earlier.


Now cut off 15 cm tape and tie a beautiful bow. It can be purchased ready or cut off from old things, toys.

Fix the bow in the place where the twine is glued to the base. Just tie the rope with free ends.

The edges of the bow can start fluffing, so carefully treat them with a lighter.

Taking the basis of this idea, you can add or change the details. The point will remain the same: a bump with a loop of a rope.

Similar option, but the bump looks up.

More ideas for inspiration. 


Also from this material, different frills are obtained. Familiar silhouettes of gnomes, angels, frosts.


Of the two fir fruits, the festive decoration is also obtained.

Interesting ideas of snowmen.

For the head you can use foam or cotton balls. For the handles - the shaggy wire.

Video manufacturing snowman.
Also, having only one pine or fir bump in your hand, you can create penguins.

I will show a small master class of manufacturing these birds.

As a muzzle, you can take acorn or nut. Breast and part of the muzzle are painted white gouache or acrylic paints. The rest of the parts are black.
From the fir bump cut off the top and glue the head into this place. If the bump is large, you can use even walnut.

For wings, use a bark, flakes from cones, cardboard.

If you prefer the modeling, I will add more plasticine or salt dough to our eco material. Who can work with a cold porcelain, it can also be used to create details of the crafts.

Twigs and acorns help give a complete image of figures.

They are also made in different ways. Sometimes you take a cardboard as a basis, sometimes wire. But I also liked the idea of \u200b\u200busing metal hanger for this purpose.
It turns into a circle form, and the top serves as a hook-suspension. The bumps can also be planted in several ways: use special decorative rings (bought in the fittings department), you can also take a wire or thread. It winds each bump and screw or tie to the hanger and adjacent cones.
Here, the idea when every thing cuts the secretary to the inflorescences.

And I also liked the options for combining fir and pine beauties.


You can sort them according to the degree of disclosure, sizes. And also for a brighter and memorable effect, paint them into various shades.


Do not dwell on classic forms, make a decoration in the form of a heart, rhombus or infinity.


Very spectacular decoration.

To create a finished look, add candles to it.

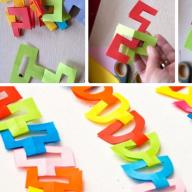
The next our idea is garland. It is done simply, special skills do not require.
You need to take a dense thread, many cones and paints. You paint our whole material.
Tearing the thread to be tied up all the beauties so that they do not hurt each other.
Here is another idea.

Here each cone is tied to the main thread wire.

Girlands or single suspensions can be tied to the chandelier.

Or use the door for this.

Decorate with a window.

Decorative panels also look very festively and elegant.

As a basis, you need to take a frame without glass, bumps and tape.

A very unusual decoration is obtained in the form of a heart. For him, two shishches are taken.


So, in the queue of mittens, made in the technique of scrapbooking. And they are focused on cones, branches, coffee beans, as well as citrus ced. In general, there are not enough cinnamon sticks.


Crew star and vines. For decoration, any natural materials will be suitable.

Parents with her son in kindergarten made this cracker. Thank you for sharing a video.

If you disassemble our bump, you will get a lot of scales. Of these, you can collect something interesting.

What else can you create, having only one beauty? Yes, here is a tree -decor.

Or souvenir for memory.

Different elements of decor and gifts.


I also like the New Year's clock. By the way, you can insert a real mechanism and you will get a designer thing.


Of course, it is impossible to pass by the candlesticks. In their roles can be a whole composition of cones, branches and moss.


Single ideas of trees.


These trees will delight you all year round. They look adequate and unusual.


Also the idea of \u200b\u200ba full winter tree.

We started with simple crafts and ideas, and we will finish complex. So, I consider the masterpiece of the whole New Year's direction - Santa Claus. Unfortunately, I did not find the descriptions of its manufacture.

Crafts from cones on autumn
The most skillful can try their strength and make such a mushroom.

Or tree.

Connecting a bump and burlap, you will get acorn.

The craftsmen use drunks.

Here is a whole composition of three elements. All of them are made on the basis of the circle.

A separate topic is to highlight the hedgehog. Such handsome plans are made based on plastic bottles or plasticine.


Other animals are populated for winter with different autumn fruits. Let's depict it.


Moths with wings of fallen foliage - we are also interested.

The craftsmen created this charming ship.

And someone took his craft to school. Before you, the rider on the donkey.

Autumn time is rich in materials: leaves, cones, berries and vegetables, dried flowers and branches. Everything is useful for the embodiment of our ideas.

I found this snake Gorynych about three heads. Cool option for creativity with a boy.

Feathers and shells united and turned out to be a beautiful swan princess.

Even your crafts can be folded into the homemade basket.

To do this, take a lot of cones and wire. All parts are twisted among themselves in one row.


From this row form the walls of the basket. Suppose she will have a round.

And build the side of the edge until the height that we need. The bottom can be made of cardboard and stick with cones.

But a simpler and easiest option.

Small vase.

From plywood or cardboard you can make a wooden frame, which also "is trimmed" by our cones.

On this options, the scales are taken and the glass vase is fully glued.

The idea of \u200b\u200bwreaths is popular not only in winter. They can also serve as autumn decor.

Like candlesticks.

And also with cones, there is a combination of living colors.

Now those wreaths that are suspended.

Of course, they can also be painted.

But it is better to do this in the shades of autumn: from yellow and golden to orange, red and brown.


Taking a small pumpkin or base of salt dough, you can create such houses for elves.

And even bells.

The most interesting ideas for children are 5-6 years old in kindergarten
For preschool gathered many, many ideas. Let's start with the simpler, then we gradually move on to complex.
All work should be carried out under the supervision of an adult.
Here is a simple step-by-step scheme of maps, hedgehog and donkey.


After the protein create a fox.

Enotics will also like you too.

Like snow-white pigeons.

The turkey is not in all rural courtyards, but even though we will tell the children about them.


From the primary materials we collect a helicopter.

Or pineapple.

Very simple ideas of fish and birds.


Funny variants in the form of piglets.

Who loves Mickey Mouse? Here is an idea. Only you need to paint accordingly.

Even the idea of \u200b\u200ba squirrel.

Also a small selection


How fun to make a lamb horch from seashells.

More ideas of making animals from cones.


Proud deer can also be different.


Babes with mothers make such dogs.

And with the help of a dad of such donks.

Options for homemade bears.


There are a lot of crafts. For example, this crocodile.

And other animals and birds.


Here the bump was taken as the basis for the body.

Familiar Christmas motives?

Paper and feathers will help make feathers for birds.


Idea with walnuts. Funny gatherings will inspire everyone.

Chaga and the bump created monkeys.

And in tandem with nuts, it turns out mice.

Looking around, you can deploy a bump. So it will be a hedgehog from a tale about Tilimylitrymdia.

And here, as if an apple.
For creativity, we take the heroes of fairy tales. For example, Babu Yagu.


The chicks conquer their positive color.

Simple swans from the cones, feathers and wire look very worthy.

And how do you like the idea of \u200b\u200bostrich?


Now complicated ideas. They are so immediately will not repeat. But the masters managed, it means that we will try with you.

Mammoths are alive in our fantasies.

The ideas of camels and dinosaurs.


But the plot about the dragon, a bold knight and a beautiful girl.


With czechs from a cone, you can create a hut on chicken legs.
It will take:
- cardboard,
- glue,
- cones
- scissors or stationery knife,
- bamboo napkin.

It was a brief instruction. Let's start the craft. From the cardboard cut out the details.

Connect the blanks.

From the cones we tear the scales and glue them to the roof.

For legs and external cladding, use the elements of a barmuk napkin and cones.
Dad may inspire and create such a lamp in the nursery.

Just a fairy tale!

Even the decorations of the girls can make a cones under the guidance of mom.

Take the children with such frames for photos.

Or just paint the bumps with your baby and fold them in a vase. Decor is ready and everyone is happy.

Baby at the age of 5 and 6 years old can not always do neatly. Therefore, be near and help crumb.
Master class how to make flowers from cones
Another capacious section - flowers of cones. It sounds absurd, but no! These are very beautiful crafts. They can serve as an independent decor, and can hang on the wall as a panel.
Look, this master class shows how to make a composition that is very reminiscent of a panel of succulents. Only does not require watering and care.


And here is a summer composition.

And one more idea. Corses can be used in different ways.
- Take only a wide part, then the flowers will become very similar to asters.
- Take the whole thing, then get semi-walled buds.
- Remove part of the cones and leave only its reveal part, like on this photo.

There are two options for making from the described me.

Bashed them need to panel on the thermo gun or super glue.

Very beautiful bright composition.


Impressed? Now I'll show you a detailed photo of a lesson for the manufacture of such colors.
We take a bump and deploy her sharp ends up. Then the secateur cut all the scales until the middle, leaving the rod.

Paint the workpiece and insert into the cradle.


Video Description of the process.
And here is the idea of \u200b\u200bunscrewd buds. Also very cute. For the stem, you can use a wire, a skeleton for kebabs or a tube for a cocktail.


A little more beauty for you.


In general, such flowers are exactly done at home. And not covered and look very worthy. And, the main thing, nothing artificial, everything is natural and eco.
Ideas of crafts from cones and acorns
So, some more crafts with young children. Only here I collected options where in addition to cones we will take more acory.


Such ideas of the crafts were shown in our Soviet books. Still, the illustrators were intelligible to explain and without step-by-step master classes! Nostalgia.


Now a large and bulk composition! It can be attributed to the competition or exhibition.
You need to take 2 cones, two acorns, snag, cardboard or piece of plywood, leaves and maple seeds or ash.

Skorega cleaned from roughness. Beautifully placing it on a piece of plywood. Fix super glue.

Each bump must be divided into three parts.

With a wide base with Judge glue - these are the heads of our eagles.
Water to the branch and glue the workpiece.

It remains to decorate all the leaves and add a couple of dragonflies.
And now there are ready-made ideas of crafts from this natural material.


So, my dear. These are all ideas today. Of course, you need to work on any craft. But we are implementing in creativity and reveal ourselves. Successes to you and new beginnings!
Tweet
Tell VK
Creative classes with a child are always interesting and fascinating. If you like to do together and looking for new ideas, the bear from the cones will become an excellent option for you. These souvenirs can be made so unusual and original that they will become an excellent gift of Grandma and Grandfather, and will also be able to decorate any interior.
Crafts from natural material: the benefits of such creativity
It is very helpful to engage in any kind of artistic skill. It develops fine motility, fantasy, imagination, the ability to follow the instruction of an adult. Working with natural materials has several advantages:
- all that makes a child maters, is natural, and therefore safe for health;
- collection and preparation of cones, acorns, leaves, colors can be turned into a fascinating cognitive process;
- these materials give ample opportunities for creativity.
A child is suitable for any bear, hedgehog, fox, mouse. Children love to make animals. In addition, the beasts are heroes of folk fairy tales. From such heroes, whom the baby produced with his own hands, you can arrange a whole theater.
Preparation of materials
All elements of natural origin should be collected in dry weather. It is desirable to give them a little lie in the room until complete drying. A wet fresh spruce bowl after a while of a thin will turn into a greater open. This must be considered. If you need to save the shape, an aqueous solution is used in a few days, modeling will be started. All you have found in nature should not have visible damage: holes, dents, mold, rot. Qualitative materials will allow the craft for a long time to maintain an attractive appearance.
Bumps, acorns and everything else is better to immediately go through and sort. Smooth, neat should be used as a whole, and those where lacks scales, hats, can be disassembled into parts and use separately. If you need a bear from the cones, the heads from the acorns or pine scales are suitable as ears.
Combining materials
In any artistic work, the taking effect of contrast looks: color, textures, shapes, size. This is one of the methods of composition, with which harmony is achieved. A bear will look good from cones and plasticine, threads, clubs, grains, nuts. You can use chestnuts, acorns, sticks, matches as additional elements. Naturally combined natural textures and artificial. For example, eyes or nose are buying in the store for needlework ready-made plastic, intended for soft toys. They will give your animal a certain expression of the face and facial expressions. Although they can be made of plasticine, pepper peas, pebbles. In a word, you need to show fantasy, and then your bear from the cones will get great.
Spruce shishk
The tips for all work were said above, now there will be concrete options and methods of their manufacture: how to make a bear from the cones of ate, pines, their combinations. You can perform a large beast or in the form of a miniature desktop souvenir. Very simple samples will be offered, with which even a small child will cope with themselves, others will require joint efforts with adults.
Any work begins with the preparation of everything you need. On the illustration, where the caishe wasches is presented, the bear is simplified quite simplified. It is made using a material assembled from under the Christmas tree.

To cope with such work, you will need to perform the following steps:
- Find in the forest or in a bump park (one large for the torso, the second - smaller for the head, four medium size for the paw and two are the same for the ears).
- Collect all the items as shown in the picture. You can fasten them with the help of glue, wire or pins, on the heads of which all parts are glued on the heads.
- Decorate the product with a ribbon.
Crafts No. 2.
And if it is for a long time to go? How to make a bear from often put it right in the park and use this material. It also turns out beautiful souvenirs.

This teddy bear can be obtained in several ways. Option 1 includes the following actions:
- Collect a torso from several large elements.
- Attach your head from one cone.
- The ears are performed from pre-separated scales.
- For paws we also take two elements.
- White threads are manufactured by pumps: round for face and endured in shape for feet and ears. They are obtained by winding yarn to the cardboard blank in the form of a ring, subsequent cutting around the perimeter and tightening into the ball. This method can be obtained any form.
- Attach pumps with glue or wire in the right places.
- Install your eyes, nose. Decorate with a scarf.
Option 2 is made at all over another technology. This bear from the cones is done very simple. We take an old soft toy and glue her pine scales, leaving fluffy legs, inner parts of the ears and a muzzle.
Then the simplest bear is presented from the cones. This photo clearly demonstrates. Even the baby will be able to build such a cradle. Cardboard form can be cut as one or separate elements. In the first case, two bumps on both sides of the workpiece are used for the body. In the second embodiment, the foot and head are inserted between the scales and glued.

Beautiful combination
If the lack of materials you are not experiencing, boldly combine them. You will get the same cheerful bear from the cones, a sweet couple or a whole family.

So do the following:
- Take a good big fir bump for the body.
- Attach to it the extended flat shape pine as a head.
- Morns and ears get from the heads of the acorn.
- Eyes and nose are performed from pepper peas.
- Four little pine cones use for paws. Try to strengthen them so that the craft is stable.
Bear from cones and plasticine
In the previous examples, the elements were connected using glue or wire. The same can be made by plasticine. The most important thing is to use the appropriate color so that it is as imperceptible among brown scales. Try to tightly press the items to each other and take a sufficient amount of plasticine.

By the way, it can be used as decor. Then choose any color. It makes a muzzle, eyes, ears, decorations.
Big Bear Covers
If you need a monumental interior decoration, use the following sample. This figure is collected from a huge number of elements. In the spruce forest you will have to spend a lot of time. This option will be suitable as collective creativity.

To build such a sculpture, you will need to perform the following steps:
- We make framework. If you do it according to the Papier-Masha method, you can use the finished solid shape of the sculpture. Then it will turn out to be hollow. Newspapers, paper are stuffed inside. In the lower paws it is worth putting anything stencil, for example, bars for the stability of the structure. If there is no finished wooden bear, it makes sense to create a form independently made of paper mixed with plaster, starch or glue. Large forms also create from the mounting foam.
- At the second stage, an outer layer of cones is made. Of course, you can fully construct a sculpture of them, but in this case they will need much more. Choose yourself. In any case, all elements are connected with glue. You can use a thermopystole. In it, under the influence of temperature, special adhesive rods melted and the composition enters the nozzle from which it is squeezed into the connection place. Working with this tool should be carried out necessarily under the supervision of adults.
- When the main form is made, decorative elements are performed: muzzle, the inner parts of the ears in the form of pumps from threads, as well as a scarf from any material, natural or artificial.
Now and you will get the same magnificent bear from the cones. The master class will definitely help in creating a sculptural masterpiece.
Fashionable bear
If you decide to do creativity and are going to make souvenirs in your pleasure or as gifts to relatives and friends, try to dress your hero in bright things. The items of its wardrobe can be associated with crocheted or knitting needles, sew or even use clothes for dolls.

Ideas for decorating are very different. Let it be a bear from the cones, in a suit of Santa Claus or Snow Maiden. Great gift for the new year. It is absolutely not necessary to adjust the souvenir from the legs to the head. It is important not to overdo and preserve the beauty of natural material. There will be enough Santa Claus cap or the crown of Snow Maiden.
If you want to make a gift to someone from your friends or relatives, decorate the bear with such a piece of clothing, which is most characteristic of this person. Original cap, scanty or bantas will be quite enough.
Polar bear
In addition to decorating additional things, it is worth using magic of color. Take the plasticine of bright shades or even paint to create a specific image of your hero. If you paint the bump in the white color at the crafts presented in the photo, the polar bear will be.

You can also make a bear-panda, clown, artist. It all depends on your imagination.
Scene composition
Bear is a frequent hero of fairy tales. The child will be interested in playing theatrical scenes with the help of their crafts. To do this, it will be necessary to build other animals. In addition, it will be interesting to present the "Three Bear" fairy tale. You can come up with simply souvenir consisting of several objects united by a common subject:
- new Year with a Christmas tree, toys and gifts;
- cooks - as a souvenir in the kitchen;
- bear with a bouquet of flowers, barrel of honey, butterflies and bees;
- with a portfolio and a letter on September 1;
- in glasses with a book, globe or other attributes of a school teacher;
- the figure can be supplemented with characteristic objects of any profession.
So, you have been presented for detailed practical material how you can make a bear from the cones. You can make a beautiful and original crawler both adult and a child. The best is a joint creativity.
Beautiful crafts made of cones made by their own hands are often found at children's competitions and exhibitions. This natural material is available, working with it is convenient and safe. The main thing is to catch it in time and properly prepare.
Forest resident from cones

Topicia from acorns and cones
What cones are suitable for children's crafts
To make crafts from cones to school or kindergarten, you need to know the following rules:
- it is necessary to collect more unpacked bumps - they take less space;
- if it is necessary that the bump be revealed, it is simply not covered;
- if it is planned to make a craft from an inconspicuous shore, immediately after collecting it needs to be dipped into the glue composition.

Original Topiary
The most reliable to cover the cones for crafts with a joinery glue, which was pre-diluted with water to the liquid consistency. You need to take a blank with forceps and dip in the adhesive solution several times. Then put on the loaf. Periodically, the bump must be turned over. Wave it will be about three days.

Composition of cones
How to make a big bump for craft
Not always the natural shape of the cone is suitable for creating a specific composition. So, it happens that you need a swept material. To soften the surface of the workpiece and give it a concrete shape, you need to put a bayer in boiling water and cook about 5-10 minutes. After a little cool, "roll up" with your hands aside and fix the rope or adhesive tape.

Little cones wreath
What crafts can be made of cones
Baby crafts from cones can be different. Funny figures of animals and men, decorative elements for home, compositions and paintings - this material gives freedom to work. On the eve of the New Year holidays, it is possible to make christmas decorations.

Beautiful wreath

New Year's decor

Balls decorated with balls

Gift from cones with your own hands
Crafts from cones for elementary school - hedgehog
If the child was instructed to make a beautiful cradle from the cones with their own hands, the parents must be prompted to him in which direction to move. Pretty just this is such a hedgehog:

Hedgehog from the shishk
You need to take a bump, plasticine. To shape out of the last face and attach to the back of the wooden base. Eyes and spout is better to produce a darker color from plasticine so that they are well released on a general background.
Needle Hedgehogs should be decorating herbs, leaves. You can make fungi and carefully attach them from above.

Funny hedgehog with sharp needles
It is interesting to see the exercise, in which several pine cones are involved:


Big hedgehog
Tree of pine cones on the exhibition
To make a Christmas tree made of pine cones, you need to prepare:
- cardboard;
- acrylic paint;
- glue pistol;
- cones;
- decorations for homemade forest beauty.

Christmas tree made of cones with their own hands
From the cardboard it is necessary to make a cone, and then you can go it with the help of hot glue by open cones. It is advisable to decorate from above the Christmas tree with some colors, beads, sparkles, tapes so that she looked more elegantly. If you want to change the color of the homemade Christmas tree, before decorating you need to spray the paint from the canopy.

Another method of manufacturing forest beauty from cones is possible. Materials will need the same, but the order of work will be somewhat different. Here you do not have to make the basis in the form of a cone - you just need to cut the circle from the cardboard and start it as follows:

Making Christmas trees from cardboard and cones
Bear from cones
A beautiful bear is easily made of cones.

Its body must be formed from the longest workpiece, the paws are of four shishechs of small size, the nose is made of peas pepper, ears - from the heads of the acorns. If some of the natural materials necessary for the design of a forest resident, at home did not replace it. So, ears, nose and eyes can be made of plasticine, crotone, painted dough.

Bear from different cones
It's great if cedar, pine and fir bumps will be combined in one composition. Then it will look more interesting and gently.

Huge bear

Small Mishka
What other craft can be made of cones
With bumps you need to experiment. Since it is very simple to connect them with each other, you can create figures of various shapes.
Very quickly, this bunny is done:

Hare from the bump
For its manufacture, you will need:
- one revealed bump;
- multicolored plasticine;
- toothpicks (can be replaced with spruce needles).
Forest white ...

Protein do it yourself
There will be only two cones for the execution of owls:

Sovice from cones
If the child asks to make penguins to the exhibition in school or kindergarten, it is not necessary to scare this task.

Penguins from cones
Make the body of animals white will help the watercolor paint covered on top of varnish.
Baskets from cones
A basket from cones can be made both to the exhibition in the garden or school and for the design of the apartment's interior. For its manufacture, you will need flexible wire. You need to alternately connect the bumps with each other, and then form rows of them.

Making basket

Decorative basket

Little basket

Large tank made of pine cones
You can decorate a basket with flowers, acorns, dry grass.

Concept Baskets
Let's try again this time to do something from the natural material, but it's bigger from the details.
Bump
Let's start with all the famous kosolapoy Mishk - The owner of the forest. Although, and the owner of the forest can be done in the same way.Basic details:
- elova cone;
- four semi-collar pine shishki.;
- opened pine cone with a round painter;
- hat zhlouda.
The method of "scaly under the scales" The rest of the details will be attached to it.
To connect the cones of "Scaway under the scales" cones, you need to move them towards each other so that the scales of one fell under the scales of the other. To secure the connection you need to pre-apply glue (put a piece of plasticine) under the scales of one of the cones. Then, when connecting the scales, the other cones will stick.
A good cone is very elastic scales, so it's not easy to break them. Connecting the cones "Scaly under the scales", do not be afraid to press them stronger.
Bear paws are half-painted pine cones. In this case, the rear (lower) paws should be a little more.
Put a fir bump on the top and attach the rear paws. So that the bear is conveniently sitting, the paws should be installed on one side of the bumps torso, slightly spreading, as you see in the photo.
Machy head Make from open pine cones. At the highest point of the top of this cone (slightly away from the center), stick the hat across, so that the maid of the bear stretches forward.
Dark nose and eye can be made of pepper pepper or plasticine. Nose stick to the tip of the face. Under the eyes, lay something light so that they stand out: light beerates light beerts, white (light) plasticine. If pupils move to the nose, the teddy bear will be a good view. In any case, the eyes must cover the center of the creek head.
Strengthen the front (top) paws over the rear.
The ears can be cut out of Berriest or use Hats Zhloud, but more flat than for frills. Strengthen them by inserting a bump-head under the scales.
That's all. If you want to do something otherwise, or add some details, then no one will interfere with you. Crafts from natural material give so many opportunities to fantasize and embody their fantasies!
Of course, the Bear is a big beast, but very gullible. In many fairy tales, the Bear is deceived, and even laughing at him. And the smartest and cunning forest beast are considered lisu.. Let's try to make a forest beauty.
Sly Fox
Basic details:- large open pine cone with round top
- large open pine cone with flat top
- the middle opened pine cone with round top
- medium closed pine cone ,
- two small semistrated pine shishki. ;
- elova cone (with scales, which are easy to break);
- beresta.
 Fox torso Make from two large open pine cones.
Take a concern with a round top and insert a flat bump with a flat bump.
Well secured this connection, put the cones on the desktop with flat top scales down. (If the central scales prevent her from standing, breaking it). So that the bump with a round paint remained in the right position, take two small semi-wax pine cones and strengthen them from the bottom of this cone (closer to the round painter) by the way "under the scales".
You have a fox torso with front paws. The rear paws do not need.
A lush tail for fox can be made of a fir bump.
First, break all the scales of this cone. Then, "Clean the" plump so as if it was a carrot. You can clean with a knife or blade of scissors in the direction from the former macushkin to the nose. If you yourself do not know how to clean the carrot, ask someone from adults to help you.
"Unsuccessful" tails can be used for other works. I, for example, it turned out the duet of Chernukh and Redhead - elegant English cats, which I will tell you later.
Of the two remaining cones, make the fox head. Broken the revealed pine cones (cut off with scissors) central scales and 2-3 coming to it. Connect this conex using the fox torso. Insert a closed pine conex to the place of remote central scraps.
So that the fox came to life, it is necessary to make the most important thing - small details of the head.
Spread the Beresto so that the lower (dark) layer is outside on both sides. Cut the ears out of her and insert them under the scales of the head.
From the bottom layer of Berestov, cut two circle with a small coin size. Bend each of them in half (in a light layer inside) and make eye-cilia.
To do this, make small scissors to make four deep cuts in the fold line direction (you should get five narrow strips), and then gently cut the corners on each side of the obtained strips.
Apply the glue on the dark surface of any half of the part and stick the eye polls to the muzzle. Pupils for the eyes can be made of a dark apple or pear seed. Stick pupils on the lower cilia, close to the fold line.
Now cut out of the bark of a small coin size. Bend it in half. Small scissors cut part of the detail from the end of the fold line to the middle of the arc. Make 3-4 cuts and cut the corners of the resulting strips only with your neighbor to the wide end of the part details. Deploy the item. (She looks like a Christmas tree). Apply glue along the fold line and glue the item so that its wide part of "hung" over the sharp end of the face.
From a thin layer of pine bark or from the theme of Berest, cut out a small circle - nozzle - and glue it from above.
So that everything is clear to you, I will explain: on the mord of the fox, near the nose, the mustache-vibrics grow. And more: nozzles will not be noticeable if you do not put a brighter piece under it.
You can make a fox with a torso from a fir bump, and for the paw pick thin twigs (better pine). You can arrange the head using plasticine and pine cheaps (for eyelashes and mustache).
What will be your fox, you decide for yourself.
If weekend is good weather, almost all day we play in the yard. A certain intelligent man has planted around the playground from a dozen chestnuts, nuts, maples and rippers. A little further growing wild grapes, mulberry and apricots.
It must be said that in the fall, multicolored trees represent an incredibly colorful spectacle. It is a pity that there are no artists in our family. Juicy paints, yes, accompanied by solar weather, the mood is raised at times and inspired for creativity.
After the outdoor games, we go with my daughter to make crafts from the natural materials collected in the courtyard. Since last season, we still have the cones of the Crimean and Ordinary Pine, as well as the chestnut peel pretty skin. It is that today we will make wild beast - a brown bear. Join now!
For work you will need:
- - Cryer of Crimean Pine
- - Plasticine,
- - Quantatian Quantatians,
- - Autumn leaves for decoration of crafts.

Initially with the child distributing the duties. Daughter lasted plasticine parts, and mom corrects possible defects. We will need two round flat ear, eyes, an oval brown face with a black nose - button.
With a difficult task of the master coped to an excellent appraisal, but to mount the finished elements on the bump will have to mom yourself. Jewelry does not tolerate a rush, it is necessary to firmly press the plasticine parts to scales so that they do not lose the form.

Torso with his head of the crafts we assign to the side and take the beast of broken paws. Last year's quarters of chestnut peel - the perfect material for the design of the limbs of all theestine animals. If necessary, parts are reduced in size, as well as scissors cut sharp corners.

We will mount the paws to the body of the crafts with the help of plasticine pieces. The bear should be sustained on the legs and not tipping over.

Here he is, a forest predator, raised his paw in a sign of greeting. Now the beast as he grows on all the impassable thickets.

Spread around the hero of fresh and slightly wild leaves. It turned out a real autumn composition.

Work on a craft line from natural materials is completed. We hope our bear will like everyone without exception to the guys.
Crafts for children from natural materials.
Basic details: fir bump; Four semistrated pine cones; Opened pine bump with a round paint; Halband hat. Bear's torso is a spruce bump.
The exhaust details will be joined by the "scaly under the scales". To connect the cones of "Scaway under scales", you need to move them
To meet each other so that the scales of one fell under the scales another. To secure the connection you need to pre-apply glue
(Laying a piece of plasticine) under the scales of one of the cones.
Then, when connecting the scales, the other cones will stick.
A good cone is very elastic scales, so it's not easy to break them. Connecting the cones of the "Scaway under the scales", do not be afraid to press them stronger. Bear paws are half-painted pine cones. In this case, the rear (lower) paws should be a little more.
Put a fir bump on the top and attach the rear paws. So that the bear is conveniently sitting, the paws should be installed on one side of the pin, slightly spreading, as you can see in the photo.

Machy head Make from open pine cones. At the highest point of the top of this cone (slightly away from the center), stick the hat across, so that the maid of the bear stretches forward. Dark nose and eye can be made of pepper pepper or plasticine. Nose stick to the tip of the face. Under the eyes, lay something light so that they stand out: light beerates light beerts, white (light) plasticine.
If pupils move to the nose, the teddy bear will be a good view. In any case, the eyes must cover the center of the creek head.
Strengthen the front (top) paws over the rear.
The ears can be cut out of Berriest or use Hats Zhloud, but more flat than for frills. Strengthen them by inserting under the scales
bump heads.
That's all. If you want to do something otherwise, or add some details, then no one will interfere with you. Crafts from natural material give so many opportunities to fantasize and embody their fantasies!
Of course, the Bear is a big beast, but very gullible. In many fairy tales, the Bear is deceived, and even laughing at him.
More options for bears from cones

So let's see what ideas Crafts from the cones I collected for you today.
The idea of \u200b\u200bcrafts
from lush cones.
(7 new ideas)
If you disassemble a bump on scales (pull them out with ticks), then you can lay out any picture from such scales (fluffy dog, natural landscape, or such a formidable owl.

Can be done cone of paper ... and with the help of a glue gun (Sold in the construction store for $ 5) Plug the entire cone's cones of the bumps, having a mustache on each other (as a cherepus). Will get a Christmas tree. It is necessary to start the cones from the bottom of the cones with the bottom of the cone ... and gradually a row for next to the tip of the cone.

By the same principle you can lay out pacre Plasticine Turtle, or a hat mushrooms.

Or a very good ideas that herself asks for bitten scales - these are hedgehogs. Body sculpted from plasticine. Cook the back with sharp scales. And form a muzzle form from a bundle. The question is what makes this bundle? So I think you can try from ordinary broom cut thin twist... or take cake from corn and cut it with scissors to thin straight chips - Collect them in a bundle, beam bent in half (the place of bend, will be the tip of the nose). Further, this bent bundle is fluffing ... so that it is spread by a whitewalk on the sides - and this raft glue into the nose of the plasticine craft.

By the way, I thought here - probably, the muzzle can be made and not from the natural material of the Kakuazova skin ... and cut out of paper (small narrow strips) ... or take elementary thread (Make a bundle, bend in half, cut the beam fold line into the nose-navel). Perhaps the thread will need to be starch then so that they keep a harsh shape.

By the same principle, this children's craft is made - protein from cones and plasticine.

First, it is pulled ... then on the body with a pencil the boundaries of the zones are outlined. We will cover one zone to cover the cushion scales, into another zone of a shallow bullet from paper (or natural materials).
When the body is ready - we separately damage from plasticine tail... and its upper part of the bumping Czekhukhai. And the bottom of the tail is becoming white thin cutting paper pile.
You can make a plasticine of an eagle ... or another bird - make a cushion of the bumps.

You can put such flakes with such flakes. This house is done very simple. For this, we need a zucchini elongated form (you need to buy not a fresh zucchini with thin skin. Which is easy to pierce the knife ... And the garden is already wearing or darkened, whose skin is not that the nail is not sold, but also the knife is not the first time. Such solid Garden zucchini sell grandmothers on the market. Come on the market, sculpt the nail of the sneak and choose. If your zucchini is not in the form of such a pear like on the photo of the house at the bottom - do not worry… Just your roof of the house will be a little different shape (not so elongated, but more rounded). The beauty of your crafts from the cones does not bother. And the main thingtry to choose the one that can be put on the ass - and so that it does not fall ... But if you fall, then nothing terrible - you can simply put plasticine under its base.

The zucchini can be left as a whole (not to remove the middle) - but be prepared for the fact that the zucchini can overreed with the inside. ... and you can cut down the lower ass. Remove its contents with a spoon ... and dry in the sun, so that his crust hardened from the inside (so your house will be eternal, and does not rot).
The zucchini is painted in a brown color (if a gouache is painted - then after painting, it's a good garbage of the whole swollen zucchini with a lacquer for hair, so the paint will cease to make hands)
Details of doors, windows and roses above the doorway Let's sculp. Sculpt best from polymer clay (plastics)that hardens in the oven.
But if you do not have plastics - then salted salty dough (water + salt + PVA glue + flour + paper napkin). I add a PVA glue into the salt dough and a fine paper napkin to ensure that the dough does not crack when drying, and it was smooth and well kept solid shape.
Or you can make all the details crafts from plasticine... And so that he does not swim in the sun it needs to harden. As a hardener, the varnish in the canopy (from the construction store) ... or hair lacquer ... or nail polish. The only side effect is that the figure will have a shine from varnish. But it is not scary. The main thing after hardening plasticine does not try to remember it (the lacquer crust can crack). Therefore, lacquer will cover the doors and windows topped to the zucchop.
Crafts from the tops of the cones.
(We take the top of the cones)
And if the bumps start to irradiate from the tip - and the tops of the cones leave with scales. TO THAT scaly hats You can glue round pads, or pumps. In the square of the canvas fabric, we put the ball of the wool (or synthet board), collect the edges of the square into the bundle and tie up the ladder (it turns out a round nodule (like the hedgehog in the fog from the cartoon). This round nodule from above (where the tie) is covered with a plugged hat.
And it turns out an acorn. Such bustle acorns can be suspended as a decor on a wreath of scyful roths.

It is possible to use the half of the foam egg to use the half of the foam egg ... it is pre-painted (for example, in gold paint).

Or such a bustle top can serve as a brother for a plasticine turtle.
And now we turn to the crafts from whole cones. Let's start with the birds ... then take the beasts ... And then the little men.
Birds from cones
(pine and fir)
Penguins.
This is the beautiful idea of \u200b\u200bpenguins from spruce cones requires plasticine and white paint. From the plasticine they sculpt the head and the wings - and the paint cover the pan. Or you can make wings from cake from corn cakes.

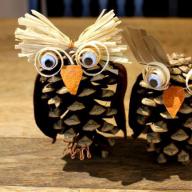
Owls and chicks.
Here in the photo it is seen that a rumming material can serve pieces of felt, cardboard, pits, as well as heats of acorns (They can be used as convex eye birds - turn the caps with the opposite side, paint in white and black marker to draw pupils.


If the bumps put each other, you can make such crafts-owls. Wings and eyebrows are made of pieces of bark, eyes and nose of paper. Paper circle for the eye of the owls can be cut in a circle with scissors and through these cuts to make a winding threads - so we will get expressive rays in the eyes of the colts.

And if the pine cone is cutting into the jacket jam on the fiber, then it will get such a fluffy white color. From these fluffy cones can be made white owls, chicks, snow, or try making fluffy peel.

Peacocks and turkeys.
Can be made of shishk make a peacock. For this craft, you need dense paper for the head, and soft fastest paper for tail plumage.

And here is another option from the same breed of crafts. Here the principle is that, but the bird is no longer peacock, and turkey.

Pine cones sparrows
Here is another version of the birds from the cone. The wings in the groove are made of pieces of bark, and the head is a ball stitched from a terry fabric (if you have a piece of terry cloth, You can donate to the creation of this bird - the fur fabric is also suitable). It is better when the white napkin ... then you can paint the frontal part of the chick of the chick of black paint. Plus, this is a bunch of fabric, which was pulled by a pinch, wrapped this tightly pinch with a thread at the base (so that it was fixed) - and painted black. The eyes of beads were sewed or glued to the head.

Or head can be done from Pompon. Take ordinary white threads and winding them into two holey mug ... As they usually make pompons with their own hands (thug, you will find such a lesson).
Or you can make a head for birds from a conventional foam ball. They are sold in local stores, or they can be ordered in online stores (they are cheap very). And if you order from China on the Ali Expens site ... then it will be cheaply.
The head of plasticine will be very heavy, And the bird will fall ...
But you can still do heads from ping pong balls.
And back head can be saved from wool (sold wool for felting) ... also inexpensive at all. It should be put in a bowl with warm soapy water - and right in the water to roll a ball from her ... As the ball is rolling, it becomes more densely and more dense ... (2-5 minutes you need to roll, long). And then we get it and dry. And we get a dense like a boar ball. He is lightweight and well keeps on a shishke, without outbuilding and without overloading the craft.

Poultry legs can be made of wire ... Wire can be mined from large stationery clips. Paper wings are attached to plasticine inside the scales.
Herons, Swans and Ostrichs from the cones.
Here are examples of high birds from long cones. The tail for the left bird with the photo below is made from a strip of paper, which are placed with scales, roll out of the cones.

If you have feathers (upgraded from the pillow, for example), you can make beautiful swans from the cones. Neck can be rolled out of plasticine and wire.

Here are more examples of crafts with feathers - ostrises from the cones. Neck and heads are molded from plasticine. The secret of the stability of such thin and long necks in a wire that inside these neck is hidden (sunset in plasticine) as a metal frame ... The end of the wire sticks out and it is that it sticks into a bump.

Due to the flexibility of the wire neck, it can be beaten in any direction and give any bend of our craft from the cones (like on the bottom photo). By the way, pay attention to that one of the birds is made in the form of flamingos ... And in the background we see pink sheep from cones.

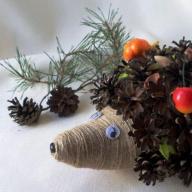
Hedgehogs and mice
From a pine cone.
Hedgehogs from cones are made in two ways. Either we scratch the stuffing of plasticine and attach to a chish. Either this muzzle we cut out of felt (cardboard). Glue butt glasses and glue felt to a chish.


But ideas for creating bears from cones. Rough postal thread (for saunte sealing of parcels) - Suitable for winding the muzzle and the abdomen of the beast. Plasticine is preliminarily inserted on the cishe muzzle so that the thread adhesive.


But the squid - the head is made from the pompon (sold in the estate stores) hands and ears from wire rams (also sold there).

But below we see the mice whose heads are simple cones from gray felt (or fleece).

If you buy pieces of fur, you can make such crafts from the cones for the New Year tree. Even more New Year's crafts from natural materials I will lay out in a separate article and then reference will appear here.

Muddles like crafts from cones.
(several ways).
Remember, just above, I explained like a piece of felt wool - in soap warm water - roll the felt solid ball. Here are little men from such balls and cones.
Or you can replace felt balls ping-pong or wooden.

Here is an example of crafts mom and kid made of cones and felt ... Mom's hair is made of orange felt wool. Pens, too, from the woven rolling in a flabby in warm soapy water.


But the family of gnomes from the cones. Crafts from the felt head and pieces of felt or fleece fabric + bubrels on the caps.

Still the same snience. Dwarfs from cones - on the head of every dwarf hat (cell from paper kastertsy for eggs). The legs are the leaves stitched on the cardboard, a beard of a piece of cotton disk, glued to a facet of cardboard.

And to the family of gnomes, you can make another company from the cones - forest residents of the magic forest - Fay. Furiously roll out of the plasticine - to the top of the head glue a bundle of chopped threads - top with an acorns with a hat. And rear glove bright wings of cardboard or felt.


And more from the cones can make beautiful skiers in bright scarves. Hair - beam of thread. Screenshots - a piece of Christmas garland.

Caps such as skiers can be tied with a crochet or on the knitting needles. Scarves cut out of the fleece or soft locking paper (you can simply be a white sheet of paper, the scarf is very soft and cut out of it - it will be soft and easily wrapped around the cones. Skiing from cardboard (or sticks from ice cream) ... Toothpicks serve as ski sticks.
Good luck to you creative ideas.
Olga Klishevskaya, especially for the site