The attractiveness of crafts from ordinary cones is extraordinary. Figures from natural material can be bribed with naturalness and expressiveness. Let's get acquainted with the most successful examples of such creativity and try to repeat them.
Before you begin work, fresh and wet cones should be dried in the oven, and also clean from dust. If there is a need to bend the bump, it must be boiled in water for several minutes, and after cooling, give the shape and temporarily secure the tape.
Animal figures from cones and plasticine for children
Crafts from cones and plasticine are quite simple in the manufacture and are well suited for creativity in the kindergarten or the 1st grade of elementary school. At the same time, the features of the beasts are most popular. It is from them that we will begin to study the amazing world of self-sizes from the cones.
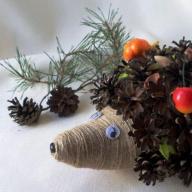
Cheerful Hedgehog-Four legs

Seeing such a hedgehog, you start thinking that the cones are invented specifically in order to make this craft.

However, the opposite idea may occur: this is a hedgehi want to be like a bump.

If you even make an animal figurine from just one bump, it will not be less charming.

Probably, this is "unshaven hedgehog." In any case, long pine needles provided it with a special image.

We decided to make a hedgehog for which cones, plastic bottle and plasticine. Step by step it looks like this:

Forest Bear and bump

The bear from the cones almost does not surprise, as the color and texture of the material successfully mimic the animal wool. Merry family of bears from the cones make their own hands will not be difficult.

Let's choose: you can collect the original handicraft of everything from one to two cones or to build a solid figurine. We decided to make a bear, for which only one bump will be required, the shell from pistachios, two pepperns, glue and gouache.
We act in steps in accordance with the photo:

Noble deer from natural materials

Deer from cones - just as a real. If you even make a figure just from one cone, your deer will look quite expressively.

Very successful deer figurine of two bumps and with a stingrel from an acorns.

Deer's head can be made of plasticine and decorate with almost real horns of twigs. Rowan twig will help create a finished plot.

These cheerful horned animals do not find it difficult. It will take a children's set of cinema wire with eyes. We can make your own deer and issuing at will. To do this, we will need a fir bump, acorn, toothpicks, branches made of grape brush and plasticine. The master class is quite short:

"There are miracles, there she is wandering ..."
Yes, in the present forest there are not only ordinary animals, but also the debt is found. What is he, lying from the cones? Probably terrible ...

Apparently, this lame is sad one in the forest, and feet flas down. Probably, if this is to create, then next to other toys it will be more fun.

This example is clearly optimistic. Bright Rowan, even in the forest monster raises the mood.

Big feet will not allow this lamely to move quickly. Only where to run, if in the forest well.

This lady is clearly once shaved. All of his time leaves for the collection of forest gifts.

And now, finally, the most pretty, in my opinion, lying. To make it, they need a bump, a chestnut shell, leaves, twigs and plasticine. We act according to the following plan:

That Lesmet was not bored alone, I decided to make two hares at once. If such a snaps liked, go through the link to the master class. 
Decor of facilities made of spruce and pine cones
Crafts from the cones are perfectly suitable for the decor of any room in the house, as well as for the design of a wide variety of holidays and celebrations. Natural material will add a few nature to the dwelling for the new year, when there are no green plantings on the street.
Decorative chip tree
For starters, let's look at the examples which tree from the cones can be made. Decor options There is a lot.

As you can see, you can make a tree without applying additional decorations, and it looks great. In this case, nothing prevents the decor from the cones with the addition of other natural materials.

The decorative tree in the standard vase looks quite harmonious. 
The cones can be painted in accordance with the interior, and then the Topiary will perfectly fit into the surrounding atmosphere!
Decorative tree made of spruce cones or topiary to build at all. This product you can decorate the interior or use as a gift. To work will be required:
- three tens of pine cones;
- foam or plastic ball, which can be replaced with newspaper and threads;
- brown paint (acrylic or watercolor);
- glass or plastic cup as a base for a vase;
- branch for the trunk;
- burlap or wooden wands for a vase finish;
- depending on the execution, beads, decorative tape, acorning, rowan, juniper, moss are required;
- paper glue, adhesive gun, scissors and brush.

The base for the crown is easier to make from a ball, plated paper. In a bowl, we make a hole in which the tree trunk is fixed using a thermal oil. The entire billet is covered with brown paint. In the absence of a ball, it can be replaced by a crumpled newspaper, which is wrapped with threads. The bumps are consistently fixed on the surface with a thermal oil.
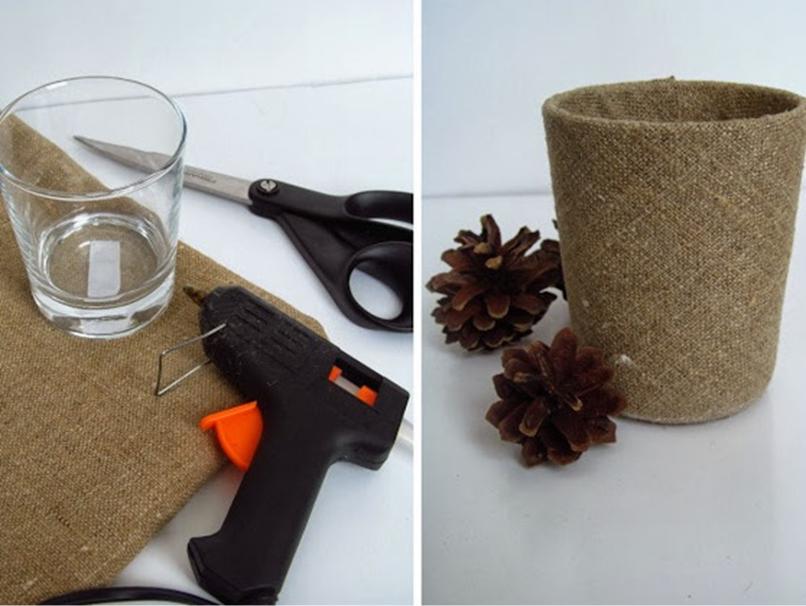
Cut from burlap a piece sufficient to cover the glass. Reincut the fabric from the inside using a thermoclaus.

We prepare the gypsum solution corresponding to the viscosity of the liquid sour cream. We insert the trunk in the porridge and pour the gypsum. After soaring the filler, we pour glue PVA for mounting beads.

I fall asleep the well under the tree beads. Decorating Kashpo ribbon. Decorations in the crown of wood fix the thermalist.

Instead of skolkins, kashpo can be decorated with wooden chopsticks. First, the segments of the branches bonded with each other with a thread. The workpiece turns around the plastic cup and is fixed by a thermoclaim. In the same way, acorns are fixed on the surface of the porridge.
The well under the tree can be decorated with moss, and the Korona Croon is decorated with rowan berries and juniper. To increase the service life of the Topiary, one can coat with colorless matte varnish.
Charming basket will decorate any interior

Admire which beauty you can make with your own hands!

Needles pine needles and tree leaves will serve as a harmonious craft.

Bright red rowan berries are remarkably combined with a brown background of the cones.

The individuality of the basket is determined by its author. A small craft can be copped with an adhesive gun, but her handle is more reliable to collect on the wire. We will learn to make a basket with a wire frame, and the design of the crafts each will choose to taste.
To work, it will take up to several hundred cones, depending on the size of the craft. The wire is better to use a copper diameter of about 1mm. Burden the craft is more convenient to the adhesive gun, the quick-drying glue is suitable. Wire cut the windows. We proceed to work and look at the pictures:

Flowers from ordinary pine cones at any time of the year
It seems that the unspoken cones under the trees do not pretend to the role of the form for flowers. However, quite a bit difficult to create a charming bouquet, which will delight for a very long time and regardless of the season.

Who will say that this is not zinnia? You need to pick up a few cones of the desired form, paint and arrange!

As you can see, the colors of the cones are not at all must be very bright. Pastel tones and straightforward slim stems make their charm.

Chamomile from the cones is amazingly plausible! White paint is not a problem at all.

I turn over the cones to the opposite side, paint the middle in yellow, and here they are dahlia! Such colors are very simple in manufacture, and children on the 8th of March can safely take on a similar craft.

So it turns out if you add leaves of trees to the cones. Some of them can also be painted and add decoration of expressiveness.

Perhaps there is no "millions of scarlet roses", but the bouquet of cones in the form of a wreath clearly attracts attention. If you look closely - nothing complicated.

Of course, we will make your bouquet of flowers. I liked these. It will take several cones to work, corresponding to them the number of sticks or twigs for the manufacture of stems, paints, brush, green paper, glue or adhesive gun. The scheme of action is very simple:

Crafts from leaves, acorns and cones in autumn

The bumps - natural material, with which chestnuts are well combined, leaves, acorns, nuts, the bark of trees and so on that in abundance it gives autumn. The listed natural materials are especially good for crafts that show the falling nature when the flowers no longer make them competition. Consider the lightest and original compositions that make in kindergarten.
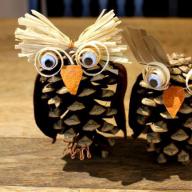
Wise Owl does not want to mock in the rain

Autumn came, and Owl sadness, hiding from the rain in a halate of leaves. It's not difficult to make such an original handicraft. To work will be required:
- just one pine cone;
- branches for the construction of a shala;
- several autumn leaves;
- threads;
- plasticine white, black, brown, red;
- the base for crafts, for example, a sheet of cardboard.
For a start, we collect from three sticks of the same length of the chaolash frame. To the base of the sticks are attached to plasticine, and on top are binding to the thread. Another wand will need to organize a volatile bird.
Now proceed to the assembly of owls. First of all, it will take off and send a couple of needles of the bump so that there are ears. From white and black plasticies, we will make the eyes of the bird, and from brown - tangim beak and legs.
Secure the cradle to the base and the rear sheolas support with plasticine. Now you can bind a thread of several leaves to the tip of the shag.

Owl made of pine cones and felt looks completely different. Multicolored felt parts are attached to a shake with glue.

Owl from a large number of cones has a solid, impressive look. The base of the crafts can be a plastic bottle on which cones are glued using a thermopystole.

This owl is made in the form of a panel and will serve as an original design of the interior. Fir and pine cones are conveniently fixed to the base with a thermal oil.
Cheerful Cockerel will raise the mood

A colorful rooster of cones and autumn leaves will delight both children and adults, and those and others will be able to make it. The bumps perfectly imitate the bird's plumage. For the manufacture of the rooster, we will need a pair of cones, plasticine of red and green, a few bright leaves, a little rowan and scissors. Getting to work:

As you can see, about the same technology you can make a little different and no less charming cock.

Of course, a chicken and even chickens may appear next to the cock. 
This solid rooster is not so bright, but almost natural sizes. For its manufacture, a pair of tens of cones will need, which are most convenient to bore a thermoclaim.
Skill-skirls do it yourself

Square from cones is no less interesting than the rooster. Let's see what they are and do to their taste.

This is clearly autumn squirrel: it is sparkling acorns for the winter and sits on yellow leaves. The pallet from the foam for products will turn the green napkin to which the autumn maple leaves are glued. Now you need to make paws, neck, eyes and ears from plasticine. They should also be copped to the body, tail and head of cones and acorns.

For the manufacture of such a squirrel, except for plasticine, bumps and acorns will need eyes from a children's dialing. However, they can also be made of plasticine. Such a craft is suitable for the smallest.

This squirrel is a little more difficult, and we can make a whole plot. For the manufacture of crafts, we will need several pine and spruce cones and a disk from birch. The grass can be made of plastic or paper. All work is performed by the stationery knife and adhesive gun:

Ideas of other craft craft
Undoubtedly, everything is done from natural materials, not to count. I will add only the most original and easy to manufacture without additional comments.

The bright still life consists of well-selected and laid gifts of autumn. There, inside, the hedgehog was hidden, which we have already done.

Let's try again this time to do something from the natural material, but it's bigger from the details.
Bump
Let's start with all the famous kosolapoy Mishk - The owner of the forest. Although, and the owner of the forest can be done in the same way.Basic details:
- elova cone;
- four semi-collar pine shishki.;
- opened pine cone with a round painter;
- hat zhlouda.
The method of "scaly under the scales" The rest of the details will be attached to it.
To connect the cones of "Scaway under the scales" cones, you need to move them towards each other so that the scales of one fell under the scales of the other. To secure the connection you need to pre-apply glue (put a piece of plasticine) under the scales of one of the cones. Then, when connecting the scales, the other cones will stick.
A good cone is very elastic scales, so it's not easy to break them. Connecting the cones "Scaly under the scales", do not be afraid to press them stronger.
Bear paws are half-painted pine cones. In this case, the rear (lower) paws should be a little more.
Put a fir bump on the top and attach the rear paws. So that the bear is conveniently sitting, the paws should be installed on one side of the bumps torso, slightly spreading, as you see in the photo.
Machy head Make from open pine cones. At the highest point of the top of this cone (slightly away from the center), stick the hat across, so that the maid of the bear stretches forward.
Dark nose and eye can be made of pepper pepper or plasticine. Nose stick to the tip of the face. Under the eyes, lay something light so that they stand out: light beerates light beerts, white (light) plasticine. If pupils move to the nose, the teddy bear will be a good view. In any case, the eyes must cover the center of the creek head.
Strengthen the front (top) paws over the rear.
The ears can be cut out of Berriest or use Hats Zhloud, but more flat than for frills. Strengthen them by inserting a bump-head under the scales.
That's all. If you want to do something otherwise, or add some details, then no one will interfere with you. Crafts from natural material give so many opportunities to fantasize and embody their fantasies!
Of course, the Bear is a big beast, but very gullible. In many fairy tales, the Bear is deceived, and even laughing at him. And the smartest and cunning forest beast are considered lisu.. Let's try to make a forest beauty.
Sly Fox
Basic details:- large open pine cone with round top
- large open pine cone with flat top
- the middle opened pine cone with round top
- medium closed pine cone ,
- two small semistrated pine shishki. ;
- elova cone (with scales, which are easy to break);
- beresta.
Fox torso Make from two large open pine cones.
Take a concern with a round top and insert a flat bump with a flat bump.
Well secured this connection, put the cones on the desktop with flat top scales down. (If the central scales prevent her from standing, breaking it). So that the bump with a round paint remained in the right position, take two small semi-wax pine cones and strengthen them from the bottom of this cone (closer to the round painter) by the way "under the scales".
You have a fox torso with front paws. The rear paws do not need.
A lush tail for fox can be made of a fir bump.
First, break all the scales of this cone. Then, "Clean the" plump so as if it was a carrot. You can clean with a knife or blade of scissors in the direction from the former macushkin to the nose. If you yourself do not know how to clean the carrot, ask someone from adults to help you.
"Unsuccessful" tails can be used for other works. I, for example, it turned out the duet of Chernukh and Redhead - elegant English cats, which I will tell you later.
Of the two remaining cones, make the fox head. Broken the revealed pine cones (cut off with scissors) central scales and 2-3 coming to it. Connect this conex using the fox torso. Insert a closed pine conex to the place of remote central scraps.
So that the fox came to life, it is necessary to make the most important thing - small details of the head.
Spread the Beresto so that the lower (dark) layer is outside on both sides. Cut the ears out of her and insert them under the scales of the head.
From the bottom layer of Berestov, cut two circle with a small coin size. Bend each of them in half (in a light layer inside) and make eye-cilia.
To do this, make small scissors to make four deep cuts in the fold line direction (you should get five narrow strips), and then gently cut the corners on each side of the obtained strips.
Apply the glue on the dark surface of any half of the part and stick the eye polls to the muzzle. Pupils for the eyes can be made of a dark apple or pear seed. Stick pupils on the lower cilia, close to the fold line.
Now cut out of the bark of a small coin size. Bend it in half. Small scissors cut part of the detail from the end of the fold line to the middle of the arc. Make 3-4 cuts and cut the corners of the resulting strips only with your neighbor to the wide end of the part details. Deploy the item. (She looks like a Christmas tree). Apply glue along the fold line and glue the item so that its wide part of "hung" over the sharp end of the face.
From a thin layer of pine bark or from the theme of Berest, cut out a small circle - nozzle - and glue it from above.
So that everything is clear to you, I will explain: on the mord of the fox, near the nose, the mustache-vibrics grow. And more: nozzles will not be noticeable if you do not put a brighter piece under it.
You can make a fox with a torso from a fir bump, and for the paw pick thin twigs (better pine). You can arrange the head using plasticine and pine cheaps (for eyelashes and mustache).
What will be your fox, you decide for yourself.
If weekend is good weather, almost all day we play in the yard. A certain intelligent man has planted around the playground from a dozen chestnuts, nuts, maples and rippers. A little further growing wild grapes, mulberry and apricots.
It must be said that in the fall, multicolored trees represent an incredibly colorful spectacle. It is a pity that there are no artists in our family. Juicy paints, yes, accompanied by solar weather, the mood is raised at times and inspired for creativity.
After the outdoor games, we go with my daughter to make crafts from the natural materials collected in the courtyard. Since last season, we still have the cones of the Crimean and Ordinary Pine, as well as the chestnut peel pretty skin. It is that today we will make wild beast - a brown bear. Join now!
For work you will need:
- - Cryer of Crimean Pine
- - Plasticine,
- - Quantatian Quantatians,
- - Autumn leaves for decoration of crafts.

Initially with the child distributing the duties. Daughter lasted plasticine parts, and mom corrects possible defects. We will need two round flat ear, eyes, an oval brown face with a black nose - button.
With a difficult task of the master coped to an excellent appraisal, but to mount the finished elements on the bump will have to mom yourself. Jewelry does not tolerate a rush, it is necessary to firmly press the plasticine parts to scales so that they do not lose the form.

Torso with his head of the crafts we assign to the side and take the beast of broken paws. Last year's quarters of chestnut peel - the perfect material for the design of the limbs of all theestine animals. If necessary, parts are reduced in size, as well as scissors cut sharp corners.

We will mount the paws to the body of the crafts with the help of plasticine pieces. The bear should be sustained on the legs and not tipping over.

Here he is, a forest predator, raised his paw in a sign of greeting. Now the beast as he grows on all the impassable thickets.

Spread around the hero of fresh and slightly wild leaves. It turned out a real autumn composition.

Work on a craft line from natural materials is completed. We hope our bear will like everyone without exception to the guys.
Crafts for children from natural materials.
Basic details: fir bump; Four semistrated pine cones; Opened pine bump with a round paint; Halband hat. Bear's torso is a spruce bump.
The exhaust details will be joined by the "scaly under the scales". To connect the cones of "Scaway under scales", you need to move them
To meet each other so that the scales of one fell under the scales another. To secure the connection you need to pre-apply glue
(Laying a piece of plasticine) under the scales of one of the cones.
Then, when connecting the scales, the other cones will stick.
A good cone is very elastic scales, so it's not easy to break them. Connecting the cones of the "Scaway under the scales", do not be afraid to press them stronger. Bear paws are half-painted pine cones. In this case, the rear (lower) paws should be a little more.
Put a fir bump on the top and attach the rear paws. So that the bear is conveniently sitting, the paws should be installed on one side of the pin, slightly spreading, as you can see in the photo.

Machy head Make from open pine cones. At the highest point of the top of this cone (slightly away from the center), stick the hat across, so that the maid of the bear stretches forward. Dark nose and eye can be made of pepper pepper or plasticine. Nose stick to the tip of the face. Under the eyes, lay something light so that they stand out: light beerates light beerts, white (light) plasticine.
If pupils move to the nose, the teddy bear will be a good view. In any case, the eyes must cover the center of the creek head.
Strengthen the front (top) paws over the rear.
The ears can be cut out of Berriest or use Hats Zhloud, but more flat than for frills. Strengthen them by inserting under the scales
bump heads.
That's all. If you want to do something otherwise, or add some details, then no one will interfere with you. Crafts from natural material give so many opportunities to fantasize and embody their fantasies!
Of course, the Bear is a big beast, but very gullible. In many fairy tales, the Bear is deceived, and even laughing at him.
More options for bears from cones

Beautiful crafts made of cones made by their own hands are often found at children's competitions and exhibitions. This natural material is available, working with it is convenient and safe. The main thing is to catch it in time and properly prepare.
Forest resident from cones


Topicia from acorns and cones
What cones are suitable for children's crafts
To make crafts from cones to school or kindergarten, you need to know the following rules:
- it is necessary to collect more unpacked bumps - they take less space;
- if it is necessary that the bump be revealed, it is simply not covered;
- if it is planned to make a craft from an inconspicuous shore, immediately after collecting it needs to be dipped into the glue composition.

Original Topiary
The most reliable to cover the cones for crafts with a joinery glue, which was pre-diluted with water to the liquid consistency. You need to take a blank with forceps and dip in the adhesive solution several times. Then put on the loaf. Periodically, the bump must be turned over. Wave it will be about three days.

Composition of cones
How to make a big bump for craft
Not always the natural shape of the cone is suitable for creating a specific composition. So, it happens that you need a swept material. To soften the surface of the workpiece and give it a concrete shape, you need to put a bayer in boiling water and cook about 5-10 minutes. After a little cool, "roll up" with your hands aside and fix the rope or adhesive tape.

Little cones wreath
What crafts can be made of cones
Baby crafts from cones can be different. Funny figures of animals and men, decorative elements for home, compositions and paintings - this material gives freedom to work. On the eve of the New Year holidays, it is possible to make christmas decorations.

Beautiful wreath

New Year's decor

Balls decorated with balls

Gift from cones with your own hands
Crafts from cones for elementary school - hedgehog
If the child was instructed to make a beautiful cradle from the cones with their own hands, the parents must be prompted to him in which direction to move. Pretty just this is such a hedgehog:

Hedgehog from the shishk
You need to take a bump, plasticine. To shape out of the last face and attach to the back of the wooden base. Eyes and spout is better to produce a darker color from plasticine so that they are well released on a general background.
Needle Hedgehogs should be decorating herbs, leaves. You can make fungi and carefully attach them from above.

Funny hedgehog with sharp needles
It is interesting to see the exercise, in which several pine cones are involved:


Big hedgehog
Tree of pine cones on the exhibition
To make a Christmas tree made of pine cones, you need to prepare:
- cardboard;
- acrylic paint;
- glue pistol;
- cones;
- decorations for homemade forest beauty.

Christmas tree made of cones with their own hands
From the cardboard it is necessary to make a cone, and then you can go it with the help of hot glue by open cones. It is advisable to decorate from above the Christmas tree with some colors, beads, sparkles, tapes so that she looked more elegantly. If you want to change the color of the homemade Christmas tree, before decorating you need to spray the paint from the canopy.

Another method of manufacturing forest beauty from cones is possible. Materials will need the same, but the order of work will be somewhat different. Here you do not have to make the basis in the form of a cone - you just need to cut the circle from the cardboard and start it as follows:

Making Christmas trees from cardboard and cones
Bear from cones
A beautiful bear is easily made of cones.

Its body must be formed from the longest workpiece, the paws are of four shishechs of small size, the nose is made of peas pepper, ears - from the heads of the acorns. If some of the natural materials necessary for the design of a forest resident, at home did not replace it. So, ears, nose and eyes can be made of plasticine, crotone, painted dough.

Bear from different cones
It's great if cedar, pine and fir bumps will be combined in one composition. Then it will look more interesting and gently.

Huge bear

Small Mishka
What other craft can be made of cones
With bumps you need to experiment. Since it is very simple to connect them with each other, you can create figures of various shapes.
Very quickly, this bunny is done:

Hare from the bump
For its manufacture, you will need:
- one revealed bump;
- multicolored plasticine;
- toothpicks (can be replaced with spruce needles).
Forest white ...

Protein do it yourself
There will be only two cones for the execution of owls:

Sovice from cones
If the child asks to make penguins to the exhibition in school or kindergarten, it is not necessary to scare this task.

Penguins from cones
Make the body of animals white will help the watercolor paint covered on top of varnish.
Baskets from cones
A basket from cones can be made both to the exhibition in the garden or school and for the design of the apartment's interior. For its manufacture, you will need flexible wire. You need to alternately connect the bumps with each other, and then form rows of them.

Making basket

Decorative basket

Little basket

Large tank made of pine cones
You can decorate a basket with flowers, acorns, dry grass.

Beautiful crafts made of cones made by their own hands are often found at children's competitions and exhibitions. This natural material is available, working with it is convenient and safe. The main thing is to catch it in time and properly prepare.
Forest resident from cones

Topicia from acorns and cones
What cones are suitable for children's crafts
To make crafts from cones to school or kindergarten, you need to know the following rules:
- it is necessary to collect more unpacked bumps - they take less space;
- if it is necessary that the bump be revealed, it is simply not covered;
- if it is planned to make a craft from an inconspicuous shore, immediately after collecting it needs to be dipped into the glue composition.

Original Topiary
The most reliable to cover the cones for crafts with a joinery glue, which was pre-diluted with water to the liquid consistency. You need to take a blank with forceps and dip in the adhesive solution several times. Then put on the loaf. Periodically, the bump must be turned over. Wave it will be about three days.

Composition of cones
How to make a big bump for craft
Not always the natural shape of the cone is suitable for creating a specific composition. So, it happens that you need a swept material. To soften the surface of the workpiece and give it a concrete shape, you need to put a bayer in boiling water and cook about 5-10 minutes. After a little cool, "roll up" with your hands aside and fix the rope or adhesive tape.

Little cones wreath
What crafts can be made of cones
Baby crafts from cones can be different. Funny figures of animals and men, decorative elements for home, compositions and paintings - this material gives freedom to work. On the eve of the New Year holidays, it is possible to make christmas decorations.

Beautiful wreath

New Year's decor

Balls decorated with balls

Gift from cones with your own hands
Crafts from cones for elementary school - hedgehog
If the child was instructed to make a beautiful cradle from the cones with their own hands, the parents must be prompted to him in which direction to move. Pretty just this is such a hedgehog:

Hedgehog from the shishk
You need to take a bump, plasticine. To shape out of the last face and attach to the back of the wooden base. Eyes and spout is better to produce a darker color from plasticine so that they are well released on a general background.
Needle Hedgehogs should be decorating herbs, leaves. You can make fungi and carefully attach them from above.

Funny hedgehog with sharp needles
It is interesting to see the exercise, in which several pine cones are involved:


Big hedgehog
Tree of pine cones on the exhibition
To make a Christmas tree made of pine cones, you need to prepare:
- cardboard;
- acrylic paint;
- glue pistol;
- cones;
- decorations for homemade forest beauty.

Christmas tree made of cones with their own hands
From the cardboard it is necessary to make a cone, and then you can go it with the help of hot glue by open cones. It is advisable to decorate from above the Christmas tree with some colors, beads, sparkles, tapes so that she looked more elegantly. If you want to change the color of the homemade Christmas tree, before decorating you need to spray the paint from the canopy.

Another method of manufacturing forest beauty from cones is possible. Materials will need the same, but the order of work will be somewhat different. Here you do not have to make the basis in the form of a cone - you just need to cut the circle from the cardboard and start it as follows:

Making Christmas trees from cardboard and cones
Bear from cones
A beautiful bear is easily made of cones.

Its body must be formed from the longest workpiece, the paws are of four shishechs of small size, the nose is made of peas pepper, ears - from the heads of the acorns. If some of the natural materials necessary for the design of a forest resident, at home did not replace it. So, ears, nose and eyes can be made of plasticine, crotone, painted dough.

Bear from different cones
It's great if cedar, pine and fir bumps will be combined in one composition. Then it will look more interesting and gently.

Huge bear

Small Mishka
What other craft can be made of cones
With bumps you need to experiment. Since it is very simple to connect them with each other, you can create figures of various shapes.
Very quickly, this bunny is done:

Hare from the bump
For its manufacture, you will need:
- one revealed bump;
- multicolored plasticine;
- toothpicks (can be replaced with spruce needles).
Forest white ...

Protein do it yourself
There will be only two cones for the execution of owls:

Sovice from cones
If the child asks to make penguins to the exhibition in school or kindergarten, it is not necessary to scare this task.

Penguins from cones
Make the body of animals white will help the watercolor paint covered on top of varnish.
Baskets from cones
A basket from cones can be made both to the exhibition in the garden or school and for the design of the apartment's interior. For its manufacture, you will need flexible wire. You need to alternately connect the bumps with each other, and then form rows of them.

Making basket

Decorative basket

Little basket

Large tank made of pine cones
You can decorate a basket with flowers, acorns, dry grass.

Concept Baskets
Let's try again this time to do something from the natural material, but it's bigger from the details.
Bump
Let's start with all the famous kosolapoy Mishk - The owner of the forest. Although, and the owner of the forest can be done in the same way.Basic details:
- elova cone;
- four semi-collar pine shishki.;
- opened pine cone with a round painter;
- hat zhlouda.
The method of "scaly under the scales" The rest of the details will be attached to it.
To connect the cones of "Scaway under the scales" cones, you need to move them towards each other so that the scales of one fell under the scales of the other. To secure the connection you need to pre-apply glue (put a piece of plasticine) under the scales of one of the cones. Then, when connecting the scales, the other cones will stick.
A good cone is very elastic scales, so it's not easy to break them. Connecting the cones "Scaly under the scales", do not be afraid to press them stronger.
Bear paws are half-painted pine cones. In this case, the rear (lower) paws should be a little more.
Put a fir bump on the top and attach the rear paws. So that the bear is conveniently sitting, the paws should be installed on one side of the bumps torso, slightly spreading, as you see in the photo.
Machy head Make from open pine cones. At the highest point of the top of this cone (slightly away from the center), stick the hat across, so that the maid of the bear stretches forward.
Dark nose and eye can be made of pepper pepper or plasticine. Nose stick to the tip of the face. Under the eyes, lay something light so that they stand out: light beerates light beerts, white (light) plasticine. If pupils move to the nose, the teddy bear will be a good view. In any case, the eyes must cover the center of the creek head.
Strengthen the front (top) paws over the rear.
The ears can be cut out of Berriest or use Hats Zhloud, but more flat than for frills. Strengthen them by inserting a bump-head under the scales.
That's all. If you want to do something otherwise, or add some details, then no one will interfere with you. Crafts from natural material give so many opportunities to fantasize and embody their fantasies!
Of course, the Bear is a big beast, but very gullible. In many fairy tales, the Bear is deceived, and even laughing at him. And the smartest and cunning forest beast are considered lisu.. Let's try to make a forest beauty.
Sly Fox
Basic details:- large open pine cone with round top
- large open pine cone with flat top
- the middle opened pine cone with round top
- medium closed pine cone ,
- two small semistrated pine shishki. ;
- elova cone (with scales, which are easy to break);
- beresta.
 Fox torso Make from two large open pine cones.
Take a concern with a round top and insert a flat bump with a flat bump.
Well secured this connection, put the cones on the desktop with flat top scales down. (If the central scales prevent her from standing, breaking it). So that the bump with a round paint remained in the right position, take two small semi-wax pine cones and strengthen them from the bottom of this cone (closer to the round painter) by the way "under the scales".
You have a fox torso with front paws. The rear paws do not need.
A lush tail for fox can be made of a fir bump.
First, break all the scales of this cone. Then, "Clean the" plump so as if it was a carrot. You can clean with a knife or blade of scissors in the direction from the former macushkin to the nose. If you yourself do not know how to clean the carrot, ask someone from adults to help you.
"Unsuccessful" tails can be used for other works. I, for example, it turned out the duet of Chernukh and Redhead - elegant English cats, which I will tell you later.
Of the two remaining cones, make the fox head. Broken the revealed pine cones (cut off with scissors) central scales and 2-3 coming to it. Connect this conex using the fox torso. Insert a closed pine conex to the place of remote central scraps.
So that the fox came to life, it is necessary to make the most important thing - small details of the head.
Spread the Beresto so that the lower (dark) layer is outside on both sides. Cut the ears out of her and insert them under the scales of the head.
From the bottom layer of Berestov, cut two circle with a small coin size. Bend each of them in half (in a light layer inside) and make eye-cilia.
To do this, make small scissors to make four deep cuts in the fold line direction (you should get five narrow strips), and then gently cut the corners on each side of the obtained strips.
Apply the glue on the dark surface of any half of the part and stick the eye polls to the muzzle. Pupils for the eyes can be made of a dark apple or pear seed. Stick pupils on the lower cilia, close to the fold line.
Now cut out of the bark of a small coin size. Bend it in half. Small scissors cut part of the detail from the end of the fold line to the middle of the arc. Make 3-4 cuts and cut the corners of the resulting strips only with your neighbor to the wide end of the part details. Deploy the item. (She looks like a Christmas tree). Apply glue along the fold line and glue the item so that its wide part of "hung" over the sharp end of the face.
From a thin layer of pine bark or from the theme of Berest, cut out a small circle - nozzle - and glue it from above.
So that everything is clear to you, I will explain: on the mord of the fox, near the nose, the mustache-vibrics grow. And more: nozzles will not be noticeable if you do not put a brighter piece under it.
You can make a fox with a torso from a fir bump, and for the paw pick thin twigs (better pine). You can arrange the head using plasticine and pine cheaps (for eyelashes and mustache).
What will be your fox, you decide for yourself.
If weekend is good weather, almost all day we play in the yard. A certain intelligent man has planted around the playground from a dozen chestnuts, nuts, maples and rippers. A little further growing wild grapes, mulberry and apricots.
It must be said that in the fall, multicolored trees represent an incredibly colorful spectacle. It is a pity that there are no artists in our family. Juicy paints, yes, accompanied by solar weather, the mood is raised at times and inspired for creativity.
After the outdoor games, we go with my daughter to make crafts from the natural materials collected in the courtyard. Since last season, we still have the cones of the Crimean and Ordinary Pine, as well as the chestnut peel pretty skin. It is that today we will make wild beast - a brown bear. Join now!
For work you will need:
- - Cryer of Crimean Pine
- - Plasticine,
- - Quantatian Quantatians,
- - Autumn leaves for decoration of crafts.

Initially with the child distributing the duties. Daughter lasted plasticine parts, and mom corrects possible defects. We will need two round flat ear, eyes, an oval brown face with a black nose - button.
With a difficult task of the master coped to an excellent appraisal, but to mount the finished elements on the bump will have to mom yourself. Jewelry does not tolerate a rush, it is necessary to firmly press the plasticine parts to scales so that they do not lose the form.

Torso with his head of the crafts we assign to the side and take the beast of broken paws. Last year's quarters of chestnut peel - the perfect material for the design of the limbs of all theestine animals. If necessary, parts are reduced in size, as well as scissors cut sharp corners.

We will mount the paws to the body of the crafts with the help of plasticine pieces. The bear should be sustained on the legs and not tipping over.

Here he is, a forest predator, raised his paw in a sign of greeting. Now the beast as he grows on all the impassable thickets.

Spread around the hero of fresh and slightly wild leaves. It turned out a real autumn composition.

Work on a craft line from natural materials is completed. We hope our bear will like everyone without exception to the guys.
Crafts for children from natural materials.
Basic details: fir bump; Four semistrated pine cones; Opened pine bump with a round paint; Halband hat. Bear's torso is a spruce bump.
The exhaust details will be joined by the "scaly under the scales". To connect the cones of "Scaway under scales", you need to move them
To meet each other so that the scales of one fell under the scales another. To secure the connection you need to pre-apply glue
(Laying a piece of plasticine) under the scales of one of the cones.
Then, when connecting the scales, the other cones will stick.
A good cone is very elastic scales, so it's not easy to break them. Connecting the cones of the "Scaway under the scales", do not be afraid to press them stronger. Bear paws are half-painted pine cones. In this case, the rear (lower) paws should be a little more.
Put a fir bump on the top and attach the rear paws. So that the bear is conveniently sitting, the paws should be installed on one side of the pin, slightly spreading, as you can see in the photo.

Machy head Make from open pine cones. At the highest point of the top of this cone (slightly away from the center), stick the hat across, so that the maid of the bear stretches forward. Dark nose and eye can be made of pepper pepper or plasticine. Nose stick to the tip of the face. Under the eyes, lay something light so that they stand out: light beerates light beerts, white (light) plasticine.
If pupils move to the nose, the teddy bear will be a good view. In any case, the eyes must cover the center of the creek head.
Strengthen the front (top) paws over the rear.
The ears can be cut out of Berriest or use Hats Zhloud, but more flat than for frills. Strengthen them by inserting under the scales
bump heads.
That's all. If you want to do something otherwise, or add some details, then no one will interfere with you. Crafts from natural material give so many opportunities to fantasize and embody their fantasies!
Of course, the Bear is a big beast, but very gullible. In many fairy tales, the Bear is deceived, and even laughing at him.
More options for bears from cones