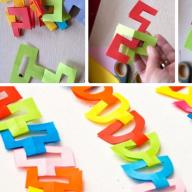
Origami is a popular technique of folding a variety of paper figures. This ancient art was born in China still in the early Middle Ages. In those days, only people from the highest estates owned origami. The technique received widespread in Western countries after the end of World War II. Now the origami is happy and adults and children are engaged. This art is well developing logic and attention. There are several of its species - flat and volumetric. Both of these species are interesting in their own way. We suggest try your hand in bulk origami. The figure is usually collected from a large number of modules, that is, the same elements that were folded in advance. So let's make modular origami "basket".
How to make a basket from modules - preparatory stage
Immediately before assembling a basket in the Origami technique, you should do the manufacture of multiple modules. They are different species, but the so-called triangular module is most often used. Office paper A4 format. The sheet needs to be cut on 16 identical rectangles size.


She has pockets on the sides, where the same modules are then inserted. Due to this, the surround figure of the origami from the modules is assembled - the basket.
For our future handicraft, you need to make 494 triangular modules of blue and 168 triangular pink modules. This process, of course, time consuming and requires patience.
Modular origami "basket" - master class
When all the necessary modules are made by you, you can crime to the manufacture of a basket. The assembly scheme of the modular origami basket is as follows:
- We collect a chain of blue modules. In both pockets of one module insert one corner of two modules.
- Then the pockets of the module are then put on the free side corners of the upper modules.
- In a similar way, the entire chain of two rows is assembled, in each of which should be 32 modules.
- Then you need to close the circle.
- Next, build eight rows of future baskets from triangular modules. In each you need to use 32 modules of blue.
- The next row needs to use pink modules. The total number of modules is 32, but every two blue modules alternate with two pink.
- The following series is laid out as follows: Pockets of one pink module are put on two central corners of two pink modules. We also do with blue modules. As a result, we have a number of 16 modules.
- After that, we put on two modules of blue, and then another blue module.
- We build new elements in the form of the arch: We ride six blue modules with one pocket on each other. Then the upper elements fasten with each other. We carry out such actions throughout the basket circle.
- After that, lay out a new solid row of pink modules.
- You need to make a stand for a basket. It consists of 1 row of blue modules and 2 rows of pink modules. In each such row you need to use 27 elements.
- It remains only to make a handle for the basket. It is made up by alternating 1 pink module with 2 blue.
- You need to make 79 rows. Having arched the arc handle, attach it.


Basket from paper origami from modules is ready!
There are many modern techniques aimed at developing in children of various skills. We offer a classic method in which a child with you will learn to use the objects for adults: scissors, paper, ruler and pencils. Let's try today to make a paper basket.
We specifically prepared several instructions for you, including one video instruction(at the very end of the post). As they say, instructions for every taste)
Instruction number 1:
The most simple basket, which even small children can do. Made from a square sheet of cardboard or paper. So that the basket is beautiful, the cardboard can be selected with the pattern, or stick the pattern on their own.
1. We need to do the following: Fill 9 equal squares (there should be 3x3 squares), in general, as shown in Figure:

2. Make cutters so that the design can be folded:

3. Now you need to bend the workpiece so that opposite edges are parallel to each other, and the remaining two were inclined equally:
 4. Squares in the middle must fix the basket and hold the entire design, for this take glue and glue them together:
 5. It remains to cut the hairs, which will serve as a handle for our basket, and then incur and her. So, the basket is ready! Business for 5 minutes))

Instruction number 2, wicker basket:
Everything is somewhat more complicated here than in the Origami technique and in the technique of simple baskets. To do longer, but more interesting, and the result will turn out much more beautiful. This basket is made of long straight paper segments. Take two large multicolored sheet of cardboard (flexible and dense) and cut them on a lot of segments of a long 30-40 cm and 1.2-2 width. As soon as you prepare, it will be possible to start weaving. The first basket is better to do from two multi-colored sheets in order to see the result of weaving - it will simplify the task. Start twisting strips so as to get such a chess order:
 2. Pleet the bottom while its sizes do not arrange you. Approximately the square with the sides of 10-20 cm should be obtained. Then you can begin to weaving the sides: it is necessary to bend the strips and bending to fix with glue and paper clips, and the paper clips are removed only when the glue grabs:

3. Plee the same way the sides until you make the height of the basket, with this even see CM 3 should remain to bend and flick. If you want a basket of deeper, then you need to prepare the strips are more authentic:

4. In principle, the basket is almost ready. It remains to bend the tips of paper stripes and glue them. And then glue the handle to the basket.

Instruction number 3, Cart origami:
You will need a square piece of paper, take the A4 sheet and cut out so much to get square:
You can make a task with the child: let the favorite doll with this basket goes to visit and will attribute the hotels; Or make a basket for flowers together. Draw it first, think about it with color and shape, come up with it can be decorated. Give your child a scope for fantasy!
Help us develop a site, tell us about friends by pressing the button :)
In contact with
Odnoklassniki.
The basket made in the Origami technique is one of the most popular origami figures. It can become a wonderful storage for various small supplies, a basket for fruit or chocolate, as well as a good design of a gift to friends and loved ones. Modular origami basket is not only beautiful, but also practical, can be useful to any hostess, since it will be convenient to add yarn in the basket so that the thread is not confused, and the process of creating knitted things was much easier.
Baskets have many symbolic values. In some cultures, she symbolizes the feminine start. The full basket is considered a symbol of abundance and, if there is any item in it, many believe that she will give longevity and immortality.
Now let's bring together a basket for small crafts together. Folding the modular basket is actually a simple lesson bringing a lot of pleasure.
We have a module as shown in the first drawing:

Thus, you need to make two more rows.

Then you need to wear four modules as on the bottom and insert one module of another color between them.

The next step will be the dressing of three modules on both sides with one pocket and fasten them with one module.

It turns out a small horn:

Then you need to wear another color module, and renew four modules again to move along the ring.

After passing around the circle, the assembly of the next row begins. Now you need to wear only three modules, since the bottom is already there. The module of another color should appear in a checker order.

In the second row, the alternation of colors goes in a circle.

In completion, you need to go around the circle with the color that went in a checker order, and go to the handle of the basket. Handles are two species: high and small. In this case, we make a small handle.

We put on the module, as shown in the lower figure:

The following figure shows that the module alternates - first two, then one basket basket module.

After graduation, you can see that the handle will have peculiar eyes, it remains only to attach it to a basket and come up with what to put inside.

Here is such a simple in the assembly basket as a result. She can become a cosmetic, candlers, or just decorate the interior of the house.

If we put in the middle of flowers and tie a bow to the handle, you can give it to your beloved person.
Hello Dear Masters and Master. I present to your attention a master class on the manufacture of such a swan origami, and I called it "Swan in Pink". How to make the origami swan? We will make a pink drawing, highlight the swan with pink modules around the perimeter and put on a round stand, and we also glue small eyes. Please look at this video for the manufacture of the origami swan. IN […]
Hello expensive masters and masters! Today I offer you a master class on the manufacture of a swan tricolor from triangular modules. It would be necessary to come up with what else there are options for making swans in the technique of modular origami. But it turns out, there are still options and this is not the last thing in my arsenal. The swan tricolor is so simple, [...]
Hello expensive masters and masters! I bring to your attention a new master class on making a swan in a black of 3D modules. At the last occupation, we made a swan in red, and now I decided to change the style a little and perform a swan in black tones. The scheme is not complicated and will suit anyone, even a newcomer in modular origami. Especially [...]
Hello expensive masters and masters! I bring to your attention a new master class on making a swan in red shades. On the Internet, you can gover a huge number of different schemes and master classes for the manufacture of swans in the technique of modular origami. I am sure that you have not seen such a swan. This scheme is quite simple and even can cope with it [...]
Swan in blue. Video tutorials and scheme. Part 3. In the third part of the master class, I offer you two video tutorials and a detailed origami scheme how to make a swan. The first video tells about how to make a swan neck and how to make a small stand. The second video tells about how best and faster crying the swan. Lesson 6 (neck and [...]
Swan in blue. Video tutorials and scheme. Part 2. In the second part of the Mater-class "Swans in Blue" we are completing to do torso. I prepared for you two video tutorials and a detailed origami swan from modules. To assemble the swan, 1438 modules of 1/16 dimensions will be required, of which: 317 - Purple modules 471 - blue modules 552 - blue [...]
Swan in blue. Video tutorials and scheme. Part 1. I bring to your attention a new master class on the manufacture of origami swan from paper from 3D origami modules. The scheme is not quite common and the view of the wing is not entirely classic. You can see small through holes and a net drawing in the photo. I will say directly - the scheme is quite complicated! Especially for this scheme I [...]
"Rainbow Swan" scheme and video tutorials (part 3). The third part of the "Rainbow Swan" master class consists of three video tutorials to build a stand. And I also decided that you will be very useful for the video tutorial to glue the "Rainbow Swan". Lesson 5 (Stand Part 1) Lesson 6 (Stand Part 2) Lesson 7 (Stand Part 3) [...]
How to gather a basket from paper modules step by step with a photo
For the manufacture of figures, we will use four paper colors: Yellow, blue, orange and red. The size of one module in our case is 7.5 cm by 5 cm (modules can be made of different size and other color)
Collect orange, yellow, red and blue modules according to the scheme. Module assembly schemes will find.
Here is such a basket we will collect with you
You need to collect:
188 yellow modules,
162 blue module,
96 orange modules,
89 red modules.
.jpg)
Step-by-step assembly process
Collect the first two rows (24 modules) and close the chain of modules into the ring.
1st row: We alternate 3 blue modules and 1 yellow.
2nd row: Alternate 2 blue modules and 2 yellow (blue modules wear on the middle corners of the blue modules of the previous row).
.jpg)
Turn over the detail
.jpg)
3rd row: On the middle corners of the blue modules of the previous row, on the 1 blue module, then on each side of these modules, you turn on 1 yellow module, and between yellow modules - orange.
.jpg)
Photo from the back
.jpg)
4th row: We alternate 2 yellow modules and 2 orange.
.jpg)
5th row: On the middle corners of the yellow modules of the previous row, you put on 1 yellow module (6 pcs.), then on the right and to the left of each yellow module are put on 1 orange module (12 pcs.). There are 2 free corners between orange modules.
.jpg)
6th row: For each resulting triangle, you turn on 2 orange modules (1 corner of yellow and 1 corner of the orange modules of the previous row).
.jpg)
7th row: On the middle corners of the orange modules of the previous row, on 1 orange module.
.jpg)
Now we will make new elements in the form of an archer.
For neighboring vershits, you put on 7 blue modules with one pocket, as shown in the photo. Top modules secure a blue module with each other.
.jpg)
.jpg)
We collect similarly to the second arch. On the middle corners of the lower blue modules, on 1 yellow module.
.jpg)
For each row of blue modules, you put on the ladder of 7 red modules (see photo).
.jpg)
You need to assemble 6 such elements.
.jpg)
Then, on the middle corners of the upper modules, open 1 blue module.
.jpg)
1st row: 1 Yellow module.
.jpg)
2nd row: 2 yellow modules.
.jpg)
3rd row: 1 Yellow module, 1 orange, 1 yellow.
.jpg)
4th row: 1 Yellow module, 2 orange, 1 yellow.
.jpg)
5th row: 1 Yellow Module, 1 Orange, 1 Blue, 1 Orange, 1 Yellow.
.jpg)
6th row: 1 Yellow module, 2 orange, 1 yellow (from each edge there remains free of free corner).
.jpg)
7th row:1 Yellow module, 1 orange, 1 yellow (from each edge there remains a free corner).
.jpg)
8th row:2 yellow modules (from each edge remains 1 free corner).
.jpg)
9th row:1 Blue Module (on the middle corners of the previous row modules).
.jpg)
In the same way, collect 5 more items.
.jpg)
.jpg)
Already in this form you can use a basket. For example, put flowers in it.
.jpg)
Now make a handle for a basket.
1st row: 1 blue module.
2nd row: 2 yellow modules (modules are put on with one pocket for one corner).
3rd row: 1 Blue module (put on the middle corners of yellow modules).
4th row: 2 yellow modules (modules wear 1 corner of the 2nd row and 1 corner of the previous row).
5th row: 1 Blue module (put on the middle corners of yellow modules).
6th row: 2 yellow modules (modules wear 1 corner of the 4th row and 1 corner of the previous row).
7th row: 1 Red module (put on the middle corners of yellow modules).
8th row: 2 yellow modules (modules wear 1 corner of the 6th row and 1 corner of the previous row).
.jpg)
.jpg)
Lightly bent the handle and make it up to a basket, as shown in the photo.
.jpg)
Basket ready!
.jpg)