If only the classic three-robber spit was popular among women, now there are a huge variety of varieties. Photo S. step by step instructions On weaving Kos can be found on the Internet, so even complex techniques are suitable for beginners. The hairstyle and its variations are not only beautiful, but practical, comfortable and appropriate in any situations.
Classical three permanent braid
Before starting work, lubricate your head special toolfacilitating combing. Share the whole mass of hair into three parts. The right strand is superimposed on the middle and turns out to be in the middle. The left is superimposed on the middle (right) and also turns out to be in the middle. In such a sequence, continued until the hair is braided to the end.
How to braid braid with ribbons
The principle of weaving with ribbons is the same as in a conventional braid, with the difference only that in this case the tape is added and the work begins not on the right side, but with the left.
This is done like this:
- Hair is divided into three parts and tie the ribbon on the middle.
- The left curl is placed on the middle and, selling it under the ribbon, laid on the right strand.
- The tape is carried out under the middle strand and laid between the 2nd and 3rd.
- According to this scheme, we turn to the end and tie with a rubber band or ribbon.
- Links are a little relaxed to give the hairstyle openness and ease.
French braid
The French spit is available even for beginners if you perform step-by-step photos, in the following sequence:

Danish braid
For weaving this braid, the curls must be soft and obedient, so immediately beyond the start of lightly lubricate them with air conditioning and spray with water. If first it is difficult to understand the technique, then you can learn from step-by-step photos for beginners. It is better to do such a hairstyle on the head that was washed 1-2 days ago, otherwise the hairstyle will not hold on and quickly disintegrate. 
Work starts with macushi. Take strand and divided into three parts. The bottom line is that while the curls are not overlapped upstairs, as usual, and are put under the bottom. Sometimes such equipment is also called the "French Spit on the contrary." At the end of the link, the hairstyles can be slightly relaxing to give volume and fix with varnish.
"Fish Tail" step by step with photos

How to braid braid with rubber bands
Options using rubber two:
- With progress.
Tie the tail (any height) and divide it to 4 the same parts. Two extremes are connected together above the middle, and tie a rubber band on them. Next, the lower curls are divided into 2 parts and connect them from above, and also tie a rubber band. The hair that was top will now be from below. And so as long as everyone is woven. 
- With the right.
Tie the tail and divide the top and bottom. A rubber band is put on top, retreating from the one that holds the tail, a few centimeters. The lower strand is passed through the upper, stretch upstairs and also tie a rubber band. The one that turned out to be below, passed through the upper, tie with a rubber band.
And further on the same principle. At the end, we can relax the rings of braids, giving a hairstyle pomp. The main thing is to tie the gum at the same distance and do not forget to tighten them every time after the curls are pulled out.
Spit twist or harness
Such a hairstyle is simple, so it is easy to make it yourself.
- Tie a tall or low tail.
- Divide on 2 (or 3) parts.
- Twist each in the harness, winding it on the finger. It is important to be twisted in one direction, otherwise nothing will work.
- Bind the harnesses among themselves.
Weaving "Waterfall" on medium hair
Weaving Kos (step-by-step photo for beginners will help to understand the technique, and quickly master the creation of even complex modification) can be carried out in the "Waterfall" technique. 
Spit "Waterfall" can be:
- four-finished;
- multi-row;
- around the head;
- volumetric.
Four distribution:
Brall on the line or on the oblique sample. Separate on the left side 4 strands. The countdown starts from the face. The second is the thinnest, the rest are the same in volume. The 1st is carried out under the 2nd and over the 3rd, and the 4th - under the 3rd and over the 2nd.
Then make pickups - to extreme strands join a small number of curls of the total mass. Next, 2nd spend over the 3rd, under the 4th.
 Weaving braids from four strands comes to any hair color
 The first curl is removed to the side. Replace it with a small amount of hair from the total mass, which are taken from below, and are carried out under the 3rd, over the 2nd Lokon. Then follows the same combination with the addition of strands, but not only below, and on top. And so on according to the scheme.
Multi-row braid "Waterfall"
Woven through a similar scheme, but in several rows. It should be noted that if there are several rows, it should be started at the level of the upper point of the ear.

Spit must go symmetrically, relative to each other.
- Around the head. Sheets similarly, but from one temple to another. You can finish with a classic option or leave in a loose form.
- Volumetric. To give a hairstyle volume, stretch the elements of the braid, moving from the end to the beginning, holding the hand. Fix with varnish.
Waterfall from Kosichek
The hairstyle "Waterfall from Kosichek" woves along the same principle as the option just considered, with the only difference that those Persays that are left and free to fall into thin classic braids.
 Weaving braids Waterfall with braids step by step with photos for beginners
 Four distribution braid

Spit from five strands
Of the five strands, you can braid a classic or French, Danish or chess braid using a tape. The countdown begins on the left. We should consider the basis of the weaving of a five permanent hairstyle, which is standard for all types (depending on the variety to the main steps are added additional). 
- Stage 1 - The first 3 strands are expanding the same way as when creating a classic type - the 1st is put on the 2nd and passed under the 3rd, it turns out between the 2nd and 3rd.
- Stage 2 - 5-y top 4th and passed under the 1st.
- 3 Stage - 2nd over the 3rd, under the 5th.
- 4 Stage - 4 under the 5th, over the 1st and under the 2nd.
- Starting from the first stage.
At first, you can tie the tail on the back of the head and weave from its mass.
French rim
Such laying make on different lengthEven on short.
- Hair is divided by horizontal sample on 2 parts. One will braid, and the second will remain loose and is going to the tail.
- Start from one ear to another. The principle is the same as in the ordinary French braid, i.e. With a pick-up strand.
- Fix with a rubber band or invisible, peeling hair inward from the opposite side. Fix with varnish.
French braid of four strands

Spit in Spit: master class

French Spirals on Long Hair
- The base is the harnesses laid in a special way.
- The separation occurs in such a way that the letter V was formed on the top, i.e. The samples are made from the temple to the top and from the top to the opposite temple.
- The selected area is shifted to the left and spin the harness clockwise.
- On the left, they take strand, put on the main, ride a little around it and, together with it, twist in the harness.
- Take strand on the right side and repeat the above-described actions, but they are put on top of the main harness, but for it. At the end, twist and chain invisible.
- The main thing is not to forget that the hair should constantly shift from side to side.
Mermaid Kosa
Romantic, light and air image looks effectively both on thin and thick curls and combined with any way.
- Take the curls of the temples and connect them on the back of the head.
- In place of the connection, we begin to weave the usual braid, making it from time to time picks up on both sides.
- With such pickups, you can weave to the end, and you can restrict ourselves to a small amount and further to braid the usual braid.
Spit Heart
- The sample is made vertically vertically. One piece is fixed with a hairpin so that it does not interfere.
- On the side, with which the work will be conducted, make a semicircular sample from the top to the temple, with a thin scallop.
- Lower curls also challenge.


- Work begins on the point in which 2 probes intersect. Weaving technique - French Spit. Rides for weta take from the top of the head.
- Having reached the field behind the ear, weaving on French techniques continue, but the addition curls are already taken from the middle and bottom. As a result, a small tail remains, which is temporarily fixed with a rubber band.
- On the other hand, they repeat the previous steps.
- After the braids are the same length, they are connected together and braid in the middle using the same technique.
Spit snake for girls
The samples are made on the side. Front separate strand middle length and begin to weave the French pouring braid, picking up strands only from the forehead. She should go parallel to him. 
The further weaving is unfolding in the other side and continue by the same technique, only now the curls pick up from the opposite side. Spit must be parallel to each other. At the end, you can leave the tail or supplement to the end.
In the creation of beautiful hairstyles, there will be no unknown moments, if we study brake technicians on step-by-step photos and detailed instructionswhich are suitable for beginners.
Such a hairstyle looks good on hair of any length. Despite the fact that the technician and so enough: it is three-, four and five permanent braids, a "waterfall" technique, French and Danish braids, braids with rubber bands, snake. Options can be combined with each other, and then the possibilities for changing the image will be even more.
Video about braid braid technique
Braiding:
Spit Fish Tail:
The simplest weavings of Kos can master not only women, but also men who have to collect their daughters in kindergarten or school. The simplest braids are braids consisting of three strands. The weaving of the brand of four strands is more difficult, however, it is worth it - such hairstyles look very unusual. What to say about all sorts of other modifications - French braids, dragons, harnesses, daisies and other ways! Oshiving these simple and beautiful ways Weaving braids, you will become a real master and you can change the hairstyle every day.
Spit are worn like girls, girls, and women on weekdays and holidays. It all depends on what braid of your style will be. To master the simple weaving of the brain, it is better to start to practice in weaving a simple braid. It is easy to do. With the right simple way Weaving Kos will be a neat hairstyle, and its owner will not have uncomfortable sensations.
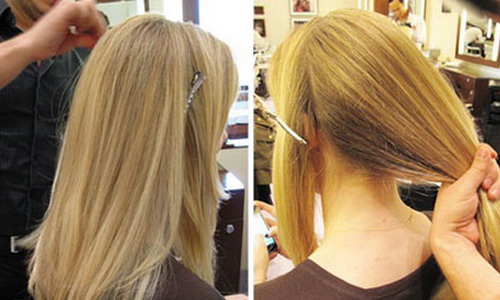
How to weave the simplest braids

The simplest weaving braids begins with combing. Draw back the hair with rare teeth back back. First comb your hair tips, then gradually move higher and higher.

In this case, you minimally traumatize your hair, combing will be almost painless, hair is easily shaken.


Before weave simple braids, go through the hair with a soft massage brush. Divide all hair on the head into three parts. Take the left side of the hair into the left hand, the right hand is right.

Enter the lateral strands alternately on the middle strand. At the same time, a strand from the left hand becomes central, and that strand, which previously lay in the middle - will go into the left hand.


During weaving, periodically stroke the hair strands with their hands so that they are not confused among themselves, were smooth and smooth. We have a braid of such a length as you want.


Note the photo simple weaving Kos - at the end always leave a tail 10-20 cm long and fasten it with a rubber band or hairpin.
Weaving braids from four strands (with photos)
Spit from four strands woves similarly to a simple spit. Look at the photo of the spit from four strands - the hair before the start of weaving is not divided into three, but for four parts and superimpose on each other alternately. Follow the pride in the picture, and you can braid such a braid on your own.


1. To do beautiful hairstyle With such braids, first divide the hair with direct verses, then separate the occipital hair and scatter them so that they do not interfere.


2. On each side of the head, perform weaving braids from four strands and strengthen their tails with rubber bands.


3. Then make hair on the back of the head and connect the braids with them. Secure the hair on the back of a hairpin or rubber band.


4. Free hair spread out. It turned out such a hairstyle: the sides of the head are original pigtails, and behind the tail.
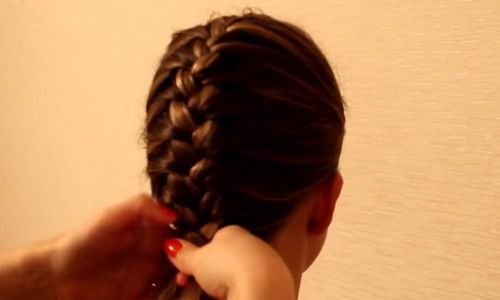
French braids with step-by-step photos
Below is represented step by step description French braids with photos.


2. Separate your hair on the top of the head and divide them on three strands.

3. One side strand to impose on the middle, like weaving a simple braid.

4. Verify the second side strand on a new middle strand. Now all three strands should be in your one hand (left), but separately.

5. Next, grab the strand of free hair on each side near the side strands, combine strands on the sides and continue weaving. Enter the integrined side strands to the middle and gossip them as with a simple weaving.

6. Thus, continue weaving, adding free hair to side strands and shifting strands from one hand to another. During weaving tightly breathe hair and keep your hands as close as possible to the head. Then the braid will be careful and will stay on the head for a long time.

7. Gradually capturing all new free hair on the sides of the braid, continue weaving to the nape.

8. Having reached the nape, you can immediately make free hair with a rubber band - make a tail at the end of the French braid. And you can continue weaving loose hair in the form of a simple braid. The choice is yours.


Look at step-by-step photos Weaving French braids to secure the information received.
French braid


1. Weaving inverse French braids, like all other braids, begins with combing. Below are the step-by-step photos of the French braid with inverse weaving.


2. Such braid woves like French. But there are some differences here. Free hair when adding to the side strands samples from below. As a result, the braid becomes embossed.


3. Having finished hair to the nape, you can also immediately fix them with a rubber band or continue weaving in the form of a simple braid.


Kosh need to weave tight, then it will look neat and beautiful.


4. The remaining tail will spread the brush. A longer tail looks more interesting, and short - in childish.
Step-by-step weaving braids "Fish Tail"
Step-by-step spit "Fish Tail" is performed in the next order.
1. Draw your hair back back.

2. This braid weave from two strands. First, all hair divide into two equal parts by a vertical sample on the back of the head.


3. The next step of step-by-step weaving braids "Fish Tail" - separation from the hair of one piece in a small strand and throwing it to the hair of another part.

4. Similarly, do the other half of the head with the hair.

5. Repeat all actions many times until you turn the braid.
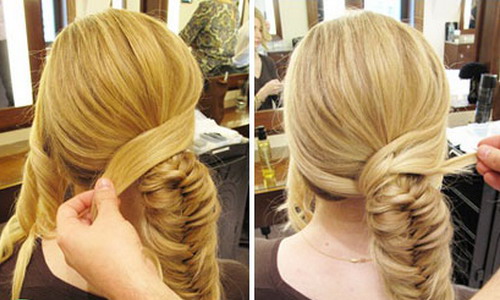

6. Leave free hair with the required length (tail) and secure the spit with rubber band.
Simple beautiful braid weaving harness

1. Before weaving braids harness, extend the hair with a brush.

2. Collect pure dry hair in a tall tail on the top of the top.

3. Distribute the tail into three equal parts.


4. Tighten each part of the hair into the right or leftBut necessarily one.


5. Twist three pieces of hair among themselves in the opposite direction.
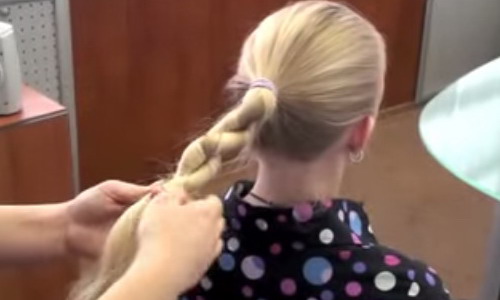
6. The resulting harness fasten the hair with a hair elastic.


7. Free hair (tail) spread out.
Simple weaving: how to braid braid-rim (with photos)

1. Draw your hair, you can beat them back or make the side sample on the left.

2. Weaving braid-bezel begins with the separation of hair into two parts by a surge, which goes through a dark part of the head from one ear to the other.

3. Before rubbing braid the occipital part Hair fasten temporarily in the tail.

4. From the left ear or from the side probor to the left in the direction of the right ear pleading the French braid.

You can perform a classic option or with inverse weaving.

5. Gradually, all hair separated to the top of the head is gradually. Pick up new hair strand for strand.


6. Upon the braid to the right ear, you can continue weaving a simple braid or make a tail.


You can strengthen the end of the French Spit, and combine the free part of the hair with a common weight of the hair on the back of the head.
Weaving braids: how to braid moster-harness
1. Before weaving the braids, burn the hair and divide them by the vertical surcharge from the forehead to the nape into two parts.

2. Before moving mostery-harness, one part of the hair will temporarily secure the rubber band so that it does not interfere.

3. Separate the horizontal span hair in the forehead in the direction of the vertical probor to the temple and twice 2-3 times to get a flagery. Helm the flagendum in the right palm.

4. Separate the parallel platform the next strand of the hair and in a similar way to twist it with your left hand.

5. Reflect both flashes with each other in hand.

6. Left hand Take a subsequent similar strand and again make a flagellum from it.

7. Right hand do similar actions. Part of the braided braids do not release from the hands.

8. Continue to weave the braid on one half of the head to the nape.

9. Secure the ready-made pigtail-harness with a rubber band at the nape.

10. Similarly, turn the braid on the other half of the head.

Spit "Double Drop"
1. Wash hair and dry well. Two horizontal samples divide the hair into three parts (one at the level of the crown, the second - at the level of the top of the ears), fasten every part of the hair with rubber bands.

2. The upper part of the hair with a vertical probor distribute into two parts.

3. On each half at the top of the head, we will braid the French braid. Pleeten first on the one hand, then on the other. Then the free ends of the hair combine together and secure with an elastic band.

4. The middle part of the hair on the head is also divided by the vertical interpretation in half. Take the French oblique first one half of the middle part of the hair, and then another. The free ends of the hair will be built with a rubber band, as in the previous case.

5. At the end of the braid "Double Drop" weaving, the hair on the back of the head is simply discharged and leave the leaving.
Weaving braid: how to weave the braid "Dragon"


1. Before weaving the braid "Drakonchik" tilt the head and expect hair against hair growth - in the direction forward.


2. Start weave the French braid from the nape to the top of the top.


3. From the top to determine the simple spio, the end of which fasten the rubber band.


4. The last stage of how to weave the braid "Dragon" - roll out a simple braid and secure its end under the French scythe.
Spit "Petals"

1. Draw your hair. Separate on the left half of the head hair with a diagonal surgeon, coming from the hair growth line on the right half of the head to the left ear.

2. Take the separated hair strand in french braid.


3. Similarly, separate the strand of the hair on the right half of the head. It will begin to begin with French pigtails on the left half of the head and continue to the right ear.

4. Make the second French pigtail on the right half of the head.

5. Thus, alternately turn the pigtails on the left and right on the head and reach the top of the top.

6. From the top to the back of the head, you need to leave a wide vertical strand of hair. Around her all hair crowd into French side pigtails.

7. Vertical strand Make a separate oblique.


8. The final stage of weaving braids "petals" - on the back of all hair, combine into one simple braid or tail and tolten with rubber band. You can make several thin simple braids.
Weaving Kos: how to weave the Korah "Crown"

1. The braid of the Kosh "Crown" begins with combing from the top in the direction of hair growth. Equally distribute them in all directions.

2. From the head. Start weave the French pigtail, collecting hair growing from the top of the hair growth line on the back of the head.

3. In the process of how to weave the Korah "Crown", move along the circle of the head in the direction of the clockwise movement.

4. Having reached the nape, where the weaving began, free hair fasten the rubber band and hide under weaving.


5. Hair can be decorated with decorative hairpins and flowers.
Method of weaving brass "mesh"
1. To begin with, spread your hair. The method of weaving KOS "Meshby" begins with a separation from the middle of the forehead, strands of the rectangular shape and fastening it with a rubber band.

2. In each direction, it will separate from it by 2-3 strands of a similar shape and secure each of them with rubber bands.
3. Each resulting tail split into two parts.

4. pieces of adjacent tails Connect into new tails and secure them too with rubber bands.
5. Tails near the ears do not need to be divided into parts. Combine them entirely with neighboring, over-site strands from the tails.

6. After the second row of rubber appears on the head, cross all the tails forward (on the face).

7. In the center of the head in the area of \u200b\u200bthe crown, we separate the strand of the rectangular shape, slightly less in the size of the first straight.

8. Connect a new strand with half parts of the adjacent strands and secure the rubber band.
9. On the parties from them continue already familiar weaving.
10. You must have a third row of rubber, and the number of tails should be equal to the number of tails in the first row.

11. Draw your hair on the back of the head. Spray hairstyle with hair varnish.
Weaving braids "Chamomile"
1. Draw your hair. Divide the hair with a vertical survey into two parts.
2. Each part of the top is divided by radial probes into four parts.

3. From the top of a straight sample, start weave the French pigtail. Finish to the end, take a turn and start weave the pigtail from the second part. On the painter, collect your hair in the tail.

4. Start weave the braid "chamomile" from the top of the next French pigtail on the same half of the head. Make it all similarly, with a turn to the next part of the hair.

5. Perform a similar weaving on the other half of the head.

6. All loose hair combine into one " ponytail"Or in a simple braid on the painter.
Spit "shells"


1. Draw your hair. Divide the hair with a direct vertical sampling into two parts.


2. On each side of the head, we braid simple pigtails over the ears.


3. Each Spiral Spiral Spirals and strengthen with studs.


4. Decorate the "shells" with decorative studs or flowers.
Method of weaving "Air Cross"
1. Draw your hair with a brush. The method of weaving the "Air Cross" begins with the division of hair with a vertical surcharge by four equal parts.

2. On each half of the head, make another diagonal test - from the center of the nape to the top of the auricle.

3. Start weave the French pigtail on the left half of the head. Capture your hair only to the top of the head. The lower edge of the braids should be free, not associated with the hair of the lower head of the head.

4. At the end of French pigtails, make a simple pigtail and secure free hair with rubber band.
5. Similarly, braid the French pigtail on the right.

6. Then begin to weave the French pigtail on the left half of the head in the occipital part. It will look like a continuation of the pigtails with the right half of the head. At the end, turn the short simple spio.

7. Split a simple braid, which is a continuation of French pigtails on the left half of the head. Continue to weave it again, but now in the form of French pigtails. Inspire your hair with the right bottom of the head of the head.

8. Two free tail or simple Koschiki On each half of the head decorate with decorative rubber bands, you can with flowers.
Spit "Snail"


1. Draw your hair. Tilt a little ahead and extend the hair again in the direction of their growth, i.e. all hair should lie from the top of the radial direction.


2. Start weave the French pigtail from the top. Capture new strands of hair always only on the one hand.


3. Welcome to the "evidence" spiral as long as the hair does not end.


4. Loose hair can be fixed with a rubber band in the form of tail or rub a simple oblique. Simple spio hide under the occipital strands, braided into French pigtail.
Tail with "snail"


1. Draw your hair. Make the tail in the occipient side of the head.


2. Separate the third part of the hair from the tail and the gossip from them is a simple pigtail.


3. Tighten the pigtail in the form of a spiral at the base of the tail and jump with it with stiletts.


4. Depending on your desire, you can decorate the tail with the "snail" with decorative studs or spin the tails with the help of electric prints.
Beam with a rim from braid
A beam with a rim from the braid looks very strictly and elegant.


1. Draw your hair. Make a low non-native tail on the back of the head, secure it with a rubber band. Divide the hair over a rubber band and thread inside the tip ends slit.


2. Divide the tail into two equal parts. From each part, gluing on a simple pigtail.


3. Wrap the pigtails around the base of the tail, which now has the appearance of the beam.


4. Koshets fasten with studs and invisible. Make sure the tips of the braids were well hidden.
Swiss braid

Swiss braid woves with assistant attraction.


1. Draw your hair. Make a low tail on the back.


2. Divide the tail into three parts and from each twist harness, ask the assistant to hold them.


3. From the harnesses gossip the simple braid. It will look more magnificent and voluminous than ordinary braid.
Sacking beautiful braids for long hair lessons presented on this page will help even a beginner laying wizard. A variety of braids for long hair are considered in detail, the instructions are accompanied by photos.
"Weaving": weaving braids for long hair
To start weaving braids for long hair in the easiest style.

1. The person determines a clear oblique sample.

2. Then separate the hair from the ear to the ear and collect the tail on the back.

3. At the end of the probor on the right side, allocate three thin strands.

4. Start weave the most ordinary pigtail of three strands, but add only to the weaving every time on the left.

5. Weaving should fit tightly to the head.


7. At the face, make a turn in the form of a small loop.

8. Continue to weave our pigtail by adding new strands on the left.

9. Your weaving must reach the end of the probor.

10. At the end of the sample, also make a turn to the loop drawing and on the back of the head.

11. Continue to weave again towards the face, constantly adding strands on the left.

12. At the face we switch the pigtail and make a new turn-loop.

13. Continue to make weaving toward the back of the back.


15. This weaving creates the effect of retro waves in the style of a silent movie.

16. It is necessary to try to face at least three turns to the right - then the hairstyle will be exquisite.

17. On the other hand, working in the same technique and remaining pigtails, consolidate the invisible to the base of the tail.

18. Tail Deliver into two equal parts, each of which twist in the harness.

19. Two lush and bulk harness should be obtained from the tail.

20. Place the harnesses in a circle and the resulting volume form fix with invisible.
"Femininity itself": brazen braid on long hair

Skip braid on long hair can be in a light feminine style.

1. At the face to highlight three small strands.

2. Start the usual weaving of three strands, constantly adding curls to it from above and below.

3. Weaving should be very soft and air - then this hairstyle will be easy to do.

4. In this technique, we switch the first pigtail - from the forehead to the nape.

5. It is necessary to penetrate all hair in the first braid to the end.

6. On the other hand, braid soft air braid in the same technique.

7. You can leave small free curls at the end of the second braids.

8. Hands to give braids an extra volume, sacrificing them with your fingers along the entire length.

9. The basis of your hairstyles is two magnificent volumetric braids.

10. Collect the braids into the hairstyle. Initially, secure the rugged strap on the left

11. Then the left braid fix the right.

12. Pay attention to strands at the face: they should be soft and create a romantic image.
"In the best traditions": hairstyles with oblique hair

Hairstyles with oblique long hair "in the best traditions"Make the most expressive and emphasize their beauty.

1. This hairstyle fits girls with very long hair.

2. In the person you can leave several lungs strands, and all hair must be assembled into one low tight tail.


4. Start working with the first part. It must be divided in half.

5. At the edges on the left and right sides, highlight small strands.

6. The left extreme strand goes into the right hand.

7. And the right extreme strand goes into the left hand.

8. begins beautiful drawing Of the four strands.

9. In this technique, we switch all hair to the end.

10. There should be a beautiful pigtail, which is often called a "fishe tail".

11. From the tail you received four volumetric and soft braids.

12. Every braid need to disassemble to the fingers to give it a pomp and lace pattern.

13. Thanks to this reception, the volume of Kos must increase significantly.

14. Four beautiful lace braids are the basis of our future hairstyles.

fifteen . Place the first braid from above in the form of a rim.

16. The resulting element is fixed by invisible.

17. Stay the second braid in a circle with the right to left.

18. The third braid is also in a circle, but from left to right.

19. Cock the fourth braid and lay the hairstyle into the center.

20. The resulting element resembling a flower, adjust the hands and be sure to fix invisible.
"Folk style": evening braids for long hair


1. et. evening braids For long hair in a folk style of four strands can be performed on very long strands.

2. All hair is collected in one tight tail. It can be located where you want.

3. Tail divide into four equal parts.

4. The first strand we throw onto the second.

5. Then we skip under the third strand.

6. Now I'll throw the first strand to the fourth.

7. The new strand passes from the left side to the right.

8. Two strands on the right to cross each other.

9. Of the four strands, such a beautiful drawing should turn out.

10. To show all the beauty of the hair, you do not need to make weaving very tight.

11. It is necessary to penetrate all hair to the end and fix the hair band.

12 . That beautiful weaving Maybe already independent success, which is complemented by bangs or free curls by the face.
"Magic Lace" - braids for long hair stages: pictures


1. From the total mass of the hair, we allocate a wide strand, process it with glitter or butter for elasticity.

2. Selected strand divide on 11 equal parts.

(132
person. already rated)
If you are tired of a monotonous pigtail, but you do not like wears loose hair and want to somehow diversify your everyday image, we will help you in this. You are the owner of medium or long hair and love pigtails, then this article is for you. Also, you can use these schemes to make the hairstyle of your daughter or younger sister.
Also, some of the presented hairstyles are quite suitable for evening exit.
We offer you a weaving schemes of various braids from the simplest to more complex. You can braid your hair yourself or ask someone about help.
Let's start with the simplest.
How to braid the usual braid of three strands.
1. French braid or spikelet.
Steel spikelets as an ordinary braid, only one thin strand is woven into each strand. Turn the hair back. Separate two thin smooth strands from the temples and overstead them. Then separate the third thin strand, it is inspired into her taken with a temple thin strand, etc.
There are many variations of hairstyles from spikes.

Another variety of spikes is the "bottom" spikelet. Weaving such a braid begins from the top of the top. So you can visually increase the length of the spit.
2. Hairstyle waterfall from pigtails.
The basis of this hairstyle is also French braid, only slightly changed.
And one more option is a waterfall from pigtails.

3. Spikelets on the contrary or Dutch braid.
This braid is brazed by type of spikes, but on the contrary, i.e. strands are injected at the bottom of the spit.
Two braids woven in one will be very impressive.
4. Spit "Fish Tail.
You can see video: How to braid a braid "Fish Tail".
It differs from the usual spit because the hair is divided into two parts, small thin strands are separated and intertwined each other.

Variations of fish tail.
French fishe tail.
Spit from nodules.
Now all sorts of braids from the nodules are very popular. You don't need to braid such braids, they need to be tied so to speak.

5. How to braid a wreath of braids.
6. Kosichka Zhgut
Easy to fulfill braid. Hair is divided into two equal strands, twisted in the harness, and then these two harnesses intertwined among themselves.

7. Maspet flower
Braid one or two braids. Each weave from the left side to pull out and tighten the pigtail into the flower.

8.Kosa from four strands. Weaving scheme.


IN long Voloch - Women's charm. But constantly walking with loose hair - uncomfortable, with a tail - annoying. Spit is one of the most universal, feminine and comfortable hairstyles. How to heat the braid itself, is it possible to do it beautiful and neatly? Sure.
How to master weaving braids yourself?
With regard to weaving, it is much clearer than the schemes and pictures, as you will see your hands and hair in motion. First, look at the roller once or twice, then start repeating the same actions by stopping and viewing again.
We train
Do not worry if you get nothing from the first time. The weaving process affects the muscle memory of the hands, and the more you exercise, the better you will have to get. At first, the Spit may turn out to be uneven, with protruding strands, then everything is better and smaller, and for the twentieth time you will see how the hands ourselves did the beautiful and smooth braid, while you thought about something.


What you need in order to heat the braid itself
- Mirror. In fact, you will need two mirrors opposite each other, or a trumulous with side turning flaps. It is necessary to see your head.
- Chair with a back. At first you will be hard to keep your arms and your back in an uncomfortable position, the hands will be tired. Sit on the chair, throw back to the back, it will be much easier for you.
- Means for laying, hair polish, comb, rubber bands, hairpins, studs.

The easiest way to weaving pigtails
- Apply a means for laying and expect them back.
- Collect your hair and divide them into three equal parts.
- Right hand capture the left strand and impose it on the middle. Hold the middle strand of free hand. Right strand impose on the left and capture it with your left hand. Then continue to weave the braid, overlapping the middle strand from above the central and giving it right handAnd put the right strand over the central and give your left hand.
- Hold the strands of the index and middle fingers, and pleading with large and index fingers.
- Secure the braid with a rubber band or ribbon.

How to braid a pigtail harness myself
Harness to brake very easy and simple:
- drop your hair and collect in a high tail;
- divide it into two equal strands, each twist in the harness in one direction;
- bind both harness among themselves;
- fasten fine rubber band.


How to braid a French pigtail yourself
This option hairstyles look very gently and beautifully on long and medium length hair. It's not very easy to weave it, it will be necessary to practice several times:
- apply a hair product, spread your hair back;
- on the top of the paint strand and divide it into three parts;
- pleerate as an ordinary braid by adding thin strands on the right. Take strands the same in thickness, then the braid will be neat;
- at the bottom end weaving the usual oblique or you can immediately fix with a rubber band, leaving the tail;
- fix the braid varnish.


How to braid a pigtail a fishe tail
- Drop your hair, divide them into two equal parts.
- From each part, take very thin strands and goss out into the braid. The thinner you take strands, the more interesting you will get a braid.
- Fasten with rubber band or hairpin, fix the hairpiece.


Outdoor French braid itself
To add your hairstyle volume you can heat the inverse French braid. Her difference from the classic French braid is that the straight should be spoiled from top, and below, putting one to another. Thus, it turns out that braid woves out:
- apply a hair product, spread them;
- separate part of the hair at the face, divide into three strands;
- make a braid, crowded right and left strands below the central;
- finish the usual oblique, fasten the rubber band;
- gently stretch strands with hands, making them volume more;
- fix the braid varnish.


Weaving There is a lot and if you wish, you can master them to make the most festive and casual hairstyles and weaving. Weaving itself is a little more difficult than weaving on other people's hair. The difference is only in the formulation of the hands and the inability to see their heads. But if you simply train your hands, the muscle memory will work, and the weaving process will be brought to automatism. You can always look original and feminine.