Hairstyles based on weaving braids, always look stylish, fashionable and at the same time feminine. If you look at the girls who go with such hairstyles, it seems that they are all professional hairdressers, because it is very difficult to make such a hairstyle. But today we will show you step-by-step lessonshow to learn to weave beautiful mosiches At home, with such arsenal, you can make a new hairstyle every day. Of course, the first time it will not work as in the picture, but the step-by-step photos will help us in this, because living photos will give a complete picture of the details of the process of creating hairstyles, and about the finished result.
Best of all weaving Kos looks on long hair, but also on hair middle length You can make a lot different breeding.
Spit with tail on medium and long hair
Weaving braids with tail is obtained more voluminous, light and playful. Interesting and unusual weavings are obtained using rubber bands, we offer you the most successful options:
Weaving braids "Fish Tail"
The fish tail at first glance seems quite complex weaving, but this is not the case, the braid woves from all of the two strands and fast enough. The hair is divided into two parts, then a small strand is pulled out of one part and is transferred to the next part, the same is done on the other side. Strands should be thin to give the pattern beautiful view. Such a hairstyle is easily held all day and keeps the form, does not delay too hair, suitable for different types Hair, but it is best to see the pattern on straight hair.
So that the hairstyle turned out more magnificent and volumetric, hairdressers advise to handle the hair from the roots of forceps-corrugation. Separate the strands of the most convenientness of the Mizinz's nail, pick up the hair by the same finger, and all the others at this time fix the braid.
The scheme of weaving fish tail is very simple, but from the first time, the hairstyle may not work, some are tired of the hands, others can not be separated by smooth strands, long hair Stunned when weaving.
Video: How to braid fish tail
French braid
French Spit is the most simple braid and it is the basis of many hairstyles, allows you to fantasize and invent new weaving and images to create the most beautiful hairstyles.
The French braid can weave directly or macash, you can braid two or more French braids on your head and a lot more. Higher variety of her types allows you to create a unique stylish image.
French braid of three strands on the principle of the usual three permanent braid is woven, only throughout the head, it is frightened and adding new strands to the braid.
I suggest watch a video on the weaving of the French Spit.
The inverse French braid has become very popular lately, and it is not surprising, it looks stylish, unusual and original, and it woves a little more complicated classic, that is, she woves as a classic, but not outside, but down. Low on video, everything is shown in detail:
Clamp combinations with a beam and tail
If you connect the braid with a bundle or tail, then get a hairstyle and feast and into the world))) such combinations perfectly complement each other, here, the more you connect your fantasy, the better.
Schemes of weaving different braids on long hair
Perhaps you will be easier to understand weaving if you look according to the scheme in which it is shown as what and what is intertwined:


As you can see creating such beautiful weaving Not so difficult, learn, experiment, create new hairstyle every day!
Learning the braid braid on long hair can be literally in a couple of evenings, but this is exactly the hairstyle that will decorate any girl regardless of age and style.
By the way, hairstyles from Kos are very fashionable, so it is worth spending some time on training. And if you already know how to braid braids, then just examine a few new ways and please yourself with a beautiful and spectacular hairstyle more often!
Before starting to any manipulations with hair, it is better to prepare them better - so you can be sure that it will be really easy to make a hairstyle, and the result will please you.
- Hair must be clean and thoroughly cleaned. If you know that the hair is not too obedient and it is hard to put them, then you can try to turn the braids when the hair is still a little wet after washing.
- Why do you get perfect in hairdressers? Because professionals use styling! You will be surprised when you find out that many women did not even think about conspiring braid by laying means.
The fact is that most often the braids for each girl are the memory of childhood, and in our childhood Nobody used to use special stacked means when braid to the child to school. But, on the other hand, now, the time is different, and the range of hair care products is completely different.
Do not stay in the Stone Age, purchase gloss fluid, spray to facilitate combing and other means to help you maintain a hairstyle beautiful.
- Have a necessary arsenal at hand - first, combs. In order to make a truly beautiful braid, a hairdresser can use up to six different combs! All sorts of ridges and brash, brushes and tizers - to braid was really unique.
Take into service this trick and learn how to enjoy different types of comb.
- How will you fix your laying? It can be ordinary gum and special, different grinding and hairpins, clamps and tapes. You should not stop on simple rubber bands - choose several options that will emphasize your hairstyle.
Long hair
Weaving braid on long hair is real art, because the hair length allows not easy to depict two school braids, but make a complex multifaceted hairstyle. It may be familiar to all spikelets, braided with great skill, but you can choose something more than more.
Look at the photo of beautiful braids and, to understand how you want to look.
Perhaps the first time you will need a step-by-step instruction.
Volumetric Spit "Fish Tail"
This option hairously suitable Absolutely to all girls without exception, even if it seems to you that you do not have enough hair lips to such an option - still try.
To brake such a braid - the matter of several minutes, you will spend a couple of minutes to give a brace is really a chic look, and you can admire the result.

To heat the bulk braid "Fish Tail" for long hair, follow the instructions.
- Well-tail your hair, if necessary, sprinkle them with sprays to facilitate combing and disperse direct or oblique sample. Do not make a complex curly sample, the braid itself is an ornament.
- Hair must calmly make her head, covering her ears - you should not start strands for your ears, it is not always appropriate and beautiful.
- Divide the entire bulk amount of hair into two parts and turn slightly.
- Alternately, separate a small strand from each part and throw on the other side.
- You do not need to try to make strands of one thickness - the braids, who whipped "theft" appear very cute.
- Uponate the braid to almost completely and fix it is not too big elastic.
- Arm yourself with a thin comb ("tail") and starting from the base of the spit slightly pull the loops. Remember, you do not need to completely remove them, you just need to add a little volume and make a braid more interesting.
- Fix strands to any stacked means that usually use - in my case it is usually a powder for laying.
- Enjoy the result!
Hairstyle with weaving and pigtails
Beautiful braids in a hairstyle on long hair look charmingly, not always the girl understands how to heat the braid in this way. Most often to create a geometric hairstyle - as in the photo - the presence of another person will need, whose actions you will lead.

But there are some secrets. For example, if you look at, it becomes clear that after a few workouts you will be quite able to repeat both on your head.
Learn to weave the main types of Kos - with the right and without. Find out if you can neatly turn the braid to 4, 7 or more elements on the back of the head, without deviating from the center. Also try to braid "waterfall" several times - so you will understand how to make hairstyles with braids on medium hair, with weaving and free elements.

For example, in the photo weaving smooth braids with cross-elements, it's not so difficult, if immediately, starting from the top to separate the smooth strands of the pseudo-laying, consolidate each spin "clarification" and then, slightly fixing along the entire length of the strand of any stacking agent, assemble on the head "Grid »", Turning free ends on both sides.
Medium hair length
Beautiful interesting braids on medium hair are in different styles, so you choose something specific for a specific image that you want to create.
For example, complex structures from thin braids invariably resemble the eastern beauties, and figure braids to the average blonde hairMixed around the head will turn any European beauty in a sequence of the famous Ukrainian political actor.
It is very interesting to look beautiful braids in a hairstyle for medium hair, when the tips of the hair are curled (or curled away from nature) - Be sure to emphasize this, leaving the maximum number of free curls.
If you do not know how to braid a beautiful braid, you may need to watch the weaving of the beautiful bracket - most often step by step guide Contains detailed photos by which you can figure out how to braid beautiful braids for long and medium hair.
Learning to braid different braids
Check out the photo of weaving braid and various braid schemes, so you can understand how you can peel your hair with an adult woman and a little girl.
You can also see the master class for quick weaving braids or master the weaving of a beautiful braid with a ribbon.
Beautiful long hair is the pride of any girl. A set of standard laying on long hair is very limited, and very long hair is uncomfortable to wear outs. Spit come to revenue. Weaving a variety of braids are easy to learn.
The main advantage of hairstyles with braids is a variety. Depending on the weaving and decorations of the Spit, it will be appropriate in business style And for chic festive styling. Properly chosen braids are suitable for any type of hair, even thin. Hairstyle with braids will give the appearance of diversity and well-groomed.
However, trichologists prevent that with weakened and inclined hair, it is not recommended to wear tight braids.
Some braids are quite complex for execution, so you need to count in advance, whether time is enough for the conceived hairstyle.
How to pick up a hairstyle with braids to the form of a face?
The form of a person is divided into the following main types: round, oval, triangular, square, rectangular. Properly selected hairstyle with braids will help to hide disadvantages and emphasize the winning sides of the appearance. 
Braid
To make spit easily and beautifully looked, the hair must be pre-combing, if necessary, apply a means for laying. For some types of weaving, a comb with a subtle sharp end for the separation of strands will be required, for fixing - invisible, silicone gum, studs.
Russian spit
Russian Spit is the simplest and at the same time the most spectacular type of weaving on long hair. It was the braid that was always a symbol of maiden beauty and female strength.

To perform braids, hair should be divided into three equal shares. Further, the side strands take turns are thrown over the middle. Spit can weave, tightening tightening from the nape, a beautiful youth hairstyle turns out if you comb your hair to braid out and freeze.
Spikelet or french braid
Spikelets are often called the French scythe. Kosh can be performed independently. Hair must be bothering back, at the base of the forehead is highlighting a strand of medium size. The strand is divided into three equal shares. 

The strands are intertwined as an ordinary braid, but at the same time, with each return to side strands, strands are added from the remaining unused side hair. Weaving continues while all free strands will not be in the spit. The remaining free hair is brazed into the usual braid.
Greek braid
This hairstyle combines the technique of spikelets on long hair and the usual braid.


First, the hair needs to be divided by direct or side verses. One part of the hair is needed to penetrate from the remaining hair to separate a little strand and divide it into three shares.
To start weaving, we need to weave several opposites of the usual three-stroke braids, then add strands from free hair, then the usual braid again.
When the braid went around the head, from the remaining hair you need to weave the usual braid. Circular Greek Spit woves in the form of a crown from temple to a temple.
The main difference between the Greek Spit from the French is that when weaving spikes, the strands are added at each opposition, and in greek spit Several ships need to do not every time. So that the weaving looked beautiful, the braid should not be tight.
Reverse french weaving
The opposite French weaving looks very impressive. Weaving begins as a standard spikelet: you need to comb your hair back and divided into three parts dedicated at the base of the forehead. 
Weaving differs from the usual in that when weaving spikes, strands each time they are thrown on top of each other, and when weaving the reverse braid, the strands are carried out under average. The rest of the equipment is the same: with each new return to the side strands, additional strands are added from free hair.
Fish tail
Sometimes it is precisely this weaving called "spikelets". For braids are not suitable curly hair.


It is necessary to divide the hair in half, then from the outside of one of the half, for example, the left, the thin strand is separated, is thrown over to the middle of this half in the middle and combines with the right half.
Now the same thin strand is separated from the outside of the right half, is transferred to the middle and unites with the left half. According to the same scheme, weaving continues until the Spit is ready. The result is fixed with rubber bands. To make a braid look neat, you need to separate the subtle spars of the same thickness.
Waterfall
Spit waterfall, she is a cascade braid - this is a combination of weaving and loose long hair. Weaving always begins on a temple from any convenient side. Separate three small strands and start weave the standard spikelet. 
After the first intersection of strands, the bottom strand needs to be released and leave freely hang. To continue weaving on three strands, you need to separate the strands from above, to make another turn and leave the lower strand again.
Spit-waterfall can be placed in a straight line around the head, lower it to the backbone, and you can also start weaving on both sides and connect both parts from the back. It is not necessary to join the waterfall all hair.
At any time, the waterfall can be continued as an ordinary braid. Having finished the weaving of the waterfall, it is necessary to consolidate the braid invisible, so that the weaving does not crumble. If the remaining hair is scored, then pretty haircut It becomes a festive.
Spit from 4 strands on long hair
Spit from 4 strands looks unusual and fit into any style. Hair must be divided into 4 equal parts. Extreme right strand threw strand to the second right, as if the usual Russian braid was woven. 

But then the work strand is carried out under the next strand and becomes second on the left. Then the extreme left strand is thrown on top to the second strand on the left and is carried out under the next strand. Weaving continues by the same scheme.
Spit Twist
This original braid does not require any weaving. In fact, this is a hairstyle turned tail, repeated several times. For hairstyles, small silicone gum will be required. Hair is combeding the side and pick up silicone rubber band. Hair above gum is separated in half. 
Through the resulting hole, the tail is made and pulls out. It turned out the first twist. Then the hair again picked up with a rubber band slightly lower, the tail is again rolled through the hole, the second twist is obtained. Weaving continues, while there is enough hair. The twists above need to pull a little to look the braid.
Spit from Zhgutikov
Spit from flashers is well suited as a business hairstyle. The hair is collected in a high tail and are divided into two equal parts. Each of the parts you need to be tied to the harness, for example, counterclockwise. The resulting harnesses are woven among themselves, the result is fixed with rubber band or hairpin.
Also, the braid from flashers can be braked in the technique of spikelets. In this case, the initial strand must be divided into two parts, each twist in the harness. When weaving, added strands should be combined with existing harness, spinning them into the main harnesses. Free hair is drawn up at will.
Snake
Also, such a hairstyle is called Spit Zig-knocked. Weaving braids need to start on the side. The temple separates the strand, divided into three shares.  Standard French weaving is performed, but with some features:
- Spit is directed not down to the back of the head, but to another temple;
- Side strands picked up only on top;
- Lower strands remain free. They will need further.
By bringing a braid to another temple, weaving need to deploy and continue in the opposite direction. Side strands are added only from above. Weaving need to continue until free strands are completed. The remaining hair is braid into the braid.
It looks very beautiful, a snake, made in the technique of reverse french weaving. Flowers and beautiful accessories will turn the snake in the festive laying.
Tail with oblique hair
The combination of tail with oblique gives a scope for a fantasy. You can braid one or more spikelets until the middle of the nape and then collect your hair in a high tail. You can, on the contrary, collect your hair into the tail and braid any of the described braids or even a few.
Malwinka
Simple hairstyle Gives incredible opportunities for fantasy. Front and side strands are combed back and fix with silicone rubber band or invisible. 
At the same time, they can be twisted into flagellas or rub simple braids by connecting them together. Next, the already united rear strand can be stored by any method specified above.
Shell
Finished hairstyle really resembles a seashell. There are two main variants of braid weaving. In the first case, the French braid from the temple is diagonally down, while the side strands are grapped only from above. Having finished the diagonal, you need to continue to weave the usual braid and fix it with a rubber band. 
Then a little lower than the first braid need to braid another in the same direction from the temple diagonally down. Additional strands are woven only from above. As a result, there should be no loose hair.
The lower braid is twisted into the beam, the top is twisted around it. A bundle is fixed with studs. The second version of the Spit Shell is a weaving of one French braid diagonally from the temple down to the back of the head and then at the bottom of the head, so that the soft arc is turned out.
Side strands picked up only on the one hand, there should be no loose hair. Next you need to braid your hair into the braid and wrap it in a circle to get a shell. The hairstyle looks very beautiful if the spit is performed in the technique of return weaving or as a braid "Fish Tail".
Crown
So that the crown succeeds, you need to perform weaving on long hair. Beautiful styling It turns out only if the braid can be wrapped around the head. Spit is performed in the technique of spikelets from the base of the neck in a circle. Hair is divided into two equal parts. 
One part is assigned to the worker, weaving begins with it. At the base of the neck, the strand is separated and divided into three parts. The spikelet woves along the hair growth line towards the forehead. Starting from the middle of the forehead, you need to continue weaving down to the back of the head, using the second part of the hair.
If the hair is long enough, then you can continue to weave the braid on and also wrap it around the head over the main one. If the spit ended on the back of the head, then it must be fixed with elastic and invisible.
Bubble braid
Two tapes will be required for bubble braids. Hair must be tied in the tail and divide it into two parts. Ribbons tie so that one is between half of the tail, and the second to the left of the hair. This tape will be a working and taking the selected strands and a central tape.
 Weaving bubble braids for long and beautiful hair
 Weaving is performed as follows: The working tape is carried out under two strands of the hair and above the central tape. Then the tape is carried out above the strands and under the central tape. Further weaving continues according to the same scheme.
The central tape and the position strands do not change. Every 4-5 blankets, the side strands should be fluffy, giving the spacing volume. Such weaving requires skill.
Openwork braid out of 5 strands
Hair must be divided into five equal shares. Weaving begins from left to right. The very left strand is thrown on top of the neighbor, then a middle strand is thrown on it. 

In fact, one turn of three permanent braids is made. Then the right strand is thrown on top of the neighboring, a middle strand is thrown on it. Weaving continues on the same scheme.
Square braid
Hair must be divided into three equal parts. Left strand is additionally divided into half.  The average strand is carried out between half the left strands, then the halves must be combined, the left strand becomes average. Then the right strand is divided into pressure, the median strand is carried out between halves right. Weaving continues on the same scheme.
Combination of beams and braids in hairstyle
Bundles and braids are perfectly combined in the hairstyle. Especially good bundle is combined with french weavingWhen the remaining hair is brazed into the braid and challenges or immediately challenge into the bundle. 
The bunch of pre-curled curls decorated with beautiful studs, flowers and ribbons is a beautiful evening hairstyle.
Evening hairstyles with weaving
Rose
Rosile can be made from the whole mass of hair or separate a small strand to make a separate decoration. To retrieve the rose, you need to separate the necessary strand and, separating it into three parts, weave the usual three-shield braid. 
During the weaving on one side of the braid, it is necessary to pull the loops that should decrease to the end of the spit. Then the spit is folded in the form of a flower so that the stretched loops are from the outside, and is fixed with decorative studs.
A heart
Hair needs to be divided into two parts by direct surge. One part challenges, on the second, the braid is performed by French weaving on an arc from the macushkin to the temple and then down to the back of the head. 
Side strands picked up only from above. Fixing the first braid, the same is symmetrically swam in the second half of the hair. It is important that the braids look mirror.
Triple waterfall
Spit waterfall is already described above. To perform a triple waterfall, you need to evan the braid waterfall from the temple around the head. Then the second braid waterfall begins on the same temple, while the lower strands remain free. 
The third braid waterfall again starts from the source temple and the bottom again strands remain free. Each of the brass is completed to the end. Free braids can be beautifully furnished and decorate with decorative studs.
Simple weaving for girls
Multilayer basket
There are many braid options called a basket. To protect the standard option, you need to highlight a little below the top of the hair part of the circle out of tighten them into the tight tail. 
Next, spikelets are braided from free hair so that the outer strands are completely captured, and the internal picked out of the tail. It is important to calculate that the hair is enough on the spikelet around the head. The remaining hair is brazed into the usual braid.
Spit-bows
To fulfill this hairstyle, a large hairpin will need. First you need to weave the usual spikelet in any direction. At the same time, it is necessary to leave a small strand from the braid. After the spit is fixed, you can start the formation of bows. To do this, in the first job you need to turn the stud round end to the side, where the strand is left. 
A small strand is separated, splashes with varnish, folded in half. The resulting loop is in the hairpin and put on to the finger. Next, the hairpin is drawn back together with a straight. Given the loop fixed with the finger, the bow is obtained. The remaining tail is stacked along the braid, the next strand will be covered. This will decorate every turn of the spikelet.
Cross-cross
This beautiful hairstyle is two spikes, braided towards each other. Hair is separated into two equal parts by direct vesary. Each of the parts is additionally divided by horizontally. Start weaving with one of the upper parts with a conventional spikelet from the temple to the back of the long diagonal.
Having reached the middle of the head, the braid must be fixed and just also to blame the spikelets on the other half. Then there are several ships of the ordinary braid, which must pass over the first, and the weaving continues down by the spiker using the lower quarter of the hair. The second braid rushes a spike from the remaining hair diagonally down.
This is how several basic weaving techniques open the broadest opportunities to diversify their everyday hairstyles, as well as create an unforgettable evening image.
Video Rollers: Long Hair Weaving
How to braid here such a beautiful braid on long hair. Video master class:
Weaving technique braid. 3 beautiful and fast hairstyles:
Kosy were an ancient way to lay hair, and to this day they have not lost their popularity. With the help of Kos, you can create a stylish image and add some highlight to it. Weaving hairstyles for long hair can be performed different waysWith the help of which it is possible to effectively and fashionably lay the chapel. Let's get acquainted which styling with weaving elements can be made.
Long hair spikelets
Very nice looks, made on long hair. In addition, it can become both everyday and festive laying option. Make it easier to do simple mappy Of the three strands, but more interestingly looks spikelers.
First you need to make a sample and divide the hair into three parts. Start tackling a classic braid from the top of the head. From one edge of the head, pick up an additional strand and pull it to the neighboring extreme. On the left side - to the left, and with the right - to the right. On the other hand, you also need to attract additional strand. Similarly, weave until the end of the head. Then you can leave the tail or continue to make a simple three-shield braid.
The champper from the spikelet is almost not knocked out and looks neat and luxurious. You can perform it from two sides, combining with tails. For the festive option, you can decorate the laying of beautiful hairpins.
Crown around the head
The crown is the perfect laying option in the summer, thanks to which you can remove long curls from the neck area. Good for everyday socks or romantic dates. Evening hairstyle You can decorate with hairpins with artificial colors.
Progress:

Such a hairstyle looks as if a pigtail braided on the head, which does not have no beginning.
Volumetric braids
The volumetric braid is a complex versa with a hairstyle consisting of several small braids, interestingly intertwined.
It can be done in this way:

Bundle with weaving
A bunch on a long hair is easily performed by classic weaving. Its feature is echoing brass and creating original wicker styling:
- Tie the hair into a high tail and divide into two parts for two braids.
- Sack two braids starting from ear.
- After that, throw a braid through the head and consolidate it.
Similarly, to do with the second oblique.
This hairstyle is good for girlfriends. And if there is a slightly frightened strands from the brand and reorganize with hairpins, the evening laying option will be.
And you can also make a bunch of braid harness:

Two horods on the heads of the head look good. They can be slightly fluffy and give an openwork, making the image unobtrusive and romantic.
Waterfall
Such a hairstyle looks particularly beautifully on the wavy or slightly curled long curb. It can be done in this way:
- Take a little chapels near the forehead and divide it into three strands.
- Make one binding, starting to braid a classic braid.
- To one of the strands add an additional part of the chapels or replace it, carefully releasing the first "wave".
- Continue to weave all over the scope.
 And you can stay in the center of the head and from another pitch to repeat the weaving. Or stopping near the ear and for the most part, leave a long hair freely free from behind. If desired, the waterfall can be combined with other types of braids.
The difference of this weaving from the French is that an additional strand joins one of the parts or replaces it, allowing the second to go down to the shoulders.
There is a scheme of weaving a bow to the "Waterfall" style. For this you just need to supplement another row of waterfall, but slightly lower. The curls ended with the initial waves are taken as picking up strands.
If experiments are planned with braid options, it is advisable to buy a set of thin imperceptible rubber bands. When dividing long hair on the same parts, it is necessary to use a comb with sharp tip.
Effective look different types Mopes combined into one hairstyle. To do this, it is necessary on the sides of the brands of spinning in one way, and reaching the pattern, to combine them and continue weaving completely differently. In the pigtails, you can climb colored ribbons or add a wire to give the hairstyle of the original form.
Thus, on long hair you can make all sorts of hairstyles with weaving, and decorating them decorative elements, Create a solemn laying option. So do not be afraid to experiment and delight yourself and surrounding the original laying with your own variants.
In the summer, circumstances oblige us not only to lie on the beach, but also go to work, walks and dates. If you can wear a light cool dress on the body, then the case is more complicated. Heat Air forces girls to seek not only stylish, but also quick ways to remove the hair. We offer 55 versions of hairstyles different stylethat you can
Spit
If you think that classic braid is too trite for a summer walk, we offer somewhat simple enough, but stylish optionsthat will become an excellent alternative to traditional hairstyle.Option 1
To begin with, make a sample on one side and start weave the braid from the opposite temple. Move diagonally, crowed strands from the crown and the forehead zones. As a result, you will get a stylish asymmetric and not at all hot summer hairstyle.Option 2.
This is a very simple and fast technique that will help slightly improve the classic braid. First of all, make not too tight tail of a thin inconspicuous elastic. Make over a rubber band in the hair the gap and the tail in it. Then, braid your hair into a braid any technique that you like. Thus, simple casual hairstyle Ready.
Option 3.
This hairstyle looks great on long hair. To begin with, tie up the side is not too tight tail. Make over a rubber band the gap and skip all your hair into it. To give the volume, relax a few strands. Slightly below, make another elastic band and repeat all actions again. The number of sections depends on
Option 4.
To get such a careless, but stylish braid, you need to wind your hair with light waves and make a nobody on the top. Then turn the braid any technique as you know. When braid is ready, pull it into different sidesto give volume. At the end, divide the hair into two parts, tie a nodule and secure invisible from the inside.
Option 5.
Separate each temple (above eyebrow) on one side strand. Take them into the braid. Grab next to each pigtail on the curl and secure them on the back of a rubber band or hairpin.Repeat the action, separating the strand near the ears. Make them in the pigtails, capture the adjacent curls and secure on the back of the head. The rest of the hair can be left lying or braid into the braid.

Option 6.
Cut the hair by making a side sample. Separate a strand near the ear and braid a pigtail with any technique. Do not braid too tight. The tip of the braid fasten the transparent elastic band. Loose strands from the braid so as to give them volume. Final barcode: splash your hair with varnish. The most successful this option will look at curly hair. If you have direct curls, spend a couple of minutes on the twist.
Option 7.
Make side sample. Separate strand at the probor and start to braid the braid, exciting hair framing the face. Use any technique. Having reached the neck, change the technique of braid weaving and pass the remaining hair into the main braid. Having finished weave, put on the rubber band on the tip of the braid. Free the strands, from which the hairstyle will seem lush. Finally, spray your hair with varnish.In the photo below you can see a combination of simple braids and a "fish tail". Looks very impressive.

Option 8.
A quick and simple version of the hairstyle with which even a first grader will cope with. Despite all the ease of weaving, the final result comes out that the surrounding extortion is unusually complex.So, divide the hair into three equal parts. From each part we turn in one spit, the ends of which are fixing with small rubber bands. Now we take one braid and turn it with a glomerulum. Barbs freamed by the bottom of the nape. We make tangles from the remaining braids.
This hairstyle has only one disadvantage: the True Rapunzel will have to tinker, turning its own curls. But the holders of the middle-length hair will cope with weaving in a matter of minutes.

Option 9.
Spit turned out to be unusually difficult, but in fact everything is very simple. Weaving technique is amazingly simple and with its help you will create a unique hairstyle in a couple of minutes.First level: Separate one strand you need a forehead and make a tail. So that the tips of the hair did not interfere with you work, wrap the tail on the top and secure it with a clip.
Second level: Capturing side curls, make a second tail. At the same time, a little retreat from the first tail. Now remove the clips. We divide the first tail on two halves, between which we spend the second tail. The tip of the second tail will turn upstairs and fasten the clips. The ends of the first tail are left below.
Third level: Capture strand just below, connect it with free ends (from the first tail). Making the third tail. We remove the clips, the tips of the second tail divide into two halves and skip the third tail between them. The third tail is brapping clips on the back of the head. The ends of the second tail are left below.
We repeat the actions as needed. After finishing to turn the braid, secure her tip with a rubber band. The queue of the last stroke: neatly release the strand, starting from the very first. The higher the strand, the more volume we give it. It is not necessary to braid hair to the end - the hairstyle will look gorgeous even with three levels.

If you are looking for an easy, but the original summer hairstyle, an unusual tail will become an excellent option for everyday life and for evening walk.
Option 1
To make such a hairstyle, first twist the hair at the ends. Tie a tail of a fine rubber band. Make a gap in your hair and thread the tail in it. If necessary, twist a little hair or divide the curls to your fingers to give them the volume.
Option 2.
For this hairstyle, hair should be smooth, so if necessary, use the alignment iphum. Then, divide the hair into two layers: upper and lower. Top Layer Hair Collect a thin elastic on the back of the head from either side of the head. From the bottom layer, the gossip of the braid in the opposite part. The thickness of the braid depends on your personal wishes. Wrap the tail gum with a pigtail and secure the tip of a small barn.
Option 3.
To create a more elegant tail, you will need a hair foam or wax. Make a smooth sample (center or on the side, as you go more) and collect your hair on one side. Apply foam on them and divide into two equal strands. And then just tie the knot twice in a row. Fix with a thin invisible rubber band right under the knot, and turn the hair tips slightly or make a light bulk.
Option 4.
To make such a stylish ponytailThat is perfect for any kind of summer events, you will need a fluff or iron, hair polish, invisible and a little time. To begin with, screw the hair at the ends. Then divide them into 4 parts: on the back of the head, on the top and on both sides of the temple, and tie the rubber bands so that they are not mixed with each other. Take your hair from the top and shoot a little from the inside, and then tighten the flagella and secure invisible. Repeat the same haired in the temples. When the hairstyle is ready, sprinkle it with varnish, for reliability.
Option 5.
Very romantic summer hairstyle. To make it, divide the hair into two parts through the probor. Move on both sides of the pigtails, which are converged from the temples on the back of the head. Tie them together with a fine rubber band. Then select a thin strand from the tail and braid a pigtail. Wrap it with elastic band and secure invisible from the inside. Tail snaps up a little or twisted the catch.
Option 6.
The horse tail is one of the most popular and universal trends in the world of hairstyles. This option is very fast and original. To begin with, screw the hair at the ends, and then divide them into two parts. From the hair on the painter, start weave the loose braid, all strands along the forehead line to open the face. The pigtail must end on the back of the head, and then lift the rest of the hair and collect them together with a fine gum. To hide the gum, you can wind up her hair strands and secure invisible from the inside.
Option 7.
Another light and fast wayHow to make an elegant horse tail. Cut the hair at the ends to make light waves. Then divide them into two parts. The hair on the painter is slightly drawn and highly tying fine rubber bands. You collect the rest of the hair slightly lower and also tie a rubber band. To create more volume at the top of the hairstyle, relax a few strands on the top.
Option 8.
This is a great way, as a few minutes to turn the usual tail in the original hairstyle. Tie all hair in the tail on the back of the back. Separate a small strand and wrap around the gum to hide it, and secure invisible from the inside. Then make another gum just below. Make a gap in the resulting sections and skip hair through it. Just below, make another elastic band and repeat the procedure. The number of sections directly depends on the length of your hair. So that the tips look natural, slightly twist them with a catch or iron.
Option 9.
Divide the hair on 3 strands (central and two side). Secure each strand of elastic, if you do a hairstyle yourself. So the hair will not be tangled. Roll the central strand into the harness and wrap it with a side tail on the right. From the left strand of separating one curl. Roll it into the harness and wrap the right tail. The remnants of the left strand also turn into the harness and turn the tail to them. Fix the hair with a rubber band.This hairstyle has several advantages. First, we need no need to observe a clear symmetry (non-uniform strands give a chaotic gloss). Secondly, the lack of probor allows you to disguise some defects: non-crushed roots, dandruff or too rare hair.

Hair rim from ... hair
This is the easiest and original way Replace ordinary bezel and remove the hair from the face on a hot day.Option 1
First divide the hair into two parts. Collect the hair on the back of the head of the elastic band so that they do not interfere, and proceed to strands at the front of the face. Make a sample from either side and start weave the braid, inlet in the forehead line in it. When "bezel" is ready, break the hair on the back of the back and enjoy the original hairstyle.Option 2.
Separate a small strand of hair in the area of \u200b\u200bthe neck and gossip the thin pigtail from it. Wrap it around the head and secure the invisible from the opposite side. Such a hairstyle looks great on curly hair.
Option 3.
Make a smooth sample and separate the two strands on both sides of the head. Glow the pigtails, not too tight, and tie at the ends of invisible rubber bands. Connect them between themselves on the back of the head and secure invisible.
Option 4.
Separating a strand in the bang area, making Nachi. Near the ear on the right separate one curl and form a flagery, twisting the hair from ourselves. Secure the tip with a transparent rubber band. Take the invisibility and secure the harness on the back of the head, closer to the left.We repeat the actions on the opposite side: we separate the eared strand; We form a flagery; Fix the tip of the rubber band. We bring the second flagellum under the first and fastening it invisible.

Hairstyle for 30 seconds
If the time is completely in the edge, and you hurry to the event where you need to be elegant - these options for you!
Option 4.
Divide your hair into three parts. The average must be more than the rest. We glue from it a bulk braid and turn the nodder using invisible or stud. The strand that is located on the left, roll up the harness and let around the node counterclockwise (below). The strand that remains to the right, wrap around the hairstyle clockwise (through the top). Secure invisible or sprinkle with varnish.
Option 5.
To make such a hairstyle, you need hair polish, invisible and a little time to practice. To begin with, wake your hair with your hands to get a good volume, and abundantly cover with varnish. Then collect hair together and wrap inside, forming a shell. Secure the hair invisible. You can leave a few free strands to give the hairstyle of exquisite negligence.
Option 6.
This is a very simple way to make a nodule on the back of the back. First of all, tie the tail and divide it into two equal strands. Each strand tighten the harness clockwise. Then start binding strands to each other (counterclockwise). Tie the harness at the end of the elastic band and turn it with a nodule on the back of the head, fastening the hairpins.
Option 7.
Tie on the head of the tail, not too high. Over a rubber band, make a gap and stretch your hair. Then, carefully roll up the tail of the shekushka and secure the hairpin or another accessory.
Option 8.
To make a bow of hair, you will need a fine rubber band, invisible and 1 minute of time. To begin with, make a nodule high on top and divide it into two parts. Pull the tail tip in the middle and secure the invisibility from behind. Such a hairstyle is also called the Bow in the style of Lady Gaga.
Option 9.
Creating this hairstyle will take longer than previous ones. You will need a foam "donut" and studs. Tie a high tail, put on it "donut" and one strands hide the hair under it, fixing with stiletto robes. At the end, the hairstyle can be decorate with a bow or other accessories.
Option 10.
Figured "donuts" look much more interesting than ordinary rounds, if you like the bunch of ballerinas. Such "donuts" can be bought in specialized stores or order online. Execution technique does not differ from classic options. Hair must be pushed for "donut".
Option 11.
Collect your hair in a horse tail high on the top of the top. Divide the tail into two halves, each wrapped by a flagella. Now turn the harnesses around the gum. We twist them tightly and in the opposite sides (left - right, right - left). Secure the hairstyle in the invisible and lock the lacquer.
Option 12.
Divide your hair into two halves. Take the first strand, separate the curl of the forehead. We twist the curl from ourselves, starting at the forehead and ending behind the ear. Tie the first tail low on the back of the head. Also we do from the second half of the hair. And now it remains to spin bagels. Ready!
Perhaps most easy way Saving in the summer from the heat and at the same time creating an exquisite hairstyle is a Greek bench.
Option 1
Put the Greek rim on the top and make small strands of the hair under the gum. You will have a wonderful hairstyle in just a few minutes.
Option 2.
This is a more complex example of how the Greek bezel can be used. For this hairstyle you need two rim. One point under the hair, and then make a nobody on the back of the head. The second is put on the top and wrap the strands to it. Voila!
"Malwinka"
One of the fastest and most pretty hairstyles familiar with us from the Small years, thanks to Malvina - the girl with blue hair. The main difference of this hairstyle: hair is dissolved, the upper strands of the boolean is high on the back of the head.Option 1
An excellent way to diversify the image, if your hair barely touch the shoulders.Separate strand over bangs and make a nobody. Under the strand put the roller and fix it. As a roller, you can use billwords on velcro. They are better to hold on her hair. We capture the side curls and (together with the prisoner) fasten them on the back of the elastic band. Using any delicate item, slightly pull the hair from above, giving them volume. A Chinese wand or ordinary stud is suitable. Pulling strands to fingers better on long hair, but not on short.

Option 2.
Separate one strands from each temple (above the ear) and secure them on the back of the elastic. By opposing a strand, we capture the curl, spending it above the tail and bring it for the first strand. We repeat from the opposite side: we capture the curl, spending over the tail and we will start up. Ends of all four curls connect with rubber band. It turns out a pretty heart.
Option 3.
Using hair weoning, tighten the tips on several side strands. Separate one strand on the top and make a scallop. To strand held, sprinkle her hair with a hairpiece. Setting the combed strand, sculpt the hair with a hairpin by making the "Malun". Ready!Excellent option is suitable for romantic date, hike in the theater and even for the wedding.

Option 4.
Grab a wide strand (from the forehead to the ear) for each temple. Secure strands on the back of the elastic band, masking it with a thin curmon. Chaotically, in any order, turn the pair of thin braids. For pooling blooming, you can cut the hair tips a bit.
Option 5.
Separate on the strand of each temple and make two flashes (turning strands from ourselves). Connect flagella on the back of the head, tolding them with a rubber band. From the loose tips of the harness, turn the pigtail by choosing your favorite technique. For example, Alya "Fish Tail".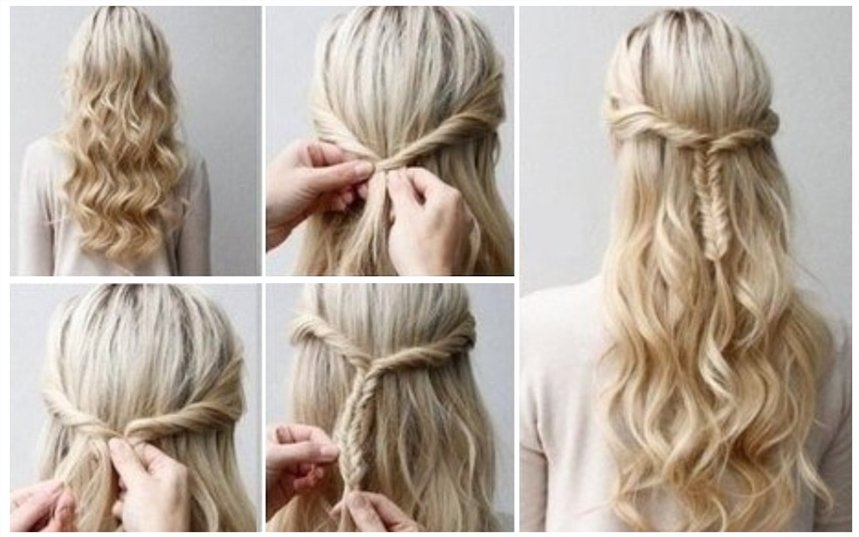
Accent on accessories
With the help of ribbons and scarves, you can even turn the most ordinary tail into the work of art. Someone will think that the hair with a scarf resemble a collective farm style. And I will be wrong! It is fashionable and beautiful - even hollywood stars Flag in branded scarves, skillfully tied to hair. In summer, scarf will save you from the scorching rays of the sun. He has other advantages: With the help of a well-stacked scarf, you can hide hair flaws that have grown roots, seeding or rare sample.Option 1
Run and disperse hair. Tie a node about the middle of the scarf. It may be an ordinary or decorative nodule - your taste. Put the scarf on the forehead (so that the node was a bit from the side). Tie a double knot on the back of the head and hide the scarf tips for the base of the fabric.
Option 2.
Love trendy images in pIN-AP style? Then this option will have to do you like.Divide your hair into two parts: rear (top and bottom) and front (forehead). Collect your hair from behind in a bundle you can pre-braid them in a spit, which will allow you to make hairstyle. Tear the hair in front of the harness, put the bagel and secure invisible. Latest barcode: Take the head with a pretty scarf or handkerchief.

Option 3.
Another excellent version of the image of the "PIN-AP girls". Make a long bang, separating strand over the center of the forehead. Collect the rest of the hair into one or more tails (whose tips are curled). The most important stage is the formation of bangs. It is a large bang that is one of the distinguishing features of this style. Having twisted the front strand on the curl. We attach it the desired shape and spray with varnish. For bangs, we say a bow of a small handkerchief in polka dot.
Option 4.
The popularity of the film "The Great Gatsby" again revived interest in the American culture of the 1920s. And, of course, this interest did not go around the fashion world. Ladies of that era, going to a party, gave preference to short hair, and long curls were removed under the catchy bezel. However, the bezel was put on short hair. In addition, the hair often curled. If you like to visit the clubs in the "mafia" or jazz bars, then retro-laying will have to be likewise. Let's look at one way to create such a hairstyle.Stash your hair side and put the glamorous rim. Take hair for the rim - a strand behind a spin. Voila! Owners short hair We advise you to smoke Lokono gel and (where without him?) To put the rim!

Among these hairstyles you are guaranteed to select a few