Frontline veterans who fought on the front lines were often reluctant to recall and talk about the hostilities. But an important place in their stories was always occupied by memories of happy day May 9, 1945. About great joy, the desire to live, love, create, which then captured all people; about the unprecedented general positive energy of this bright day. We reflect particles of this energy today in special posters and wall newspapers for Victory Day.
See what options for the design of festive wall newspapers your colleagues found, what wonderful drawings and collages they created. All publications in this section are illustrated with photographs.
Draw a holiday of great victory together with MAAM!
Contained in sections:Showing publications 1-10 of 547.
All sections | Victory Day. Wall newspapers and posters for May 9
As a final lesson on the topic weeks: "Animals of the North and South", I chose to prepare and decorate with the children wall newspaper on the topic... It was created throughout the week, each day working with children with material on the topic, thereby activating and supplementing knowledge about ...
 ... Our great and beloved country is preparing for a wonderful and large-scale holiday, May 9! We all honor the feats of our grandfathers! Telling children about the Great Victories our people over the fascist invaders. Every year a veteran of the Great Patriotic War comes to our children and ...
Victory Day. Wall newspapers and posters for May 9 - Wall newspaper "Hero of the Great Patriotic War"
Publication "Wall newspaper" Hero of the Great Patriotic ... "  Vera Voloshina (1919-1941, Soviet intelligence officer, Hero Russian Federation Vera was born on September 30, 1919 in the city of Kemerovo in the family of a miner and a teacher. She went in for sports at school: gymnastics and athletics. In high school she won the city championship in jumping ...
 Library of images "MAAM-pictures"
 As part of the implementation of the goals and objectives in the work on the Project "I will tell you about the war", in a group together with the children and the active participation of their parents, we decided to draw up a Book of Memory and Glory dedicated to those who defended our Motherland and returned home with Victory "Immortal Regiment ". Parents...
 Ilya Ehrenburg - In May 1945 "When she came to our city, We were at a loss. To wait so long, Catch every rustle with our souls And these volleys cannot be recognized. And there was so much previous torment, There was such a ball of nights and days, That even a tiny snowdrop bloom That morning could not. And only - I saw - ...
 This idea is aimed at creating creativity, on the development of imagination and aesthetic taste in children. To promote the upbringing of patriotic feelings in preschool children. To cultivate love, respect and gratitude to all defenders of the Motherland. Unfortunately, ...
Victory Day. Wall newspapers and posters for May 9 - Children's master class on creating a poster "To know and remember"
 We prepared this poster with the guys of the group for the 75th anniversary Great Victory in the Great Patriotic War as part of the implementation of the goals and objectives in the work on the long-term information and educational Project "I will tell you about the war." Material for the master class: ...
 Once the children went to sleep - The windows are all darkened. And we woke up at dawn - There is light in the windows - and there is no war! You can no longer say goodbye And not see off to the front - They will return from the front, We will wait for the heroes. Trenches will overgrow with grass At the sites of former battles. Better every year, ...
Victory Day is extremely significant holiday, celebrated annually in Russia on a large scale. They prepare for it very carefully at all levels. City streets, facades and interiors of buildings are necessarily decorated with flags and traditional symbols. Bright and colorful posters for May 9, printed or made by hand, are inserted into citylights, windows of shops, schools and office buildings. If you haven't decided exactly how to decorate your meeting room happy holiday victory, use our ideas and advice. They will help you to adequately prepare for a joyful day and create a warm, soulful and festive atmosphere at school, kindergarten or office center.
Posters for May 9: "Victory Day", "Remember ..." and others
For Victory Day, you can pick up different thematic posters. A bright, catchy, optimistic version with a soldier-liberator will look great in a school classroom, student auditorium, a respectable office or a department of a large bank.
The poster, designed in light shades, looks very festive and spring-like. Victory symbolism in it is harmoniously combined with a bouquet of flowers, a wide St. George ribbon and flashes of fireworks.
The poster, which combines a black-and-white image framed with bright shades, symbolizing the victory banner of Russia, looks relevant and attractive.
From May 9, it will be appropriate to decorate the premises with modern cool and funny posters kindergarten, school classrooms where primary grades study and a festive assembly hall.

DIY poster for May 9, how to make it right
Making a poster for May 9 with your own hands is not so difficult. You just need to be patient, not in a hurry, devote a certain amount of time to the process and put a piece of your soul into the business. Only in this case you will get a spectacular, bright and attractive product that reflects your personal attitude to the feat of veterans and the great holiday.
For comfortable work, you will need a Whatman sheet, a set of curly rulers, colored paper, scissors, gouache or felt-tip pens, scissors and a sharp stationery knife with a retractable blade. First, you need to choose a suitable drawing and determine its location on the poster. When this stage is passed, you can think about the title and accompanying text (poems, songs, congratulations, etc.). Traditional thematic symbols (eternal flame, orders and medals for valor and courage, carnations, St. George's ribbon, etc.) will become important additions to the layout. Preferred bright, saturated and rich colors. Dark, mourning shades are best avoided. The poster should look optimistic and inspire pride in the glorious feat performed by veterans during the war.
If you cannot draw a poster yourself, use ready-made templates. They can be colored to your liking or filled with thematic text and photos. To enhance the visual effect, it will not be superfluous to decorate the leaf with voluminous flowers from velvet or smooth paper different shades... They will give the poster an elegant and solemn look.
Poster templates for May 9, original and bright
Poster templates for May 9 are special blanks with a colored or monochrome background and traditional festive paraphernalia. You can place any text on them, print or write by hand poems on military topics, holiday greetings veterans, combatants and home front workers, couplets of victory songs, photographs or drawings.
The simplest version of the template is a bright red base, decorated on one side with the traditional symbols of the great holiday - a St. George ribbon, a scarlet five-pointed star and an obelisk of golden leaves.
The template with the victory symbols located at the bottom of the poster looks no less impressive and bright. The juicy red background is beautifully diluted by orange rays emanating from the main picture, symbolizing the sunrise over our free and strong Motherland.
The poster template for May 9 with a large and catchy central symbolic composition looks interesting and extraordinary. On the empty fields of light orange, located at the edges, you can place a large amount of text and complement it with thematic photos.
Those who do not know how to draw, but still want to create a holiday poster, will be helped out by a black and white outline template. It only needs to be colored with crayons or paints and provided with a catchy title.
Hello dear readers!
I don’t know about you, but in our school preparations have already begun for one of the most important holidays of the year - Victory Day. Many expected interesting events, including the contest of wall newspapers created by our own hands, in which we take part.
Our poster for May 9 is already ready, and for you in the course of work we made a master class on its production. I hope it will come in handy for someone.
So, working on a poster starts with choosing a theme. We had three pending:
Articles on these topics have already been written and posted on the blog under the heading "Projects". In general, we thought, we thought, and chose the theme "Hero Cities".

The basis for our poster is an A1 sheet of Whatman paper - this is the largest possible one. We also used in our work:
- sheets of plain white A4 paper;
- colored paper (black and orange);
- orange gouache;
- black marker;
- black tea bags;
- scissors, ruler, brush, pencil, glue.
Now we will show the work in stages.
In our opinion, a poster without a frame looks somehow unfinished. Therefore, we started with the frame. Colored paper black and orange were cut into strips 5 mm thick. They took one sheet of one and the other, there were enough strips, even the extra ones remained.

These strips were glued along the edge of the poster in the form of a St. George ribbon. Above left space for the title.

The title “Glory to the Hero Cities” was first written in pencil, then the letters were painted with gouache and outlined with a black marker.

The base is ready.
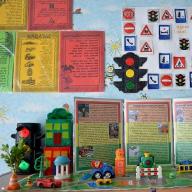
Let's move on to the inner content of the poster. There are 13 hero cities in total, and for each city we decided to make a separate leaflet with the name of the city, given short description the feat of the townspeople is a photograph of the times of the war.

Texts-photo-titles were typed in advance on a computer, and then printed on a regular printer in A5 format. If you are suddenly thinking of making such a poster, then at the end of the article I will post a link to download the document.
It would be possible, of course, to glue the leaves to the Whatman paper, and that's the end of it, but it's not so interesting. Therefore, we decided to age the leaves with cities. Make them look like old newspapers. We aged the paper with tea. The blog has about how to make the paper old, so I will not describe in detail here. I'll tell you briefly.

First, we cut off the edges of the leaves with our fingers, made them uneven. The main thing here is not to overdo it and not to tear off a piece of the text. So, neatly.

Then we crumpled the leaves.

Literally, they were first crumpled in fists, and then smoothed.

Then they dipped them into the tea leaves, held them for 15 minutes, pulled them out, dried them and ironed them with an iron. Thanks to this tea bathing, the leaves acquired the required "old" look.

Time to glue the sheets to the Whatman paper. You can post them as you like. We placed Moscow in the center, Smolensk and Kerch in the lower corners. These three sheets are glued to the Whatman paper completely, with their entire back surface.

And we glued the remaining 10 sheets diagonally, with a corner. The leaves bump into each other. Therefore, only the upper part of the sheet was smeared with glue. So that you can lift the top leaf and read what is written on the bottom. This design adds interactivity to the poster and makes it more attractive to children. Thanks a lot for the idea to our dad!

As decorative elements used stars, which were also first printed on paper and cut out. And then they glued it and outlined it with a red pencil. Although you could just draw them.

And the poster for Victory Day is ready!

The beauty of it is that it is fast, simple, unusual and informative.
And here is the link promised earlier to download the archive of files with hero cities and stars. Use it to your health!
Enjoy your creativity!
Do-it-yourself wall newspaper for May 9 is a good opportunity to give solemnity to the Victory Day. In this master class, we will make a wall newspaper "soldier's diary" with volumetric elements.
Necessary materials:
- whatman paper - 2 pieces of A1 and A2 format;
- colored paper or red cardboard - 2 sheets of A4;
- gouache - 6 or more colors;
- natural flat brushes (synthetics can also be used) - the largest available;
- hard pencil;
- grater;
- 1-2 tea bags;
- container for tea;
- acrylic glue with shimmer;
- glue in a paper sticker;
- foil, preferably with a paper base on one side;
- crepe (floristic) paper - 1 meter each green and red;
- st. George ribbon (optional, you can do it yourself);
- pre-war photo of the girl (you can use black and white printout);
- old newspaper;
- lighter;
- cotton clean rag;
- scissors;
- ruler;
- stationery knife;
- compasses (not necessary, you can use improvised items, for example, lids from dishes, etc.);
- sponge;
- blanks with military-themed poems or memoirs of soldiers of the Second World War.
Step-by-step instruction
We need to start by preparing the workplace: we need deskif it is large enough for Whatman A1 format or free floor space.
The first step will be making aged paper to simulate excerpts from a soldier's diary. To do this, brew strong tea, in the proportion of 300 ml for 2 tea bags. While the tea is cooling down, you can start marking the main Whatman paper.
We will place our A1 sheet on a table or floor. To outline the place for the diary from the area for creating inscriptions, we will attach Whatman A2 to our "base" and outline the borders.
With an indent of 10-15 centimeters from the top edge, we draw a place according to the inscription "Victory Day".
When the tea leaves have cooled down, you can start "aging" the drawing paper. Having spread sheet A2 on the table, we evenly distribute the tea leaves over the area in any convenient way, starting with a brush and ending with a sponge.
Please note that for a greater effect of "old age" paper must be pre-wrinkled. Also, to enhance the effect of tea, you can simply dip the entire Whatman paper into a container, but this must be done carefully so that when you remove the paper, it does not break or soften. Therefore, in order not to overdo it, it is enough to apply a strong tea leaves on top of the sheet. When the leaf has softened, we transfer it to dry on the balcony or to any dry place for half an hour.
We mark on colored paper the borders of the nine using a compass or, as shown in the photo, using an ordinary saucer.
With a clerical knife, cut out the number 9 along the outlined contour.
Note: it is better to put a piece of plywood or any other solid base under the paper so as not to cut through the table.
From the remaining sheet of red paper with scissors we cut out the base 7x20 cm for the word "May" along the previously outlined contour.
We put aside all the blanks for now and return to the military diary, which by this time has dried up a little. To give it a complete look, we use fire.
While the leaf is still not completely dry, exposure to a lighter will add yellowness around the edges. To make it look even more realistic, you can tear off the edges a little before firing. So the wall newspaper will look more voluminous. Result versus white paper:
Now you can start creating a symbol of peace - a clear sky. And for this we will use the blurring technique. Prepare blue and white gouache, a sponge, cotton rag and clean water in a jar. Please note that it is more convenient to apply gouache with a small brush over a large area, if before that it is diluted to an almost liquid mushy state.
The paint is applied to the drawing paper from top to bottom, from left to right, to create the effect of a graduated color.
When the drawing paper is completely covered with gouache, wait a few seconds for the paint to dry a little. Blurring is needed to give color uniformity, as gouache can often lay down with characteristic dark stripes. So, let's use a wet rag, as shown in the video:
When the sky base is ready, apply white clouds with a sponge. Note: The sponge should be dry, the paint should not be diluted, and the paper base should be wet. This will give the clouds a more abrupt and airy appearance.
Apply white color with light movements, distributing the clouds over the entire area of \u200b\u200bthe drawing paper.
To complete the sky, let's do a few final touches. In a circular motionUsing a sponge, add curls (counterclockwise) as shown below.
While the base of the wall newspaper is drying up, add a few entries to the soldier's diary. The page on the left symbolizes the beginning of the war - here we will place a poem or any other note of those times (you can use the memoirs of soldiers).
The right side symbolizes the victory and end of the war. After the entries are ready, we will stick a photo of the girl on the diary. If a printout is used, it can also be aged with tea. To do this, it is dipped for 2 seconds into a container with infusion, and then ironed with an iron for several seconds (first, you need to put a printout between two blank sheets or use a newspaper).
We glue the girl's photo on the diary using the glue in the sticker.
In the previously marked places on the pages of the diary, we make two holes with the help of a clerical knife. From a piece of foil 5x5 cm in size, we twist the element for binding the pages and thread it, twisting the loops from the bottom so that the foil does not slip out.
Making a stencil for the medal of glory (you can also use the printout). Using the finished stencil, cut out a star from 7x7 cm foil with a clerical knife.
Glue the star on the pages of the diary with acrylic glue. Since the base is already dry, you can glue all the blanks.
By May 9, the wall newspaper is done by hand for a long time, so the production of tulips can be simplified by observing only the external symbolism.
We need: crepe paper in both colors, scissors, glue and newspaper.
The first stage is the flower stems. We twist the newspaper from the corner, as shown in the photo
Important: the stem should be thin, as being thick it loses its flexibility. Glue the finished rolled newspaper around the edge.
Cut a thin strip of green crepe paper along the pattern 60 centimeters long. One strip is enough to wrap one stem. We apply glue to the beginning of the strip and glue it to the upper base of the stem.
Stretch the strip around newspaper tube in a spiral, as shown in the video
By analogy, we do the rest of the stems. When this stage is passed, we cut out leaves (5-6 pieces) 12-15 cm long and 4-6 cm wide. Glue them at the base of the stem.
Now let's move on to the petals. One tulip will need 6 petals - this is 9 strips of crepe paper 7x60 cm.We prepare the paper - cut 9 strips 7x60 cm, fold it in a pile and cut it in half - it turns out 18 sheets 7x30.
We form the petals as shown in the video.
We attach the finished petals to the stems with glue, 6 pieces for each, evenly distributing them around the perimeter. First, the first 3 are attached, then the rest, overlapping the joints between the previous petals.

When the tulips are ready, you can proceed to the final stage of our do-it-yourself wall newspaper.
The final part is writing the name of the holiday against the blue sky. So, let's draw the upper part, previously prepared for the inscription. In 1.5 cm increments, draw letters 5 cm long and 7.5 cm high with a pencil. 
Note: You can use a stencil or a regular printout to style the font in the typical pre-war style. Here the letters were applied by hand in the Cyrillic Real Truth font. (imitation of the wartime Pravda newspaper font).
After the gouache has dried, proceed to gluing the main elements of the wall newspaper. For more naturalness, a kink or bend can be added to tulip stems - a twisted newspaper base is flexible enough.
As a final touch, add a few drops of silver glitter acrylic glue to the tulip petals.
Congratulations on Victory Day can be different: beautiful poems, solemn speeches, touching postcards, cute handmade crafts. But there is also a special kind of congratulations on May 9, which has long become traditional on this day. It is about posters and wall newspapers, without which not a single Victory Day celebration takes place in schools and kindergartens. It might seem that today the May 9 poster looks like an outdated echo of the past. But actually in the posters, dedicated to victory, there is something that you will not find in any other kind of congratulations. This is a unique combination of clarity (photos of heroes, excerpts from front-line magazines, letters, etc.), gratitude (words of appreciation, touching verses) and creativity. In our article today, you will find several poster templates that we hope will inspire you to create your congratulations.

A beautiful poster for May 9 do it yourself - step by step instructions with a photo
This version of the Victory Day greeting poster is very simple to design. We will mainly use paints to create it. But if you want to add dimension to the poster, you can replace the drawn St. George ribbon with a real ribbon glued to the Whatman paper.

Necessary materials:
- whatman
- simple pencil
- eraser
- paints and brushes
- military photos

Do-it-yourself funny poster for May 9 "Victory Day" - step by step instructions
Our next version of the greeting poster for the technique of execution will resemble the first. There will also be pictures of the characters and hand-drawn congratulatory inscriptions. But besides that, we propose to make this poster for May 9 more informational and interesting by adding a list of hero cities and portraits of Heroes of the Soviet Union to it. And so that in the end the poster also turns out to be touching, let's not forget to place a beautiful poem on it.

Necessary materials:
- whatman
- pencils or paints
- simple pencil, eraser
- pVA glue
- photos
- colored paper (optional)
Step-by-step instructions for making a poster by May 9:
- The poster will consist of 5 zones, into which we mentally divide whatman paper. The middle of the poster will be the largest and most informative - it consists of 3 parts. The upper and lower zones will be smaller, about 1/5 of the width of the middle. To begin with, we display the inscription "May 9 - Victory Day!" On the sides of the inscription we draw St. George ribbons, rolled into traditional loops.

- Then, in the upper part of the middle zone, a frame denotes a place for a congratulatory poem. It can be decorated with paints or colored paper. We fill it with a beautiful verse.

- Below we make a similar rectangular zone for the names of hero cities. In total, 13 cities of the former Soviet Union were awarded this unique title: Brest Fortress, Moscow, Leningrad, Odessa, Kiev, Sevastopol, Volgograd, Murmansk, Kerch, Minsk, Tula, Smolensk, Novorossiysk.

- Now, to the right and left of the central part of the poster, place a photo of a military theme. For example, portraits of Heroes of the Soviet Union, acquaintances of veterans, grandfathers and grandmothers who went through the war.


- In conclusion, draw two Eternal Flames from below, St. George's ribbon and the inscription "Thank you". Original and informational poster for May 9 - ready! Photo 6