In kindergarten, the children are very sincerely rejoicing the transformations that occur in autumn in nature. And for the children of younger groups, the autumn leaves becomes a real event, because in his conscious life they see it for the first time.
Many kids try to raise the most beautiful leaves while walking, put them on or arrange a bouquet.
But in the room the leaves quickly lose the form, and their beauty, alas, it turns out to be short-lived. So you can offer the guys to arrange a bright autumn bouquet with their own hands for kindergartenUsing more durable materials.
Autumn Bouquet of Foamiran
As the basis of work you can take the most different material: cardboard, plasticine and even salty dough. But we propose to make an unusual craft, taking the foamed rubber as the basis, or, as it is also called decorative foam. This is a good, pleasant to the touch and sufficiently piercing the basis for creativity, and many children will be happy to meet her. And crafts from decorative foam look very beautiful and unusual, they retain their appeal to a long time.
Before making an autumn bouquet for kindergarten, you will need to prepare simple cardboard templates of leaves. You can print them on plain paper, and then translate to cardboard. We make templates of oak, maple and birch leaves.


We use chests of yellow, orange, green and red. Cut the drawn leaflets from rubber. Then to give leafs more natural color, paint them with acrylic paints or gouache. In some leaves, you can first paint the edges, then toned in the center, emphasizing the bodies. We try to reflect all the riot of paints in our work!

And now we make our leaves even more similar to real. To do this, we take our leaf and heat it a little on the iron. Then we take a small dry branch of the tree and apply it to the sheet.

The branch leaves his imprint on it. Ready!

Lay the leaflets to the side and turn plastic bottle in a vase. Just cut it at the right height.

We glue with bilateral tape branches to the bottle. We will have a real autumn vase.

Each paper cutter glue the wire and placing leaves in a vase. We complement this composition with cones, dry flowers and branches of dry.

Our work is over! We made a wonderful autumn bouquet for! Now the kids will be able to enjoy autumn beauty even in their group.

Autumn bouquet of candies with paints and pencils
A very beautiful bouquet of sweets can be made on school themes. For this, we harvest several chocolate chocolates and pushing them with wire. Then turn the corrugated paper by forming a bud. Fix glue.

Cut from green corrugated cardboard leaf stems. With the help of a tape pin them on the flower. We make several such floweries.

Take a piece of foam and cut it, trying to give a rounded shape. Wrap it with green corrugated paper.

Cut from white cardboard the shape of the palette. We glue a foam blank on it. Insert flowers to foam.

Insert pencils into foam and decorate a bouquet of scarlet ribbon. We take the lid from the juice and fill it with color plasticine. We must have a palette with paints, and on it a bouquet.

Autumn bouquet of maple roses
Chic autumn bouquet can be made of maple roses.

How to make such a bouquet Look at the video:
Maple roses can be decorated with an autumn composition for kindergarten or school.

Ecumenical choice gift ideas For any case and occasion. Surprise your friends and loved ones! ;)
Greetings, dear readers and visitors! I have repeatedly wrote that I love to decorate gifts with the most unexpected ways. And today I suggest you make flowers from paper with your own hands. Already twenty with excessive methods, by the way.
Now, unfortunately, before the mass packaging of gifts, I get rarely. Moreover, every year more and more familiar and friends appear, who must be congratulated on a series with relatives. It's very joyful! I love to give presents. But if I choose them very carefully, I pack the recently in the sachet of organza, because on the detailed packaging it is decided only for the holidays of single (like birthday).
However, the passion for my different kind of packaging beauty is difficult to win, so today together with you will train to make beautiful flowers in step-by-step schemes.
Paper flowers with their own hands: just with zadorinka
Master classes will be a bunch, get ready. Good news for all roses lovers: they will be as much as 4 pieces.
Aster
Guys, honestly, I am not very strong in the names of the colors. So if you see an explicit discrepancy for you - write in the comments.
So, the first to the queue of Astra. For her cut five more circles: two large, two medium and one is very small. Each circle fold in half three times, after which we place the edge as 4m photos. After deploying the design, each petal is squeezed to give volume. All circles fold each other and decorate the middle.
Almost calendula
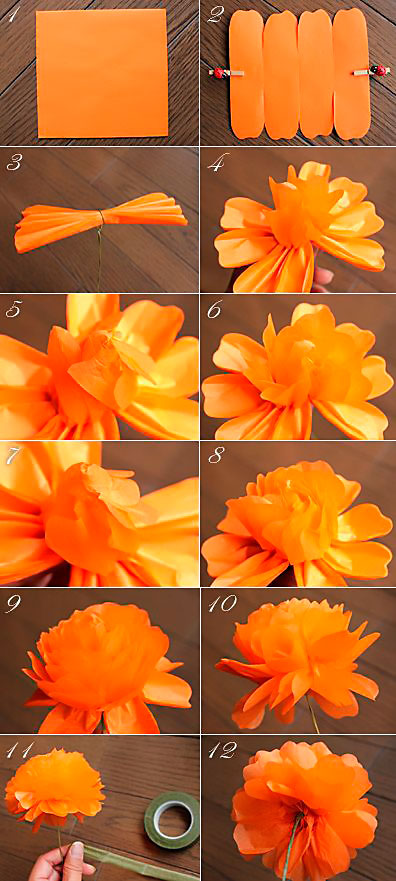
This flower is much more like a packaging bow. Prepare a square of the paper of the desired length for it and cut the edges according to the stage 2. There will be several such billets. Put them alone on the other and squeeze in the center, pulling the wire or thread.
Now the most important thing is to straighten the petals so that it turns out a beautiful similarity of the flower. Accordingly, the more layers, the greater the petals and the magnificent flower in the end.
Tip: Make some such flowers of different sizes and glue them to package next to each other, then it turns out a beautiful semblance of a bouquet.
Calla
To create calla, you can use both the usual double-sided paper and foamed rubber (here wrote what it is in the section about Mignon).
For Calla, take the launcher (you can sck out of paper go to make a polymer clay) and the petal made in the form of a heart. Tychinka to put in the petal, the edges of the petal turn over the stitch, gluing with each other. It remains only to unscrew the edges to get the maximum resemblance to Calla.
Such flowers are well suited for registration of postcards, and for packaging design, and as an independent gift in the form of a bouquet.

Bell
The master class for the bell is completely simple and understandable. Cut the workpiece according to the first photo. They glue the edges, and the tips gently straighten. So that the VTT looked naturally, make a middle of several oblong stamens that will need to incur inside the flower.
From such bells, by the way, it will be great to make the packaging decoration on March 8 or just spring birthday.

Lrangessi
Well, or something similar. For a single flower, take a long rectangle and remove the edges of it, as in the photo. Consider a wide part so that there are many small stripes. With the help of scissors, tighten the stripes (for this you only need to spend the sharp side of the scissors along these strips, slightly pressing the blade to them).
So that the flower does not fall apart, take the rod to wound the green strip. Then, on top, start gently twist the "floral" part, pre-missing glue. Lay the layers tightly so that the greens did not break out from them.
But it's not difficult to make green leaves at all - for them just fold the rectangle of green paper by the accordion and cut the edges of the "triangle". When you expand, you will get a variety of green leaves ready for gluing to the base.

Poppy
Now let go to the progress of corrugated paper. Cut about ten deteral-shaped petals from it. Stretch a wide part so that the billets resemble mushrooms.
Take a thin wire and wrap a lot of paper on it - it will be the heart. Screw the petals to this core so that each slightly overlap the previous one. When everything is ready, the design can be pulled down at the bottom so that it does not break.
In the master class, it is shown how this flower can be attached to the festive cap, but believe me, and on gift box Mac will look great.

Red flower
What is his species affiliation? No associations occurred to the head. But the essence is not in this - it will take about ten petals to create it (used by the word, corrugated paper). The form they have almost drowned. But with a cut end.
Cut out out tight cardboard Circle base. All the petals glue the layers to this circle, slightly leaning (somewhat? God, how correctly, then: _d) the base, thus forming folds - then the flower will be more voluminous and "fluffy". Center decorate some button or bead.
Such a flower, by the way, will look great from soft felt - So he will acquire durability. And if you attach the base for brooches behind the back, then you will get two in one - the decoration of the gift and the gift itself.

Farming of color
There are only two flower, but due to bright combinations it turns out a very unusual effect. Take the corrugated paper again, cut the circle and roll it in the form of "dolls". To him, do the "skirt", which wrap around the pupa. At the top of attaching the petals, gluing them in a circle. Based on the two wide leaves.
The second flower is completely simple - cut the fringe and twist into several layers. Flowers are very simple, it may turn out a very interesting gift composition.
Unprecedented flower
To prepare the foundation for this flower, I advise you to look here - here for the second Christmas tree the framework is created in the same way. But then the differences begin - each from the corners should be wrapped with a thick wire or needles so that the spiral turned out.
You can leave such a design one, but I suggest you to connect several (say, three) pieces with the help of the existing spirals - the Wow effect is provided further can also be experimenting - connect elements with spirals in unprecedented designs.
Tip: Are you going to a Japanese-style party? Then make such a flower of very large size and capture with you - it will serve as an excellent chandelier decoration.

Pion
"Pioo, Pioli, peonies give a new acquaintance ..." - words from the song of the underground group "My Michel" (Recently, I often listen to it, inspired). Mastery will be out corrugated paper. It will take five sizes of petals about five instances of each ( appearance As in the photo).
Petals stretch so that it turns out like a wave (both for large and small). Then, from the same corrugated paper, form a tuchink by folding paper with further seal. You can do it on a wire skewer, but without it.
Stick the petals on the finished tuchink, overlapping each subsequent previous one. Do not tighten the petal too much. In the end, it remains only to cut green leaves and stick them around the peony.

4 in 1: Dandelion, Carnation, Astra, Chamomile
All these wonderful creations of nature are made according to one principle - cutting the edge of the strip from which the flower will be made. The end form of the flower depends on the cutting form. Note that for some you need the core, and for others there is no.
Please note: despite the completely simple design, the flowers are very realistic. If the time for the manufacture is completely small, then this is the perfect option.
Experiment and open your unprecedented plants - be sure to tell what happened.

Roses from paper
Magic roses - one of my favorite colors
Rose with a twisted edge
The main complexity here is to carefully spin the edges of the corrugated paper, plating folds. Follow the folds to be smooth. Now tighten the strip so that the layers firmly fit to each other. At the end, fasten the thread, do more superfluous.

Simple rose
Need to make a plant in five minutes? Then this rose is for sure! Just cut the circle in which you draw a spiral. Cut the spiral, as in the photo and twist a rose, ranging from the longest helix link (the central part serves as the base).

Large Rosa
Even gigantic, if you follow exactly such sizes. Heart petals are stretched and superimposed on each other in a circle with glue fixing. At the end are attached green petals. Of course, the flower is optional to do so large as in the photo - repel from your preferences.
Twisted paper rose
Once I already described this way to create a rose (here is the second). The principle is absolutely the same, but the size of the triangles, resulting in twisting, should be the same along the entire length of the tape, otherwise there will be a not very neat flower.
Once even made a rosemary doll, which took part in the urban exhibition. All her body was covered with robes made just in this way (roses were from tapes, though).

Clover
I will show you only how to make the basis for a four-lift clover. To do this, take the square of the paper and fold along in half and once again in half. Send the ends to the center. From the resulting design cut the heart. As a result, it will be what we achieved - a happy flower.

Nameless
As I did not affect, but I could not give the intelligible name. As a result, a comrades remained just a beautiful flower, resembling Kanzashi motifs (Japanese art production of decorations from satin ribbons).
The beginning here is the same as in clover. But after the bending of the edges, the ends will be bent, so that the length of the bent part is equal to the length of the visible side in the middle. Then these parts are straightened and the edges are already valued so that the sides are smooth. They are again bend and glued so that there are three stamens. Such petals should be three.
Most such a flower is suitable for designing a Japanese-style gift.

And again Astra
This time you already need to stick the petals along the edge until you reach the desired volume. The center decorate at your discretion or simply fill as a large number of petals.

On this large floral review, I declare closed. I hope you have found exactly the option that will help you steal everything to decorate a gift. See again, subscribe and share with friends!
Sincerely, Anastasia Speeva
The educators are taken to give standard compositions from Astra, Chrysanthemums, roses. But the autumn bouquet for kindergarten made by their own hands will certainly become a unique and pleasant presentation. Such compositions make together with the child are quite simple, they are saturated with a special flavor and remind of the beginning of a beautiful pore.
Simple bunch of maple leaves
This is a very simple and entertaining handicraft in a kindergarten with which any preschooler can cope. To create an unusual autumn bouquet, you will need the following tools and materials:
- Scissors are average.
- Short branches of trees.
- Narrow Scotch Green
- 7-10 maple leaves.

It is desirable to close the leaves of different sizes and the shade so that the bouquet turns out to be juicy and bright. They are better to dry up slightly, so that during work they did not be wounded and did not break, but acquired the necessary forms.
- A small leaf turns from yourself a bright face. Bend the tip on yourself inwards.

- Then on the left or right, the sheet is twisted into the roll. It will be the core of the flower.

- The second autumn leaf should be more first. Its tip is also bent and stacked over the first leaf. Side edges bend inward and twist them around the central bouton.

- Similarly act with the rest of the leaves. For the manufacture of one flower you will need 7-10 different maple leaves. When forming, each bud put a seam back so that it does not unfold and did not deform the composition.
- After the manufacture of colors proceed to the formation of stems. They are tightly pressed to the base of the flower and are tightly wrapped with a green tape with a small lap, so that the flower has a reliable skeleton. The end of the scotch is cut off.

Autumn bouquet ready. Composition made by hand from maple leaves, it looks great. The flowers themselves are placed in a small basket or a cardboard capacitance decorated with bright small leaves or berries. Perfectly complement the painting of the sprigs of rowan, rosehip, barbaris, hawthorn, that is, natural decorative elements that give a mother-nature.
Unusual colorful bouquet of felt
Of course, a bouquet of autumn leaves, berries, flowers is an adorable gift for kindergarten employees, but you can make it from other elements. To do this, you will need:
- White cardboard.
- Threads.
- Wire.
- Floral brown ribbon.
- Scissors curly.
- Cache or vase.
- Transparent liquid glue.
- Felt pieces (orange, green, brown, red).

When working with such materials and tools, it is important to ensure that the child does not hurt and did not take something dangerous in his mouth.
- From cardboard, leaves of different sizes and shapes. They are applied to the felt and cut the same leaves, but from the material. They will be double-sided.
- Felt leaves are fired by manually or on a typewriter. The edges are cut off with scissors.
- Floral ribbon wind the wire and glue leaves to it.
- The finished composition is placed in a porridge or a small vase and fix with the help of Earth or small pebbles.
Any clay jug is suitable for setting the composition. If you take a transparent glass vessel, it can be covered with colored sand or painted pebbles.
Bouquet-tree
Autumn bouquet of nature gifts, which are full of full in the garden, is a worthy decoration of any room, including a group in kindergarten. Bright autumnal colors are enough to add sunflowers, coatshirts, red and yellow leaves, rowan berries. Exclusively looks like an unusual bouquet of a tree. For its manufacture, you need the following:
- Merchant sticky tape (orange, brown, black or green).
- Tight harness.
- Elements for decoration: can fit fern, reed, coffee beans, fizalis, rowan inflorescences, acorns.
- Long sticks of trees.
- Leafs with branches or cuttings.
- Any autumn flowers.
- Wire of medium thickness.

Rowan twigs are fixed with the rods with a wire. Gradually attach live flowers, fixing them into the composition also with wire. At the end it is harmoniously decorated with additional materials. The entire barrel of wire, sticks and stalks to the bottom are wrapped with a sticky ribbon and harness.
Original flowers from the acorns
Unique bouquets are obtained if you use the most simple natural materials, such as acorns with hats. Such compositions for years retain their primary appearance. They are easy to make together with a small child. It is enough to prepare the following materials:
- Nail polish, paints, multicolored sparkles.
- Tassel and glue
- Dried autumn leaves.
- Wire.
- Sticky tape or corrugated paper (green or brown).
- Medium sized acorns.
Funny inflorescences are obtained from such simple components, which can be supplemented by anything from the garden and garden.

- A thick needle or seer in the judder is done through a hole and stretch through it wire. Below leave a long tail. This work should perform an adult, as the baby can be injured.
- Hats glued around oak fruit circumference, forming a rounded flower.
- Wire flower legs are wrapped with paper or sticky ribbon.
- The finished flowers are disappeared with paints, covered with varnish and sprinkled with sparkles.
Merry inflorescences put in the vase, complement them with multi-colored autumn leaves or other decor. Durable amazing bouquet of acorns ready!
Want to know how to make flowers from paper with your own hands? You hit the address! 🙂 Here we have prepared an excellent selection of photos and master classes for you, including the new 2019, designed for different levels of skill: for beginners and for more experienced craftsmen. After all, the paper you can make flowers as simple (children's crafts) and complex, which are not distinguished from the present.
First, of course, you need to solve what paper and what techniques you plan to use for your crafts.
Let's look at all possible homemade paper flowers in more detail. Following step-by-step photos in master classes, as well as videos from YouTube, you will learn how to do the same beautiful 3D flowers as a birthday present, March 8, Teacher's Day, Class, Class, Rooms, Photowons Decor and other rooms for the holiday .
Corrugated paper flowers
Corrugated or fastener - so called fine yam paper, from which various crafts make. It is good because the flower elements can be made volumetric, slightly sprouting the texture microscillings with the fingers, and the flowers with curved, convex petals are obtained.
The easiest flower of corrugations:
Pansies, buttercups
Cute and simple butchers and Pansies: To create wild flowers, you need to cut the same petals that are combined and fixed with wire or glued onto a wooden skeleton, the skeleton is wrapped with a strip of green paper.


Rose and Roshovnik
SAMI simple drinking — corrugated paper rosewhich is even for children.
From the red crepe paper, cut out 3 circles, we put them on each other, then we turn into a cone, fasten the stapler approximately in the middle. Then half turn it out and spread the petals. Krepim on a skeleton, which is wrapped with a green shroudmag. We glue the leaves. Simple rose ready.


This is a scarlet flower:

Volumetric roses more precisely being done -:

Simple little roses in 10 minutes (how to make a flower of paper -):


"Roses for Mom." Christina Matishitis.
Made from corrugated paper.

And detailed instructions how to make a basket with their own hands -
 Here is such a beautiful bouquet it turns out:


Hyacinths
Spring Paper Flowers - Hyacinths- Also the simplest crafts.


"Flowers in a vase. Hyacinths from corrugated paper. " Senior group №5 MBDOU №267 G. Izhevsk. Educator Kocheryova G.V.

Pion

Beautiful and naturalistic pion It turns out from the tinted cocktail: to produce large volumetric petals, a white blank from corrugations lay on a cup, spraying with a spacing with a spacing with a form of a bowl. Tint yellow and pink paint, let me dry. The core we take ready or make a yellow stripper, glue it with our lush petals.
Application "Ponii Basket" - a very beautiful bulk card -

Narcissus
Daffodss and lotus —


Please note that the colors assembly technique is the same, but the shape and number of petals differ in all, the patterns and patterns of petals and the shape of the core of different flowers are shown in this photo:

Such stencils for cutting are easy to make with their own hands.
Such simple flowers from paper sent us Tatiana from St. Petersburg. The manufacturing technology is simple, but as a miraculous bouquet looks in this children's handicraft.

Carnations from paper from Masha Shevtsova.

Large growth flowers
Large flowers from corrugated paper are obtained simply gorgeous, with them even an adult woman can feel in a cheerful. From you can use for the design of the hall with your own hands for the holiday, photosons for shooting beautiful memorable photos, you can hang on the wall or give the perpetrator of the celebration. How to make bulk growth peonies with their own hands, is shown in this video:
Just giant roses:
There is a faster option - huge, but simple flowers that can be hung on the wall of photowons:
As you can see, the size of the colors is limited only by the source size of the paper, the real giants are obtained from huge paper.
Little flowers
You can make miniature charming spring bouquets - apple or cherry flowers corrugated paper:


pink boutons, snowdrops, mother and mazehu,

crocuses and daffodils,

small poppies, cornflowers,

forget-me-not ... It all depends only on your imagination.


Make a flower with chup-chups
Using a small ball (we took Chupa-Chupp), you can get a fantasy flower with very magnificent petals that will keep the shape, only the ends are desirable to lubricate the PVA glue, so as not to be promoted.

Cut 5 squares from corrugations and screw them down on Chupa Chups, so that it turned out on the one hand "tail" is longer than on the other.


For the core we are folded several times the strip of red strips, we cut the tips - these are "stamens".


Store the core between the long tips of the petals, take everything to a stick-stalk. Watch up the stalk strip of green hood.

It turns out such an original flower with lush petals.

Snowdrops
Delicate first spring flowers Snowdrops -


Basalnica
Tender lights (swimsuits). For petals you need to cut a few identical circles, in which one edge twisted into the tube, and the other - expands and strifted. For the core, the paper strip is cut and twisted into a roll. By the way, how to make a swimsuit from the Foamyran, see.

Chrysanthemums, daisies, carnations
All master classes for the manufacture of these colors from attached paper on a separate page


Sunflower
Craft paper and real seeds. :


Macs
Charming Flowers - Maks from Skumagi -:

Crocuses
Crocuses are spring flowers, so they are very often made by March 8. You can make a simple and cute color bouquet -.


Corrugated paper flowers with candy
From the hypobmagues are excellent
The simplest children's version corrugated paper tulips with candy. On March 8, our teachers decided to make tulip, because these are the most spring flowers. From the candies chose truffles, and the stalks decided to try to do without spamps. For this we needed:
- dense bilateral paper green
- red corrugated paper,
- red threads
- glue (stationery or pva)
- as well as packaging film for colors and ribbon (A bouquet should look like a real).
For stalks cut green strips and twisted them with spirals.
The petals cut out of red corrugated paper elongated form, pointed on the one hand, six pieces for each flower. My fingers neatly spread the fibers in the sideline of the petal so that it turns out slightly convex.

The candy inserted a stalk into the spiral, tightly twisted and glued.

Then wrapped candy petals, as in the present tulip - three inside and three outside. In order not to mess with glue (such a thin paper under liquid glue, it can be said, melts), just rided with a red thread in the tone of paper.

The leaves cut out of the green paper, similar in shape on the long leaves of the tulip, glued them to the bottom of the stalk.

Two more such flower - and ready a bouquet. It remains only to wrap it with a film and tower a ribbon.

Tulips from paper are ready, three bouquets turned out.

You can attribute to the kindergarten and hand.


Simple carnation
Another option to collect a flower from corrugobumagues without glue - to ride the edge of a long strip on a thread like a pump, but here you need to act very carefully so that thin paper does not break.


As a result, it turns out the flower of the carnations - quickly and simple.
Flowers from napkins
Just just done dIY - Flowers made of paper napkins.


Such crafts are very simple and easy, for children. Photo I. step by step description Ermasheva Helena on how to make bouquet of napkins do it yourself.

For such an original bouquet, you will need:
- paper napkins: yellow and pink (35 pieces);
- bamboo sticks for kebabs (13 pieces);
- pVA glue;
- bronze acrylic paint with glitters;
- green paint;
- brush;
- scissors;
- feltaster or pencil;
- plastic bank;
- decorative chips;
- satin ribbon;
- linen fabric;
- plastic bottle by 0.5 liters;
- small pebbles.

Paint the wands of green paint, let dry.

For a bouquet of 13 roses, 117 circles of 8 cm diameter are required, 9 pieces on 1 flower. Cut the desired number of billets of petals.

For 1 flower you need to fold 7 circles in half.

The edge of the fold of each circle is lubricating glue. Put the wand on the semicircle and turn the petal on the wand.


In this way, gently glue the rest of the petals.


Switch with a wand in the center two circles.

Top circle lubricate glue in three places. Glue ready-made petals.

Last circle stick the same, flower is ready.

Do it vase for a bouquet.


Colored paper flowers


For bulk colors will need special double-sided paper. Applications are suitable and ordinary school colored paper.
The easiest bouquet of colored paper
Make such a bouquet of colored paper with your own hands is simple enough. Even the kid can cope with this task. That is why the craft is a great mother's gift on.
If the child does not cope with scissors, parents can help him. And in the rest of the process should not interfere. Creativity with children is an important part of the upbringing. It develops creative thinking, feeling beautiful. In addition, the child sees the joy of mom from the received gift and becomes happy himself.

Materials:
glue;
colored paper;
scissors;
pencil.

Colored paper bouquet guide
We take a whole sheet of colored paper green. Long edges with glue. We fold the sheet horizontally in half, so that the edges glued down. Paper cut from the fold and to the place of gluing on a width of 1 cm.
 Lubricate the base of the workpiece.
 We turn the paper with a tube. Fix the clips until the glue is dry.
 Cut the blanks of floweries. We use a few shades. It will be more convenient to draw the template first, and after cutting flowers along the contour. Several yellow circles will serve the cores for colors.
 We glue the middle to the colors.

Each flower is glued to separate leaf from colored paper.
 Uniformly distribute flowers on a bouquet. We spread the leaves. Children's bouquet ready:

Make a flower with a child
Paper flowers are an excellent gift for mom. Such a workout is simple in performance and looks much better than living colors. In this step by step lesson The process of making a paper flower is described.
For the flower arrangement, such materials and tools will be needed:
1. Cardboard (yellow and green).
2. Red corrugation (can be replaced with a napkin).
3. Stationery glue, pencil, scissors.
4. Small piece of plasticine.
5. Cover from the bottle.

Step 1:
The flower will consist of three floral blanks of different sizes. From the cardboard of yellow, you need to cut three flowers the same in shape, but different in size (from more to the smaller). For convenience, you can first draw a pencil flower shape, and then cut. Glue blanks with each other. The biggest flower should be bottom.


Step 2:
Using a pencil to twist each petal down: put a pencil under the petal, press a finger and stretch down, to the tip, slightly twisting. These actions make flower lush and volumetric.

Step 3:
For the middle of the flower it will take a corrugation or a red napkin. It is necessary to cut off the strip with a thickness of about 3 cm, then up to the middle to cut a lot of narrow bands. Twist the workpiece into the roll and cut again. There is another way: just cut the paper into small pieces. In the middle of the flower, abundantly apply glue and glue red pieces of paper.


Step 4:
It is possible to make leaves like this: folded the cardboard of the green color twice, in the place of the bend draw half the future leaflet and cut. There should be two of these leaves.

 Step 5:
For the manufacture of the stem is needed green cardboard. It is necessary to cut off the band with a width of 2-3 cm, twist into a narrow roll and secure on glue. The top of the stem is cut into four parts.

Step 6:
All items are ready, it remains only to connect them with each other with the help of plasticine. It must be applied to the top of the stem and fasten the flower. Leafs are attached to the same principle. Flower gluing on plasticine to bottle cap. It will be a stand for crafts.

The flower of paper is ready.

"Postcard to March 8!". Safonova Svetlana Aleksandrovna.
Application of colored paper. Gift card for March 8.
We will need colored red, purple, weak, yellow, green, green. It is advisable to take glossy colored paper. Cut out three flower of different shapes. Big, middle and smallest, and so three times. Then we stick the big flower first to the overthrick cardboard, then smaller, and so three times. Cut from purple paper vase, glit to the postcard. We make three yellow mug, make the middleings in our flowers and stick them. Then three skeins cut out and glue from the flowers to the vase. Cut out lettuce leaves and glue. That's this postcard turned out!

In this video, it is shown how to make chamomile from paper, very naturally looks, almost like alive:
Flowers are so realistic that they are difficult to distinguish from real plants.
Narcissus. Master Class
This master class describes how to add daffodils from colored double-sided paper.

To work, you will need:
· Simple pencil;
· School line;
· Scissors;
· Bilateral colored paper of orange, yellow and green shades;
· PVA glue;
· Wooden thin sticks;
· Small vase.
Work description
Take half the standard sheet of yellow duplex paper. Prepare a ruler and a simple pencil.

Draw on a piece of paper squares with sides of 5 cm. Cut them with scissors on a graphic figure. For 5 colors you need to prepare 10 squares.

Take 1 square and make 4 outbreaks on it, as shown in the photo. Then take 1 wooden wand or rod from the handle and slightly twist the corners of the paper blank.

So you have petals. For one flower, you need to prepare 2 identical billets.

To glue them so that the petals of the top blanks are between the petals of the lower.
To make a middle for Narcissa, you need to cut a circle of orange duplex paper. After that, bend a circle with a rod, as shown in the photo.

Stick the middle to the center of yellow blanks. One flower is ready.

For the same principle, make another 4 flower. These are the daffodils.

For making stalks prepare wooden thin sticks and strips of green double-sided paper.

Just get the sticks with green stripes, and the stalks are ready.

Cut thin long leaflets from green paper. With the help of scissors slightly twist one of the ends of each leaflet.

Stick on the stalks of 2 leafs.

Now it remains only to fix the boutons at the top of the stalks.

Beautiful artificial flowers look no worse than living.

Collect them in a bouquet and put in a low narrow vase. Look awesome!
Plus such a bouquet is that his beauty can be admired not one day, because the paper will never start.
Narcissus is not the only flowers that can be done. Experiment, and your home will decorate a variety of flowering plants. For example, the faithful satellite of spring daffodils - tulips, how to make them from paper easily and simply, look at the video:
Blue Watercolor Paper Flower
Beautiful bulk flowers for decorating postcards and gift boxes can be made with their own hands. There is such a wonderful direction in needlework - paper plastic, allowing you to create incredibly beautiful flowers and bouquets. Thanks to the plasticity of watercolor paper, make flowers for scrapbooking will not be difficult.
Necessary tools and materials for forget-me-not:
- Blue watercolor paper;
- Scissors;
- Stencil in the form of a flower with 5 petals;
- Capacity with water;
- Tool with ball;
- Sponge;
- Soft cloth;
- PVA glue;
- Pearl semobusins.
Work description
First you need to make a stencil flower with five petals: it can be drawn from hand or print on the printer. Cut with a stencil an even number of flowerfish from watercolor paper.

Put flowers into the water for 5-10 minutes. Do not be afraid to reap, watercolor paper is quite dense and long turns into the water. After the allotted time, blot the blanks with a napkin to remove the excess fluid. If you did not find colored watercolor paper, you can paint the usual white food dyes, gel handles, wovers or gouache. You need to do it while paper is wet.

Put the flower on a wet soft cloth. A tool with a ball at the end or any other item with a rounded end (for example, a handle tip, tassels) put on the edge of the petal and with the effort to spend the center. All the same actions do with all the petals. So the flower will get relief.


Now put the flower on the thick sponge and sell the flower center. Here the deepening should be more than in the petals.

The second flower after squeezing the petals turn over to the wrong and the same in the center.


There should be such two types of flowerflowers: with petals, covered up and down.

Put the flowers on a flat surface and leave until complete drying. Furious flowers are very rigid, remind cardboard.
Now it's about assembly. In a flower with petals, bent outwards, pose flower with petals inside. For watercolor paper, PVA glue is perfect.


Stick in the middle of a chumina flower.

Relief flower from watercolor paper is ready! These flowers were used for registration. Flowers from watercolor paper are sufficiently rigid, so they can well decorate wicker boxes and baskets, as well as used as an interior decoration.

Easter bouquet of snowdrops. Oblodyna Anna.

"Snowdrops". Clementieva Polina and Alexandrova Oksana.
Very nice picture, but despite this, it is not at all difficult for children from 5 years. For its manufacture, you will need half a sheet of blue cardboard, white sheet, green pencil or felt-tip pen, plasticine of green color, napkin, glue.

Simple paper flower with their own hands
From ordinary white paper, on a very simple technique, you can perform beautiful, elegant flowers that will definitely find use in creativity. First of all, it is the creation of volumetric cards in a technique that is often practicing needlewomen, as well as the specified flowers can be collected in a bouquet or simply add them flower composition. A small magnificent emphasis will surely attach attention to a wall newspaper or an ad, beautiful box or package.

What needs to be prepared to create a similar flower:
White office paper;
water and brush;
gouache or watercolor paints;
scissors;
glue;
decorative stamens;
Slice of thin wire.
How to make a lush flower with your own hands in stages
1. In the list of materials used intentionally not specified colors of paint and decorative stamens, which can be used to create a flower, because they can get out of your desire. The base of the flower is the usual white office paper, and then you can paint the product with any paints, according to your taste or as needed. To begin with, you should take scissors and sheet of white paper.
2. Cut from paper the first flower with oblong petals in the amount of 6 pieces. But the flower shape can be a little different, only it is desirable that the petals be obliged.

3. Taking advantage of the first flower as a template, cut 6 identical layers of white paper. The more layers you will use to create a list, the magnificent product you will succeed. I can not care about evenness and accuracy.

4. Taking advantage of the tassel and ordinary water, wet the petals. Lock the tip of the tassel into the water and spend on the petals as if painting them.

5. While the paper did not dry, squeeze each petal, while it is convenient to use the same tassel or handle, applying to a rounded surface. Thus, you will not only bend every petal into a kind of harmonic, but also make them twisted out.

6. Do the same procedure with all other petals, leave all layers to dry.

7. While the layers of the flower will dry, prepare the beam of the stamens. Since there is a white and yellow flower here, then the stamens were chosen appropriate. Take 6 or 7 bilateral stamens of white and yellow, using wires. Find the middle and bend in half to get a bundle. The end of the wire twist so that it becomes sharp. In the future, the wire will help secure the stamens in the center.

8. Beat white flower layers start fastening. On the first layer, get the second, shifting it.

9. Then glue the same layers in the same way. Before you, a blank for a lush flower.

10. In the center of the flower, make a small hole with scissors and stretch the wire tip, fixing the stamens. Bottom Kistica do trust and wake glue.
11. Select the color of the paint and carefully wake the top of the flower, leaving white lumeges to make it even more elegant.

12. Beautiful flower From paper made with your own hands - an excellent addition to.

Simple Autumn Bouquet - Astra
The autumn bouquet made of paper will become an interesting child's handicraft made with their own hands. It is autumn that is the time of year, which gives us the motley paints and incredible materials for creativity. Crafts is a bright bouquet, decorated with flowers, outwardly similar to asters, autumn leaves and a bows.

- set of cardboard and paper;
- scissors;
- glue;
- black capillary handle;
- semi-gracy crystals;
- a brocade bow;
- maple leaf pattern (or special hole punch in the form of any leaflet).
How to make an autumn bouquet in stages
Prepare cardboard and paper for work. Dense paper (in this case, a green color was used) is necessary for creating a base. You can also prepare for this purpose a chain cardboard from packaging or color plastic. Bright sheets from the set are needed to create colors and leaves. If one-sided paper is used for colors, the reverse side of which is white, then interesting two-color buds will turn.

From a dense, prepared for the base of the leaf, cut the part, on the form resembling a bouquet. The upper part will expand, and on the bottom - there will be a tail, like a bouquet.

Cut out several maple leaves (or you can prepare the blanks of another form, for example, oak, brown or birch leaves). It is better to use yellow, orange, brown or red paper for this work. Apply the capillary handle. Leafs should be small - this is the addition of a bouquet that ends with autumn topics. Make 5 or more billets.

Stick prepared leaves on the base. You can fill four above, one - from below, or distribute them at your discretion.

Additionally cut down the oblong leaves. This is directly the leaves of the ASTR, which will become a central decoration of the postcard. Each leaf will cover the same scissors. Long details - bouquet decoration.

To create buds, prepare a thin twig from pink paper. Cut the sheet with thin stripes and divide about about 10 cm to segments each of them or so.

Each segment to fold into the loop, overlapping the edges on each other. The reverse side of the paper may be white.

From paper of any color cut the circles for colors. Lubricate the mug with glue and start the circle to apply the loops, forming flowers.

Get two or more of a row of looping to get lush buds. Mains decorate semi-graysins. You can choose semi-grayscakes to tone with flowers or use yellow parts.

Model three or more aster flower to decorate a bouquet.

Cut the autumn flowers in the center of the bouquet.

The bottom of the composition decorate a braching bow to disguise the shortcomings, and the bouquet looked finished.
Interesting autumnal Crafts From paper is ready.
Chamomile
For example, to make chamomile from paper, Cut two white paper blanks and a few of the yellow, glue the core to the basic form:

rose flower
For Roses It will take more billets and efforts, but the result will be impressive: the square of the scarlet paper is folded twice in half and once diagonally. Cut the tip and wide edge of the semicircle, make 4 such billets of layers with 8 petals. To create volume, cut one side of the workpiece and glue, so that it turned out to be different widths of the workpiece: in 6, 5, 4 and 3 petals. Spin the petals, insert the layers into each other and glued. Leafs from green paper fold harmonica.
"Rose Alaya". Sivolapova Polina.
For the manufacture of this rose it took red double-sided paper (colored paper for the printer).

Another interesting option is a two-color: there will be not only scissors and glue, but also a stationery knife for cutting.

A simple option how to quickly do. Fold 2-3 sheets of paper with one accordion, tie up in the middle, edges cut the semicircle. It remains only carefully to flip petals:

Simple flowers
Simple flowers You can make a spiral method: a classic spiral or a wavy is drawn on a sheet of colored paper, with petals, cut and twisted into flowers.


Dahlia
And even if you make the circles of different diameters from paper and cut into them the petals, it will be very lush flower - dahlia.
Flower of curled paper strips.
One more option how to make Rose from ribbon, paper or tissue, simply bending under the desired angle of petals and turning into a roll:
Video from YouTube:
Hyacinth Elizara Polyakova:


Large Flowers for Photowes
Flowers for office ormealing Places of photo sessions can be made from double-sided colored paper.
For example, in this video used paper density 160g., It took 15 - 24 pieces. Templates can be taken, for example, here: //pl.pinterest.com/pin/789818853371506785/. How to make a pho table from paper flowers:
For photosone, a framework is needed to which the canvas is stretched, and the flowers on the wire and hot glue are attached to it:
Another option is to make beautiful suspended compositions, for example, such:
Paper flowers dropped in water
It is interesting to spend the time with a small child at home. This simple, but a fascinating miracle craft will be interested in the baby. The collaboration of flowers will bring pleasure to everyone.

It will take:
- color (on both sides) cooling paper;
- office white paper;
- colour pencils;
- glass of water;
- white shallow plate;
- stapler
- circle templates with a diameter of 6, 10 and 12 cm (for more complex options flowers).


Simple option
Draw on a white sheet of paper several colors options, about 4-5 cm in diameter with not very large petals. Can different colors and the forms of petals. Now they need to be cut. Petals of each flower bend into the center in a circle one on another.


 When the flowers are ready, put a plate and pour some water into it. Now you can lay paper flowers bent petals up. And then an amazing transformation will occur. All petals will open and bloom flowers on the water.
There is such an action from the fact that the paper absorbs water and tries to return to the initial look. So it straightens in the collapsion. It turns out that the flower flashes.

 Flowers can be immediately cut from color cooling paper. You can roll something ridiculous or draw a flower inside. Optional.
More complex option
Option number 1. The original flower can be made large in 3 layers. Take a photocopy paper, connect it with the help of a stapler in the middle. Taking advantage of the template, draw two circles with a difference of 2 cm between them. In the resulting bubble, portray the petals. The finger will serve as a template. Cut flower, capturing three layers at the same time.
Now folded correctly into the center of the petals. One after another, overlapping on each other. And so all three circles. It remains to run it on the water and see. The flower will open a layer behind the layer. Baby like it.


 Option number 2. This flower can also be made in 2-3 layers. Only now the difference between the circles will be 4-5 cm. It turns out long petals. Now every petal should be tightened with a pencil inside. You can use a thinner diameter.

Flowers in Origami
Flowers in the Origami technique, of course, are not so similar to the real, but they have their own charm. In addition, this technique helps to develop small motorWhat is very important for children, and adults too. How are such original things from the usual square of the paper?
Calla
For the manufacture of children's applications, paper is most often used. We suggest adding a little cinema wire to it and make beautiful flowers similar to elegant calla. And when creating the flower of the child themselves, you can introduce the foundations of Origami technology. The entire process of manufacturing such an applique is given in this master class.

To create such a craft, we prepared:
- white cardboard;
- paper red, orange, pink and green;
- glue;
- silent wire;
- pencil;
- scissors;
- rule.

Flowers for this applique will be made of colored paper using Origami technology. Therefore, initially we prepare the square blank. In our case, there will be a square with a side of 8 cm.
 We fold it diagonally in half.
 Now we will shift the workpiece of the future flower and start bending the sides to the midline.
 You need to symmetrically bend from two sides.
 Next, the upper parts of the curved elements are flexing back. We try to do it symmetrically. Such a billet for the flower is obtained.
 The middle of the flower will be a piece of cine-sleeve wire. It is enough to take about 4 cm. We use orange cinema wire, but if desired, such a middle can be made of a cinema wire of any color. Fix this piece with the help of PVA glue.
 The lower corner of this flower is tagged on the opposite direction and we are lining.
 Similarly, we make flowers from pink and orange paper.
 Now we distribute flowers on white cardboard, after which they fix them with glue.
 From the green paper, we cut narrow strips, which will become stalks on our appliqué.
 Flower leaflets also make out green paper. To do this, fold it in half, after which we cut the contour of half a leaflet. We cut out 3 sheets of different sizes. We glue them to our craft. Application with paper flowers and cinema wire is ready.
Step-by-step photographs of the process and scheme:

Video, how to make snowdrops from paper in Origami technique:
Video, how to make spring valley. Valeria uses a large sheet of paper to make it clearer, but for miniature flowers you need to take squares of 5 x 5 cm and repeat by the author:

Flower carnations from modules -:

Send your photos
Do you also do beautiful paper flowers? Send photos of your crafts. Top works We will publish and send you a diploma of the competition.
Good afternoon - today I start cup articles On the decoration of the house in the fall. In this article I will show What principle to draw up autumn bouquets. I will show how to choose the material ... and by what rules make a bakery composition. We will see bright examples of autumn floristics from juicy colors and dry bouquets of leaves ... how to do low Bouquets from autumn material. I will tell you what original vases You can make from simple pumpkins, zucchini and kochanov kale ... In short, there will be a lot of interesting things.
So ... Let's start our floral selection ..
Autumn bouquets - from branches, herbs and colors.
It is better when in the autumn bouquet more bright and juicy colors. Astra, roses, ripe juicy rosehip fruits + Small splashes of fresh leaves and stalks of herbal plants.


To bouquet looked like a single dense whole - It makes sense to tie him into a single beam - and then in a bundle as a whole autumn composition inserted into the vase.

Optionally use long stems of flowers and plants ... autumn bouquet can be done and from short cut colors and branches (as on floral examples below).

Things rosehip Fruit, Hawthorn, Barbaris and Rowan The bouquet creates a special flavor of autumn floristics. You can still add deciduous branches of shrub or trees ... Heavy fruits on the bottom line of the composition and blue flowers along the top edge of the bouquet.

Autumn flowers: garden roses, astra, rosehip fruits and wild roses ... and original floral inserts - as miniature pumpkins or patiences... In order for heavy pumpkin frods well in a bouquet in them, it is necessary to carefully "drill" holes ... Find a strong branch ... and patching the patient on the branch. And so on the branch insert into our autumn bouquet.

A vase for the autumn composition can serve any capacity ... for example milk tin (as in the photo above). Or clay decorative amphora ... or you can put a vessel with water in a wicker basket.
Fresh berry can also be present in the autumn bouquet.
Red currant branches They will give a bouquet of juicy shade - especially if the roses are also coincided with the color of the berries. And by the way ... in the same composition in the photo below clearly seen the rule of three classic lines of the bouquet (About which I will tell just below).

Autumn bouquets of leaves.
You can simply cut with dwarf maple Beautiful twigs with maple yellow leaves. Their beautiful rods let them look at the crystal water of the transparent vase.

And another interesting move - if in a transparent vase, to lower purely washed korneflodes of carrots - Cut does not need to cut, it will serve as a part of the autumn bouquet. And by the way, one classic composition of the composition is seen in this letter (and not only autumn).

Dry transparent-leaf stems It is better to choose high - so that they create the upper edge of the bouquet ... and at the bottom bright juicy flowers and leaves.
How to make a bouquet - the rules of competent lines.
Even the bouquet has a rule of lines ... This rule illustrates the next photo. Need to observe T. ri of the main directions (see Yellow Branches) - The branch up with the slope to the left ... The branch left with a slight rise ... The branch is right almost horizontally.
And for balancing - several branches or stems should hang down (these are brown branches in the photo below)

Here is a bouquet below - also created on the same principle of three classic composition lines.

Leaves and flowers - friendly combination of shapes and shades.
Beautifully look at small bouquets of autumn colors and large leaves ... Chrysanthemums are ideal for this purpose - they stand very long without fading ...
Teas roses color ... and orange-yellow tint lilies ideally coincide with a tint of autumn foliage... and in a bouquet this color coincidence is emphasized by greenolitic plants. And still pay attention - what as linear elements - are used seed stalks of plants(brown in the photo below).


But an example of whether "Tea" roses can be made with their own hands From ordinary maple leaves. Below, we see the very essence of the equipment itself - and to help yourself it is better to take a sticky tape so that it is better to wind the foundations of such deciduous buds (and the ribbon is better to choose green - sold in construction and floral stores).

Dry bouquets for autumn interior.
Dry bouquets are an excellent idea for interior design for a long time. Such autumn compositions do not need moisture. Such a dry bouquet can even paint it with paint from the canister (as in the photo below).
Or bouquets can be issued as decorative "bunch" Of the leaves, shishi, seed boxes of plants, dry branches, berry umbrellas and other natural material.

Minimalistic design - in the design of the autumn bouquet.
A bouquet can be very modest - The main thing is that the design was stylish. Here's how in the photo below - the inspiration and lids from the acorns can be glued to funny inflorescences ... and insert such dry flowers in a vase along with oak leaves. This is an excellent autumnal career for kindergarten (can be done with the child). Only wire holders will already do.

Even so modest composition from leaves in mins - Looks self-sufficient. Also a sample of minimalism in the interior bouquet.

After all, it really is not necessary. Small flowers ... Stands of cereals ... Spreads-umbrellas with berries - and here you already have a beautiful autumn bouquet for a small composition on the table.

Or you can use Cup of colors with a very short stem - If you put them on the bottom of the Great Bokal Vase. For linear harmony there add high stalks - But already muted coloring ... so that they do not draw attention to themselves and the center of the composition remained juicy bright inflorescences.

Or cup of colors can be laid beautiful floral carpet in flat vase (similar to a pile or salad bowl).
By the same principle You can make a bouquet of rowan branches, branches of juniper and needles ...

If you didn't find a beautiful salad bowl ... then you can disguise her walls with dry leaves - Posted by all this coarse rope, or woolen knitting thread (as in the photo below).
And by the way - this is the photo below - an example How to extend the life of your fading roses (who were presented to you ... they cost you in a vase and have already drooped the heads and here they will start to lose the petals - despite the fact that you change the water and cut the stalks) ...
Faded cups will instantly revive ... If you cut them short. Lower to a small pile (as in the photo below) and decorate the pile here such a deciduous wrapper ... The secret is that the water will not be necessary to get to the bud On a long stalk ... Buds will get water in sufficiency and again the petals will become dense and elastic ... and your roses will be happy for a long time ...

Autumn bouquets - on the "oasis" (floral foam).
You can make a bouquet composition in an oriental style - when the material for bouquets of the oasis is placed in a flat vase (this is a cross-porous material, plasticine foam. It is wrapped with water and stalk it into it - such a bouquet lives for a long time at the expense of moisture cluffed in the oasis. And you just need just time From the time to wet this floristic sponge with water.

In such an oasis, you can stick not only stems of flowers and herbs, but also a chew ... cones ... Poppy boxes ... and other natural materials. And as we see in the photo below - an oasis can be placed on a spice of the usual birch.

Autumn bouquets from apples.
Beautiful bouquets-composition with apples in the photo below can be made with their own hands.
For the soothes of apples kept - from need thug on holders. It may be metal holder - with floating peaks ... The holder is inserted into the water ... we stick to the peaks of the yaboka ... and the gaps fill in other vegetation.
Or the holder is possible replace with sharp bitch ... Strong thin bundles to sharpen a knife ... Small-shaped apples ... Insert them into the water under different Nakolom ... and the rest of the lumens fill with autumn flowers and leaves.


And you can also use the bouquet of sweet pepper fruits ...

Fruit-favorable vases - for autumn bouquets.
Citrus and pumpkin cultures - have a durable water-permeable peel. It pushes them to the idea of \u200b\u200busing them - as a vase.
Just cut off the top of the fetus ... take out the flesh out of it ... Fill with water and put our autumn bouquet in such a fruit vase.
And even kachan cabbage May become a vase. No, the swing itself will not hold water for a long time ... most likely give weight. But after all, you can be smarter ... to make a recess in the frame ... in which to insert a small vase with water.

But the most convenient, of course, pumpkins - such a vase can be used much more paint ... and not only as a vase, but also as a candlestick For autumn evening sites with cozy candlelight.


In addition to the classic round pumpkin, a vase for a bouquet of autumn can serge Patesta, Zucchini and Decorative Pumpkin Cultures having a bizarre curved shape.

And even decorative pupil fruits - which are not stable - can be put on the side - and make the neck of such a fruit vase - in the bochine of the fetus. (as on the left photo below).
Or a vase can be made of birch hemp ... This is certainly not a fruit - but also part of the plant world.

Vases with decorative filling for bouquets.
You can use the jandelery in the vase as an embellowing ... Eschiki ... Rosehip fruits ... Apple ... beans ... Crupes ... and other bulk natural material.

And most importantly ... water to pour into the bulk material itself should not... otherwise the water will just darken and all this beauty will just rot. It is better to do smarter.
IN wide vase - Place narrow vase... so that there is space between the vases. And in the inner vase, we pour water for a bouquet ... and in the space between it, and the outer vase, we embarked a mound of a natural material.
And also ...
I prepared articles on the creation of autumn floral masterpieces from natural materials to decorate the interior ...
Autumn table setting - 40 photo examples.
Successful to you autumn crafts.
Olga Klishevskaya, especially for the site