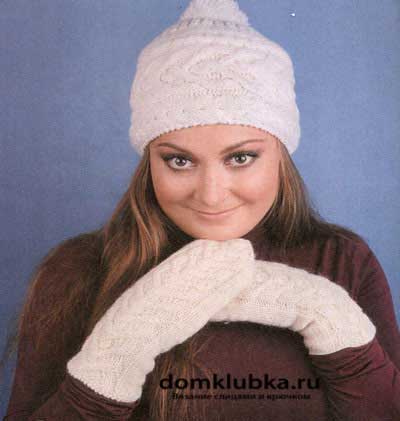
Mittens were always the most practical and comfortable for the cold winter. Today in stores a huge selection of mittens for the whole family, but much more pleasant to wear things that were created with your own love.
Having learned to knit, you can create entire kits: cap, scarf, mittens. They will be beautifully harmonized with each other, if you perform them in the same style with the same pattern.
I propose to go directly to the topic discussion: "How to tie the mittens with the needles - step-by-step instructions."
How to knit mittens with knitting needles (for beginners step by step)
In order to learn to knit beautiful stylish mittens, you need to learn to knit the simplest, on the basis of which you can create the most original models for the whole family.
Mittens without a seam - master class with a detailed description (photo)
The most interesting thing is that even the lazy will cope with this model. They can be monophonic, but the author offers to add several red stripes for a variety.
To work, we will need a wool thread (70 g), 5 stocking spokes No. 3.
The product is tied from top to bottom on five knits, with the result that it will turn out without a seam. Calculation of the number of loops: 20 X. 1,7 \u003d 34 loops. We distribute for 4 knitting spokes 34 of the loops. I propose to round and score 36 loops, so we will succeed in 9.
To facilitate the explanation we will give each needle the sequence number. The closure circle, four loops of the 1st knitting knit, along with the end of the yarn remaining on the 4th needle from the hinge set, so that the circle on the edge closed more densely.

The thumb will knit on the 1st needle, for the left - on the 2nd. To do this, they are tied on the 1st needle the first loop of the thread of the primary color. All other loops other than the latter, knit face color thread. Then we return the loop associated with the color thread, on the 1st knitting needle and once again insert the main thread. We get a color stroke. This will be further a hole for thumb. Next, simply check to the mother's (approximately 8 cm).

Then proceed by K. rebalance loops on Mat Mittens. On the 1st and 3rd knitting needles at the beginning of the first two hinges, we are together the face second way (for the rear walls), having previously turned the 1st loop. On the 2nd and 4th knitting knit two hinges together at the end of the knitting needles in the first way (for the front walls). So we produce a loot loop through a circle, until the half-number of loops are on each needle (in our case, when the number of loops on each needle is odd, we reduce the circle to the smaller part - 4 loops), then we reduce the loop in each circle (5 loops). At the same time on the 1st and 3rd knitting needles, in those rows where the loops do not reflect the first hinges also turn over and in the first way. When on each needle it turns out to be 2 loops, the loops are tightened and fixed on the involving side.
Now proceed by K. rejoice in thumb. To do this, carefully pull the color thread from the thumb hole. Then we enter two knitting needles in the vacanted loops, we get 7 loops on the bottom knitting needle, on the upper 6. We start knitting a finger, distributing the loops by 4 knitting needles: on the first 4 loops, onto the second 3 and pull one loop from the side edge of the opening, on the 3rd And the 4th Spice will also be 4 loops (3 + 1 from the side edge of the hole). To be more convenient, the end of the working thread can be lowered into the hole (on the wrong side of the product).

We continue to knit your finger in a circle until the middle of the nail, and then begin to subscribe a loop in the same way as when you knit a mittens: on the 1st and 3rd knitting needles, on the 2nd and 4th knitting needles at the end, but the relevant We do in every row. When on each needle it remains on the 1st loop, the loops are tightened and fixed on the involving side.
Left veasage Looks like the right, but in the mirror reflection: a hole for the finger with a 2nd needle.
Step-by-step instructions for knitting on two spokes
Such long mittens knit on two spokes. You can separately connect two parts with the subsequent compound of halves, but we will consider the option where you have to do only one imperceptible seam (it will be right and visually more beautiful).
It is necessary: \u200b\u200byarn, knitting needles, the pin is normal and for knitting, centimeter tape, hook, needle.

Let's start with the right detail.
We measure the wrist girth, the length of the palm and thumb. It is also necessary to measure the density of knitting, sticking a bit. We measure how many loops accounted for 1 cm. I have 20cm girth, in 1 cm - 2 loops. It is necessary 40p-4 \u003d set 36P + 2 edges.
We begin from the bottom from the 2x2 gum (2 facial, 2 irons). It turned out about 10 cm (15 rows).

Next, go to the main canvas, where you can choose the needles of smaller diameter. In the second row, we evenly add 4 loops. Next, knit just 7 rows to the base of the thumb. You can try and, if necessary, tie a bigger.
Finger in the mittens is not on the side, but as it were, not much closer to the palm, so for the right mittens knit as follows.

- A. - edge, 2P. In the drawing, they are tied and removed on the usual, sewing pin.
- B. - 6-7 loops are taken for a finger. Depending on completeness. We have 7 loops in the drawing, and all the remaining remove on the pin.
- B. - On the workpice, we have only 7 thumb loops.
Knit in the height of the main pattern, without the edge !!! The length of the finger is multiplied by 2. I have a finger 6cm * 2 \u003d in a height of 12 cm. 21 row came out. The first and last pronounce in the drawing !!! Return a loop with a large pin.


We divide all loops by 2. One part is removed on the pin.

Start a reduction.

An invalid rod knit in the drawing. I have no need for 20 loops. I knit like that, edge, 1litsevaya, 2 together, 12 facial, 2 together, 1litsevaya, 1 naolanaca. Direct 20 loops. We reduce so in each facial row until 6-8 loops will remain on the needker. I have 7.

We close the loop and do the same procedure with the second half. In order to finish correctly, simply check the two hinges together, shutting up to the main needle.


From these lessons, we can conclude that it is not such a complex knitting needles. Knitting vechers require basic knowledge and some free time.
Mittens with knitting with pattern (scheme and description)
Having learned to knit the simplest models, you can dilute them with beautiful patterns, giving the will of fantasy. In the article "Patterns and knitting schemes (descriptions)" you will find them in large quantities.
And now I propose to go to more complex mittens with knitting needles (schemes and descriptions will help you understand this difficult business).
How to tie beautiful mittens with braids for women
Mittens with brazy knitting needles and description for lover of classics.
The pigtail will be the main decoration. We have chosen a simple braid, but if you are not afraid of difficulties, you can choose a more complex and original option.
Yarn - acrylic (can be from Angora), approximately 70 g.; Breaking spokes number 3.5.

Pattern "Rubber": 2 persons., 2 out.
Crab "Spit" pattern: 8 loops crosspit left (leave 4 loops on auxiliary needle before work, 4 persons. And penetrate loops from auxiliary needles).
8 loops cross the right (leave 4 loops on the auxiliary needle at work, 4 persons. And to penetrate the loop from the auxiliary needles).
Dissate 48 p. And distribute them to the bullshops, it turns out on each spice of 12 loops. Knit a 7.5 cm gum pattern (if you have little gum, knit more cm).
Then, proceed to knitting the main pattern. For the convenience of knitting the "Spit" pattern, I carry a loop with 1 and 2nd spokes per knitting. Those. My loops are distributed by 3 knitting needles (and not on 4 knitting knitting), on the first spice 24 loops of the main pattern, and on the 2nd and 3rd spices from the palm of 12 loops.
So, the first row after the gum begins with the knitting needles on which 24 loops, begin to knit the main pattern.
1-6 row: 1 Persons., 2 is elevated, 8 persons., 2 izn., 8 persons., 2 izn., 1 Persons., Loops on 2ps from the palm of the knitting faces.
7th row: 1 individuals., 2 out., 8 loops crosspit left, 2 out., 8 loops crosspoint right, 2 out., 1 persons., Loops on 2 knitting on the palm of the palm of the knit. We repeat the ranks 1-7 throughout the work.

At an altitude of 10 cm from the start of knitting (you do not need to be 10 cm, your hands and fingers are different), form a thumb hole. Let's start with the left mittens. On the face of the palm (3rd needles), knit 4 persons., 6 p. Remove to the pin, we type 6 p. (To allow them, as before 12), 2 persons.
Hole for thumb with right mittens knit symmetrically, i.e. On the second spice from the palm: 2 persons., 6 p. Remove on the pin, we recruit 6 p., 4 persons.
Make formation We carry out after the little finger is closed on hand.

For the rounded mystery, you lie on each needle two middle loops together.
Remove the loops in each row, while the knitting needed only 1 p. (Total 4). After that, tear off the tangle thread and in the needle in a needle. Pick up with a needle all 4 p., Roll and secure with the inside the mittens.
After two mittens are associated with a thumb knight. To do this, remove 6 p. From the pin to the knitting pin, we recruit 6 p. On a parallel row and type 4 p. On two side rows. Total turned 20 p., We distribute them to 4 spokes (5 p. On the needle).

And knit circular rows of persons. to the desired length of the finger. We form the thoughts of the finger similarly to the formation of the mittens of the mittens.
Knitting needles for children
Babies love very much when mom creates with her hands, for example, beautiful chanterelles or bears that can be put on the handles and go to play in snowballs.
Knitted children's mittens with owls
For a child, there is nothing more interesting mittens with a pattern. Such things he wears with great pleasure, so I propose to please the child wondrous owls.

Materials and tools:
1 MOK;
Breaking spokes No. 1.5;
Additional needles or special removal of loops;
Needle for yarn;
Four beads;
Threads and needle for sewing beads.
Mittens knit in two threads.
So, we recruit 32 loops, distribute them for 4 knitting needles (8 on each).
1 - 10 rows: gum 1 persons. x 1 is elevated
11 row: persons.
12 row: persons.; Add up of 2 persons from breakdown. On each needle
13 - 18 Rows: Persons.
19 Row: We begin to encourage the "owl" on 12 loops of the third and fourth spokes. First needles - persons.; The second needle - persons.; The third needle is 4 persons., 6 is elected; The fourth needles - 6 is ezn., 4 persons.
20 row: just like the 19th.

21 row: first needles - persons.; The second needle - 2 persons., Remove 6 loops on the pin for a thumb hole, to score 6 additional loops, 2 persons; The third knitting needles - 4 persons., 2 out., 4 persons.; The fourth needles - 4 persons., 2 out., 4 persons.
22, 23 rows: first needles - persons.; The second needle - persons.; The third knitting needles - 4 persons., 2 out., 4 persons.; The fourth needles - 4 persons., 2 out., 4 persons.
24 row: first needles - persons.; The second needle - persons.; The third knitting needle is 4 persons., 2 izn., 2 loops to remove on extra. The needle behind the work, to penetrate the following two loops of faces., Then loops on extra. Spice - persons.; The fourth needles - two loops to remove on extra. The needles before work, to peck the following two faces., Then loops for extra. Spice - persons., 2 out., 4 persons.
25 - 31 Rows: The first needles - persons., The second needle - persons., The third knitting needles - 4 persons., 2 izn., 4 persons.; The fourth needles - 4 persons., 2 out., 4 persons.
32 row: just like the 24th
33 - 35 rows: first needles - persons.; The second needle - persons.; The third knitting needles - 4 persons., 2 out., 4 persons.; The fourth needles - 4 persons., 2 out., 4 persons.
36 row: just like the 24th and 32nd.
37 row: first needles - persons.; The second needle - persons.; The third knitting needle is 4 persons., 2 out., 2 persons., 2 izn.; The fourth knitting needle is 2, 2 persons., 2 out., 4 persons.
38 - 41 rows: first needles - persons.; The second needle - persons.; The third needle is 4 persons., 6 is elected; The fourth needles - 6 is ezn., 4 persons.
39 row: We start to subscribe. The first needles - to stick the first 2 loops together. for the back wall; The second needle - to train the last 2 loops of persons. behind the front wall; The third needle is to stick the first 2 loops together. for the back wall; The fourth needles - to train the last 2 loops of individuals. For the front wall. The rest of the loops knit on the pattern (individuals. And out.)

When there will be only 8 loops on the spokes - we are tightened by a needle. For the thumb to be transferred to the pin on the pin to the knitting pin on the pin, type 2 + 6 + 2 hinges from the edges.
 Knit 12 rows in a circle. Then we carry all the loops on two knitting needles and begin to subscribe: on each needle the first 2 loops in the rear wall, the last 2 - for the front. We knit the second mandrel in the same way - only the hole for the thumb leaves not on the second knitting needle, but on the first.
  Seving beads eyes and rejoice in a wonderful novelty for the winter.
Ideas with bulking (embroidery)
Having under hand simple mittens, you can decorate them with the original embroidery, which will look gorgeous in the children's config.


Video lessons from the best masters
YouTube today has become a real treasure, where you can find a huge number of learning video. For example, in the blogs Svetlana Bersanova video tutorials can be viewed free. And there are not few such good author. You can find a mentor to the soul and get the most valuable knowledge absolutely free.
Original mice or white hedgehogs for kids
How to knit mittles
Warm openwork for the girl (double Mochhar)
Interesting two-color minions for a boy of 7-8 years
Jacquard products (video tutorials)
Jacquard with winter topics - a classic that will always be relevant, so I propose to go to the most difficult versions that require a maximum of time and attention to detail.
Original knitting with ornament (Norwegian patterns)
For girls with deer
If you want to learn to knit a complicated, but very original pattern of "deer", this lesson will help you with a detailed description.
Men's mittens with Arana for small men
If you are learning all the lessons offered by us, you can fantasize and create products of any complexity: Women's gloves without fingers, with a folding riding, with a false pattern, from thick yarn and embroidery. Good luck to you in your endeavors. Try, experiment and indulge your homemade nice knitters.
Tie mittens with knitting needles so that the hands do not froze even in the most fierce frost!
Mittens are the most practical and convenient accessory for the cold winter. Today, the market you can buy mittens of different models, but more pleasant to wear if you link them yourself.
- If you learn to knit clothes, then you can create entire sets for the winter - the hat, a scarf or a snew and mittens. These things perfectly complement each other, if you create in a single style using the same pattern.
- To learn how to knit beautiful mittens, you must first create a simple model of mittens - with a simple pattern and without a seam.
- Based on the ability to knit such accessories, you can connect any warm clothing objects for your husband and children.

Mittens, like woolen socks, should be able to knit every woman. Let's look at how to create simple female mittens and men's knitting needles.

Scheme and Description:
Such a product can be monophonic, and you can add a thread of another color to an elastic band or facechair. Knitting diagram of such vechers Simple: 2x2 gum on the wrist, the rest is a facial smooth.
- For the knitting process, make a wool yarn - 70 grams and 5 short spokes number 3.
- For brush girth about 20 cm you need to dial 36 loops (9 loops on each needle).
- First knit the right mittens. Mentally, for ourselves, number the knitting needles: on the 1st and 2nd spokes - loops of the lower part of the product (palm), on the 3rd and 4th - top.
- Tie first a 2x2 elastic band height 7 cm.
- Then knit in a circle Facial loops before the start of the thumb - 7 cm.

We continue the steps:
- Mating thumb on the right detail, produce on the first spinAnd for the left - on the second knitting needle. So, the first loop of the first knitting knitting knitting needle is adjusted by the usual facial stuel, and 8 others - remove it on the English pin, button.
- Then, on the same needle, type 8 cape And check the front stroke of the last 9th loop. The mittens turned out a hole for thumb.
- Now stick to the nail of the mapleza - 8 cm.
- Miss Vareshka Looks with recess loops. On the 1st and 3rd knitting knitting of the first two loops together behind the back wall. Pre-turn the first loop. On other knitting knakes, knit two loops together at the end of the front wall.
- So knit until 2 loops remain on each needle.. Tighten the loops and secure off the inside.
- Knitting thumb - Remove the pin and enter one needle to the place of this pin, and the second straight on the opposite side. It turned out 7 loops on the bottom of the knitting needle and 6 loops on the top.
- Distribution hinges for 4 spokes: Three will be 4 loops, and on one - 3 plus one loop pull out of the side edge.
- Knify your finger in a circle before the start of the nail. Then begin to subscribe.
- Fingering on the finger is made like on Mask. When on each needle it remains on the same loop - pull the loops and secure from the inside.
- Little mittens knit similarly to the rightbut in the mirror image.

If you have mastered the knitting technique by facial stuff, then it is worth starting to mate openwork patterns. Mittens with the use of such a pattern look original and stylish.
Tie such openwork mittens with knitting needles, it turns out interesting, and your hands in such an accessory will be feminine and beautiful.

Pattern schemes with description:

- Type 44 loops - 11 loops on each needle. Tie a gum 2x2.
- The first row suggest facial loops.
- In the next row, reduce 2 loops together face. So do on each needle.
- Two spokes - facial stroke. Other two knitting needles. Start knit pattern: iznanka, other facial, the latter is an exhaust.
- Again on two knitting facial loops.
- One invented and 6 facial, nakid, facial, nakid, remove one loop, 2 loops remove on the left side. Skip the next loop through the loop, which was removed and pull through it. Next facial to the end of the knitting needles.
- Two knitting needles again.
- Pouring loop, 7 facial hinges, nakid, facial, nakid, facial, cross the loop on the right knitting needle and reduce the front loop. The loop, which has shifted, pull through the next loop. Then the facial to the end of the knitting needles.
- Again 2 knitting facial hinges.
- Announced, peroxide on the free spin of 3 loops and leave at work. Three facial, then rolling down the hinges from the auxiliary needles and suck the facial stroke. Two facial loops, nakid, facial, nakid, 2 facial, 1 loop permanently on the work knitting needle, reduce two loops. Pull the peroxide loop, 2 facial, invalous.
- Two facial knitting needles.
- Exchange, 9 facial loops, Nidid, Facial, Nakid. 3 facial, 3 facial. Put the loop and 2 together. Pull out the peroxide loop, exhaust. Rapport is ready. Continue so to the mouse mittens.
Details of knitting such a pattern Look in the video. The craftswoman made double mittens with a knitted lining.
Video: knitting knitting mittens double-opening leaves with braids. Easy 1
Video: knitting knitting mittens double-opening leaves with braids. Even 2
Video: Knitting knitting mittens double-opening leaves with braids. Sing 3
Video: knitting knitting mittens double-opening leaves with braids. Easy 4
Video: knitting knitting mittens double-openwork leaves with braids. Sing 5
Video: Knitting knitting mittens Double-folded leaves with braids. Even 6
Video: knitting knitting mittens double-openwork leaves with braids.
Here are some more schemes of openwork patterns for knitting vechers:
This pattern you can connect mittens and shawl - it turns out an interesting kit.

The original pattern that fits easily on the spokes. Leaf and bugs will perfectly decorate your mittens.

Beautiful diamonds imposed on each other will great look at the top of the mittens.

Mittens for lovers are a stylish accessory that symbolizes the warmth of feelings and unity. In such mittens, it is nice to feel the warmth of your loved one, walking together in a strong frost.

Tie mittens for lovers with a white heart on a red background, or the opposite, a red heart on a white background. In addition, you can make a shared mitigation to walk through the streets of the city, always keep hands and warm up each other.
Scheme with a description of the general mittens:
- The photo shows that the gum of the mittens for each hand is associated separately. 7 cm. Knit a pattern 2x2 - 2 pieces. Type 16 loops on each needle. Let's knit with two spokes.
- Now connect two rubber bands on circular spokes.

We continue:
- Knish facial stroy in a circle. You do not need a hole for your fingers on such a mittens. Therefore, knit until the start of creating a heart is 7-8 cm.
- The heart knit in the drawing, making first 6 loops in the middle of the mating on one side, white thread, after 2 loops.
- The next row will already have 7 white thread loops through one red. Next, continue in the drawing, first tissing the loops with white thread, then having reduced the white color until one loop remains.
- Tie the mittens, as described above and when 2 loops remain, tighten them and secure from the wrong side.
Here are some more photos, how can you connect mittens for lovers:


Pearl pattern is often used for knitting needles. Even a beginner needlewoman can tie mittens with such a pattern, as it is simple.
How to tie women's mittens with spokes with a pearl pattern? Scheme:


Description:
- 1st row alternate 1 facial loop, 1 facial loop.
- 2nd row - again alternate 1 hovering and 1 facial, but above the front loop of the previous row, knit offext, and above the invalid loop - facial.
- Then repeat the 1st and 2nd row to the end of the mating.

Double mittens are comfortable to wear in the cold or when you want to play snow, especially children. Such mittens will not quickly worst, and the hands will always be warm.

How to tie winter women and men's double mittens with knitting needles? Several tips:
- If knitting is still difficult for you, then knit separately an internal and outdoor verge.
- First, tie an internal mittens. Then create an elastic band of outdoor mittens and facial stroke to the base of the thumb. Tension the outdoor mitten on the inner, straighten your finger so that it is outside and start tidy - it will be more convenient.
- So that the lower part of the mittens does not slip, make a pair of stitches in several places of mating, and fix the items.
- For the mating of the bottom of the mittens, use a thin yarn, and for the top - a dense woolen thread. As a result, mittens will turn out warm and beautiful.
Tip: You can associate separate two mittens and then insert one to another, connecting the bottom of the gum using a conventional needle and thread or tying the edges of the crochet. You can also associate a single web, and then insert one part to another. It is simply formed by the place of bend exactly in the center of the accuated gum.
Classic genre - jacquard mittens for the winter in Russia. The mold is obtained double and dense, due to the weave of the threads of different colors. The product will be warm, and your hands in such mittens will never be frozen.
How to tie jacquard women mittens with knitting needles? Scheme:
Beautiful and very stylish pattern. The scheme contains all the colors of the threads used.

These mittens knit from the yarn of just two colors, but how interesting they look.

Jacquard pattern "Owl" - stylish and fashionable.

Jacquard pattern with deer. Tie mittens with such an ornament, only a real needlewoman will be able.


Mittens with Arana look luxurious. Products with such a pattern knit both adults and children. They are warm and beautiful.
How to tie female long mittens with rhombuses and Arana knitting needles? Schemes:

IMPORTANT: Beautifully obtained with such a pattern of the relief, sinks and caps. Therefore, you can connect the whole kit - elegant and stylish.


From the mohair you can connect warm down mittens with knitting needles. Pattern You can use any. Suitable "braids", "Arana" and others. Here are an exemplary mobby patterns of mohair:


Mittens with snowflake and I want to wear and go to walk in the frost, smoking the snow from the branches of trees and shrubs. Tie such mittens simply: type 44 loops, distribute for 4 knitting needles, check the gum 2x2 (7 cm) and a front stroke 7 cm. Next left hole for a finger, as described above and begins knitting the snowflake itself.
Below is a scheme and a description, how to tie the New Year's mittens for women with snowflake. Such a pattern is also called "Norwegian":


Establishness of the hand, the uniqueness of the image, a gentle style - all this emphasize the mittens "Princess". An interesting pattern resembling Arana will make items original and beautiful.
So, learn to knit the mittens of the Princess of the knitting needles. Scheme and Description:


Mittens of the model "Princess" can be associated with different patterns. For example, Figure "Owl".


Beautiful looks on the mittens pattern with harness. Here is his knitting scheme:


Deer as well as snowflake is a symbol of winter and new year. Therefore, the knitting of sweaters, socks and mobs uses a drawing with the image of this animal.
How to tie men and female mittens with deer knitting needles? Schemes, Description:

Here is another knitting deer scheme on mittens.

Tip: You can come up with your deer, draw the scheme on your own and tie the mittens on it. It turns out the unique and original accessory.

Gorgeous and unusually intertwined harnesses on knitted things. At the mittens with this pattern will necessarily pay attention. Such an accessory will add to your image of individuality and originality.
Mittens with harness knitted knitting needles. Below is a scheme for which you can create an outdoor portion of mittens on two knitting. On two other knitting knitting the inside of the product facial stroke.

How to knit such patterns, it is better to see clearly. In the video, it is described in detail how to create an interesting accessory - mittens with harness.
Video: Knitting mittens with harness part 2 basic pattern.

Mittens-transformers are convenient to the fact that when you need, you can open your fingers without removing the product itself. In such gloves, it is convenient to use a mobile phone in the cold. It is also comfortable to work, for example, trade workers if their activities occur on the street. When you need to accept and calculate money for the purchase, it is enough to remove the valve and your fingers will be free.
Tip: Mittens Transformers for men and women without fingers with a folded riding needles knit just. For a woman, you can take strands of gentle shades: beige, white, pink, and for a man - blue, black, brown.
Scheme and Description:
Knit such mittens by the usual facial stroke. Rubber according to the 1x1 or 2x2 scheme. Below is the pattern of knitting veasions-transformers.

Work description:


The pattern "Braided" looks unusual. If you link mittens using the "braid", it turns out a stylish accessory. Knitting such a pattern easily - a rapport repeats from 9 rows.
How to tie mittens of a wicker with knitting needles? Scheme:

Description of the mating of this pattern:

Stages of work:
- First bind 7 cm gum, typing 36 loops and distributing 4 knitting needles.
- Then, on two spokes, knit the usual face, and on the other two - the pattern "braid".
- Leave a hole for your finger and knit before the start of Myski.
- Now start the relevance of the loops of 2 on each needle: on the first two first knitting, and on the other two - at the end of the mating.
- When it remains 1 loop on each needle - roll them and fasten them off.

Norwegian patterns are winter, trees, deer and snowflakes. Even if you associate only a snowflake, it will already be considered a pattern in the Norwegian or Scandinavian style. On the mittens you can create separately as deer, nature or snowflakes, and combine it in one pattern. Fantasy no limit!
How to tie the knitting mittens "Norwegian patterns"? Scheme with description:
Important: When knitting such an ornament, it is important to be able to stretch the thread, because you need to constantly change the yarn of one color to another. Watch the quality of the broach so that the tension of the thread was uniform, and the drawing did not lose its form.


The process of pulling is done like this: straighten the sleets on the right needle, stretch the thread along them, and hold the thread with the index finger of the right hand, pressing it to the last knitted loop. In the wrong, the thread is more convenient to press with a thumb right hand.
Tip: On the front side, knit facial loops and stretch the thread of unused color so that it remains under the right spin. In withc. Knish the hinges and left hand stretch the other thread before work and under the right spin. From the wrong side of the threads stretched in front of the hinges.

If you learned to stretch the thread of another color, then you can proceed to knitting the Norwegian patterns according to any of the schemes. One cell on the diagram is one loop of a certain color.
Video: Knitting (mittens "Norwegian Pattern")
This type of mating can be done without broaching, but the canvas will turn out more subtle than with broaching. Look at the video, how to knit jacquard without broaching.
Video: The simplest way to knit jacquard without broaching

How to tie the knitting mittens "Spit with shadow": description

See how such mittens look original. Unusual, and so knit a few women. Make such mittens with your own hands and surprise your friends and loved ones.
Indian wedge knitting scheme on mittens knitting:
- The back side of the mittens knit, as usual - by any pattern or simply facial loops. On the palm: 1st row - 15 facial, from the 16th loop tie 2 for the front and rear walls, 4 facial.
- 2nd row - 15 facial, from the 16th loop tie 2 for the front and rear walls, 5 facial.
- Knit on this scheme further 15 rows With adds to the palm of the loops in each row. As a result, it should be on the first two spokes 15 + 20 loops.
- In the 16th row Help your finger on the thread, closer in the circle and continue to knit up to the desired length of the mittens.

You have already knit mittens with different patterns, but I want something unusual and original. Tie gloves from thick yarn. It turns out very interesting, and the products will be warm and comfortable.
How to tie the needles warm female and men's mittens from thick yarn? For mating mittens from such a yarn, score two times less hinges than for mating mobs from thin threads. But not to make mistakes with the number of loops, you need to make some calculations:
- Tie a pattern of thick yarn 10 cm and calculate how much you got a loop of 1 cm.
- Now you know how much the loops for one mittens - 18-20 or a little more.
IMPORTANT: Mittens from thick yarn. Apply uncomplicated patterns - facial or invalid stroke, grinding and so on.
If you can not only knit, but also to embroider, then you can create mittens of a beautiful model. Tie gloves in one color and make a beautiful embroidery on the back.
Foto Makeup with knitting needles:


Mittens with knitting with tender embroidery: photo
Set - hat, snead and mittens with knitting needles: photo models
Tie for myself, your child or husband set - hat, snead and mittens. It will decorate any image, and the things made by the hands of a native person will warm in tall frosts.
Set - cap, snead and mittens with knitting needles - photo models:
Beautiful products related to the use of "Arana" and "braids" patterns.

Set - hat, snead and mittens with knitting needles in pink: photo of models
Dark kit, created with the help of a knitting pattern "Spit with shadow". It will be great to look with a coat or a jacket of contrasting color.

Set - cap, snead and mittens with knitting needles with an interesting pattern: photo models
And again the green shade - the color of the New Year's ate. Arana and Spit are decorated with a hat, mittens and sind.

Green set - hat, snead and mittens with knitting needles: photo models
Gray kit, but not at all boring, but even very stylish and interesting.

Gray set - hat, snead and mittens with knitting needles: photo models
And again the "braids" pattern, but the kit is already connected in beige. The classic always decorates and adds originality to the image.

Set in beige - cap, snead and mittens with knitting needles: photo models
Knick your own things. Rejoice your relatives and friends. If you bind the kit, then it can be a great gift, for example, by the new year.
Video: mittens with knitting needles. Children's mittens at age 2 years. How to tie mittens of any size?

Mittens were always the most practical and comfortable for the cold winter. Today in stores a huge selection of mittens for the whole family, but much more pleasant to wear things that were created with your own love.
1:894Having learned to knit, you can create entire kits: cap, scarf, mittens. They will be beautifully harmonized with each other, if you perform them in the same style with the same pattern.
1:1212I propose to go directly to the topic discussion: "How to tie the mittens with the needles - step-by-step instructions."
1:1414 1:1419How to knit mittens with knitting needles (for beginners step by step)
1:15241:8
In order to learn to knit beautiful stylish mittens, you need to learn to knit the simplest, on the basis of which you can create the most original models for the whole family.
1:349Mittens without a seam - master class with a detailed description
The most interesting thing is that even the lazy will cope with this model. They can be monophonic, but the author offers to add several red stripes for a variety.
1:758To work, we will need a wool thread (70 g), 5 stocking spokes No. 3.
1:881 1:886 1:1155 1:1160The product is tied from top to bottom on five knits, with the result that it will turn out without a seam. Calculation of the number of loops: 20 X. 1,7 \u003d 34 loops. We distribute for 4 knitting spokes 34 of the loops. I propose to round and score 36 loops, so we will succeed in 9.
1:15771:4
To facilitate the explanation we will give each needle the sequence number.
1:125The closure circle, four loops of the 1st knitting knit, along with the end of the yarn remaining on the 4th needle from the hinge set, so that the circle on the edge closed more densely.
1:391 1:396 1:796 1:801 1:1068 1:1073
2:4
Big finger will knit on the 1st needle, for the left - on the 2nd.
2:118To do this, they are tied on the 1st needle the first loop of the thread of the primary color.
2:251All other loops other than the latter, knit face color thread.
2:377Then we return the loop associated with the color thread, on the 1st knitting needle and once again insert the main thread.
2:561We get a color stroke. This will be further a hole for thumb.
2:713 2:809 2:814
Then proceed by K. rebalance loops on Mat Mittens.
3:1422On the 1st and 3rd knitting needles at the beginning of the first two hinges, we are together the face second way (for the rear walls), having previously turned the 1st loop.
3:1690On the 2nd and 4th knitting knit two hinges together at the end of the knitting needles in the first way (for the front walls). So we produce a loot loop through a circle, until the half-number of loops are on each needle (in our case, when the number of loops on each needle is odd, we reduce the circle to the smaller part - 4 loops), then we reduce the loop in each circle (5 loops). At the same time on the 1st and 3rd knitting needles, in those rows where the loops do not reflect the first hinges also turn over and in the first way. When on each needle it turns out to be 2 loops, the loops are tightened and fixed on the involving side.
3:1072 3:1077Now proceed by K. rejoice in thumb.
3:1172To do this, carefully pull the color thread from the thumb hole. Then we enter two knitting needles in the vacated loops, we get 7 loops on the lower spice, on the upper 6.
3:1486We begin to knit your finger, distributing the hinges for 4 knitting needles: on the first 4 loops, on the second 3 and stretch one loop from the side edge of the hole, on the 3rd and 4th knitting of 4 loops (3 + 1 from the side edge of the opening) .
3:1860To be more convenient, the end of the working thread can be lowered into the hole (on the wrong side of the product).
3:181 3:186
We continue to knit your finger in a circle until the middle of the nail, and then begin to subscribe a loop in the same way as when you knit a mittens: on the 1st and 3rd knitting needles, on the 2nd and 4th knitting needles at the end, but the relevant We do in every row.
4:1092When on each needle it remains on the 1st loop, the loops are tightened and fixed on the involving side.
4:1273Left veasage Looks like the right, but in the mirror reflection: a hole for the finger with a 2nd needle.
4:1486Step-by-step instructions for knitting verges on two spokes
Such long mittens knit on two spokes. You can separately connect two parts with the subsequent compound of halves, but we will consider the option where you have to do only one imperceptible seam (it will be right and visually more beautiful).
4:20284:4
It is necessary: \u200b\u200byarn, knitting needles, the pin is normal and for knitting, centimeter tape, hook, needle.
4:171 4:176
Let's start with the right detail.
5:732We measure the wrist girth, the length of the palm and thumb. It is also necessary to measure the density of knitting, sticking a bit. We measure how many loops accounted for 1 cm. I have 20cm girth, in 1 cm - 2 loops. It is necessary 40p-4 \u003d set 36P + 2 edges.
5:1154We begin from the bottom from the 2x2 gum (2 facial, 2 irons). It turned out about 10 cm (15 rows).
5:1314 5:1319
In the second row, we evenly add 4 loops.
6:246 6:459Finger in the mittens is not on the side, but as it were, not much closer to the palm, so for the right mittens knit as follows.
6:685 6:690
- A. - edge, 2P. In the drawing, they are tied and removed on the usual, sewing pin.
- B. - 6-7 loops are taken for a finger. Depending on completeness. We have 7 loops in the drawing, and all the remaining remove on the pin.
- B. - On the workpice, we have only 7 thumb loops.
Knit in the height of the main pattern, without edging !!!
7:1803The length of the finger is multiplied by 2. I have a finger 6cm * 2 \u003d in a height of 12 cm. 21 row came out.
7:132The first and last pronounce in the drawing !!!
7:217Return a loop with a large pin.
7:301 7:306
I have 16 facial rows. We try and check the size.
8:1126 8:1131
9:4
We divide all loops by 2. One part is removed on the pin.
9:99 9:104
Start a reduction.
10:663 10:668
An invalid rod knit in the drawing. I have no need for 20 loops. I knit like that, edge, 1litsevaya, 2 together, 12 facial, 2 together, 1litsevaya, 1 native.
11:1712Outcome 20 loops. We reduce so in each facial row until 6-8 loops will remain on the needker. I have 7.
11:177 11:182
We close the loop and do the same procedure with the second half.
12:819In order to finish correctly, simply check the two hinges together, shutting up to the main needle.
12:1040 12:1045

From these lessons, we can conclude that it is not such a complex knitting needles.
14:798Knitting vechers require basic knowledge and some free time.
14:928Mittens with knitting with pattern (scheme and description)
Having learned to knit the simplest models, you can dilute them with beautiful patterns, giving the will of fantasy.
14:1200And now I propose to go to more complex mittens with knitting needles (schemes and descriptions will help you understand this difficult business).
14:1430How to tie beautiful mittens with braids for women
Mittens with brazy knitting needles and description for lover of classics.
14:1659The pigtail will be the main decoration. We have chosen a simple braid, but if you are not afraid of difficulties, you can choose a more complex and original option.
14:270Yarn - acrylic (can be from Angora), approximately 70 g.; Breaking spokes number 3.5.
14:393 14:398
Pattern "Rubber": 2 persons., 2 out.
15:965Crab "Spit" pattern: 8 loops crosspit left (leave 4 loops on auxiliary needle before work, 4 persons. And penetrate loops from auxiliary needles).
15:12588 loops cross the right (leave 4 loops on the auxiliary needle at work, 4 persons. And to penetrate the loop from the auxiliary needles).
15:1506Dissate 48 p. And distribute them to the bullshops, it turns out on each spice of 12 loops. Knit a 7.5 cm gum pattern (if you have little gum, knit more cm).
15:287Then, proceed to knitting the main pattern. For the convenience of knitting the "Spit" pattern, I carry a loop with 1 and 2nd spokes per knitting. Those. My loops are distributed by 3 knitting needles (and not on 4 knitting knitting), on the first spice 24 loops of the main pattern, and on the 2nd and 3rd spices from the palm of 12 loops.
15:781So, the first row after the gum begins with the knitting needles on which 24 loops, begin to knit the main pattern.
15:9681-6 row: 1 Persons., 2 is elevated, 8 persons., 2 izn., 8 persons., 2 izn., 1 Persons., Loops on 2ps from the palm of the knitting faces.
15:11467th row: 1 individuals., 2 out., 8 loops crosspit left, 2 out., 8 loops crosspoint right, 2 out., 1 persons., Loops on 2 knitting on the palm of the palm of the knit. We repeat the ranks 1-7 throughout the work.
15:1495 15:1500
At an altitude of 10 cm from the start of knitting (you do not need to be 10 cm, your hands and fingers are different), form a thumb hole.
16:768Let's start with the left mittens. On the face of the palm (3rd needles), knit 4 persons., 6 p. Remove to the pin, we type 6 p. (To allow them, as before 12), 2 persons.
16:1056Hole for thumb with right mittens knit symmetrically, i.e. On the second spice from the palm: 2 persons., 6 p. Remove on the pin, we recruit 6 p., 4 persons.
16:1350Make formation We carry out after the little finger is closed on hand.
16:1497 16:1502
For the rounded mystery, you lie on each needle two middle loops together.
17:664Remove the loops in each row, while the knitting needed only 1 p. (Total 4). After that, tear off the tangle thread and in the needle in a needle. Pick up with a needle all 4 p., Roll and secure with the inside the mittens.
17:1033 17:1038After two mittens are associated with a thumb knight. To do this, remove 6 p. From the pin to the knitting pin, we recruit 6 p. On a parallel row and type 4 p. On two side rows. Total turned 20 p., We distribute them to 4 spokes (5 p. On the needle).
17:1513 17:4
And knit circular rows of persons. to the desired length of the finger. We form the thoughts of the finger similarly to the formation of the mittens of the mittens.
18:734 18:750Knitting needles for children
Babies love very much when mom creates with her hands, for example, beautiful chanterelles or bears that can be put on the handles and go to play in snowballs.
18:1086Knitted children's mittens with owls
For a child, there is nothing more interesting mittens with a pattern. Such things he wears with great pleasure, so I propose to please the child wondrous owls.
18:1439 18:1444
19:4
Materials and tools:
19:541 MOK;
Breaking spokes No. 1.5;
Additional needles or special removal of loops;
Needle for yarn;
Four beads;
Threads and needle for sewing beads.
Mittens knit in two threads.
So, we recruit 32 loops, distribute them for 4 knitting needles (8 on each).
1 - 10 rows: gum 1 persons. x 1 is elevated
11 row: persons.
12 row: persons.; Add up of 2 persons from breakdown. On each needle
13 - 18 Rows: Persons.
19 Row: We begin to encourage the "owl" on 12 loops of the third and fourth spokes. First needles - persons.; The second needle - persons.; The third needle is 4 persons., 6 is elected; The fourth needles - 6 is ezn., 4 persons.
20 row: just like the 19th.

21 row: first needles - persons.; The second needle - 2 persons., Remove 6 loops on the pin for a thumb hole, to score 6 additional loops, 2 persons; The third knitting needles - 4 persons., 2 out., 4 persons.; The fourth needles - 4 persons., 2 out., 4 persons.
20:38822, 23 rows: first needles - persons.; The second needle - persons.; The third knitting needles - 4 persons., 2 out., 4 persons.; The fourth needles - 4 persons., 2 out., 4 persons.
20:60824 row: first needles - persons.; The second needle - persons.; The third knitting needle is 4 persons., 2 izn., 2 loops to remove on extra. The needle behind the work, to penetrate the following two loops of faces., Then loops on extra. Spice - persons.; The fourth needles - two loops to remove on extra. The needles before work, to peck the following two faces., Then loops for extra. Spice - persons., 2 out., 4 persons.
20:118625 - 31 Rows: The first needles - persons., The second needle - persons., The third knitting needles - 4 persons., 2 izn., 4 persons.; The fourth needles - 4 persons., 2 out., 4 persons.
32 row: just like the 24th
33 - 35 rows: first needles - persons.; The second needle - persons.; The third knitting needles - 4 persons., 2 out., 4 persons.; The fourth needles - 4 persons., 2 out., 4 persons.
20:167036 row: just like the 24th and 32nd.
20:4837 row: first needles - persons.; The second needle - persons.; The third knitting needle is 4 persons., 2 out., 2 persons., 2 izn.; The fourth knitting needle is 2, 2 persons., 2 out., 4 persons.
20:28438 - 41 rows: first needles - persons.; The second needle - persons.; The third needle is 4 persons., 6 is elected; The fourth needles - 6 is ezn., 4 persons.
20:48539 row: We start to subscribe. The first needles - to stick the first 2 loops together. for the back wall; The second needle - to train the last 2 loops of persons. behind the front wall; The third needle is to stick the first 2 loops together. for the back wall; The fourth needles - to train the last 2 loops of individuals. For the front wall. The rest of the loops knit on the pattern (individuals. And out.)
20:1117 20:1122
When there will be only 8 loops on the spokes - we are tightened by a needle. For the thumb to be transferred to the pin on the pin to the knitting pin on the pin, type 2 + 6 + 2 hinges from the edges.
21:1945 21:4

Video lessons from the best masters
YouTube today has become a real treasure, where you can find a huge number of learning video. For example, in the blogs Svetlana Bersanova video tutorials can be viewed free. And there are not few such good author. You can find a mentor to the soul and get the most valuable knowledge absolutely free.
25:1616Original mice or white hedgehogs for kids
25:105 25:110
How to knit mittles
25:166 25:171
Warm openwork for the girl (double Mochhar)
Part 1
25:286 25:29125:302 25:307
Part 2
25:324 25:32925:340 25:345
Interesting two-color minions for a boy of 7-8 years
25:460 25:465
25:476 25:481
Jacquard products (video tutorials)
Jacquard with winter topics - a classic that will always be relevant, so I propose to go to the most difficult versions that require a maximum of time and attention to detail.
25:884 25:889Original knitting with ornament (Norwegian patterns)
25:1008 25:1013
For girls with deer
If you want to learn to knit a complicated, but very original pattern of "deer", this lesson will help you with a detailed description.
25:1292 25:129725:1308 25:1313
Men's mittens with Arana for small men
25:1421 25:1426
If you are learning all the lessons offered by us, you can fantasize and create products of any complexity: Women's gloves without fingers, with a folding riding, with a false pattern, from thick yarn and embroidery. Good luck to you in your endeavors. Try, experiment and indulge your homemade nice knitters.
25:199525:4 25:7
Gentle, warm, comfortable, stylish mittens with knitting needles - what else brings so much inspiration with needlewomen in winter? Moreover, it is beautiful as the process of knitting mittens and the result obtained in the end. Tie this accessory is quite simple, but it will look exclusively. If you know how and love knit, and you want make your loved ones exclusive gift for the new year - No cooler idea than make mittens with knitting needles: Description and schemes are already waiting for you on this page, like exclusive video lessons.
Beautiful mittens with a pattern is a unique, and most importantly, a warm find for those who love to look unusual. Of course, today almost any thing you can buy in the store, however, for your own model, you can independently pick up the yarn, choose a pattern and gorgeous to decorate your pair of vergesby the decor, which only want. Of course, such a designer model in the store will cost Neschaev, you can make it with your own hands.
Before proceeding with the performance of work, you should carefully make the hand measurements so that your future product look perfectly.
What measurements should be made before knitting the verges?
- Girth brushes on line running from index finger to the little man (We carry a centimeter tape on the bones).
- From the beginning of the brush to the tip of the middle finger.
- From the Misinchik to the wrist. Also takes into account the length of the thumb.
- Measure distance between thumb and wrist.
Also for its future masterpieces it is necessary to choose the corresponding size. There is special size scale Movers for men, women and children.
 When you count the size of the mobs and measure your palm, you should take into account the thickness of the yarn and the size of the spokes. If the nipple is quite dense, then the yarn is needed slightly more: when knitting molds, harms or braids take yarn by 30-40% largee than this is required.

The calculation of the yarn is made as follows:
- for women's verges - 100-120 g yarn;
- for children - 60-70 g thread.
The table indicates how much it is necessary to recruit loops for knitting of those or other verges. Knit we begin with a brush and knit in a circle for 5 knitting . Cuffs we knit a pattern of gum - Through one facial and one irons, either 2 through 2. Go to the instructions of knitting cuff mittens for beginners.

- Loops we we recruit on 2 spokes.
- Then we divide the number of loops on 4 parts (equally) and pour on the needles.
- A row of loops closer in the circle and tie the ends Threads among themselves.
- Cuffs will be 5-7 cm.
- After you connect cuffs, add one loop on each needle.
- Knit the main part of the mittens to the field of thumb.
Mittens with knitting with pattern: schemes and step-by-step instructions
Now that you know how to correctly do measurements and knit cuffs, you can proceed to the consideration of the chart of the vessels with the pattern with the pattern.


Beautiful patterns on the mittens are designed not only for women. Men's mittens with a drawing also existand they look spectacular and stylish.


Unusual New Year's mittens Let's give you a festive mood.


Consider now several stylish schemes.


Mittens with brazy knitting needles: Schemes and descriptions
In the process of knitting vechers it is very important to correctly arrange a thumb. Earl of a big finger for the right mittens will be on the third needleFor left - on the fourth needle. In the photo you can consider a small master class to knit finger (one of the options).

- Inspecting a hole for your finger. On each needle you have the same amount of loops, for example, 12. The first loop knit on the third knitting needle, and the next 10 challenge the pin.
- On the right spoke to throw air 10 loops (So \u200b\u200bmuch loops you removed on the pin). Knit final 12 loop.
- Knit in a circle to the level of maiden.
- Reduce the number of links: on the first and third needle knit with a cake of 2 loops (Start), and in the second and fourth needles knit 2 joint loops for 2 upper stakes (end).
- On each needle reduce the number of links (through a row), Until half of the loops remain on each needle (from the initial number). We reduce the number of loops in each row.
- When you have 8 loops, we are tightened and tighten with an inside.
Knit a big finger
- Loop removed to be transferred to the needles.
- When we knit air loops, we have both edges. We recruit from them new loops in quantity, multiple 3.
- We distribute hinges for 3 knitting needles and knitting into the tip of the nail. We reduce the loop, as described above (in paragraph 4).
- The last 6 capeties collect and tie With inside.
 These 2 patterns will help you. master knitting techniques.

 Here is another option of knitting mobs with a spit pattern - cute Sovice - For Girls.
 Elegant female mittens with flowers can be connected free of charge on this MK.
How to tie baby mittens with knitting needles?
Perhaps every mother wants to learn how to knit mittens for children. This is another faithful way to give your child your love, care and warmth. Children's mittens knitting needles even easier than adults, because they are smaller in size.  Instructions for knitting children's verges Explain all the nuances of work. This method of knitting is considered the easiest and most universal, and the mittens will fit for a child for 7 years, and for 2 years, and for 1 year (see the size table).
 And this set of children's patterns A little will complicate your task, but will cause a storm of positive emotions from your baby.
 Here it looks tender and cool "Help Mittens". In the front, they look pretty neatly, but on the back of the palm there are soft "needles" from the threads, and on their fingers - the muzzle of the hedgehog. In this photo, a detailed MK is painted.
 You should also clarify how to finish work.
- The first way. To round the thoughts, we reduce the loop at the end and in the middle of each needle. The last loops are closed into the ring and tighten the thread from the inside.
- The second way.On the first and third knitting needles, they see every two first hinges with a cake. At the same time, stretch one loop through the second. On the second and fourth knitting needles, we have together the last two loops.
 And on this scheme you can tie mittens on two spokes.
 This instruction presents a detailed description, how to knit fingerin such an accessory, like mittens without a seam.
 Jacquard patterns Also welcome in children's mittens.
 On 3 knitting knit cute mittens. Your child will like such a new cozy friend.
 Here is such beauty you can tie on 5 knitting.


Today are popular mittens with Indian Wedge.
 Children's mittens with ornament They look concisely and stylish.
Knit Mittens: Beautiful models with knitting
We continue the interesting topic of knitting veasions and mittens. We have prepared for you a few more ways, how to knit mittens with knitting needles.
 - To stay closer to each other.
If you know how to knit, then tie the mittens to you will not be difficult. And in order to make the mittens not only warm, but also beautifully can be knitting them with various drawings, patterns and braids.
White mittens with a pattern of brass
For these tops you need yarn 100 gr. 100 m. The yarn is better to take thick.
Circular spokes under No. 7 are best suitable.
We recruit 30 loops on the needles and check 6-9 cm. Rubber. Gum knit 1 p. Pouring 1 p. Facial.
After you connect the gum go to the drawing with braids. To start the formation of the pattern, knit 2 p. The invalid 9 p. Facial and again 2 p. Pouring. The rest of the pigtail ties only by facial loops, as shown in the diagram. Look at the left side and follow it. It is only necessary to start knitting according to the scheme, and then the principle will be understood.
By sticking the centimeters 15, we leave the loops of 6 to the finger, traveled to the loop pin, and we throw 6 loops on the new ones and continue to be knitted.
When the mitten becomes the size of your hand, start starting the loop.
First on the sides of the drawing and about the middle of the palm. When 8 loops remain, tighten the loops.
So it turned out beautiful, knitted mittens.
Patterned mittens

These mittens with beautiful braids fit on five spokes or so-called stocking spokes. We recruit 52 loops, it turns out, 13 loops per knitting. An elastic band knit 2x2 about 40 rows. The following is a scheme and description, how to knit braids.
Irrieving your finger on the 10th row. On the side of small braids, adding to two middle hinges - in the second row 3 times. Then in the third row 3 times. When it becomes 18 loops, cross them onto the pin and continue to knit the mittens. Finger can be associated later. It knits exactly as well as the mitten herself, only smaller size.
Then there is a double knitting, in the first row on the spokes knit alternately one facial loop and two together facial. In the second row of facial loops, two loops together and so until the end of the row. All the remaining hinges will pull out.


Beautiful knitted mittens
Facial mittens knit, circular knitting, all loops facial.
Spit knit according to the scheme (see the scheme below).
Divide 48 loops for four knitting needles and tie to each other to get a circle. Of the first two spokes, it is 24 loops, there will be palm. From the other two spokes, it is also 24 loops, there will be a back side. The first and second knitting knit facial stroke.
The third and fourth needles are counting on the pattern, 3 loops of the facial, 9 loops on the braid, on one needle and on the second 9 loops on the braid and 3 loops of the facial. Next, after 40 rows, we remove 7 hinges for a pin to the pin, and type 7 air loops on the needle.
Tied the mittens on your hand, start to run, for this, in each second row, we reduce the loop. So that the triangular launch is needed to be removed from the 1st and 3rd needle at the beginning of the row. With the 2nd and 4th Spice, the last loops. After 24 loops remain, start to get out in each row. Last 8 loops are shy.
Knit finger
Separately, remove 7 loops from the pin from the pin, type 7 loops from the top edge to the second knit and twist on the sides. There should be 18 loops. Knit a finger with a circular stroke, all the loops are facial. After the desired size, launch your finger, as well as the mittens itself.
The edges of the molds can be tied with a crochet and decorate beads or beads.