Yulia Popova
"Draw with thread" Master Class.
This unconventional imaging technique is very affordable and absolutely successful. Each of us who teaches children to draw knows that there are children who literally "Afraid of a blank slate"... Having tried this technique, you will see in minutes how liberating your children are. Feel like a magician in their eyes.
My children and I very often draw with a thread... The results are always in line with the expectation of a miracle in their hands; a surge of positive emotions and great mood; children just "Shine" eyes. And how parents react! Sometimes I watch my parents react when they consider drawings of their precious children, and, believe me, grown-up people light up with this idea of drawing ... and then bring their drawings... This is how I remember one important-important dad-boss, who once brought me a folder of his thread drawings,and while saying: “I drew with my son all evening. I never even thought that I had so much fantasy and imagination. "
I certainly may not "I will open America" Most likely, this work is familiar to many, but, unfortunately, I had to see how this just a gold mine of the development of imagination and creativity, the flight of imagination and 100% success of the child were spoiled by some unpreparedness of teachers and ill-considered presentation of the technique itself. But it is very simple and accessible. So, I suggest you mini thread drawing master class.
Very little is needed for this exciting job.: a skein of white thread, paper and a bottle of ink or ink, a marker or felt-tip pen - that's all!
PRACTICAL ADVICE:
1. Threads it is better to take white - so the children will see how thread soaked and changed color.
The best image clarity will give you reinforced threads, and the thickness of the thread is more convenient 40-60.
Do not use woolen threads... They are too fuzzy and everything will be smeared.
2. Length threads the best option is 40-45 cm. If it is shorter, there will be no possibility "Laying down" strings; if it is longer, it is difficult for a child to pull it out.
3. When the child takes thread to dip it into mascara (or ink), it is better not just to clamp it between your thumb and forefinger, but to make a loose loop around the index finger. This is for better fixation threads in fingers... One enough thread for 5-7 patterns then she will start "Get sour".
4. Why ink or ink? Everything is clear here - they contain a certain percentage of alcohol and they quickly (almost instantly) dry and do not have a specific odor.
5. It is more convenient to pour ink into the most ordinary saucer. (I once saw a teacher trying to teach children to paint thread in a brick of watercolor paint flooded with water. For fun, try this - you will immediately understand how inconvenient it is).
6. Marker or felt-tip pen at the beginning of such a practice, it is better to take a different color than ink or ink (for a clear definition of the painting, and then take it in tone - this will get a more complete picture.
That's all the practical advice.
Progress:
Thread arbitrarily and smoothly lower it in a saucer with ink. We also smoothly raise the painted over the saucer. thread(if abruptly, there may be splashes, or the thread gets tangled).
On an outstretched hand, hold the thread over a sheet of paper and arbitrarily lower it thread... When 10-15 cm remains between the plane of the sheet and the hand, then we cover the lying on the paper thread with a second sheet of paper, lightly press it with the second hand and pull it in any direction thread... All is ready!
You have two prints - an imprint of the outstretched threads... First, try to finish drawing one picture in front of the child, and invite him to finish the second one. Very soon, your help in painting will not be needed at all - the children will do a great job on their own, and will also surprise you with their associations and flight of imagination.
Everyone in the print can see their own picture. And this is great - here she is, a bright creative personality!
I wish you success in your work!
Materials for work:
Step one: we put thread on paper.

Step two: got two impressions.

Step three: completed. Here's a picture turned out. "Sleep of a cute animal".

Step four: designed the exhibition.


Nitkography for children
Alena Dmitrievna Krutenkova, teacher of additional education, MBOU DOD "House of Children's Art" p. Molchanovo of the Tomsk region
Dear colleagues, I bring to your attention the material where you can get acquainted with a powerful and unjustifiably forgotten instrument in the artist's visual means - "Nitkography". The word "nitkography" consists of two words: thread and graphics(from "grafo" - "I write") - a type of fine art that uses lines, strokes as the main means of painting ... That is, it turns out, "I write with a thread" or, more simply, "I draw with a thread."
The main task of the artist - nitkographer: find in the loops and hooks left by the thread on the sheet, images that can be recognized and used in drawings.
the main objective such classes: creating conditions for the child's experimental activity in the field of mastering the imagery and symbolism of color.
Tasks:
- to teach children to refer to their experience, analyze their feelings, create new meanings and forms;
- to develop the creative potential of children: imagination and imaginative thinking;
- to instill artistic skills and aesthetic taste.
Activity organization form: individual and practical.
The lesson is aimed at an audience of 5 years old and above, with no age limit.
To study nitrography, we will need a large number of Her Majesty Your Fantasy. What is fantasy? The generous and brilliant storyteller Viktor Yuzefovich Dragunsky will help us figure this out.
Fantasy
I'm a sky climber
I climb the sky
And then from there - once! -
I sink to the ground.
You do not believe? Well then ...
It's not a lie anyway
And my fantasy.
Her Majesty Fantasy also woke up in my head, and a small rhyme was born on this method of drawing.
Nitkography
I want to invite you to create masterpieces -
Draw with an ordinary thread.
Here is the image of a wolf, a cat or a lion,
Or maybe a long-nosed owl is here?
The mice rustled from under the thread:
- And where are our smart capes!
A wonderful bird stood on its wing -
Everything spun around, went head over heels ...
And my thoughts suddenly began to stir
They poured into the leaves with a wonderful song,
They wrote a fairy tale for us,
The needle and thread were glorified.
And they are happy to dance on paper,
We would have embraced a dashing fantasy!
To embody Her Majesty Your Fantasy you will need the following materials and tools: paper, gouache, ink or watercolor, pen, brush, threads of different thickness, needle, napkins.

So, let's get started! The technology for performing "nitkography" is extremely simple.

1. We take a white sheet of paper, format A-3 and bend it in half - this option is acceptable in primary education, and if you get carried away, you can take 2 sheets that are not fastened together. We collect paint on a thread with a brush: we lower the thread in ink, or paint.
2. Arbitrarily lay the thread with paint in loops and zigzags on a sheet of paper.

3. After the thread moistened with paint is laid, it is covered with a second sheet. Both sheets are pressed tightly against each other by hand, and the thread is pulled at the end.

It is good to use thick woolen thread - the pile leaves the most intricate silhouettes on the paper.

4. Several colors can be laid on one sheet with thread. They can be intertwined with each other, or they can be printed separately from each other.

5. To create more interesting images, add a needle, with which we pierce the top sheet in the right place, and pull the thread through the hole.

6. After the thread is pulled out, you have two mirror copies with intricate designs that you can later refine.
Each time you get two identical patterns. They can be viewed from any side ...


This is an inverted previous drawing ...

The same print gives new images.


If you are observant, you will soon be able to deftly control the needle and thread.
And now I want to tell you a fairy tale, which I have gladly composed and tell my pupils in the classroom.An extraordinary journey of Thread and Needle
Little Princess Thread sat and was bored in her secret corner. She explored all the expanses of her kingdom, learned how to make simple and complex seams: from sweeping details to amazingly delicate satin stitch embroidery. She wanted something new, unusual. Nurse-mothers Fingers never allowed even a step to step without them, but she really wanted independence ...
- What are you doing? - the servant Needle broke her solitude.
“Yes, I miss you,” Princess Thread said sadly.
- Listen, let's go on a trip! - Needle suggested cheerfully and happily.
“I would love to,” sighed Nitochka, only the nurses are unlikely to let us go. And where will we go if we never know anything except our kingdom, ”Nitochka said even more sadly and almost despairingly.
“Just think,” Igolochka objected briskly, “travel is what you need to study different countries… Do you remember how the old Count Tangle told us a tale about the extraordinary country of Imagery.
- Yes, I remember, but how do we get there, in this country of Imagery?
- Stop whining! - interrupted Needle. - Let's go!
She grabbed Thread by the hand and dragged him along.
- Where are you taking me? Let go of my hand and tell me where we are going.
- Where where? Of course, to grandfather Tangle, - Igolochka answered with a smile and mischief.
- What if he complains about us to the nurses? - Still in a plaintive voice, Nitochka spoke as she walked, barely keeping up with Needle.
- How do you imagine it? - Stopped, rooted to the spot, Needle. - So that an inveterate traveler like Count Tangle would run to complain? Well, I beg you! Has he nothing else to do?
“You’re probably right,” Nitochka answered in a more cheerful voice. “Let go of my hand. I myself will go to Grandfather Klubku with pleasure.
The friends quickly ran down Pugovichkina Street, turned onto Spitsyns Street and ended up on Klubochkin Street in front of the count's house.
- Oh, what are we going to tell grandfather Tangle? - Indecision again seized Thread.
- Friend, you are so strange. Of course, we will tell him everything as it is. Go ahead, follow me!
The needle knocked loudly on the Count's door.
-Who's there, - a cheerful, slightly hoarse voice was heard.
- Grandfather Count, this is us, Needle and my friend Nitochka.
- I'm going, I'm going - answered the grandfather. - Well, hello, young princesses. How can I help you?
Hello, Grandpa Ball, - as if spellbound, the girls answered in chorus. For the first time they were in the possession of the count, and they really liked the garden and its snow-white castle. Knitted columns towered over the trees and flowers. A white gazebo, with lace trim, was buried in a blooming apple tree, in all corners, like a multi-colored carpet, there were all kinds of flowers: gorgeous peonies, haughty daffodils, beautiful roses. Everything was done in the same style, it was immediately obvious that real masters worked wonderfully here.
- Well, so what is it about - with a smile asked the grandfather Ball.
- We wanted ...
- You know what, let's go to the gazebo, and there we'll calmly discuss everything.
Grandfather Tangle took the girls into the depths of the garden, to a fabulously beautiful gazebo. He rang the knitted bell, and immediately there was a thin, very graceful, his assistant Knitting.
- Dear Spitsa, please serve us some tea with honey and strawberry jam, - Grandfather Clew ordered.
“This very minute,” Spitsa answered, and at once she appeared with a knitted tray laden with various dishes. She set a small, elegant table in the middle of the gazebo and quietly left.
- Help yourself, beauties, - offered Grandfather Tangle.
- Thank you, - as in a dream the girls answered in chorus. They began to drink tea infused with rose petals and peppermint with a bite of strawberry jam.
- So tasty! - Nitochka admired.
- This is a treat! - Igolochka did not hide her delight. - Grandfather Ball, could you take us to the country of Imagery, which you told us about at the festival of dreamers.
- To the land of the image? - Grandfather Klubochka asked slyly. - Why do you need to go there?
- We are tired of sitting in our kingdom, we have already studied all the sciences well and decided to go on an exciting journey to learn something new, - Needle blurted out in one breath.
- Travel? This is great! And what will Mother Pink Bobbin and the esteemed Pincushion say about this?
“We are already five years old, and we ourselves can be responsible for our actions,” the still silent Nitochka said with firmness in her voice.
- Well, since you are so grown-up and independent, then of course, I will take you to the land of paints and brushes. This is not to be in a distant kingdom, and not just seven mountains, but here, nearby, in a neighboring kingdom.
- Hooray! The girls shouted in unison. - When are we going there? They asked impatiently.
- Have you finished your tea? - asked Grandpa Tangle.
- Yes, thanks a lot! We have never drunk such amazing tea.
- Do you want supplements?
“No,” Thread and Needle answered in unison.
- Well, well, then you can set off right now on the path of the track!
- And what do we need to take with us?
- Good mood and a little imagination, - answered Grandfather Tangle.
- Then let's go! - Thread chirped cheerfully and happily.
They left the Sewing Kingdom without any obstacles and in five minutes stood in the Main Exhibition Square of the Country of Imagery. From the grace and beauty of the exhibited paintings, Thread with Needle felt dizzy out of habit and gasped. They have never seen so many paintings made in different techniques and genres. And how beautiful and believable were the captured moments! The girls, together with their grandfather Klubochk, passed from one picture to another, admiringly examined various historical subjects, portraits of famous people, picturesque landscapes and animalistic genres.
- Do you want to see one of the workshops where such miracles are created, - asked Grandfather Tangle.
- Of course, - the girls clapped their hands. - We will be happy to see the birth of paintings.
- Then we come here, - said the grandfather, and the whole company turned into Inspiration Street. They went into the nearest workshop and witnessed an argument between the two ladies of the Brushes. One of them was as thin as a reed, the other was the complete opposite: a very well-fed and wayward lady.
“Interesting,” said the plump Brush. - Why do we need such thin people like you?
“We are very much needed in the Land of Imagery. After all, you cannot complete any standing drawing without us, thin brushes, retorted the Reed Brush.
- Something I doubt, - the plump lady did not stop. - Look, what a rich smear, it turns out from under my nap.
She quickly dropped into a jar of gouache and ran over a snow-white sheet of paper.
- But I leave a thin, barely visible trace.
And the Reed Brush left a thin, barely visible mark on the sheet.
- And you can try for me too, - Nitochka could not resist and interrupted their argument.
- Maybe I will succeed, - said Needle uncertainly.
Both Brushes instantly fixed their gaze on the strange company.
- Who is squeaking here? You weren't taught not to get involved in other people's conversations? They said in unison, as if they had not noticed the girls.
- Dear ladies! We came from the Sewing Kingdom, - grandfather Tangle stood up for his charges. These young talents decided to try their hand at a new field.
“Let them try,” Aunt Gouache stood up for Thread and Needle. - I love it when someone comes up with something new, - and she opened her possessions for Thread.
- Wow, - Thread rejoiced, and dipped her tail into yellow paint. But she was so small and light that she could not go down even three millimeters in gouache.
- Come on, come on, - Brushes began to gloat. - Let's see what you are capable of.
“I myself don’t know what I’m capable of,” Thread almost cried.
- Ladies, in general, it is not decent to welcome guests from a neighboring kingdom, - a snow-white gallant Sheet of paper stood up for Thread and deftly spread it out in front of her. - Come on, girl, do not be shy.
- Forgive us girl, it's just that when my sister and I begin to quarrel, the whole world ceases to exist for us. I'll help you pick up the paint, ”said Brush reed guiltily.
She carefully helped Nitochka to plunge up to her shoulders in the paint. Soft paint caressed Thread's body, tired from travel. Thread was happy. She crawled out of the paint and happily swirled on a sheet of paper in an unusual shape, but she didn't know what to do next.
The snow-white leaf felt sorry for the girl, and he gallantly covered her with his other free half.
- Where are you! - Mamki-nannies shouted and with force pulled the thread from under the sheet. - We knocked off our feet, looking for you, and here you lie to yourself calmly, chilling - they did not let up.
Educators, sincerely loving children and passionate about their profession, always try to go beyond the traditional program in fine arts and periodically invite preschoolers to create in non-traditional techniques. Children really like such activities, because they offer great opportunities for self-expression and the manifestation of imagination. The original and accessible way of drawing is nitkography and thread painting.
What is nitkography and thread writing
Nitkography is laying out images of various objects using a thick thread or cord. At the same time, the thread is glued to the base. The result is an unusual textured picture, even if simple images are chosen. The image can be contoured or the objects are completely "shaded" with yarn.
The image can be outlined, or objects are shaded with a thread.
This technique originated in Mexico. Local craftsmen created paintings with ethnic flavor from thick woolen yarn. The base was impregnated with a special mixture containing pine resin and beeswax, and the multi-colored threads formed various patterns. Due to the simplicity of execution and low cost, nitkography is popular in our time.
A variety of nitkography is thread writing. This is drawing with a colored thread (most conveniently with gouache). It bends many times and floridly - the result is a graceful and often fantastic image. Glue is no longer used in such a painting. With the help of dyed yarn, flowers, butterflies, underwater, space and magical landscapes are most often painted.
Dyed threads often create beautiful flower arrangements.
In this case, the finished image is often complemented by a brush.
Specific details of the image are complemented with a brush
Isothreading also applies to thread drawing. When working in this technique, holes are pre-pierced on the base along the contour of the image, and the threads are threaded through them, forming an image.
Holes are located along the contour of the object, into which threads are threaded
Tasks of using the techniques of nitrography and threading in kindergarten
Drawing with threads is of great importance for the development of preschoolers, it solves a number of important educational, developmental and educational tasks:
- Acquaintance with a new drawing technique. Children learn new visual techniques.
- Improving visual perception. Kids carefully peer into objects, highlight their structural parts, while maintaining the integrity of perception. In addition, the eye is trained: after all, you need to figure out which thread in length you need to take for each element.
- The development of fine motor skills. This is very important, because many modern preschoolers have problems in this area: parents do not do enough with their children at home, try to buy shoes with locks and Velcro instead of laces, buttons on clothes are replaced with buttons, etc. Developed fine motor skills are a guarantee the ability to write correctly and beautifully at school.
- Development of creativity and imagination. There are guys who are afraid of a blank slate, unsure of their capabilities. The unusual technique liberates them, turns them into little wizards.
- Improving attention, perseverance. Classes with pliable soft thread calm preschoolers, they work more carefully.
Painstaking work remarkably develops fine motor skills and fosters perseverance in children
You can practice drawing with threads in kindergarten from the middle group. Initially, these will be very simple images, for example, the collective composition "Basket with balls". The teacher lays out the largest element - the basket, and the kids complement it with multi-colored glomeruli (spirals of thread).
At first, pupils of the middle group create very simple images.
Over time, the work becomes more complicated, a more complex contour image and "hatching" appear.
Required materials for classes
Drawing with threads involves unusual combinations of materials and tools for work. So, for nitkography you will need the following items:
- Base - any rough surface of white or other color: thick paper, cardboard, velvet paper, a piece of flannel fabric, plain carpet. The dimensions of the workpiece should not exceed the A5 format. In addition, you can use templates depicting an object: children will decorate it with threads.
The base may be in the form of an object that children will decorate with threads.
- Sufficiently thick (at least 2 mm) woolen, acrylic or cotton thread. In the middle group, you can even give a lace with a diameter of 3-4 mm, but not synthetic (it should not slip). The thread can be cut into pieces in advance, older preschoolers do it on their own in class. The length of the solid thread depends on the specific objects in the pattern.
The thread for drawing should be thick and non-slip.
- PVA glue.
- Glue brushes, napkins, oilcloths, scissors.
- Thin wooden sticks or toothpicks - to make the thread lay smoother.
- To complement the composition, you can offer the children pencils, felt-tip pens, watercolors.
For thread writing, the following set of materials is required:
- Album sheet of A5 format.
- Threads of the same texture and thickness as for nitro printing (40–45 cm long).
- Gouache.
- Jars for diluting paint with water.
- Brushes.
Gouache should not be old and dry - it is easier to dilute liquid with water
Basic techniques of nitrography
First, a drawing with a simple pencil is performed on the basis. In the middle group, this is done by the teacher, while the older preschoolers do it independently.
After that, the contour of the image is coated with glue, then a thread is glued to it. The elements of the image can be completely filled with yarn in accordance with the color scheme of the composition.
Depending on the age of preschoolers and the degree of development of their fine motor skills, you can use various techniques of nitrography: the threads are twisted into flagella, tied in pigtails, balls, beams, waves are formed (the image becomes even more voluminous).
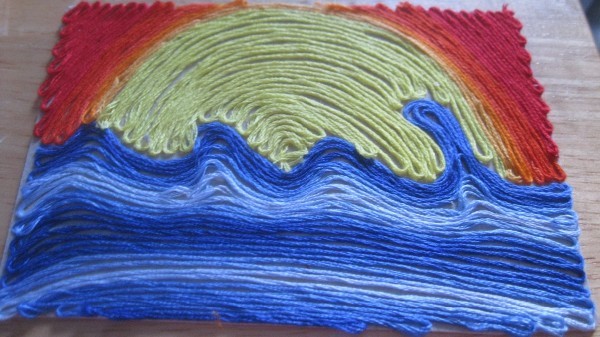
Threads can be laid out in spectacular waves - this will create the effect of volume
The density and direction of the yarn can be any. For example, it is convenient to fill circular objects in a spiral, square and rectangular - with parallel lines. The main thing is to avoid the space between the threads.
Elements of the image can be filled with threads in a spiral or parallel lines
Alternatively, you can finely chop the yarn and fill the pattern with it.
The image from the chopped yarn is more voluminous.
After gluing the threads, you need to lightly press them against the base with your hands or a sheet of paper.
Step-by-step execution of the composition "Cherries" in the technique of nitkography
- On the basis, cherries on a twig are drawn with a simple pencil.
You need to draw cherries with a simple pencil
- Then you need to apply glue to the contour.
The glue is applied directly to the graphic design
- Black threads are applied to the glue. A toothpick will help to lay it flat.
A toothpick will help to lay the thread evenly.
- Then you need to fill the inner space of each element (berries, leaves, twig) with glue.
It is convenient to fill round cherries with thread in a spiral
- The cuttings are filled with parallel lines, and the small spaces are filled with short pieces of light green yarn.
Long items are filled with the same long parallel lines
- After that, dark green threads are glued to the leaves according to their shape, and brown ones - to a twig. The cherries are ready.
Leaves have a darker shade of green than cherry cuttings
Video: a preschool girl depicts a fish using nitkography
Photo gallery: children's work in the technique of nitkography
The threads can be twisted into flagella, braided into pigtails, form balls, bunches - the image will only become more voluminous and original A complex landscape composition, appropriate for the preparatory group Although there is space between the threads, the composition is very beautiful, including a frame in the form of a thick braid of yarn A simple option for the very first lessons in the nitrography technique An uncomplicated composition of fruits for the middle group Outline image, unusual in that the threads are braided The combination of long threads and yarn scraps is an option for older preschoolers The body of the cat is decorated with a fantasy ornament of threads
Video: children's works, lined with threads (video sequence)
Basic techniques of thread writing
To draw with the thread-writing method, you first need to fluff up the woolen thread a little (its pile will create an interesting effect).
Then the thread is dipped in gouache diluted with water and laid out on a sheet of paper in the form of an arbitrary figure.
The thread should be moistened with paint slightly diluted with water
Then the base is covered with another sheet and the image is lightly rubbed. After that, the top sheet is first removed, and then the thread is carefully removed. The result is a whimsical image. It remains to complement it by connecting imagination.
The resulting image must be supplemented with details until the desired image is obtained.
You can simply fold the sheet in half - you get a combination of thread writing with a monotype. The result of creativity will be an elegant symmetrical composition.
Filament writing is often combined with monotype - elegant symmetrical images are obtained
Step-by-step execution of the composition "Beautiful flower" in the technique of thread painting
- The thread needs to be dyed in a deep blue color and twistingly laid out on paper so that its tip hangs down.
The thread needs to be folded fancifully and leave its ends outside.
- The image is covered with a second sheet, from above you need to press it down with something heavy, for example, a book. Then the thread is pulled out sharply at the ends. As a result, when the second sheet is removed, you will get two identical patterns.
As for a specific thread-writing technique, it is usually not considered a separate area of work. Classes are held as part of a circle on nitkography or a circle on non-traditional visual techniques (they alternate throughout the year).
The thread drawing technique is interesting and accessible to preschoolers. The works always turn out to be bright and unusual, especially since the teacher offers interesting topics for classes. Many guys are so inspired by creativity that they continue to create original images at home.
Thread printing in our country is popular, first of all, because of its low cost. It got its origins in Mexico. Experienced craftsmen create whole pictures from woolen thread that amaze with their subjects. They can not only embroider and knit, but also draw. You can create a real masterpiece with the help of a small piece of thread that was left, for example, after knitting a scarf.
Each type of needlework has its own secrets, and drawing in nitkography has its own tricks that will help inexperienced craftsmen create their first masterpiece. It is best to start with small, simple designs that do not have intricate spirals and patterns. When you learn how to form turns and bend the working strings properly, you can move on to the plot images.

In the work, you need to use thick glue, more liquid options will be absorbed into the base, in the end, they will not adhere well. If you are using old sweaters that were the basis of the sweater, for example, you need to straighten them, otherwise they will not lie flat on the cardboard. Remember that the thicker you choose the main working material, the more voluminous your picture will turn out. You can slip them closer together with a knitting needle or a regular toothpick.
After each application, press them with your hand or a handkerchief so that they grip better. If you glued the thread incorrectly, you can tear it off until it grabs or glue it with the same toothpick with the glue applied. Round patterns are made in a spiral, and long patterns are made from right to left. By adhering to simple guidelines, you can get spectacular prints without significant effort and time.
Embroidery materials
To complete the painting, you only need:
- woolen threads
- base (cardboard, fiberboard, velvet paper)
- paints

They carry out nitkographic drawings very quickly, even schoolchildren can cope with this task. You need to decide in advance on the pattern and apply it to cardboard or velvet paper. Next, use a brush to apply glue to the composition and draw outlines using threads. It is best to take woolen ones, they are denser. After that, they begin to fill in the middle of the figure, they can be placed, both in stages and chaotically, as long as there are no white spaces between them. They should fit snugly together. After the image is filled in, the drawing is ironed through a thin cloth or gauze. This is where the work actually ends, you just have to put it in a frame and give it to a loved one or decorate your interior.


Isothread
It would seem that the technique of drawing in nitrography cannot be different, but there are several more techniques of nitrography - isothreading and drawing with threads.
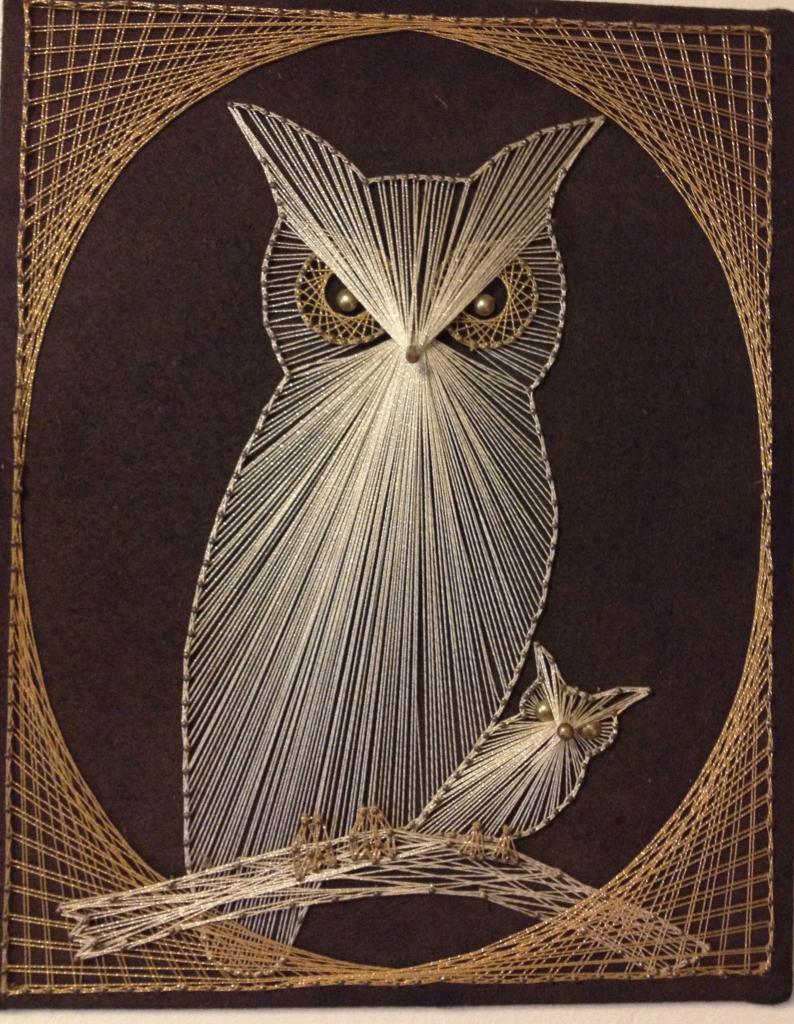
Isothreading - means drawings with threads without the use of an adhesive base. They are previously placed in the correct places and fixed to the cardboard with special nails or pulled through the holes in the base. For the first time they started talking about it in England, the craftsmen applied weaving on planks with pre-filled nails. Over time, she found mass distribution and instead of the boards that were used before, they began to use thick cardboard.

With the above technique, you can embroider large panels, landscapes, portraits of people, book covers and individual ornaments. It is very easy to master it, you just need to carefully follow the recommendations and pull the strings evenly. If you explain it in a more understandable language, then you need to put certain styles on the cardboard - this can be, for example, an acute angle. On both sides of the corner, numbers from 1 to 6 are applied in different directions. The angle itself is designated by point 0. Next, pierce the base with a needle and connect the same points.
In round figures, dots are applied to the likeness of a dial. On the seamy side, it is necessary to tie a knot and stretch the needle onto the face of the picture at point 1, then stick it into the opposite number and poke it out from the inside out to point 2, this is done in a circle. It is important to apply them with a marker that disappears or with a pencil, which can later be erased. By filling in the round shape on the front side, you get an ornament that resembles a star, and from the inside out, the thread simply follows the contours of the figure. That is why you can control the correctness of the creation of the work.
There are a huge variety of schemes for needlework, you can copy them on the Internet or come up with yourself. The main thing to remember is that the number of points in one figure should not exceed 12, otherwise you will simply get confused with opposites.


Thread drawing
It will be very interesting for working with preschool children. All you need to do is soak the wool thread in the paint. Before starting work, it is better to fluff it up, it will make the composition effective. You can draw on a regular A4 sheet. Soaked in paint, put on a sheet and cover with a second sheet. Next, roll the thread around the entire perimeter of the sheet or guide it by hand, as it suits you. In the end, a rather funny image is obtained, which can already be corrected with felt-tip pens and get ready-made cartoon characters. Several threads can be laid out on one sheet. Then the drawing will be more detailed. Unleash your imagination!


Lesson nitrography contributes to the mental development of children. Such activities broaden the horizons of the child, and also educate them for an artistic taste. For adult craftsmen, threading and drawing with woolen threads forms a creative vision of the environment. Of course, this kind of needlework requires a lot of patience and sleight of hand, but you will gain all this in the process. At first, you may not succeed in everything, but over time your efforts will certainly be rewarded, and the finished picture will be able to create worthy competition with world masterpieces.

Video master class of embroidery in the technique of nitkography
Nowadays, the opinion is very widespread that a person who does not have a hobby is absolutely unhappy. That is why the lessons of knitting grandmothers, embroidery mothers, woodcarving grandfathers and burning dads are so often remembered. All this creativity, which helps not only to distract from everyday difficulties. For some, this is a real way to make money. The uniqueness of handicrafts brings them special value. Today we will consider one of the techniques that will allow you to create the most real masterpieces.
The uniqueness of the patterns created by the thread
Thread printing - drawing with threads, this is an unconventional technique. With its help, you can create unique crafts that will not have competition, since everything will depend only on the imagination of the author. True, for each artist who will use this technique, the paintings will be very diverse. After all, the images that he will create on paper by drawing with thread and paint will be absolutely unique not only in the style performed, but also in what the artist could see in this image.
Nitkography for children
Most often, this technique is used in the classroom in kindergartens. Drawing with threads helps children not only develop imaginative thinking, have a creative approach to some non-traditional situations. Such art also requires perseverance, it helps young artists to learn how to control their fingers. And besides this, every masterpiece created by a child becomes absolutely unique and inimitable, because a childish, not yet sophisticated fantasy is included in the work.
Basic tools
So, the technique of drawing with a thread itself is quite simple, it requires a little skill and a lot of imagination. What do you need to work? A sheet of thick white paper, you can from the album. Someone prefers smooth ones, since the drawing falls on them smoother, someone seeks to expand the scope for the possibilities of their imagination and uses rough paper. Next, you need a thread. You can take a few to try on a separate sheet, how the paint left by them lays down, and then choose what you like. And, of course, the paint itself. For starters, it can be the cheapest watercolor or gouache. When the technique of drawing with a thread is sufficiently mastered, it will be possible to purchase more expensive materials to create real masterpieces. You will also need dishes in which the thread itself will be stained.
For a more even dyeing of the thread, it is better not to take disposable dishes. An uneven bottom surface can disrupt the structure of the thread, making the pattern sloppy. A brush is also useful, with the help of which the miracle thread will absorb the paint. And so as not to make a mess on the table, a box for used threads. It is worth laying them without mixing the colors. Throwing them away is not recommended; further it will be clear why.
Let's start creating a unique painting
For work, cut the thread into small, 30-40 centimeters, segments. This is the perfect size for starters. Place the thread in the dyeing bowl. Be sure to pull the ends of the threads out to keep them clean. Choose the color you like. You can create your own shade by mixing paints. Apply paint to the thread with a brush, trying to saturate it as best as possible.
Next, fold the sheet to grind. For the dry ends, pull the thread out of the container with paint and, as your fantasy tells you, lay it out on one side of a sheet of paper. You can do two at once, but this requires good skill, because if the sheet is bent, the thread can move out and ruin the drawing. You can lay it out in circles, loops, zigzags - as your imagination works. Pull dry tips down the sheet. Cover with the other side of the sheet the part on which the thread with the paint is laid out. Press the sheet tightly, for example, with a book, gently pull the thread out by the dry ends.
Depending on how the thread is stretched, you get a different pattern. You can pull on both ends at once, you can only pull one, pull smoothly or abruptly in turn. Spread out the sheet and take a close look at what happened. And the result is a mirror image of fantastic lines.
Drawing the image
Children immediately begin to see the most incredible images in them. They just have to finish the missing details. To do this, you can use the same paints, pencils, crayons and felt-tip pens. Looking at how children widely use their inner capabilities, one can recall that once upon a time, everyone had a similar potential. That is why it is recommended that adults not only teach children the technique of drawing with a thread with paint, but also join them themselves in order to reawaken their sleeping imagination. In addition, over time, adults get used to performing the main type of their work mechanically, which interferes with the development of not only creativity, but also motor skills of movements. When using this technique, the brain will have to use those parts of it that have long ceased to respond to the outside world - the parts that are responsible for the joy of creativity.
We bring variety with different threads
You can diversify the technique of drawing with a thread using yarn of various textures. For example, a thin and even thread such as iris or floss will give the drawing gentle and graceful lines. Wool or acrylic yarn will add volume and brightness. Just using them at the same time will not work due to their different thicknesses. You will have to do the drawing in several stages, be sure to wait for the previous layer to dry. Drawing is more convenient for young children or older people whose fingers do not have very good sensitivity. However, the finer work should not be neglected. It is always worth improving in drawing with threads and paints.
Colorful choice

Some experiments can be done with paints too. It is very interesting to observe children who know absolutely nothing about color harmony, but confidently dye the threads in one color, then in another, achieving unrealistic results. You are simply amazed at the varied illustrations you end up with. An adult person, creating his creation, will have to think about the combination of colors in order to teach a child by personal example not only to stain paper with different colors, but to make images that are pleasing to the eye.
Drawing flowers with threads is very popular. To do this, it is worth keeping in mind an approximate version of the picture that should be the result. The thread drawing technique provides various drawing options. You can dye a thread in one color, or two or more, you just have to take into account that when drawing a certain picture, it already makes sense to select colors according to the desired result. Flowers are drawn by laying out the thread with loops. Depending on the expected result, the threads are pulled down, to the sides, or stretched, and then pulled out from one side. This thread drawing technique helps to realize your fantasies in an unusual way. Here you have the opportunity to experiment not only with shape, but also with color. Overlapping on each other, the colors take on completely incredible shades, which are sometimes simply impossible to predict.
Thus, you can draw the whole picture, and then draw it, as your fantasy tells you. Or you can cut out with separate petals and make an applique out of them. Such jobs are often used in the lower secondary school classes. They help not only to develop imagination, but also accuracy.
Drawing decoration

When the drawing is completely ready, it can be decorated using an unconventional thread drawing technique. For this technique, you will need additional transparent glue, a thin stick (you can use a toothpick or the back of a brush), scissors, dyed and dried threads, with which the picture was drawn. You can just take threads of different colors.
Disassemble the threads by color. Cut them into small pieces, literally a few millimeters each. Put in different containers. Next, you should take a closer look at the drawing and decide which part should be decorated with such a drawing using threads cut into small pieces. With the help of a brush, smear these places with glue and pour on them segments of those shades that are suitable for this fragment of the picture. With a toothpick or the other side of the brush, correct the strings that are unevenly laid down or have gone beyond the border of the pattern. For a stronger fixation, fragments with cut threads can be additionally covered with glue on top. This will give the appliqué a shine. But if you want the drawing to look more voluminous, then you should leave it as it is.
Paintings from multi-colored threads
Drawing with threads can be more than just using paint. Extraordinary paintings can be created using leftover thread from knitting or embroidery. Thread printing includes several more techniques. For one of them you need: cardboard or a piece of fiberboard, pencil, transparent glue, brushes, scissors, threads, stick. A drawing is drawn on the cardboard. Next, a contour is drawn on it with glue, a thread is laid on it, which will highlight the picture. And again, everything depends on imagination - the thickness of the threads, and the color, and the pattern, and the ornament. Apply glue with a brush, spread the thread on it with a stick, trying not to leave gaps, tightly and evenly. As a result, a unique masterpiece is obtained, which remains to be ironed with an iron and inserted into a frame.
Isothread technique
Unconventional thread drawing is also possible using the isothread technique. This technique is more complicated not only in equipment but also in execution. For her, you will need not only cardboard and glue, but also an awl, polystyrene, a special board with holes or nails, a needle with a wide eye, a bag or file for a substrate, an awl, as well as diagrams with numbers by which crafts will be created.
Embroidery with thread
The first way to work with thread is very similar to embroidery. A drawing is applied to the cardboard using a pencil or felt-tip pen. Then holes are pierced with an awl, according to the selected scheme. The holes must be numbered to get a certain pattern. For greater clarity, you can draw it with a simple pencil on the back. Then it will be clearly seen what should be the result.
When the basic preparation is completed, you need to choose a needle with a wide eye, the threads that will be used for this craft, and get to work. We make loops from the inside out, we embroider a drawing from the face. Mastery is always comprehended from simple to complex. This technique is no exception. Do not rush to move on to complex processes. Do not overtighten the thread or leave it loose. The tension of the thread greatly affects the aesthetic appearance of the craft. From various elements embroidered in this way, you can create unique paintings.
Volumetric crafts

Another technique for working with isothread involves stretching it between numbered studs inserted into the holes of a special board in the form of a figurine. To begin with, the thread is dipped into the glue and soaked in it. A file or a plastic bag is placed on the board. Nails or special construction rivets are inserted into holes specially made in the board according to a certain pattern. Construction rivets are safer and more convenient to work with. A thread impregnated with glue is wound on them.
The product can be made bulky if you do not press it tightly against the board. You do not have to pull the thread too tightly so that inside the figure there is an impression of a kind of chaotic fullness. The finished figurine must be left on the cloves until it dries completely. When it is dry, it can be removed from the nails and used as a separate toy or as part of a painting.
The final chord in the work on the masterpiece

Crafts must be framed. Without them, any masterpiece looks nothing more than a piece of paper with threads. Recently, homemade frames from baguettes have been very popular. Color matched to the interior and the picture and neatly made, they can compete with real rich frames, and weigh much less, which makes them much more convenient to use and transport.

All of the techniques listed here have the ability to exist separately. They can be worked out and developed each separately, brought to perfection, create masterpieces that will be an excellent decoration for your home or an unforgettable gift for friends. You can combine techniques with each other. Then these crafts will become even more original and unique.
If there are children in the house, for them it will be a wonderful training for fine motor skills, and for the development of imagination, and for aesthetic and labor education. And most importantly, children will feel like they are part of something meaningful, creating decoration for their room with their parents.