How to learn to weave from newspaper tubes? Schemes, techniques and master classes of weaving from newspaper tubes. The most beautiful crafts from newspaper tubes.
The talent and skills of some people are sometimes simply amazing. It would seem that what can be done from an ordinary newspaper? Well, cap, well, airplane, well, what else? An, no, there are such masters of their craft who manage to create from old newspapers not just a work of art, but a whole masterpiece.
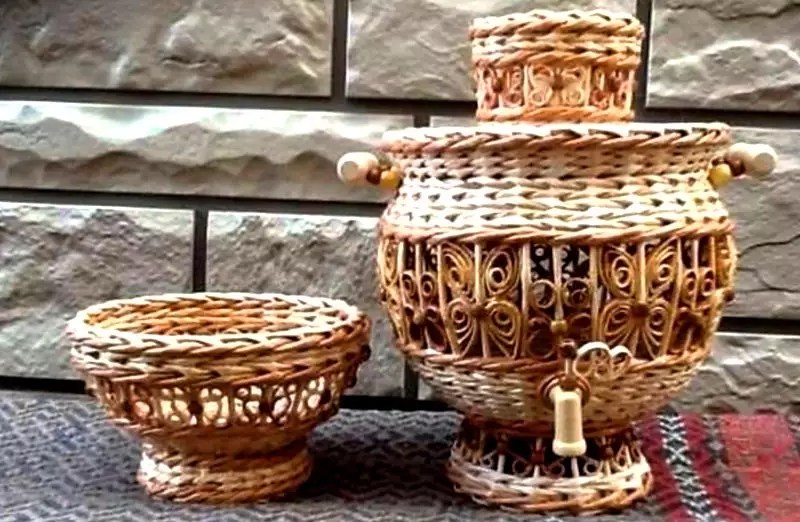
Ideas for boxes, crafts, vases, baskets, boxes from newspaper tubes: photos of the most beautiful products
Just look at these wonderful crafts made from ordinary newspaper tubes. Their beauty is simply breathtaking!


Unusual vases from newspaper tubes


How to make, twist newspaper tubes from newspapers and paint?

We twist tubes from newspapers
For those needlewomen who take up the process of twisting newspaper tubes for the first time, this business may seem very difficult and almost impossible. But over time, having stuffed your hand, you can achieve pretty good results when the newspapers seem to roll themselves into tubes.
So, here is a list of materials needed for twisting newspaper tubes:
- Newspapers
- PVA glue or stationery glue stick
- Knife, stationery knife or scissors (as you prefer)
- Thin knitting needle 0.5-1 mm or skewer

Algorithm for twisting newspapers into tubes:
- We take a newspaper or a stack of newspapers.
- We fold all the pages in such a way that they lie clearly under each other.
- Fold the newspaper in half.
- Again, we make sure that the edges of the newspaper do not overlap each other.
- Cut the folded newspaper in half.
- The resulting halves of the newspaper are again folded in half.
- We cut the halves of the newspapers along a new fold.
- The resulting quarters of newspapers are sorted into two piles.
- We put strips of newspaper with white edges in one pile - the tubes twisted from them will be pure white.
- We put strips with letters in another pile - the tubes twisted from them will be printed.
- We take one of the strips of the newspaper.
- We put a knitting needle in its lower right corner.
- The needle is placed at an angle of 25-30 degrees.
- Holding the tip of the newspaper, we begin to twist the knitting needle, while winding the paper around it.
- We try to roll up the newspaper as tightly as possible.
- Having twisted almost the entire tube, coat its edge with glue and glue it to the tube.
- We take out the needle.
- We give the finished tube 15-20 minutes to dry.

It is worth paying attention to the fact that the final version of the finished tube will have two ends of different thickness - on the one hand the tube will be thicker, and on the other thinner. Such a structure of the tubes is necessary in order to "build up" them. "Extension" is a procedure based on the creation of long tubes. It consists in the fact that the thinner end of the other tube is “screwed” into the thicker end of one tube and “pasted” into it. Thus, one long newspaper tube is obtained.
Instructions for twisting tubes from newspapers: Video
You can paint tubes from newspapers after the fact - when the product is completely ready. However, this option is only suitable for cases where the craft is done in one color. If the product is conceived in different colors, then it is advisable to paint over the tubes in advance.
You can dye newspaper tubes with any dyes:
- watercolor
- gouache
- acrylic paints
- aerosol cans
- stain (letters will show through)
- food colorings
- eyebrow, hair dye
- brilliant green
- basma
- wood paint
- colorless paint with the addition of color (this way you can do it on
- the basis of one paint at once several different shades of paint)
How to paint tubes from newspapers: Video
- It is immediately worth highlighting two types of dyes, which are the most popular among the masters of weaving from newspaper tubes - these are acrylic paints and water-based stain. Both of these water-based dyes allow the paper to be thoroughly and densely colored. At the same time, during weaving, no paint remains on the hands and surface, which is important in this process.
- In order to make the product more durable and water-resistant, it is desirable to varnish it at the tube stage. The ideal option is when the varnish is applied in 2 layers.
- By the way, in the case of varnish, you can save on paint - color can be added directly to the varnish.
- The dyed tubes must be thoroughly dried in the oven, in the sun or in front of the oven.
How and where to start weaving from newspaper tubes?

- Often the design of newspaper crafts consists of a bottom, guides and woven tubes.
- In the form of guides, several tubes of the required length are used - the length directly depends on the height of the craft.
- There may be several tubes for weaving - it is better for beginners to start with one tube.
- It is advisable to make the bottom of the craft wicker - so the product will look more attractive. With this type of weaving, the core of the bottom is first made, the ends of which will later become the racks of the craft, and then tubes are braided around it, creating a round (or other shape) bottom.
- But you can also make a solid bottom - it is created from two circles cut out of thick cardboard. The vertical racks of the craft are glued to the lower circle (they need to be flattened a little at the attachment point), and on top they are fixed with another circle with glue.
- As a basis for crafts, you can use a jar, vase, glass or other container that is suitable in size. The base is installed on the bottom, and the racks are fixed in its upper part with clothespins for evenness of the product.
- When the bottom, base and guides are in place, you can begin to braid them with a paper vine.
Ways to weave newspaper tubes for beginners: step by step instructions, master class

For beginner needlewomen, the easiest way to weave from a newspaper vine is suitable - a single one with a solid bottom:
- We take the finished frame of the future crafts.
- One of the tubes, which will act as a vine, is slightly flattened at the end.
- Glue the flattened end of the vine to the bottom of the craft.
- We start the vine behind the nearest guide (with this type of weaving there should be an odd number of them) from the outside.
- We bring the vine inside the craft.
- We braid the next guide from the inside.
- We bring the vine out of the craft and wrap it around the next guide from the outside.
- Thus, we continue in a circle along the entire height of the craft.
- In the process of work, the vine will end, so we build it up along the way.
- We make sure that the vine lays down tightly, and the racks stand straight.
- Having stuffed your hand a little, you can try to weave several vines at once (2-3).
Types of weaving from newspaper tubes for beginners - bending simple, double, rod, complex, pigtail, lazy, izida, volume: weaving pattern for beginners, photo

The scheme of weaving in the technique of a rod of three rods


The scheme of weaving from newspaper tubes using the technique of "isida"

Weaving pattern from newspaper tubes "double bend"

Complex bend - scheme


Weaving scheme "lazy braid"
The bottom of newspaper tubes is square, rectangular, round, oval: how to weave for beginners?
How to weave a simple round bottom from newspaper tubes: Video
How to weave a square bottom from newspaper tubes: Video
How to weave an oval bottom from newspaper tubes: Video
How to weave a rectangular bottom from newspaper tubes: Video
How to weave handles at a basket of newspaper tubes: patterns for beginners
Twisted handle for a basket of newspaper tubes: Video
Newspaper basket handle: Video
How to finish weaving from newspaper tubes?
The simplest bends from newspaper tubes: Video
Basket of newspaper tubes: technique, weaving patterns

The scheme of weaving a box of newspaper tubes
Newspaper tube weaving patterns for beginners

Summing up, it is worth saying that you should not be afraid to start something new. Even the most eminent needlewomen were once beginners. They also did not succeed all at once, they were also upset and intended to abandon their hobby. But nevertheless, over time, everything fell into place - the tubes began to roll up faster, the patterns became more complex and ornate, and the crafts were simply mesmerizing. So, dear readers, go ahead, study, fill your hand, and skill will surely overtake you!
How to weave a box of newspaper tubes: Video
How to weave a lid for a box of newspaper tubes: Video
Some experts condescendingly state that needlework is something that borders on art. Looking at the masterpieces of our craftswomen, we can say with confidence that such things have the right place in an art gallery and this is what real creativity is. Here is a flight of fancy, exquisite taste and the most complex technique of execution. Today we will look at step by step weaving from newspaper tubes. New ideas for beginner needlewomen, the basics of technology and useful tips are in this material.

In the finished work, it will be difficult to paint over all the weaves with high quality.
Do not use watercolor for painting. It gives a dull color. Gouache or acrylic paint is more suitable. It is worth considering that acrylic cracks after drying, so if you decide to paint with acrylic, process the finished product. To give color to the work, some craftsmen use spray paint, water-based composition and food coloring.
For shine, the finished work is covered with several layers of varnish. In addition to the decorative task, the varnish also performs the task of a strengthener.

Weaving methods
It is enough for a novice master to master several basic methods of weaving. All other options are based on them and will be easy to deal with.
- Spiral weave. A simple option that even a child can master. The tubes are successively built up and threaded through the base in a continuous manner.
- Layered weaving. Two tubes in series go around the posts so that one passes in front of it, and the other behind it. This principle is used on cotton fabrics.
- Rope technique. The strips are intertwined with the uprights on the product and with each other.
Mastering these basic techniques will lay the foundation for further experiments.
For more information about weaving techniques from newspaper tubes, see the video at the end of the article.
Related article:
In the article, we will consider in detail the technology of making flowers from paper with a photograph of each step, as well as other original crafts that even a beginner can do.
Weaving from newspaper tubes for beginners step by step: different products
After mastering the basic techniques, you can take on the first job. It is better if it is a basket. This simple option will help you master the technology, and the finished product will certainly come in handy in the household.
How to make a basket of newspaper tubes step by step
To make a basket you will need:
- newspaper tubes;
- base - pot or jar;
- for the bottom;
- acrylic paint;
The sequence of weaving baskets from newspaper tubes photo:


- Two circles are cut out of cardboard. Newspaper tubes for racks are glued to one of them at an equal distance. From above, the structure closes with a second circle. Tubes - racks are bent up. A form is inserted inside the frame. The top of the racks can be fixed with a wide elastic band. The frame is ready.
- We weave walls. To do this, we take a tube, fix its edge at the base of one of the racks and begin to twist its circle of racks. When the length of the tube does not allow you to continue weaving, you need to build up a newspaper vine. To do this, the tips must be inserted into each other, after dropping glue on the junction.
Important! When twisting the tubes, one end is narrower than the other. Accordingly, when connected, the narrow tip is inserted into a wide hole.
- To decorate the edges of the basket, the racks are sequentially intertwined with the main vine and fixed on the inside with glue.
- The last stage of work is decorating the product. To do this, the basket is completely covered with acrylic paint and two layers of acrylic varnish. After that, you can decorate the basket with ribbons, beads, braid and other accessories.
Advice! The basis of the basket can be made not from cardboard, but from tubes. For this, a flat base is woven, the axes of which become racks.
In the same sequence, you can make a vase from newspaper tubes:
Secrets of weaving a rooster from newspaper tubes
The rooster is not only a symbol of the year, but also a talisman for the home. In Russian culture, the symbol of the rooster denotes wealth and prosperity in the family.
To weave a talisman, you only need newspaper tubes painted in bright colors.
- It is necessary to lay the foundation. For strength, you can thread a wire inside the newspaper tube.
- The cockerel's body, head, beak and beard are successively braided with colored tubes.
- Lastly, the tail and paws are done. If the weave is tight enough, the cockerel can be put on its feet. For additional strength, it is better to varnish the product.
Photo cockerel step by step (crafts from newspaper tubes for beginners).
It's always fun to make something with your own hands. Unusual crafts bring a lot of pleasure, and even more happiness comes when your creations are praised by friends and relatives. If you try hard, you can make a good little thing that you can safely present as a gift.
There are quite a few techniques and different creative directions, today we will talk about crafts from newspaper tubes. Why about them? The fact is that such simple material is always in the house, and the process of work is within the power of any person.
But, despite all the simplicity, newspaper products are simply amazingly beautiful. What exactly can be done and to whom to present, you will find out further.
For everyday life
The lightest and most beautiful accessories from newspaper tubes can be used daily. Here is a list of ideas to inspire you:

You can easily make all these and many other items with your own hands. Yes, this can take a lot of time (if the accessory is made for a gift, it is better to start work in advance), but the end result will pleasantly surprise you.
For decor
If household items can only be given to the closest people, then decor accessories are also suitable for colleagues or little-known people. Here's what you can craft:
- Vase. A good option for a present to a colleague or neighbor;
- . A great present for a girl;
- Wedding decorations. Cars, dolls, bouquets on tables - all this can be done with your own hands;
- . Always a good idea, especially if it is made by you personally. Suitable for men and women.
Accessories can be complemented with stylish decorations, both purchased and handmade (any technique, for example, a photo frame can be decorated).
For kids
For kids, you can also make a bunch of interesting things from paper tubes. The main rule is more bright colors. Here's what might make them happy:

Advice! As a gift for children, build a hiding place, for example, a piggy bank or a toy, it may have a small door or recess where you can put your baby's favorite treats.
Let your imagination run wild, you can make absolutely anything that comes to your mind. The main thing is to believe in yourself and not give up after the first failure. Try it, you will definitely like it!
Small hands and children's inquisitive mind will give newspaper pages a new life! Weaving from newspaper tubes is not much different from traditional weaving from a vine. The only difference is that it does not require special tools, and the material is always available. For example, vegetables - made by the hands of children are beautiful. And crafting from newsprint is also interesting! And very soon figurines of insects, fish, birds and animals from newspaper tubes will settle in the young master's ark. This lesson teaches perseverance and the ability to bring things to the end. In addition, the weaving process allows you to show imagination, trains fine motor skills and design skills. Create together! Zoo-crafts will please both children and adults! For children from 5 years old.
Wood stains water-based will help to paint paper tubes in the colors of pine, maple, oak, rosewood and even ebony wood. On sale you can find about two dozen shades. There is a stain in powder, which is diluted with water before work.
A mixture of building primer and color also very well suited for coloring tubules. Before work, be sure to dilute the primer with water, as indicated in the instructions on the bottle. Keep in mind that paper is a highly absorbent surface.
How else to color the tubes
To give the tubes the desired color, you can use paints for wool, fabrics, a printer, food coloring, a hot decoction of onion peel, brilliant green and potassium permanganate.
2. It is best to twist the tubes on a table with a rough surface. Attach the needle to one side of the paper strip at an angle of approximately 30°. If there is a limiter on the spoke, then it must be behind the surface of the table.
3. Wrap the corner of the newspaper at the same angle and press firmly.
4. With your right hand, turn the knitting needle, gradually twisting the tube, with your left hand, hold the newspaper.
5. Put a little glue on the corner of the strip, roll it up to the end and let the glue grab.
6. Remove the needle. Since we started to twist the strip from the side of the text, the tube turned out to be white.
The width of the paper strips depends on what kind of product you have in mind. If you decide to weave something large, then the width of the strip should be 8–10 cm. For a small craft, 6–7 cm is enough. The narrower the strip, the thinner the knitting needle should be. Stripes 10 cm wide are best wound on a needle with a diameter of 2.5 mm. For a strip 6 cm wide, a knitting needle with a diameter of 1.5 mm is suitable.
Tubule extension
If you twisted the tube correctly, then on one side it will be slightly wider than on the other. In this case, to build one tube, you just need to insert 1.5-2 cm into another.
If the ends of the tubes turned out to be the same, then to build up, fold one end with a “corner” or cut it at an acute angle.
To make the connection strong and reliable, use glue.
Coloring
It is convenient to paint newspaper tubes in a tray with a small amount of liquid or dip several pieces at once into a bottle with a wide neck. You can paint with a wide brush on a surface previously covered with oilcloth, slightly scrolling the tubes. It is best to dry them on a wire rack or stacked in a woodpile.
If you want to paint the finished craft, do it first with a wide brush, and then with a thin one, carefully smearing the cracks. You can also give the work the desired color with a spray gun or by immersing it in a container with a coloring agent and slowly turning it.
And now - we will weave the first figures from newspaper tubes.
Hedgehog
You will need: 8 straws 30 cm long (4 dark and 4 light)
Let's start with light tubes. Fold one of them into a drop shape and glue the ends together. It turned out a blank for the body and muzzle. Put the second tube on top, its tip will become the hedgehog's tail.
With the long end of the second tube, begin to braid the body with a figure eight. Bend the tube back, loop around the base on one side of the ponytail, pass through the middle of the body, loop around the base on the other side of the ponytail, etc. During weaving, try to keep the body of the hedgehog in the shape of a drop.
Finish the work, leaving the muzzle unbraided. Fix the working tube and cut off the excess.
To make a nose, wrap the tip of the muzzle with a piece of dark tube, glue it and fix it with a clothespin. Curl another segment in a spiral - you get an eye. Fasten it at the end of the braid. Between the turns, glue the short tube-legs folded in half.
Just like the legs, make needles for the hedgehog. At the same time, cut the ends of the tubes obliquely.
owlet
You will need: 7 straws 30 cm long (5 dark and 2 light)

We invite you to try your hand at an ancient and ever-relevant craft - weaving. However, the material in this case is not a traditional vine, but newsprint, twisted in a special way into long thin tubes, in many ways resembling a vine and just as suitable (and maybe even better) for weaving of varying degrees of complexity - from the simplest, on which you have to "fill your hand", to future masterpieces.
Perhaps, in childhood, among many, you studied with interest how your grandmother's basket works and once dreamed of learning how to do something similar. However, the need to find and harvest a suitable vine, the lack of a mentor or available information even in rural areas, not to mention urban conditions, forced them to give up on interesting and useful needlework, which could become a wonderful hobby. Today, a unique opportunity has arisen, and we present it to you.


Many ideas can be realized from paper tubes, in fact, everything is the same as from an ordinary vine - baskets, caskets, decorative panels, figures of animals and dolls, bags, photo frames, hanging interior decorations and much more that your imagination and craftsmanship increasing from product to product. From dense tubes, you can even weave some pieces of furniture!


Material preparation is an important step
The material for making straws can be very different - from ordinary newspapers for more flexible "twigs" and openwork crafts to dense glossy magazine pages, the straws from which are not so flexible, but are great for more experienced craftsmen who create durable household items. It is clear that we, as beginners, are more interested in newspapers and other similar grades of paper.
Twisting the tube-twig is quite simple. To do this, you will need a knitting needle and strips of paper about 7-10 cm wide. Put the strip in front of you, attach a knitting needle to its lower left corner at an acute angle and, starting from the tip, wrap the paper tightly on the knitting needle, rotating with your right hand and helping with your left throughout length. The fact that the length of the needle is limited should not worry you: keep winding, rotating by the spoke. When a small corner of the paper remains at the end, apply a drop of PVA glue (prepare in advance) and wind it to the end, the glued corner will firmly hold the entire structure. The tube is ready! You will see that it is not difficult at all and after a little practice it will only take a few seconds.