Municipal educational institution "School No. 97 in Donetsk"
Kovalenko T.V.
Subject : Application "Bunny"
Class: 1
Level: base
Lesson type: traditional
Lesson type: creative work
Target : make a “Bunny” applique.
Tasks : Educational:
consolidate the skills of marking according to a template;
consolidate knowledge of safety precautions when working with scissors and glue.
Educational:
develop finger motor skills;
develop skills and abilities of manual labor;
develop students' imagination and thinking;
develop the ability to use paper sparingly.
Educators:
cultivate frugality;
cultivate a respectful attitude towards loved ones;
develop discipline and the ability to work in a team.
Methods and techniques used: method of emotional stimulation; method of illustrations and self-control; deductive and practical methods.
Equipment:
on the board - an envelope (in the envelope: an image of a Snowman, riddles, a finished model “Bunny”, the word SNOWMAN);
part templates, album sheet, colored cardboard;
scissors, glue stick, napkin;
simple pencil, eraser, colored pencils;
During the classes
The long-awaited bell rang and the lesson began.
A lesson in labor is a lesson in art, a lesson in goodness and kindness.
And... (children read in unison from the board):
To do good is to amuse yourself.
Emotional mood.
Guys, today I received a letter with a task: guess the riddle:
White fluff is falling from the sky, it has covered the entire bare forest.
The children collected the fluff, inserted coal and carrots:
He lived in the middle of the yard where children play.
But from the sun's rays it turned into a stream. Snowman.
Our guest is the Snowman. Appendix: Figure 1.
2. Checking the workplace, providing safety instructions when working with scissors and glue.
You will find out what tools and materials we will need during the lesson by guessing riddles from the Snowman.
1. He doesn’t look like a man, but he has a heart,
And he devotes his heart to his work all year round. Pencil.
2. You can write on me, you can draw on me.
I can be painted on, I can be cut out. Album sheet.
3. Once upon a time there lived a very important grandfather in the paper kingdom.
He considered himself durable, and therefore the most important
And very, very hard of all papers in the century. Cardboard.
4. An experienced instrument – not big, not small.
He has a lot of worries: he cuts and shears. Scissors.
5. I can connect cardboard with paper, connect two sheets. Glue.
6. Even though I’m not a laundress, friends, I do my laundry diligently. Eraser.
7. Multi-colored children are huddled in a narrow house.
Once you release it into the wild - where there was emptiness,
There, look - beauty! Colour pencils.
Now let’s remember the safety rules when working with scissors and glue.
Rules for safe work with scissors:
Do not hold the scissors with the ends up.
Do not leave scissors open.
Pass the scissors only closed, with the rings facing your friend.
When working, watch your fingers.
When cutting out a circle, turn the paper clockwise.
Rules for safe work with glue:
Do not allow glue to get into your eyes.
Hand over the glue stick only in a closed form.
After finishing work, close the glue and put it in a safe place.
III Learning new material
1. Listen to the riddle from the Snowman. Who is it about?
The forest beast stood up like a post under a pine tree
And he stands among the grass - his ears are larger than his head. Hare.
2. Work using the atlas-identifier.
Guys, the Snowman wants to know what the hare can tell about himself.
Let's open with. 197 read the information about the hare.
3. Which hare is the riddle about, the hare or the hare?
White in winter, gray in summer. White hare.
Today we have the application “Bunny” (the teacher shows the finished craft).
You like? Appendix: Figure 2.
What do you think the bunny's mood is? (Cheerful, joyful, happy.)
Why did you decide so? (The hare has a smile on his face.)
IV Fizminutka
One - rise on your toes and smile!
Two – hands up and stretch!
Three - bend, straighten.
Four – everyone take a deep breath.
Five - we put our hands on the belt.
Six is a right turn.
Seven - turn left.
Eight - let's sit down.
Nine - and we continue our lesson.
V Doing practical work
1. Analysis of the craft.
What color cardboard will we choose? (Optional.)
What material will we use to make the bunny white? (We will take a landscape sheet.)
What parts does the bunny consist of? (The bunny consists of a body, head, ears.)
2. Progress of work.
1. Trace the templates on a landscape sheet and cut them out.
2. Distribute the applique on the cardboard and glue it.
3. Design the bunny’s facial features. The children decide for themselves what the hare's eyes, nose, and mouth will be like.
Look at your application. You have made very interesting “Bunnies”. Let's ask the guys to come to the board and show their work. Well done!
How do you think you can use the “Bunny” applique? (Give to family and friends.)
Why give?
VI Game "Find a word in a word."
On the board is the word "SNOWMAN".
The snowman sent the game “Find a word in a word” (Snow, juice, dream, movie.)
VII Lesson Summary
1. Reflection.
What did you especially like about the lesson? Why?
What's your mood now? Was it comfortable during the lesson?
What caused the difficulty? Why?
2. Exhibition of works.
Appendix: Figure 3.
3. Cleaning the workplace.
Guys. We present workplace in order.
The lesson is over. Thanks to all.
Application
Figure 1 Figure 2

Literature:
1. Collection of riddles: a manual for teachers / M.T. Karpenko. – M.: Enlightenment,
2. Both study and play: natural history: a guide for parents and teachers /
T.I. Tarabarina, E.I. Sokolova. – Yaroslavl: Academy of Development, 1998.
3. Labor training. 1st grade: lesson plans based on the textbook
T.M. Geronimus “Little Master2 / N.A. Tarakanova. - Volgograd.
Bunny applique will be performed with pleasure by a child of any age, because the hare is one of the main characters of children’s favorite fairy tales. This article presents step by step instructions to making applications with bunnies using various techniques and photos of examples of finished works that can inspire beginners to their own original creative ideas.
To make a bunny applique, you can use the most various materials: paper, cardboard, fabric, cotton pads and even autumn leaves for the herbarium. It will be interesting to do the craft both with children during educational handicraft classes, and for the purpose of decorating the design of something with your own hands.
IN younger group Kindergarten teacher for the lesson needs to prepare in advance details in the form of various triangles, circles, squares and rectangles. It is more interesting for children to experiment with patterns made from colored paper. If you carefully print out a diagram for gluing geometric elements and show examples of finished work, then children's creative work will be more focused.


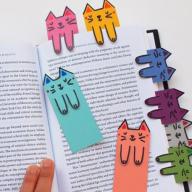
The hare applique can be made not only on the basis of the standard contour of a hare figurine or a muzzle with ears. You can use your imagination and figure out how to make an abstract bunny applique from geometric shapes.


Bunny made of hearts
An original way to design a children's gift card is a bunny applique made from hearts. IN senior group and in preparatory group Kindergarten children can already make elements for appliqué on their own, cutting them out of colored paper with scissors according to templates of the required size or at random.  What you will need to make the hare applique from hearts and a description of the process:
- background from a sheet of colored paper of any color;
- two hearts made of colored, pink paper, one of white paper (the same size);
- a slightly smaller pink heart, divided in two vertically (to decorate the bunny’s ears);
- two small hearts white(for the bunny's tail and collar);
- two even smaller black hearts (bunny eyes) and the same red heart (bunny nose);
- The hare's antennae can be thinly cut from small, black rectangles.
 The bunny applique made from hearts looks unusual and is an interesting alternative to standard valentines.
Fabric hare
If, when looking at children's books about bunnies, you especially like one of the pictures, then you can, with patience and creative enthusiasm, make a fabric hare applique similar to the picture yourself.  To complete the work you will need the following materials:
- starch;
- fabric of various colors;
- A3 paper sheets, in the same quantity as the number of layers the applique will have;
- glue, preferably PVA;
- hard brush and watercolor paints;
- felt-tip pens or markers;
- ribbons for creating additional hare accessories or threads with a hook to tie them;
- container with water.
 Instructions for making a fabric hare applique based on an illustration from the book, step by step:
- To starch scraps of fabric, you need to dissolve 3 tbsp in a glass of cold water. l. starch, then pour the resulting mixture into a liter of boiling water. Then bring the liquid to a boil and leave to cool. Dip fabric flaps into the cooled solution for a few minutes, wring them out and hang them to dry. When the fabric is dry, sprinkle it with water and iron it;
- print out the illustration with the hare you like on a sheet of A3 paper and photocopy it several times;
- With reverse side From the pattern printed on paper sheets, glue starched fabric flaps with PVA glue, in one layer. Press the sheets with a press for several hours;
- onto a blank A3 sheet, spray watercolor paints of different colors with a brush, one at a time, and let the surface dry;
- cut out the outline of the hare, the largest in area, from a sheet (covered with fabric and dried under a press), then stick it on as the first layer of applique;
- one by one, in accordance with the selected image, cut out and glue the remaining details of the bunny applique from fabric;
- Depending on the book drawing, finish drawing the hare’s face and add accessories from ready-made ribbons or knitted with air loops.
 Fabric bunny appliqués are interesting in themselves, but they are also an expressive way to decorate ordinary things. In this way, you can make the design of a T-shirt, another item of clothing or, for example, an interior pillow more interesting and memorable.
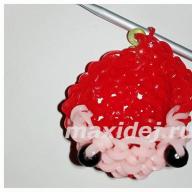
Bunny made of napkins and cotton wool
The napkin bunny is interesting and simple option for classes with preschoolers on the topic of appliqué, in kindergarten or at home.
Materials for making three-dimensional applique from napkins:
- colored cardboard for the main background;
- one-piece stencil of a hare made of white paper;
- snow-white napkins;
- cotton wool;
- PVA glue;
- black velvet paper (small rectangle, for thin hare whiskers).

Detailed description of making a bunny from napkins:
- Carefully tear the napkins into small shreds and roll each into a small round ball;
- the figure of the hare is tightly pasted over with paper balls on PVA (glue is applied to the entire area of the stencil, and then napkins are applied);
- the bunny is glued to the background;
- fluffy cotton wool is glued in the area of the ears, muzzle and tail;
- The applique is completed by gluing the mustache (the muzzle can be drawn on a stencil in advance).
Bunny made from palms
Bunnies made using the palm applique technique look incredibly beautiful. Such crafts will wonderfully decorate the everyday interior of a children's room or the festive hall of a kindergarten.  To make a high-quality template of a child’s palm, you need him to press a sheet of cardboard with his hand to the surface of the table. Then the palm is outlined. You can trace your hand all the way to the elbow, but the version of the template up to the wrist will be an excellent material for joint creativity.
  Then, using the blank cut out of cardboard, the details of the palms are made from colored paper. IN middle group Preschoolers can already trace patterns of their palms on their own, and when they get older, they can cut out blanks for appliqué under the guidance of a teacher.
  You can applique the entire hare, or just its face. Anyway, great result guaranteed. All children, without exception, really enjoy making appliqués from their palms.
  A handmade bunny applique made from palms, left as a keepsake, will give rise in the future to pleasant memories of childhood. You can make a bunny applique not only from colored paper, but also on a fabric basis.
Crumb from disk and colored paper
Everyone's favorite character from the animated series “Smeshariki”.
 A cheerful bunny face applique made from an unnecessary music CD will lift your spirits every day. It can diversify the interior of a kitchen, bathroom or car.
Video: Making Krosh from Smeshariki
Carrot for the bunny
A carrot applique can be made to complement any applique with a story about hares, because this is their favorite food, an irreplaceable accessory and their best dream.
 How to make a carrot-pocket applique step by step:
- a circle of orange or red paper is divided in half with scissors and folded in three, then the two touching extreme sides are glued together;
- On the resulting carrot, it is necessary to clarify the black horizontal strokes inherent in a real vegetable. This can be done with a black pencil or glued dark threads;
- the next stage is the green tops. The green paper circle is folded in half and folded several times in a zigzag pattern. The corners of the semicircle are slightly shifted to create an interesting beam shape;
- carrot - pocket and greens are glued together.
The resulting carrot applique for a bunny is multifunctional in itself, thanks to its convenient pocket. And it will look great on any applique with hares, especially in sufficient quantities.
Hare in the forest
It is especially pleasant to do appliqué, especially with children, when you have the opportunity to use natural materials for the activity. For the hare applique in the forest, autumn or summer leaves of various shapes will be useful. This craft will brighten up a weekday and become a unique highlight of your home interior.  When making a forest bunny, you will need slightly ironed or book-dried leaves, glue, scissors, cardboard or paper for the background of the applique, and a pencil. In addition to the bunny itself, you can depict the entire forest landscape with leaves: Christmas trees, birds, bushes.
Bunny under the Christmas tree
The original technique for making this application - corrugating colored paper - may seem difficult for beginners. But this is not so, especially if you carefully approach the process of creating the bunny directly under the Christmas tree. The finished applique turns out to be so airy that it looks wonderful not only against a background of colored paper or cardboard, but even on a mesh of intertwined and glued threads, fixed in a thin frame.  For a Christmas tree you will need a certain number of green leaves - twigs. Each such element is made from a triangle of colored green paper, folded into a thin corrugated accordion, folded in half and glued into a sheet-like shape. The elements made in the required quantity are fixed with glue on the background and connected to each other in the shape of a Christmas tree.
  For the head of a corrugated bunny you will need two snow-white rectangles, which, after being assembled into a small fold, form two semicircles. Then the resulting parts are glued into a circle. The bunny's eyes and nose are decorated with a marker or beads, if desired. The hare's body is made from a rectangle bigger size, gathered into a fold and glued into a semicircle.
  Bunny ears and paws can be made from white triangles of the desired size, assembled and glued together like Christmas tree branches. The fluffy round ponytail is made from rectangles gathered into semicircles and glued together.
Tatyana Shilkina
Application "Bunny". Templates. Master class with step-by-step photos.
Goal: making an applique from colored paper using templates.
Objectives: - improve the ability to cut in different directions;
Develop children's attention when marking and cutting;
Develop the eye, fantasy, imagination, thinking;
Cultivate accuracy in work and patience.
Materials and tools needed for work: colored paper for children's creativity, colored cardboard, PVA glue, scissors, pencil, black felt-tip pen.
Safety precautions when working with scissors.
1. Scissors must be well adjusted and sharpened.
2. Store scissors in a specific place (box or stand).
3. When using scissors, you must not be distracted, be as attentive and disciplined as possible.
4. When passing the scissors, hold them by the closed blades.
5. Place scissors on the right with closed blades directed away from you.
Rules for working with PVA glue.
1. Do not open the glue with your teeth.
2. When working with glue, use a brush.
3. Take the amount of glue that is required when performing the work at this stage.
4. Remove excess glue with a soft cloth or napkin, gently pressing it.
5. Wash your brush and hands well with soap after work.
6. Avoid getting glue on clothes, hands and face; In case of contact, rinse thoroughly with water.
Templates


Progress:
Let's take it colored paper, trace the templates and cut out the applique details.

Take a sheet of cardboard of any color and place it vertically.
Glue a piece of grass onto the bottom of the cardboard

Glue the bunny's body and a part of the sleeveless shirt onto it


Now we will stick the carrots, as shown in the photo


Let's glue the paws on our bunny

We design the face (glue on the eyes and nose)

Take a black felt-tip pen and finish drawing the face, paws, and apply strokes to the carrots


Our “Bunny” application is ready.
We frame the work

Thank you for your attention!
Publications on the topic:
Origami-type Christmas tree. Master class with step by step photos. In anticipation of the New Year, my children and I did various crafts, including Christmas trees.
Master class with step-by-step photos. Goal: The desire to please your loved ones. Tasks:1. Show children new possibilities when working with junk.
"Easter Bunny" Nowadays, many competitions are held in kindergartens. The children, of course, want to take part in everything and they start making noise.
Dear colleagues, I want to offer you a master class on making soft toy- bunnies. For production we will need: darnit, fleece,...
I bring to your attention a master class on making easter egg with your own hands. Master Class designed for older preschool children.
Irina Draganova
If you only have 15 minutes of time, no more, you can do a small teamwork"Winter funny bunny".
Target:
1. Teach children perform volumetric applique from napkins and cotton wool.
2. Teach children tearing off a napkin, crush each piece and roll it into a ball.
3. Develop fine motor skills fingers
4. Develop children creative imagination
Material:
Colored cardboard, white paper hare blank, black velvet paper (for hare whiskers), white napkins, cotton wool, PVA glue.
Progress of the lesson:
Educator: Guys, I’ll tell you a riddle now, and you guess who it’s about!
Trembling in the bushes all day,
They scared him a little - he runs away.
Has a small height
And a very short tail.
Gray in summer, white in winter
So that no one eats it.
Children: Hare!
Educator: Right! Today we will do it with you funny winter bunny.
There are napkins on your table. We take them, tear off small pieces, then crush each piece and roll it into round balls.

Children work with napkins according to instructions.

Educator: And while you're rolling, I'll read you a poem about bunny:
It won't be long before trouble is in the forest,
But the hare is not a simpleton.
Know how to confuse your tracks -
The trail winds here and there,
Forward, backward and sideways.
Where the hare was, there is no hare - jump, jump!

Now let’s glue the lumps you made onto this one workpiece: paper outline of a hare. We coat the workpiece with glue and now glue each lump of napkin onto the silhouette of a hare, pressing it tightly together.

Children: glue lumps onto the workpiece (excluding tail, middle of ears and muzzle).
Educator: And we will make the muzzle, tail and middle of the ears fluffy - from cotton wool.
Children: begin "take away" pieces of cotton wool, glue the cotton wool onto the muzzle, tail, ears.
Educator: Look what a bunny we got! What else is he missing?
Children: He doesn't have a mustache.
Right! Let's glue on the mustache and eyebrows that I cut out especially for the bunny from black velvet paper!
The teacher draws the hare's mouth with a red felt-tip pen!
Now our bunny is ready! Look what we got winter, funny bunny!

That's what funny bunny!
Don't be afraid of us, runaway.
On the top of the head there are long ears,
White back, soft belly,
And behind bunnies- fluffy tail!
We won't offend you
Let's play with the bunny!
LESSON SUMMARY ON APPLICATION IN A SENIOR GROUP. Subject: "Little white bunny."
Goals:- teach children to complete the task by transforming a circle from a square and an oval from a rectangle.
– consolidate the ability to create an animal figure from geometric shapes.
– cultivate patience and accuracy when performing work. Bilingual component: hare - koyan, white - ak. Preliminary work: asking riddles, looking at illustrations, talking about wild animals in class. equipment: Games V.V. Voskobovich educational games “Lanterns”, “Multi-colored ropes”, “Colored circles”, carpet graph, pictures of a hare, colored papers with geometric shapes (large square, medium square and small square, large rectangle and small rectangle), paste, tassels, napkins, scissors. Progress of the lesson. 1 hour. Organizational moment; Children, today I met our friend in the forest and invited him to visit. But what kind of guest you will find out by guessing the riddle. Listen carefully:
1 . White in winter, gray in summer. He doesn’t offend anyone, but he’s afraid of everyone. (hare). 2 . The long-eared one is very dexterous; in the morning he gnaws on carrots. He quickly hides in the bushes from the wolf and the fox. Who is he, this gray one who is running head over heels? Gray in summer, white in winter, tell me, is it familiar to you? (hare). 3 . It jumps across the field - hides its ears, stands up like a pillar - its ears stick out. (hare). 2.h Main part:
Who is our guest?
- Yes, of course it’s a hare.
-Look at what a beautiful bunny galloped to our clearing. white, fluffy, cheerful bunny. The teacher shows on the carpet using Voskobovich’s games “Lanterns”, “Colored Circles”, “Multi-Colored Strings”. This is a forest clearing, it is snowing (white circles), snowdrifts made of white rope, a green Christmas tree so that the hares can hide from their enemies. Children, our guest is not in the mood because he is bored walking alone in a forest clearing.
Nikita, you want to help find a friend for our bunny. Fold a cheerful and beautiful hare from geometric figure. Well done, Nikita, you made a beautiful hare, now our bunny won’t be bored.
Tell the children:
-What color can you see a bunny in the forest (white in winter, gray in summer).
– Why do bunnies change their color and when? (bunnies change their color in winter and spring; in winter the skin is white, in spring it is gray).
The hare becomes completely white in winter, which means it is invisible in the snow. The hare has excellent hearing. He sees poorly and smells poorly, but he hears excellently. The hare knows how to confuse his tracks. this is due to the ability to jump far.
A teacher and children look at pictures of hares different types.
Today we will glue the bunny applique. (the teacher shows a bunny in a white winter coat)
Finger gymnastics: " Bunny".- Bunny, bunny, where is your tail? - claps,
- Here, here, here! - hands behind your back.
Bunny, bunny, where is your nose? - claps,
Here, here, here! - show your nose.
Bunny, where are the bunny's paws? - claps,
Here, here, here! - show hands.
Bunny, bunny, where are the ears? - claps,
Here, here, here! - show ears.
The teacher explains and shows how to perform the application. Sequence of work:
1 . We cut out circles of different sizes from squares - these are the torso, head and tail.
2 . We cut out ovals from rectangles - these are paws and ears. 3 . We lay out the finished bunny shapes on a piece of paper and carefully glue the geometric shapes one by one. 4 . Take a felt-tip pen and draw a face for the bunny.
Our bunnies are ready, let them watch us as we play. Game "Winter - Summer".
The teacher offers to play the game “Winter - Summer” (hands out snowflakes and suns to the children, from Voskobovich’s educational game “Colored Circles” (white and yellow circles).
– I will say a sentence, if they are about summer, you will raise the sun (yellow circle), and if they are about winter, you will raise a snowflake (white circle). - The children went to the river to swim. (yellow circle).
- The children are making a snowman together. (white circle).
- It started to rain, and a rainbow appeared over the river.
- Masha and Misha took the sled and ran down the hill. - It’s frosty outside, a cold wind is blowing.
- The children are sunbathing.
Well done, children, raised the sun and snowflakes correctly
Independent work children. The teacher helps and advises when children are doing work.
Finished works (Bunnies) are exhibited on forest clearing(children carefully examine all the bunnies in the clearing).
3 hours. Lesson summary .
– Our fairy bunnies are ready! They can play happily in a forest clearing.
- Children, tell me what we did today?
What color are bunnies?
At what time of year do they change their color?
Well done, you did a good job, and now let's admire our bunnies.
Lesson notes
on application in the senior group.
Subject; "Little white bunny."
Lesson notes
on familiarization with the environment in the senior group. Topic: “I love you my Kazakhstan.”
Educator: Kulmagambetova D.S.
Lesson notes
By getting to know your surroundings.
Topic: Observation of migratory
birds (rooks)."
Educator: Kulmagambetova D.S.
Educator; Kulmagambetova D.S.