Add to favorites
1 1443 3 years ago
The technique of drawing with a needle goes back to the distant past. Even before the beginning of the era of various nail designs, women of fashion knew how to create breathtakingly beautiful patterns on their nails. Then the trend was gradually forgotten, giving way to more stylish and professional solutions. But the fashion is cyclical, and today the drawings on the nails with a needle are again popular more than ever. Any girl can learn to draw with a needle, especially since no special tools or accessories are needed for this.
What do you need for drawing on nails with a needle?
Although the technique has a clear and “self-explanatory” name, it is better to clarify the list of elements necessary for operation. You should not start drawing on the nails with a needle if there are no:
- Varnishes of different colors. For painting, it is better not to use gel coatings, but to choose conventional formulations that are easy to apply and erase. The quality of the patterns created largely depends on the selection of colors, so you should make sure that you have contrasting and matching shades at hand - at the choice of the master.
- Needles of different thickness. The term "needles" is used in this context rather conditionally, since you can draw on nails not only with a sewing needle, but also with pins, hairpins and even. The choice is influenced by the requirements for the diameter of the tool - a thin sharp needle or a thick tip of a hairpin.
- Nail polish remover. You can't do without it. The creative process involves a flight of imagination and experiments, which sometimes need urgent adjustment. So it's better to have everything you need at hand.
Actually, on this, the preparation process can be considered complete and proceed directly to the creation of drawings on the nails with a needle.
Drawings on nails with a needle: the choice of technique
There are many ways to paint on your nails. They are conventionally called:
- wet;
- dry.
Wet technique involves a creative process on a still wet lacquer surface. The step-by-step process looks like this:
- applying a base coat of the desired color;
- immediately applying a few drops of varnish of the selected shades;
- drawing until both compositions are dry.
The beauty of the patterns created in this case is simply incredible, but it is very difficult to try to have time to do everything before the varnishes dry. Therefore, beginners, and many experienced craftswomen, choose the dry method. Everything is simpler in it:
- covering with the first colored layer;
- waiting for it to dry;
- applying drops with another varnish;
- creation of drawings.
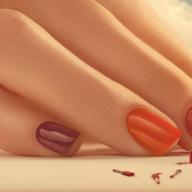
If the principle of drawing on nails with a needle is not yet clear, then it is worth explaining: patterns and ornaments are created from droplets of varnishes by their purposeful spreading over the surface of the nail with a needle. In this case, the needle serves as a guiding tool, giving the droplets arbitrary and complex shapes, as well as necessary for connecting varnishes of different shades to each other. Externally, the drawings on the nails with a needle look like the result in its simplified version.
Rules for drawing on nails with a needle
Unfortunately, it is not uncommon for beginners to make mistakes and become disillusioned with fashionable technology. To prevent this from happening, it is recommended to consider the following rules:
- when drawing, place the needle perpendicular to the surface of the nail;
- start drawing with the little finger;
- take a lot of varnish to create spectacular patterns;
- draw with surface strokes;
- think over a pattern and try it on paper;
- work only with a clean needle.

There are many techniques and tricks for creating simple and original designs on your nails, thanks to which you can get an amazing manicure at home - get to know them by reading this article!
The beauty of a woman is, first of all, grooming, and most of all, her hands speak about a woman's grooming.
Bad manicure, rough skin, lack of jewelry speak of untidiness and a desire to look not like a woman spinning her head and breaking hearts, but a gray aunt who does not care how others perceive her.
Well, if you have a desire to look good, but there is no money for a salon manicure, then it does not matter - this article will tell you how to create a stunning pattern on your nails without spending any extra money or time.
The easiest nail designs for beginners
Even those who do not have the talent of an artist can create an original and aesthetic drawing on their own nails. This does not require any professional varnishes or any special tools - you only need imagination and some improvised means that are in any home.
Fancy drawing is easy
To create a simple drawing you will need:
- varnishes of various colors
- needle
- cotton swab
- nail polish remover (in case something goes wrong)

 With the help of multi-colored varnishes, the manicure will become colorful and unique
 Before starting the creative process, you need to prepare your hands: lower them for 15-20 minutes in a hand bath with sea salt, tidy up the cuticles and the shape of the nails. After that, hands can be lubricated with a nourishing cream and wait until it is completely absorbed.
But the cream should not be applied to the nails - this can harm the future drawing.

 First step: nails need to be shaped
 The simplest nail design is the creation of various lines, points, geometric shapes in a chaotic or ordered manner. To do this, the nails are painted in the main color, and after the varnish has completely dried, dots are applied with a needle or lines are made with a brush (but this already requires a certain skill).
The use of various stencils will also be useful for beginners. After the drawing has dried, a fixer is applied on top - so the beauty of your manicure will last for a long time.
Simple nail art step by step
You can quickly and easily create a pattern on your nails using stationery tape. Stencils are made from it, and after that they are glued to the nail and painted over with varnish.
When the scotch tape is removed, they get an ideal pattern, which, after covering with a fixative, will delight its owner for more than one day.

 Scotch
 Most often, using scotch tape, they create various lines and geometric shapes on the nails, but experienced craftswomen got the hang of creating whole masterpieces of painting on their nails using such a simple device. And for beginners, imitation of a checkerboard on nails is perfect.
To get a beautiful chess manicure you need:
- Prepare your hands: a salt bath, cutting the cuticles, giving the nails the desired shape (in our case, the actual shape is a square or a rounded square)
2. Cut the tape into comfortable strips 0.5 cm wide
3. Cover the nails with a base, and then, after it is completely dry, paint your nails with varnish in white, gold or silver.
4. After the polish is completely dry, stick a strip of tape on the bottom of the nail, and stick the other crosswise so that a small even square is formed in the upper right corner of the nail
5. Paint over the entire free part of the nail with varnish so that it goes over the stencil line
6. After drying, peel off the strips and paste others in the same way mirror
7. Paint over with varnish and peel off the stencil after the varnish is completely dry
8. The finished drawing is covered with a fixer.

 An excellent and stylish idea would be to combine matte and glossy squares.
 French Chess Manicure
 By cutting the tape into thin strips and using them as stencils, you can create an unusual manicure - it only takes a few minutes. To achieve the desired result, you must follow a simple instruction:
- Paint your nails sequentially with stripes of any three colors (you can choose both contrasting and harmoniously combined with each other)
2. After drying, apply thin strips of adhesive tape to the nails.
3. Apply black varnish to the entire surface of the nail
4. Wait until the varnish is dry and remove the strips
5. Apply fixer
 Manicure created using scotch tape
 More intricate designs can be created with an adhesive tape stencil.
 Video: Nail design. Scotch tape for nails
Schemes of simple and beautiful patterns on the nails
With the help of a needle and varnishes of various colors, you can create original designs on nails, even for those who do not have a talent for drawing and experience in creating manicure.

 Draw versatile horizontal stripes along the length of the nail
 Interesting floral ornament
  Intricate design can be created with one stroke of the needle
 Multicolor drawing
 Wavy ornament
 How to make simple drawings on nails with gel polish
Creating a pattern on the nails is a painstaking task and it is very offensive if the painted flowers or lines begin to wear off and peel off after the first wash of the dishes.
But this problem can be solved: for those who want to contemplate their manicure for two weeks, there is a wonderful tool for manicure - gel polish. Its composition provides a durability that cannot be compared to that of conventional varnish.
 Manicure with gel polish
 To create a beautiful drawing with gel polish, you need:
- degreaser
- the foundation
- several multi-colored gel polishes
- UV lamp
- a sheet of cardboard to be used as a palette

 Dots of various calibers
 Step-by-step creation of a spot manicure:
- Before creating a drawing with gel polish, the surface of the nail must be degreased and applied with a vitamin base.
2. Choose a base shade (preferably a light color), apply it to your nails and dry under a lamp
3. Pour a small amount of gel polish of other bright colors onto the palette.
4.Using a small dots, paint dots of different colors on the nails, placing them close to each other
5. Dry the design under the lamp and apply a shiny finish

 Using different dots, you can create a fun dot pattern
 Multicolored dots
 If you combine the bitmap with the technique of the famous French manicure, you will be able to create sophisticated marigolds that all friends will envy!
How to make simple drawings on nails with a needle (diagrams)
Floral patterns on nails look original. It is not difficult to make such a drawing, but it is a painstaking business, requiring patience and perseverance. But the result will delight both you and those around you - such a pattern will suit any event and style of clothing, it is only important to choose the desired color scheme and not bend with variegation.

 Step by step drawing flowers
 For a flower manicure you will need:
- base varnish light shade
- red, pink, blue colors to create petals
- contrasting color to create the middle of the flower (if the petals are pink, then the middle can be yellow or silver)
- needle
- cotton swab and nail polish remover
Sequencing:
- Paint your nails with a light shade of varnish and wait until it is completely dry
2. Dip a needle or a toothpick in varnish and put a point on the nail, marking the middle of the flower
3. Wipe the needle from the traces of varnish and mark points in a circle from the base of the flower, imitating petals.
4. You can decorate the entire nail with such flowers or draw several pieces along one edge of the nail.
 The scheme for drawing flowers with a needle
  A simpler option
 After the drawing is dry, the nails must be covered with a varnish fixer. For greater decorativeness, you can draw leaves: for this you need to put a point and draw a needle along it in the direction from the flower, forming a sharp leaf.
Schemes of simple drawings on nails with a toothpick
Using varnishes of different colors and a toothpick, you can create an elegant pattern on your nails called "butterfly wings". This requires:
- varnishes of different colors
- toothpicks
- napkin
- varnish fixer
- the foundation

 Butterfly wings
 The sequence of creating a picture:
- Apply base to nails and wait until it dries completely
2. Paint your nails with a base color
3. Without waiting for drying, apply three different colors in stripes from the top corner of the nail to the middle obliquely
4.Using a toothpick, immediately draw lines from the middle to the corner, as shown in the photo
Video: Nail Design "Butterfly Wings"
Schemes of simple drawings on nails with a brush
With the help of a special manicure brush, even a beginner can create a simple and aesthetic drawing. The instructions and techniques described below will allow you to independently transform your nails no worse than salon nail art.

 Drawing created by brush and varnish
 Vertical stripes
 Magic ornament
 Step-by-step creation of an ornament

Video: We do a manicure with a fan brush
How to make simple nail art with acrylic paints?
You can feel like a real artist painting with acrylic paints on such a "canvas" as your own nail. A wide range of colors and ease of use will allow you to create a variety of designs, which will inspire imagination and creativity.
But working with acrylic has its own characteristics that you need to know in order for the drawing to be aesthetic and preserved for a long time.
 Acrylic paints
 Before starting the artistic process, you should prepare all the tools necessary for this:
- acrylic paints (you can buy them at any craft store, stationery store, and even in the market)
- thin brush
- fixer varnish

 Brushes
 Having prepared the nails for manicure (by removing the cuticles and shaping them), they must be covered with a base base. After it is completely dry, you can start painting with a brush.
You can depict on the nails both various dots and wavy lines, and by composing these elements, you can create whole inflorescences and enchanting patterns.
If fantasy did not suggest anything, then you can be inspired by the works of novice masters:

 Wavy brush strokes
 Points
  Beams
Beams 
 Flame of fire
 French manicure and dot patterns
  Beams and sparkles
  Show your imagination and the result will please
 After completing the drawing and drying the acrylic paint, it is imperative to cover the nails with a protective coating - a fixative varnish. Otherwise, at the first contact with water, the pattern will blur.
Simple shellac nail designs
Shellac is a new generation product that combines nail polish and gel for building. This combination allows the product to stay on nails for a long time with shine, without chipping and abrasion.
It is not surprising that modern women of fashion and lovers of various new products from the field of beauty prefer shellac painting even at home.
 Shellac
 It's easy to create a stunning shellac manicure if you prepare everything you need:
- shellacs of various colors
- the foundation
- brushes of various sizes and structures
- top coverage
- cotton pads, sticks, alcohol and nail polish remover
- Ultraviolet lamp


After preparing your nails for a manicure, sit back and get ready to create:
- Cover your nails with a base product
2. Gently apply shellac and dry under the lamp
3. If necessary, apply another coat of shellac and dry again
4.Use rubbing alcohol to wipe your nails with a cotton pad
5. Start creating a drawing: draw lines, dots, flowers or try to create an imitation of a French manicure with different shades of colors
6. Dry your nails under the lamp and cover with a protective layer of top coat and dry again under the lamp
Video: Drawings with shellac on nails
Absolutely everyone can create an unusual manicure at home, even if the soul does not lie to drawing, and I really want beautiful nails. You just need to choose the technique in which you will be able to maximize your creative potential - the main thing is that both the occupation and the result bring pleasure.

 The result of creativity should inspire
 In order for the drawing of patterns on the nails to work out and be preserved for a long time, follow the tips:
- it is necessary to select high-quality products that are characterized by increased durability. In the absence of such, you can turn to the good old varnish, but then you will often have to repaint your nails and paint again
- when creating a drawing, be guided by the size of the nail: do not try to draw a bunch of everything on short nails - it looks ridiculous and tasteless
- if it doesn't work out with fine art, don't despair, because you can always turn to geometric shapes that always look fashionable and organic
- do not neglect the application of base and fixer varnish
- so nails will delight you with their appearance much longer
Do not be afraid to experiment: create a drawing that suggests fantasy and do not despair if you fail, because this is just an experience and the next attempt to make a stunning manicure at home will be more successful.
Video: Draw on nails
Hands are a woman's calling card, and a flawless manicure is the final touch in creating a stylish look. Many women who want to do an exquisite and unusual manicure go to a beauty salon, believing that they cannot cope with this task on their own. This is a misconception, even at home, without special tools, you can reproduce exquisite patterns. In order to surprise others with your original design in the future, you must first master at least the simplest patterns on the nails. Painting on nails is an extremely fun process. However, in order to achieve a high level of skill, a girl should be prepared for the fact that she will have to constantly experiment, mastering new techniques for applying drawings and materials that can be used to create them. In our article, we will consider various patterns on nails for beginners in stages from a photo.
Drawings on the nails step by step can be done quickly enough without professional skills. To make a manicure in the form of a puzzle using the step-by-step method, you need to prepare four contrasting varnishes and one black. Divide the nail into 4 equal parts and paint each of them in a different color. Draw a vertical and horizontal stripe with black varnish, which will emphasize the borders of the multi-colored parts. After that, on each multi-colored part, put a black dot on the side, imitating a niche. In the middle of this point, draw another point with that varnish, the color of which will match the color of the adjacent part. To make a snake pattern on the nails, use ordinary tulle. A varnish of any color is applied to the entire surface of the nail and a piece of tulle is immediately applied. After 2-3 minutes, the tulle is removed from the nail, and an unusual pattern, similar to snake skin, remains on the surface.

A set of accessories for painting on nails for beginners photo
Simple patterns on nails for beginners can be drawn using materials at hand. To apply drawings you will need:
Scotch;
needle;
foil;
glitter sprinkles;
thin brushes;
varnishes of various colors;
toothpicks;
cotton sticks;
nailfile;
nail polish remover etc. etc.


Patterns with a needle on nails for beginners photo
Very often there are situations when you urgently need to make a bright and beautiful manicure. And in this case, exquisite and unique patterns on the nails with a needle will suit us. This design is not complicated at all, but it requires a little perseverance and experience. But then, when you master this technology, you will always have an amazing, unique and unique manicure. To do such a manicure, you need several varnishes of various shades and a regular needle. Please note that when choosing a color, you should take, if not contrasting, then the most different shades. Otherwise, the patterns on the nails will merge. The second irreplaceable tool, of course, is a sewing needle. Although you can buy a special needle and pen in professional stores, you can also adapt, for example, a wooden pencil with a needle. Keep in mind that you need to use a fine needle, usually a # 90 needle, to get fine lines and a graceful pattern.


2017
Patterns on nails for beginners using photo varnishes
Simple drawings on nails for beginners can be done with varnish, choosing, in addition to the base, a special tool with a thin brush. True, this option has a significant drawback - a beginner may encounter some problems directly in the process of drawing on nails. The most common technique for simple nail art is painting with nail polishes. To do this, choose two or more contrasting varnishes, one of which will become the base, and the second - varnish for drawing drawings. The problem with nail polishes is that most often the texture is quite thick and it is quite problematic for a beginner to apply thin, even lines. However, large figures without small elements using ordinary varnishes can turn out to be of fairly high quality.


Patterns for beginners using scotch tape photo
Scotch tape is another versatile tool that we use everywhere in our household. So it is not surprising that over time, our women have found use for it in creating designs.
When starting your manicure with scotch tape, prepare two different shades of varnishes and a clear coat. We apply varnish to the nail, when it dries, cut out a stencil in the form of rays from a piece of adhesive tape. First, put the tape on your hand to get rid of excess stickiness, then on the nail. Apply black varnish, after it dries, remove the stencil. Glue the scotch tape again and emphasize the pattern with silver varnish, remove the stencil.


Patterns for beginners using acrylic paints photo
Another popular technique used to create simple yet extremely beautiful patterns is painting with acrylics. This method of creating nail art for beginners is no more difficult than painting with varnish. And for some, it's even easier and more convenient. And to be convinced of this, we offer you schemes for creating a pattern with acrylic. Most often, such a manicure is performed in the salon, but it is quite possible to do it yourself. The paint dries quickly enough on the nails. Acrylic paints provide a wide range of colors and options. You can create patterns with them using a dots or a needle, but some decors allow you to limit yourself to ordinary paint brushes. Newbies often need a little more time to complete a design. In this case, the paint can be slightly thinned with water. It is also possible to correct the drawing with it. It is convenient to do simple acrylic designs on nails, so they are ideal for beginners.


Patterns for beginners with a heart photo
A breathtaking Valentine's Day look is absolutely essential, so pick one of the heart-inspired nail designs inspired by this romantic day. The stencil can also be cut from a soft but dense fabric. For example, in the shape of a small heart. A layer of pink varnish is applied to the surface of the nail, then, when the enamel has dried, the fabric is applied to the nail and a layer of white varnish with sparkles is applied to the heart. Hearts can also be made with a toothpick or a special dots (such a tool with a small ball at the end, which allows you to make even points on your nails). For such a pattern, you will need a varnish of your favorite color (but it is more advisable to take pink or red), well, a toothpick or a special dots.


2017
Patterns on nails using photo stickers
If you have not yet learned how to draw patterns on nails with a needle or a thin brush, and you have very little time for a spectacular manicure, special stickers for nails can help you out, of which, fortunately, there are a great many on sale. Transfer Slider Stickers are thin films that are usually fixed to a white or colored paper backing. It is fixed on the surface of the nails after soaking in water. The film itself is most often translucent and is suitable for partial decoration or full coverage of the nail plate. Depending on what kind of varnish you will use as a base and fixer, one or another technology for applying the sticker will be determined.
- The nails are painted in the main color and the varnish is allowed to dry completely;
- One image is separated for the purpose of fitting;
- The sticker is immersed in warm water for 20-30 seconds;
- The image is placed on the desired area of the nail, excess moisture is removed with a napkin;
- The sticker is secured with a top coat.
Such a manicure takes an average of 20-30 minutes, and lasts from 3 to 7 days on the nails. As you can see, decorating nails with beautiful designs is within the power of beginners.


Every woman at least once in her life did herself a designer manicure in the salon, but not all women made drawings on their nails at home, especially drawings with a sewing needle.
Nail design has become not just a way to additionally decorate your nails, it is almost an obligatory part of a manicure. Therefore, a woman who has learned to make herself a design on her own will reduce the cost of manicure, and will be able to change her image at least every day, choosing a manicure for the outfit.
The main thing is to set a goal and, but you can learn anything. On the Internet, anyone will find a large number of training videos on drawings on nails with a needle at home, for inexperienced and advanced nail designers, you just need to follow the instructions and follow all the recommendations.

A novice manicure master will need the following tools for drawing on nails:
- transparent base for manicure;
- topcoat;
- base varnish;
- varnishes of different colors;
- the design tool itself, the basis of the foundations is a sewing needle or a toothpick;
- cotton swabs, they eliminate errors in work;
- nail polish remover.
As you can see, a novice nail designer will not need anything special, and every woman has such a set of tools, unless you have to buy a lacquer fixer. Tools should be removed immediately after work, especially if children and pets live in the house.
Advice! In order to make it more convenient to draw with a needle, and so that it does not get lost after use, you can simply insert the needle into a new pencil.
Before decorating your nails, it is advisable to do a manicure, because the drawing on unkempt hands looks vulgar.
Tools for manicure at home

Manicure can be done at home, an important component of an independent manicure are tools, namely: cuticle nippers, nail file and pusher. How to Pick Good Tools:
- The first thing you need to pay attention to is the material from which the nippers are made. Quality tools are made from stainless steel. The cost of good wire cutters starts at 700 rubles.
- Blade length. Cuticle nippers have a cutting blade of 4-10 mm. The optimal size is 5-6 mm.
- Before you buy wire cutters, it is advisable to take them in your hand and make sure that they are easy to squeeze, and the hand does not get tired when working.
- After purchasing the nippers, you should immediately take them for sharpening, despite the fact that the packaging will say that the nippers are hand-sharpened.
- Pusher is a tool for pushing back the cuticle. They come in different types and shapes. The tip is square and oval. The other side with and without a sharp point. Pusher also needs to be sharpened. But you can't make it too sharp, otherwise you can damage the nail.
- The first thing you should pay attention to when choosing a nail file is the numbers 180/240, 100, 150, 1000 grit. This is the abrasiveness of the file. The lower the numbers, the harder the file. For example, a 50 grit file will be very hard and only suitable for artificial nails. For home manicure, you need a 180/240 grit file for natural nails.
A prerequisite for an independent manicure is the sterilization of instruments. If the wire cutters and pusher are used by only one person, then it is enough to wipe them with alcohol after use and boil them once a month in distilled water. If these tools are used by other family members, then they need to be boiled after each use. It is necessary to boil for 15-20 minutes, then dry on a clean towel.
Important! It is necessary to treat your hands before starting a manicure, this can be done with alcohol, cologne or washed with antibacterial soap, it is better not to get carried away with the last procedure, because antibacterial soap also kills beneficial bacteria.
The main stages of drawing on nails at home with a needle.
Manicurists distinguish two methods of drawing with a needle for beginners. Dry drawing - drawing is applied only after the first varnish has dried. With this method, you need to drip varnish on the nail and then stretch the drawing with a needle.
Wet application is when there is no need to wait for the varnish to dry, and you can immediately drip the next one, while mixing one varnish with another with a needle
So, the stages of drawing with a needle on the nails are as follows:
- The first layer is to apply a base varnish, it will protect the nails from the effects of varnish.
- Next, you should apply the first layer of varnish of the main color. You need to wait for the base varnish to dry.
- Next is the second, thicker layer of the base varnish.
- The last step in applying varnishes will be the points that need to be dripped onto the nail.
Now it is advisable to make the drawing before the varnish dries, otherwise everything will have to be repeated from the beginning. At first it will be difficult to come up with a pattern on the nails, so you can use the schemes from the Internet


Idea! Those who lack the talent of an artist can practice drawing on paper. Even beginners will get simple patterns after a few trials.
For training and tests with different images, you will need the following materials:
- white sheet of paper;
- acrylic or gouache paints;
- sewing needle.
You just need to drop the paint onto the paper and stretch it with a needle, creating a drawing. After the hand is trained on paper, you can safely proceed to the drawing on the nails.

It is better to start the design with the little finger, so as not to grease the already formed nails. If you follow the rules, then everything will turn out fine, and small tips will help with this:
- French style manicure visually lengthens the nails. Light and dark tones will make your nails shorter.
- During the process, do not press hard on the surface of the varnish, it is better to make smooth and light movements, otherwise there is a risk of leaving scratches on the varnish.
- Each subsequent layer of varnish must be thoroughly dried, this is the main principle of manicure. If there is no time, then you can dry your nails in cold water.
- When drawing with a needle, make sure that the varnish is not too thick and the varnish layer is not thick, otherwise the drawing will not work. The needle should slide easily over the surface.
- At the end, you need to cover the nail with a fixative, so nothing will harm the pattern.


Constant training in drawing will help you gain experience and “fill your hand”, and over time you can decorate your nails not only for yourself, but also for your friends. And if you wish, and at all, you can turn this occupation into a lucrative profession.
Advice! For beginners, it is not necessary to buy the most expensive tools and materials right away. At first, you can even practice on simple watercolors that are easily washed off.
There are several basic techniques for creating simple nail art. But first you need to prepare the workplace, tools and auxiliary materials.
Nail Art Supplies Set
Simple patterns on nails for beginners can be drawn using materials at hand. To apply drawings you will need:
- Scotch;
- needle;
- foil;
- glitter sprinkles;
- thin brushes;
- varnishes of various colors;
- toothpicks;
- cotton sticks;
- nailfile;
- nail polish remover etc.


Advice! The workplace should be well lit, it is better to use a table lamp with a conventional incandescent lamp (not fluorescent), since it does not distort colors.
Preliminary preparation
Before starting to paint patterns on nails for beginners, it is important to know that a manicure should be performed on the hands.


Now you need to stock up on patience, perseverance and accuracy.
Advice! You can practice drawing patterns on paper blanks made in the form of a nail and having the same dimensions.
Scotch tape to help us


To create nail designs for beginners, it is important to consider step by step the main popular techniques, for example, using scotch tape. You can also buy special self-adhesive manicure strips available from nail art stores.


So a simple, but at the same time original and neat manicure in two colors is ready! Now, using this technique, you can create patterns in the form of triangles, rhombuses and colorful stripes.

Using this method, you can also make a French manicure.
Advice! A very beautiful manicure will turn out, for example, if you cut out a pattern pattern in the form of stripes, circles from scotch tape.
Patterns on nails in point technique
By drawing neat dots on your nails, you can create original patterns that will look very good for beginners. You can buy special tools for spot painting, or you can do with improvised means:
- toothpicks;
- hairpins;
- thin rods.


Using different devices, you can get points of different diameters, for example, small points are obtained if you use toothpicks, and large ones if you use the opposite end of a pencil, you can even leave prints with an eraser on its tip. A drawing is created from points, these are flowers, patterns, animals, shapes. You can simply decorate the nail with a series of dots from the base to the edge of the plate.
A variant of spot painting is painting with drops. A larger drop is placed in the center of the nail, and smaller drops are located around.


Advice!As you master this technique, you can buy professional spot painting tools. They are called dots.
Gradient nail decoration
Another pattern for beginners is presented step by step. It looks very impressive, and it is created easily and simply with the help of eyeshadow and sponge. To do this, a varnish of the main color is applied to the nail, after drying, an eye shadow is applied to it with a sponge, and now the resulting colored enamel is covered with a colorless varnish.


Advice!It is better to first check the interaction of the transparent varnish and the shadows planned for application in order to exclude their ugly spreading or unnecessary reaction.
Draw with a needle


Drawing patterns with a needle is fine for beginners. In terms of the technique of execution, it is somewhat reminiscent of a dot painting, but has its own characteristics. All that is needed to create a pattern is an ordinary needle, and multi-colored varnishes - 2-3 pieces. There are no restrictions on color, the main thing is that the colors do not merge with each other. Varnishes in contrasting colors will look very nice. So, the step-by-step technology for applying a pattern with a needle:
- The nails are covered with a colorless varnish. This is to protect against possible scratches from the needle if you press too hard on the plate.
- After the varnish has dried, the base varnish of the selected color is applied on top.
- A drop of another varnish is applied on top, and while it is not dry, a drawing needs to be done with a needle. By carefully dipping the needle directly into a drop of contrasting varnish, and guiding it in different directions, a pattern or pattern is formed.
- After the resulting pattern has dried, a transparent varnish is again applied on top to fix it. Thus, you can either mix varnishes with each other, or get thin lines - it all depends on your imagination! You can get abstraction, ornate patterns or tropical flower petals.


You can also create a specific pattern. For this, for example, a large red dot is placed in the center. This will be the heart of the flower. Now the contour of the petals is drawn with a needle from the center. Lines can be painted over with varnish of a different color and shaded with a needle. After complete drying, a fixing base is applied.
Advice! Beforehand, it is better to practice on a paper blank.
Painting patterns with a brush
How to draw nail patterns for beginners with a brush? In fact, it is not as difficult as it sounds. For example, to create a geometric pattern, you will need: base, base coat, varnishes of two colors, a thin brush. In terms of complexity, this technique is comparable to needle drawing, and it is quite suitable for beginners:
- nails are covered with a base base;
- mentally, a line is drawn across the marigold, dividing it into two equal parts.


One of the parts is painted over, for example, with a blue varnish; using black varnish and a thin brush, a black stripe is applied, separating the colored blue part. The result is a manicure with a clear contour of varnishes in contrasting colors.
The finished pattern, as usual, is covered with a base base. With a thin brush, you can draw "leopard patterns", for this, brown spots are first drawn, then they are outlined with black varnish.


Advice! If it is difficult and inconvenient to draw on the fingers of the right hand using the left, you can choose only one nail to apply the pattern, and cover the rest with varnishes in contrasting colors.
Decoration decor
With the help of decorative elements, you can easily decorate marigolds for the holiday, for this you will need glitter sprinkles, rhinestones, sparkles, etc. You will also need a colorless varnish, a base varnish. The technique of applying patterns using decor elements is very simple:
- The nails are covered with a colorless base.
- If desired, a varnish of a different color is applied.
- After drying, decorative elements are laid out on the surface in the desired order.
- The base varnish is again applied on top.

 Glitter sprinkle applied on top of white varnish
Advice! In order for the decor not to crumble ahead of time, you need to try to choose the elements that fit the nail as closely as possible.
Drawing with tulle
Using this method, the nail acquires an interesting openwork pattern. To do this, you need a piece of tulle with a beautiful fine lace. Nails are prepared, as with other techniques (base varnish, main color), without allowing the second layer of varnish of the main color to completely dry, a piece of tulle is applied to the nail plate, pressed for a while and removed. It turns out an imprint of openwork tulle on the enamel, and now you just need to cover it with transparent varnish to fix it.


Advice! The pattern can be customized for each finger. And instead of tulle, take knitted fabric or velvet.
Acrylic paints will decorate your fingers
This method of applying patterns is also suitable for beginners; in terms of complexity, it is equivalent to painting with varnish with a thin brush. Some beginners may find it even easier to complete.
For example, you can draw a branch. This will require yellow and green paints. It is carried out in the following stages:
- A varnish of some dull color is applied.
- On the top left, two curved lines are drawn with a brush - these will be branches. The lines are drawn with bright yellow acrylic paint.
- With the same brush, small leaves are drawn on the branch.
- The middle of the leaf is tinted with a lighter paint.
- Everything is covered with colorless varnish for fixing.


Advice! Do not forget about applying clear varnish as a fixer. Without it, the paints will quickly be washed off with water.
2016 nail trends
Neat and well-groomed nails do not go out of fashion. This year, short marigolds are in trend. The almond shape of the nails does not lose popularity, giving the image a harmony.
The color scheme differs in non-standard colors, for example, turquoise shades are suitable for red-haired beauties, and jeans-style will be interesting for young girls. Coral shades are already a classic for feminine and elegant.


The mint color, fashionable this season, will not disappear in the fall. The flesh color of the varnish is also popular, and the most daring girls are already using yellow vinyl, dark lavender and hot coral. Pink color, which has also become a classic, does not leave the stage either. Interesting varnish "confetti". It has an unusual combination of coral and violet particles, and there are also particles of a calm pink color of various sizes.
Styles and directions of nail design in 2016
Patterns and decorative elements on the nails have already become a tradition in nail art. Geometric figures are in demand this season, as well as drawings in the form of squares, cells or triangles.


Interesting "frames" have also appeared. The main color is framed along the contour with varnish in a contrasting color. The tradition of monofilament in the design of nails is not getting old either.
You can dilute the image by decorating a couple of fingers, simply highlighting them with varnish of a different color. Summer has passed under the sign of brightness and luxury. Combinations of bright manicure with decorative elements in the form of massive decorations are in fashion. Nail stripes are still popular. At its peak, there is a blue base with a white stripe, to match the nautical outfits that are fashionable today.
Lunar manicure does not lose its position. Its most demanded appearance is a black matte finish with a silvery and shiny moon.
To create a geometric design, you need to use at least 3 types of varnish. New combination: beige - black - white. For several seasons, the topic of geometry is still relevant. The lateral jacket is also interesting, this is when a strip of white is drawn on the side of the nail.
The so-called unusual varnish blots are also in demand. There is also a trend towards a natural look in fashion, as a result, flesh-colored varnishes are popular. Transparent varnish is also in trend.

Don't be afraid to experiment
Women always dream of having beautiful and well-groomed nails. Chasing fashion trends is not worth it; instead, you can become the creator of your own design, only starting from fashion trends as a starting point.
It is quite possible to independently create a pattern and decorate nails, especially, as it turned out, it is not so difficult - the main thing is to adhere to the rules and know the secrets of performing the techniques. There is no need to be afraid to use your imagination and design possibilities, you should not be afraid to experiment.
Who knows, maybe next season your design will be taken as a basis, which you yourself came up with?