If the baby was bored with toys, just show him how to make a boat from paper. Children explore the process with interest, and then for a long time they work on its details, equipping the origami ship by plasticine passengers, paper tools, straw flagpole or improvised sail. Run ships from paper even more interesting than folding. Adults are engaged in this with the same azart as the kids. Why not make folding and launch of a paper fleet of a family hobby?
Option 1 "Basic"
 Make paper boat
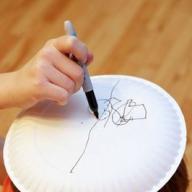
The first scheme is widely known. However, how to make a simple boat from paper on it, not everyone knows. But here everything is simple - only a piece of A4 is needed or any other format (rectangle, but not square) and a little patience. You can use colored paper, such as green - it will be a warship, which is often decorated with red stars (appliqué). Please note that one-sided sheets are folded in color to get the maximum color outside the ship. Step-by-step instructions and rice. 1 will help to understand the subtlety of the process. So, proceed:
- The rectangular sheet position is vertically, and then fold it in half from top to bottom;
- Now bend the workpiece vertically, equal to it left with the right, give the place of bend;
- Return to the stage of the back - in front of you again a horizontal sheet (place of bend from above, loose faces at the bottom);
- Now the upper corners are maintained to yourself, bring them into one point and equal to the edge along the central edge of the workpiece (see how to do in Fig. 1);
- Top "walking" bottom sides on each side and give the workpiece the shape of the triangle, locating the protruding corners for each other;
- Open your triangle from below, reducing its sharp corners to each other - it will turn out already square (see Fig.);
- The workpiece will have only 2 free corners, each of which must be wrapped to the opposite top on each side;
- Open the resulting triangle from below, turning it into the correct square (as in clause 6);
- Watching the "Walking" corners on the parties, freeing the mast, straighten the toy - a paper boat with a mast cone is ready.
We looked at how to make a paper ship in stages, and you remained to decorate and stylize a toy in your own way: under a passenger liner or a military battlefield - as you want. Such an illustration is superbly swimming and staying on the water for a long time. To the toy does not twice and even raised the baby even longer, squeak it outside with acrylic paints or use the glossy glossy sheets of paper.
Option 2 "Sailboat"
 Paper sailboat with his own hands
Have studied the first scheme and have mastered this technique in practice? Then it's time to diversify the origami skills and fold the beautiful sailboat, for which it also will not need anything other than a paper sheet. It is important to consider that there is a sailboat a little differently - unlike the first scheme, here the color side of the leaf remains outside, that is, the sheet needs to be put "face" down, and the draft side. So, to the case:
- Rectangular sheet Put it in front of it vertically and fold it with an angle, bringing together the left facet of the sheet with the top;
- At the revealed bottom face, cut the workpiece with scissors - you need the right square sheet, the cut edge is not useful to you;
- "Spray" the square by folding it in half and left to right, and from top to bottom, and then diagonally;
- Holding rice. 2, fold the "sash" sheet to the center and to lay down the "boats" on both sides, pressing the workpiece in the center and revealing it from the inside with a free hand at the edges;
- Inverting the resulting adjacent boats down the "face", fold the workpiece diagonally, turning the elements perpendicular to each other (see Fig. 2);
- Clear the bend and straighten the toy - the sail boat is ready to make the first swimming.
Such a boat can be made of colored paper of any tone - the matter of your personal choice. And if the ship is decorated with an umbrella for cocktails and give it a name (write on a side), it will turn out to be a full origami yacht - an interesting interior decoration for children, which can be used in a fascinating game. After all, such a steep cruise liner is always a tallest piece for pirate ships. And knowing how to make boats from paper, the schooner flibuses you now also fold easily.
Gaming child development
Not every adult knows how to fold a boat from paper, what to talk about children. Small child It will be methodically and with interest to master the process if my mother or dad helps him. And engage in the folding of paper figures is useful not only in leisure purposes, but also for common development kid. Motoric hands, non-standard thinking, design skills, memory and attention - all this trains the basic origami course for children and paper ships in particular.
Turn the autumn walks to the most real adventure.
And if autumn does not please the fans of marine hazards with deep puddles, you can run the boat of the house or in the yard, filling the suitable container with water. There are many options for how to do.
Launcing boats, you can make sure of simple desires, hoping that they will definitely come true.
Cut from cardboard details.

We glue the front of the ship.

We glue the back of the ship.

In order to secure the mast we need a wand, a piece of foam and a rectangular sheet of cardboard.

With the help of foam and cardboard fix the mast.

With the help of a rope, secure a stick to the mast.


With the help of a rope, we connect a sail and a small gun made of sticks. We glue the bridge. Draw on the verge of a circle window. Ship from the box is ready!

Ship from the carriage from eggs
For example, interesting pallet the boat with your own hands can be made
Reveal it, we attach from the top of the deck from sticks from ice cream, stain - and now the base of the ship is already ready.

One cell carved from the packaging will be a basket for a sentiment.

It will remain to attach the flag - and the ship is ready for sailing.

And if you use several separate cells from to create a ship, you can make a small bot or yacht. Even without staining, such a ship looks quite effectively.


Ship out of a box from under milk
You can create a real ship from any paper capacitance remaining on beverages or products by cutting it with and salas the self-tier film.


Games with boats depend on the type of reservoir in which they will be shown.
- On the river you can arrange competitions, running ships from one level and following them along the shore.
- Launching a boat to the lake, you can move the time through which it hits out of mind, then put the next and compare their results - such a classes is enough for a long time.
- You can launch a boat on the sea or lake with the waves and wait for the wave to take it back to the shore.
- You can build all the flotilla on the shore and watch which boat will first take into a free swimming of the wave.
Video about how to make a boat from foam:
Paper crafts are an exciting occupation. Of the simple white or non-colored sheet, an interesting creation may turn out.
Folding figures, at first glance, is like a children's game. But this is real art with its technicians and methods of work, which, nevertheless, can master every person.
Paper boat from childhood
Each child at least once folded the paper figures. The most familiar and loved ones are paper airplanes and boats.
In childhood, paper ships launched into swimming and simply used in games. This imperious toy gives a scope for a fantasy child.
Some were fascinated by the manufacture of complex and large models with a variety of small elements.
Create a paper figure under the power of anyone who wants. It is enough to know simple instructions.
Instructions for folding a durable boat
In order to fold the craft, a paper sheet is needed. Nothing is no longer required. And the scheme itself is rather simple. It is enough to figure it out in it and fold the product several times.
 In the future, you can do without tip.
- It is necessary to prepare a sheet of rectangular paper. From its size will depend on the end size of the ship.
The sheet can be white or color, depending on the wishes. If paper is used, the color of which only on the one hand is desirable to be folded in color. The finished figure will look more beautiful.
- It is necessary to fold it in half across.
- Place the fold and find the middle of the sheet. To do this, fold it again, but not to the end. As soon as the middle is designated, you can make a lightweight hall.
- At this stage there is a leaf, folded twice, with the marked middle. Next, you need to fold both corners to the center, focusing on the mark.
- Holding the corners, you need to spend your finger over all lines of bend. They must become fixed and thin.
- Next, you need to expose free edges of the sheet, which remained under the formed triangle. One edge one side, and the other on the second.
- Now the corners of the adjacent edges must be cut, repeating the shape of the triangle and fix the fold again. Perform it on both sides.
- Now it turned out a blank in the form of a triangle. If you push the edge of its base, then pockets are formed inside.
- Next, you need to reduce the angles of the triangle base and folded the opposite sides. Now the workpiece has become a square shape.
- It is necessary to grab the top corners of the square and stretch them into different sides.
- The product is ready.
How to make a paper boat with a child
The design of the folding process may seem long and complex. But in practice everything is much easier and more interesting. In order to interest such a child, it is necessary to take part in the process. At least at the initial stage.
Folding figures will not just pass the baby, but will benefit in its development:
- the process helps the development of shallow motility;
- ancestrance and patientity are formed;
- imagination develops.
There are a huge set of circuits and figures. They are different in the degree of complexity, and you can choose the appropriate option for a child of any age.
 In order to collect the crawl together with the child, you need:
- Pre-think what model is planned to be folded. Prepare her scheme and understand it before the process.
- Prepare a suitable work surface and several sheets of paper (in case something fails from the first time).
- You can also prepare colored pencils, markers or paints. When the ship will be ready, you can decorate it: come up with a name, draw the tricks or just paint.
- When everything is ready - you can proceed to work. It is necessary to add paper, demonstrating the child actions and execution technique. The kid parallel to do his own hand.
- The finished figurine can be decorated to taste the child. Then let the "ship" on the water (even at home).
- It is necessary to show patience and not to rush the child so that he calmly managed to figure out the new lesson for himself.
Paper origami in the form of a boat
Origami is the type of art of folding various paper figures. In classical performance, it is supposed to use only one sheet of paper without applying scissors.
Origami in the form of a sail boat can be collected as follows:
- The sheet of paper is folded on both diagonals alternately, break and turn it over.
- Now make bend on all corners and turn over again. The resulting bends make it easier to fold the figures.
- A piece of paper must be folded twice and then deploy back.
- Now you need to wrap the edges of the leaf to the central collar and press them.
- It turns out a rectangular blank. The top and bottom edge should be beatened to the center. Now it turns out the square.
- Next, the top and bottom need to be accessed back.
- Bottom corners need to raise up and pull out their corners out to get a trapezoid.
- The same to do with the top.
- Next, you must grasp the upper trapeze for the central part and pull it up.
- Turn over the workpiece. The center turns the square. The whole figure must be folded in the diagonal of this square.
- It remains to raise the lower corner and the handicraft ready.
 Another model in the form of a boat:
- The sheet must be folded half the horizontal.
- Then make one horizontal inflection in the center of the sheet.
- Next, you need to bend the upper corners outside on both sides to the central line.
- Bottom corners also bend to the center.
- Now you need to get the top layer forward, the bottom - back.
- Next to fold the workpiece inside and straighten.
- Corners Bend back and dissolve the boat.
A4 leaf boat
Most often for the manufacture of figurines, a sheet of A4 format (or album) is used. Its parameters allow you to create a medium-sized ship and a good form.
Preferably use A4 with a density of 80 to 160 gr.
Often, the product requires a rectangular sheet (as for a classic boat). In this case, even the scissors are not required.
If you need a square sheet, it is easy to make it from A4 using scissors (for example, as for a two-tube boat).
Creating a large boat from cardboard
For the manufacture of a ship big size You can use the same schemes as for ordinary crafts.


 But the usual paper is no longer suitable here, since such a blank will be bad.
- Sometimes large figures are made of newspaper sheets in two or three layers. But even such tricks do not particularly help. The cauldron as a result does not hold the form and does not have a species.
- For such a product, very dense paper or cardboard will fit. This material will give stiffness and will keep shape.
- It should be noted that it is more difficult to work with cardboard than with paper.
- First you need to perform measurements, and then make bends in the right places.
- For fixing folds will require a certain physical strength. Therefore, the child will need adult assistance.
- Sometimes a layout of a large ship is made of thinner paper, and then strengthen it with cardboard figures of the desired form. They are glued to the ship, and it becomes stable. But it is not recommended to put such a product for water, since the folds of the folds are quickly impregnated with water.
- Large ships often perform a decorative function and are decoration or interior addition.
Beautiful sail for paper boat
Sail is one of the ways of decoration paper craft. With this part, the product acquires a finished look.
In this case, the sail does not functionably save faster. Therefore, you need to take care only about its beauty and originality. It does not matter in which part of the ship it will be attached.
- First you need to prepare the base for the sail. If the figure is small, then the toothpick is suitable. For a large model, you can use any wooden wand. Or another material is not too heavy for the product.
- The base is attached with the help of glue or mechanically (for example, with threads).
- At the top of the base, the sail itself is attached. It can be any form and color, from any material: colored paper, Material, shiny foil.
- For convenience, it is better to initially attach a sail to the base, and then this design to the craft.
- It is necessary to take care that the sail does not outweigh and the boat did not fall on the side.


Dual Tube Savage for Interior Decoration
The two-pipe boat (or steamer) is also easy to manufacture, as well as the classic option. He can become not only a toy, but also worthy addition and decoration in the interior.
 In order for the boat looks presentable, you can make it from beautiful, unusual paper. Or already prepared a figurine decorate so that it harmoniously fit into the interior.
The process of manufacturing a two-pipe boat:
- For this model, you will need a piece of paper square shape. If the form is rectangular, then scissors are also needed.
- The rectangular sheet must be folded by reducing one angle diagonally to the opposite edge. Thus, a folded twice square and the remaining strip of paper, which must be cut off.
- The resulting square should be beaten first on one diagonal, and then by the second. Thanks to this, the center of the sheet will allocate.
- Next, you need to bend all four corners to the center. It also turns out a square figure, but smaller in size.
- The workpiece must be flipped with curved corners on the table. And on the resulting surface, repeat the operation again - get angles to the center.
- We turn over the workpiece and the corners to the center for the third time.
- Now you need to turn the figure again. Upper and bottom corners need to be straightened. They will serve the boat pipes.
- Other two angle (left and right) need to pull on the parties and the handicraft ready.
 One more simple instructionAnd as a result, it turned out a new model of a shoe with two pipes in the center.
How to run conventional boats to water
To start the finished paper boat to water, you must first prepare.


 Of course, you can do it without preparation. But this figure is quickly soaked with water, will lose the shape and will take it.
In order for the product to be disposal, you need to follow these recommendations:
- use for making dense paper, which poorly absorbs water;
- you can melt paraffin or wax and dip a figurine in them. When everything dries, a layer is formed on paper, which will serve as water protection;
- do not overload the ship by additional cargo. Sometimes during the game on the boat, you can arrange a figure (captain) or cargo to be transported. If all these items are too heavy, then some of them must be postponed at the time of swimming.
Any of the schemes for creating a boat is surrounded for both adult and a child. This is a pleasant and interesting lesson for everyone.
You can make such a crawler in any conditions. For this, neither special skills or special materials will be required.
Often children in their free time are trying to have any interesting to build on their own paper. But as a rule, nothing but the standard airplanes and frogs do not come. And here, naturally, parents must come to the rescue - caring dads and moms. They are exactly what they know that cool boats made in a matter of minutes from the affordable material, it is possible to raise your own child that it simply will not forget about everything in the world. Imagine, dear friends, you fantasize all friendly family in a row and draw up steamers, boats, boats, sailboats, and then let them in the water to contemplate the charming swimming paper masterpieces. You also want to have fun with your children, but are not entirely aware of this technique, then we suggest you familiarize yourself with our article. It will provide 6 ideas, as easy and easy to make a boat ship with your own hands. Crafts will turn out beautiful and clear, let's consider them now.
Simple boat from paper sheet A4
This is the easiest, fast and common option of a boat from paper. He will be able to make little children and adults. To create simple craft From the A4 sheet do it yourself, you should familiarize yourself with step-by-step instructions, as well as photos and video description.
You will need:
- Sheet of paper A4.
Progress:
- We fold the leaf in half 2 times.
- Next, expand the sheet 1 time.
- Now lay the top half of the sides to the central collar so that you have an angle.
- The lower parts of the workpiece bend up on both sides, while when you fold, extrany corners will remain. These corners must be bandaged for the triangular part of the workpiece. Similarly, we will make it from the second side.
- Now open the triangle and fold on other bends. Thoroughly worry the colors of the sides.
- The bottom corner of the rhombus bend upstairs, but without reaching the top angle of about 2 cm. In the same way, we do on the other hand, turning the workpiece.
- Now reveal our workpiece and fold on other bends.
- Holding side corners, expand them by pulling in different directions. You will have a beautiful boat. To visually approach our idea, we have prepared a video for you, which will help to cope with the task quite quickly.
Ship with sail
If you do not know how to make a sail paper boat yourself, then take into account our provided idea. Such a masterpiece to do longer in time, but it turns out more interesting and beautiful. By complexity, it is not too different from the first, so it is quite accessible to the child's execution. Let's see step-by-step instructions to get the necessary knowledge and skills to create it. 
You will need:
- Sheet of paper A4;
- Billet from a sheet of 12 × 5 cm and 3 × 3 cm;
- Thin wire;
- Scissors;
- Big needle;
- PVA glue.
Progress:
- The demolition itself makes the same way as in the first version.
- Needle Do the hole in the top of the triangle boat.
- We need to turn the wire into the hole and bend from the bottom so that it keeps.
- From the sheet 12 × 5, we need to make a sail. The needle should pierce two holes for fastening and put the sail on the wire.
- Now from a small billet make the flag. Bend the leaf in half and attach to the wire, bending it down. Two parts of the flag we need to glue with each other.
- Cut with a triangle on the flag, so that there are two teeth.
- Pass all the details of your beautiful boat from paper and you can run it in swimming. As a bright example, we recommend that you view our video. It will tell you how it is easier and easier to cope with this creative work at home.
Paper boat with your own hands
Another option is a simple paper boat that you can make your own hands. Such a beautiful boat will like you and your child, and most importantly, he will swim well. Let's see how to build such a boat when used by our step by step description provided ideas.

You will need:
- Sheet of paper A4.
Progress:
- Put the sheet on the table vertically.
- Right upper angle Take to the middle of the left in such a way that the top edge of the leaf is parallel to the left edge of the sheet. And make a bend.
- Next, strifter the sheet and fold it in the same way only to the right.
- Now the bottom of the sheet of paper, bend in half to the line of folding the top.
- The bottom curved part on both sides bend triangles upwards.
- Top into the top and make another fold by pulling the top line to the bottom. Thus, you will be folded horizontally.
- Now, in horizontal bends, we fold the top of the sheet into the triangle, bent these bends inward, and the rest.
- The resulting workpiece fold in half in length. Expand back.
- Now turn over back side Sheet to himself and fold into the triangle, pulling the sides to the center.
- Lower little triangles fold on bends up. You will have a figure like a diamond.
- Side angles are tested to the central collar.
- Fold our workpiece in half in length.
- Now straighten a beautiful boat ship, open the central fold and gradually form the boat. For a more detailed and visual consideration of the master class, we recommend familiarizing yourself with the following interesting video performed in the Origami technique.
Flat bottom boat
Another option is a simple boat ship - this is a flat-bottom model. It will be perfectly swimming on puddles or river. To make such creation with your own hands, you can familiarize yourself with our step-by-step instructions, as well as photos and a video description of the idea provided.

You will need:
- Sheet of paper A4.
Progress:
- Fold a sheet of harmonic paper on 3 parts so that the bends are along the sheet. Thoroughly worry all the bends.
- Roll into one fold, and the second bend in half, leaving the middle part of the untouched.
- Then straighten back.
- Now at the top, regenerate two corners inside, focusing on the center of this part.
- In the same way, bent the remaining part, bending the side to the middle.
- On the other hand, bend only one angle on the side, where the sheet is folded twice.
- We begin the previously bent side to the common side.
- Inspell the outward half of this part, and break it back.
- Now, from the side where 4 corners were bent, in the same way in the way 4 more, only on the free side.
- On the other hand, bend one corner.
- The resulting workpiece divide into 2 equal parts and start forming a beautiful boat.
- The part where only one corner was bent, bend along the line, where the sides of these triangles end.
- Bend back and in the middle open the workpiece. You will get the bow of the boat on the one hand.
- On the other hand, stripped the walls and corners to get the back of the boat.
- Now you will succeed good strap. To facilitate your creative work, we suggest watching a video that will tell and show you how to make a boat from paper in the Origami technique just enough and quickly.
The simplest boat
If you want to surprise your friends or a child the fastest assembly of a paper ship, then this option should like it. Such a masterpiece will not swim, at least for a long time, but he has original way assembly. Let's see how to make a miracle like a miracle.

You will need:
- Paper sheet (square).
Progress:
- To perform this idea correctly, it is necessary to start folding the square sheet diagonally.
- Now regenerate the lower part of the triangle (about 1/3 part) up. Work carefully bends.
- Separate the design and the bottom curved parts tweak in such a way that you get sides of a beautiful and neat boat made by your own hands.
- Our quick build product is ready! If you find it difficult in the process of creating crafts, then we offer you a video. With him you will handle much faster.
Paper yacht in origami technique
In order for you to be able to quickly create a similar original boat from paper, you will not need a lot of effort and time. It is worth only a few times carefully view our step-by-step master Class and success will be in your skillful hands.

For work it will be necessary:
- colored paper (square);
- brush;
- stationery glue.
Manufacturing process:
- In order for this idea to come to your soul, you need to be patient and take a wish. Make a yacht is completely simple, on the contrary, very exciting. We take a bright sheet of any color and fold it in half diagonally so that one big triangle turned out. We begin the finger of his edge, and then we unfold and fold them again in half, but on the other hand, trying to form the same geometric shape.
- On the unfolded sheet of paper, we received two longitudinal cross lines of the fold, which was denoted by the center of our sheet. Now put the material with a sharp angle up - type of rhombus. His right edge bend, highlighting a clearly bent side of the finger, and pull up to the center.
- After that, we will need to fold our rhombus with three corners in half, but so that its central part looks out. That is, a bent earlier right angle should look upstairs, not inside. We will take over the end of something like a triangle, but the right side will not have an acute form.
- Now we have to top the right side of the triangle, bend inside so that we have a little rhombus. His upper sides pressed the finger, creating the clarity of the lines.
- Now the upper left side of the only rhombus obtained, we need to be back from below, making a sharp triangle in this way. In this way we do with the right side of our figure.
- A sharp top base of our rhombus, we should connect together, put on the side in the form of a certain flag, highlight the folds of the folds from both sides, and then deploy back.
- The sharp corner of the deployed rhombus should be slightly beaten, then the opposite sides of the figure to connect together, tightly pressed them.
- The left upper side of the rhombus, we also have to be outward, pulling it to the center of the small rhombus. Do not forget to carry out your finger on the bent lines.
- Now the left side corner of the rhombus, we also need to bend slightly, pressed, and deploy.
- Similarly, we will need to do with the right side of the rhombus.
- After that, the right side of the rhombus lay on the left, and the middle of the figure seems to be pulling up to look like a pipe from the ship.
- The tips of the two sides folded in half, we hide inside. We got a five-pointed figure with a pipe at the top.
- Now the lower side we begin up and attract almost to the base of the yacht. Finger fix the bends, and then deploy our bottom of the yacht and raise the edge of the ship so that they are from all sides of the product.
- The back of the crafts is to be born to the stationery glue, so that it does not reveal.
- The bottom of the product with your fingers gently straighten and put on the table to admire. Such a beautiful creative work will appeal to every parent and child, including. The idea at first glance will seem difficult, however, with the help of our prepared video, all the difficulties will disappear by themselves. Do not believe, it is worth doing this creation from paper with your own hands.
The ship model can decorate any interior. It makes a romance element in the room, the dream of long-haired travels and adventures. This may be a bought souvenir, someone's gift, but more interesting the model - made by your hands or hands of your loved ones.
This boat made my dad, at the request of my boys when we were visiting. He had no tools or materials at hand, so he did the ship "from what was", right in the kitchen. I saw that it turns out interesting and asked Pope to describe the construction process for my site with intermediate photos. When the ship was finished already, I was afraid to give it to children (let them forgive me) and put on a shelf, for beauty.
Here is the description of the ship
Required materials and tools:
- 2 packs of bamboo sticks for kebabs (we buy in a household or grocery store),
- super glue,
- threads
- monotonous fabric
- pencil,
- knife shoe or stationery big.
Process manufacturing boat
Step 1. Made the bottom
First make the bottom. At the real ship, the bottom is usually rounded or pointed, and the sailboat must be keel. You can do this bottom, but then the boat will not stand on the table and he needs a stand, so we make a flat bottom. To do this, we prepare 2 long side sticks of 16 cm, 2 short nasal sticks of 5 cm and 1 feed wand 4 cm long. Lay them on the table in the form of a pentagon bottom, so that the edges lay down on each other. Pencil is placing the joints of our sticks, so that you can make oblique connections "in the floor tree". I cut the corresponding bottom and upper parts of the ends of the adjacent sticks with a knife. Needlessly protruding edges of the sticks (due to the fact that the corners are not straight) gently cut off with a knife. We take super chairs and glue the frame of the bottom. Watch that the resulting framework was strictly symmetrical.
After that, fill the resulting frame with other chopsticks. We start from the center. Cut the wand slightly long of the distance from the nose to the stern, then foster it with the nose and cut the feed, so that the wand entered into our framework. But the upper parts of the sections leave a little longer to the wand not falling into the frame, and hung on the edges. Lubricate the edges with glue and glue into the frame. Similarly, we cut the neighboring, decreasing in size, sticks and also insert them into the framework. The extreme sticks are somewhat harder when decay occurs on both sides, but the principle is the same. Thus, we have a kind of wooden fleet - the bottom of our boat.
Step 2. We take overboard

Cut and glue along the entire length of 3 transverse racks of the bottom, to give the strength of our design. Next, cut out, at the place, new sticks for the construction of sides, but we make them a little longer, so that the vessel's body expands up. And we stick them to the lower row with a small displacement from the center. The joints of the chopsticks are in the overwest of the previous row, by type of well.

After 8 rows we form a nasal and feed part from the same sticks, but already less than the length. In the nose, you can put the wastewater chopsticks.
Step 3. put masts
Making masts. Middle mast (grotto) is the longest. Made from the whole stick. Fixed as shown in the photo to the bottom. Correctly with displacement to the stern.
Front (fock) and rear (bizan) are shorter as much as. Inclined (bushprit) is glued to the nose and to the bottom.

Step 4. We make deck.
By second from the top of the board, we glue the reference planks to which the deck will go. It is possible from the same bamboo sticks, and it is possible from toothpicks or matches. We cut the cross sticks for deck and glue on support rails. You can overlap the entire deck, and you can partially as in the photo to be access to the bag. On the deck rails near the mast cut the grooves, so that the masts were passed, and sneaking these places. In the stern, we bring beauty, like a railing. We cut from cutting sticks of a barrel of 5 mm, glit them lying along the edge of the stern, and on top of glue another row of sticks, the same length that was already on the stern.

Step 5. Cut and fix the rei
Place the masts under the sail. We retreat from above and below each mast 2cm. We make a knife transverse grooves under repeat. Distance between them is divided by 3 parts and cut out for another 2 transverse grooves, under the rest of the rei. Cut the rei, 4 for each mast. The lower per 1 cm from each edge is larger than the width of the deck at the place of the mast location, the top is equal to the width of the deck, and the average has an average size proportionally decreasing. Insert them into the appropriate grooves on masts.

Step 6. Tensioning the sails
We make sails from suitable fabric. We cut the trapezidal loskutka, on the width of the Ray and a height of 5-10 mm between the residue. Glue sails straight to the spear with a bunch in height to imitate lightness. We take a thick thread (or thin in 3 layers) and stretch the rope from the bushprit to the stern, wrapped, on the road, around all the mast. Cut out the oblique nasal sail and glue it to the rope and bushprit (you can 2-3 sails smaller size). Cut from another matter triangular flags and glue on masts. Ship ready.

If you want, so that the boat was swimming, the case should be painted with thick varnish or paint to flush all the slots. Perhaps 2-3 layers. For the best stability of the bag, the ballast can be placed, for example, a lead plate.