Fast navigation through the article
Have a kindergarten or school announced an exhibition of winter-themed crafts? Or do you just want to keep your little one busy with creativity on these cold days? In one material, we have collected for you 6 ideas for winter crafts from natural and improvised materials with step-by-step master classes, a selection of 60 photos and videos.
Idea 1. Tabletop diorama with a winter storyline
A tabletop diorama will allow you and your baby to show all your talents - from modeling to construction. Moreover, using a variety of materials and objects: branches, cones, toys (for example, from eggs "Kinder Surprise"), plasticine, salt dough, cardboard, cotton wool and much more.
The first thing you need to do is come up with a storyline for your diorama and plan your composition. You can recreate any of your imaginations or be inspired by our selection of themes with photos and small tips for making crafts.
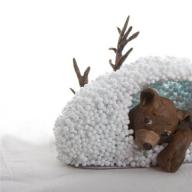
Topic 1. "Winter in the forest"

The craft is made of polystyrene and plasticine. The bear can also be molded from polymer clay or salt dough.

If in a kindergarten or school you were given the task of making a winter craft from natural materials, then you can use cones. They make excellent Christmas trees, owls, deer, squirrels and hedgehogs for the winter forest. By the way, we just have several master classes on how to make them.

Do you want to make a simple craft more effective? Just light it up with an LED string! To embed light bulbs into cardboard, you need to make cross-shaped cuts in it.

This winter forest is made entirely of felt. In this case, animal figurines can be worn on the fingers.

Topic 2. "Winter House"
A favorite theme at exhibitions of winter crafts. The house can be surrounded by a forest or a courtyard with paths, a wicket, a mountain ash, a skating rink and a snowman. And the hut itself can be beautiful not only outside, but also inside.

This video tutorial shows a simple and quick way to make winter crafts from natural materials, namely from twigs and cones.
Topic 3. "Christmas in the village / town"
If you build a couple of houses and connect them with beautiful streets, you get a whole village or town.

The easiest way to make houses is paper, more precisely from printed templates, which only need to be cut, painted and glued. The next video presents a step-by-step master class on making such a craft.
Topic 4. "The North Pole and its inhabitants"
Want to make a more original craft? We suggest making a diorama on the theme of the North Pole.

To make such a craft, download and print templates (click on the picture to download), transfer them to cardboard, then cut, connect and paint the parts


Topic 5. "Winter fun"
Crafts on the theme of winter fun illustrates all the joys of winter. For example, sledding, making snowmen, or playing snowballs. To recreate winter scenes, Lego men (pictured below), Kinder Surprise figures from eggs and any small toys are well suited. You can also make people with your own hands from plasticine or polymer clay.

Topic 6. Winter sports
Another very original idea of \u200b\u200bthe craft is a diorama on the theme of skiing, figure skating, hockey, bobsleigh, snowboarding. By the way, the Sochi Olympics can serve as an inspiration and model for modeling.


To make such figurines of skiers, download, print, color and cut out templates (to download templates, click on the picture), then glue a toothpick to the hands of the little men, and a popsicle stick to the legs.


Topic 7. Scenes from fairy tales
Choose your favorite fairy tale story and recreate one of its episodes. For example, it can be a fairy tale "12 months", "The Snow Queen", "Frost", "The Nutcracker", "By the Pike's Command."

Everything in this craft on the theme of the fairy tale "By the Pike's Command" is molded from plasticine and only the mill is assembled from matches

To make such a craft, you need to cut several holes in a piece of plywood and insert tree branches into them

This composition is dedicated to the theme of the ballet "Nutcracker". The figures in it are made of ... clothespins. Unfortunately, in Russia, clothespins with a round top are not sold, but you can order them on the Aliexpress website or use the usual ones.
From this video you will learn how to make a winter craft with your own hands based on the fairy tale "By the Pike."
Idea 2. Skating rink with a steerable figure
The originality of this winter craft lies in the fact that the skater can be smoothly "rolled on the ice" by running a magnet along the back of the box.

What you need:
- Shallow tin can of cookies, tea, etc.
- Paper;
- Paints and brushes, pencils or markers;
- Paperclip or coin;
- Glue;
- Magnet.
How to do it:
Step 1. Decorate the tin box so that it resembles a skating rink: paint the bottom with blue and white paint and cover with clear varnish (glitter nail polish works well), garlands and flags can be placed on top of the box, and snow-covered trees on the sides.
Step 2. Draw a skating figure of a girl or boy on thick paper or cardboard, then cut and glue it to a coin or paper clip.
Step 3. Attach a magnet to the back of the box. Voila, the ice rink is ready!
Idea 3. Picture painted by prints
Painting with fingerprints, palm prints, and even footprints is a lot of fun, especially for preschoolers. All you need is fantasy, gouache and a piece of paper! In the next selection of photos, you can see examples of such drawings.


Idea 4. Mini Christmas tree made of paper
Another winter craft idea for the little ones is paper Christmas trees. They are made very easily and quickly, and you can use them as you like: as a decoration for the same diorama, an applique for a New Year's card or panel, to decorate a garland or a Christmas tree.

What you need:
- A sheet of green paper and some brown paper for the trunk;
- Glue stick;
- Scissors;
- Sequins, rhinestones, beads and other decorations for the Christmas tree.
Step 1. From a sheet of green paper, make a square by bending one corner of the sheet, as shown in the photo, and cutting out the excess.

Step 2. Cut one of the short sides of the triangle into equal narrow strips, not reaching the fold of about 1 cm (see photo above).
Step 3. Now straighten your workpiece and begin to alternately glue the ends of the strips to the center fold line, moving from bottom to top.


Step 4. When you have all the strips in place, fold and glue the bottom corner of the tree up. Further in the same place, but on the back side, glue a small rectangle (tree trunk) cut out of brown paper.


Step 5. Decorate the tree with colorful beads, sequins, buttons and other decorations. If you wish, you can make several of these trees, glue loops to them, so that you can then assemble a garland or decorate a real Christmas tree with crafts.
Idea 5. Snow globe ... or rather a bank
Now we propose to make a real souvenir with your own hands - a variation of a snow globe. True, it will be made from an ordinary glass jar. The child can present the craft to a loved one, present it at a winter crafts competition, or simply leave it on the shelf for beauty.

What you need:
- Glass jar with a lid;
- A piece of styrofoam;
- Glue (hot or "Moment");
- Acrylic paint to decorate the lid (optional);
- Artificial snow or just sea salt, sugar, white soap or foamed polyethylene grated with a fine grater;
- Figurines that will fit in the jar;
- Styrofoam balls or any white beads;
- Fishing line;
- Needle.
How to do it:
Step 1. Repaint the lid to the desired color and leave to dry. In this project, spray paint was used to redesign the lid.
Step 2. While the paint is drying, let's make a "snowfall". To do this, you need to string several balls of polystyrene on a fishing line threaded into a needle. Use scotch tape to attach the "snowflakes" to the jar.
Step 3. Trace the bottom of the can directly over the foam, then use a knife to cut the resulting circle out of it. This circle will become the base for the figures.

Step 4. Glue your figures to the foam circle, then glue the resulting composition to the bottom of the jar.
Step 5. Pour artificial or homemade snow into the jar, cover it with a lid with snowflakes and enjoy the view of a winter fairytale.

Idea 6. New Year's card
New Year's cards are never enough, so we suggest making a few with your child.

What you need:
- A sheet of white paper;
- A sheet of colored paper;
- Scissors;
- Glue stick;
- Markers.
How to do it:
Step 1. Fold a sheet of white paper with an accordion three times so that each top layer of the accordion is smaller in width than the previous one.
Step 2. Spread out your accordion, cut the leaf diagonally and slightly in waves as shown in the photo above, then reassemble the accordion. You have the slope of a snowy mountain.
Step 3. Now take a sheet of colored paper, glue a blank on it and cut off the excess. Hurrah! The postcard is almost ready.

Step 4. Decorate the mountain with Christmas trees, draw snowmen and skiers, and finally sign the postcard.


In the same way, but using larger paper, you can make a winter craft for kindergarten.


Zaichenko Natalia
New Year is such a mysterious and magical holiday! In anticipation of the holiday, creating and creating coziness is much more pleasant with the whole family! On New Year's Eve, almost each of us makes various New Year's paper crafts with children, decorates a house or a Christmas tree with handmade toys, presents his work to relatives or friends, and someone takes part in various competitions. So we decided to participate in the city district competition! Our work - " Santa Claus mitt"took the 2nd prize! The craft was made using the quilling technique. The quilling technique will allow you to realize almost any of your fantasies!
Material and tools:
stencil mittens
0.5 cm strips, cut from red, white, pale pink and white paper
quilling awl or homemade quilling tool
ruler-template glue quilling
ribbon, thread
Stroke work:
1. Prepared the workpiece of our mittens(the size mittens"ask" yourself)
2. Cooking the whole tool:

3. Draw colored paper and cut into even strips (I drew on
computer)

4. Twist the base rolls from the paper strip (there are a lot of them)
using a special tool. We make from the base roll
"drop" from which we will glue flowers for decoration
mittens(the pattern may be different and the number of "flowers" -
snowflakes "free"!

5. All workpieces are ready! Now along the contour we spread the mittens
"rolls" and glue, decorate with "flowers" - snowflakes!

6. Here is such a beauty!


Crafts for the kindergarten on the theme of winter and New Year are again becoming in demand and relevant. However, if you do not have a tradition of making crafts for kindergarten for the New Year, you can do needlework at home. This is a great opportunity for an interesting affair.
DIY winter crafts for the garden: funny snowmen
Crafts in the garden on the theme of winter and New Year: Christmas trees and snow-covered trees
Fir-trees, of course, are green and elegant. Snow-covered trees are white and delicate. To make this beauty, cardboard, colored paper, thin paper napkins, video tutorials, and other ideas for garden crafts on the theme of winter and New Year from our selection will help you.

Details on how to make such Christmas trees with your own hands in kindergarten as a New Year's crafts are in the photo. We cut out a triangle from cardboard - the basis of our future Christmas tree from paper - and string it on a wooden stick or glue it with a glue gun. Then we cut green paper of different shades with the children into strips. The next step is to glue the stripes in random order on a cardboard triangle, and cut off the excess.


And here are the delicate winter trees. You can paint snow with your fingers. If you are looking for crafts on the theme "Winter" or "New Year" for the younger groups of kindergarten, then ideas will come in handy.


And such cute DIY Christmas crafts in kindergarten can be used even as Christmas tree decorations.

If there are trees and Christmas trees under them, Santa's deer can walk, which you can make from cardboard with your own hands.


Winter is a traditional time for home evenings. It seems that nature itself, tired of our noisy and bustling walks in warm weather, makes it possible to gather more often in the family circle, communicate with children, spend time at handicrafts, pay attention to the design of compositions for the New Year holidays. It's time to remember about the New Year's decoration of your room or group in kindergarten. And now a branch covered with snow seems to you like a fabulous bouquet, a window decorated with frost gives the idea of \u200b\u200ba winter panel, and an imaginary winter composition with bright bunches of mountain ash and viburnum is already seen in the center of the Winter Garden in Kindergarten corner.
We develop, communicate, educate
Hand-made craft gives our children a lot of positive emotions. The process of its implementation develops aesthetic taste, imaginative thinking, imagination, perseverance and patience. The manufacture and decoration of parts develops fine motor skills of the hands.
Communication in the process of coming up with and implementing an idea for a craft (be it a panel, or a bouquet, or a funny figurine) is the most important moment of upbringing. Without lectures and lectures, in a relaxed creative atmosphere, you teach your child to respect other people's opinions, politely object, tactfully advise, rejoice in someone else's luck, listen to reasonable advice.
Do not miss the opportunity to draw your baby's attention to bizarre natural forms, which will then turn into a festive New Year's bouquet, stimulate the imagination of the imagination.
Winter windows
The window is always attractive to the child. Everything that happens in the field of visibility is interesting. This is a real window to the world. We offer the design of this window, or let it be the craft "Winter window".
Mittens
The decoration of a group window in a kindergarten or at home is made in the form of a garland of funny mittens strung on a ribbon.
- We prepare the template by tracing our palm.
- Paper mittens are cut according to a pattern from multi-colored paper.
- Decorate mittens with bright applique (snowflakes, hearts, Christmas balls, etc.).
- Make the edges of the mittens openwork with a hole punch.
- String the mittens with string or ribbon.
- You can alternate between large and small mittens.
- Attach the garland to a window or over a doorway.
Garland
Window decoration with traditional snowflakes can be replaced or supplemented with a DIY Christmas garland. The decoration is made of cardboard or felt.
- Cut out the Christmas balls from colored paper according to the template.
- Decorate them with bright appliqué or designs.
- Attach with glue to strings or ribbons.
- Collect all the ribbons into a garland.
Night city
Everyone is used to decorating windows with snowflakes. But the window can be no less spectacular with an applique of houses and towers. You can pick up houses of different sizes and shapes, add Christmas trees and trees - so a fabulous snow-covered city is growing on your window. It will be perfectly complemented by volumetric models of houses on the windowsill.
- Using templates, draw the outlines of the houses on thick white paper.
- Cut out the houses.
- Stick to the window along the frame.
- Make a house out of the finished box by pasting it with white paper and drawing windows and doors.
- You can make a house yourself using the cube principle.
- Make a roof with folded cardboard.
Forest garland
If you still have pine cones after a summer trip to the forest, your window can become original and fabulous.
- Prepare the buds: clean off excess debris, paint with gold or silver paint.
- Secure each bump with a different length of tape or braid.
- Assemble the garland by alternating short and long pendants.
- Attach the garland to the window.
Winter panel
A winter garden in a kindergarten is perfectly formed from various New Year and winter panels. The panel always looks harmoniously on the wall of a kindergarten group or at home in a nursery. Such a do-it-yourself composition requires manufacturing in several stages. The decoration of your panel will perfectly complement an elegant winter bouquet.
You will need photographs, clear plastic plates, a candy box, and decorative materials for decoration.
If the mural is done for a group in kindergarten, collect photos of all the children. For home murals, the composition can be formed from fragments of different photographs of family members.
- Cut out baby silhouettes.
- Color or paint snow on the transparent plastic plates with liquid concealer.
- Glue the photo onto a plate.
- Decorate a candy box with background colored paper, braid or rain.
- The composition should be harmoniously distributed throughout the panel.
- Cut the snow slides out of colored paper or felt.
- Secure the plates with glue.
Crafts based on toilet paper roll
Snowflakes - ballerinas
- Color the toilet paper roll.
- Glue the head and arms drawn separately. You can use silhouettes from the photo.
- Prepare a do-it-yourself openwork napkin or snowflake with an appropriate slot diameter in the middle.
- Finish the decoration of the craft by assembling and fixing the parts.
Such snowflakes - ballerinas will perfectly complement a winter garden in a kindergarten, will become an original decoration for a group and even a Christmas tree decoration if attached to a decorative thread or braid.
Penguin
- Color or wrap the toilet paper roll with colored paper.
- Glue the oval - tummy, eyes, beak, wings and legs.
This craft can be an independent toy - decoration. It can be supplemented with a winter composition or a panel.
Snowmen
This composition of funny snowmen, made on the basis of toilet paper rolls, will perfectly complement the decoration of a group in a kindergarten and will become a wonderful Christmas tree decoration.
Decorating the craft will require pieces of felt or other dense fabric, buttons, braid and pieces of fluffy (chenille) wire with fluffy buboes for the headphones.
Winter bouquet
With the arrival of winter, we exchange a bright autumn bouquet for an elegant winter bouquet. Such a bouquet is not at all difficult to make from scrap materials.
- Find branches that are suitable in size and branching on the street, which will make up your bouquet.
- Clean them, dry well.
- Wrap them with foil or thread, paint with white or silver paint, wrap with white paper.
- Such a bouquet can be put in a vase, fixed in foam or plasticine, placed in a basket or box.
- The composition is perfectly complemented by New Year's toys, Christmas tree tinsel, bunches of mountain ash or viburnum, and figures of birds.
Let the winter decoration of the group become a fun experience for children and adults. A beautiful reward will be an exquisite winter bouquet for the group, an original panel, funny groups of penguins, snowmen and snowflakes.
A simple, but interesting craft with good developmental potential - paper applique "Rukavichka". Children from 3 to 5 years old will gladly take part in its production, and for older children, you can come up with more advanced versions of this bright postcard-picture.
Craft mitten for children
As materials and tools, you will need a sheet of plain white paper for the printer, scissors, colored paper of several colors and a glue stick (or PVA glue, if the child is better at handling it). Colored paper is better to take double-sided, tinted paper in the photo - it is bright and moderately dense).

Step 1. You need to fold a sheet of paper in half and draw a mitten on one half. The figure must be cut out as in the photo.


Step 2. Cut the colored paper into squares about 2x2 cm in size. In fact, the shape is not important: it can be circles, triangles and any other shapes.

Step 3. Ask your child to glue the squares to the inside of the card. If your artist is too young, help him deal with the glue. By the way, you can apply glue to the card itself, or you can apply glue to each square, as you like. The kid in the photo decided to smear the squares, but your baby may have a different opinion. Don't tell your child exactly how to stick the elements. It is important. Let it be his personal work based on his own imagination.


As soon as the required half of the sheet is filled, the mitten is ready. You can leave it in the form of a postcard or glue the sheets together - you get a bright picture.

Craft Mittens: benefit for the child
The benefits for fine motor skills of hands in working on any application are obvious, but how to enrich the manufacture of this craft with other developmental and educational moments?
First, use this time to reinforce your child's knowledge of colors. If the kid has difficulty memorizing a certain color or needs to learn a new shade (purple, light green), feel free to include it in the work.