A knitted openwork hat is a stylish and elegant addition to women's summer outfits. In such an attractive and romantic accessory, a woman will look mysterious and original. Hats knitted independently look especially elegant. Look at the proposed summer hats for women with a crochet pattern and description in this article, choose the right model for yourself and get to work.
Summer knitted hat for women
We start knitting a hat from the crown with single crochet stitches (CC1H). We work in a circle, moving to the fields.
For them, a diagram is presented depicting the beginning and end of each circular row. Using the description, the model can be knitted in any of the calculated sizes.
Sizes: S-M; L-XL.
Head circumference: 54-56; 58-60cm.
We will need:
- yarn, 100% cotton, 50g per 100m - 150; 200g;
- hook No3.
Density: 22 CC1H for 11 rows, you get 10cm by 10cm.
Description
Note:
- we start from the crown and go around, knitting columns with one crochet (CC1H). The pattern for the fields - see diagram A.1, the transition from one row to another - see diagram A.2;
- decreases: tie 2 CC1H with a common top;
- increments: tie 2 CC1H from one p. of the base.
We collect a chain of 5 air loops (VP) and close them into a ring with a connecting column (SS). Next, knitting is performed using the description:
- 1cr.r.: 11 sts with 1H in the ring;
- 2 cr. R.: 2 sts with 1H in each loop of the row;
- 3 cr. p .: * 2 sts with 1H in the next / first st with 1H, 1 st with 1H in the next. stlb with 1H * - from * to * repeat for the entire row. Total 33 CC1H;
- 4 cr. R.: * 2 sts with 1H in the next / first st. with 1 nak., 1 CC1H in the next. 2 СС1Н * - from * to * repeat for the entire row. Total 44 CC1H;
- 5 cr. R.: * 2 tbsp. with 1 acc. to the next/first post. s / 1n, 1 tbsp. with 1 acc. in the next 3 art. with 1 stitch, * - from * to * repeat for the entire row. Total 55 CC1H.
We continue knitting, using these instructions. We make increases in each row, we finish at 9p. In work 99 CC1H.
Further knitting of summer hats for women will be prescribed separately for two sizes.
Summer hat size S-M
10 cr. R.: * 2 tbsp. with 1 acc. in the next / first art. with 1 nak., 1 tbsp. with 1 acc. in the next 10 st. with 1 stitch, * - from * to * repeat for the entire row. Total 108 Art. with 1 acc.
We perform further knitting of a hat for women in a circle, knitting CC1H in each p. Having received 16 cm, in the last kr. R. subtract 3 columns at regular intervals. 105 pillars remain. s / 1n.
We knit the fields according to the images of scheme A.1. At the same time, we repeat the rapport of the pattern pattern 15 times. We finish knitting in 9 cr. R. scheme. By this time, we should have 135 b/n stlb. We break the thread, fasten and carefully hide the end.
Summer hat size L-XL
10 cr. R.: * 2 pillar. s / 1 in the next / first CC1H, 1 column. s / 1n in the next. 8 pillar. s / 1n * - from * to * repeat for the entire row. Total 110 СС1Н;
11 cr. R.: 1 column. s / 1n in the first 2 columns. s / 1n, * 2 SS1N in the next / first column. s / 1n, 1 column. s / 1n in the next. 17 СС1Н * - from * to * repeat for the entire row. Total 116 pillar. s / 1n.
Then we knit CC1H in the round until we get 17cm in height (measured from the first row). In the last row, we decrease at regular intervals 4 CC1H. We continue knitting hats for women according to cx. depicting a pattern for fields.
Rapport is repeated 6 times in a circular row. Having completed the last, 9th p., We get 144 stlb b / n. We break the thread, fasten and carefully hide the end.
Summer hat “Sea Dreams”: video MK
Summer hat with wide brim
We will need:
- fine cotton yarn - 200g;
- hook No1.
Description
We knit a hat with a wide brim for women according to the scheme, placing the lifting loops along the edge of the fan strip.
The symbols of the given scheme are standard. For beginner knitters on our website there is a detailed article with detailed illustrations on this topic.
The finished product must be starched and ironed.
- yarn containing 50% cotton, 50% polyacrylic (50g per 80m), melange gray-turquoise - 150g;
- yarn containing 78% cotton, 22% polyester (50g per 100m), blue - 100g;
- hook No3,5 and No4.
We will need:
- motive "Fan": performed according to the instructions of the scheme.
The designations for this scheme, as well as for the previous one, are standard, you can clarify them in the same article on our website.
The figure of the diagram fully shows the 12th circle. R. 13th p. and subsequent ones contain only a fragment of the motif. We use it for knitting on all cr. R. We finish each row with one connection. stlb in the initial air. P.
In a schematic representation of 19 p. rapport is shown, it should be repeated on all loops. The transition between rows is carried out according to the instructions of the scheme.
We knit circular rows of hats for women containing “Fan” motifs with blue yarn, for the remaining rows we use gray-turquoise melange. The last SS of the last cr. R. we knit with a gray-turquoise melange with a blue thread and behind each kr. R. with blue yarn we attach a gray-turquoise thread to the 3rd VP of the last "Fan".
From the 1st cr. R. on the 19th cr. R. knit once, then repeat from 16 cr. R. 19 cr. p., performing additions - see description below.
Important note
For the “Fan” motif, all rows must be knitted in the same direction.
Density: 20p. original r. (without the motive "Fan") for 12 kr. R. it will be 10cm by 10cm.
Description
We knit a chain of 8 VPs with gray-turquoise melange, close it in a ring 1 SS. We carry out further knitting according to the scheme, making additions.
Having knitted 12 kr. R. (this is 10cm), we completed 29 rapports and have 116p. At this point, the hat is tied to the middle.
From 13 kr. 22 kr. R. knit evenly, without additions.
Next, for the fields, we perform single crochet increases - see the description below. All added loops are included in the pattern.
23 cr. R.: * from each 4th loop of the base we knit 2 sts without a crochet * - from * to * repeat 28 times. We get 144p .;
27 cr. R.: * from each 4th loop of the base we knit 2 single crochets * - from * to * repeat 36 times. We get 180p .;
31 cr. R.: * from each 4th loop of the base we knit 2 sts without a crochet * - from * to * we repeat 44 times. We get 224p .;
35 cr. R.: [* from each 6th p. of the base we knit 2 stsb b / n * - from * to * repeat 8 times, from each 8th p. repeat three times. We get 260p., Which is equal to 65 rapports.
Having knitted up to 30 cm (this is 36 kr. R.), we complete the work.
Crocheted raffia hat “Vasilisa”: video MK
Selection of schemes


Summer hat crocheted with white yarn. The hat is decorated with a decorative flower and a satin ribbon threaded through the holes of the pattern.
The size: single
You will need: about 100g of white yarn;
Hook #2
patterns
fantasy pattern: knit on scheme
Abbreviations used:
V. p. - air loop
Comm. Art. - connecting column;
RLS - single crochet;
С1Н - a column with 1 crochet;
С2Н - a column with 2 crochets
Description of knitting
Crochet a chain of 8 in. n. and close it in a ring conn. Art.
1st p.: 30 С1Н
2nd p.: 3 c. lifting item 2 c. p., * C1H, 2 c. n. *, repeat from * to * 14 times
Starch the hat by turning the edges, as shown in the photo. Pass a satin ribbon through the holes of the pattern and decorate with a decorative flower.
Crochet hat and scarf

Size: 56.
You will need:
250 g of yarn (PAN, Helena);
hook number 2.
Technique: crochet.
Basic boucle pattern: crochet according to scheme 19.1.
Knitting density: 7 rapports x 16 rows = 10 x 10 cm.
Model pattern: 


Work description:
How to do it: work pattern bottom (A), starting from narrow edge (= chain of ch 12 + ch 3 inc) and work in main pattern 19.1, gradually expanding to 20th row to 30 sts Then knit the part covering the head (B), starting from the lower wide edge (= a chain of 111 in. p. + 3 in. lifting) and knit with the main pattern according to the scheme 19.1, gradually reducing the number of loops on both sides, to On the 20th row, reduce to 93 p. The length of sides a, b, and a1 should be equal to the length of the perimeter of the bottom without the length of its lower part. Connect the connected parts on the front side (at the same time, slightly tuck the bottom in the upper part) with a hook with one row of single crochets and 1 next “crawl step“. On the edge of the front of the hat, knit fields (C) with the main pattern, evenly increasing the number of loops to 150 (= 50 rapports). For side bevels on both sides, decrease in each row by 1 p. At a height of 6 cm from the beginning, finish the work, tie the fields without side bevels with a “crustacean step“.
Bow: tie a rectangle with the main pattern according to scheme 19.1, starting from the short side (= 18 ch + 3 ch lift), 12 cm long. Sew the middle of the bow to the middle of the bottom, and the edges to the part covering the head.
Scarf.
Size: 26 x 135 cm.
Doing the work: tie a chain of 60 c. n. + 3 c. lifting and knitting with a pattern according to scheme 19.2. At the end, tie around the perimeter: 1st row - s / n columns; 2nd row - * 1 tbsp. s / n, skip 2 tbsp. previous row, 2 c. P.*. Tie a fringe along the narrow edges according to scheme 19.3. On the long sides, tie 1 row with a “crustacean step“.
A source: mailing lists -darievna.ru


HERE IS ANOTHER DESCRIPTION OF THIS PANAM
Panama for girls "Chamomile" - Knitting
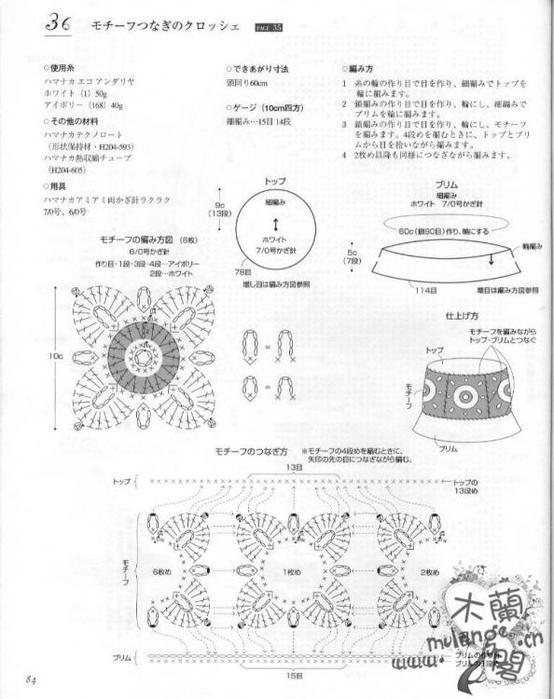
According to scheme 1, complete the core of the flower with a yellow thread. Next, knit 12 petals according to scheme 2 with a white thread. Connect all the petals together as follows: when the last petal is completed, then, without breaking the thread, take the 1st petal and tie it on three sides with. b/n. (one long side, rounded and one long side). So connect all the petals to each other sequentially one by one. When the entire chamomile is tied along the contour, perform the second row of tying with. b/n. Sew the core in the center of the chamomile. Tie the chamomile petals around the edge:
1 p. - 10 v.p. between petals, 2 s. b / n at the top of the petal;
2 p. - 3 in. lifting, knit a sirloin net, alternating 2 ch. and 1 s.n. throughout the row;
3 p. - 3 v.p. lifting, 2 s. n. under the arc of the previous row, 1 s.n. in the column of the previous row, 2 ch, 1 s.n. in the same column of the previous row, 2 s.n. in the next arc of the previous row, 1 s. n. in the column of the previous row, 2 c. n. and so on until the end of the row;
4 p. - sirloin net (like 2nd row). Tie the crown of the hat with a pattern according to the scheme shown in fig. 3. The number of rows depends on the desired product size. Knit approximately 16 rows. For a full hat, tie 11 daisies with 9 petals each.
To get the fields, connect 11 daisies in the process of their implementation. Next, proceed to connect the fields and crown of the hat with a crochet hook or needle and thread. Connect the petals along the edge of the product with neat chains of air loops, as well as single crochets.
You need to connect 11 daisies for the fields in the process of knitting them. In order for the daisies to lie correctly in a circle, make a template according to the size of the circle and connect the daisies on this template. When all 11 daisies are connected and interconnected, proceed to the connection of the fields and crown of the hat. Choose a method convenient for you and connect the details with a hook or a needle and thread. Along the edge of the hat, connect the petals with each other with chains from c. n. and s. b/n. (look at the photo). 


The model is crocheted.
You will need: 150 g of Vista yarn - equally blue and blue, a little light green and green; wire; hook number 2.5.
Knit sc in a circle (scheme 10): 6 p. - light green color, 1r. - blue, 1 p. - light green, 1 p. - green,
Sp. - blue.
Then knit without additions: 4 p. - blue, 4 p. - light green, 1 p. - blue.
Then knit 2 p. drawn loops (Fig. 96).
Tie a wire circle and attach to the fields. Sew the fields on the hat along the edge of the openwork strip.
Model Olga Semikina based on the materials of the magazine FASHION "SHAPOCHKI" No. 455.
Scheme


The model is crocheted.
You will need: 150 g cotton yarn; hook number 2.
Tie the hat scheme 69, starting from a ringlet of 6 VP, and, hard starched, dry on the form.
Model of Vera Kulikovskaya based on the materials of the fashion magazine "SHOTS" No. 455
Scheme


Crochet hat

Materials:
100 g melange yarn "Paglia di Fiesole" Manifattura Mafil di Ro magna no Sesia
Hook number 5.
Types of loops:
vp - air loop
conn. Art. - connecting column
sc - single crochet
sen - double crochet.
Work description.
With hook No. 5, dial 4 ch and close the connection in a circle. Art. 1st circle. R.: in the resulting ring, perform 8 sbn (replace the 1st sbn in each p. 1 ch, and 1st Sep - 3rd ch, finish this p. and the next rows of the connection in the loop of the beginning of the row).
2nd circle. R.: 2 sb in each p.
3rd and 5th circle, p.: * Sep 1, in the next. n. knit 2 Sep *, rep.
between **.
4th circle. R.: sbn.
b-th circle, p .: * 2 sb, in the next. p. knit 2 sbn *, rep. between **.
7th circle, river: * Sep 5, in the next. n. knit 2 Sep *, rep. between
**
8th round. R.: sbn.
9th and 11th circle, river: * Sep 8, in the next. n. knit 2 Sep *, rep. between **.
10, 12, 14, 18, 20 and 22nd circle, p.: sbn. 13th, 15th and 23rd circle, river: Sep.
16th circle, p .: * 2 sb, in the next. p. knit 2 sbn *, rep.
S between **. 17th circle, river: * Sep 3, in the next. n. knit 2 Sep *, rep. between **.
19th circle, river: * 4sn, in the next. n. knit 2 Sep *, rep. between **.
21st circle, river: *Sep 10, next. n. knit 2 Sep *, rep. between **.
Cut the thread and finish the job.
White crochet (the pattern is clickable)


Summer hat Yu_Yu


Crochet Hat Tips

Most often, crochet hats are knitted from the top (from the crown) down in a circle.
The circle begins to knit from the center, making increases in a certain order. There are several fairly common forms of hats.
Flat Circle Laws
1 law. If the circle is knitted st. b / n, then start in the 1st p. from 6 st. b / n, divide the circle into 6 wedges and add 6 columns in each row-circle.
2 law. If the circle is knitted p / st., Then they start in the 1st p. with 8 p / st., divide the circle into 8 wedges and make 8 increases in each p.
3 law. If the circle is knitted st. s / n, then start in the 1st p. from 12 st. s / n, divide the circle into 12 wedges and make 12 increases in each row.

Additions can be made in several ways:
1 way. The increase is always performed on the last column of the wedge. You will get symmetrical wedges with a noticeable increase line between them.
2 way. The increase is always performed on the first column of the wedge. Asymmetrical wedges will be obtained, slightly rounded to the right, with a noticeable increase line between them.
3 way. Increases are performed in each wedge so that they are not located one above the other. You will get a flat circle with no visible increase lines.
Which method of making increments to choose depends on your desire and the intended model.
1. Classic round cap.
With the selected columns, a flat circle with a diameter of 12 cm is knitted, making increases in each row. Then the increase is made through the row to the desired size of the cap, equal to the girth of the head (Og). Then knit without increments to the required height of the cap.
2. The cap is slightly elongated.
A circle is knitted with the selected columns, but with fewer increments. If they knit st. b / n, then start in the 1st p. from 5 tbsp. b / n and make 5 increases in each row. If they knit st. s / n. then start with 10 tbsp. s / n in the 1st p. and make 10 increases in each row. And so they knit to the desired girth of the head. Next, knit without increments to the desired height of the cap.
3. Cap "Kuban".
With the selected columns, a flat circle is knitted to the desired head circumference. The diameter of the circle is equal to the girth of the head divided by 3. Then they knit without increments to the desired height.

Increases for hats, practical tips


A brim hat is an attribute of elegance in both men's and women's wardrobes. A stylish hat always refreshes the image, makes it more refined and complete, it is an indispensable headdress in the off-season and does an excellent job not only with an aesthetic function, but also with the task of protecting its owner from the cold wind.
Also, the hat visually corrects, masks the flaws in appearance. If the facial features are large, then it is recommended to wear a hat so that it hangs slightly above the forehead, and if the facial features are small enough, with a snub nose, then the hat is recommended to be slightly shifted to the back of the head.

Hat knitting pattern crochet
Translation of a description of knitting a men's hat from English.
Size: 7. Hat measurements: Height - 10 cm Circumference at the bottom: 56 cm Brim - 6.5 cm wide. Materials: Carpet yarn: 255 g of yarn in color A and a small amount of color B and C.
Steel hook (2.75 mm) Optional: 70 cm of lining tape, 3.8 cm wide, color of your choice. 

Hat height - 11 cm.
Circumference at the bottom 48-50 cm.
You can reduce it by changing the hook 1.5 (the circumference will be 42-45 cm.)
Margins - 6.2 cm wide.
Materials: Yarn Pekhorka, children's cotton - color Light violet
Composition: 100% cotton. Thickness: 200 m / 50 gr.
on the rim a slightly different color.
Hook 1.75
Density of work 15 loops = 5 cm
Yarn in 2 additions
crown
With the main color, tie 8 columns into a ring b. n., close in a circle with a connecting column (ss).
1-3rd row add in a circle 8 + 8 (in each loop 2) \u003d 16 + 8 (through one loop) \u003d 24 loops.
4th row - no increase,
5th row increase in every 2nd loop = 36 p.
6th row - no increase
7th row increase in every 3rd loop = 48 p.
8th row - no increase
9th row increase in every 4th loop = 60 p.
10th row - no increase
11th row increase in every 5th loop = 72 p.
12th row - no increase
13th row increase in every 6th loop = 84 p.
14th row - no increase
15th row increase in every 7th loop = 96 p.
16th row - no increase
17th row increase in every 8th loop = 108 p.
18th row - no increase
19th row increase in every 9th loop = 120 p.
20th row - no increase
21st row increase in every 20th loop = 126 p.
22-32nd row - straight
33rd row increase in every 25th loop = 131 p.
34th row - no increase
35th row increase in every 26th loop = 136 p.
36th row - no increase
37th row increase in every 27th loop = 141 p.
38th row - no increase
39th row increase in each 28th loop = 146 p.
Change to a different color for the rim of the hat.
You can use a single-color thread, or decorate with stripes of different colors.
40th row - no increase
41st row increase in each 36th loop = 150 p.
42-52 row - no increase (straight).
If the volume is insufficient, continue to increase:
43rd row increase in every 37th loop = 154 p.
44th row - no increase
45th row increase in every 38th loop = 158 p.
46th row - no increase
47th row increase in each 39th loop = 162 p.
48-52nd row - no increase. (if necessary, continue increasing through the row,
but knit depth only up to the 52nd row)
Cut the thread and go to the starting color.
Fields. We adjust the width of the fields to your taste and desire.
Description to the maximum extent possible.
1st row knit for the outer walls of the loop, the previous row, adding
in every 12th loop = 162 p.
We begin to knit the 2nd row for both walls of the loop, adding to each 13th loop = 174 p.
3rd row - no increase
4th row - increase in every 14th loop = 186 p.
5th row - no increase,
6th row - increase in every 15th loop = 198 p.
7th row - no increase
8th row - increase in every 16th loop = 210 p.
9th row - no increase
10th row - increase in every 17th loop = 222 p.
11th row - no increase (last row + 12th row without increase)
if you need wider fields, like a cowboy hat, then continue
12th row - increase in each 18th loop = 234 p.
13th row - no increase
14th row - an increase in each 19th loop = 246 p.
15-16th row - no increase
To finish work.
Decorate the crown, highlight the middle, bend the top with a dome, steam off the crown and fields,
press hard and steam the upper folds.
My knitting is sooooo dense, the hat perfectly holds all the bends and fields, if something doesn’t work out for you, try diluting 1 teaspoon of PVA glue with 1/4 cup of water, turn the hat upside down and moisten the entire bend of the dome in a circle, abundantly, so that the thread is abundantly saturated.
Next, turn the hat over to its normal position and fix the fold with clothespins, let it dry completely, at room temperature.
When everything dries, remove the clothespins and carefully steam again through gauze.
Scheme for knitting hats with double crochets
Diagrams and a description of how to crochet a summer hat for a woman, photos of products.
The appearance of the hat, like many other accessories, was dictated not by fashion, but by practicality and necessity. In hot, sunny countries, it saved from the scorching heat and bright rays, thanks to wide fields, and for the inhabitants of the north it served as protection from the cold. During the Middle Ages, the hat acquired a decorative purpose. There are many styles and forms of this headdress. Hats are decorated with fur, ribbons, feathers and precious stones. Over time, the height of the crown, the width and direction of the fields change, flowers appear and disappear as an ornament and decor element. In the 80s of the last century, hairstyles with a large pile came into fashion for women, it was difficult to put on a headdress on such structures, and the popularity of hats was fading, in order to gain momentum again by the end of the 90s. Hats are made from straw, felt and many other materials. Crocheted hats are a separate line. Hats are knitted from pure woolen and mixed threads for cool autumn and winter. They are characterized by dense and embossed patterns and narrow margins. Hats can also be openwork, decorated with ribbons, rhinestones, beads or flowers, knitted with their light cotton threads and perfect for hot summers. It is about summer models that will be discussed in this article. A characteristic feature of crochet hats is that they are knitted from the center of the bottom down. Crocheted summer hats have another undoubted plus - yarn consumption. To create an openwork product, you will need approximately 100 - 200 g of cotton threads. Each needlewoman will have a few threads from a swimsuit or a summer sarafan that can be used to create a hat to match the existing outfit. Romantic openwork hat, decorated with ribbons and flowers.  You will need cotton yarn (100% cotton) peach color 200 g, hook number 2.
  Close a chain of 10 air in a ring. loops.
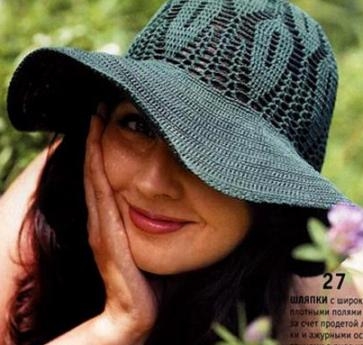
Pass the tape through the last row of the sirloin net. Decorate with flowers if desired. The brim of the hat can be starched hard or soaked with PVA glue diluted 1:1 with water. Summer cloche hat.  An elegant hat fits snugly to the head. The photo shows a white product of their cotton threads, while the fantasy of the needlewoman will definitely tell you the shade of yarn that is right for her.
Summer hat with wide brim.  In order for the brim of this natural cotton hat to keep its shape, you can use a piece of wire.
  Connect a chain of 8 air into a ring. loops. In each row, replace the first loops with the required amount of air. lifting loops. And end the rows with a connecting column, unless another end of the row is indicated.
Insert a thin wire into the last row of hat fields, tie one row of st. without a crochet. Starch the finished product. The next hat with a famously broken field is suitable for the beach and for a walk on a summer evening, being the highlight of the whole outfit.  This hat is knitted in a spiral and does not require knitting air lifting loops. The beginning of each row can be marked with a contrasting thread for easy loop counting. Connect a chain of air into a ring. loops.
Continue knitting until the bottom reaches the required diameter, then knit without increments to the required depth. Fields knit similarly to the bottom. If desired, you can alternate rows with increments and without increments. In this case, the fields will fit a little more to the head. Like any product, it is better to try on a hat several times in the knitting process to achieve the best result.
Comments
related posts:
How to crochet summer women's tops, diagrams and job descriptions, photos of finished products How to crochet a summer women's blouse, patterns, patterns, job description
A hat is a hit of the season, and the larger it is, the more fashionable. It is not difficult to knit it, you can follow the pattern of any napkin you like. ready, strongly starch, stretch, iron and that's it! And like in the movie "Vacation at your own expense." Good luck!
Wide brim crochet hat
Size 54-56.
You will need: 120 g x / 6 red yarn; hook number 2; wire with a diameter of 3 mm.
The dimensions of the product are shown in Fig. 8. Start working according to scheme 8, after the 8th row (the diameter of the bottom should be equal to 15 cm), knit another 5 rows straight without additions. Depending on the density of knitting, the number of rows with increments can be increased or decreased. Next, perform 3 rows of RLS around the perimeter of the crown, then proceed to knitting the fields. To expand, divide the circle into 8 parts and increase as shown in diagram 8 a. Knit in this way until the width of the fields is 21 cm. In order for the hat to keep its shape, it is necessary when tying the fields along the edge next to the RLS, lay the wire along the working row and knit the RLS in the girth of the wire. Decorate the finished hat with a brooch.


Yarn Rose (50 g - 150 m), hook No. 1.6
We knit the bottom according to scheme No. 1 to the desired diameter.
Next, we knit without increments (to the ear)
Then 3 rows of single crochets.
Hat brim:
scheme number 2, we knit without increments. The fields are obtained by a "cone". Tie with single crochets. A whalebone is inserted into this row (you can use regilin or a thick fishing line).
A wire is inserted into the last row of the flower binding.
Orchid.
Threads No. 40, 5 g. pale pink and a little pink, bright pink, pale yellow and yellow. Hook 0.75. Wire #26 and #24 Just thin wire).
With a pale pink thread, tie a chain of 30 in / p and knit according to scheme A (3 petals). With a pale pink thread, cast on 20 loops for petal B (2 petals). . Knit in straight and reverse rows. Row 1: Ch 1, 1 sc in 2nd st from hook and in each of next 5 sts (6 total), 1 dc in next 6 sts, 1 dc in 8 warp sts. Air loop, turn knitting, sc / bn from each loop of the previous row, and in / p of the initial chain. 3-4 rows knit according to the scheme. In the diagram, the columns are respectively: with the 1st dash - st / sn, 2nd - st with 2 crochets, with 8 dashes - with 8 crochets. Pay attention (I did not immediately notice), at the very top of the petal there are 3 columns with 10 crochets!
tongue. 1-5 rows. With pale pink thread, knit in straight and reverse rows according to the scheme, on the 5th row, form a picot of 4 loops over the central column. 6-8 rows. Attach the pale yellow thread to the central picot of the 5th row and knit according to the scheme, using the connecting posts at the junctions. 9-10 rows. Attach pink thread for 9th, and hot pink thread for 10th Continue knitting according to the scheme
Middle. With a yellow thread, knit 3 rows according to the scheme.
Assembly. Pass the wire No. 26 into the middle, as shown in the diagram. Shape the petals and thread the wire as shown in the diagram. Connect the petals, as in the picture, cut off the excess wire. 


Size 54
Yarn consumption: 100 g of white cotton yarn and 20 g of yellow.
Hook No. 0.85 from ‘Pony’. Start knitting with one chamomile according to pattern 1 and pattern 2.
According to scheme 1, complete the core of the flower with a yellow thread. Next, knit 12 petals according to scheme 2 with a white thread. Connect all the petals together as follows: when the last petal is completed, then, without breaking the thread, take the 1st petal and tie it on three sides of the RLS (one long side, rounding and the second long side). So connect all the petals to each other sequentially one by one. When the entire chamomile is tied along the contour, perform the second row of tying RLS. Sew the core in the center of the chamomile. Tie the chamomile petals around the edge:
1 p. - 10 VP between the petals, 2 RLS along the top of the petal;
2 p. - 3 VP lifting, knit a sirloin net, alternating 2 VP and 1 SN along the entire row;
3 p. - 3 VP lifting, 2 CH under the arc of the previous row, 1 CH in the column of the previous row, 2 VP, 1 CH in the same column of the previous row, 2 CH in the next arc of the previous row, 1 CH in the column of the previous row, 2 VP and so on repeat to the end of the row;
4 p. - fillet net (like 2p.). Knit the crown of the hat with a pattern according to scheme 3. The number of rows depends on the desired size of the hat. Tie approximately 16 p.
Crochet hat knitting pattern
For the brim of the hat, tie 11 daisies. These daisies have 9 petals. You need to connect 11 daisies for the fields in the process of knitting them. In order for the daisies to lie correctly in a circle, make a template according to the size of the circle and connect the daisies on this template. When all 11 daisies are connected and interconnected, proceed to the connection of the fields and crown of the hat. Choose a method convenient for you and connect the details with a hook or a needle and thread. On the edge of the hat, connect the petals together with chains of VP and RLS (look at the photo). Knitting a hat 
To knit a summer hat you will need: 200 g of mixed beige ribbon yarn with golden lurex; crochet No. 4; wire with a diameter of 1.5 mm.
See the dimensions of the knitted hat in fig_77. Before starting work, complete the sample and calculate the loops. Start work with a round bottom according to scheme_77. Continue working according to scheme_77a, then 776. To stiffen the fields, take the wire, lay it along the working row and tie it 1 p. RLS in the girth of the fishing line 


First, I closed the ring of 7 air loops and tied it with single crochets (12 +). Further, above each column, she knitted a tick of 2 double crochets.
The scheme of the bottom is drawn: 
Then knit rows in the following order: 10, 11, 12, 13, 1, 2, 3, 4, 5, 6, 7. 
In the next row, 3 columns with a crochet for each arc of 5 air loops.
Next - 2 rows of single crochet to strengthen the edge.
Then - the fields according to the scheme, only in the first two rows of air loops there are two less air loops in each fan, in the next two - one less. The last row of single crochets secures the crossbar. The edge is processed by the reverse row.
A crochet hat will protect well from the sun's rays and add elegance and charm to any outfit. Tie, starch and wear with pleasure, striking all envious people with their beauty and skillful hands.  http://www.valentina.ru/shems.php?act=2&vrc=13&chm=4552
Yarn Troitskaya Astra (610m/100gr) 100% mercerized cotton.
It is knitted from above, a pancake approximately according to this pattern
Only I knitted with double crochets and made 12 wedges, two increases in each wedge through the row.
If you are very worried, you can reduce the number of wedges.
Continue knitting with this pattern
only instead of two air loops between sts I knitted one air loop, instead of 5 air loops - 3.
The pattern rapport in my case is 6 loops.
I started with the second row of the scheme.
After the pattern, we knit the finishing strip for the ribbon.
I knitted two rows * st.b.n, air *, in the second row st.b.n knit over the air of the previous row.
A row of double crochets (possible with 2-3 double crochets, for a wide ribbon), and two more rows * st.b.n., air *.
Fields knitted with st.s. yarn (deep injection), 24 wedges, one increase per wedge. I made increments through the row. I knitted the last 5 rows without increments, increasing the hook number. But you can knit with the same crochet and with increments to the very end.
She knitted regilin into the edge, I have 4 veins, folded it in half, twisted it into a ring according to the size of the fields, and tied it with a st.b.n., capturing the last row of a hat between st.s.n.
Lily knitted according to this pattern
I knitted together with monofilament, but after steaming it didn’t keep the shape well, I had to tie it around the edge a little tightening, and for one I tied it with beads.
It is beautiful with beads, but it makes the product very heavy.
In order for the petals to keep their shape better, you can tie a fishing line along the edge.
In my case, the flower is on two buttons, it comes unfastened, but you can sew it on thoroughly, then everything will keep its shape well even without fishing line.
First, 6 stamens are knitted. I knitted in two threads just a pigtail of air loops (tight) and at the very beginning I knitted 4 beads. I knitted a stamen about 5-6 cm.
For the pestle, knit in a ring 6 st.b.n., pull off the ring, in the second row knit the beads with semi-columns with a crochet, then knit with a tube in a circle of st.b.n., after about 3 cm in each column without a crochet, knit along the stamen, and knit along circle another 2-3 cm, then add 1st bn through each column, it will be 12, and add more in the next row (through two columns or through one, depending on how it flares)
Tie the finished pistil to the center of the flower with connecting loops or sew with a needle.