There is a special technique that allows you to give b ABOUT more expressiveness to the faces of our toys. Embossed faces, eyes with long eyelashes look very cute and pretty. In store toys, by the way, such "delights" are not often found.
To do this, insert a black thread folded 8 or more times into a long needle with a large eye. Insert the needle into the place marked for the eye, and bring it out on the back of the head (or at the point where the corner of the mouth is marked - in the event that we are sewing a little man, gnome or doll). Then you need to again insert the needle at the puncture point (or near, in 1 mm) and withdraw it at the point of the same eye. Tie the two connected ends of the thread with a knot, pulling slightly so that a raised cheek is obtained, and fasten everything with a double knot. Cut the threads at some distance from the knot, and the length of the remaining ends will depend on what kind of lashes you want to make.
On the other side of the muzzle, repeat the same operations (in a mirror image).
The second option for giving the face a relief: in the event that the eyes are located on the sides of the head. It is still easier here - we stick a needle at the point of one eye, and draw it out at the point of the other, piercing the head through and through. If the eyes are made of buttons or beads, we pass the needle through the eye of the button. Then we insert the needle in the opposite direction. In this case, you need to slightly tighten the thread to get small indentations. We pick up another button. We repeat the operation several times, fasten the thread - and you're done!


Making faces and muzzles for toys


Location of eyes and ears

Nose embroidery patterns


What can be used to make toy eyes? For the same toy, you can choose several options for the eyes. You can make them composed of several layers of oilcloth, artificial leather or other similar materials. You can use any suitable buttons, beads, jewelry (for example, old mom's clips of a small size and a suitable color can be very useful. If, of course, mom does not mind :-). However, eyes made up of several colors, almost exactly similar to real ones, undoubtedly look much more advantageous and expressive.
Of course, the choice of the shape of the eyes is not limited only to those options that we presented in the figure. Based on our schemes, you can endlessly fantasize, and come up with something of your own, unusual and original. We repeat, we are only giving general recommendations.
So, let's start with the simplest scheme. For example, we need to make eyes according to scheme # 1. We need pieces of white and colored (blue, green, brown) artificial leather or oilcloth. First, we will draw on paper an eye of the shape and size that we need. Let's remove the pattern of each detail on tracing paper. They will look like the one shown in fig. one.
Then you need to carve out these details from leather (det. 1 - from white, det. 2 - from color). It is more convenient to cut out leather parts with nail scissors, since the work is very delicate, and we need great precision and accuracy. The appearance of our toy depends on this.
Using the Moment glue, evenly lubricate the wrong side of part 2, wait a little until the glue dries a little (20-30 minutes), and stick it tightly on the front side of part 1. Place your ready-made eyes under a thick book for a couple of hours, and then trim the edges if you will need it, and glue your eyes with Moment glue to the toy's face.
This technology can be applied to all double layer eyes. In the figure, their schemes are designated by numbers 1, 2, 4, 5.
Three-layer eyes are made in much the same way, but here, in addition to white and colored, we also need black skin. Let's draw an eye of the shape and size we need on paper. Let's take scheme # 8 as an example. Let's remove on tracing paper the patterns of all three parts as in Fig. 2.
Let's cut out two pieces of leather of each color: det. 1 - from white, det. 2 - from color and det. 3 - from black leather. Spread the glue evenly on the seamy side of parts 2 and 3, let it dry a little, and then glue part 2 on the front side of part 1, and part 3 on the front side of part 2. Now we need to put our eyes under the press (that is, under a thick book) until completely dry. After that, they can be glued to the toy's face.
A small touch that adds expressiveness to the eyes is an imitation of a glare, a reflection of light on the pupil. This is done in option No. 9. This flare can be used to make eyes of any type, it will only improve their appearance. To do this, it is enough to glue a small circle of white skin on the pupil.
Another very interesting option for making eyelashes. It is applicable, perhaps more for dolls, clowns, gnomes and other "humanoid creatures", and goes very well with eyes made according to schemes No. 6 or No. 9. We need a narrow strip (1-1.5 cm) of thin black ( or another color of your choice) fabric. For example, we need eyelashes 0.5 cm long. Take a strip of fabric 1 cm wide and pull out all the longitudinal threads at half of its width. A fluffy fringe has formed in this place. These will be our eyelashes. Now we will coat the remaining strip of fabric with glue, let it dry a little and glue the eyelashes to the wrong side of the finished eye. Cut off the excess length of the strip that protrudes beyond the eye. Do the same with the second eye. You can also glue the lower eyelashes on the eyes, and it is better if they are slightly shorter than the upper ones. After everything is done, you need to put your eyes under a thick book for several hours, and after that you can glue them to the toy.
In the book by Olena Makarenko "Kazkovy svit igrashki" ("The Fairy World of a Toy"), several more options for making eyes and noses for toys are described.
How to "animate" a face
... It depends on the correct location of the face or muzzle design whether the toy will seem kind, funny, cute or angry, sad, serious. There are some general rules. In animals, the eyes are located at the level of the bridge of the nose, and the nose is in the middle of the lower half of the muzzle. In dolls, the eyes are placed on a conditional line that divides the face in half into the upper and lower parts. Sometimes the proportions can be deliberately violated to emphasize the character or mood of the toy.
Eyes.
Can be made from leg buttons. If you put a piece of light-colored material or oilcloth under a dark button, the button will look like a pupil. Alternatively, stick a pupil made of dark material onto a light button. In this case, you can use buttons with holes, first sew, and then stick the pupil. ... Very interesting movable eyes can be made from transparent packaging for tablets - cut out 2 cases (see picture) and stick on paper. inside each you need to put a small ball - a pellet, pepper or bead that will run inside the eye.
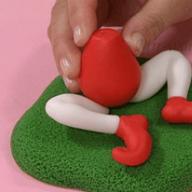
Noses for dolls
... You can cut a small triangle out of the same fabric as the doll's face. Spread it from the back with glue. When the glue dries a little, shape the spout into the desired shape. Then glue the finished dried structure onto your face.
Never glue / sew on parts of the face at once, spread all of them on the face, suddenly you want to move something to change the mood of the toy.
If you love making toys, then this article will help you.
Embossed faces, eyes with eyelashes
There is a special technique that allows you to give b ABOUT more expressiveness to the faces of our toys. Embossed faces, eyes with long eyelashes look very cute and pretty. In store toys, by the way, such "delights" are not often found.
To do this, insert a black thread folded 8 or more times into a long needle with a large eye. Insert the needle into the place marked for the eye, and bring it out on the back of the head (or at the point where the corner of the mouth is marked - in the event that we are sewing a little man, gnome or doll). Then you need to again insert the needle at the puncture point (or near, in 1 mm) and withdraw it at the point of the same eye. Tie the two connected ends of the thread with a knot, pulling slightly so that a raised cheek is obtained, and fasten everything with a double knot. Cut the threads at some distance from the knot, and the length of the remaining ends will depend on what kind of lashes you want to make.
On the other side of the muzzle, repeat the same operations (in a mirror image).
The second option for giving the face a relief: in the event that the eyes are located on the sides of the head. It is still easier here - we stick a needle at the point of one eye, and draw it out at the point of the other, piercing the head through and through. If the eyes are made of buttons or beads, we pass the needle through the eye of the button. Then we insert the needle in the opposite direction. In this case, you need to slightly tighten the thread to get small indentations. We pick up another button. We repeat the operation several times, fasten the thread - and you're done!
Making faces and muzzles for toys


Location of eyes and ears

Nose embroidery patterns


http://www.liveinternet.ru/users/thory/blog Eyes
What can be used to make toy eyes? For the same toy, you can choose several options for the eyes. You can make them composed of several layers of oilcloth, artificial leather or other similar materials. You can use any suitable buttons, beads, jewelry (for example, old mom's clips of a small size and a suitable color can be very useful. If, of course, mom does not mind :-). However, eyes made up of several colors, almost exactly similar to real ones, undoubtedly look much more advantageous and expressive.
Of course, the choice of the shape of the eyes is not limited only to those options that we presented in the figure. Based on our schemes, you can endlessly fantasize, and come up with something of your own, unusual and original. We repeat, we are only giving general recommendations.
So, let's start with the simplest scheme. For example, we need to make eyes according to scheme # 1. We need pieces of white and colored (blue, green, brown) artificial leather or oilcloth. First, we will draw on paper an eye of the shape and size that we need. Let's remove the pattern of each detail on tracing paper. They will look like the one shown in fig. one.
Then you need to carve out these details from leather (det. 1 - from white, det. 2 - from color). It is more convenient to cut out leather parts with nail scissors, since the work is very delicate, and we need great precision and accuracy. The appearance of our toy depends on this.
Using the Moment glue, evenly lubricate the wrong side of part 2, wait a little until the glue dries a little (20-30 minutes), and stick it tightly on the front side of part 1. Place your ready-made eyes under a thick book for a couple of hours, and then trim the edges if you will need it, and glue your eyes with Moment glue to the toy's face.
This technology can be applied to all double layer eyes. In the figure, their schemes are designated by numbers 1, 2, 4, 5.
Three-layer eyes are made in much the same way, but here, in addition to white and colored, we also need black skin. Let's draw an eye of the shape and size we need on paper. Let's take scheme # 8 as an example. Let's remove on tracing paper the patterns of all three parts as in Fig. 2.
Let's cut out two pieces of leather of each color: det. 1 - from white, det. 2 - from color and det. 3 - from black leather. Spread the glue evenly on the seamy side of parts 2 and 3, let it dry a little, and then glue part 2 on the front side of part 1, and part 3 on the front side of part 2. Now we need to put our eyes under the press (that is, under a thick book) until completely dry. After that, they can be glued to the toy's face.
A small touch that adds expressiveness to the eyes is an imitation of a glare, a reflection of light on the pupil. This is done in option No. 9. This flare can be used to make eyes of any type, it will only improve their appearance. To do this, it is enough to glue a small circle of white skin on the pupil.
Another very interesting option for making eyelashes. It is applicable, perhaps more for dolls, clowns, gnomes and other "humanoid creatures", and goes very well with eyes made according to schemes No. 6 or No. 9. We need a narrow strip (1-1.5 cm) of thin black ( or another color of your choice) fabric. For example, we need eyelashes 0.5 cm long. Take a strip of fabric 1 cm wide and pull out all the longitudinal threads at half of its width. A fluffy fringe has formed in this place. These will be our eyelashes. Now we will coat the remaining strip of fabric with glue, let it dry a little and glue the eyelashes to the wrong side of the finished eye. Cut off the excess length of the strip that protrudes beyond the eye. Do the same with the second eye. You can also glue the lower eyelashes on the eyes, and it is better if they are slightly shorter than the upper ones. After everything is done, you need to put your eyes under a thick book for several hours, and after that you can glue them to the toy.
In the book by Olena Makarenko "Kazkovy svit igrashki" ("The Fairy World of a Toy"), several more options for making eyes and noses for toys are described.
How to "animate" a face
... It depends on the correct location of the face or muzzle design whether the toy will seem kind, funny, cute or angry, sad, serious. There are some general rules. In animals, the eyes are located at the level of the bridge of the nose, and the nose is in the middle of the lower half of the muzzle. In dolls, the eyes are placed on a conditional line that divides the face in half into the upper and lower parts. Sometimes the proportions can be deliberately violated to emphasize the character or mood of the toy.
Eyes.
Can be made from leg buttons. If you put a piece of light-colored material or oilcloth under a dark button, the button will look like a pupil. Alternatively, stick a pupil made of dark material onto a light button. In this case, you can use buttons with holes, first sew, and then stick the pupil. ... Very interesting movable eyes can be made from transparent packaging for tablets - cut out 2 cases (see picture) and stick on paper. inside each you need to put a small ball - a pellet, pepper or bead that will run inside the eye.
Noses for dolls
... You can cut a small triangle out of the same fabric as the doll's face. Spread it from the back with glue. When the glue dries a little, give the spout the desired shape. Then glue the finished dried structure onto your face.
Never glue / sew on parts of the face at once, spread all of them on the face, suddenly you want to move something to change the mood of the toy.
MK My new old friend
Everybody loves teddy bears! But not everyone can afford to buy a real antique bear. Alas, they are extremely expensive and, frankly, not very affordable. But everything is in our hands! If desired, we can independently create an almost real "old" teddy bear!
First, let's figure out what the “old” bear is? We all know that over the years, teddy bears looked different and were made with slightly different proportions. Various color combinations and materials were used.
Here is a simple, but very descriptive table, broken down by year. It is very easy to understand from it what period this or that teddy bear belongs to.


So, if we want to sew an old, cake (from the French “beat, torment”) bear, we must choose the right pattern, materials and clothes for it.
For convenience, I will divide my MK into several parts. In this part, a little theory and some basics, without which you will not be able to choose the right materials and decide on the image.
Let's get started? :))
Pattern.
For these purposes, only the classic pattern is suitable for us (it is ideal to take the one where the paws have only one seam, that is, they consist not of two, but only of one part)
We need such a paw :))

Very good mohair "antique" firm "Schulze" on a cotton basis, with a short and sparse pile. Viscose and plush are also suitable
It is good to use a kapok for stuffing, but if for some reason you do not have it, then sawdust and wood shavings are quite suitable
By the way, having chosen a suitable mohair for your bear, do not forget to check before opening whether your pattern fits on the piece you have! A piece of mohair can be of different sizes!
Here are some examples of mohair layouts.

Eyes
Until 1910, shoe buttons were used, and later they began to use the already familiar glass eyes
Bear proportions
Another important point! All bears claiming the title of "old" should ideally meet the following proportions and requirements:
X- body height
½ X - head height
X- arm length
Slightly less than X - leg length
Palm width = sole width
A hump must be present
5 hinges (use cotter pins) Disks, by the way, used to be made of durable
cardboard or wood ;-)

Hands and soles - felt
"Triangular head" without darts
Long muzzle
Long, slightly bent arms, reaching almost to the knees
Ears (two parts) are made only from mohair
Claws - 4 claws on a paw (not three, not five!)
Ideally, we strengthen the sole of the foot by putting cardboard there (as was done before)
About noses.
For polar bears we embroider with light brown, beige or pink thread
For blacks - pink-red thread
Beige or cream bear - dark brown thread
Brown or yellow bear - black thread
By the way, the nose of an old bear can be either embroidered or made of plastic or a piece of leather.
Here is a remarkably clear picture of a plastic nose, which I found once upon a time on the Internet (alas, for many years now I can not give a link to the author of the picture)

And this is a cut of the nose made of leather.
Well, here are the forms of embroidered noses from different manufacturers and used in different years


The embroidered spout can be covered with wax, which gives an amazing antiquity effect ;-)
For an old bear of a suitable size, it would be very good to insert a howler inside it (a device that emits characteristic roaring sounds when you press it or when the bear is turned "back and forth")
How is it inserted? It's very simple! In the belly we lay a thin layer of padding polyester (or padding polyester) and insert a howler into the belly (the side where the mesh (the sound comes from it) to the bear's face). Then the sound will not be dull. The layer of the padded padding polyester must be very thin, pay attention to this! The howler must be well felt, otherwise its sound will hardly be heard!
Naturally, if you and I are planning to sew a bear (suppose) of the 30s of the last century, then we will have to dress it accordingly! Therefore, approach the choice of a costume for your bear with all care!
Here are the basics, so to speak. :))) You are still thinking about your future bear cub and select suitable materials. And in the next part I will show you some patterns suitable for this purpose ;-)
MK My new old friend part two
So, as I promised, let's continue :)
Let's now get down to business, that is, directly to the manufacture of a bear.
The very first, as you already understood, is the choice of patterns. That is, you have to decide for yourself what kind of bear you would like to sew!
Here, for example, is a beautiful pattern dating back to 1910-1919.


The bear itself, sewn according to this pattern, will look something like this

But before cutting out the details, prepare the mohair! Here are some simple "secrets"
Pre-wash the mohair in warm water with hair shampoo, squeeze out a piece of mohair (without fanaticism, until we tear it to shreds and rip the nap out of it) :))
Dry it by spreading it out on a flat surface (this way you will avoid creases, which will certainly form from the clothesline)
The pile on the mohair will become soft and shiny!
In addition, after washing, the pile will take its normal ("native") position and stop sticking out in different directions.
Wet mohair can even be brushed gently with a rare comb or animal slicker brush to help long and matted hair lie down properly.
Of course, for a light-nap antique mohair, this may not be very relevant, but for mohair with a slightly longer and thicker pile it is very significant.
If you are planning to sew a viscose bear, then you should not wash it (unless it is too much stained with something, but this is more force majeure than a regularity!)
When using plush, you should first figure out how old you have it. If we are dealing with a piece of antique plush that you got after a successful trip to the "flea market", then, most likely, you cannot do without washing! But such a plush should be washed very carefully, because most likely it will not survive intensive twisting!
A newer plush, you will most likely want to age (and rightly so!)
Of course, I simply will not be able to tell you all the tricks and nuances in this short MC (I can tell and show all this for hours in person and at MC held live), but I will try to voice some points!
So if you want to age your existing piece of plush, what can we do with it?
Do you want your plush to shine? Boil it in water with soda, 40-60 minutes How much to hang in grams ?? :)) On a small saucepan, in which your piece of plush will fit and at the same time it will be completely covered with water - somewhere 3-4 tbsp. tablespoons of soda
If you really want to "kill" this plush, you can put it in our "Whiteness" for a few minutes BUT !!! Stay close and watch! Believe me, you can easily find in a basin with a piece of plush a lot of beautiful holes along the edges of which the remnants of that plush will sadly float :)) "White" is a nuclear thing!
If you want to give the plush an older look, you can boil it for 15 minutes in hot water with instant coffee
Plush, before you start sewing from it, it is best to put on a glue (antique first of all!). Then it will not warp and creep when stuffing
Just in case, I will also voice the main points that you need to remember when laying out and cutting mohair:
1 lay out all the parts on a piece of mohair (if it does not contradict the requirement for the direction of the pile, then we lay out, observing the direction of the share thread)
2 make sure the right amount of parts fits
3 do not forget to leave seam allowances (approx. 5 mm)
4 check if you transferred all the details correctly (did you forget that we need to transfer some of the details in a mirror image?)
5 make sure that the details of the pattern are laid out in accordance with the direction of the pile (marked with an arrow on the pattern)
6 even before cutting, mark the attachment points of the legs and control points (if any) on the parts
7 when cutting, it is most convenient to use small scissors with sharp tips
8 be careful not to accidentally damage the pile when cutting
Now you just have to sew the parts and turn them out on the front (you did not forget to leave the holes for turning out ???) :)))
You can start stuffing!
As I said, for stuffing, we can, without further ado, take a synthetic winterizer. But since we decided to make a real old bear ... Let's take materials that are more "believable" for him!
Good shavings. It can be obtained in imported Internet shops, in some of our specialized stores where they sell materials for teddy bears and in those places where they sell expensive wines (they use it to transfer bottles when packing them in boxes), as well as in flower shops. But the simplest thing is to order it on the internet :)
Who does not know, the shavings look something like this :)))
.JPG)
Wood sawdust is also suitable. The places where they are found are quite accessible - these are pet stores! Give preference to packaging that says "insect repellent"

Can be stuffed with wool. Where to get it? And which one do we need? Even easier than shavings. Great for felting, the one used for the base (don't mix up)
If you decide that somewhere your teddy bear will have places worn to holes (they are often made on the shoulder or on the hip - in the places where the discs are attached), then you need to take care in advance that the "inner content" corresponds to the external image.
Agree, an old "frosty" bear with a worn hole in the side of which the whitest synthetic winterizer sticks out is, at least, strange :))) So we will also age the inner content!
Discs can be placed in a hot coffee solution (just make sure that they do not get splattered there) Sawdust or shavings can also be treated with a coffee solution. We dry everything thoroughly and only then put it into action!
How to stuff, with what density?
First, let's figure out what happens to the teddy bear over time. Have you guessed? Right! The stuffing sags in it! But how exactly?
The head is the only weak point in her nose. All other places in the head cannot "sink".
Honestly, I do not like to make a "weak nose", but you can see for yourself
Further, the padding sags so that the neck and hump become empty. The more weakly you fill your neck, the more "depressed" your bear will sit (hanging his head) You can fill a humpback very, very weakly, or even not at all!
Paws - voids, usually, are formed behind the pads and feet (the feet and palms themselves are well stuffed, behind them there is about a cm of "empty" space and then there is normal padding again), as well as in the places where we place the disc mounts.
The packing settles from top to bottom!
Sewing up the secret holes through which we stuffed the bear, do not strive for the usual accuracy! These seams (not everything is possible, only the seam on the back) must be made noticeable! You can even deliberately pick up a seam on a thread and only then sew it up, you can sew it up sweepingly, over the edge.
Ears, as you remember, for such a teddy bear we make from 2 parts of mohair (viscose, plush - you need to insert it) That is, we do not use any felt or other inserts in the eyelet.
Hands and feet - felt.
We embroider the nose with a thread of a suitable color.
When embroidering a spout, you can put a felt lining under it (to give it extra volume). And you can deliberately inaccurately embroider the nose with threads, stepping back from the previous stitch a little to the side, climbing one thread onto the other. Just imagine that this nose has already been repeatedly tried to restore and correct the hands of a person who only played with bears ;-)
Eyes - black glass (the shoe buttons, which we talked about above, were used until 1910, they will not quite suit us on this bear)
Naturally, we do not make any "proteins", eyelids or eyelashes on such bears!
When the eyes are sewn on, you can rub their surface with a fine sandpaper. Such real, very plausible scratches and scuffs are formed, which appear over time from the fact that the beloved bear is often carried with its muzzle on the floor, table and other hard objects)))
So, the teddy bear is sewn, stuffed, assembled. It is necessary to tint and dress it.
It is best to use oil for tinting. Of course, its color should be chosen based on the color of mohair, but sepia, umber, and mars brown are quite universal.
I know that many are afraid to use oil paints for toning, preferring acrylic or paints on fabric to them, but believe me, there is nothing difficult in toning with oil (and here again I have to admit that it is much easier to show live some toning techniques oil, than to explain "on the fingers", but, alas, this is possible only on the MK held live)
Tips: Use pinene to dilute the oil to the desired consistency and a hard, flat brush of the right size :))
When the tinting is ready and has already dried up, we begin to select clothes for our bear.
But since toning does not dry immediately either, we will talk about clothes for our bear in the next part of our small MK)))
MK My new old friend part three
The tinting has dried up and it seems like you can wear our bear. But first, let's torture him a little? ;-)
Since you and I have decided to make an old bear, we will be consistent! Not a single old bear could reach us in perfect condition - that's a fact! Just look at the real antique bears. So we will play the role of an "evil stepmother" who mercilessly treats our "newborn"
In order to qualitatively and believably age the bear cub, it would be nice to imagine how his life developed until the moment he appeared in front of the most respectable audience (well, in front of us) That is, now we will turn on our imagination and play a little, inventing a story for this bear !
Here they bring a new bear cub home and solemnly hand it over to a happy child (yes, comrades, these our grandmothers and great-grandmothers were such irresponsible personalities that they gave bears to their children to play) :))))) And children, they are those toys, which they fell in love with, it's scary even to say, they are playing !!! :)))
What's going on with the bear ??? It is worn everywhere (and most often behind the ear or under the arm). They feed with porridge, endlessly dress and undress, put them to sleep next to them, take them out for a walk in the garden, where they make Easter cakes together ... Sometimes the unfortunate person is quietly taken from the tenacious children's paws to quickly wash and dry .. And also, if the bear was presented to a very small child, then a caring mother would certainly remove her eyes from the bear and put it in the closet, "until better times"! This, by the way, is one of the main reasons why so many antique bears came to us without peepholes (they were simply lost during storage or, being not too well sewn on, fell off and, again, were lost)
Well, what do you think, can such a sufferer reach us in perfect condition? ;-)
What and how are we going to do with you to restore "historical justice"?
Ears. We sew them onto the bear (they have already been sewn, right?) And now we thoroughly moisten them with rather hot water and begin to "twist" and crush them. You can pinch mohair on them in places. We leave the ears in a "broken" state and dry. "At the exit of the product" we will get such an old, worn-out, broken ear ;-)
A hump: we pluck out a mohair here and there with tweezers, take a blade in our hands (such a dangerous one, remember how the Neva and Sputnik blades used to be?) And gently shave the pile here and there. Try not to cut yourself or cut through the base of the mohair (although if it happens to damage the fabric, you can darn it on top, deliberately not too neatly, with black or brown threads - it will even work out interestingly ;-))
Paws. Remember when you and I used to age shavings and discs? So, you can pluck the nap on the bear's shoulder, take a thin skin and rub it as it should! We wipe the base of the mohair to the state that we like (you can barely outline a hole so that the shavings can be seen through it, or you can make a decent hole, pull out the excess packing and so that the disk with the mount can be seen directly) Everything is in our hands. As we decide, so it will be)))
As you already understood, in this way you can walk on different parts of the body of our bear))) In some places, make a darning (it is not necessary to wipe the hole under it, you can also imitate ;-)) In some places, create bald spots with a razor. To pull something out with tweezers ... .. The scope for your imagination is simply endless!
We embroider the nose and claws.
You can walk with a skin over the embroidery, loosening and chafing the threads (here and there ;-))
I like to wax my noses (i.e. cover them with beeswax). Such a nose can also be smoked a little later ;-)
I'll digress a little. I'll tell you about the nose.
The fact is that many times I tried to explain to people exactly how to do this. But, either I am not talented, or this is the case when it is necessary to see exactly how I do it…. Since I simply cannot technically show, I will tell (well, I can show those with whom I will meet live :)))
So. We take a piece of natural beeswax in one hand, our favorite hair dryer in the other hand, a bear with its nose up under the arm :))
Hold the wax over the embroidered nose and blow (wax) on it with a hot hair dryer. The wax starts to melt and is about to drip. Here you do not get confused and get this drop on the embroidered nose :)) This, girls, is the main thing! Because if you drip wax past the embroidery, an ugly whitish spot will remain :-(
We put wax on the nose without fanaticism, the best is the enemy of the good! When a few drops of wax are already on the surface of the threads, blow on the nose with a hairdryer so that the wax is absorbed into the threads…. I usually apply "two layers" of wax, that is, dripped it, blew it with a hairdryer, the wax went inside the threads, dripped it with wax again and blew it with a hairdryer from a distance (if you bring the hairdryer too close, the wax will spread further, crawling out far beyond the embroidered part of the nose )
When you think you have enough wax, let the spout cool a little and polish it with a soft cloth.
What else can you do with your aging bear?
You can cut the pile with scissors in the designated places. If you go "along the pile", it will be smoother and more accurate, if "against the pile", you will get a "ladder" (also gives an interesting effect)
Shaving with a blade is the same: "against the lint" is cleared more ;-)
Hands and feet can also be rubbed with sandpaper (to a whitish state of felt or to a hole, as you like) You can sew a patch of fabric on them "over the edge"
Now we meticulously examine the bear. Where else can we age it?
Seams! Please note that the seams are always dirty, therefore we will darken them too!
Take a pastel, oil or watercolor pencil and walk at the seams. Do you like the result? Then right on top of our tinting we go through Vaseline or baby cream (we get a dirty greasy effect)
Already finished bear can be sprayed with instant coffee from a spray bottle and put (put) on the battery - you will get excellent "drips". Well, just a feast for the eyes :))
If you did not cover the spout with wax, then you can do this:
We take a bag for frying (the one in which we usually bake chicken;)), well sprinkle the bear with a solution of coffee and place it in this bag. We put a damp cloth next to it. We close the package and…. into the oven (temperature 100 degrees)! Such a "fried" bear is very good, check :))
How to prepare fabrics for clothes?
Naturally, they also need to be aged, but how could it be otherwise? You don't want to break the image we created ???
As for dolls, fabrics for bears are preferable natural, thin, well draped.
You can put a piece of cloth in "Whiteness" (remember that we are standing next to you and watch?))))) - it will give a wonderful dilapidation!
Dye the fabric by dipping it in instant coffee
Or tea. Different types of tea will give different shades, experiment ;-)
You can take a decoction of oak bark
Onion peel decoction
Walnut ink
All these natural dyes will give a very good old shade to our fabric!
Ready-made clothes can also be dipped into one of these solutions, removed, squeezed slightly, put on a paper towel (multilayer), put all the folds we need at once and baked for 30 minutes at a temperature of 100 g
In fact, the options and methods for dyeing fabrics for the aging effect are the sea! I name you only the simplest and most accessible (all of the above are almost always at our fingertips)
You can also rub the hem on the finished clothes with the same sandpaper - we will get a wonderful shabby edge ;-)
Well, since again it turned out a lot of letters, a pattern of clothes and a little about costumes next time :)
Now we will embroider the nose, so the eyes should definitely be attached, and the ears can be left for later, because the image changes dramatically from the nose and ears.
We embroider the nose.
For this we need a thread of iris, or floss, preferably thicker. Another piece of dark fabric (ideally fleece, or felt) and a pencil. Scissors and pliers.
What is the fabric for? We cut out the nose of the required size, put it on the face and embroider it as it will be shown below. The nose will turn out to be neat and more convex.
Pencil. With a pencil, we will simply draw a shape, by the way about the shape: it can be any, even round, even rectangular, triangular, square, trapezoidal, whatever you like. I draw the nose with a pencil or a pen. If the bear is made of long and fluffy fur, then the place of the nose embroidery must be cut with nail scissors to the very base, otherwise the fur and thread will crawl into the stitches, this is very disturbing. Pliers are used to pull the needle out. This is sometimes difficult due to the tightly stuffed nose.
Begin.
We thread a very long double thread into the needle, I make the maximum 1 meter, there are craftsmen who thread 2 meters at a time. I cannot embroider the nose completely with 1 thread, I do it in 2 passes.
If we make a nose with a fabric, then we hide the knot under the fabric and then everything, as in the photo below.
Or draw a contour and go.
We saw it, tied it up, pierce the nose in the middle and bring it to the top drawn outline.

This is how we start

We make the first stitch, the principle of embroidery is satin stitch. Move the first stitch to the bottom contour in the middle 
We tighten the first stitch and then the needle in the upper and lower contour should be brought out as close as possible to the previous stitch. I say right away: it's not very convenient for me, I first kind of outline my nose with stitches, and then I close the gaps with the next layers. We embroider the first half of the nose LEFT. Go 
I pull with pliers, otherwise nothing 
first stitch of the nose 
And thus, to the end of the left half, you can often sew stitches to completely close the half. Strictly make sure that the thread does not twist, otherwise the nose will turn out to be not SMOOTH, but ROUGH
My noses more or less began to work out right away, so many times I had to rip and even alter the muzzles, but it doesn't matter, the main thing is patience 
When we make the last stitch on the left, the so-called edge of the nose, then we bring the needle to the lower middle, where the first stitch was made and, according to the above principle, we embroider the right sidewall 
yet 
We make a stitch from the right edge and again bring it down to the middle and embroider the left side along the second circle, closing the gaps, then again the right. The nose should be covered with thread 
In general, the second layer is the same as from the very beginning. 
Then I ran out of thread and I'm threading another. The knot can be pulled through the unsewn bottom of the head and brought out into the nose, I do it without a knot, I just hide the end of the thread in the nose and then pull it slightly so that the thread does not slip out. The nose is embroidered and we need to make a "contour" with a thread so that the nose is neat. if you still have a thread, then we bring it to the upper left base of the nose and start it to the upper right, in a kind of semicircle, rounding the top of our bear nose

it looks like this 
Then a needle was taken out of the middle and again we stick it into the upper left, or right (right in the photo, it doesn't matter anymore) edge to complete the "wing of the nose". This procedure makes the nose tidy and helps to tighten the edges, because they are not always even. We repeat the same with the other edge of the nose. 
Repeat with another "wing" 
The nose is ready.
Newans: A nose drawn initially, or cut from fabric, will be smaller in the end because its stitches are noticeably pulled together in diameter. If you want a bigger nose, do not skimp on drawing MORE.
Found a scheme for embroidery of a triangular nose 
We embroider a mouth.
I still use the same pins to mark the points of the future mouth. I decided to make this bear cheerful, so the points will be above the line from the nose down. If you want a classic, then the corners of the mouth should be down. here everything relies on your desire, first you can play with a string and try on various options 
So, first we made a line from the nose, then we draw the thread to one point and then to another. The mouth is ready!

What to do next? You can pull the thread down your head and tie it. I decided to make my bear dots on the face, like from a mustache in the form of French knots. We put it in the face, tie a knot and take the needle back to the same place, or very close

like this 
Then I make such knots, three pieces on each side of the muzzle. 
I make the rest of the "points", then from the rest of the thread you can embroider the eyebrows or eyelashes for the bear. I didn't like either one or the other, so just with dots on the face. By the way, this method of "French knots" is used on sewing and other animals - cats, hares, tigers, lions, etc. 
Let's start toning.
I tint with dry pastel pencils, they are still oily, but they get very dirty. I buy them in a shop for artists - it is very convenient to work, because clean hands and very precise impact. I tint my eyes by drawing in a circle and then shading it either with my finger (as if I rub the area so that there is no clear border), or with a cotton swab. A cotton swab helps well with acrylic tinting, because absorbs excess moisture.
Acrylic. If tinted with paint, then it is necessary to dilute it strongly enough with water. Then we dip the brush and first try on paper until the strokes become "dry" and indistinct, as it were. Ideally, it is better to practice on a piece of fabric from which the animal is sewn.
The color of your choice, not necessarily black.
Cosmetics. This is an extreme option, because all cosmetics have a greasy cream base and it dries very badly, but in the absence of more, it can be protonated with shadows.
Acrylic and cosmetics can be dried with a hairdryer. 
I tint the nose with strokes "from the nose", but sometimes I also draw it around the circumference very close to the threads. I also blend it with my finger later. 
The muzzle immediately seems to "come to life". Here is my tinted "duck" 
In the figure, she depicted schematically: at the top of the eyes, at the bottom, respectively, the nose 
I mark the places where the ears are sewn with pins and grab both tips of the first ear with a needle 
Stitch to the head again. Then I straighten my ear over the head in the position I need and sew it back and forth to the bottom. 
I sew both ears to the head. Here's a face came out

To be continued...
Clown
The toy consists of the following parts: costume - 2 parts, sleeves - 2 parts, cap - 2 parts, palms - 4 parts, tuff - 4 parts, head - 1 part, collar - 1 part.
The clown toy can be tied to a crib and he will take care of the baby's pajamas, which can be hidden in his suit during the day. It can be sewn and presented to friends and acquaintances on their birthday. The clown is sewn from bright multi-colored patches. Details are sewn on the wrong side of the fabric on a sewing machine or by hand with a needle back or stitch. Two parts of the suit are sewn together, the bottom is pulled together in the form of wide trousers, after putting small lumps of cotton wool inside.
Clown shoes are sewn from dense fabric with a buttonhole seam, stuffed with cotton or padded with foam rubber a little, and then sewn to the trousers. The sewn sleeves are pulled together on a thread on one side and secured. Through the hole on the other side, the sleeves are loosely filled with cotton wool and sewn palms are inserted into them, pulled together and fixed. After that, the finished sleeves are sewn into the top of the clown costume.
The clown's head is made of jersey. A circle is cut out, pulled over the edge onto a thread, the resulting bag is filled with cotton wool and tightened. It is designed as follows: the eyes are made from transparent packages of tablets, where buttons of the required size, dark color are inserted. The nose can be made from the same jersey from which the head was made. In the same way as the head, it is gathered on a thread over the edge, pulled together, and then sewn into place.
The mouth is drawn with a red pencil or felt-tip pen, the clown has a cheerful smile on his face. The cheeks and nose are tinted with a red pencil. Eyebrows are drawn with a black pencil, felt-tip pen, 
Clown hair is made from any fur, thread, any length and color.
The cap is sewn to the clown's head beforehand
processed edge. The head is then secured to the top of the clown costume.
Now let's make the toy contain a secret. To do this, we sew a zipper of the required length in the back of the suit. Thus, our clown will have a secret pocket that can be easily closed and opened.
We will complement the costume with a collar, which is cut out of light material of any color. We sew the cut edge with a stitching seam. Its other edge is gathered on a thread, the collar is put on over the clown's head and pulled together.
Clown shoes are decorated with small balls of any color from any material. They are cut into a circle and pulled together and then sewn on. The cap is decorated with a pompom.