In such a pencil, not only handles with pencils, but also scissors with a square.
You will need:
2 types of fabric (for the outer side and for lining);
Zipper zipper 25 cm long or a little more;
Pair of stationery clips;
Pins;
Scissors;
Sewing machine and thread.
Sequence of work:
1. Call each type of fabric for 2 parts 25x16 cm in size each.

2. Put one of the lining parts to the work surface face up. Put the lightning face upside down top. From above - detail of the main fabric with an insane up. Scaliate pins, capturing all layers of fabric and lightning bracket, as shown in the photo.

3. Stretch.

4. Put the second lining detail on the work surface face up. Put the details with a partially sewn zipper, as shown in the photo. Then - the item from the main tissue with an inlet. Cold pins two layers of fabric and lightning bracket between them.

5. Load the line.

6. Spray the items and start.
7. Lay the lines along the lightning.

8. Open zipper. Fold and scaliate the details, as shown in the photo. Lightning directed towards the lining, and the allowances towards the main parts, and secure the clamps.

9. Stop over the perimeter, leaving the hole, as shown in the photo above.

10. Cut corners by retreating a couple of millimeters from the seam.

11. Remove the pencils. To turn the corners well, you can use a wand.

12. Sewing the remaining hole.

13. It remains to fill the lining inside - and ready. At the end of the clagging, you can hang a label named.

Photo and Source: ThediyDreamer.com
2. Fabric pencils with lining and clasm front: master class

Due to the strengthening of phlizelin and zipper in front, such a penalty is well held by the form. Another one plus is a capacity. If you want a smaller penalty, change the size of the details and take shorter zipper.
You will need:
2 types of fabric, basic and lining (you can also use third-colored flasks for lightning trim);
Adhesive unilateral fliesline;
Zipper 30 cm long or more;
Water soluble glue (suitable adhesive pencil);
Scissors;
Sewing machine and thread.
Sequence of work:
1. Pour the details of the Penal. We need 1 rectangle from the main tissue with a size of 30x35 cm, 1 of the same rectangle from the lining fabric, 1 is the same - from fliesline. Also - two rectangle 2.5x7.5 cm.

2. Clean the part from the main fabric Fliselin.

3. Both small rectangles fold in half, as shown in the photo, with an inside inside, and secure the bends with an iron.

4. Lightning half open. Enclose rectangles to the ends of the lightning, as shown in the photo.


5. Route the line on the bends of rectangles, as shown in the photo. At the beginning and end of the line, make the lines.


6. Now glue rectangles, as shown in the photo, and cut the "tails" of lightning on both sides.


7. Fold the lining parts and the basic fabric to face and place the lightning between them, as shown in the photo. Scaliate pins.


8. Lay the line by retreating 0.5 cm from the edge.


9. Remove the items, as shown in the photo, and secure the iron.


10. Wrap the parts by forming a penalty, fold, as shown in the photo, and scroll the pins.


11. Load the line by retreating from the edge of 0.5 cm, and remove the pencil.


12. Slow seams.


13. Fold the penalty so that there is about 2.5 cm from above, and secure the fibe of the iron.

14 . Lay the lines on the sides, retreating from the edge of 1.5-2 cm, then fir the edges with scissors.


15. Remove the pencils inside out, spread the corners well. Rign down side lines, as shown in the photo.
Pencil made of multicolored lightning.Pencil made of multicolored lightning.


1. Decide what size you need a penalty, pick up a sufficient amount of zipper zones. Sust them with each other with an inside, retreating 1.5-2 mm from the edge, first in the strip, then in the cylinder. To sew it is more convenient, put a paw to the machine for taking ordinary lightning. And it is also useful in the process of guarding "distilling" there and here "Dogs". This will help make a line smoothly - the dog will not interfere. Just leave the needle in the lower position, raise the paw and shift the "dog" to where it will not interfere with you.
In addition to the lightning you will need a cloth for barrels. I took a rather dense denim fabric.
Estate one zipper, spread the cloth exactly and measure its width. The resulting digit is divided by 3.14, and the result of the division is two (L \u003d 2 π R). You will receive a circle radius for cutting the sidewalls of Penal. You need to carve four parts with a viscosity of about 1 cm.
2. Locks are better to sew, alternating opening directions so that the width of the canvas along the edges turned out the same. Since the penalty does not imply a subclass, I sharply sharpened, picking up the threads under their color. I played the coils and bobbins in the station.)))) For convenience, a part of the colors of the threads on the bobbs chose, and the part is on the coils. Attaching, for example, red and blue locks, I cleaned a bobbin with a blue and left the coil with red, and put the bobbin with blue - and tracked the blue castle. Then she cleaned the red coil, instead of her brown - faced a brown castle. Then he changed the bobbin again ... In general, it hipged all this, like a player - a deck of cards.)))
It would be nice yet, stitching the lane from the locks, first try carefully the seams so that they do not pull inside, and then sew into the pipe and try the last seam. And it would be good for now the canvas is not sewn into the pipe, place the lines of the future junction with a barrel - to spend two parallel lines on the locks there. Where will be sewn from the fabric. It would raise the "evenness" of the finished product, but I danced on these rakes.))))
3. Pin out of the lightning fold in half, tick the bends pins. Then fold it in half so that the pins are opposite each other and again tick the folds - you divided the pipe to 4 equal parts. Take two tissue blanks and divide them into four parts or bending or using a ruler.
4. Align pins on a lightning tube with pins on a tissue part, folding them face to face. Skolith in four points, and then notify with threads throughout the circumference, evenly distributing the "locking" canvas in a circle.
5. Remove the pencils on the front side and all the locks are unbuttoned a little - so they will not bother you to lay the line. Then again turn out inside out and step up the sides.
6. Cut the circle of 1 mm from the cardboard less than the radius calculated in paragraph 1. Two remaining billets are pleased with the edge of a living thread. Insert into the first cardboard circle, pull the thread and disappear with the iron to fix the form. Ski))) Cardboard from the first circle and do the same operation with the second. Remove the cardboard from it. "Lish" leave - it will not be visible anyway.
7. On the vioraner, lay the allowance on the seams on the penalty in the middle of the barrel - with the facial and invalid sides. Be careful - do not send a zipper iron!
8. To facilitate further work, fix this allowance, noting it to the side part.
9. Estate all the zippers (here it is the convenience of the cloth from the locks compared to the whole piece of fabric!))), Remove the design inside out, attach a circle from the fabric to the inside of the sides of the Penal and the secret stitches, enter it so as to hide the line sewing the front Part of the sides. Do it with the second barrel.
Use the scroll if you are accustomed to him. And get ready to hit the finger, if not accustomed.)))) Jeans itself on itself a tight for piercing material, synthetic locks - also not a flower bed with roses, and even at times the needle gets into the plastic snake of the lock ... In general, my finger is picked up alone. ))))
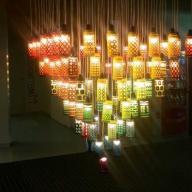
10. If all the zippers are unbuttoned, you get this, similar to paper Christmas flashlight, item.)))) All sides, inside, and outside, will be sewn so that the lines and seams can not be seamless.
11. So that the sides are not bubble, shoot them 2 mm from the edge - or make some curly lines across the entire area of \u200b\u200bthe circle. I was limited to the line in a circle.)))
Here is such a penalty I sewed recently. For a long time he was planned to sew Slavs, bought locks and threw them into a distant corner. They lacquered there, do not lie, hardly from the summer or beginning of autumn. And in January Slavs began driving to me with hints "And I would not sew, mom, I fennifier ..." I rested for some time, but then I gave up.
I sewed him in two stages. On one day I collected the locks in the pipe, in a week or more gathered with the Spirit and sewed the Boc. And along the way, he picked up the process, because he promised in the MK on the stitching of the Castle to show, in which ways you can do the sidewalls in such things.
It would be nice to pick up the most equal length. And when stitching, try to make it so that all the starts and ends of the locks, limited by metal lines, turned out strictly on the same line. For this, it is desirable to mix the locks, and I sewed without a mixture and even without a pin - why it turned out some curvature in the finished product.

1. Decide what size you need a penalty, pick up a sufficient amount of zipper zones. Sust them with each other with an inside, retreating 1.5- 2 mm from the edge, first in the strip, then in the cylinder. To sew it is more convenient, put a paw to the machine for taking ordinary lightning. And it is also useful in the process of guarding "distilling" there and here "Dogs". This will help make a line smoothly - the dog will not interfere. Just leave the needle in the lower position, raise the paw and shift the "dog" to where it will not interfere with you.
In addition to the lightning you will need a cloth for barrels. I took a rather dense denim fabric.
Estate one zipper, spread the cloth exactly and measure its width. The resulting digit is divided by 3.14, and the result of the division is two (L \u003d 2 π R). You will receive a circle radius for cutting the sidewalls of Penal. You need to carve four parts with a viscosity of about 1 cm.

2. Locks are better to sew, alternating opening directions so that the width of the canvas along the edges turned out the same. Since the penalty does not imply a subclass, I sharply sharpened, picking up the threads under their color. I played the coils and bobbins in the station.)))) For convenience, a part of the colors of the threads on the bobbs chose, and the part is on the coils. Attaching, for example, red and blue locks, I cleaned a bobbin with a blue and left the coil with red, and put the bobbin with blue - and tracked the blue castle. Then she cleaned the red coil, instead of her brown - faced a brown castle. Then he changed the bobbin again ... In general, it hipged all this, like a player - a deck of cards.)))
It would be nice yet, stitching the lane from the locks, first try carefully the seams so that they do not pull inside, and then sew into the pipe and try the last seam. And it would be good for now the canvas is not sewn into the pipe, place the lines of the future junction with a barrel - to spend two parallel lines on the locks there. Where will be sewn from the fabric. It would raise the "evenness" of the finished product, but I danced on these rakes.))))

3. Pin out of the lightning fold in half, tick the bends pins. Then fold it in half so that the pins are opposite each other and again tick the folds - you divided the pipe to 4 equal parts. Take two tissue blanks and divide them into four parts or bending or using a ruler.

4. Align pins on a lightning tube with pins on a tissue part, folding them face to face. Scaliate in four losses, and then notify with threads throughout the circumference, evenly distributing the "locking" canvas in a circle.

5. Remove the pencils on the front side and all the locks are unbuttoned a little - so they will not bother you to lay the line. Then again turn out inside out and step up the sides.

6. Cut the circle of 1 mm from the cardboard less than the radius calculated in paragraph 1. Two remaining billets are pleased with the edge of a living thread. Insert into the first cardboard circle, pull the thread and disappear with the iron to fix the form. Ski))) Cardboard from the first circle and do the same operation with the second. Remove the cardboard from it. "Lish" leave - it will not be visible anyway.

7. On the vioraner, lay the allowance on the seams on the penalty in the middle of the barrel - with the facial and invalid sides. Be careful - do not send a zipper iron!

8. To facilitate further work, fix this allowance, noting it to the side part.

Beautiful and unusual accessories always raise the mood! Therefore, school pencils must necessarily like his owner to not only keep the necessary accessories, but also inspire their studies and creativity. With our master class, you can sew a very original pencil made from ordinary lightning GAMMA. Such a penalty will certainly please your schoolchildren and will cause surprise and interest of classmates.
For work we will need:
1. Malnia Tractor GAMMA Type 5 Overweight Dual Jam, ART. G3052 130 cm (№325 coral)
2.Pheter Decorative Gamma Premium, Art. FKS12-33 / 53 (909 Yar.Persik)
3. Polyester Gamma, ART. 40/2 200 I (№162 red-pink)
4.Carababine Micron, art. GH 101/13 (№04 Nickel)
5. Basins Acryl Zlatka, art. ARW-10 (№29 turquoise)
6. Bush plastic Zlatka, art. BFC (№01 Alphabetical Cocktail Color)
7. Laptop Waxy Gamma, ART. JB-01 (№001 white)
8. Signboard Universal Gamma, ART. G-204.
9.Ili for charming with glass heads (pins) Gamma, art. PH-010.
10.Marker self-describing with Gamma proofreader, art. MKR-001 (purple)
11. Sewing machine Household MICRON STANDARD 112
12.Lists are plastic to create globes and Gamma templates, art. PSM-02.

1. I will cut the template from the Gamma plastic sheet (art. PSM-02) with a diameter of 8 cm. On the Gamma Premium fetter (art. FKS12-33 / 53, 909 Yar.Persik) using the GAMMA marker (art. MKR-001 Purple) will apply Markup by template.

2. With the help of scissors, we cut two parts from the felt.

3. Gamma pins (art. PH-010) We rock zipper GAMMA (art. G3052 130 cm, No. 325 coral) and one of the parts from the fetra.

4. We lay the line for MICRON STANDARD 112 in a circle. The allowance must be about 0.5 mm. Make the score.


6. We lay the line on the sewing machine on the spiral.


7. For convenience, unbutton with zipper.

8. At the end, with the help of the pin, we rock zipper with the second part of the felt and lay the line.

9. Pencil is ready! It can be opened on both sides, it is completely disposed.

10. For the decoration of Penal, make a key chain from Zlatka Beads (ARW-10 and art. BFC). It is easy to manufacture. From Beads lay out three words, for example, "Vacation", "Friendship", "Autumn". Next, from the Gamma Waxed Cord (Art. JB-01) Cut two lace in length - 20 and 17 cm.


11. We take a long cord and on one end tie the knot. Next we wear a bead.
To repeat this master class can already experienced master or your mother (grandmother). Sewing lightning so that it looks neatly quite difficult.
But the result is worth it, because of several multi-colored lightning you can sew a super original penalty, or cosmetic bag (depending on that you want to put there).
So, you will need a few color lightning (the author used 13 zapors), sewing machine, threads and needle, scissors, a piece of cloth If you decide to sew a handle.
First of all, you need to unbutton lightning and sew alternately to each other (on the right edge). You must have a solid strip of sewn 13-dimensions. Lightning is needed an odd amount so that the bottom lightning formed the bottom of the Penal.
For convenience, sewing can be fastened with lightning and thereby stretch the fabric.

As soon as all the zippers are sewn, fold the resulting workpiece in half, a good side inward and take zippers on the sides.
To make it easier to make lightning, you can sew a pair of stitches on the side.

If you want your Penal or Cosmetic bags a handle, then it must be sewn at the same stage.

It is necessary to flash as close to metallic rivets in the ends of the lightning.


It will only be left to turn the finished product and slightly smooth out the iron.