Master Class. Decoration of the interior to the new year with their own hands
Christmas tree - Topiary do it yourself
Tsybanova Galina Anatolyevna, teacher GBOU SPO "Tver Trade and Economic College"Purpose: I like to decorate your study office to the new year.
But every square centimeter is busy in the computer class, so the little New Year tree-Topiary will be as impossible. Such a tree is not ashamed and to give, you can even put it on a festive table.
Purpose:
- develop creative abilities
- bring up imagination and fantasy
Hello, New Year's holiday,
Holiday tree and winter!
All friends of their today
Call on the tree we.
Spurla, Fires Tree,
We are happy about the holiday!
All desires will be
All dreams to do!
To work, we will need:
1. Materials for the Christmas Tree:Tight paper sheet A4 (I have paper for drawing)
Aluminum wire 40 cm long
Polyfoam 8x8 cm
10x10 cm lining fabric
Green thick threads for the christmas tree and brown for the trunk
PVA glue
Glue "Moment"
Sequins of two species
Christmas tank beads 50 cm
Tape for niza 30 cm
Tape for bows 30 cm
2. Materials for the pot:
Plastic cup
Building plaster
Burlap 20x8 cm
8x8 cm lining fabric
Sintepon 8x8 cm
Tape for decoration 20 cm (2 pcs)
Phaliki from candy (for "gifts")
3. Tools:
Scissors
Rule
Pen (or pencil)
Passatii

The process of making Christmas tree:
1. Collapse the "Couples" from the sheet of paper, adjust its width on the bottom.
Loading the edge of the paper and grip tightly.
2. Attach a ruler to the top of the cone and measure it in the shortest part.
(This is the maximum possible height of the Christmas tree). Then holding one end of the line
And gradually turning the cone, make marks of the same length over the entire bottom.

3. Cut the extension paper with scissors. The base of the tree is ready.

4. Put a cone to a piece of foam, circle a circle and carefully cut donyshko.

5. Prepare the "trunk": wrap a piece of wire on one side by brown thread
Approximately 1/4 of its length. (I did it not immediately, so there was inconvenience)
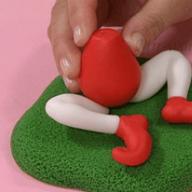
6. The top of the "trunk" go through the center of the circle of foam and insert it
In the cone so that he performs above the vertex at 7-10 cm and bend the passage.

7. Rodyshko on the sides Loss of PVA glue and insert into the lower part of the paper cone.
You can additionally fill the inside the cone crumpled paper (newspaper) so that the cone itself
Not deformed with subsequent manipulations.
8. In a piece of lining fabric, 10x10 cm do a hole, put it on a wire
From the bottom and gently glue the PVE glue to the bottom, cover all the foam.
For insurance, you can wind the edges of the tissue at the bottom of the cone with several turns of the thread.
I wrapped the entire cone with a thin thread, lubricated PVA glue for better subsequent
Clutch with main thread.

9. Green threads fix at the base of the cone, wipe the cone
Approximately 2 cm PVA glue and grind tightly thread so that there are no clearance.
Then loss and wind up the following 2 cm, etc.
I did it in such a way that it was more convenient to keep the product and not to put your hands.

That's ready ...

10. Return to the pot. Prepare the necessary capacity:
If the pot will be small - the Christmas tree can fall, and too big - ugly.
I cut the cup from the yoghurt.

Rodyshko covered with a lining cloth 8x8 cm, gluing on PVA.
Boca smoked burlap. Surplus burlap slept inside the pot.

11. Then you need to prepare a solution from plaster, collecting it with water to a tough condition.
Here I snorted a little: I added a handful of river sand into the finished solution - and gypsum saved, and the solution was harder, which means that the sustainability of the future product is better.

The pot must be filled with a gypsum solution almost to the top.
12. It's time to insert the base of the tree trunk and the center of the pot and the mortar around it.
You can use the blunt end of the pencil, after having wrapped it with the cellophan.
The solution "falls" and a place for "snow" will appear. Now you need to leave our product for a couple of hours or until the next day, as follows solid.
I had to put the Christmas tree "into the angle" to save.
Here I was so fascinated that I forgot about the camera
13. Decorate the pot. The jack of burlap can be sealed.
Around the trunk to lay a syntheton.
Glue the "moment" glue to the braid on top of the pot and around the base.
Optionally, stick bows and sequins.
Under the tree - "Gifts" from candies from candies (inside also candy).

14. The final stage: decoration of the Christmas tree itself. First glue braid
At the bottom of the cone to further consolidate the threads and cover the possible flaws.
Then Christmas beads, separate beads, sequins, bows - and all on the glue "moment"
(PVA will dry long).
Here is our beauty with girlfriends from "Herbers" and "Swan Pooh"

And two more babies are born :)

And she herself has already taken an honorable place in the computer class and reminds my students that soon the new year and it's time to rent tests

P.S. Thanks for attention.
This is my first master class. There are many works, the ideas are even more.
I already see your mistakes and lack of photos, I promise to correct
New Year's holidays are one of the most anticipated and wonderful in our lives. It is noteworthy that every year in anticipation of the new year we are waiting for something magical and try to make something new, unknown in your life and, of course, in the house. The tradition to establish a living Christmas tree is gradually inferior to various options for decorating a house of wreaths such as wreaths, artificial firings, twigs. New Year Topiaries, created by their own hands - another version of the crafts that can be beautiful and cheap to decorate the house at the festive season of 2020.

Topiary is a beautiful seal in a pot, which is performed with your own hands. The source of such decorations can be called a plant architecture, which was popular in the 17th century. Gardeners cut their bushes all kinds of figures: birds, animals, portraits.
To date, Topiary is a tree, made of decorative, natural materials and others. Recently, they are made even from candies, cheese and sausages. They are not suitable for decoration, but will become an excellent gift.

Simple topicia from christmas decorations
One of the most common ideas, how to make New Year's Topiary, assumes the use of Christmas balls of different colors and sizes.
In addition to toys, you will need a rain and tinsel, cones, decorated with gilded paint, ribbons, bells and other decorative elements.

Pot wrap with cloth, ribbons or rain. If initially you have chosen a container with a good appearance - draw its surface with thematic patterns: snowflakes, christmas trees, snowmen, etc. For decor, you can use colored paper and double-sided tape.
The tree axis is enough to repaint in a brown or wrap the rain, ribbon or rope thread. On the crown, fasten the Christmas balls from plastic. It is not necessary to do such a tree multicolored: you can stay on a single color scheme - and pick up the balls of one tone, but of different sizes.
So that the balls keep on the "Crown" of the tree, take advantage of the toothpicks. Their ends are treated with glue: then the toothpick is tightly to the base, and the toy will not hang out.
Christmas tree from acorns and chestnuts
For the manufacture of such a craft you will need:
- Several acute and chestnuts.
- Beads, glass beads of different sizes.
- Golden spray paint.
- Acrylic paints.
- Adhesive gun.
- 200-300 gr. Alebaster and / or gypsum.
- A piece of beautiful fabric for the decor pot (maybe non-unheated luna).
- Beautiful durable branch for the trunk.
- A suitable glass or pot for the base (usually in diameter is equal to the diameter of the crown).
- Polyfoam ball for crown.

How to do:
- The manufacture of a ball for the crown is described above.
- Prepare Topiary for the decor, consolidate a tree in a pot.
- Production acorns and chestnuts. Some sprinkle with golden sprays and, when they get sick, attach one by one with the help of an adhesive gun to Krone. It is necessary to carefully pick up acory and chestnuts in size to preserve the crown roundness.
- In the intervals neatly glue beads and beads so that there are no clearance.
- Reduce the trunk of crafts. It can be painted acrylic paint or sprinkle with golden sprays and glue a little beads to it.
- Decorate the basis. On the frozen alabastra, consolidate a couple of acorns and beads. You can also spat the alabaster to spray or paint paint so that there are no lumen. And you can sprinkle a finely condensed cloth on glue, then fasten the acorns and beads.
Christmas tree from cones
This example uses a cone-shaped base for the crown from the mounting foam.

It will take:
- Cones of different sizes.
- Acrylic paints.
- Red beads.
- Small decorations (Christmas balls).
- You can take several coins of various sizes.
- Pot.
- Fabric for decor.
- Adhesive pistol.
How to do:
- Prepare a product for decorating. If the tree is in a pot, then it is important that the pot is covered with a cloth before filling alabaster. And it is better to mount the fabric so that the traces of glue are not visible. That is, from the inside edge and at the very bottom at the bottom.
- The cone is better to paint in paints in the tone of cones or in green.
- Place the smallest cones at the top, the largest cones on the bottom of the cone.
- Fill the spaces between the bumps. There you can attach coins, small decorations, beads.
- At the already finished Christmas tree attach beads and decorate the foot.
Fragrant Topiciary of coffee beans
And such a decor element will not only decorate your home, but also create a warming atmosphere. And round topiary, and the miniature Christmas tree can be issued with coffee beans. The only way to fix these elements on the surface is the use of glue.
If the grain is glued to the surface of the grain (for example, when using foams as the main material) - think over what to wrap the "crown" before decorating.

Coffee beans on Topiaria will look spectacular and in its original form. But if you decide to diversify the decor - take advantage of the gilded paint or sparkles. With grains, you can combine rope tissue or braid, as well as some dry fruits.
note. That the grains is better to lay out differently: let the layers of the front and rear side of the grains alternate. Some grains can be made by "hanging" from the crown of trees: take advantage of colored threads, ropes or a thin rain.
Topicia of sweets
It takes a great success Topiary made from edible sweet elements. Wrap the ball with a cloth, and the Topiary Christmas tree wrap a wide ribbon. To the textile surface, start mounting sweets in bright wraps.
They can be glued, sew or fixed with a stapler. We advise you to choose candy in advance with a similar design and harmonious colors - and combine so that the topiciary does not look controversial.

To mask the space between the candies, beads, beads, decorative snow, small christmas balls, rain, as well as lace elements are traditionally involved.
Another option of a sweet tree for the new year is a topiary with a décor from Mandarins. At the ball-shaped basis, attach the leaves or twigs of the Christmas tree: they can be both natural and artificial. Take a solid wire - and wrap the mandarins: so they will be easier to fix to the surface.

For the decor of the twigs, take a small bead (it is easy to glue to fabric and plastic) or artificial snow. To such a tree, it was even more fragrant, complete the composition with dry laurel leaves.
These and other Master Classes of New Year Topiary will help you create a stylish and memorable gift to relatives and loved ones for the New Year. And, most importantly, on the decor of the village you will not spend a lot of money.
And to the process of creating trees and christmas trees you can connect the children who will only be happy with the possibility of manifesting their creative abilities.
Money Tree
Here is a round kroon from the mounting foam.
It will take:
- Artificial bills and coins.
- Twine.
- Sackcloth.
- Several candies or dried ornamental fruits.
- A clay pot for support is well suited.

How to do:
- The clay pot can be beautifully painted with acrylic paints.
- Barrel make from twisted wire. It must be 1-2 cm in diameter and about 10 cm high. You can bend it beautifully.
- To the tree fixed in the pot gently glue coins with a glue gun. Stick top down so that it looks like the petals look like.
- The basis to reorganize green tinsel. Attach rolled bills, machine and a pair of candy or decorative fruits.
Tsesca from Salfetok.
It will take:
- Openwork base-ball from threads.
- Paper napkins.
- A little lace and ribbons.
- Branch for the trunk.
- For support, you can use an elegant cup.

How to do:
- Set a tree in a cup. Decorating a cup by adding lace and satin ribbons and bows.
- The branch of the trunk can also be collected by ribbons.
- For the crown, press the rose from the napkins.
- Secure them on a bowl with pins-carnations.
- In the intervals add bows from lace and tape.
- The finished handicraft is obtained very gentle and air. The final stroke can be any light accent in the form of a complex bow of lace and tapes, or a piece of candied decorative lemon at the foot of the village.
Evaluate Article.
How useful was this article?
The main element of the New Year decor is an elegant Christmas tree - it is not always possible to install in home interiors. Sometimes the room in the room is not enough to accommodate a large Christmas tree, and reduced copies of New Year's beauties are used as a replacement.
You can make a simulation of a small Christmas tree with your own hands using a remedy and spending a minimum of time. They are called Topiarii (translated - trees of happiness) and can be used not only as an element of the interior, but also as a gift to guests on New Year's Eve.
The possibilities of decoking such Christmas trees and trees can be limited to your fantasy: for decoration, almost any material can be used to decorate.
But some ideas of the design of Topiariyev have already become traditional, so let's learn how to create original decorations for your home, passing the master class about New Year Topiaria do it yourself.
New Year's Topiary do it yourself photo
New Year Topiary: manufacturer options
Surely you paid attention to the finished topiaries that are sold in stores: from the side such decorations look complex and professional, but in fact it is necessary to make an even better and original Christmas tree.
Our master class of New Year trees Topiary will tell you how to create such jewelry, without having the skills of the own manufacture of decorations and accessories.
The main feature of such decorative elements is the interchangeability of jewelry used for the decor.
Reduced copies of the Christmas trees can be decorated in different ways, focusing on the color gamut and a variety of design of the New Year's interior.
By the way, it is not necessary to be limited to the creation of mini-ends: topiaria may look like small trees decorated with Christmas toys and other devices.

New Year Topiary with your own hands: master class, photo
Determine how your Topiary should look like: Depending on the shape, size and features of the decor, you will have to use different materials. Follow everything you need - and you can transform your room in a short time, focusing on the photo and master class about New Year Topiaria do it yourself.
Necessary materials
To create a New Year's Christmas tree Topiaria, you may need the following materials and tools:
- ball from foam, papier mache, plaster, plastics Or a large Christmas ball that will be used as a crown. If you decide to create a small Christmas tree, use durable paper or cardboard;
- flower pot, cup of yogurt, small box or other container in which the finished tree will stand. Consider that the Topiary should stand tightly in such a basis, so do not choose too variants of small sizes;
- pencil, wide wire, needle, branch or other axiswhich will be used as a finished design holder;
- materials for the potwhich quickly frozen after use: for example, gypsum or cement;
- glue or similar mass that reliably captures all the elements of the decor, as well as the components of the New Year Topiaria;
- accessories for decorating. Preferred as bright and brilliant accessories as possible, which will emphasize the celebration of the holiday;
- resistant paints and tassels. They will be applied to design some parts of the Christmas tree, for example, for painting a pot or creating imitation of white snow on the surface. The best option is water-soluble acrylic paint.
When all the materials and decorations are prepared, you can start compliance with the step-by-step instructions of the New Year Topiary with your own hands: If you wish, you can make it possible to make up New Year's Christmas trees or a tree, using your ideas.

New Year Topiciary Photo
Preparatory work
How to make New Year's Topiary? The first stage of this process should include preparation of the Crane of the Future Trop. Create imitation of a small Christmas tree will be easier: it is enough to choose durable paper or cardboard and minimize the cone.
Tip: If you plan to decorate the Christmas tree with heavy toys and accessories, you should not make the inside of the base of the floor. It can be stuffed with cotton or foam rubber or make a ready-made cone from wood, plaster and other materials.
Most often the cone-shaped base of the Christmas tree is wounded by a wide thread: First, this approach allows you to disguise the material, and secondly, it serves as the basis for further decoration, since it allows you to attach almost any accessory.

If you plan to create a tree, his crown will be a big ball. Many prefer use a conventional Christmas ball of large sizeBut if you do not have such an accessory or you are afraid that it can spoil and lose shape, choose more reliable materials.
For example, a foam is perfectly suitable as a ball: glue a large cube from small foam pieces and cut extra pieces with a stationery or wallpaper knife.
Remember! Solvent-based glue will cride foam plastic, therefore it is not suitable for bonding individual fragments of the ball, nor for subsequent stickers of jewelry and accessories.
In order for the finished ball from the foam to had a flat surface, put the basis of the hand.
Small disadvantages can be disguised with accessories, so it is not worth spending time to correct all flaws. By the way, this approach allows give Topiaria and other unusual forms: Christmas trees with an inclined end are made this way.
At this ball you can immediately stick christmas toys or other decorations.

Another option to create a ball for the crown is using balloons. Inflate them to the desired sizes, turn thread throughout the area - and thoroughly treat with glue. After the surface is freezing, you can blow away the ball and pull out through the base.
The second stage of the creation of New Year's Christmas trees Topiarias is the manufacture of the axis on which the finished decoration will hold. The trunk of a tree or christmas tree can be made of a small twig or tube, plastic sticks or pencils.
If there is no primary materials suitable in form and sizes - Create an axis itself from cardboard or papier mache.
Do not forget that the trunk must withstand not only the ball or cone, but also all the elements of the decor.which will be involved.
Such elements are connected very simply: if it is a foam - the barrel is lubricated with glue and inserted inside. If this is a stronger base, you have to glue items without inserting each other.
Tip: Decorate the stem of the tree in advance, using paints, sequins, varnish, bright threads or beautiful paper. After connecting two parts, it will be more difficult to transform it.
If you wish to create a tree or a Christmas tree, which can be tilted in different directions - use thick wire as a pillar. Such an axis will look more original if you select the wire of different sizes or colors - and go away with each other.

New Year Topiary with a flexible barrel
Foundation for topiciary
Do not forget that the basis for your Christmas tree should be stable, and beautiful. The standard method for designing the foundation for topiary is the use of a small flower pot. It can be painted in New Year's pictures, arrange a cotton-imitating snow, or convert with threads, bows, coffee beans with threads, bows, coffee beans.
Instead of a flower pot, you can use a small vase, a jar, a plastic glass. Even match boxes are suitable for small herring.
Do not forgetthat the originality of your craft will depend on the appearance of the foundation, so you can show fantasy and personally make the basis of non-standard forms.

To create a pot or foundation for the Christmas tree, you can use Papier-Masha technique. Prepare a small vase, paper or newspaper, glue, scissors and brush. Treat vase with vaseline or bold cream, wet pieces of paper - and stir up on the prepared surface. All subsequent layers of paper are superimposed similarly, but we are labeled with glue for reliability.
For convenience, you can use paper of different colors to not be confused in layers. As a rule, for a strong foundation there are enough five-six paper layers.
When the application is dry, you will be able to remove the paper from the base of the vase without obstacles. Such the pot can immediately be attached to the collar post.. The material is poured on the material like plaster or cement. The mixture is diluted with water (you should not start with pouring liquids, since the base is splashing, and the dry mixture will affect the respiratory tract).
The solution is immediately attached to the solution and keeps until the base is free. If desired at this stage of work can decorate a pillar and an inner pot: Enter beads, beads, rain, coffee beans and other decorations. Such elements will serve as an additional holder of the entire composition.
At the next stage, the master class about the New Year Topiary can be seized with decorative work. After all, such a tree should replace the New Year tree - which means that decorate it should not less bright and interesting.

Methods of decor
There are many diverse ways to decorate such mini-chips. If you like standard imitation of the New Year tree - Use small Christmas toys and rain. As elements of the decor, garlands and tinsel will be useful, but try not to overdo it with the decor: sometimes abundance of accessories can make a Christmas tree tasteless.
Complex, but interesting ways to create a bright and festive Christmas tree using a plastic ball. The openings under the garlands are drilled inside it.
Using the ball like the top of the tree and decorating other accessories, you will create a bright element of the New Year's interior. Such Topiary can be put on the table or the most darkened zones of your room.
Most toys and jewelry are attached to topiary with hooks, glue or double-sided tape. If the Christmas tree or ball is wrapped in thread or cloth, you can sew accessories to the prepared surface.

What other decorations are suitable for the decoration of New Year Topiaria? We present you the most common design ideas:
- creating reduced copies of plastic or felt toys To simulate a real New Year tree;
- fastening small cones (if desired, they are decorated with sparkles, paint or decorative snow);
- using small christmas balls of different colors;
- decor with help mandarin and candy;
- decoration with bows or ribbons throughout the area of \u200b\u200bthe village and his pillar;
- cuffing coffee beans throughout the base of the ball or cone or in the form of individual compositions;
- using rain or small fir branches;
- beading Beads and Beads To impart the brightness of the New Year's composition.

Usually, in the New Year's interior of the rooms, several topiaries of this type are used.. They can be performed in a single style to follow the setpoint of the design, or make different color, brightness and form - and place in different zones of the room.
Since the creation of the New Year tree Topiaria does with their own hands implies decoration for every taste, a variety of christmas trees and trees can be given to your guests and close people.. Such crafts will harmoniously fit into any New Year's interior and emphasize the solemnity of this night, so increasingly used not only as a replacement, but also as an addition to the usual Christmas tree.

Now you know how to diversify the New Year's decor and make a festive evening are still brighter and more interesting. Watch the video lesson Elena Rogacheva, how to make a decorative Topiary with their own hands from the primary materials:
Follow our advice, implement your ideas - and the decor of your room with a tree of happiness in the New Year will be unforgettable.

New Year's holidays are one of the most anticipated and wonderful in our lives. It is noteworthy that every year in anticipation of the new year we are waiting for something magical and try to make something new, unknown in your life and, of course, in the house. The tradition to establish a living Christmas tree is gradually inferior to various options for decorating a house of wreaths such as wreaths, artificial firings, twigs. New Year Topiaries, created by their own hands - another version of the crafts that can be beautiful and cheap to decorate the house at the festive season of 2019.
What it is
Topiary is a beautiful seal in a pot, which is performed with your own hands. The source of such decorations can be called a plant architecture, which was popular in the 17th century. Gardeners cut their bushes all kinds of figures: birds, animals, portraits.
To date, Topiary is a tree, made of decorative, natural materials and others. Recently, they are made even from candies, cheese and sausages. They are not suitable for decoration, but will become an excellent gift.
Creation of festive Topiarias do it yourself
There are many master classes on the Internet, but there are rules that need to be understood before the start of work.
- First of all, you should decide on the stylistics of the crafts. This can be a stylized Christmas tree or pine tree, a tree from cones, acorns, glass bowls, satin ribbons, paper napkins or money. You can use the 2019 Symbol on the Chinese Calendar: Yellow Pig.
- New Year Topiary can embody the fulfillment of your cherished desires, and therefore, for his decoration, you can add symbols of everything that I would like to bring in your life. It can be coins to attract money, a toy machine for incarnation of a dream about a new car, hearts to attract love. The process of creativity will be a resource for positive changes in life, because we all make a desire for the new year, so why not help them with their wording, creating a toopiary?
- New Year's souvenirs made by their own hands will become beautiful gifts to friends and loved ones. Through such a gift, it will be possible to express its best wishes.
So, from which the tree will be executed is determined, it remains to understand how. Topiary consists of crown and trunk, which are subsequently attached to the base.
As the basis, any kashpo, flower pot, plastic or glass cup, a cup, a small box.
For the trunk it will take a robust wooden stick, a few returned wires, and plastic or metal rods can also be used. The trunk can be straight or curved - it depends on the idea of \u200b\u200byour tree.
Crown most often has a ball shape. For this, the foam or various kinds of balls are used, on which materials adorning the toopiary are fixed. For tree, you can use cone-shaped forms or an abstract crown.
Crown
Start better with the preparation of the crown. Consider several options.
- From mounting foam. In order to make a round crown yourself, you can use even the mounting foam. To do this, take two plastic boxes from under sour cream. Fill them with foam. When it freezes, take off the boxes. Foam glue with a plow glue, and after cutting so that it turns out a neat ball.
- From foamflast. Take a thick foam, you can use the remaining household appliances packages. To glue the cube from it using PVA glue and gently trim the paper knife. True, when trimming the foam, the material is strongly electrified and scattered around the apartment. It is better to immediately remove it with a vacuum cleaner.

- From thread. Take an inflatable ball. Inflate it to the desired size and wrapped with threads, each layer impregnate the PVA glue. Layers of thread should be rather dense and covering the ball completely. When the glue dries, burst the ball. The openwork base is obtained, in which you can easily fasten the nonsense jewelry of Topiaria.

- Rubber ball. Medium size The rubber ball can serve as the basis for the crown. Only you can not use pins for fastening decorations to it. But the adhesive gun will well attack materials to the base.

- Papier mache. Paper, glue, paper. From Papier Masha, you can create a cone-shaped, and spherical, and the crown of non-standard form. The disadvantage is that the time is required to make each layer as a mischief. Yes, and the strength is slightly lower than that of the mounting foam or foam.

- Foam, foam, and tight cardboard are suitable for a cone-shaped crown. It is only necessary to solve the proportion of the cone correctly.
- Non-standard forms. Hearts, abstract figures create a similar way from any available materials. Creating such crowns requires more experience and patience.

Trunk
As mentioned earlier, the trunk can be straight or curved. For him, the usual tree, wire, plastic fit perfectly.  For the decor, the trunk can be used:
- acrylic paints;
- threads;
- tinsel, rain;
- crushed shells or ground coffee, tea;
- other interesting and affordable materials.
The foundation
Often, the finished handicraft is not very easy. In order to give it stability, you need to take care of a solid basis. Most often for this use plaster or alabaster:
Manufacturing process:
- Reduction the pot for the base.
- Pour into the pot alabaster solution. According to the consistency, it should be thick sour cream.
- Insert the trunk into the solution, fix and wait until it frees.
- After the frozen to attach to the barrel of the crown. A joint place to additionally glue PVA or other durable glue.
- Now you can proceed to decorating the product.
 After reading the peculiarities of the manufacture of parts of the crafts, you can proceed to the implementation of the project. The templates presented below can help this.
Christmas tree from acorns and chestnuts
For the manufacture of such a craft you will need:
- Several acute and chestnuts.
- Beads, glass beads of different sizes.
- Golden spray paint.
- Acrylic paints.
- Adhesive gun.
- 200-300 gr. Alebaster and / or gypsum.
- A piece of beautiful fabric for the decor pot (maybe non-unheated luna).
- Beautiful durable branch for the trunk.
- A suitable glass or pot for the base (usually in diameter is equal to the diameter of the crown).
- Polyfoam ball for crown.
 How to do:
- The manufacture of a ball for the crown is described above.
- Prepare Topiary for the decor, consolidate a tree in a pot.
- Production acorns and chestnuts. Some sprinkle with golden sprays and, when they get sick, attach one by one with the help of an adhesive gun to Krone. It is necessary to carefully pick up acory and chestnuts in size to preserve the crown roundness.
- In the intervals neatly glue beads and beads so that there are no clearance.
- Reduce the trunk of crafts. It can be painted acrylic paint or sprinkle with golden sprays and glue a little beads to it.
- Decorate the basis. On the frozen alabastra, consolidate a couple of acorns and beads. You can also spat the alabaster to spray or paint paint so that there are no lumen. And you can sprinkle a finely condensed cloth on glue, then fasten the acorns and beads.
This example uses a cone-shaped base for the crown from the mounting foam.
 It will take:
- Cones of different sizes.
- Acrylic paints.
- Red beads.
- Small decorations (Christmas balls).
- You can take several coins of various sizes.
- Pot.
- Fabric for decor.
- Adhesive pistol.
How to do:
- Prepare a product for decorating. If the tree is in a pot, then it is important that the pot is covered with a cloth before filling alabaster. And it is better to mount the fabric so that the traces of glue are not visible. That is, from the inside edge and at the very bottom at the bottom.
- The cone is better to paint in paints in the tone of cones or in green.
- Place the smallest cones at the top, the largest cones on the bottom of the cone.
- Fill the spaces between the bumps. There you can attach coins, small decorations, beads.
- At the already finished Christmas tree attach beads and decorate the foot.
Money Tree
Here is a round kroon from the mounting foam.
It will take:
- Artificial bills and coins.
- Twine.
- Sackcloth.
- Several candies or dried ornamental fruits.
- A clay pot for support is well suited.

How to do:
- The clay pot can be beautifully painted with acrylic paints.
- Barrel make from twisted wire. It must be 1-2 cm in diameter and about 10 cm high. You can bend it beautifully.
- To the tree fixed in the pot gently glue coins with a glue gun. Stick top down so that it looks like the petals look like.
- The basis to reorganize green tinsel. Attach rolled bills, machine and a pair of candy or decorative fruits.
It will take:
- Openwork base-ball from threads.
- Paper napkins.
- A little lace and ribbons.
- Branch for the trunk.
- For support, you can use an elegant cup.

How to do:
- Set a tree in a cup. Decorating a cup by adding lace and satin ribbons and bows.
- The branch of the trunk can also be collected by ribbons.
- For the crown, press the rose from the napkins.
- Secure them on a bowl with pins-carnations.
- In the intervals add bows from lace and tape.
- The finished handicraft is obtained very gentle and air. The final stroke can be any light accent in the form of a complex bow of lace and tapes, or a piece of candied decorative lemon at the foot of the village.
Glass and soft balls
Required:
- Ordinary New Year's glass balls of different sizes.
- Prepared soft balls stuffed with cotton, syntheps or trimming fabrics.
- The base (may be in the form of a cone or a ball, if desired).

This Christmas tree can stand on a flat basis, without trunk.
How to do:
- It is necessary to fix the balls with an adhesive gun from the top, to the bottom placing the largest.
- You can also fix the glass balls on the round crown, in this case the branch for topiary should be powerful.
- A very original topiary of glass balls with a split crown will look very original. Balls can be two colors or two different shades.
Fabric tree
Beautiful and magnificently look like new year trees from the fabric.
It will take:
- Organza or other beautiful and lightweight fabric from which you can cut a lot of long strips.
- An object for accent (beautiful brooch, flower, toy).
- For such a tree, it will be suitable as a support cone from ordinary cardboard.

How to do:
- Cut a lot of long strips from the fabric.
- A prepared basis should be carefully and tightly glued to the tissue strips, so that the tree is fluffy. It is good to take two or more tints of the fabric so that the game color makes the tree is richer.
- You can decorate such a Christmas tree with a bright accent in the form of a brilliant toy, brooches or an artificial flower.
Candy tree will delight the Devora.
It will take:
- Lollipops in bright wrappers.
- Candy tree will not be easy, so for the base you need to choose a strong branch.
- Rain for winding branches.
- Cone for crown.

How to do:
- Secure candy to the branch with a glue gun.
- In a special decor, this tree does not need. Well it will look in a beautiful cup.
- The branch can be decorated with small toys and tinsel, place a symbol of the coming 2019 under the New Year Topiaria - a small pig.
Step-by-step master class on the creation of Topiaria: video
One of the popular jewelry for the house is recognized by Topiary. It is a small church created from artificial and natural materials that can be selected at the discretion of the wizard to create New Year Topiaria with their own hands for 2018. Their form can be both traditional, rounded and figured, for example, in the form of ate. The dimensions of such a tree vary from 10 cm to half a meter.
A tangerine tree may become a popular New Year Topiary. Such a decorative element consists of natural citruses, supplemented with decorative materials, and can act as an alternative substitute for a living tree. How to create it, will present a master class below.
For manufacture, you will need:
- two dozen mandarin;
- curved branch or snag;
- flower pot;
- floral oasis or a piece of foam;
- the branches of ate and leaves of mistletoe;
- crushed foam as an artificial snow;
- motion linen rope;
- cut wires for fixing mandarin on a tree;
- scissors and knife on paper;
- pVA glue.
A branch for crafts can be chosen on the street, but in this case it will need careful processing: cleaning from dirt and debris, removing unnecessary branches and in the coating of varnish. The curved shape will give the tree a spectacular look.

First of all, the tangerines should be embedded. For this, their cross-strokes are winding with silver flax thread. So that they look more festive, you can purchase a brilliant thread or slightly split citrus varnish with sparkles.
The wire segment is flexible under the threads and slightly bend. If the threads are badly kept, it is slightly lubricating them with glue in the center.

Then you need to create snow-covered fir sprigs. To do this, they are slightly wetted with glue, so that the needles do not stick together with each other, and after dipping in artificial snow. You should leave them for a while dry.

At this time, you can take preparation of the foundation for the tree. From the foam or oasis carved the cone suitable in the size of the pot, and put it there. Next, it is necessary to cut a spherical basis on which the mandarins and the leaves of the mistleta will hold.

Now you can collect the design together. The branch sticks the basis in the pot, and then on the second end it is put on a spherical basis. Mandarins are attached with wire. For reliability, they can be lubricated with glue.
The gaps between citrus are filled with the leaves of the mistletoe. Their ends do through the middle and stick to the base. At the end, the composition is complemented by fir branches.

Topiary from lollipops
New Year Topiaria with their own hands for 2018 it is easy to create from lollipops. Such options are extremely simple in performance and look very appetizing. Such sweetness can be surprised by your friends and loved ones, presenting them an unusual New Year present and a great decoration for the house.

For manufacture, you will need:
- flower pot;
- ball and cube from foam;
- color cardboard sheet;
- pick for the trunk;
- sticky and satin ribbons;
- 200-300 gr. lollipops;
- decorative glass pebbles.

Initially, the foam cube will prevent a pot. Then the marker is carried out two lines diagonally and denote the center. The center of the Cuba should stick the stick on which the basis will be fixed.

So that the toopiary looks more accurate, it is recommended to close the foam of the cardboard sheet, in which the hole is pre-cut. It is important that the material is in the size of a flower pot.

Then the ball from the foam is neatly covered with adhesive tape.

Before putting the whole ball completely, it is recommended to stick a stick into it, as it will make it much more difficult through the tape.
When the basis is fully ready, you can begin to decorate it. Lollipops are placed as close to each other, covering them all over the area. After that, the bottom is lubricated with a generous layer of glue and decorative pebbles or candies are poured on it. Finally, a bow on the trunk of a festive tree is made of satin ribbons. All is ready. Optionally, you can upgrade the pot with the help of ribbons.

Topicia from natural materials

New Year Topiaria with their own hands for 2018 can be deprived of a spherical basis, consist of large pine cones and twigs, as well as Christmas toys. Such a church may well replace the living tree in the house, in addition, materials for its creation inexpensive.
For manufacture, you will need:
- pine cones;
- pine or fir branches;
- small Christmas balls;
- flower pot;
- wooden skewers for the trunk;
- twine or twine for decor;
- gypsum solution;
- a small cut of burlap;
- motor thick wire;
- adhesive pistol.

First of all, it should be fixed on each brush along a small segment of the wire. It must be fixed at its base and tweak several times for reliability. The length of the remaining tail is approximately 7-10 cm. To form a ball, about 10 such billets of cones will need.


Then, the bumps are connected together with the remaining wire length. Equally distributing them in different directions, it is necessary to form the basis for the ball. It is also important to leave some space for pine branches, which will give a topiary final form.

Next, it is necessary to make the basis that will serve as a tree trunk. To do this, take a few spedes and process their ends with the help of a glue gun so that they keep them better together and did not crumble. The end of the tops are inserted between the sparecrows and securely fix it with silicone glue.

After that, the gypsum is bred to the consistency of thick sour cream and lay it in advance prepared pot. The center is installed with a stick and stick it slightly until the material is completely frozen.

To the trunk looked more attractive, it is wrapped up with twine or twine. Rope ends can be fixed with a glue gun.

Then the pot must be punctured by a small cut of burlap, giving it a decorative bag shape. The edges should be bent alternately and fix on hot glue. Next, the pot is tied up with a bright satin ribbon. It is worth considering that when creating Topiary, other means for decor can be used.

At the next stage, the crown of the tree is complemented by pine branches. They are inserted between the bumps and fix with the help of an adhesive pistol. To give them a snowy look, they are covered with conventional glue and loose in the crushed foam. Some branches can be decorate with christmas balls.


Topiciary - Christmas tree

As mentioned earlier, the Topiary does not always have a classic pattern in the form of a spherical crown. This tree is made in the form of a festive Christmas tree and decorated with sweet candy in motley wrappers.
For the manufacture of such a version of Topiari, it will be necessary:
- styrofoam;
- motor thick wire;
- large candies in wraps;
- corrugated paper;
- decorative rope;
- cable with a diameter of 0.5-1 cm;
- textile and plastic ribbons;
- small cones, balls and other decorations on your taste.

At the beginning, a harness should be prepared, which will serve as a link. For this, the cable is wrapped with a ribbon, you can use a stente or satin. The edges are fixed with hot glue. In general, the harness can be given any form at its discretion.

Next, it is necessary to prepare a bell, which will decorate the top of the Topiaria. It is worth noting that it can be seen by a small christmas ball or a large bead. The edge of the long wire segment is fixed on the bell. To slightly seal it, the wire is gluable paper.

After that, they start working with a foam cone, the basis for the Christmas tree. You can purchase a ready cone in the store or carefully cut it yourself. The rope is glued to the base and begin to gradually wrap it with a figure. It is worth noting that it is also perfectly suitable for sisal, synthetic fiber.

Before fully covered with a cone with a rope, you should insert the wire with a bell in its top. Photo 29 shows the recommended length that must be left. After the rope covers the figure, it continues to wrap the wire to the very base of the bell. The end is fixed with hot glue.

Then the bottom of the cone is punctured by candy. They are glued behind the tails, tightly pressing sweets to each other, to fit as much as possible. In photo 31, you can see the result. You can also fill out the remaining space of cones and balls.


At the next step, it is necessary to create a base for Topiaria. In this case, it is used by a polyfoam in the form of a rhombus. It is placed by paper, ribbons and rhinestones to taste.


At the end, the tree is fixed to the stand and add the last decorative elements: various bows made of ribbons, flowers from corrugated paper, multi-colored beads and so on.


Completed for this principle of Topiaria have many different designs. Photos below are presented options for decorating these festive trees.


New Year's masterpiece - Mini

The following topiary is a real work of art. To decorate this village, a Christmas garland was used. It is not a mandatory component, but it looks very impressive, especially with the light off.
To create it will be necessary:
- sheet of paper A3 format;
- mounting foam;
- wire with a thickness of 3-4 mm;
- bilateral thin tape;
- sisal fiber;
- ceramic pot;
- glue pistol;
- ordinary tape;
- a stick for the stem;
- decorative tape;
- beads and garland.
Optionally, you can choose other decor elements.

To form the basis, it is necessary to turn the paper with a cone and fasten with scotch from both sides. The diameter of the cone should be slightly wider than the pot.

The cone is then filled with mounting foam. It will be enough to fill it up to the middle and leave for the night. After complete drying, all paper is carefully removed. It is recommended to fill the bottom with a knife so that it is smooth.


After that, the stick is installed in the center of the pot and to the middle fill it with foam. It is recommended to hold the stick so that it does not shift before the material is frozen. The photo foam has already hardened.

At this time you can do the christmas tree. In order for its top to become more expressive, you should take a segment of the wire and spin it slightly, and after stick to the cone. Then the whole tree from the tip itself and to base is covered with two-sided thin tape. Do not confuse fine tape with narrow.

Next, you must carefully wind up the garland around the figure. It is important not to damage it, otherwise it will stop working. The length of the garlands should be enough to completely wind the topiary and the bottom will only remain a box for changing the mode.

Then the entire surface of the cone is covered with a sisal. This material has a fibrous texture. Opening along a small piece, it should be evenly covered with a fiber with the entire crown in the tree.


Finally, stick stick into the cone and begin to dress up a Christmas tree. Optionally, you can stick a little wool imitating fluffy snow over the assembly foam. And around the festive tree wrap a little bright beads. Experimental, the most different design options are obtained.