From the cones you can make a lot of amazing crafts: from interior items to funny animals and fabulous heroes. The latter especially like children, because they can make them independently or with the help of parents. Such crafts will not only please the eyes of children, but also can become an excellent option for crafts to school or kindergarten on the autumn exhibition. The master classes offered by us are different in difficulty fulfillment, but they all are animals and characters who have fallen fabriced fairy tales. Detailed instructions will help you make any of these crafts.
Crows from the cones

A funny blizzard from the bumps to do is so simple that even small children can cope with their manufacture.
Materials
For the manufacture of a small blizzard you will need:
- cones;
- newspapers;
- paint in the balloon black;
- little straw hat;
- eyes for crafts;
- chopsticks of hot glue;
- thermopystole;
- pieces of felt of orange and black colors;
- scissors.
Step 1. Before starting work, be sure to check the collided cones. In order for the craft to be such as needed, the bump should be stable in a vertical position. For a little blienenka, it is better to take the discontinuished bumps so that they resemble the bird's support. Clean the collected cones from dirt and dust. To do this, you can rinse them in clean water and dry or just brush the dust with a brush.
Step 2.. Now the cones need to be painted, use the black paint in the ballots for this. Work outdoors or indoors, which is well ventilated. Working surface or plot of land is shutting up with old newspapers so as not to stain them. Put the bumps on the newspapers, and evenly color the latter. If necessary, apply several layers of paint, in which case, be sure to dry the drying of the previous layer so that the paint does not flow. Leave the cones until the paint is completely drying.

Step 3.. From a piece of felt orange color cut out a small triangle - it will be a beak of a crow.

Step 4.. From the felt of black color cut the wings of the crows. So that the wings are the same, you can draw them a pre-spin on the fabric and, if necessary, to correct or cut one wing and, apply it in a mirror reflection to the remaining felt, cut and second.
Step 5.. Using hot glue and thermopystole sticks, stick the crows details to the chish. On the sides of the cone, secure feathers, beak and eyes ahead. Please note if your eyes are on the adhesive basis, remove it before work. Top on the head of Voronenka, Welve a straw hat. Also stick it.

Since working with hot glue glue injuries with incorrect use, make this part yourself, not trusting children.

Crow is ready, she will delight your kind of you and your child for one year.
Hedgehogs from cones and polymer clay

Charming hedgehogs are obtained from cones if instead of plasticine use polymer clay. As a result, the hedgehog is very realistic.
Materials
For the manufacture of such a hedgehog you will need:
- polymer clay color clay;
- polymer black clay;
- cone;
- two black beads for eyes, 4 mm;
- crumbling blush;
- cosmetic brushes;
- tube for cocktails;
- watercolor brushes;
- toothpick;
- board for working with clay;
- glue.

This Master Class of Preschool Children will not be able to fully repeat completely, and therefore it is necessary to prepare the parts for the hedgehog from the polymer clay. Kids themselves can attach them to chish.
Step 1. The cones for the manufacture of the hedgehog take well, so that they resemble the needles of the hedgehog. Before working a bump, be sure to prepare and clean from dust.
Step 2.. First you need to make the head of the hedgehog. To do this, form a ball made of polymer clay, then make a cone from it. Flat-side tightly press it to a chish. The base of the cone gently straightens and stretch to the edges of the bump. Top the top of the cone carefully pull up, giving it the shape of the nose of the hedgehog.

Step 3.. Shot from polymer clay four identical cylinders, press them to the side of the bumps - it will be the legs of the hedgehog. The bottom of the cylinders are a little bent and, using toothpick, give the lapes a characteristic form.
Step 4.. Form small balls from clay. It will be the basis for the ears. Place them at the appropriate location of the already formed face. The back sides of the tassel for the paints, press the ears inward, giving them a characteristic deepening. From the back of the ears, all the joints are stuck in your finger.

Step 5.. Toothpick the tip of the nose press to put a small ball of polymer clay black in it. So, you will finish the manufacture of nods.

Step 6.. In the area of \u200b\u200bthe eye clay, press the back of the tassel. Insert into place of the resulting recesses of black beads. Insert so that the beads are not visible. It will be the eyes of the hedgehog.

Step 7.. Take a cocktail tube and cut a small strip scissors. Sut it so that at the end of the tube it turns out the basis in the form of the letter U. Attach the cutting tube into the area of \u200b\u200bthe Hedgehog and slightly pressing. So you get a smile on the face of the animal.

Step 8.. In the field of cheeks and on the inside of the cosmetic brush, apply crumbling blush. Rushane take pink tone so that they look natural. Surplus Rumba Clean brush wake.

Step 9.. Send a bump-hedgehog to the furnace. Bake the craft in accordance with the clay manufacturer's instructions.
Bakeing parts made of polymer clay, make sure that the room in which you work is well ventilated.
Note, when baking a bump can expand some more, and clay pieces can break down. If this happened, just glue the left parts into place after the craft is completely cooled. Do not use superclauses for gluing. He will leave noticeable traces.
Hedgehog is ready!
Fabulous gnomes from cones

Such amazing characters like gnomes can also be made of cones. They can be not just a cradle for an exhibition or a toy, but quite a beautiful gift souvenir.
Materials
For the manufacture of small dwarves from the cones, you will need:
- pine cones;
- large wooden beads;
- paper sheet or newspaper;
- compass;
- pencil;
- pieces of fetal tissue;
- threads;
- needle;
- acrylic paint black;
- thin brush;
- small brushes for washing the nipple;
- nippers;
- round-rolls;
- chopsticks of hot glue;
- thermopystole.

Step 1. At the very first stage of the manufacture of dwarves, you need to choose a bump. Trye take pine and ajar. Be sure to check that the bumps be integer, so the gnome will look much more aesthetically. Be sure to clean the bumps from dust and check that they are firmly stood on vertical surfaces.
Step 2.. From the newspaper, make a blank for the gnomic cap. Circle draw a small circle, cut it out and bend it in half. Figure the resulting figure in the cone. After trying on the cone to the existing wooden bead, adjust its shape. The resulting sample use both the finished pattern.
Step 3.. Attach a paper pattern to a piece of fetal fabric, circle it with a knead or shallow and cut the base for the cap.
Step 4.. The resulting foundation for the cap of the gnomer is covered with threads. Stick carefully so that the seam in the eyes is not rushed. Remove the hat. It is interesting to the felt cap seams outward. To do this, it must be sewn by hand overlocked seam and leave it in such a form without turning. If you want to make a tip of the cone, more on the newspaper pattern adjust its shape.

Step 5.. Beads stick to a chish using hot glue.
Step 6.. On the bead, wear a hat, for reliability you can fix it using all the same hot glue.
Step 7.. For the manufacture of handles, the gnomic need to take two small brushes. Usually they wash the nipples of bottles for kids. The handle needs to be bought off, and the wires themselves with bristles beolate with the help of round-rolls in the form of bent hands of the gnome. Most often they are sold white, and therefore you can paint them with paint from the canopy to tone with felt pieces. Paint should be applied with one layer.
Step 8.. Felt cut mittens for gnomic. Stick them to the already harvested base of brushes.
Dwarf handles can be made simply from felt. In this case, mittens need to be cut with a long base. The base should be beatened in the form of a tube and sew it a secret seam, leaving the mittens themselves directly.
Please note that the knobs of felt do not need long, they will be located directly. To get them back and make more neat, like handles from brushes, you can insert a piece of wire or bend the felt base at an angle and a loop from the thread to secure it in this position.

Step 9.. Made knobs on the end. Lubricate the glue and insert the side of the bump. Hold them a bit so that the glue grabbed well.
Step 10.. Cut the legs from the felt pieces and glue them to the base of the cones. This will help make the gnome more stable. In addition, the felt base will protect the surface where the gnome from scratches will stand.
Step 11.. The last barcode in the manufacture of a gnome is a face. Make it very simple. For this you will use acrylic paints of black and thin brush. Draw half-closed eyelids of the gnome and smile. If you desire, the face of the gnomic you can portray the way you like, drawing him open eyes, cheeks and so on.
The fabulous gnome from the cone is ready.
Autumn gives many natural materials for adult and children's creativity - these are chestnuts, acorns. Pine, cedar and spruce cones, which help to create a lot of interesting crafts are particularly popular. This material is perfect for classes with children - from three years and older. Crafts from cones with their own hands for kindergarten on the subject of autumn are obtained by unusual and cute. Subsequently, these interesting products can be saved to hang on the New Year tree. Explore several master classes to realize them with kids in kindergarten.
What can be done with your own hands from the cones on the topic "Autumn"
Needlework is an excellent lesson that can offer kids or parents or parents. Environmentally friendly materials, such as cones, acorns and chestnuts, are excellent items for creativity. Working with them will enjoy a little child, help reveal the creative potential and express individuality. Such an occupation contributes to improving the shallow motility, positively affecting the development of kids. Crafts on the subject of autumn will get involved and delight young children.
With the help of these natural little things, kids can create many interesting items - features of animals, people, interior items (baskets, vases). Finished products will serve as children's toys or become the basis of the original bulk composition. Plasticine, glue, polymer clay, twigs, scissors, wire can be used as auxiliary materials.
Step-by-step instructions for simple crafts for kindergarten
In order for children to simply make interesting things, experienced handicraft masters create step-by-step master classes with photos and a detailed description of the process. These instructions are suitable for kids in kindergarten and for children who are already studying in elementary school. All master classes are distributed step by step, which will help the rapid absorption of information, and each child will make the same product. Crafts from the cones with their own hands for the kids of a kindergarten on the subject of autumn will be a great occupation for children of preschool age.
Master class on the manufacture of "men"
Cute crafts-little men will be absolutely like young children. For their manufacture, you can use fir or pine cones, dried acorns. Also on the move will go toothpicks or twigs, threads and plasticine. Depending on the idea, you can use other materials. So that pine cones, the striking, do not acquire another form, treat them before slightly heated joinery glue. The same concerns fir natural materials. To make the original handicraft:
- Take a cone suitable size. Turn over with a sharp end to the bottom. A lot of plasticine sticks to a wide part - it will be the neck of the future little man.
- Inverted acorn, place from above to make a hero head.
- Put some plasticine on it. Make thread beams, place them on your head - it will be hair. Cover this place with an acorns with a hat.
- On the sides in the widest part of the bumps put two pieces of plasticine. Some more material use to make the same procedure below, closer to the sharp edge. These are fasteners for hands and feet.
- Insert twigs or toothpicks in plasticine. They also attach the inverted gastric caps to the legs - for strength.
- With the help of white and black plasticine, make eyes.
- The original figure is ready!
Beautiful composition "Owl on a tree"
The manufacture of touching owls will delight young children. It requires a spruce bump, seeds of ash, persimmon, melon seeds, plasticine (for kids) or glue (for older children), and also a branch on which the night bird will ride. If you do not find suitable natural materials, you can replace them with something at your discretion. To create owls:

- Turn the bump. Attach it with a sharp end to the selected branch, which will serve as support for the entire design.
- Ash seeds on a glue or plasticine attach on the sides - it will be wings of owls.
- Cears of the night birds make a persimmon (or other fruits). Use plasticine for fastening.
- Flat melon seeds are perfectly suitable as an eye. Take two pieces of black plasticine, make balls, press. Place where you want to make your eyes. Place seeds from above.
- Keeping Owls Make Orange or Yellow Using Plasticine.
Crocodile - simple and funny handicraft on autumn for kids. To carry out this interesting idea, you will need plasticine of dark green, white, black, two unpasses pine cones - one more, the other is smaller, green paint (gouache), joinery glue. To make a pretty animal using natural natural material:

- Lower the elements of the future toy (cones) into warm carpentry glue. It is necessary that they keep the shape, without opening after the manufacture of crafts.
- Color natural materials gouache dark green. For this you can mix the usual green tone with black.
- Take a piece of plasticine and secure pine cones together with wide parts to each other. Croodile Taurus is ready.
- It remains to make an eye animal: roll white balls, place on a bump, designed for the head. Attach two black plasticine points on them.
- Crafts ready!
"Turtle"
Beautiful turtle will become an excellent option for children toys. To create this animal, you will need a plasticine of brown and green, a sharp durable knife, a pine cone, which has already revealed well. Starting working with children, cut the upper part of the natural material, leaving only the foundation. What happens will be an animal shell. Make a turtle like this:

- Take a piece of brown plasticine, cut out a flat oval (future animal body). Make another ball smaller (about three times), attach with a narrow side of an oval piece, slightly add. Such a ball will serve as a turtle head.
- Make four brown legs and place on the sides of an oval piece.
- Take green plasticine, roll two small balls. Place them on the head of the future turtle, slightly add - it will be eyes.
- Complete the crawl by placing a pre-prepared shell (bump) from above.
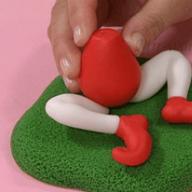
The "Swan" handicraft is easy to create, but it looks elegant and attractive. She will be an excellent home decoration. To make it, it will take white, black, red plasticine, small pine semi-walled or opened bump, a piece of snow-white wool. The finished product on the subject of autumn is removed even the smallest children. To create a beautiful swan:

- Shot a white striped plasticine 4-5 centimeters long for a bird neck. Bend it to the letter S.
- Attach it to the thick side of the bump.
- On a free end, put a small piece of black plasticine to be at the top to be a sharp angle.
- Place an orange material on a black detail, fascinating it at the end, like a bird's beak.
- Complete the crawl by placing the pieces of wool with a sharp side of the cones - it will be wings and tail of the swan.
"Bird"
A fabulous bird is a snaps, which will accurately like the kids. For her manufacture, you will need dry leaves (one big, two smaller and very small), fir bump, rosehip berry, wire, blue beads, toothpicks, plasticine. The creation of such a craft is better to trust older children who are not embraced by a wire material. For the manufacture of the magic bird, follow such instructions:

- To make your head, use a wire of a copper or gold shade, a small leaf, beads, a rose hips. The fruit of a riding bush pens out with a metal material, at the ends of it fasten two bispers. Cut an excess wire. From the thick side of the berries, stick a little dry leaf, which serves as a king of a bird.
- Bottom stick into the fruit toothpick - it will be fastening for the head and calf (pine cones).
- Large narrow leaf. Use the poultry tail, two leaves are smaller - for wings.
- Paths will serve as a paws. Make a flat stand using plasticine of a preferred shade, place a bird on it.
Funny Hedgehog will be an excellent home interior addition, decorate the shelf of a nursery, can be included in an interesting autumn composition. Creating this cute animal will bring a lot of pleasure to the kids. To make it, it will take dark brown plasticine, black pepper polka dots, dry pine needles and a bump of the same tree. Little branches, plasticine, stomach caps are needed for making finished things with mushrooms. Do the hedgehog so:

- Collect pine needles in the beams seven-nine pieces. At the ends, attach some plasticine.
- These elements are placed under the extended scales of natural material from the other side where the hedgehog back is. Slightly cut the needles to a length of 2-3 centimeters.
- With the help of plasticine material, pick up a pointed face of the animal. At the tip, place the polka dots of black pepper for nose.
- Make homemade mushrooms for the back: under the stomach hat, place some color plasticine, stick short branches into it.
Stylish decorative basket will serve to decorate the house, will be amazing guests and households with their unusual views. It will take dense wire for its creation, 39 discontinued pine cones almost the same size. Scheme of weaving basket is simple, but requires attention. All items must be fixed exactly so that the product looks good in the interior. Sequencing:

- Make three bumping rings, directing natural materials with sharp edges inward and fixing their wire layer between scales. It will take eight cones for the small, nine - for the middle, 11 - for a large circle.
- Make a semicircle from eight cones, which will be a handle of the future basket, fastening the elements with two wire strips.
- Putting each other, connect three rings with a wire material. Handle to the widest top circle, attach the wire.
- Insert three cones from the bottom. You can fix them, but with a high probability they will hold on and yourself.
- Stylish basket ready!
If you want to take the guys in kindergarten in an interesting needlework, make a fun bear with them. To implement the idea, you will need one large pine or firing bump, one element is three times less, four completely small bodies, plasticine of black and brown colors. Make the original Bear toy using natural details, like this:

- Big element will become a bear body. Position it with a sharp end to the bottom.
- From above, elongated the edge towards yourself, position the part of the medium size - it will be a bear head. Secure it with plasticine.
- On the sides on top and bottom to strengthen with the help of plasticine material two small bumps. Bear paws are ready.
- Shot the balls of black plasticine, attach where the bear's eyes will be. Ears Create with brown.
- cones;
- newspapers;
- paint in the balloon black;
- little straw hat;
- eyes for crafts;
- chopsticks of hot glue;
- thermopystole;
- pieces of felt of orange and black colors;
- scissors.
- polymer clay color clay;
- polymer black clay;
- cone;
- two black beads for eyes, 4 mm;
- crumbling blush;
- cosmetic brushes;
- tube for cocktails;
- watercolor brushes;
- toothpick;
- board for working with clay;
- glue.
- pine cones;
- large wooden beads;
- paper sheet or newspaper;
- compass;
- pencil;
- pieces of fetal tissue;
- threads;
- needle;
- acrylic paint black;
- thin brush;
- small brushes for washing the nipple;
- nippers;
- round-rolls;
- chopsticks of hot glue;
- thermopystole.
Children's fantasy is truly limitless! Thanks to the ideas of kids, surprisingly beautiful crafts are obtained. These are figures of people and animals - men, cats, mice, squirrels, deer, fish, penguins, horses. Popular the creation of fabulous characters, cartoon heroes, such as loving, leishes, Cheburashka. Flowers made of cones - roses, peonies are originally and unusual. An excellent interior decoration will be a tree of happiness - Topiary. Sometimes these paintings are created by children's hands. Look at the photo of the crafts of kids on the subject of autumn to draw new ideas:
From the cones you can make a lot of amazing crafts: from interior items to funny animals and fabulous heroes. The latter especially like children, because they can make them independently or with the help of parents. Such crafts will not only please the eyes of children, but also can become an excellent option for crafts to school or kindergarten on the autumn exhibition. The master classes offered by us are different in difficulty fulfillment, but they all are animals and characters who have fallen fabriced fairy tales. Detailed instructions will help you make any of these crafts.
Crows from the cones

A funny blizzard from the bumps to do is so simple that even small children can cope with their manufacture.
Materials
For the manufacture of a small blizzard you will need:
Step 1. Before starting work, be sure to check the collided cones. In order for the craft to be such as needed, the bump should be stable in a vertical position. For a little blienenka, it is better to take the discontinuished bumps so that they resemble the bird's support. Clean the collected cones from dirt and dust. To do this, you can rinse them in clean water and dry or just brush the dust with a brush.
Step 2.. Now the cones need to be painted, use the black paint in the ballots for this. Work outdoors or indoors, which is well ventilated. Working surface or plot of land is shutting up with old newspapers so as not to stain them. Put the bumps on the newspapers, and evenly color the latter. If necessary, apply several layers of paint, in which case, be sure to dry the drying of the previous layer so that the paint does not flow. Leave the cones until the paint is completely drying.

Step 3.. From a piece of felt orange color cut out a small triangle - it will be a beak of a crow.

Step 4.. From the felt of black color cut the wings of the crows. So that the wings are the same, you can draw them a pre-spin on the fabric and, if necessary, to correct or cut one wing and, apply it in a mirror reflection to the remaining felt, cut and second.
Step 5.. Using hot glue and thermopystole sticks, stick the crows details to the chish. On the sides of the cone, secure feathers, beak and eyes ahead. Please note if your eyes are on the adhesive basis, remove it before work. Top on the head of Voronenka, Welve a straw hat. Also stick it.

Since working with hot glue glue injuries with incorrect use, make this part yourself, not trusting children.

Crow is ready, she will delight your kind of you and your child for one year.
Hedgehogs from cones and polymer clay

Charming hedgehogs are obtained from cones if instead of plasticine use polymer clay. As a result, the hedgehog is very realistic.
Materials
For the manufacture of such a hedgehog you will need:

This Master Class of Preschool Children will not be able to fully repeat completely, and therefore it is necessary to prepare the parts for the hedgehog from the polymer clay. Kids themselves can attach them to chish.
Step 1. The cones for the manufacture of the hedgehog take well, so that they resemble the needles of the hedgehog. Before working a bump, be sure to prepare and clean from dust.
Step 2.. First you need to make the head of the hedgehog. To do this, form a ball made of polymer clay, then make a cone from it. Flat-side tightly press it to a chish. The base of the cone gently straightens and stretch to the edges of the bump. Top the top of the cone carefully pull up, giving it the shape of the nose of the hedgehog.

Step 3.. Shot from polymer clay four identical cylinders, press them to the side of the bumps - it will be the legs of the hedgehog. The bottom of the cylinders are a little bent and, using toothpick, give the lapes a characteristic form.
Step 4.. Form small balls from clay. It will be the basis for the ears. Place them at the appropriate location of the already formed face. The back sides of the tassel for the paints, press the ears inward, giving them a characteristic deepening. From the back of the ears, all the joints are stuck in your finger.

Step 5.. Toothpick the tip of the nose press to put a small ball of polymer clay black in it. So, you will finish the manufacture of nods.

Step 6.. In the area of \u200b\u200bthe eye clay, press the back of the tassel. Insert into place of the resulting recesses of black beads. Insert so that the beads are not visible. It will be the eyes of the hedgehog.

Step 7.. Take a cocktail tube and cut a small strip scissors. Sut it so that at the end of the tube it turns out the basis in the form of the letter U. Attach the cutting tube into the area of \u200b\u200bthe Hedgehog and slightly pressing. So you get a smile on the face of the animal.

Step 8.. In the field of cheeks and on the inside of the cosmetic brush, apply crumbling blush. Rushane take pink tone so that they look natural. Surplus Rumba Clean brush wake.

Step 9.. Send a bump-hedgehog to the furnace. Bake the craft in accordance with the clay manufacturer's instructions.
Bakeing parts made of polymer clay, make sure that the room in which you work is well ventilated.
Note, when baking a bump can expand some more, and clay pieces can break down. If this happened, just glue the left parts into place after the craft is completely cooled. Do not use superclauses for gluing. He will leave noticeable traces.
Hedgehog is ready!
Fabulous gnomes from cones

Such amazing characters like gnomes can also be made of cones. They can be not just a cradle for an exhibition or a toy, but quite a beautiful gift souvenir.
Materials
For the manufacture of small dwarves from the cones, you will need:

Step 1. At the very first stage of the manufacture of dwarves, you need to choose a bump. Trye take pine and ajar. Be sure to check that the bumps be integer, so the gnome will look much more aesthetically. Be sure to clean the bumps from dust and check that they are firmly stood on vertical surfaces.
Step 2.. From the newspaper, make a blank for the gnomic cap. Circle draw a small circle, cut it out and bend it in half. Figure the resulting figure in the cone. After trying on the cone to the existing wooden bead, adjust its shape. The resulting sample use both the finished pattern.
Step 3.. Attach a paper pattern to a piece of fetal fabric, circle it with a knead or shallow and cut the base for the cap.
Step 4.. The resulting foundation for the cap of the gnomer is covered with threads. Stick carefully so that the seam in the eyes is not rushed. Remove the hat. It is interesting to the felt cap seams outward. To do this, it must be sewn by hand overlocked seam and leave it in such a form without turning. If you want to make a tip of the cone, more on the newspaper pattern adjust its shape.

Step 5.. Beads stick to a chish using hot glue.

Step 6.. On the bead, wear a hat, for reliability you can fix it using all the same hot glue.
Step 7.. For the manufacture of handles, the gnomic need to take two small brushes. Usually they wash the nipples of bottles for kids. The handle needs to be bought off, and the wires themselves with bristles beolate with the help of round-rolls in the form of bent hands of the gnome. Most often they are sold white, and therefore you can paint them with paint from the canopy to tone with felt pieces. Paint should be applied with one layer.
Step 8.. Felt cut mittens for gnomic. Stick them to the already harvested base of brushes.
Dwarf handles can be made simply from felt. In this case, mittens need to be cut with a long base. The base should be beatened in the form of a tube and sew it a secret seam, leaving the mittens themselves directly.
Please note that the knobs of felt do not need long, they will be located directly. To get them back and make more neat, like handles from brushes, you can insert a piece of wire or bend the felt base at an angle and a loop from the thread to secure it in this position.

Step 9.. Made knobs on the end. Lubricate the glue and insert the side of the bump. Hold them a bit so that the glue grabbed well.
Step 10.. Cut the legs from the felt pieces and glue them to the base of the cones. This will help make the gnome more stable. In addition, the felt base will protect the surface where the gnome from scratches will stand.
Step 11.. The last barcode in the manufacture of a gnome is a face. Make it very simple. For this you will use acrylic paints of black and thin brush. Draw half-closed eyelids of the gnome and smile. If you desire, the face of the gnomic you can portray the way you like, drawing him open eyes, cheeks and so on.
The fabulous gnome from the cone is ready.
Baba Yaga is one of the brightest fabulous characters. All children love her very much and are not completely afraid, despite its harsh appearance. In all fairy tales in which this terrible old woman is present, she still did not really harm anyone. The smallest children can deceive it, flush. And she, having a flying magic broom, can no longer catch up.
Favorite heroine fairy tales often draw, depict children as senior preschool and younger school age in their crafts. In our article, we will tell you how to make Babu Yagu from the cones, that for this you need to cook, what additional details will be needed for the completeness of the images than the elements to fasten each other.
Materials for craft
In order to create an image of a fabulous old woman, you need to find a large spruce bump. It is long and suitable as a torso. For hands, you can pick up the same size of the stick. It can be one-piece twigs, then the hands will not bend. But you can make them bent in the elbows. Then you will need four short sticks and plasticine in order to bore them.
Head crafts "Baba Yaga from cones" can be made from any natural material of the rounded shape. It can be chestnut, walnut, small pine cone. In spruce, even a small size, an elongated and pointed form, and the pine cones are rounded. From the back, all the scales are adjacent to each other, it turns out a dense round item, on which all other parts of the person can be placed.
Small parts
Baba-jagi from the cones should also have a face, hair, you can even cook for her handkerchief. After all, Russian women all used to wear scarves, and our old woman is a resident of the Russian Forest, so it should also be the owner of such a head-building. If the head is made of chestnut or walnut, it will be enough to make eyes from plasticine or appliqué. To do this, take two small balls of white plasticine and attach to the top of the chestnut, we cling to them with two more black or brown balls, only smaller size.
If you decide to make Baba-Yagi's eyes from the cones using the applique method, then you need to cut two white circles and draw on them a black point marker. Then glue the eye level on the chestnut or walnate PVA glue.

If the head is made of a small pine cone, then everything "face" can be coated with yellow or beige plasticine, and already on top of the aligned surface to have eyes and nose. Then the role of the eyes can perform acacia seeds or buckwheat.
The nose can be created from a piece of plasticine, as well as other materials. A small acorn is suitable, a piece of branch, macaronic in the form of a hook.
Hair and headdress
Hair for baba-jari from cones makes from natural hemp ropes, threads from the savage of the appropriate color, straw. It is easiest to make a thread or rope brush. To do this, you need to wind the pattern from the cardboard in several layers. The more the threads will be, the stringener will be the hairstyle of the old woman. Then on the one hand, all the threads are going to a simple cotton thread on the knot, a couple of turns are made around the tops of the tassels so that all parts hold together. On the opposite side, the edges are cut sharply with sharp scissors so that the threads were all the same length. Then the hair is attached to the top of PVA glue.

The scarf for a baba-jaga made of cones make a piece of cotton fabric. On the cardboard draw a triangular template pattern. It must be a chain a triangle, where the base is done long, so that then the scarf is easy to tie around the head. The pattern is described on the fabric on the fabric, and the scissors are cut. It remains only to tie it on the head. If on the tissue after cutting, the threads will be seed, then the edges can be burned with a candle or lighter.
Build details together
In order to get a Baba-Yagi Figure from the cones, you need all the products prepared in advance to be made together. To do this, take a large piece of plasticine and roll a round ball. They glue it to the top of the fir bump, and the head is assigned to the top, which we have already made separately. If the hands are bent in the elbows, then two small sticks or twigs are connected at an angle of plasticine. Then in the neck area attached plasticine balls from one and on the other hand. They insert hands sticks. You can also arrange the bottom of the plasticine. There will be a palm in which you can insert a broom.
How to make a broom for a fabulous forest old woman? It's not hard. You need to take one long twig, in size just more character figurines. To create a broom itself, you need to choose thin twigs of the same length from the bushes. Around the large branch there is a beam of thin, tightly tied with a simple cotton thread. It is necessary to wind several tight turns so that small twigs do not crumble. The finished broom is in the punch or in the hand of Yaga.
Materials for the Stupa
It is impossible to present a forest inhabitant without its main flying attribute. Of course, then it will be about the stage. What does she represent? This is a large round-shaped capacity resembling a bucket. It is made of wood. Yaga, when you need to go to the chase for someone, sits down in it and flies. Baba Yaga from the cones to the stage will not work, if you miss this item in its fabulous image. The pitch is made from a paper or plastic cup, which serves as the basis for further applying natural material.

It can be placed either by the bark from the tree, putting it in a circle for glue, or branches. You can still get a cup to wrap burlap and tied up in a circle of the twine. It turns out the original. Now we will stay in more detail on the manufacture of Baba-Yagi from cones in a step. The photo below shows how to do it.
How to make a knock out of the twigs?
Disposable glass needed around the circumference to enclose brown plasticine by covering the entire surface. It is necessary so that the twigs do not fall out of the stupa. Then in turn attaching one size thin branches, pressing into a plasticine mass with a slight press of hand.

It remains only to bind the twine branch from below. You can take a simple rope, and you can also contrast bright yarn, for example, red. When the flying object is made, Babu Yagu is gently put in the pitch. All, handicraft ready.