And hello again, lovers of crafts do it yourself! Today we will tell how to make paper candies in different ways. Such sweets can be decorating the interior, culinary products, use as a gift box. And show some different interesting options for this craft with your own hands. The following is an applied video manufacture of candy.
1 option
When you make these candy with your own hands on this option, they will very much like this, many may even believe that they are made of paper. They can be decorated with culinary products or fill the vase for treating as decor.
Prepare a pre-corrugated paper (better than different colors), several toothpicks, threads (under the color of corrugated sheet), paper glue, silicone glue, scissors and of course balls of the same size (1.5-2 cm).

1 step .
Originally N.aDO Cut from corrugated paper rectangle with a size of 10 cm x 8 cm. Then apply a little glue for paper to the ball. And then put the ball on the edge of the sheet in the middle and wrap the ball into the paper, as shown in the photo below. 
2 step .
After that, you make a ball of the edge of the edge of the edge of the leaf from one and the other side, do not forget to cut the remnants of the thread so that nothing can be seen. Further, if the long edges of the paper remain, carefully cut them down with scissors, leaving 2 cm on each side.
3 Step . Fuck the remaining edges of the paper of the resulting caramel, it turned out beautiful sweetie. In conclusion, a little bit of the toothpick into silicone glue and stick it to the middle of the caramel ball. So it turned out a real caramel made by hand.
I hope you liked this master class! 
How to make candy out of paper.
Option 2
In this master class, we will tell you how to make a box in the form of a large candy, in which you can put really real sweets and give a close person.
We harvest color cardboard, scissors, stationery knife, pencil, paper glue.
1 step . Cut out, retreating from opposite edges of 1.5 cm, three equilateral rhombus. Also cut out from other opposite edges of the cardboard 2 halfcomb (see photo).

2 step .
Pay your attention to how to cut minor parts along the edges of the cardboard (on the photo are highlighted in circles). They are needed for further bonding origami. 
3 Step .
Roll the template to take shape similar to candy. Then glue the edges. 
4 Step .
In order for the candy to be more like a real, glue beautiful stickers to it, and you can also sign anyone. This surprise is intended. 
5 step .
Tie ribbon with one edge of caramel. Put in the inside of different little candies and make another edge by the same ribbon.
The original compliment in the form of candy will delight your loved ones, you can also make such a candy and give in the morning (or for any holiday) to your work colleagues, they will accurately improve the mood and they will appreciate your work.
Thank you for using our master class! 
Origami paper candy.
3 option
Before you, a brief scheme, how can you make a beautiful gift box - candy, in which you can put something small. Take cardboard (color), scissors, tight threads, then try to stick to all steps and you will have an excellent box-candy.
First, cut out a rectangle from cardboard for a size of 21-21.5 cm by 38 cm. 
Measure all the necessary details on the line, as in the figure and carefully cut out (use the stationery knife). 
Bend the harvest along the folding lines. 
Roll into the cylinder and glue the edge glue with each other. Fill in candy what you want to give. Then tie a string on both sides. It turned out a cute present in the original packaging.
Thanks for attention! 
Paper candy scheme
Take the square sheet to turn it in half (Fig. 1), then another 3 parts (Fig. 2). Find the middle of the workpiece and take two folds on both sides (Fig. 3). On the resulting edges of the paper, mark the further fold lines (Fig. 4) and roll over the lines inside (Fig. 5). Turn the crawl, pull it out with beautiful pencils, so it turned out a candy (Fig. 6).
Thank you for your attention to our master class!

In the article you will learn how to make decorative candy to decorate the house on holidays.
How to make candy from wrapping paper and cardboard stages with your own hands step by step: master class, photo
Paper candies are spectacular and very beautiful decoration for any holiday. They can be used to decorate the New Year trees, premises of the birthday or wedding, for a bachelorette party or anniversary. If you wish the candy, you can make any size, leave it empty or fill with some kind of surprise gift: sweets, soft toys, candy and much more.
You can use the material to work as a material:
- Corrugated paper
- Packaging paper for gifts
- Colored paper
- Colored cardboard
- Normal cardboard (packing)
- Designer paper
- Foil.
- Polyethylene
- the cloth
It looks most effectively, of course, packaging paper. You can buy it in any department of the office, souvenirs, decorations and gifts. The advantage of paper is that it is possible to choose a drawing on it, pushing out from the approaching holiday.
To work, you also need to prepare:
- Serpentine
- Cardboard
- Satin ribbon
- Scotch
- Scissors
- Rule
How to make decorative candy:
- Prepare all tools and materials for work
- Expand Packing Paper Roll
- You need to cut off a piece of 30 cm with a piece of 30 cm (if a larger candy is required, increase the size of the sheet or glue it).
- From the sheet of cardboard, form "candy". It can be a cylinder or rectangle. It is also convenient to use a shoe box as the basis.
- Candy cardboard foundation Put on the edge of the packaging paper sheet exactly in the middle.
- Start twisting "candy", carefully wrapping the shape into a roll.
- Then you must fix the edge, for this, wake it with glue or glue the tape (more conveniently and firmly).
- The edges of "candy" should be wrapped with "tails". After you twist them, lock the "tails" with a ribbon or serpentine, knitting a bow, or a nodule.
- Your "candy" is ready, if you wish, you can decorate it with any kind of decorative material.
How to make a New Year's paper lollipop: template, photo
You can decorate the New Year tree or house for holidays with the help of "Christmas Lollipops". It is very simple to do it by turning two sheets of colored paper - red and white.
Depending on what size you need a "lollipop", you can prepare a large or small size sheet of colored paper. Phased to twist and flexing the paper, following the scheme:
- Take two sheet paper sheet
- Paper colors should be from the outside
- Fold two leaf triangle (2 pcs.)
- The triangle is superimposed on the triangle (not exactly, but with a small shift down)
- Starts twisting sticks with a wide party
- For convenience of twisting inside, you can put a wooden long skewer or needle.
- Continue twisting until you get a beautiful tube
- Top of the resulting tube roll in crochet
Important: For the convenience of twisting and flexion of the candy, it is necessary to work with paper napkins (red and white).


Origami Large Candy Candy Large from Watman: Scheme, A4 sheet template: Scheme, stencil
The large-sized candy, made of watman (white or color) suitable for decorating the street tree. In addition, it can be hung as home decoration on the wall, furniture.
What you need to work:
- Watman - 1 pc. (for one candy)
- Pencil
- Scissors
- Scotch
- Ribbon or serpentine
- Sheet need to fold across 6 times
- Then, from two sides of the twisted Watman, make marking (using a pencil).
- Cut out the outlines of candy
- Split Watman
- Roll down the candy.
- From two ends, tie "tails" candy with ribbons


How to make small candies - toys on the Christmas tree?
Bright and colorful paper candies on the Christmas tree look very bright, elegant and fun. You can gladly spend time with children, creating such candy colored or crafted paper, decorating them with sparkles, taste.
What is required for work:
- Color, corrugated or wrapping paper
- Scissors
- Ribbons
- Serpentine
- Sequins, rhinestones, candy and other healthy decorative materials.
How to make Candy Corrugated Paper:
- As the basis, you can use a foam ball of real candy or a lump of the newspaper (twisted in the ball).
- Put the edge of the cut-off square flap of corrugated paper on the edge of the candy.
- Start twisting candy
- Pickles of each candy decorate bows of serpentine or ribbons.
Other schemes for twisting of decorative candy paper:


 Candy twisting in Origami technique
 How to make candy with a surprise?
Such candy can be used as decoration on the New Year tree or instead of a gift for any holiday. As a basis for candy, you will need to use the sleeve. The sleeve is a cardboard base in the form of a cylinder for kitchen towels, a food film or foil, toilet paper.
Important: It is the sleeve is filled with a variety of surprises and gifts (sweets, small toys, lollipops, decorations, notes, even money).
How to do:
- Prepare all materials for work: you will need a sleeve, decorative paper, a piece of scotch, serpentine and the "filler" (that is, a gift).
- Distil on the desktop sheet of paper
- The sleeve must be filled with a surprise
- So that your gifts "are not poured" from the sleeve during work, the ends of the "pipe" close something (for example, soft toys, stools, handkerchiefs, gloves or mittens).
- Start twisting the candy, at the end, secure Scotch paper.
- Tails (tips) candy beautifully tying serpentine and flip.


How to decorate candies from paper and cardboard?
Candy decoration options:
- Applique from paper
- Decor sparkles
- Decor waters
- Slipping with golden sand
- Printing real candies
- Lace decor
- Foil decoration
- Decoration from satin ribbons
- Coloring paints
- Broken glass (from old New Year's toys)
How to make a garland of paper candy?
Garland of sweets is an unusual, but delicious decoration for the house on the holiday. To work, you can use both your hands and shop candies.
Garland is very simple, it is enough to ride a large amount of candy on the thread. As a fastening thread, you can use any, but much more aesthetically looked gold or silver (it can be bought at the needlework store).
Candy garlands:


Video: "New Year's garland from candy"
We will need:
1. We take the wallpaper (width of 1.5 m for the Christmas tree 30-35 cm). Making a circular from the handle and thread, we draw a semicircle of the radius of such a height of the tree.

2. From the semicircle twist the cone - the wall is obtained double. Glue with hot glue, because It gives additional rigidity to the base.


3. From the fastener (or foam), we make the base - we supply the bottom of the cone, cut out. At the bottom of one edge weigh, so that you can then insert it into our cone. Dysheko remove to the side, it will come in handy a little later.

4. Then glue candy. If the candy is light, can be glued on double-sided tape, and heavy glue on glue for the tip of the packaging. Candy glue not quite in full circle, because Mishuur will need to put on the glued candies on the second row and further along the spiral. We do everything in parallel - they glued several candies, next to Mishur.

5. When everything is placed, cutting up tinsel, if necessary. Glue the bottom of the Christmas tree.

6. If you have an asterisk or a beautiful bow, or something else to decorate the top - well, if not, we take the wire and make a star!

7. Krepim the tip of the fine gold tinsel to the top of the star, then wrap it around the wire along the entire frame, cut, and glue the end of the tinsel on the other side.


8 Fresh Star to Makushka.

9. Decorating the Christmas tree beads - carefully at the base of the star glue the first bead, then wrapped the Christmas tree with beads along the candies and at the end the last bead is also neatly glue at the base.

Source: http://woman.delfi.ua.
Christmas christmas toys
We will need:
Let's remember the amazing and long-long forgotten tradition - to decorate the New Year tree with sweets. Babies will be delighted with the process of making toys, and then from her eating. Make toys from sweets is very simple - it will take a pack of colored caramel and 15 minutes of time. So…
1. Baking a baking sheet for baking paper, paper need to lubricate the paper. And even better, instead of paper to use a package for baking. Put the molds on the paper, put a few caramel into the molds.

2. It is very important that the molds and baking sheets have a smooth surface and sufficiently lightened to each other. Otherwise, caramels flow through the gaps.

3. Now we put future toys from candy in the oven preheated to 180 degrees. Melting time for different caramels is different, but mainly 5-7 minutes. It is necessary to monitor the process: as soon as the candies are melted - immediately pull out. Otherwise, sugar will be overlooking and become bitter.

4. While caramel is still warm, we make a hole with a knife.

5. When they are completely cooled, take them out of the form and tie a ribbon or rope. Here is such a tasty-beauty! If you decide to eat them, it is better to do two servings - one on the Christmas tree, the second - on the table.
Waiting for New Year holidays is always exciting. Of course, this is not only because of the most fabulous New Year, but also because of the upcoming "vacation", which adults and children are waiting for. Many walk to the walk on the night of December 31 on January 1, the event is obligatory next to the beauty of the Christmas tree. Usually it is put somewhere in the city center or in several places where the main celebrations will occur. Street trees, as a rule, are dressed in advance, but you can contribute to the decoration and make a big toy on the city tree with your own hands.
At the same time, it is not necessary to spend very much, to look for some expensive materials in the stores, you can only show fantasy and do all of the remedies that are often lying without needful in almost every home. It is especially interesting to do this with children. This fun will help to develop a fantasy, improve the motorcy and simply interesting to spend time in a family circle.
Big New Year's toy - "Angel"
Option number 1 - Toy from the tubes and disk
You will need:
- computer disc - now there are already few who uses, so you probably have 1-2 unnecessary,
- pipes for cocktails (it is better to use those that are thickening) - from 16 pieces,
- hot glue,
- aluminum wire (can thick wire),
- 2 mug of thick cardboard,
- thick thread.
Procedure:
- One of the tubes must be strengthened. To do this, insert it in advance the wire prepared in advance. This is done so that the tube is not broken. It will be the basis of the whole frame.
- Prepare 2 "Washers" from cardboard with a cut-out hole in the middle so that you can insert a tube in such a way that it keeps inside.
- Both mugs glue from two sides of the disc in the middle, where there is a hole.
- Next, the disc is put on a fortified tube and lubricate hot glue to keep the design. When it dries, you can continue to work.
- Through a solomine with a disc, to turn a strong thread, rinse another 2 solomins and from this design to make a triangle.
- Add 2 solomins with threads. It will turn out 2 triangles with one common side.
- Next, continue in the same order, in the end it will turn out a polyhedron.
Pipes, if you wish, you can use more, as far as there is enough opportunities and your fantasy to create a figure
The junctions between the tubes and the core, where the cardboard mugs are glued, you can close with a tinsel or something else in the New Year's topics.
Option number 2 - Ball from Packets
This option is a big New Year's toy on the street fir-tree suitable even for the smallest. The instruction is simple, and packages will be in any house.
Toy on the Christmas tree "Ball"
You will need:
- paper (any),
- colored shiny packages,
- ropes from cake or gift bags,
- pVA glue.
Procedure:
- The insides of the ball will consist of a crumpled paper. To do this, take absolutely any paper, you can use even old newspapers. Comkay them one after another, gradually "wrapping" the next on the already obtained ball. In order for the layers better than, they can be periodically lubricated by PVA glue. Surely he will find a student in a portfolio, this is the necessary thing at school.
When the ball turned out already quite large, the desired size for the street tree, then the elegant packages will go into the course. It may be wrapping paper in which the boxes with gifts are usually covered.
- Paper ball wrap with wrapping paper or color packages, secure glue.
- Publish the resulting shiny ball with elegant color ropes and make a loop on the top, so that the toy is easy to hang on the city Christmas tree.
If desired, the ball can additionally decorate beads, beautiful clips, bows, snowflakes.
Option number 3 - Plastic bottle toy
This option is suitable for people creative and able to draw. Although children can leave their "Kalyaki-Malyaki" on this uncomplicated subject. After all, the main thing is the creative fantasy and the joy of the work done!
You will need:
- plastic bottle (any volume),
- paints for decoupage.
Action plan:
We do not take into account the glass bottle, although it would look more spectacular, but for the Christmas tree this subject is too heavy, it can break the branches, so we will take it immediately.
In this embodiment, the toys on the street tree will be needed only fantasy. On the bottle you can portray anything. It is better that this concerned exactly the New Year's subject. For example, this is a fabulous hut, sorry by snow. Or the face of Santa Claus, and may also depicted grandparents together with the Snow Maiden. It may be an elegant Christmas tree, a drawing of a beautiful toy bowl, a snowman. Yes, all that your heart!
The main rule when working with such a toy - first it is necessary to fully sketch plastic with one common background color
Option number 4 - "Delicious" sweetie
This toy is one of the easiest and most standard manufacturing plan for the Christmas tree. It is done very easily. It will take paper or something soft, for example, wool or foam rubber. This will serve the inside of the candy. Make the "filler" in the form of thick sausages of the desired size. Top to wrap it with shiny colored paper designed to wrap gifts. On the sides of the paper tightly roll up and tie the bows. Do not forget to attach a loop.
Big Toy on the Christmas tree "Candy"
Option number 5 - Penguins from a distilled light bulb
Surely you have at home the blown bulbs of incandescent. You collect them, and then carry everything in a special urn for such things. But do not rush to do it, because soon the new year, and you need to make a toy on the Christmas tree. For the manufacture you will need conventional incandescent bulbs and paint for decoupage. In fact, to draw penguin, you do not need special artistic skills, it is very simple. Front creek light bulb in white. Make as if 2 circles - on the top of the light bulb (below the base) and on the bottom the most convex. As an association mentally imagine the figure 8, and you need to draw white paint in front. The top is a face, the bottom - belly. The rest of the unwitted surface of the light bulb sketch black paint. It remains only a cute penguin lyrum: eyes and kerpping, everything is ready! Clapped to the basement. As an option, you can wind the base of rope or twine.
Conclusion
Show fantasy, create, and then the holiday of the New Year will remember you with bright moments. If you want to do something more unusual and intricate, then look at the photo toys on the street fir tree on the Internet. Options Weight, and these five do not need to be limited. You can use as the basis and papier-mache, and soccer balls, and even hats!
Useful advice
Almost all people love sweet, even if for any reason it comes from him to refuse.
And yet an unexpected surprise in the form of candies in beautiful box, similar to one big candy, will please anyone.
Standard packaging is boring, but packaging, made with their own hands Unique.
To create such paper candy.You will not need a lot of time.
Here are just a few options for manufacture beautiful packaging in the form of candy.
Paper candies do it yourself

You will need:
Thin cardboard
Colored paper
Pencil
Rule
PVA glue
Scissors
1. Prepare a sheet of fine cardboard and with a pencil and line, draw three parallel horizontal lines - the distance between each line is the same.
2. Add the fourth line, which is 0.5 cm from the edge of the paper.

3. Now you need to draw lines perpendicular to the fact that you have already been drawn. To do this, measure 5 cm on the left and right side and mark the vertical lines.
4. From vertical lines, retreat 4 cm for another 4 cm and again draw 2 parallel vertical lines.
5. In a place where the lines intersect, draw the rhombus and, with the help of scissors or the stationery knife, cut them out.

6. To make it easier for you to glue the workpiece, on one side of the future candy it is worth cutting the edges to the extreme rhombus and do it in the shape of the teeth.
From the opposite side of the edge of the rhombus, you need to cut (see image).
7. Based on the drawn horizontal lines, make bends. Watch that the candy does not lose shape.
8. Now glue the workpiece, but leave the ends free.

9. Decorate paper candy. This will help you with paper for scrapbooking or ordinary paper with a picture printed on it.
Use fantasy - you can decorate with sequins, stickers, etc.
10. Fill candies with sweets. Do it through one of the sides of the packaging.
11. Prepare a satin ribbon and make it the ends of paper candy.

* This gift is safe for children.
* Such candy can decorate the New Year tree.
Candy paper. Option 2.


Candy Corrugated Paper
Such orgami candy can be used to decorate gifts, postcards, houses or New Year's Eve.
Make it very simple.

You will need:
Corrugated paper
Decoration
1. Prepare a sheet of corrugated paper and bend it in half vertically.
2. On the eye split the paper into 3 equal parts. Horizontally bend 2 extreme parts to the middle.
3. Now turn over the workpiece and create 2 folds on each side to the center.
4. Turn over the workpiece. Bend its edges in the form of triangles (see image).
5. Pull out the ends of the candy.
6. You can decorate paper candy with ribbons (with which you can hang it on the Christmas tree, for example) or draw various patterns with flomuses.
Paper candy (video)
You will need:
Double-sided paper
If desired, paint and / or markers
Decoration of Cape (Cup) paper candy

You will need:
Corrugated paper
Glue stick
Toothpick
Small foam balls
Scissors
PVA glue
Thick thread

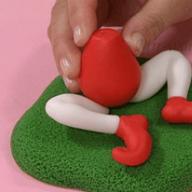
1. From corrugated paper cut out such a piece so that they can wrap a small foam ball, and there remained long ends in paper.

2. Apply glue to the ball.

3. Put the ball in the middle of the cut piece of paper and start wrapping it.
4. Postpone the ball and let him dry.
5. Tire or satin ribbon, make the ends of the candy.

* If the paper is too long, you can shorten it with scissors.

6. Apply glue to toothpick and paste it into future candy.
* You can make a garland and several such sweets and decorate the house.