To please loved ones, it is not necessary to purchase expensive presents: it is better to use your imagination and, with a little effort, make a homemade gift.
It is easy to give others positive emotions: just give them a New Year's card made by yourself. With the help of such a present, you will convey your warm wishes to others and surprise them with a beautiful craft. self made.
A postcard with congratulations to friends and relatives on the New Year will perfectly complement the main present; it can also be made by hand. A similar gift duet - good way show your loved ones your attention.
Homemade postcards are remembered and sink into the soul much more than store ones. You can create a creative masterpiece from the most ordinary things, showing a creative approach and existing creative abilities.
The tradition of giving cards to each other for the holidays appeared a long time ago, recently it has been forgotten a little, but this situation is easy to fix. Modern technologies cannot give as much body and emotions as simple postcards made with soul.
Give joy to others by congratulating them on the New Year holidays with a homemade postcard. A colorfully decorated piece of paper is able to give a festive mood and create a New Year's atmosphere.
Postcards for New Year do it yourself, photo
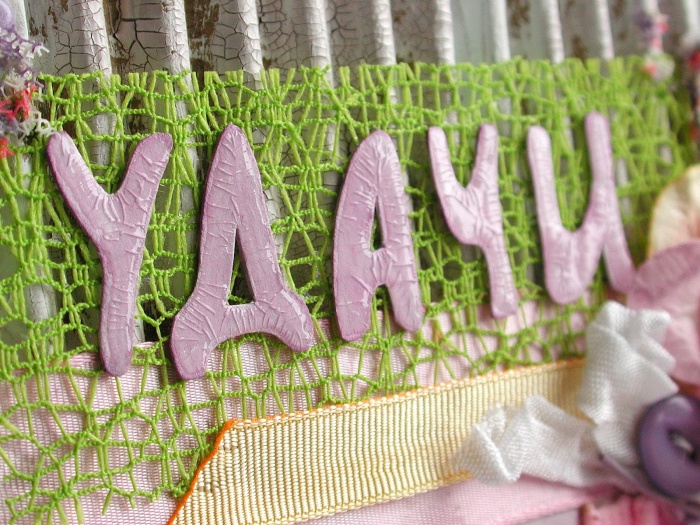
Handmade postcards can be given to relatives, acquaintances and even co-workers. Homemade postcards can make the older generation happy; this way of congratulations from loving grandchildren will be appreciated by grandparents. Believe: beautiful craft with wishes of happiness will not seem as banal as a standard store souvenir.
Making a New Year greetings card is not difficult, and this article provides some ideas for creating holiday cards for the New Year for children and adults.
Bright Christmas tree
New Year is associated, first of all, with a beautifully dressed forest beauty-herringbone. A fluffy Christmas tree is the central attribute of the winter festivities. So why not decorate your holiday card with this traditional New Year symbol?
To make a greeting card decorated with a colorful Christmas tree, you only need paper.
Advice. To make the postcard more original, it is best to use paper with a different pattern.
Make a semicircular paper blank, fold it, focusing on the picture. You should get something like a fan.
The second option is to make “branches” out of paper and glue the paper parts together, otherwise they will open up. To decorate the top of the Christmas tree, glue a small star or bead to the top.
 New Year card, photo
A slide of presents
It is not difficult to implement this creative idea, and the joy of receiving such a wonderful postcard will be genuine.

Take a bright paper sheet, preferably with a pattern, and fold it in half. Mark three squares with a ruler (each subsequent one should be slightly larger than the previous one). The squares will serve as gift boxes. Using scissors, make cuts (not completely) at the top and bottom: this will make the drawers voluminous.
Decorate the boxes as you wish. The original congratulatory present is ready.
Unusual Christmas trees and a button snowman
Making an original New Year's card is as easy as shelling pears, and the following ideas will make sure that you do.
You will need:
- paper sheets with different textures;
- a sheet of cardboard;
- blue marker;
- trimming ribbons;
- buttons;
- office glue.
 New Year's card with your own hands, photo
 winter tree
To create a paper tree, cut out a triangular blank, make the top long. Decorate the Christmas tree with two small white ribbon bows. To decorate the top, use a snowflake with sparkles.
On a note! To make the Christmas tree elegant, use snow-white paper with a pattern.
Even more unusual is the Christmas tree, made of paper circles of different colors, differing in size. Details in the form of circles are glued to the base, creating an imitation of a Christmas tree.
The top of the Christmas tree on the card is crowned with a star.
 DIY cards Happy New Year, photo
 Button snowman
This idea will allow you to make a baby card featuring an adorable button snowman. Take three buttons (they should differ in size). One button should be especially small and always with two holes (instead of eyes).
Glue the buttons one above the other, put a headdress (for example, a paper bucket) on the snowman's head and tie a thread scarf to him.
Next to the snowman, draw snowflakes using a blue felt-tip pen. Tie a bright ribbon at the top of the card.
 Beautiful New Year's cards with your own hands, photo
 Button compositions
Using buttons, you can realize various creative ideas.
Make a button Christmas tree: beads, rhinestones or paper mugs are suitable to fill in the gaps. Buttons in one color scheme combine with decor elements of the same color.
You can decorate with buttons a store-bought greeting card or create your own unique masterpiece by abandoning templates.
Buttons do not have to be fixed with glue, they are also fixed with threads. Snowflakes, beads and ribbon bows are suitable for decorating a button tree.
 Beautiful New Year cards, photo
 Not only Christmas trees are created from buttons, but also New Year's wreaths. The main thing is to choose a successful combination of buttons that differ in size and configuration. Lubricate the bottom of each button with glue and lay them in a circle, forming a wreath, supplement it with a ribbon, gluing it to the base in the same way.
An analogue of a European postcard is ready - the composition looks festive and unusual. One wreath can consist of multi-colored buttons: feel free to create original drawings from them.
 Postcards for the New Year: do-it-yourself photos
Creativity and economy
When making New Year's greeting cards, use cuts of ribbons, lace, patches, ropes, threads - everything that is found in the house.
 DIY cards Happy New Year
 Rustic craft
Bandage the cuts in the center different material ribbons with lace and fix them with glue, placing one element on top of the other - the rustic Christmas tree is ready.
Decorate it with beads and shiny buttons.


Original postcard "Christmas sock"
Such postcards imitate tags, and look very cute as a gift. This postcard for the New Year will perfectly complement any souvenir.
 Beautiful New Year cards
 For manufacturing, you will need thick cardboard and a sheet of colored paper to match, an image of two socks (cut or drawn), a ribbon, beads, beads for final decoration.
If you have special scissors for cutting scallops and a hole punch - great: the tools will come in handy to make a hole for hanging our crafts.
We cut out a wide strip from paper, draw a cut line with scallops, and glue it. We sign a congratulation and glue the cut out socks. We decorate their lapels with beads or beads.
Through the hole made by the hole punch, stretch the tape and tie a knot.
For connoisseurs of minimalism
Those who like minimalism will appreciate the following idea: take thin emerald ribbons of different widths and fasten them one on top of the other using beads or colored buttons.
After performing simple manipulations, you will receive an unusual postcard.


Living Christmas Tree
Attach the stick to the paper base and tie ribbons of different lengths to it: they will serve as spreading branches of the spruce. Decorate the top with a miniature star.
Even a child can make such a stylish postcard from ribbons.
scrapbooking
Do you want to create your own greeting card with an exclusive design, the likes of which you will not find in the store? Use the scrapbooking technique.
To make this craft, you will need the following materials:
- thick multi-colored paper sheets (preferably cardboard);
- scrapbooking paper (can be ordered in the online store);
- glue;
- pencil;
- decor elements.
First of all, decide on the size of the future Christmas tree and, depending on this, using scrapbooking paper, make rectangular blanks that differ in width.
Using a pencil, twist the rectangular blanks, forming tubes, and fix them with glue so that they do not unwind.
The resulting tubes should be glued together, starting with the longest. Glue the tube Christmas tree to the cardboard base. Decorate as you wish.
 New Year cards, scrapbooking: photo
 Quilling card with the symbol of the coming year
Respect the patron of the coming year - the Fire Cockerel - and decorate the card with his image.
This requires the following materials:
- stripes of different colors for quilling;
- stationery glue;
- cardboard (for the base);
- ready-made stencil or pencil for drawing the outline;
- sequins and other embellishments.
On cardboard you need to create an image of a bird. Twist the quilling strips and, using a little glue to keep them from untwisting, form the desired configuration. Having prepared the details, “assemble” the image of the rooster by gluing them to the base.
Remember the bright plumage of a rooster and give the craft chic by decorating it with sequins, feathers and other decorations.
Don't forget to write warm wishes inside the card.
 Creative postcards happy new year with your own hands
 Postcard with embroidery
Another way to decorate a New Year's card is embroidery.
For this you need simple materials:
- cardboard;
- multi-colored threads for knitting;
- needle;
- printed words or image;
- Scotch;
- small details for decoration.
Fold the cardboard in half. Stick a set of words or an image in accordance with the New Year theme: you can temporarily fix it with tape at the base. Carefully use a needle to make holes along the outline of the letters or image.
To create an appliqué, use threads of different colors.
Advice! First, "draw" the contours, and then move on to decorating the inside.
Decorate the finished craft with ribbon bows or beads.

Consider another option for creating a postcard with a thread application, but it will look completely different.
To create a thread postcard, you will need:
- a thick sheet of paper (preferably colored) or cardboard;
- PVA glue;
- thick multi-colored threads;
- scissors;
- sequins.
Fold the cardboard sheet in half. Cut the threads into pieces, but with different length(from smallest to largest or vice versa). Attach the threads with glue to the base (the longest one is glued, the next ones are smaller, and so on). The order of alternating colors is not critical.
Glue two small pieces of thread (identical length) at the bottom of the postcard: they will serve as a trunk for the tree.
It remains to decorate the thread tree with sequins.

geometric herringbone
Here is another example of an original postcard with a Christmas tree. To create it, you need a thick paper sheet (a very beautiful postcard will turn out if one of its sides is white and the other, for example, light green), a printed image of a Christmas tree, and a clerical knife. If there was no printout of the drawing, you will need a pencil, as well as a ruler.
Fold the paper sheet in half (the green side should be wrong side). Using a pencil, draw a triangle (under the ruler, this is easiest to do, in this case the triangle will turn out to be even). Divide the inner part of the triangle into small triangles - it is important that they are the same.
Using a utility knife, carefully cut through the triangles without touching the base.
Turn the triangles down from the front of the card.

"Herringbone accordion"
The principle of creating a congratulatory New Year's card "Herringbone-accordion" is quite simple, and for this you will need:
- cardboard;
- a sheet of green paper;
- scissors;
- decor elements;
- office glue.

Fold the cardboard in half - it will serve as the basis for the postcard. From a green paper sheet (you can take any other color you like), make six rectangular parts of identical width, but with different heights (each subsequent part should differ in height by 15-20 mm).
Form an accordion from each rectangular fragment. Try to make the harmonica proportional and identical for all parts.
Fold each of the resulting accordions in half and stick them on the inside of the card along the fold line, starting from the bottom and moving up.
On a note! The largest harmonica is glued first, and the smallest one is last.
The final touch is the decoration of the “Christmas tree-accordion”. Complete the composition with congratulatory inscriptions. Warm words are always nice.


Greeting cards with felt Christmas trees
To create a greeting card decorated with felt Christmas trees, in addition to multi-colored felt, you will need scissors, stationery glue, and thick paper.
Make trapezoidal and triangular-shaped parts from felt fabric, differing in volume and color.
Stick the fragments on the base and decorate with sparkles and congratulatory inscriptions.

There is nothing difficult in making homemade cards with congratulations for the New Year. Try to make such crafts with your own hands: the creative process is exciting, and needlework will give you a lot of pleasure and allow you to please others with unusual postcards.
Combine the suggested ideas with your own creative ideas, and you will make unique New Year cards that keep your hands warm and uplifting.
Video
There are other ideas for holiday original postcards for the New Year: see the MK in the video lesson below:
For this we need:
- colored cardboard different color(the thinnest, it will be more convenient to bend and stick, and the ends of the folds will not be whitish)
- Thick thick colored cardboard for the cover.
- White paper(album sheet).
- Sequins, sequins and other "tinsel" for decoration.
- Scissors, glue
Children, even small ones, we try to use to the maximum. Of course, at the age of three, a child will most likely not be able to fold a beautiful "accordion" or cut a Christmas tree, but sticking, sprinkling, decorating is easy.
So, we bend a sheet of thick blue cardboard in half, glue, if desired, an application on the front side. We also decorate the inside with snowflakes (you can apply snowball, sky, snowdrifts, etc. with white paint or toothpaste with your finger). pre-cut to width to the depth of the postcard, we fold a white sheet of A4 format along the long side into an accordion (ideally, even longer it is better to take a sheet, then the card will open wider, well, or make the folds completely shallow, which is also not good - the effect of "snowdrifts" is lost). We smear the ends of the pva accordion and glue the postcard to the base. We close our postcard and squeeze its sides for a few seconds. Everything. It remains to glue pre-cut Christmas trees, houses, bunnies, etc. on the "snowdrifts".

This photo shows the best way to hold the harmonica before sticking it on. After each harmonica, close the card and squeeze it for a few seconds. Please note that thin uncoated cardboard sticks to PVA almost instantly, and when you try to remake or move an accordion, part of its ends may "remain" on the substrate.
From thin green cardboard you can make just such a magnificent beauty.

The principle is the same - we make several accordions from thin green cardboard, "but there is a nuance: we cut an A4 sheet in length with strips of different widths and we also make the width (depth) of the fold for each strip different: in the diagram I tried to show how approximately the part of the sheet that I have drawn looks like.

As a result, we begin to bend the widest strip, making it the deepest folds - this will be the base of the tree. If you take a closer look at our Christmas tree, you will notice that the tiers of the Christmas tree are most pushed forward at the bottom, while the accordion at the bottom is folded with a large "step". Further, moving to the top of the tree, the depth of the tier and the depth of the bend decreases. We decorate the top of the Christmas tree with a star, gluing it tightly to the substrate. Christmas tree can be "dressed up" with sparkles and sequins
Cute voluminous New Year cards

In order to make such a postcard, you need to make triangular blanks from colored or decorative paper, and then glue the edges in sequence. Decorate the card with a bow and write a congratulation!
Volumetric Christmas tree
In order to make such a postcard, you will need to print two layouts on thick paper and arm yourself with scissors. Layout one, two (files in Word). It is better if your sheets are of different colors. Here are the photo instructions:

We decorate the resulting Christmas tree with sparkles, painted or glued toys, you can draw snowdrifts and a snowman next to it, or gifts, and we get, for example, such a cute creation:

herringbone origami
Such a postcard with my mother's help can make and Small child. It is better to take paper with a beautiful background (for example, for scrapbooking). If the child wants to do it himself, take thinner paper, as it will be difficult for him to bend a thick sheet with high quality.


We decorate with ribbons, buttons and as a result we get such cute postcards:

There is another way to make absolutely amazing postcards, the manufacturing technology of which can only be used for new year holidays, but also for any others: March 8, February 23, birthdays.
These postcards will occupy the attention of the recipient for a long time and cause a lot of enthusiasm. What do you need:
- Transparent plastic lid (from food packaging), you can use lids from sour cream, yogurt.
- Cardboard or thick paper for the base of the postcard
- Filling material: beads, beads, pictures, buttons, etc.
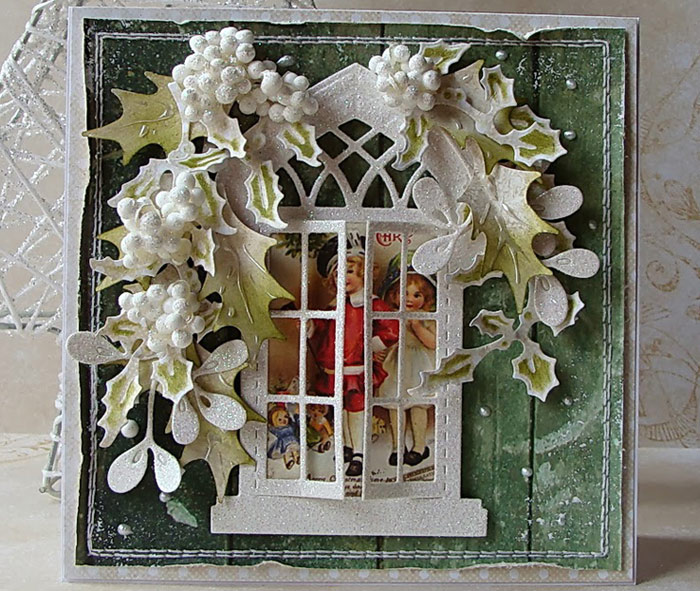
We fold the base of the postcard with a book, it should be at least 3 centimeters wider than our cap. At the lid, we cut off the side with scissors, which serves to close, leaving only the area for gluing (see photo).

In the front part of the card, cut out a round window with a diameter 2 mm larger than the diameter of the lid window. Ideally, this can be done with a circular knife or just nail scissors.

We outline with a thin pencil a place on the back half, which will be visible through the window. Glue the lid to the hole in the front of the card.
On the second side we make our picture, and then glue both halves. Can be decorated with braid, sequins.

And here Santa Claus and the Snowman hurry through the snow-covered snowdrifts))). The snowdrifts and the cloud are cut out of felt, the heroes are made of buttons and felt, the tree is a real twig, which is slightly pasted over with pieces of synthetic winterizer, snowflakes are drawn with a helium pen. Approximately such a picture can be "hidden" inside the plastic cap.

We hope that we inspired you a little to be creative and charged you with New Year's enthusiasm :) And in our blog you can learn more!
In contact with
Since ancient times, on New Year's Eve, people exchanged greeting cards or send them to their families by mail. Unfortunately, with the development of digital technologies, people have almost ceased to give each other postcards, in extreme cases, they send its digital version by e-mail. But it's so great to get a real postcard, hold it in your hands and fill your heart with the warmth of attention. It is especially pleasant if children give a New Year's card, almost independently creating it with their own hands. A handmade postcard can create Christmas mood and bring joy to the author and addressee.
There are many options for creating New Year's cards Let's take a look at a few step by step descriptions making a variety of postcards.
For the smallest children, we suggest creating a postcard with a bright (can be multi-colored) garland of clear fingerprints. Or, using the print of a small palm, create a funny Santa Claus.
Step 1. On any flat object that does not absorb paint, make a rectangular frame of insulating tape or tape to fit the size of the future postcard. For these purposes, you can use a baking sheet.
Step 2. Apply paint evenly on your palm and use a cotton swab to create Santa Claus or any New Year's drawing.

Step 3. Reprint the drawing on a postcard by attaching the postcard to the paint.
See video: Do-it-yourself New Year's card Christmas tree using a child's footprint or hand.
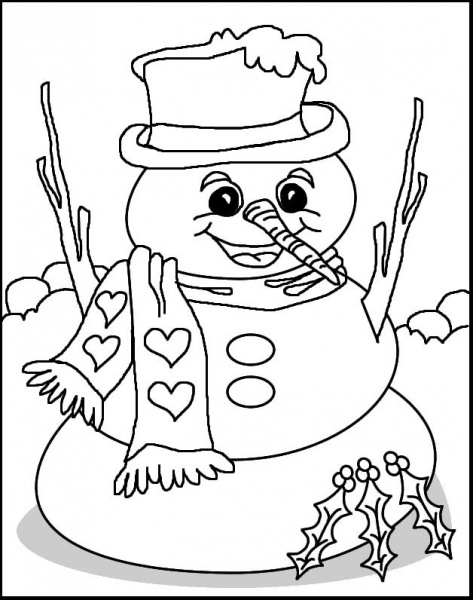
New Year's card with a snowman in 3D format

Take white thick cardboard and cut out three different circles. Shade the edges of the circles with a pencil lead, so the snowman will take on a favorable shape. Glue the circles one on one, with the smaller one on top and the largest one on the bottom, then glue them onto the card. From colored cardboard, cut out a triangle-nose, pens, circles - eyes and buttons, a rectangle - a scarf.
New Year card with snowdrifts
The creation of this postcard will turn into an amazing fairy tale ritual for your child. Any kid will be happy to help you and will be able to show his talents as much as possible.

Necessary materials:
- Thin double-sided cardboard, various shades of green;
- Thick cardboard for postcards;
- Sequins, beads, sequins and other decorations;
- Scissors;
- Plain white sheet;
- Glue.
Step 1. Cut out different Christmas trees from colored green cardboard.
Step 2. Fold thick cardboard in half.
Step 3. Cut the white sheet to the depth of the created postcard. Fold it into an accordion shape.
Step 4. Glue the ends of the white accordion to the bottom, inside of the card, and glue the Christmas trees to the snowdrifts.
Step 5. Decorate the card.
Christmas card with balls

As a gift, you can make a card not only with the image of a Christmas tree, but also with bright multi-colored balls. To create balls, you can use bright colored paper or even glossy sheets of old magazines. Cut such sheets into thin strips of different widths and glue them onto a white sheet. From the resulting striped sheet, cut out different balls and glue on a postcard.

Decorate Christmas balls on a postcard tied in a bow with bright ribbons.
You can also use flat buttons to create balls.
New Year's card with volumetric balls

Necessary materials:
- Multi-colored cardboard for balls;
- One sheet of cardboard for a postcard;
- Pencil;
- Scissors;
- Glue;
- Stapler (thin wire).
Step 1. Cut out identical circles from multi-colored cardboard so that they come out the same, use a compass or any flat round object that you circle with a pencil along the contour.
Step 2. Fasten the cut out circles with a stapler (wire) together in the center.

Step 3. Glue the resulting flat ball to the base of the postcard and bend the circles in half.
Step 4. Decorate the balloon with a bow and sign the card.
A greeting card can also be decorated with multi-colored fabric or paper flags and attached or sewn to the card.
Postcard with application

Such a postcard is easy to make and will bring joy to any addressee. Take rice grains as a material. Use long grains to lay out a Christmas tree, snowflakes or a star. Round grains are great for simulating snow.

Take a dark cardboard and glue the cut out white snowflakes to it. You can place one large snowflake in the center of the card, or you can use several snowflakes of different sizes. This picture looks very elegant and festive.
A Christmas tree is an invariable attribute of the New Year celebration, and a card with a Christmas tree is a great gift. Creating such a postcard is very simple, so feel free to start creating with your children.
A Scandinavian-style card will feature a Christmas tree made from strips of paper.

Necessary materials:
- A4 cardboard or thick paper;
- Glue;
- Colored paper (preferably bright), you can also use ribbon or scrapbooking paper, and colored tape is also suitable;
- Scissors.
Step 1. Take paper or cardboard, fold it in half and place the Christmas tree on the "front" part of the card, and you can write a wish inside. You can not fold the sheet, then the postcard will be single (for this version, you can also take A5 cardboard).
Step 2. Cut thin strips of colored paper with scissors, from short to longest, in ascending order. You also need to cut a rectangle for the future trunk.

Step 3. Glue the strips onto the Christmas tree cardboard.

Step 4. If desired, decorate your Christmas tree, for this you can cut out balls and an asterisk on top.
See video: Scrapbooking. New Year card in Scandinavian style.
One more thing:

Required materials for manufacturing:
- Cardboard (thick paper);
- Pen or pencil;
- Scrapbooking paper;
- Glue;
- Decorative details (beads, buttons).

Step 1. We cut the scrapbooking paper into different rectangles, and the width of the rectangles should be the same for all, and the length of each next one is slightly longer than the previous one (about 1 cm).

Step 2 Twist the tubes of the cut out rectangles tightly, winding them around a pencil or pen. Fix the tubes with glue.


Step 3. Glue the formed tubes together in the form of a Christmas tree, from the longer to the short tube. Glue the resulting Christmas tree to paper (preferably embossed) or prepared cardboard.

Step 4. Decorate the Christmas tree with bright beads or buttons.
Even a small child can create a Christmas tree from bright purchased stickers; multi-colored bright flat buttons can be used as decorations.
Older children can embroider a Christmas tree on thick cardboard, it is better to pierce holes with an awl in advance.
It is very easy to create such a postcard if you embroider a triangle with a star on the crown and a small rectangle - the trunk.
The option is more complicated if you make holes opposite each other around the perimeter of the triangle, and then sew them with threads, use sequins to decorate.
You can embroider anything you want with threads - a modest Christmas tree, a small deer and a sock with gifts.

Younger children can also create an appliqué out of a common cypress or fern leaf and decorate it with beads, beads or sequins. The main thing is that an easy-to-make postcard will bring great joy to the baby and grandfather or grandmother.
Creating a three-dimensional New Year's card
Volumetric postcards they look very nice and solid. It is always a pleasure to receive and give such a card. A voluminous postcard can also be presented to your favorite teacher or educator.
Postcard 1

For manufacturing you will need:
- Thick paper or a sheet of cardboard;
- Glue;
- Christmas tree blanks (can be printed);
- Stapler (you can take a thin wire).
Step 1. Download, print and cut out the blanks of the future Christmas tree. (You can also cut out triangles yourself from colored thick paper).

Step 2 Connect the parts together with a stapler (or wire).
Step 3. Glue the resulting Christmas tree onto cardboard or paper. Bend in half all the triangles of the Christmas tree, except for the bottom one. Sign, if you wish, you can add decorations, for example, in the form of sequins or beads.
Postcard 2
A very easy card to make, even a first grader can do it.

Necessary materials:
- Scissors;
- Glue;
- Thick paper (cardboard);
- Colored paper.
Step 1. Take colored, preferably green, paper and cut out rectangular stripes. We cut out the rectangles in descending order, and the longest strip should be wider than the rest, and the short one should be narrower.

Step 2. Fold the cut strips with an accordion. We fold the smallest strip more often and the larger the strip, the more we fold.
Step 3. Glue the Christmas tree onto a sheet of cardboard folded in half. We glue the Christmas tree inside the postcard, on the formed fold.

An easier option for creating a postcard is when you can fold a cut-out green triangle like an accordion. Glue on cardboard and make a trunk and a star on top.
Postcard 3
This very easy to make, bright and beautiful card will appeal to all children.

For manufacturing you will need:
- Two sheets of thick paper (cardboard);
- Scissors;
- Various small decorations;
- Pencil.
Step 1. Take one sheet of cardboard, bend it in half, then straighten it and draw a regular Christmas tree on the fold line.
Step 2. Bend the cardboard with the painted Christmas tree so that the pattern is on top and carefully cut out the painted tiers of the Christmas tree.
Step 3. Bend in reverse side received tree.
Step 4. Take the second cardboard and glue the cardboard with the Christmas tree along the contour to it. Decorate the resulting Christmas tree and sign the postcard.
Postcard 4

An original postcard for lovers of origami technique, very simple to make.
For manufacturing you will need: cardboard, scrapbooking paper, scissors, compasses and glue.

Draw a circle on paper, draw a diameter and cut out both semicircles. Fold the Christmas tree as in the photo and glue. Decorate and sign the postcard.
Postcard created using rainbow folding technique
The iris folding or rainbow folding style can reflect your original ideas for creating a New Year's present. The result is a very beautiful postcard with the effect of a twisting spiral.
Necessary materials:
- Cardboard (thick paper);
- Colored paper, you will need three colors;
- Glue;
- Iris template (you can download and print it or build it yourself).
To create this postcard, you will need to build an iris template, it will be built on the basis of an isosceles triangle with a base 14 cm long and a height drawn to the base equal to 16 cm. Take a rotation step of 1 cm. Dimensions can be changed as you wish.

Step 1. Cut strips from colored paper. We make the width of the strip twice as large as the step and add an allowance of up to 4 mm. Thus, for this postcard, we cut out strips with a width of 22-24 mm. Make the first strips a little wider, as they will have to cover the contours of the Christmas tree. There will be a lot of prepared strips, so cut them as you create the postcard.
Step 2. Fold the cut strips in half.

Step 3. Take brown paper and cut out 5 strips (preferably different shade brown) measuring 35 by 20 mm. We also fold these strips in half.

Step 4. We draw a silhouette of a Christmas tree on thick cardboard and cut it out very carefully (you can use a stationery knife). We make an iris template or print out the finished one.

Step 5 We attach the prepared template from the wrong side of the cardboard with paper clips. It's okay if the silhouette of the Christmas tree is more than a template. Next we will work from the wrong side.
Step 6. Filling the barrel. We begin to glue the prepared brown stripes. To do this, glue the strip on the right side of the slot with glue and glue it so that the fold of the cut strip falls on the template line. Next, grease the cardboard top and bottom as well as the first strip and glue the second strip.

Step 8. Glue the largest strip of the first color at the beginning of the template, try to match the fold with the line on the template.

Step 9. Glue the second large strip of the second color on the opposite side of the template.
Step 10. Glue the next large strip of the third color along the bottom edge of the template.
Step 11 Very carefully glue the next strip of the first color near the first strip of the same color. Glue use very carefully, only putting small dots.
Step 12 Glue a strip of the second color along the template line, carefully aligning it so that the fold coincides with the line.


Step 14. Turn the card over and, if desired, decorate the resulting Christmas tree. Sign and you can give an excellent new year gift handcrafted.
For more clarity, also watch the video, although it is in English, the essence can be understood without words: iris folding tutorial papermart.
Content
If you have already prepared everything for the New Year (and if not, then you need to read our articles) and you still have some finishing touches from the series: postcards to relatives, to school, Kindergarten and so on, then you also do not interfere with reading our articles. Or rather, this particular article, which we decided to dedicate entirely beautiful postcards for the New Year. We have ideas, as always, a wagon and a small cart. So stock up on time, materials and let's create together.
Postcard options
With drawings
As usual, let's start with a simple option - these are painted postcards. All you need is thick cardboard or whatman paper, pencils, glitter glue, paints, felt-tip pens, wax crayons. In general, any option for drawing a picture that you or your child likes.
You can fold a rectangular sheet in half and apply a specific pattern to the front side. You can use the template and decorate the drawing.

Don't forget about funny inscriptions both on the front side and on the wrong side. Use a special stencil or calligraphy tools to make the inscription beautiful and even.

Draw something touching and cute, you can even without the inscription "Happy New Year". In a drawn postcard, you can combine several techniques: something can be partially drawn, and something voluminous, made of some kind of material, as in the photo. Or the drawing can first be applied to paper, then the paper can be glued to a thin foam, and then this design can be glued directly to the postcard and it will turn out to be voluminous.
We offer you several images that you can use as a template for the future New Year's card 2018 with your own hands:

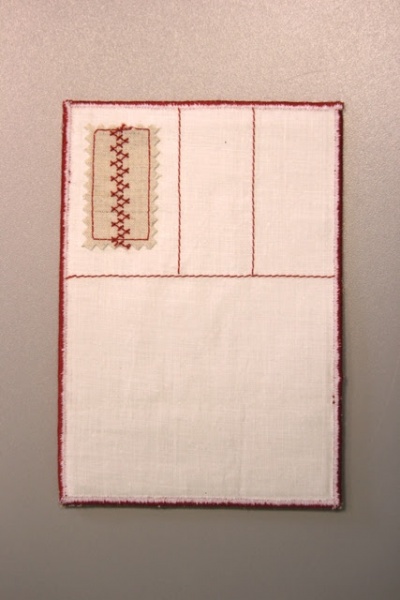
Textile
Collect all sorts of pieces of fabric around the house, leftovers from sewing, old jeans, pillowcases, pajamas, socks. All of this can make for amazing products. Note that even the base of the postcard itself can be made of material, see an example in the photo:

Making a postcard from textiles is quite easy. For example, in this case, felt parts were used, but you can take any other material. On the wrong side, you can sew something like a lining, which will serve as a kind of sheet for wishes for the New Year 2018.
For the product, you can use a cardboard base, on which you will attach textile parts using a glue gun. Various beads, buttons, lace, ribbons, natural material, knitting threads are also suitable as decor. It turns out very beautiful and unusual.


Similar crafts for the New Year can be presented to your mother, teacher at school, girlfriend, work colleague. You can write a congratulation inside with a pen or cut out letters from fabric, it will look quite original.
scrapbooking
This option is more difficult, because it is no longer just a postcard, but a whole album. We can put both photos and some tickets to the theater or cinema where you went with the scrapbooking recipient.

In general, scrapbooking has recently been a whole movement, a fairly popular technique for designing postcards and creating memorable diaries. Literally, the very word "scrapbooking" is translated as "a book of clippings." To create such a book, special sheets and materials are sold. They are quite durable, because the book is designed for long-term storage. But we can make a postcard using the scrapbooking technique from improvised means, the main thing is that it be cool and impressive.
Use volumetric details to decorate the front side. Scrapbooking involves the use of various pockets, envelopes for storing tickets, photographs, dried flowers, sweets, labels. In general, everything that can evoke pleasant memories and give joy, look at the photo:

The most important thing in this technique is to correctly and correctly arrange the details of the decor so that the card turns out to be beautiful, unpretentious. You can use some creative details, say, nails, screws, nuts, if the congratulation is intended for a motorist. Or letters from the keyboard, parts of a floppy disk (if you find it), if a person connected with computers will receive the postcard. You can use buttons, pins, clothespins, disposable tableware, newspapers. The mass of ideas and topics will depend on the interests or work of the recipient of the gift.

3D postcard
Here we come to another interesting idea creating a postcard for the New Year with your own hands in volumetric technique. 3D is, of course, loudly said, but something like that can be created, that is, a three-dimensional postcard. What do you need:
- a lot of colored cardboard;
- colored paper;
- PVA glue or stationery glue;
- pencils;
- markers;
- transparent cover from sour cream;
- beads;
- paints.
This is a list for several postcard options. For example, let's make it with a three-dimensional pattern inside. Take a rectangular piece of paper, make small cuts in it so that you can put forward a kind of coaster for the future composition.
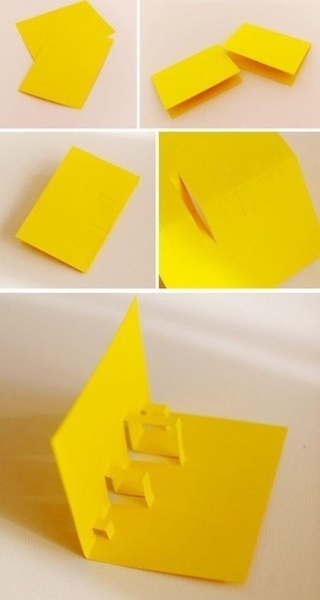
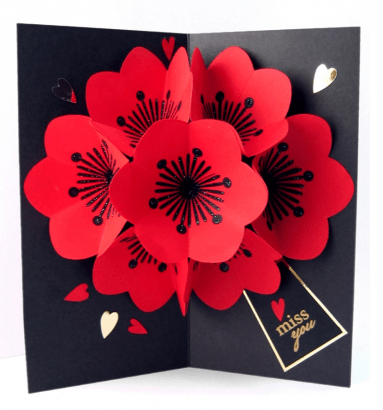
Now prepare the decor of the composition itself directly - it can be something plot, or it can be flowers, patterns, hearts, even photographs.

After you attach the decor elements, the blank itself must be inserted into the main pages of the postcard and glued well, look at the photo what can happen:


You can not cut out the base with peculiar coasters, but cut the pattern itself directly from the sheets for the postcard. Volumetric postcards look original and will please not only children, but also adults.
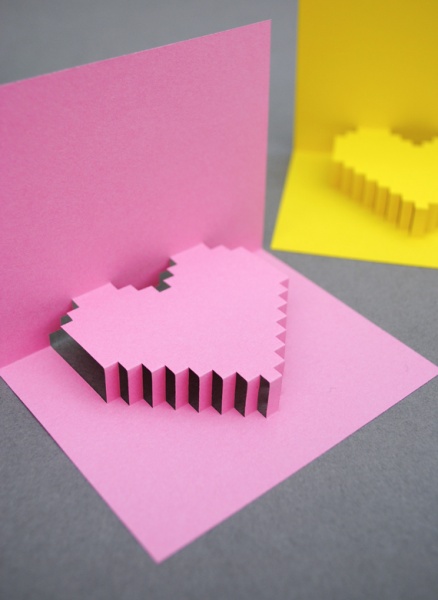
And here is a template for such a postcard with your own hands:

And a few more wonderful ideas for do-it-yourself voluminous congratulations for the New Year:

With quilling elements
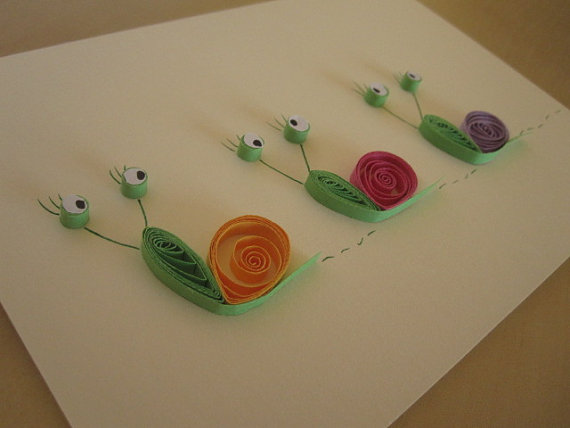
Quilling is also a fairly popular technique lately. From twisted thin strips of paper, quite original three-dimensional drawings are obtained. This technique can be used to decorate New Year's cards.

To make such beauty in the quilling technique, of course, you will need skills and experience. But the most simple options perfect even for toddlers.

For more difficult option in the quilling technique, you will need a little more skill and special tools. At the end of the article you will find helpful video master class on this topic.
More original postcard ideas
The most amazing thing is that to create a postcard for the New Year 2018 with your own hands, you only need a little imagination, good mood and minimum materials. In addition to colored cardboard and paper, these can be newspaper or magazine sheets. For scrapbooking, in general, everything that is bad in the house is suitable. For children's cards, good pencils or felt-tip pens are enough. And if there is something left from the past needlework: felt, wool, natural materials, then all this can be used to create a gift for the New Year 2018.
Preparations for the New Year have already covered the whole country! Do-it-yourself New Year's cards 2018 using photo and video instructions are not difficult to make, but giving them is incredibly nice! Everyone is in a hurry to think over the decoration of rooms, workrooms, menus for New Year's table, outfit and gifts. As you know, a gift in the form of a handmade postcard is doubly pleasant. After all, this is not some faceless trinket chosen in a hurry, but a targeted gift made with love.
We will analyze in the article how to make one of the most beloved gifts - a postcard. We will consider many options for creating New Year's cards with our own hands for the 2018 meeting. Next will be given advice on their creation, the choice of materials and plot for design, as well as signature options and wishes.

Materials for creating a postcard or something that might come in handy
Experienced handmade craftsmen already know that any material is suitable for a handmade New Year's card for 2018. Turn on your fantasy!

What you may need to work on a postcard:
- The base is thick paper, better than A4, folded in half, but any other format is also possible.
- Glue. It is better to use PVA produced by Luch, it does not leave yellow marks. For fastening non-paper decor, Moment Gel or Crystal glue is suitable.
- Decorative elements. These can be clippings from old postcards or magazines.
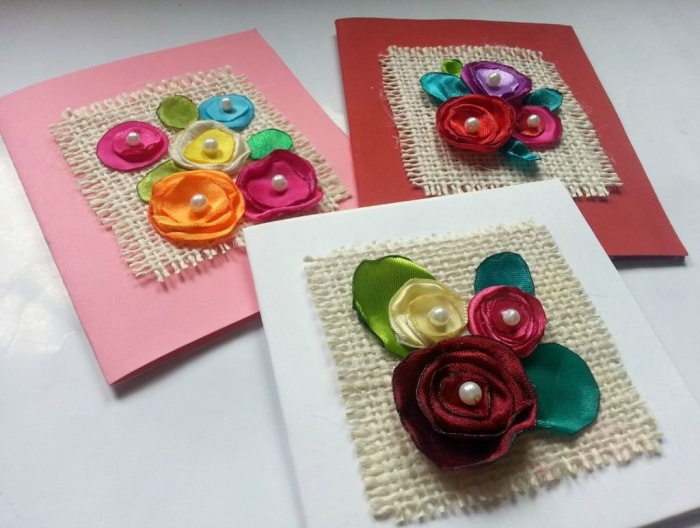
- Satin ribbons, lace.
- Flowers made of paper or fabric.
- Half beads, cabochons, rhinestones, sequins, pendants.
- Any decorative elements in the form of wooden snowflakes, insects, Christmas trees and so on.
- Paper: crepe, tracing paper, colored, corrugated, any decorative paper, old postcards or magazine clippings, pages of old books.
- Sisal, thread, foil, jute rope.
- Buttons, buttons, rivets, leather patches and so on.
Everything that remains of any jewelry, accessories, old damaged postcards can be carefully stored and used again to create a new masterpiece.

Step-by-step instructions for creating a postcard for the New Year
You need to create any New Year's card following a certain algorithm. The success of a creative undertaking largely depends on this.
Before you start, it is important to think over the idea and size of the postcard, decide on necessary material, select everything that is needed in the work from the whole variety decorative elements and materials.

Now follow the plan below:
- Think over the plot of the postcard, what will be depicted on it and the size of the base. Most of all, this is the A5 format, that is, an A4 sheet folded in half, but you can choose any other format at your discretion.
- Next, you need to consider color palette postcards. Color and the combination of shades play a huge role in the overall perception of the finished product. The following are options for combining shades and a special New Year's palette in the photo. If there is no special flair and knowledge of color combinations, it is better to use a palette.
- Next, we think over the composition and arrangement of the details. Special ready-made templates or sketches, but more on that later in the article. For a successful composition, it is important to choose the center and the main, larger element. Next, think about where the small details will be located, you don’t need to fill the entire area of \u200b\u200bthe postcard with them, let them create a beautiful shape. It is important to unite the entire composition on the postcard with a common color idea and compositional idea.
- When everything is thought out and the idea is clear, you need to prepare all the elements. Cut, paint details. Pick up beads, cabochons, ribbons, lace, snowflakes, flowers and so on.
- Now we need to make the background.
- After we glue the main element.
- Next, we place all the small details in their places.
- Decorate if necessary.
Templates and sets for postcards, separate materials for the realization of your own ideas
To create postcards, including New Year's, by 2018 with your own hands, you can use various templates and sketches. They help to decide on the composition and the idea of the postcard. The following are photos of such sketches. They can be printed on paper or used for clarity, creating your own postcard based on a template.

Postcards can contain different elements: a Christmas tree, balls, stripes, a beautiful background design, snowflakes, glued half-beads, and so on. Of course, each template can be changed to your liking, but in general, the templates are thought out in terms of composition and color.
Herringbone - the main element of decor. Different ways and materials for its image
On New Year's cards, you can most often see the image of a Christmas tree. We can make it using various materials:
- Buttons, rhinestones, half beads.
- Ribbons and lace.
- Paper or paper napkins.
- Openwork small snowflakes.
- Felt, old postcards or rolls of colored wrapping paper.
Postcard templates:
The Christmas tree can be placed on the front side of the card or inside and open beautifully at the same time.
Video:
Three options for creating a postcard with a Christmas tree
Option number 1
For this stylish Christmas card with a Christmas tree, you will need:
- Beautiful cardboard and corrugated cardboard in a stylish metallic shade and stripes.
- Colored paper to match the cardboard.
- Decorative lace.
- Adhesive rhinestones.
- Scissors, glue, ruler and a simple pencil.
We make a postcard like this:
- On white paper we draw patterns of all the details (as in the photo);
- We cut out the template and transfer it to cardboard and colored paper, cut it out;
- We fold all the details neatly in the right places, glue the decor;
- We place rhinestones, attach a lace and the card is ready.
 Step by step photo postcards
 Option number 2
This postcard is made from rolls of colored paper. The manufacturing technique is somewhat reminiscent of quilling. For work you will need:
- Decorative cardboard with a pattern and white.
- Colored paper with a print in the New Year theme and colors.
- Decorative buttons, rhinestones.
- Smooth round pencil or wooden stick.
- Glue, ruler and scissors.
Let's get creative:
- We cut out squares from colored printed paper of different sizes (as in the photo);
- We twist them into rolls and fix them with glue;
- We glue the rolls together into a Christmas tree in the shape of a triangle (see photo);
- We fold the base from white cardboard and glue a Christmas tree from rolls to it;
- We decorate the Christmas tree with rhinestones, buttons.
The card is ready, it remains to make a congratulatory inscription inside.
 step by step photos
 Option number 3
This version of the postcard for the New Year 2018 is made on bright cardboard using corrugated paper. For work we need:
- Decorative cardboard in a bright red shade for the base.
- Corrugated green paper.
- Double sided tape and glue.
- decorative satin ribbon with Christmas print.
- Beads and small beads or braid, cabochon in the form of an asterisk.
Let's start creating:
- Make the base for the postcard out of cardboard by gently folding it in half;
- Stick decorative tape on top and bottom along the edge of the postcard;
- Mark the outline of the Christmas tree with a pencil and place double-sided tape (see photo);
- Cut strips of different sizes from corrugated paper and shirring a little, stick over the strips of double-sided tape. So we got a Christmas tree;
- We glue beads, beads and a star into place.
These are variants of New Year's cards with main character- Christmas tree. Next, we will consider how to make a postcard with the symbol of the year - a dog.

The dog is a symbol of the year on a postcard
You can make a postcard with the image of a dog - a symbol of the coming year. There can also be many variations here. Make a postcard in the form of a dog's face from colored paper. The following are step by step photos with the manufacturing process.

In addition, you can make a postcard in the form of a dachshund. For her you need:
- Colored thick paper in 4 shades: blue and white for the base, golden and brown for the dog. You also need some black paper for the eyes and nose.
- Glue, scissors and a ruler.
We make a postcard like this:
- cut out a rectangle from blue paper. This is the foundation. We fold it in half, then one front part in half again.
- cut out rectangles of white paper of such sizes that they overlap each of the parts of the bent base, glue them on top of the base.
- cut out the tax. A long oval body to fit over the entire postcard. Cut out the legs, head, ears, tail, eyes. We duplicate each small detail from brown and gold paper.
- we paste the body on the whole postcard, paws and muzzle to it, after all the small details.
- so we got a dachshund, whose head is on the front bent half, and the end of the body on that half of the postcard, which is not bent. A closed card is obtained with a short dog, and an open card with a long dog.
To the postcard, you can stick a congratulatory inscription on a separate square or flag inside.
Step-by-step photos of creating a postcard for the New Year 2018 with your own hands in the form of a dog:
Step by step photos of postcards:


Simple postcards with a good mood
Today fashionable and stylish does not mean complicated. You can make an excellent DIY 2018 New Year's card in a couple of minutes, which will have style and good mood.
Option number 1
- Take a bright cardboard, fold in half.
- From white paper, cut out the outlines of Santa Claus's beard and mustache, glasses and a few stars.
- Glue small details on the front of the postcard.

Option number 2
On white cardboard folded in half, draw a beautiful thin line with curls diagonally. This will be the base of the garland. After in some places marked on the garland, draw multi-colored circles - light bulbs.

Option number 3
Postcard with a funny snowman - top view. To do this, you need to cut out several circles of different diameters and stick them on top of each other, you can lay thick cardboard. Next, it remains to add small details and inscriptions.

Option number 4
Use buttons. Here you can withstand a postcard in minimalism, it will acquire a special style and charm from this. A pair of white buttons is enough to create a snowman, which we will complement with a red braid - a scarf and a black braid - a hat. Or a few bright buttons that will depict Christmas balls. We will draw a rope on them and make a beautiful inscription below.

Postcards in different techniques
Very interesting and beautiful cards are obtained for the New Year 2018, made by hand using the quilling or vytynanka technique. In order to create such a miracle with your own hands, you need to make a lot of effort, be careful and attentive. These are quite complex techniques that require extreme accuracy and concentration to achieve a good result.
Postcards using the quilling technique can be with the image of a Christmas tree, a dog, winter patterns. For their implementation, strips of colored paper are needed, which are twisted into rolls and give them the desired shape. After these rolls lay out intricate drawings.

The vytnanka technique involves cutting plots from several layers of paper and overlaying them on top of each other. These cards fascinate with their elegance and beauty.
You can also use threads and the technique of thread printing or embroidery to create a New Year's card with your own hands. To do this, on a separate square of paper, they embroider with a cross or satin stitch, or lay out a conceived pattern using the nitkography technique. After this square is glued onto the base for the postcard.

A card design can also be made from felt, such as carved deer, a snowman, mistletoe flowers or a herringbone, which are then attached to the base for the card.

If you are making a postcard with your child, then a wonderful New Year's option would be to make a drawing on a New Year's card 2018 with a baby's handprint. To do this, paint the child's palm in white paint. The kid will be delighted with such an activity! Immediately on the prepared colored base for a cardboard postcard, you need to print a palm.


If you print it with your fingers down, then after you can finish Santa Claus, the fingers will be a beard. And if you print the palm with your fingers up, then the palm itself will be a snowdrift, and we finish the fingers and turn them into snowmen and Christmas trees.
Did you like our New Year's cards, which you can do with your own hands in 2018 using step-by-step photos?
Video: